
Today’s Freebie Roundup 5/3

- Free Guide: Understanding and Managing Arthritis
- FREE 14-day Supply of Clinique Super City Block Sunscreen at Macy’s
- FREE Scoop of Hola Margarita Sorbet at MaggieMoo’s
- Personalized Mother’s Day Card for your mom or mom-like figure for FREE at Cardstore.com! Mother’s Day card, add your own sayings or photos, and use coupon code LUVMOM during checkout. Shipping is FREE! Offer valid thru 05/06
- Free 30 Free Craft Projects for Mother’s Day eBook featuring 30 Mother’s Day crafts to make for Mom. Make a pretty pansy card (p. 6), candle slip covers (p. 29), mosaic bath jars (p. 42), and much more with this free eBook.
- Free Mother’s Day Jewelry Gifts: 8 Free Jewelry Making Tutorials eBook featuring 8 jewelry projects from talented craft bloggers and designers. Make a beautiful glass photo pendant (p. 7), a thumbprint heart necklace (p. 9), a thoughtful trinket keepsake necklace (p. 22), and much more with this free eBook.
- FREE Quart of Clark+Kensington Paint at ACE Hardware (5/5)
- Link to Free Android App Promo @ Amazon.com Today’s app is the iStunt Pro Game app
- Participating Cinnabon bakeries will be offering one FREE Cinnabon Classic Roll to each nurse who shows his or her healthcare ID badge during National Nurses Week, May 6-12, 2012. Limit one free roll per nurse during promotional period. Valid only at participating U.S. locations.
- FREE Bakery Fresh Italian Bread at Farm Fresh Supermarkets
- Register for L’Oreal Gold Rewards! Enroll for FREE hair color products, limited-time offers and more from L’Oreal!
- Get premium coupons now in the Coupons.com Savings Club
- FREE Mrs. Dash Original Blend Sample
- Give your mom a break, this Mother’s Day! IKEA will serve her a FREE small breakfast ($.99 value) from 10:30 a.m. – noon, or a FREE dessert (up to $2.49 value). This offer is valid only on May 13, 2012, in the IKEA Restaurant & Cafe. Limit one per customer.
- The first 1,000 entrants beginning 3:00:01 PM (ET) on Thursday, 5/3/12 will receive a coupon for 1 FREE Metamucil 114 dose product (up to $16.00 value) by mail.
- Amazon Prime FREE Trial
- Domino’s Pizza is giving away more FREE Artisan Pizza everyday through May 3rd. The giveaway will start at a random time each day during the giveaway period. Domino’s will give away a fixed number of FREE Artisan pizzas each day during the Giveaway Period as detailed in the chart below:
Thursday, May 3, 2012 – 15,000 pizzas - FREE TRESemme Split Remedy Shampoo & Conditioner Sample
- Send Mom a FREE Card and Make a Difference!
- “Like” Lakeshore Learning Facebook Page. When they reach 50,000 Facebook followers, they’ve promised to give a free educational software download to all of their Facebook followers.
- Meow Mix Sample
- Free Depends Sample Pack
- Treat.com Create a card and enter code FREETREAT at checkout to make it FREE! (There is a new code that you may want to try first TRYTREAT – it may be good for new customers only)
- “Like” Blockbuster Express on Facebook to get your promo code for a $1 discount off your next movie rental. Expires Today.
- Food on the Table – the better way to plan meals and save money. SPECIAL OFFER: New Members can Use promo code: SPRINGFREE, throughout the month of April, and get the premium version of the service for FREE for life!
- My Survey – Take Surveys, Earn Rewards, It’s Easy & Free!
Welcome Fox 13 Viewers! Here are the HOT deals from PYP and Rebecca Pickett!
1. $10 off your Folica.com order of $20 or more!

More info HERE
2. Axe Gift Packs only $5.97 shipped!!

More info HERE
3. Digital SLR Camera Holster Bag only $9.98!!

More info HERE
4. 48 AA Batteries only $9.99 Shipped!!

More info HERE
5. Cinemark Theaters Summer Movie Pass!
More info HERE
6. Free Bowling for kids this summer!
More info HERE
7. Sonic 1/2 price Ice Cream Shakes after 8 pm this summer!

More info HERE
DIY Flip Flops
Finally flip-flop weather; my favorite footwear! (read that sentence 10 times fast!)
I think I can never have too many pairs of flip flops and I was thrilled last summer to discover how easy and inexpensive they are to make myself. I’ll start here by showing you how to make the easiest, fastest flip flops, and then you’ll be ready to experiment with other styles. A quick internet search will bring you no end of ideas and inspiration to make flip flops from plain to fancy, simple to fabulous and everything in between!
Supplies:
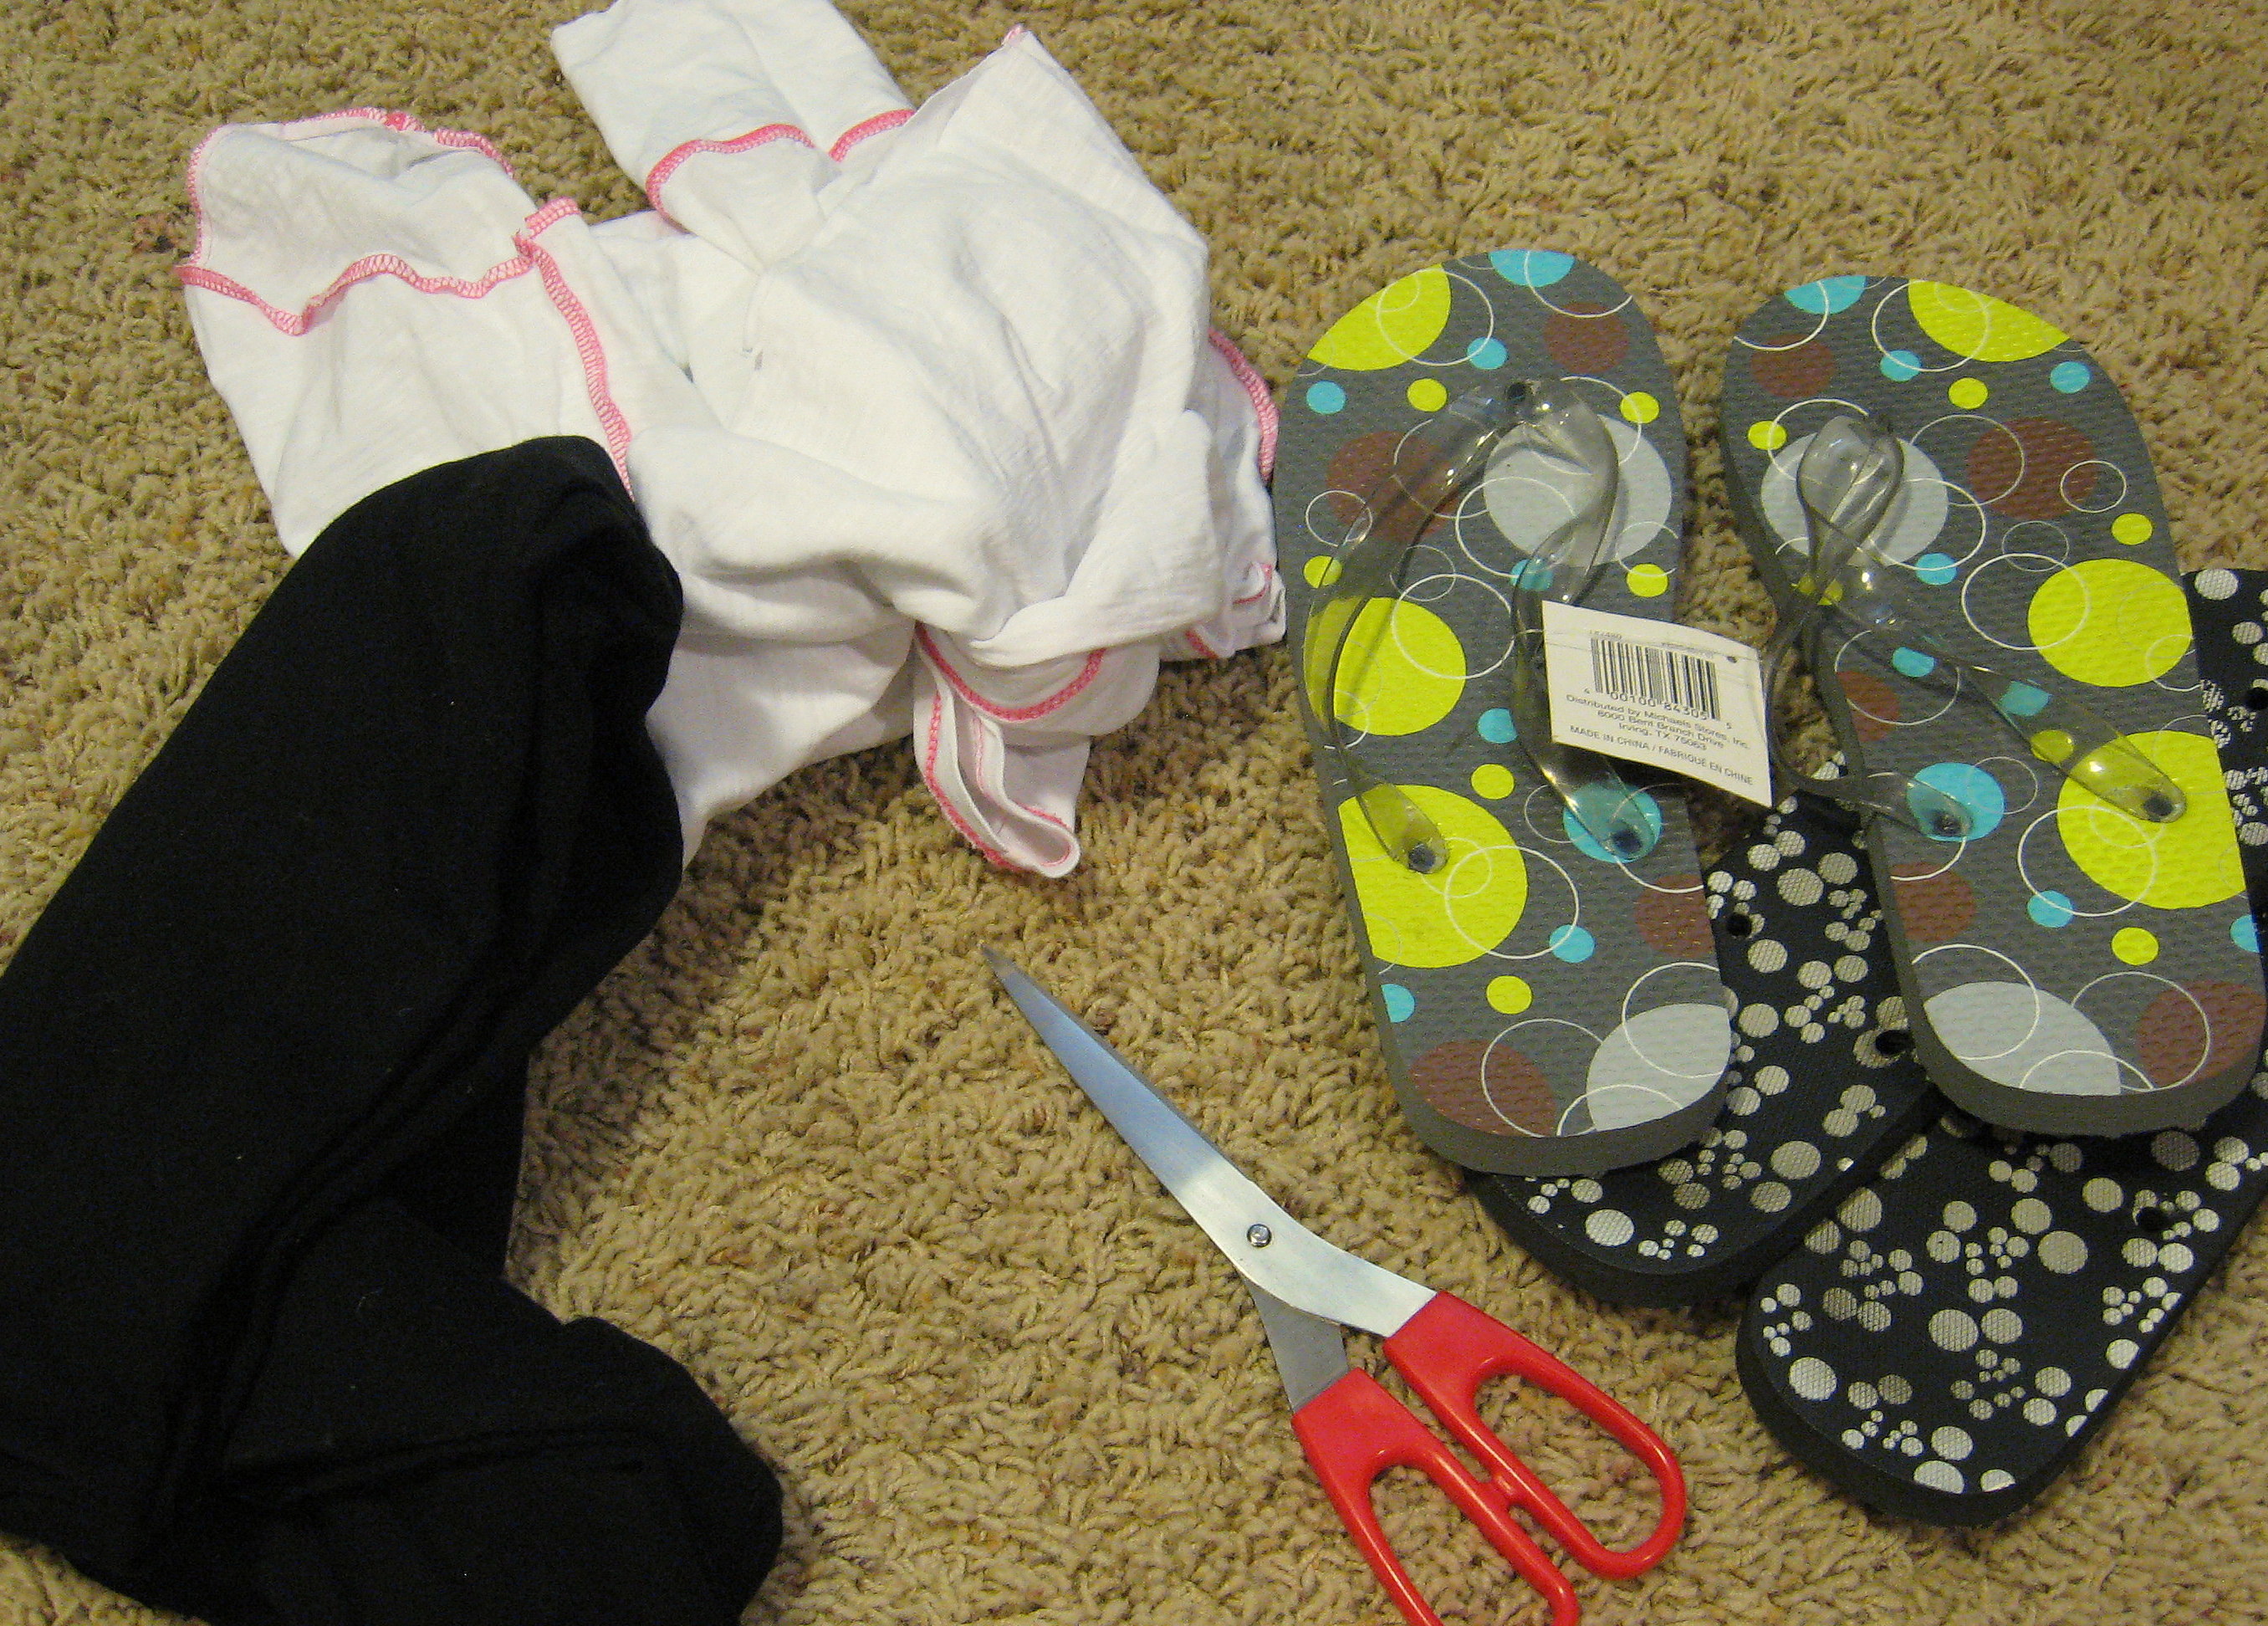
Flip Flops – Use a cheap pair of flip flops – the kind that you can remove the plastic “Y” that sits on top of your foot. With cheap flip flops, I find that the thing that makes them uncomfortable is the plastic pieces under your foot in the back, or the piece that goes between your toe and you’ll be cutting those off, so the cheaper the better! The top pair in the photo were picked up at Michaels last year on clearance for $1. I’ve also gotten a pair from the grocery store that were $ .69; they were much too large for me, but for that price I bought them anyway and trimmed them down to size with sturdy kitchen shears.
Fabric – You can use any kind of fabric you like. I’ve made them with simple cotton, and I’ve seen them made with wide ribbon. My favorite fabric for comfort, though, is a soft, stretchy jersey knit. Remember a few weeks ago when we made bags from old T shirts and I told you to keep the leftover fabric? That’s what I’m using here.
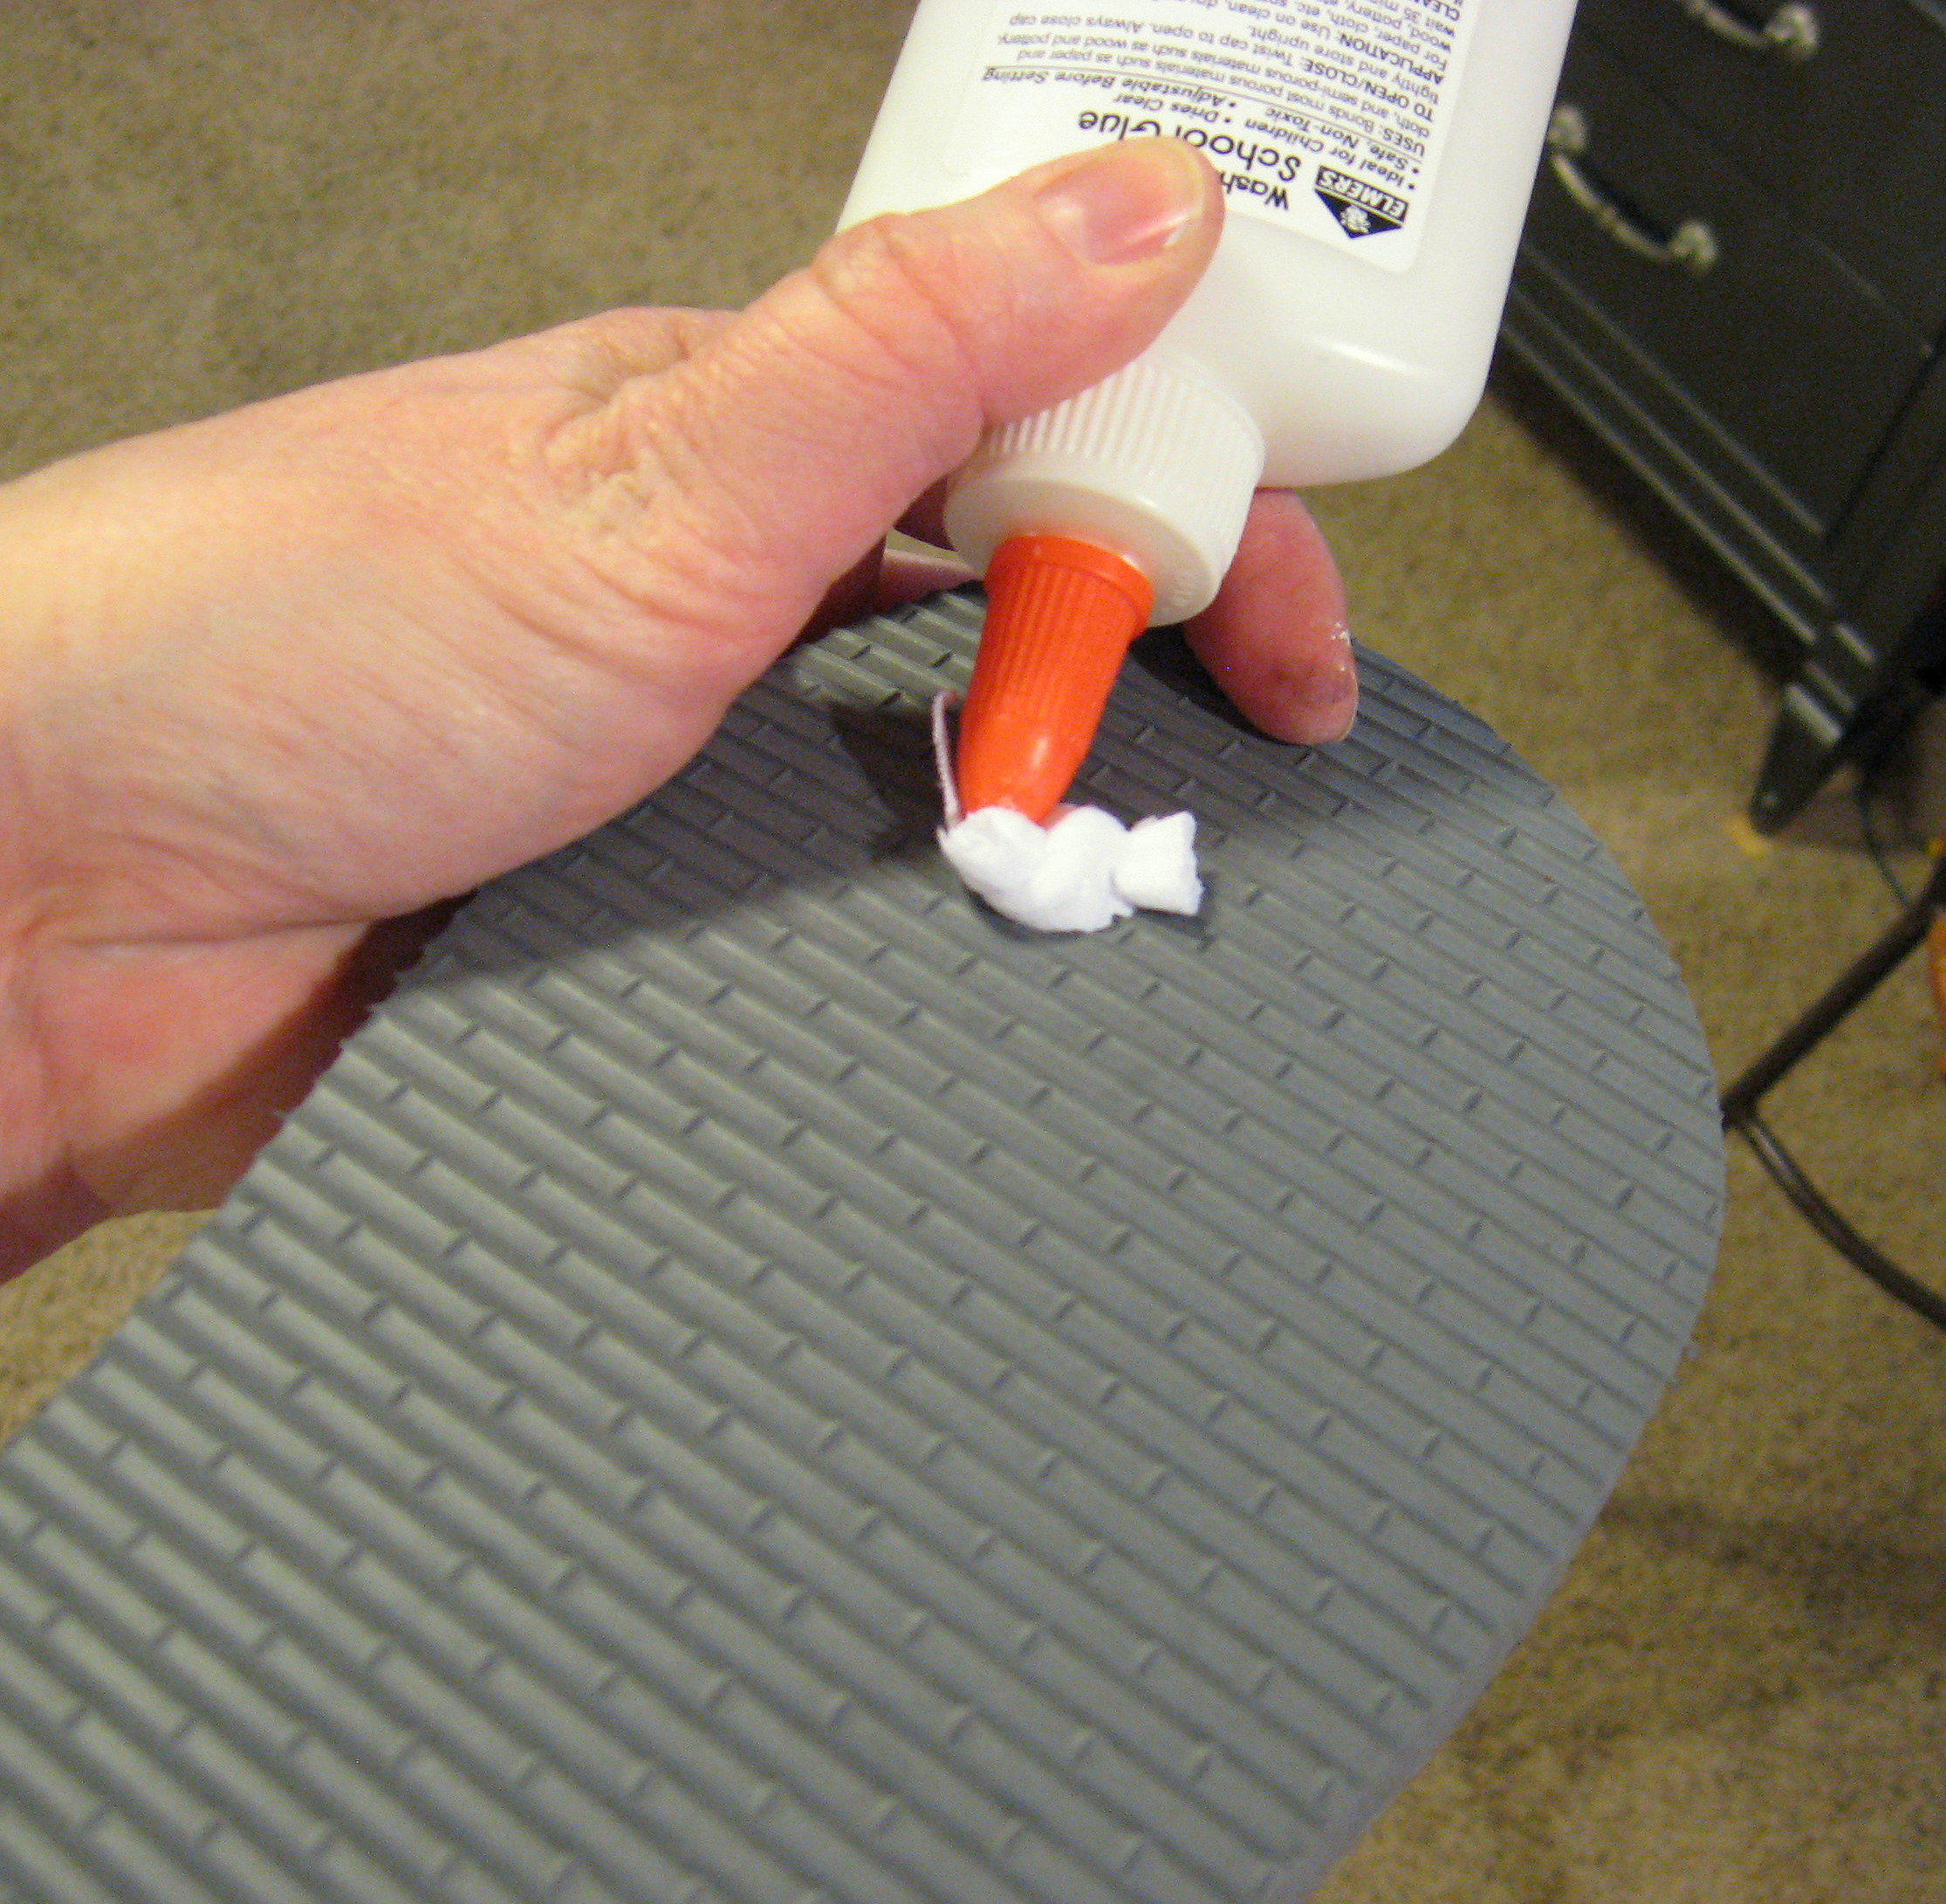
Scissors and Glue – You don’t even need the glue if you don’t want to use it. I just used Elmer’s.
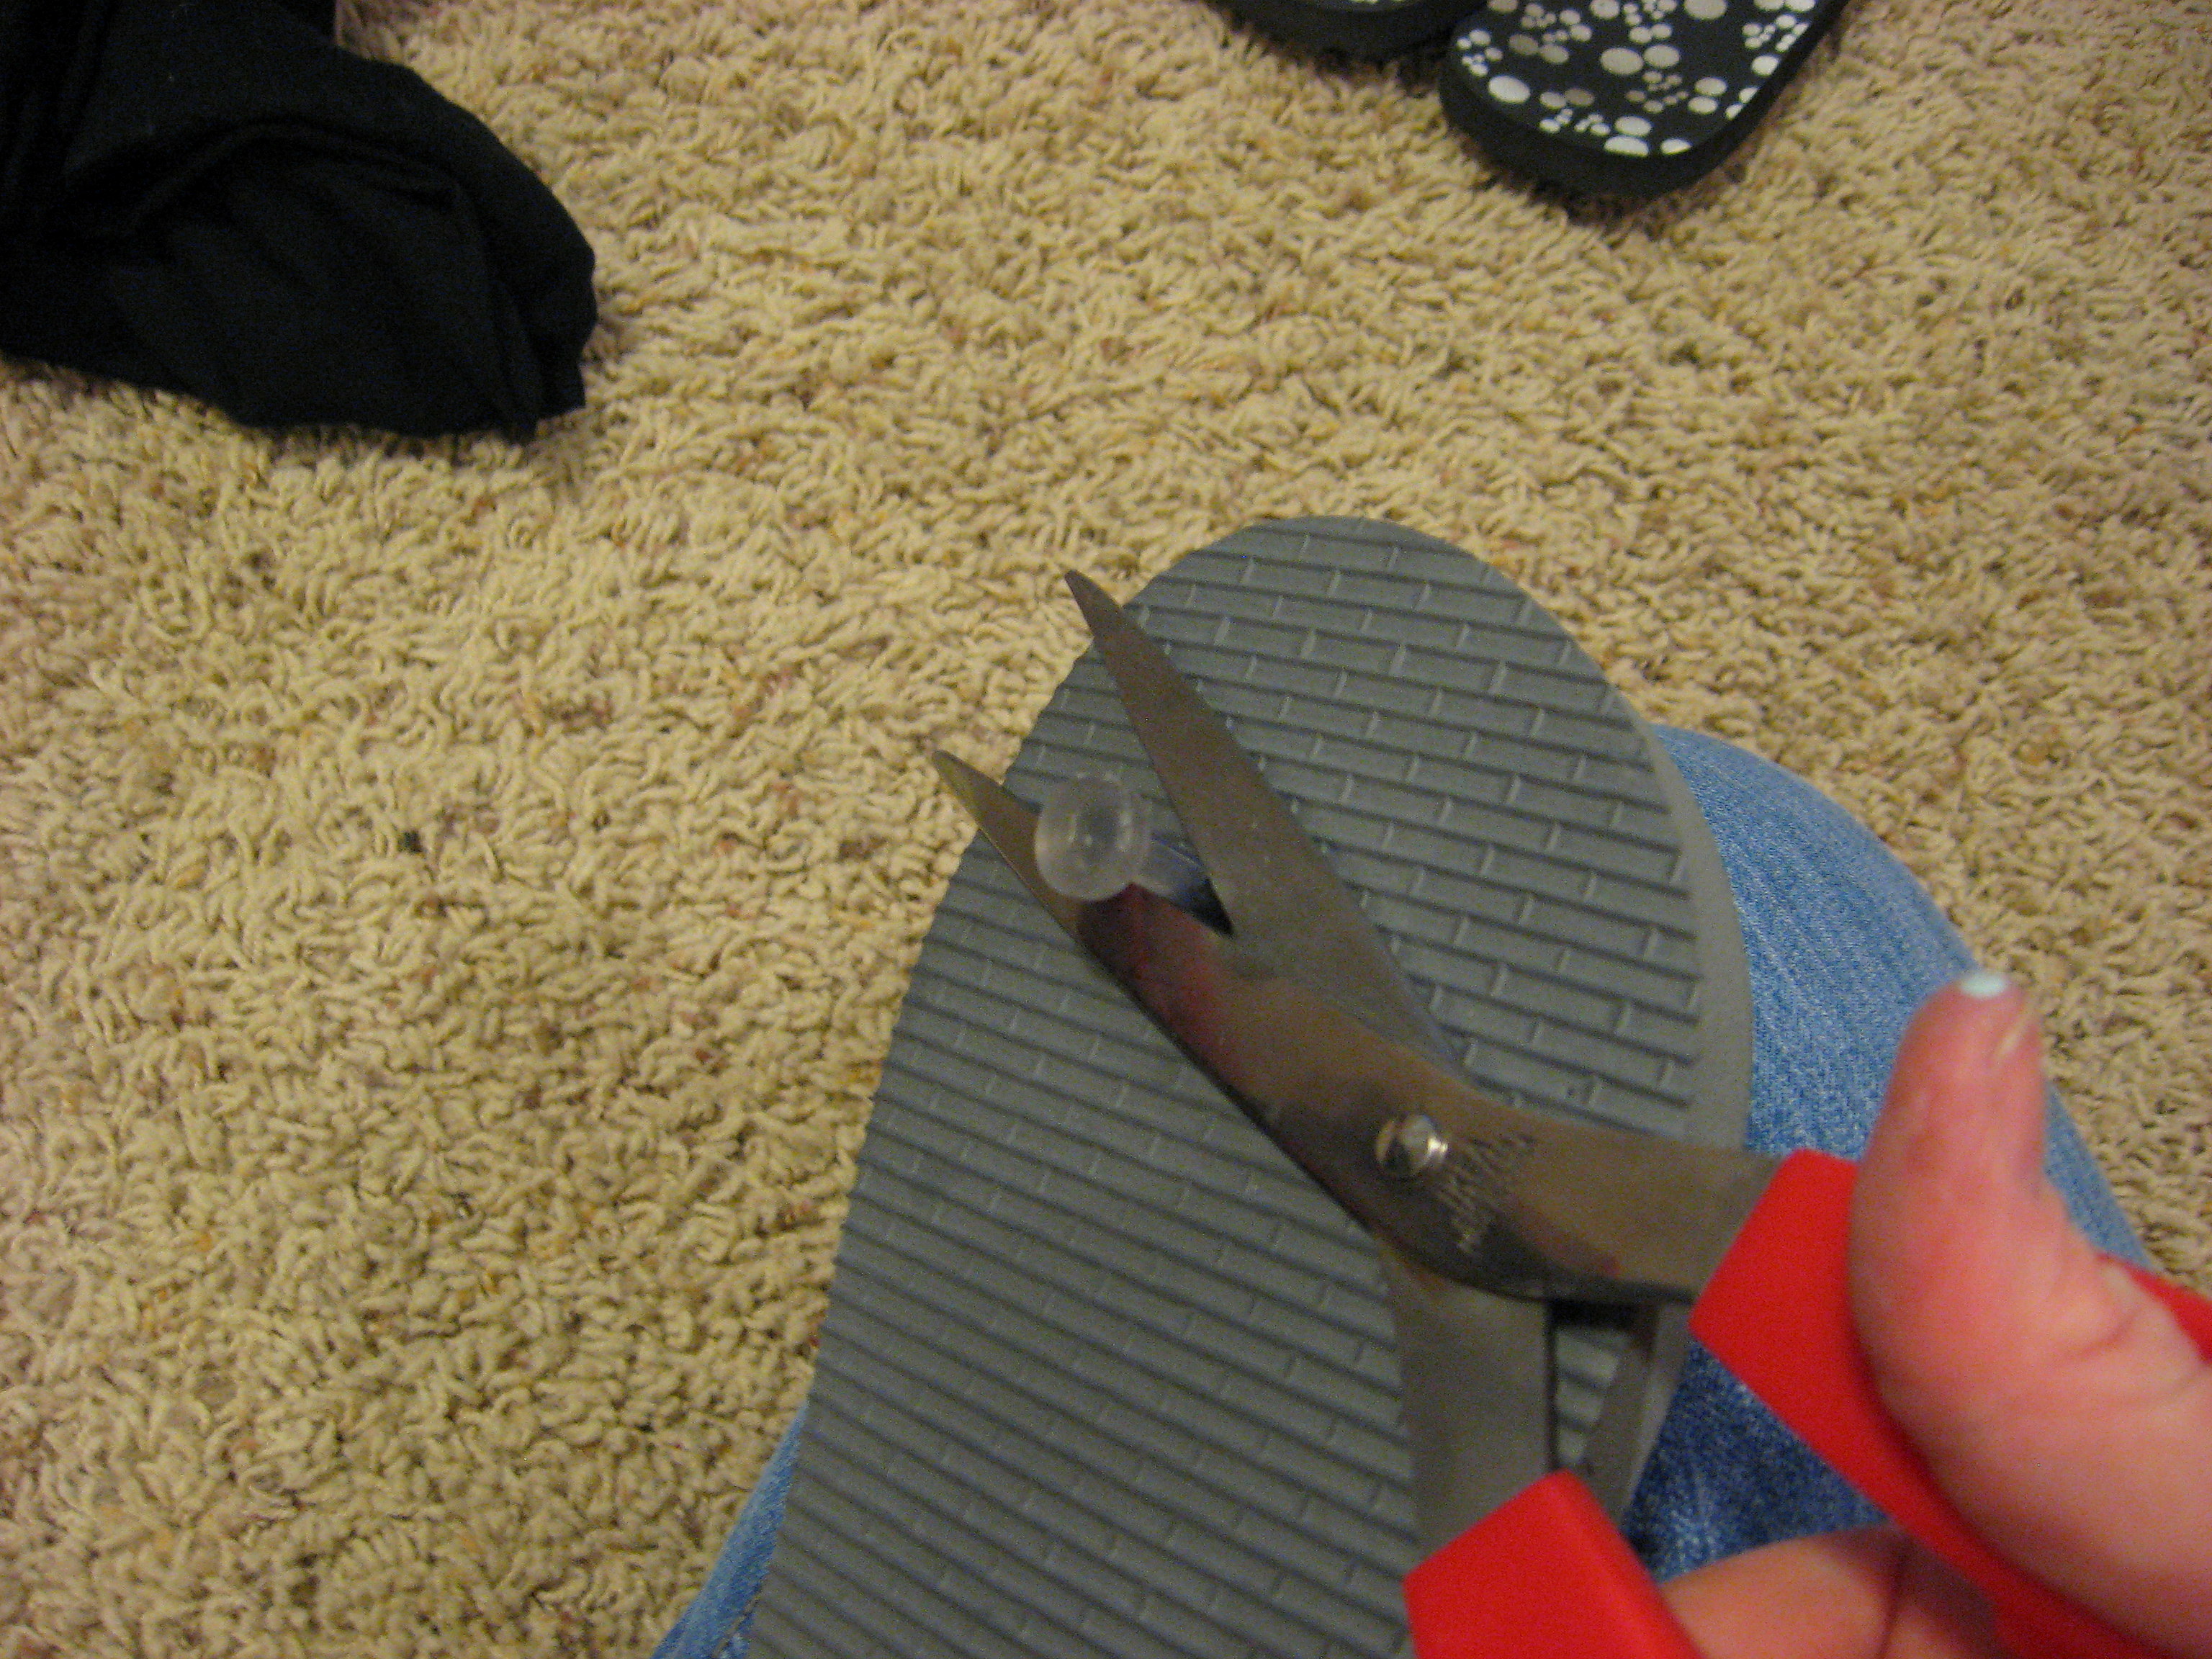
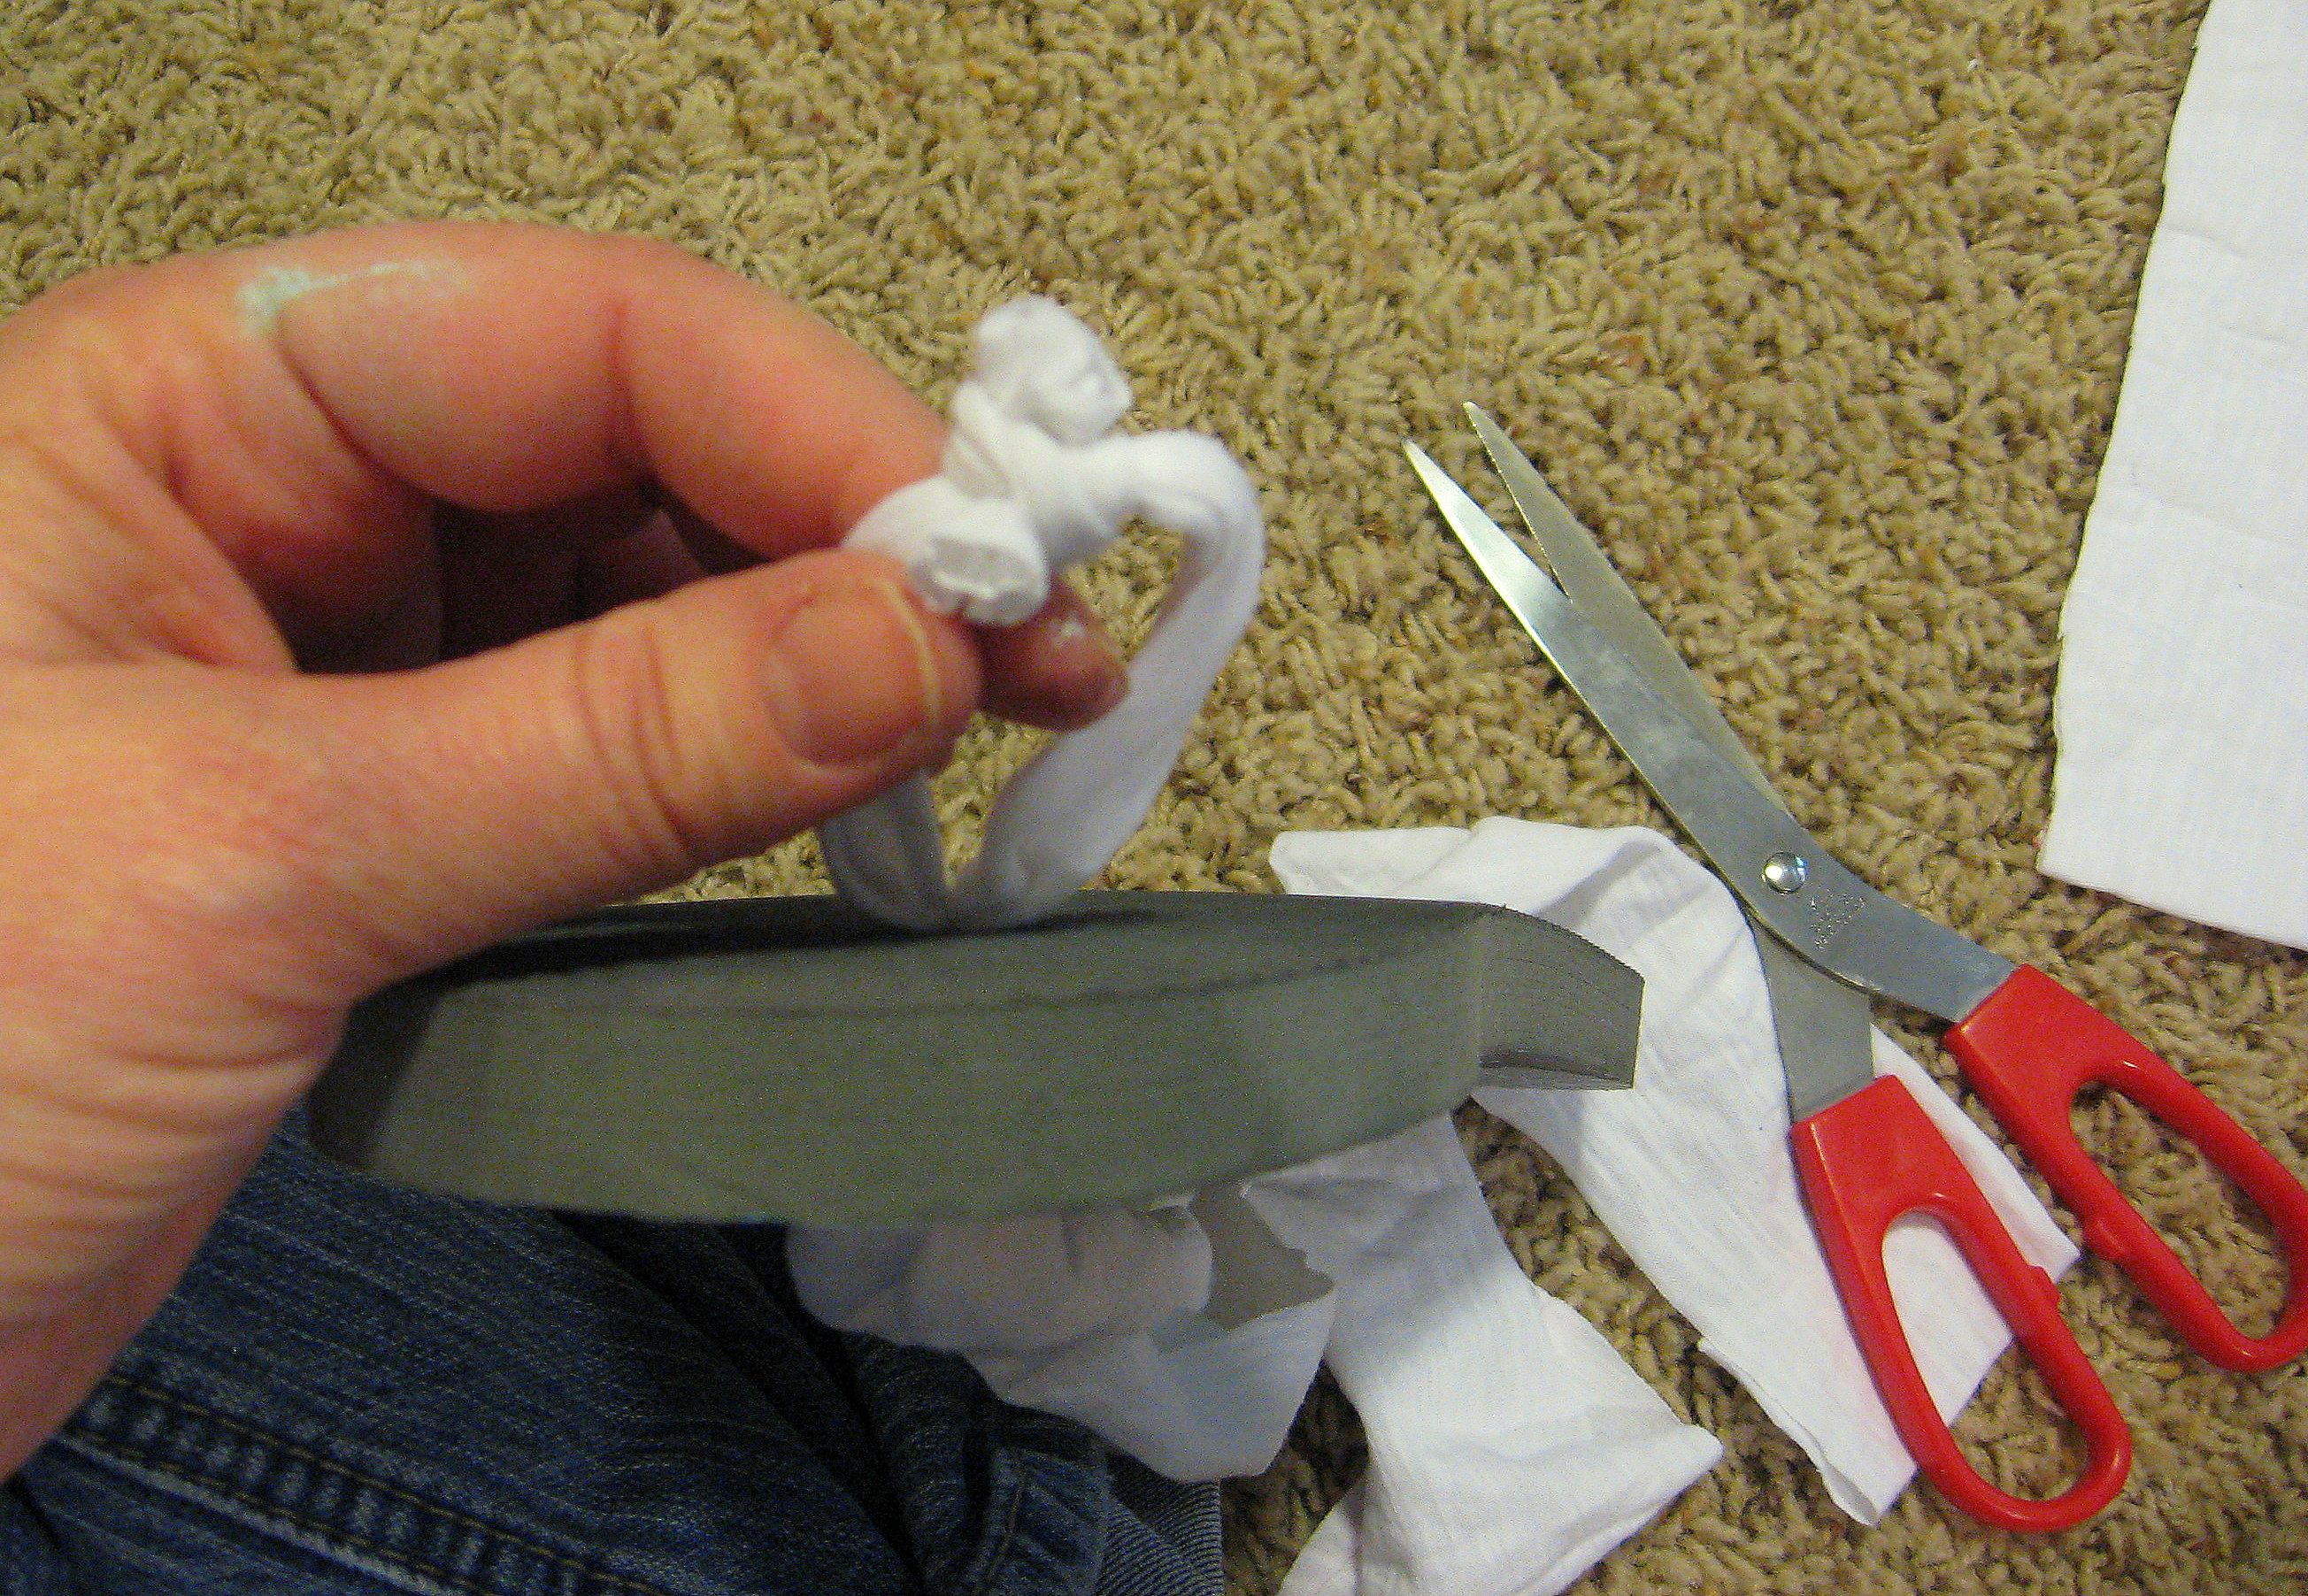
Start by cutting the straps of your flip flops and discarding them
Now you’ll cut the fabric into strips. This is totally up to you based on how you want the finished shoe to look. For these, I cut the strips about 3 1/2 inches wide. I usually start with strips about a yard long; you will probably not need that much in the end, but it allows for some oops along the way. I double it over to cut the strips so both sides will match perfectly.
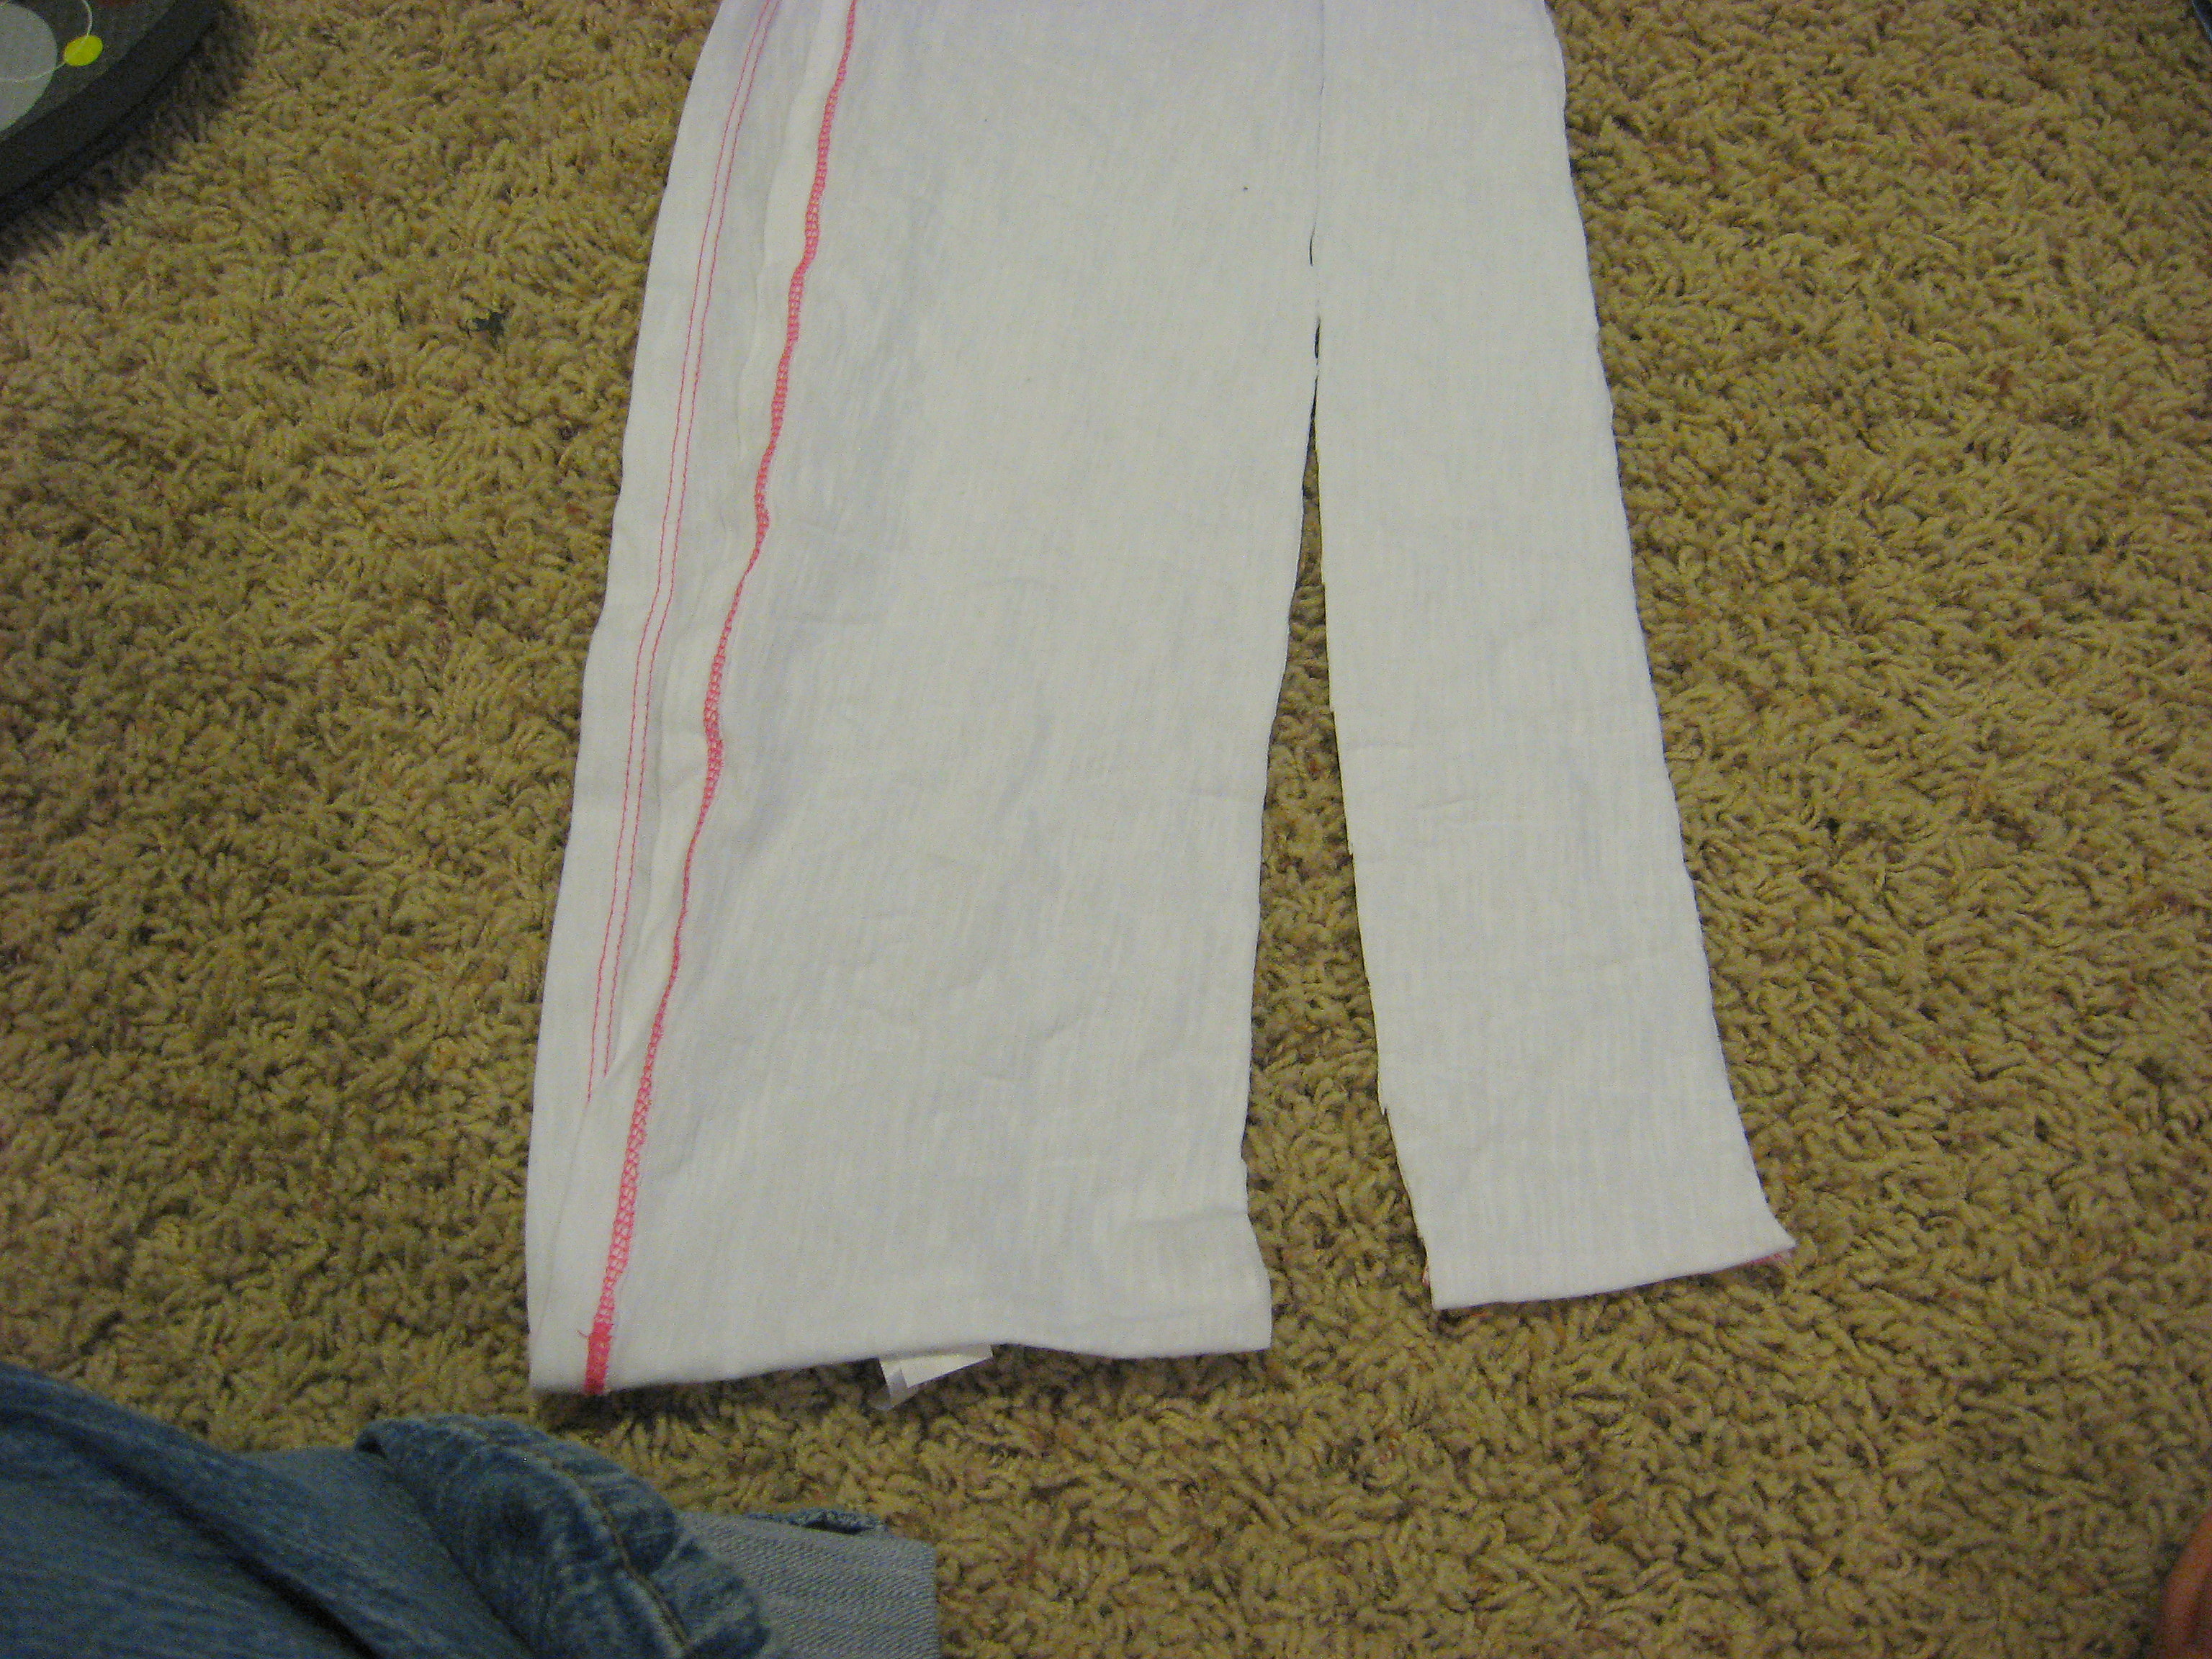
The fabric in the picture above is still doubled-over so you can see that the end that will be between my toes is a little narrower. If you don’t want to think it through that much, no worries. Just cut it straight and you’ll be fine.
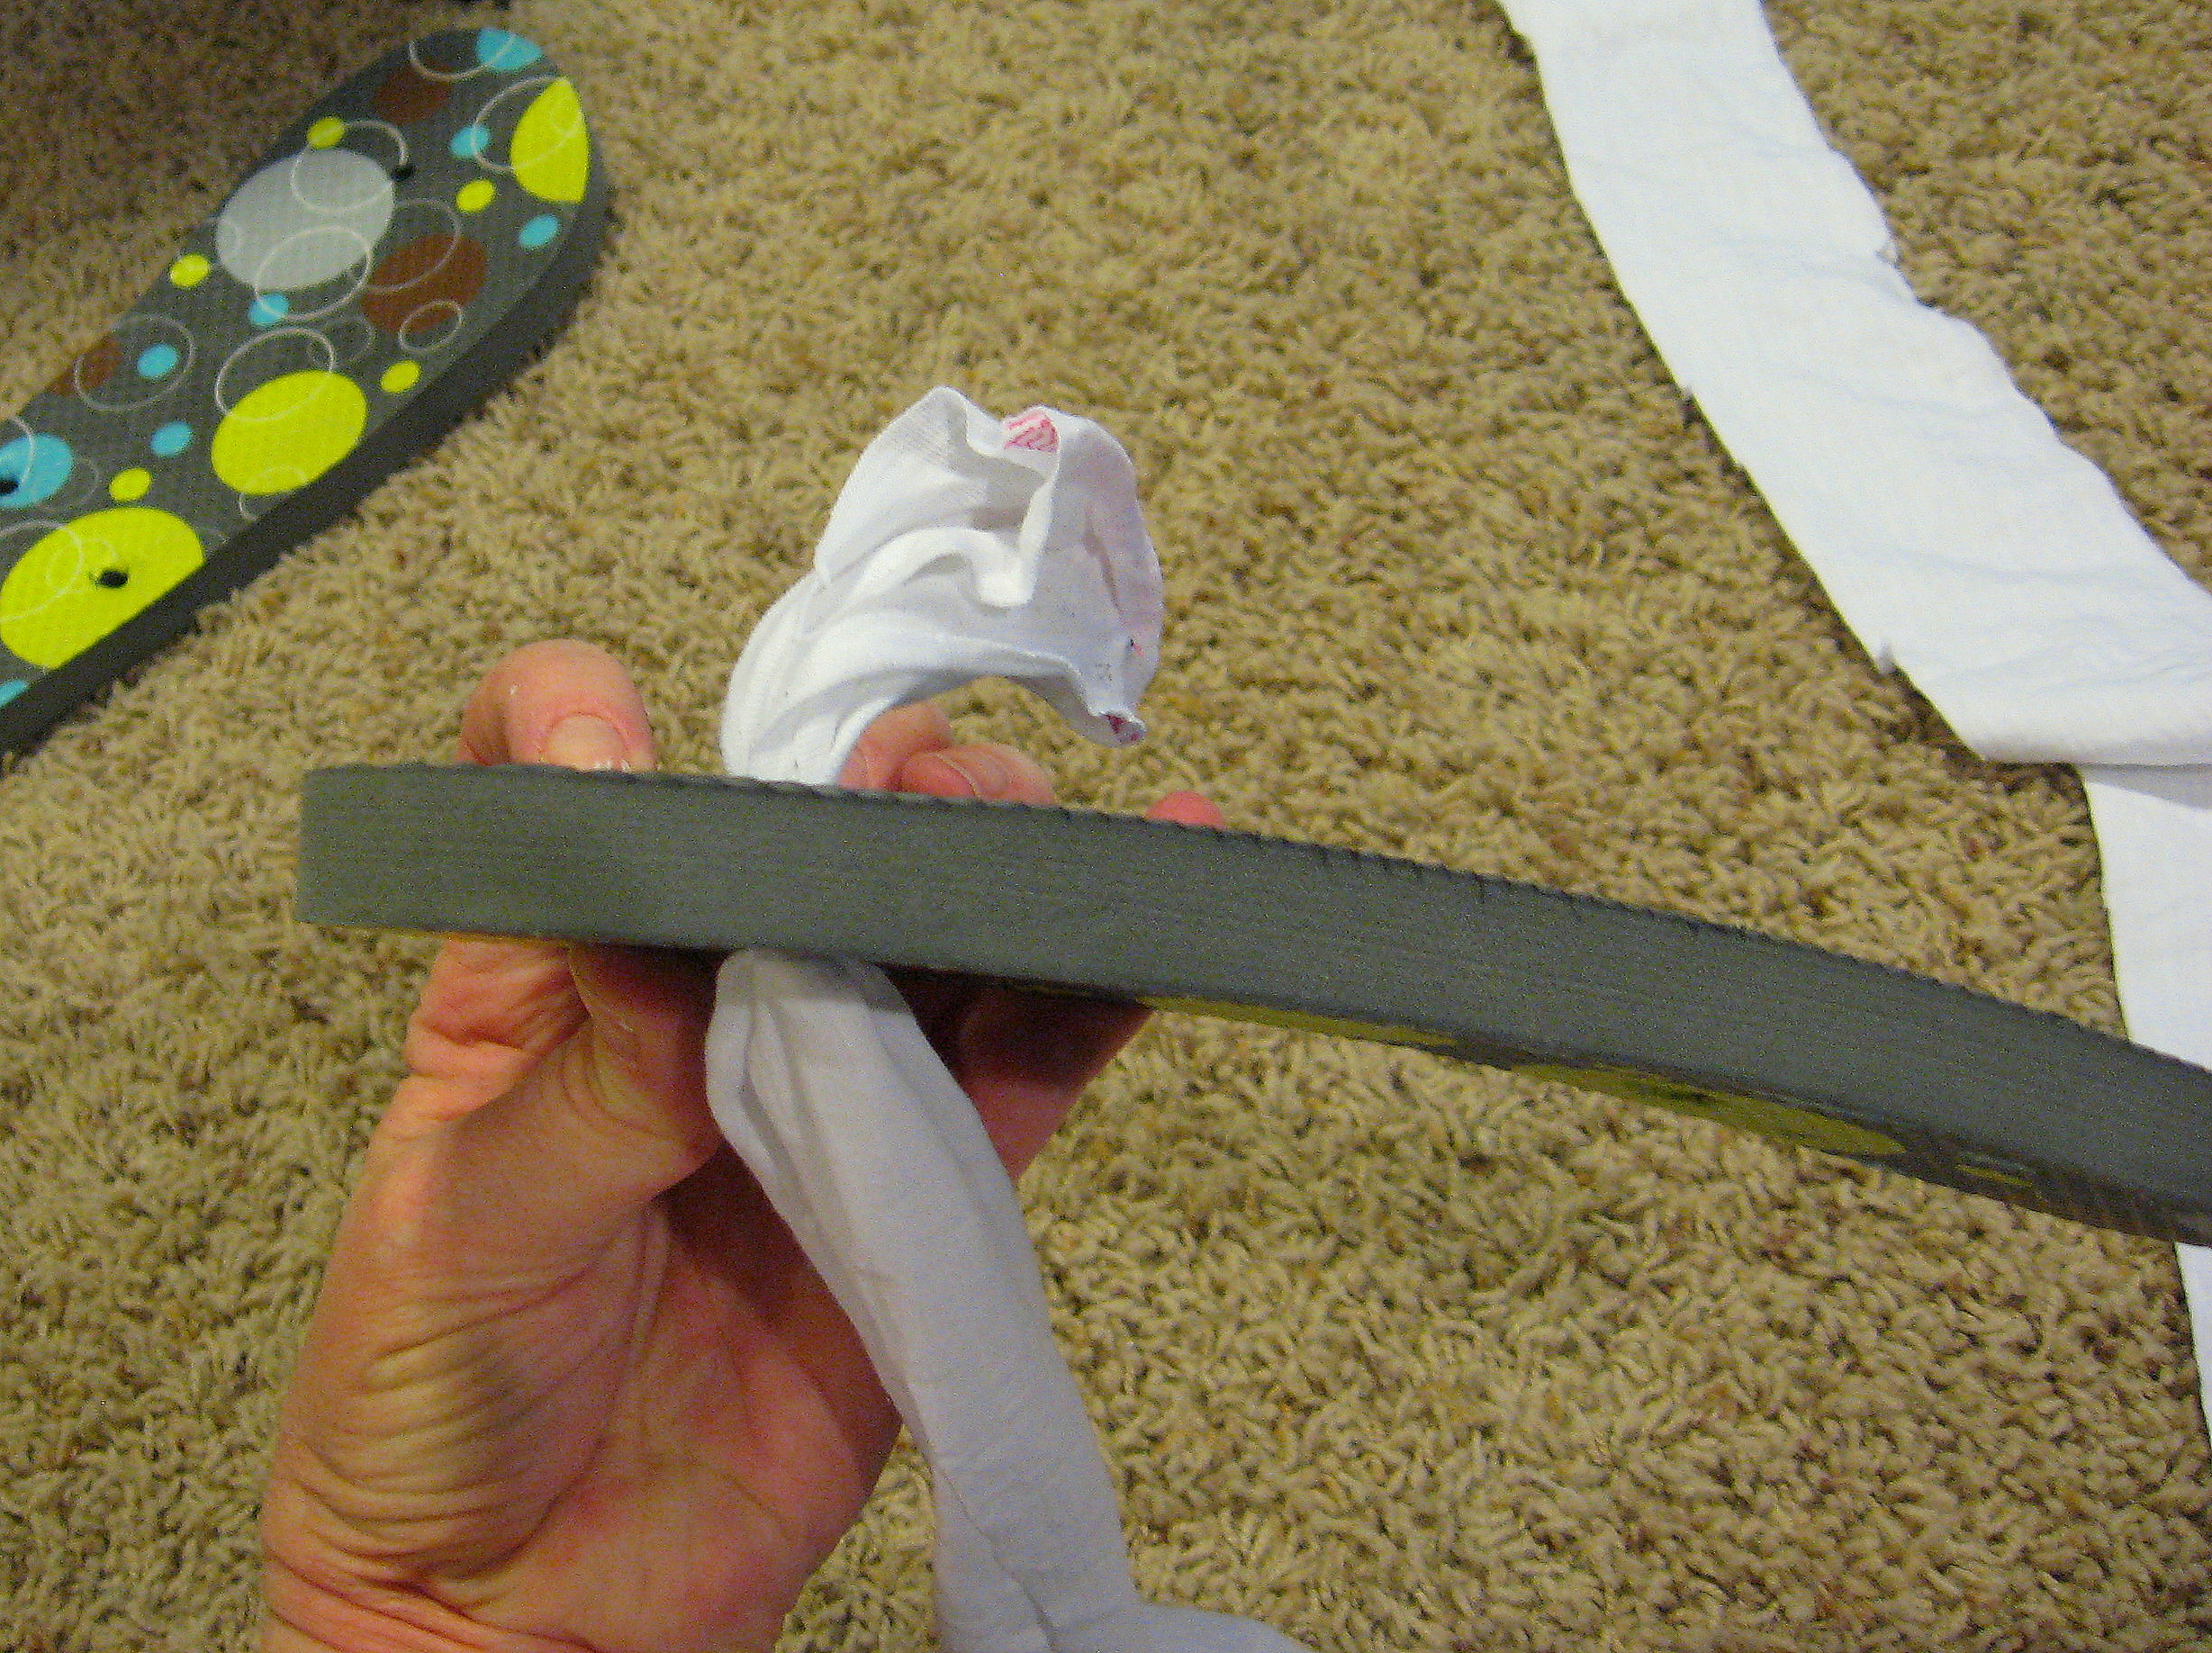
Keeping the fabric doubled up, grab the end that will go at the front of the shoe and shove through the hole at the toe end of the flip flop. Tie a knot. 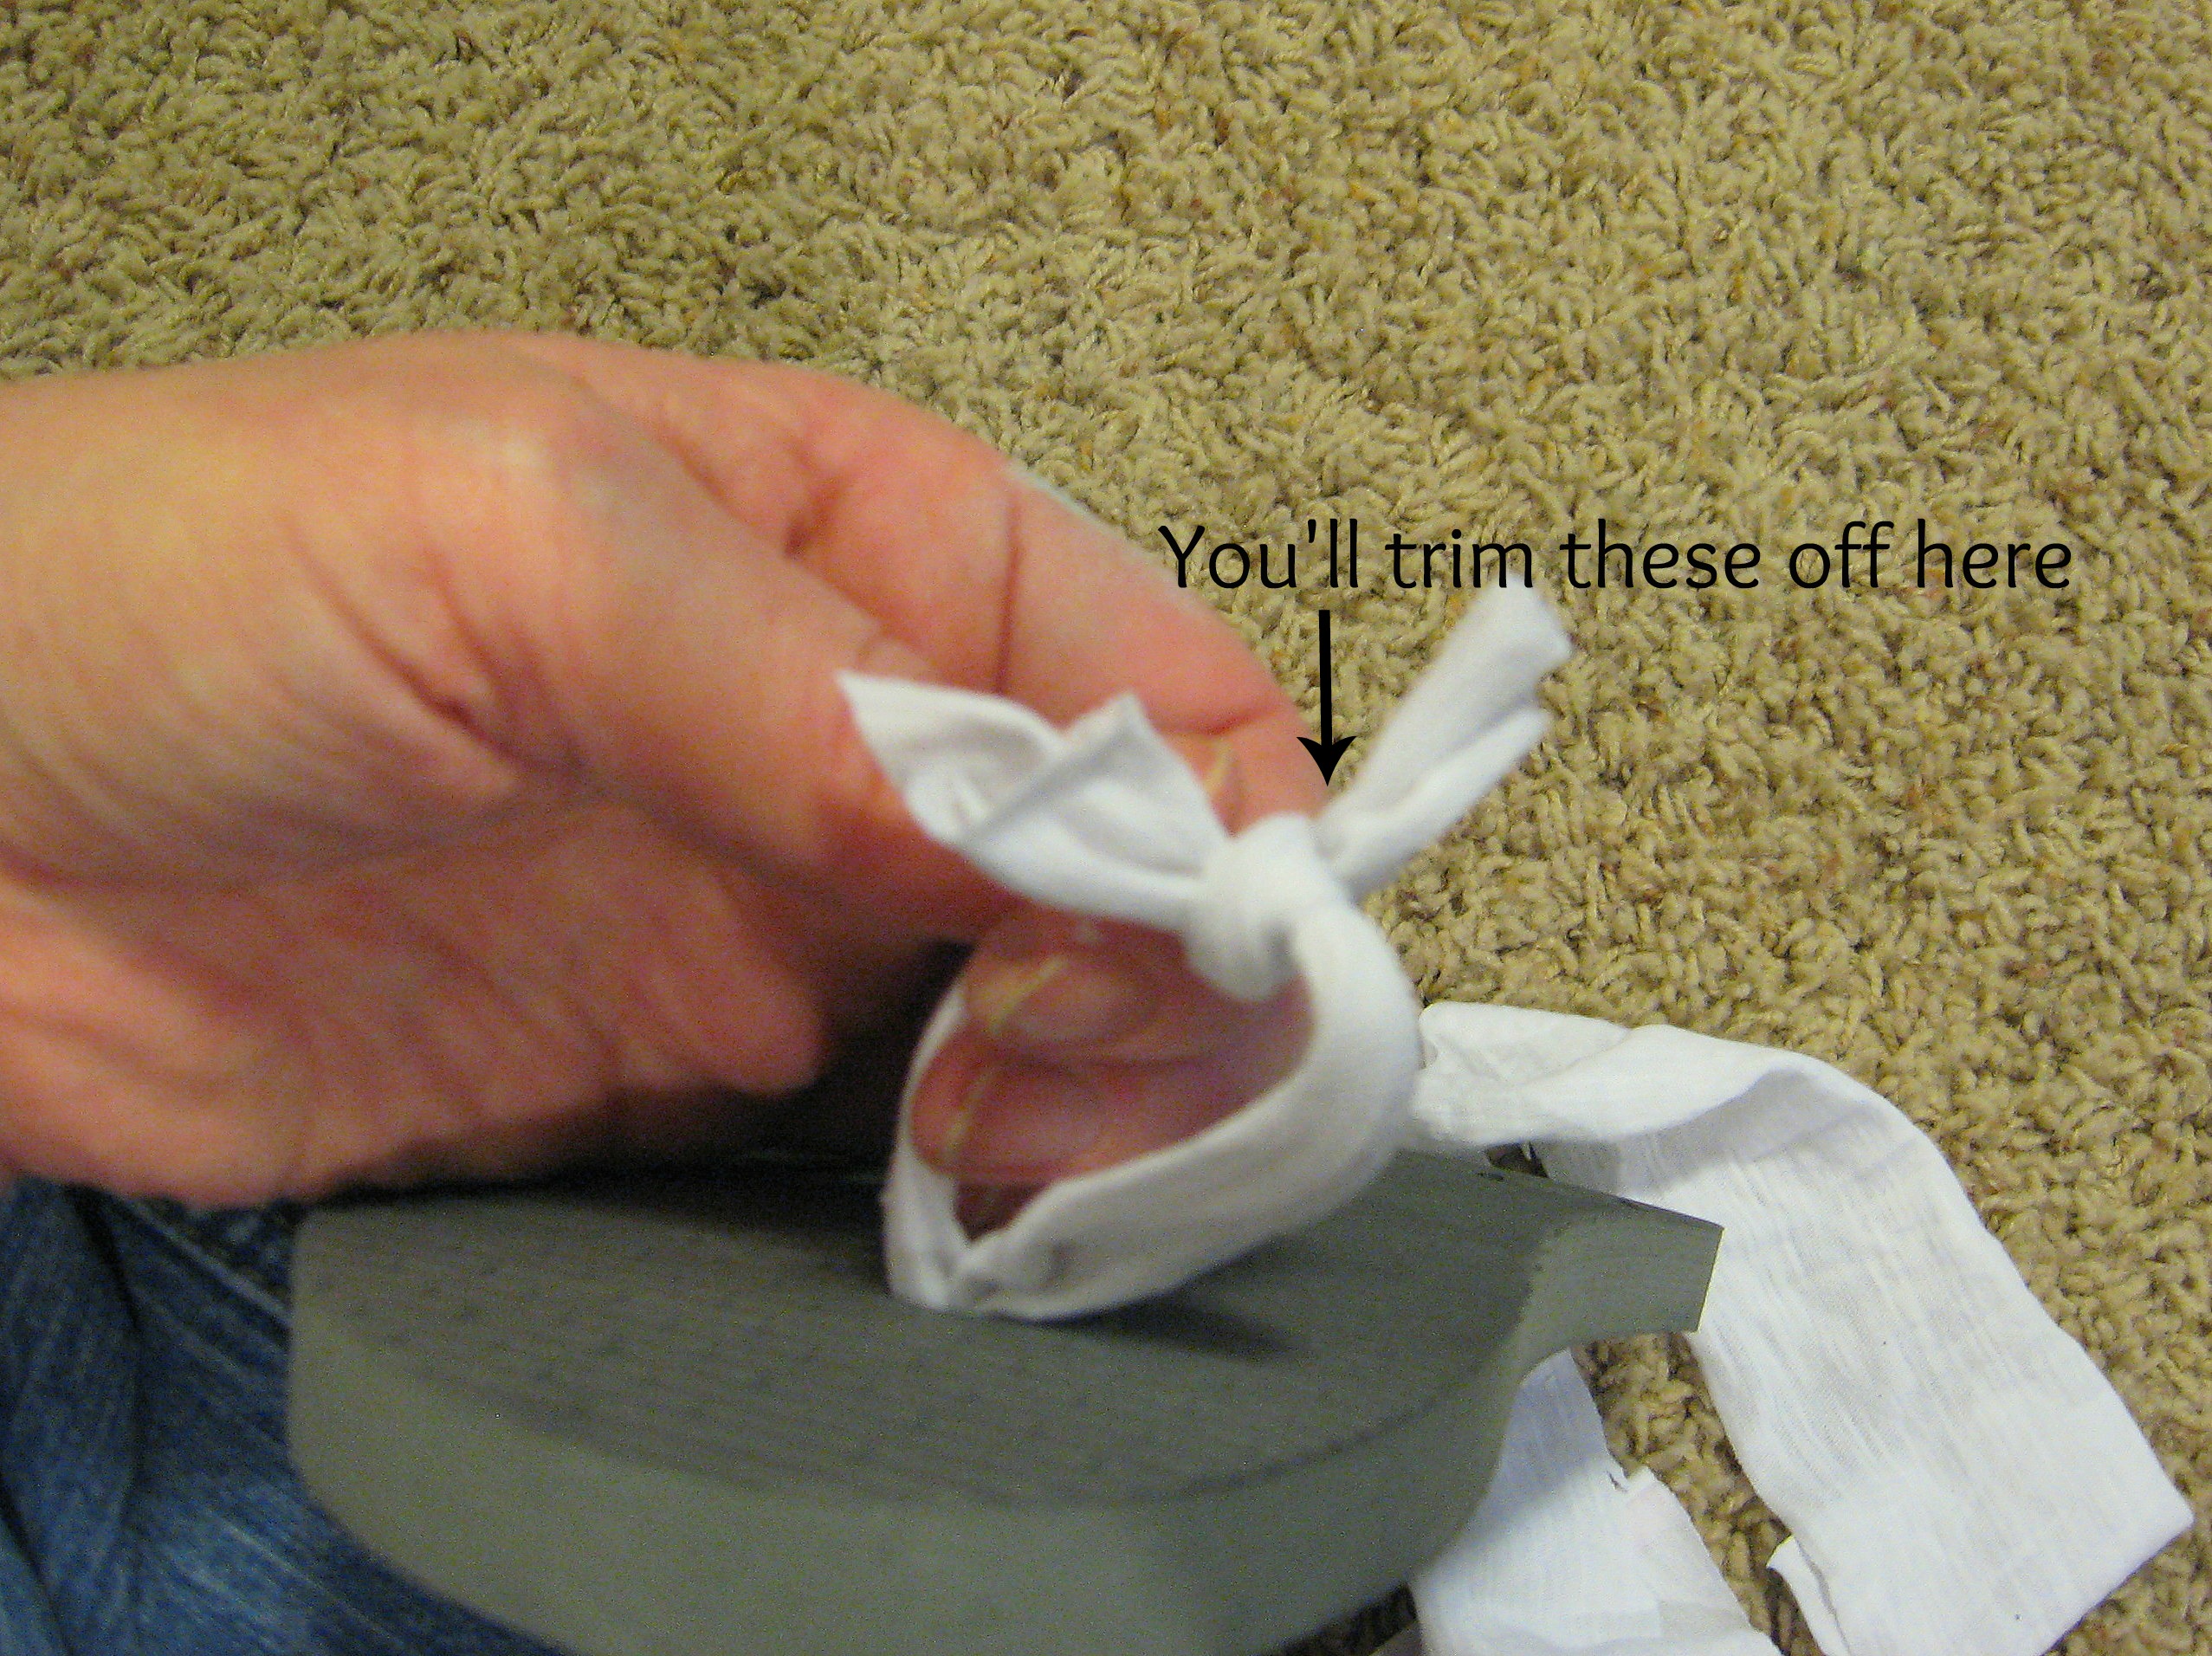
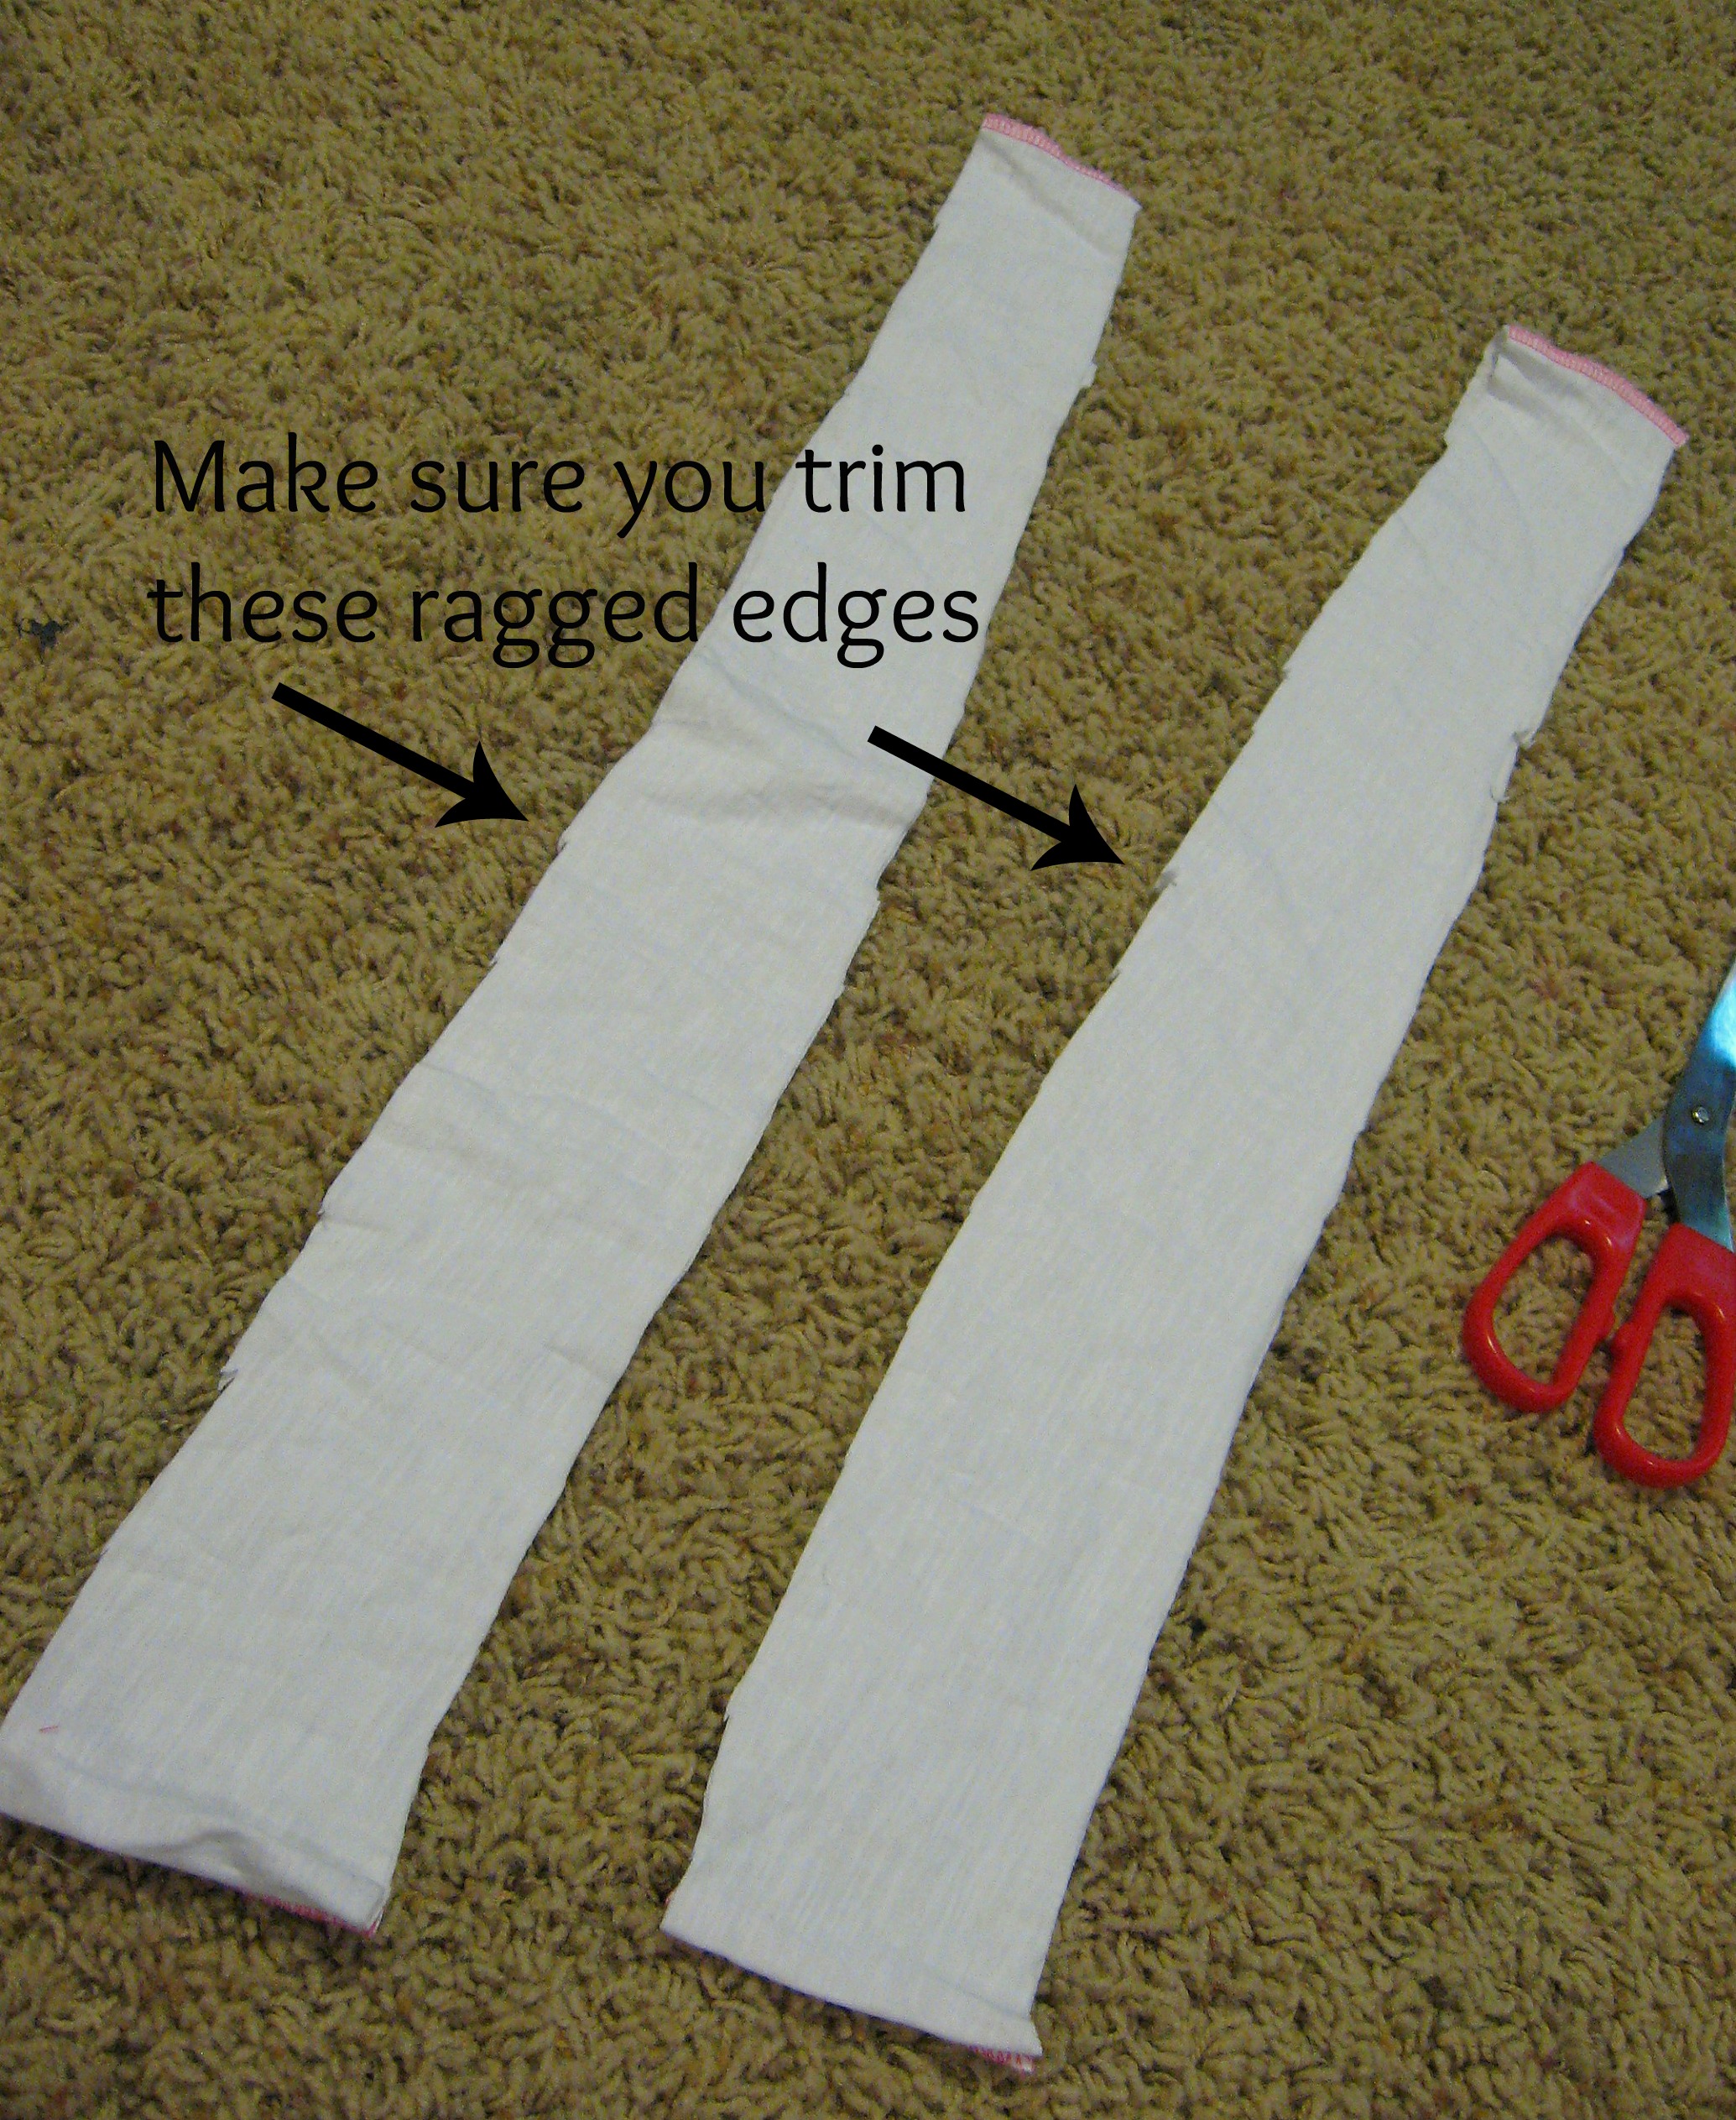
Get it as tight as you can, then trim off the extra fabric ends.
Now pull the fabric back towards the top of the shoe until the knot nestles down in the hole. The knot needs to be big enough that it won’t pull through the hole, so if you are using really thin fabric, or you cut your strips very thin, then you may need to tie another knot until it is bulky enough to stay in place.
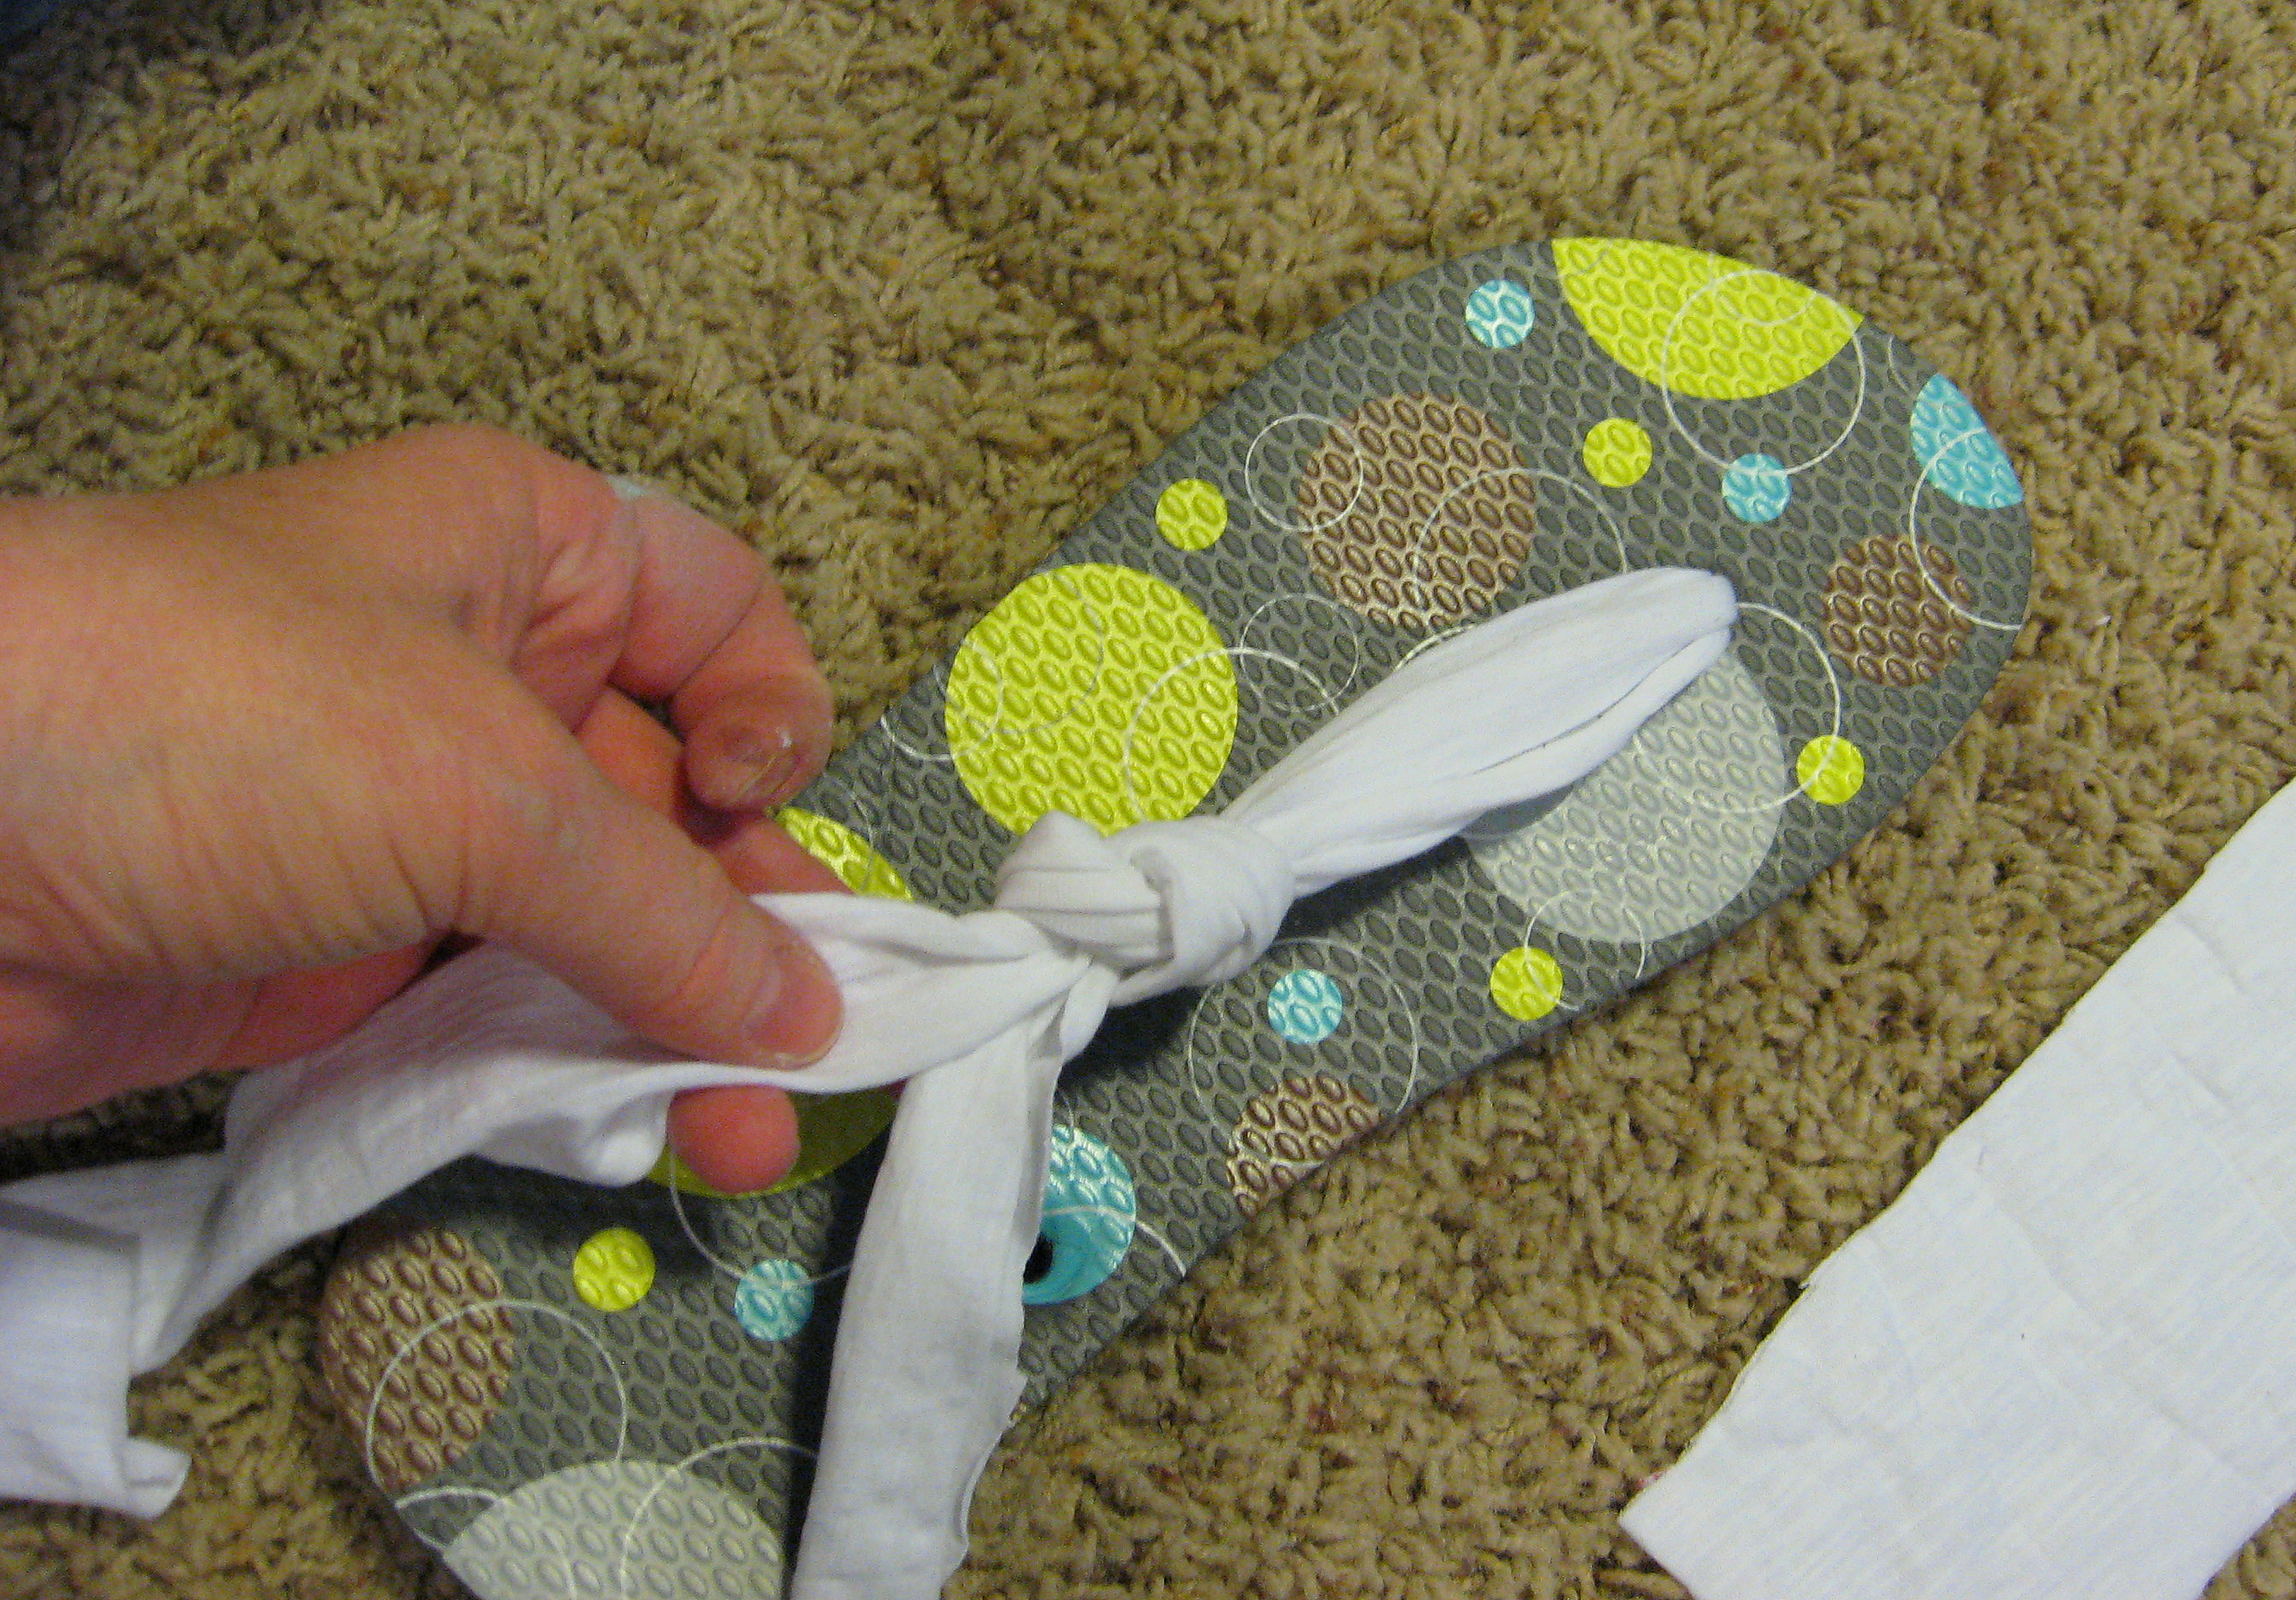
Now you will tie a knot on the top of the shoe to form the “Y” on top of your foot. Put the shoe on with the new straps coming up between your toe. Grab the fabric together and determine where you want to tie the knot.
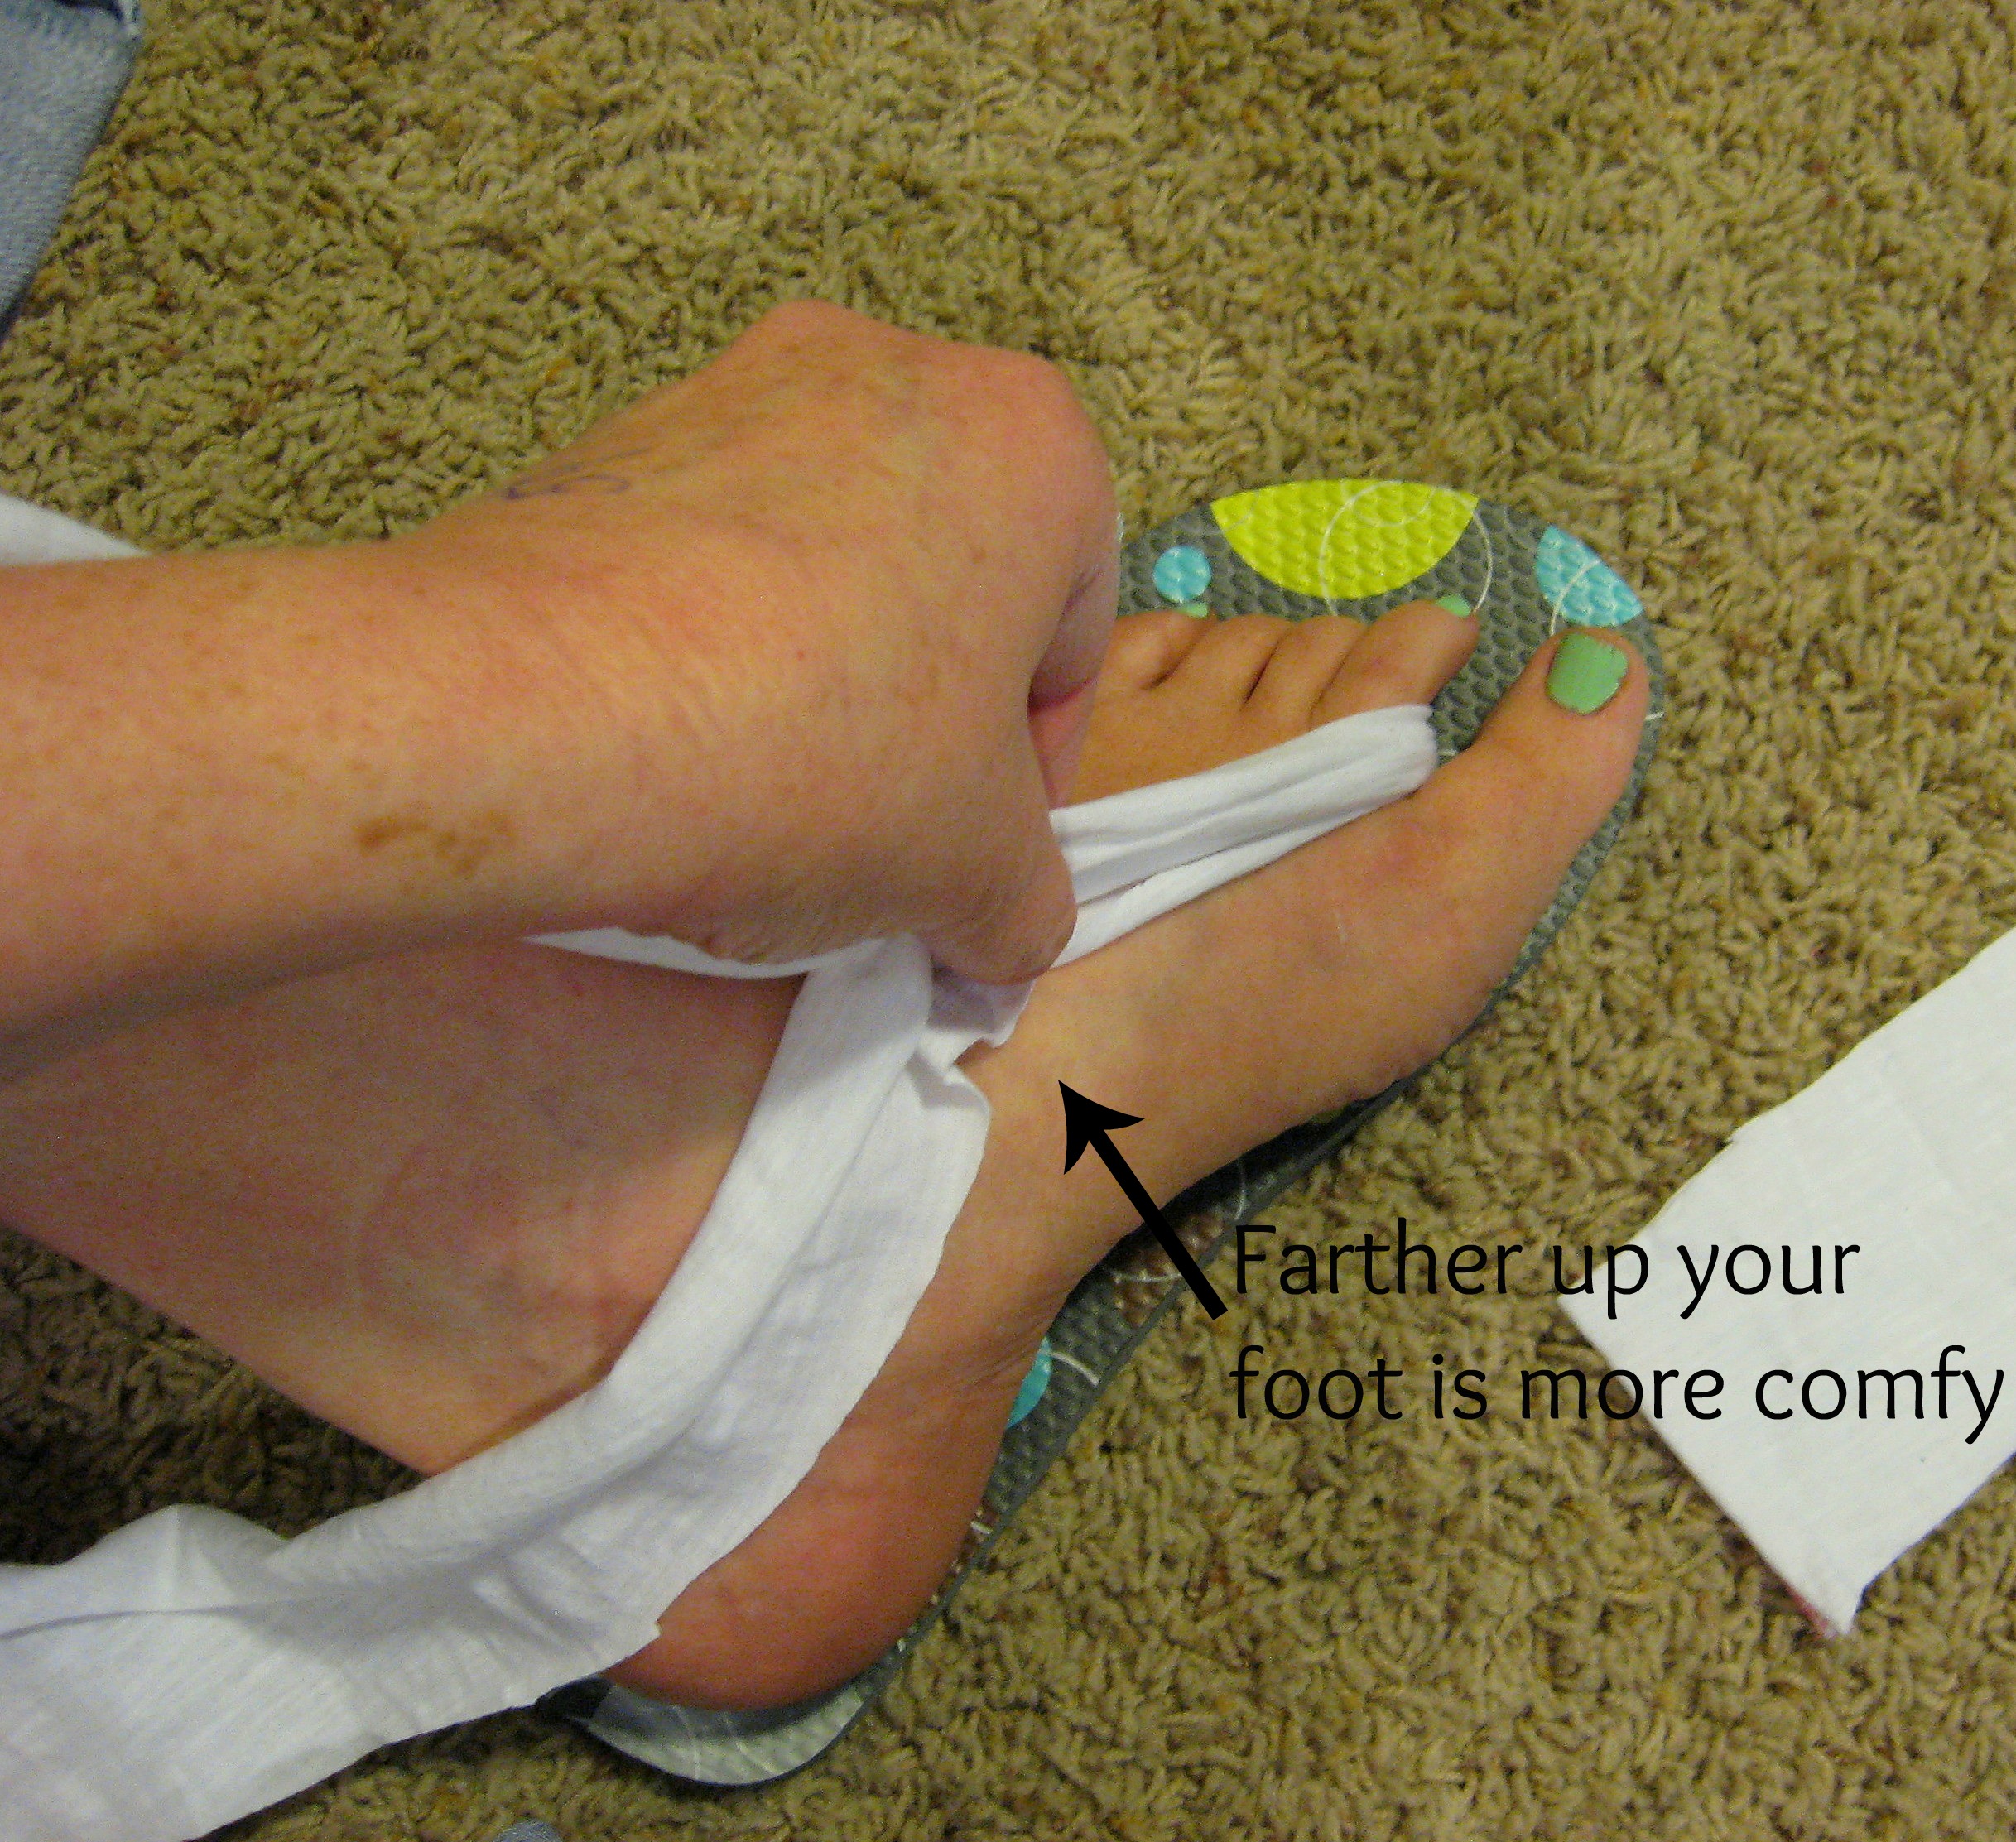
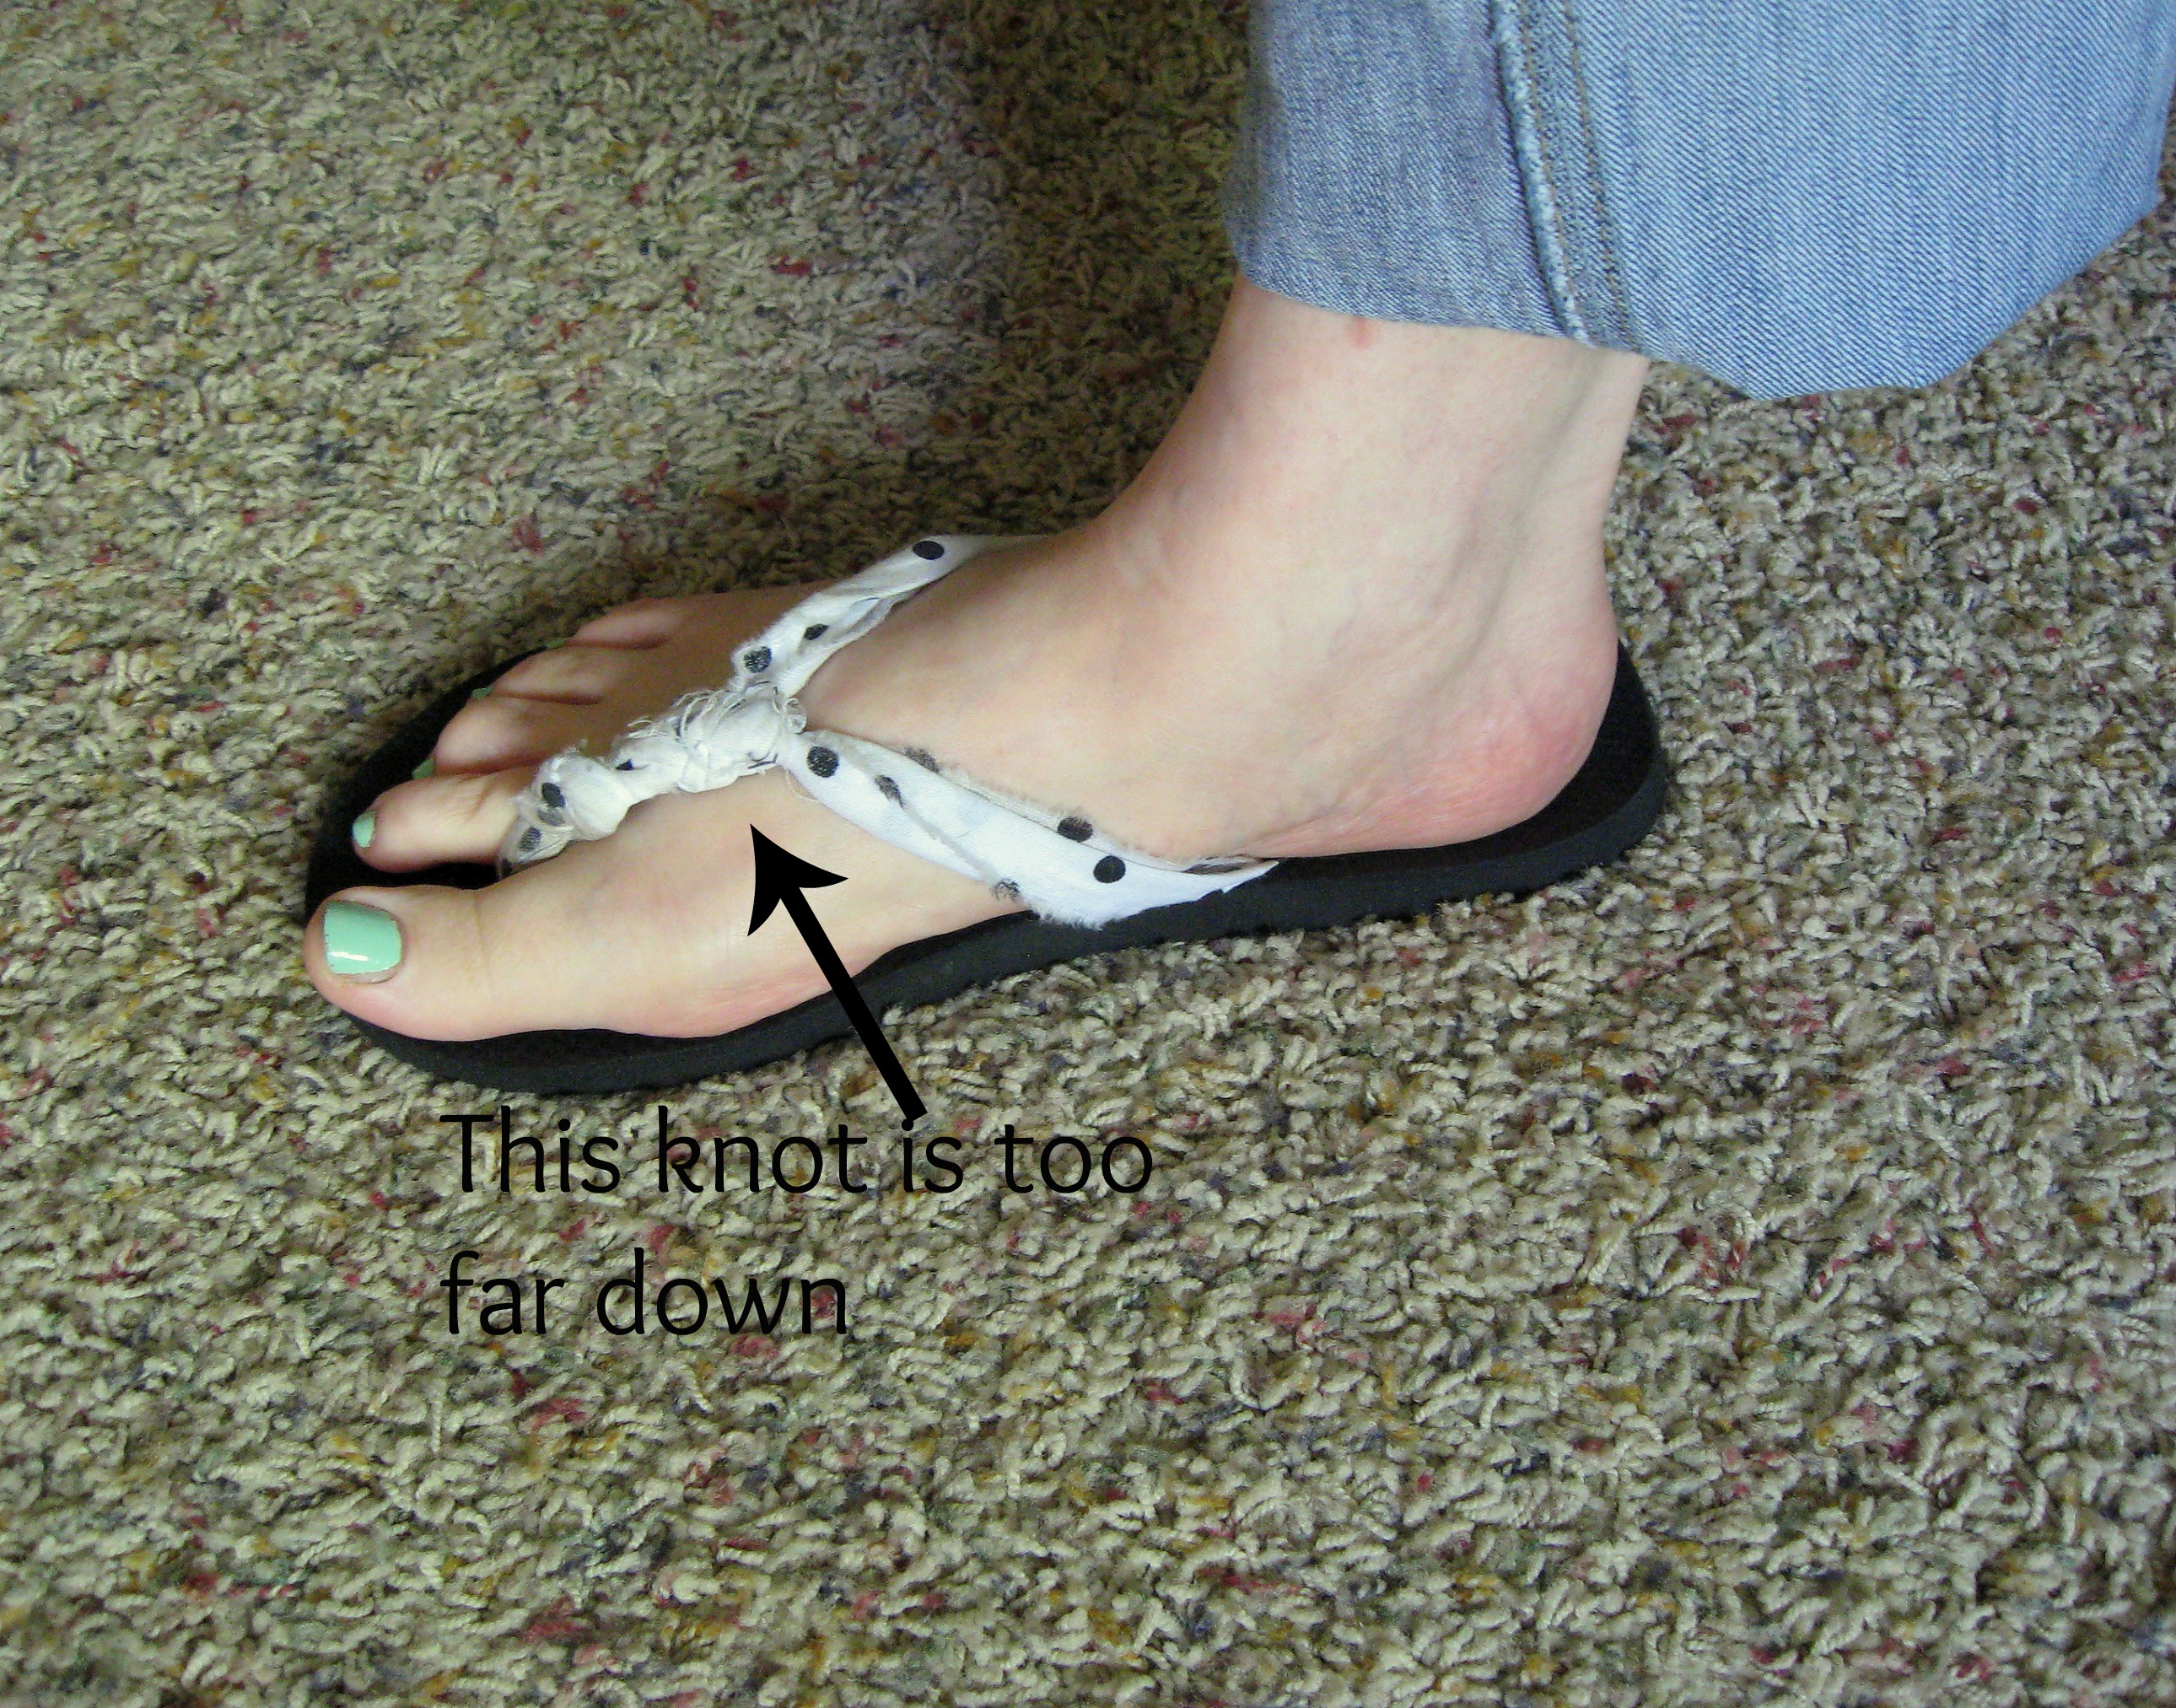
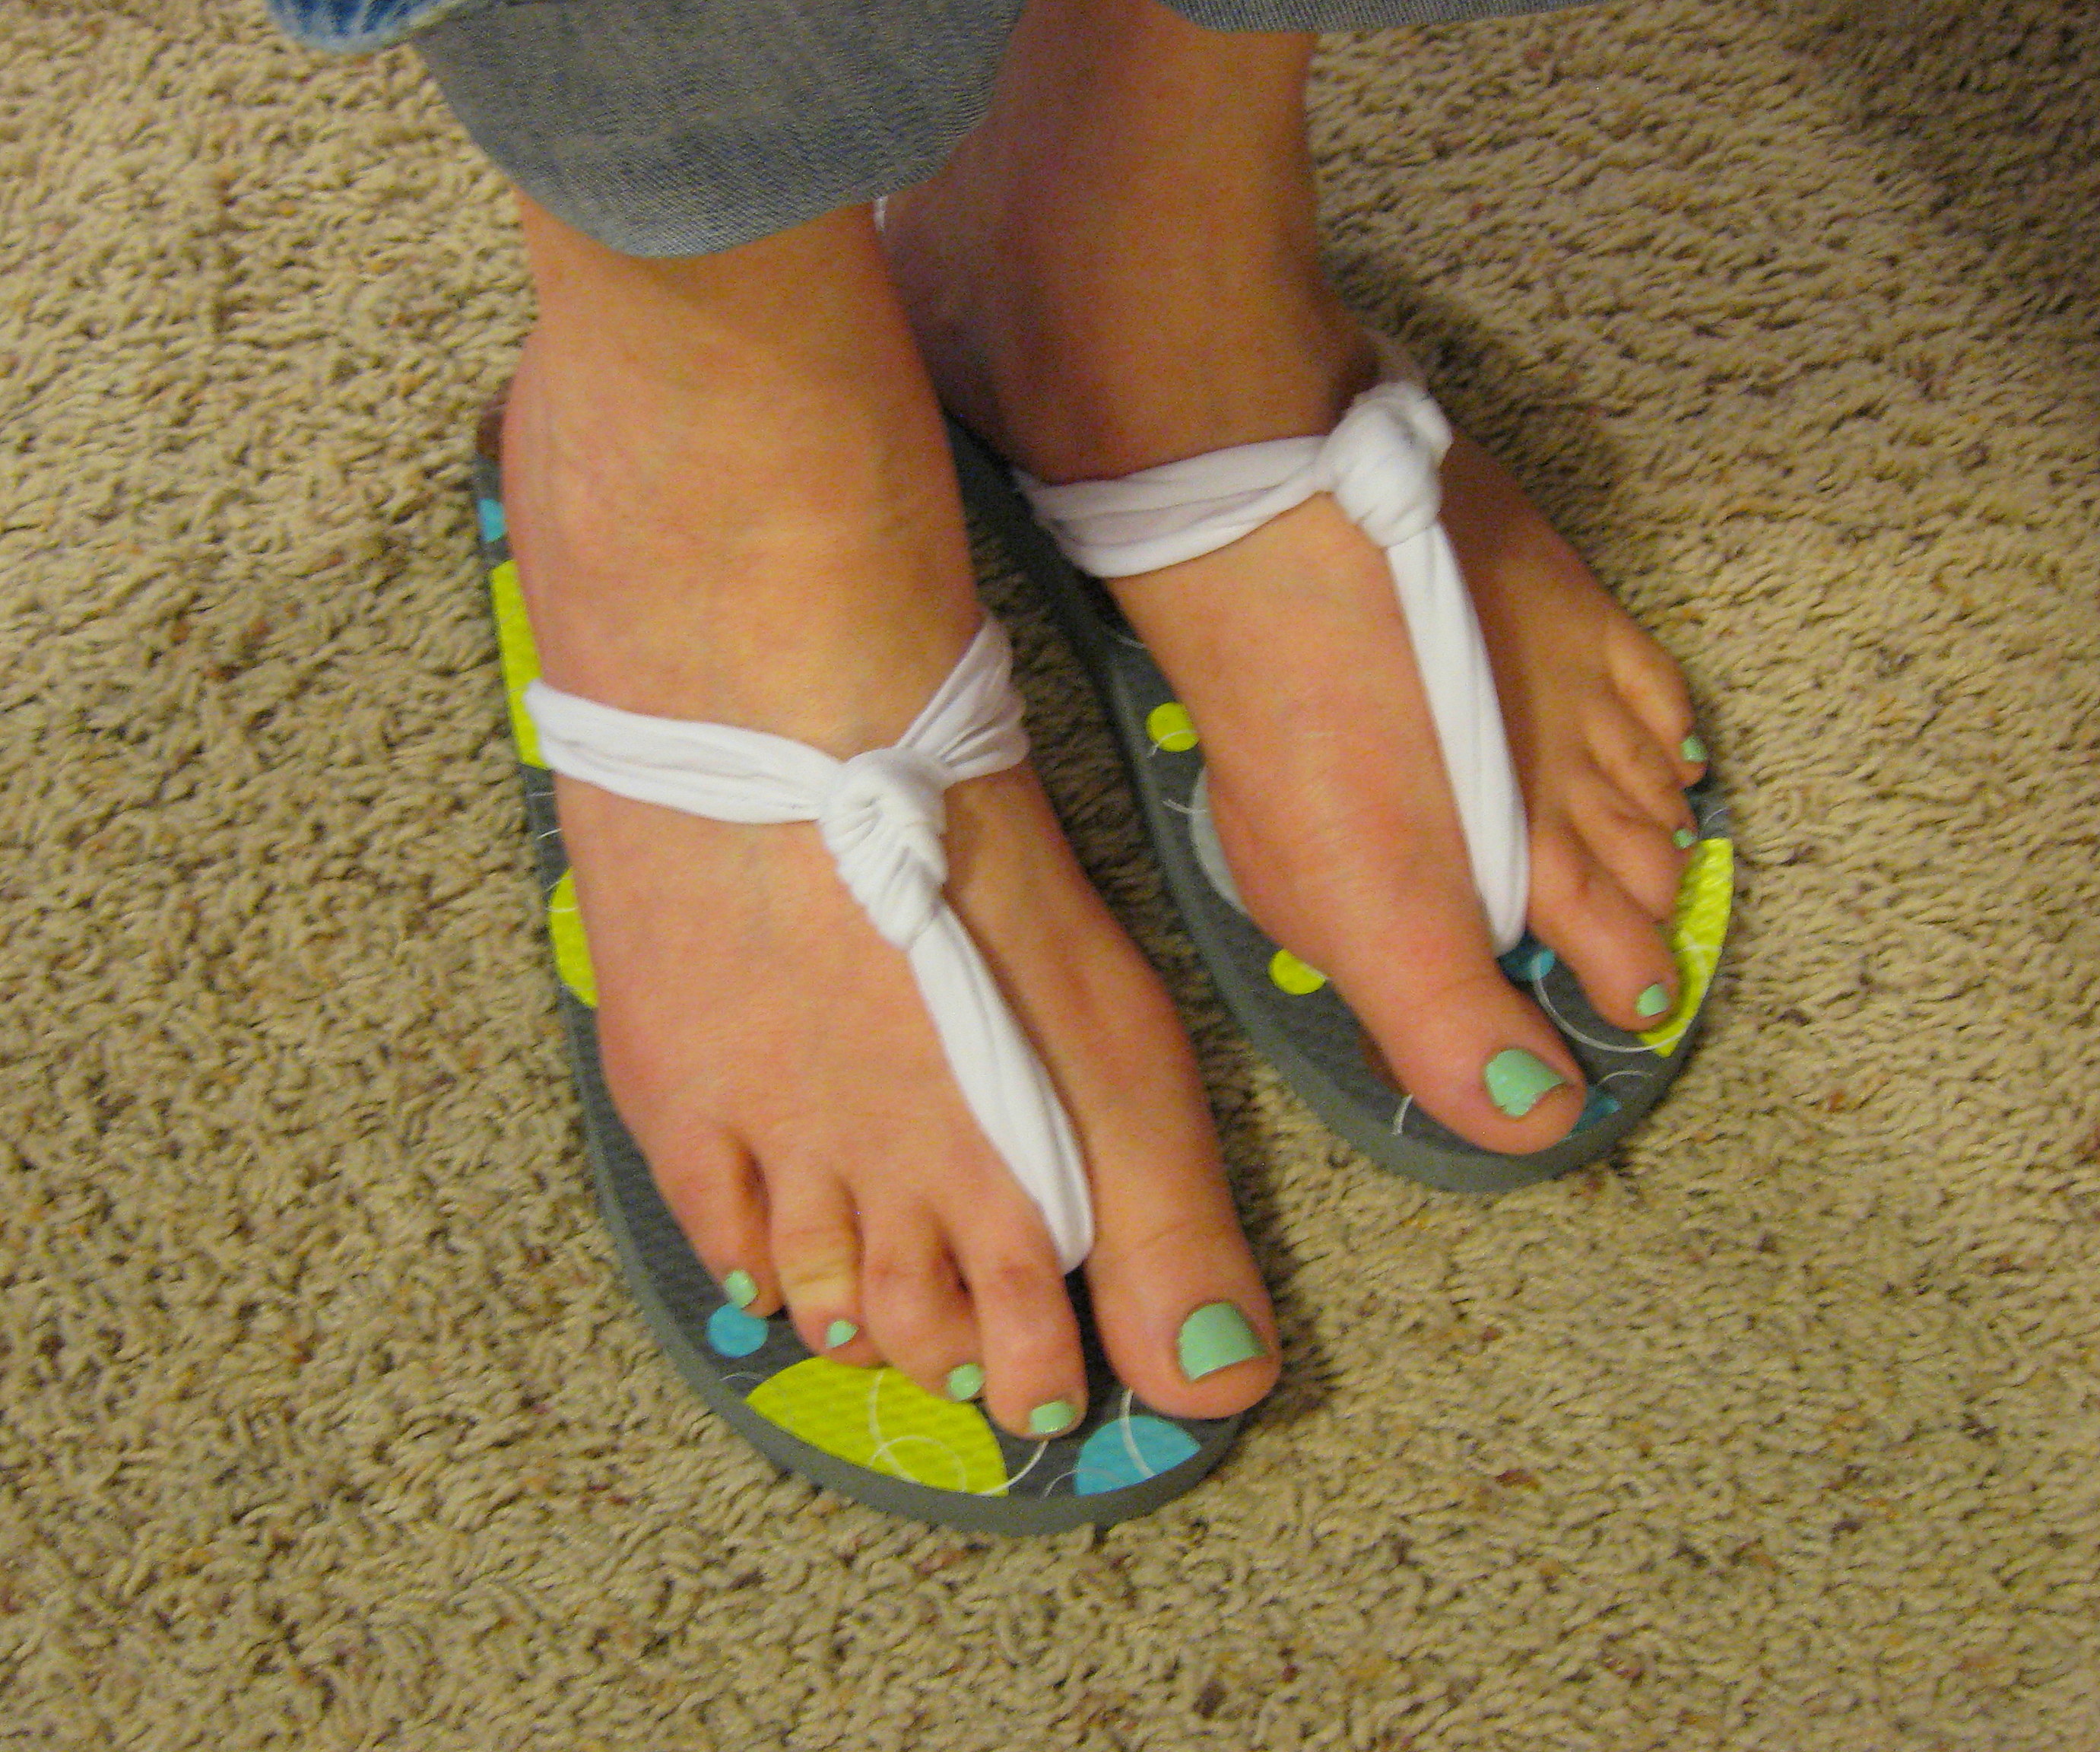
I found that the farther up my foot the knot is, the more comfortable they are to walk in. Below is a picture of a different pair I made. The knot is too close to my toes, and they aren’t as easy to walk in; I have to clench my toes to keep them on and it makes my feet tired! (Also, though, a good picture to show how easy it is to vary this basic idea. Here I used a simple polka-dotted cotton and tied a series of small knots instead of just one big one.)
Once you know where you want the knot to be, grab both fabric strips and tie a simple knot. Try the shoe on again and make sure it is in the right place. Tighten it up and arrange it so it looks just right.
I would pause now and make the other shoe up to this point so that you can make sure they look the same. Whichever direction you tied the knot on the first shoe, do it the opposite way on the second shoe (harder than it sounds!!)
Now separate the back straps and, keeping them straight and untwisted, shove them through the back two holes.
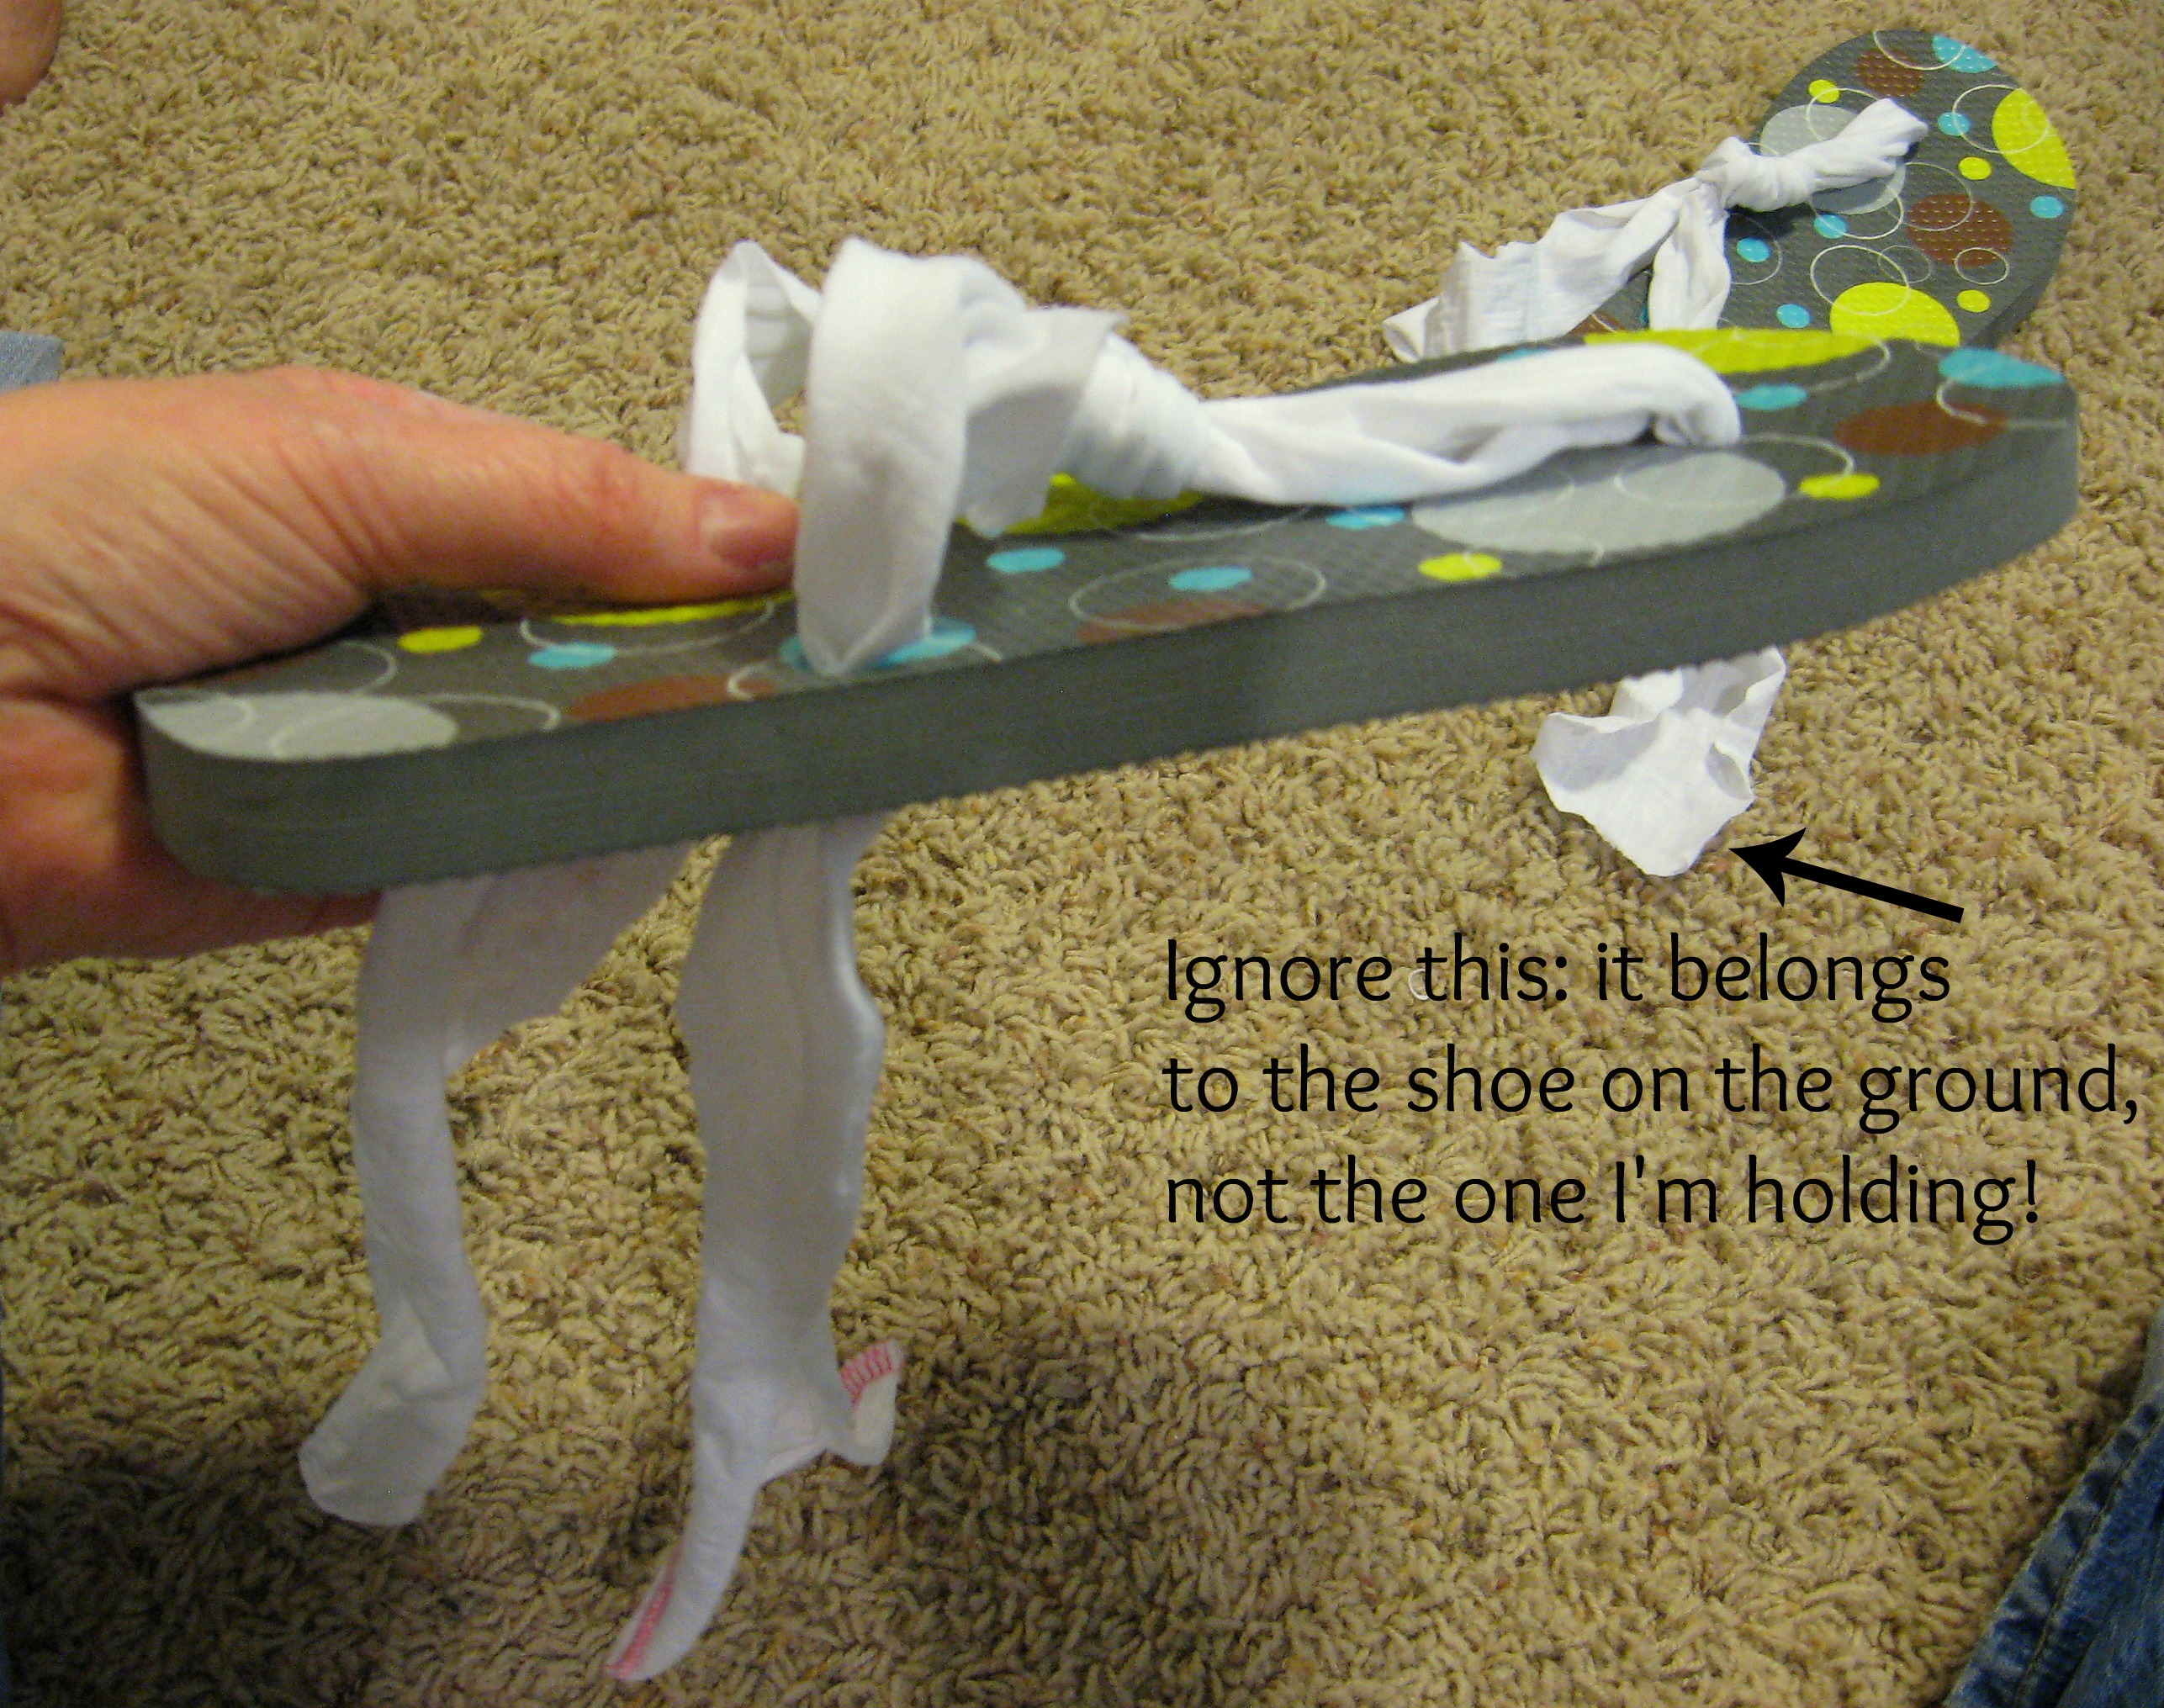
Put the shoe on again, and pull the straps through until they are as tight as you want them to be. Remember to take into account what type of fabric you are using. If I’m using something that doesn’t stretch – like cotton, I like them to be just barely snug. If I’m using something that does – like knit, I like them to be pretty tight.
Hold one of the straps underneath the shoe right where you want the knot to be and take the shoe off, keeping your fingers in that spot.

Tie that knot, then put the shoe back on and repeat on the other side.
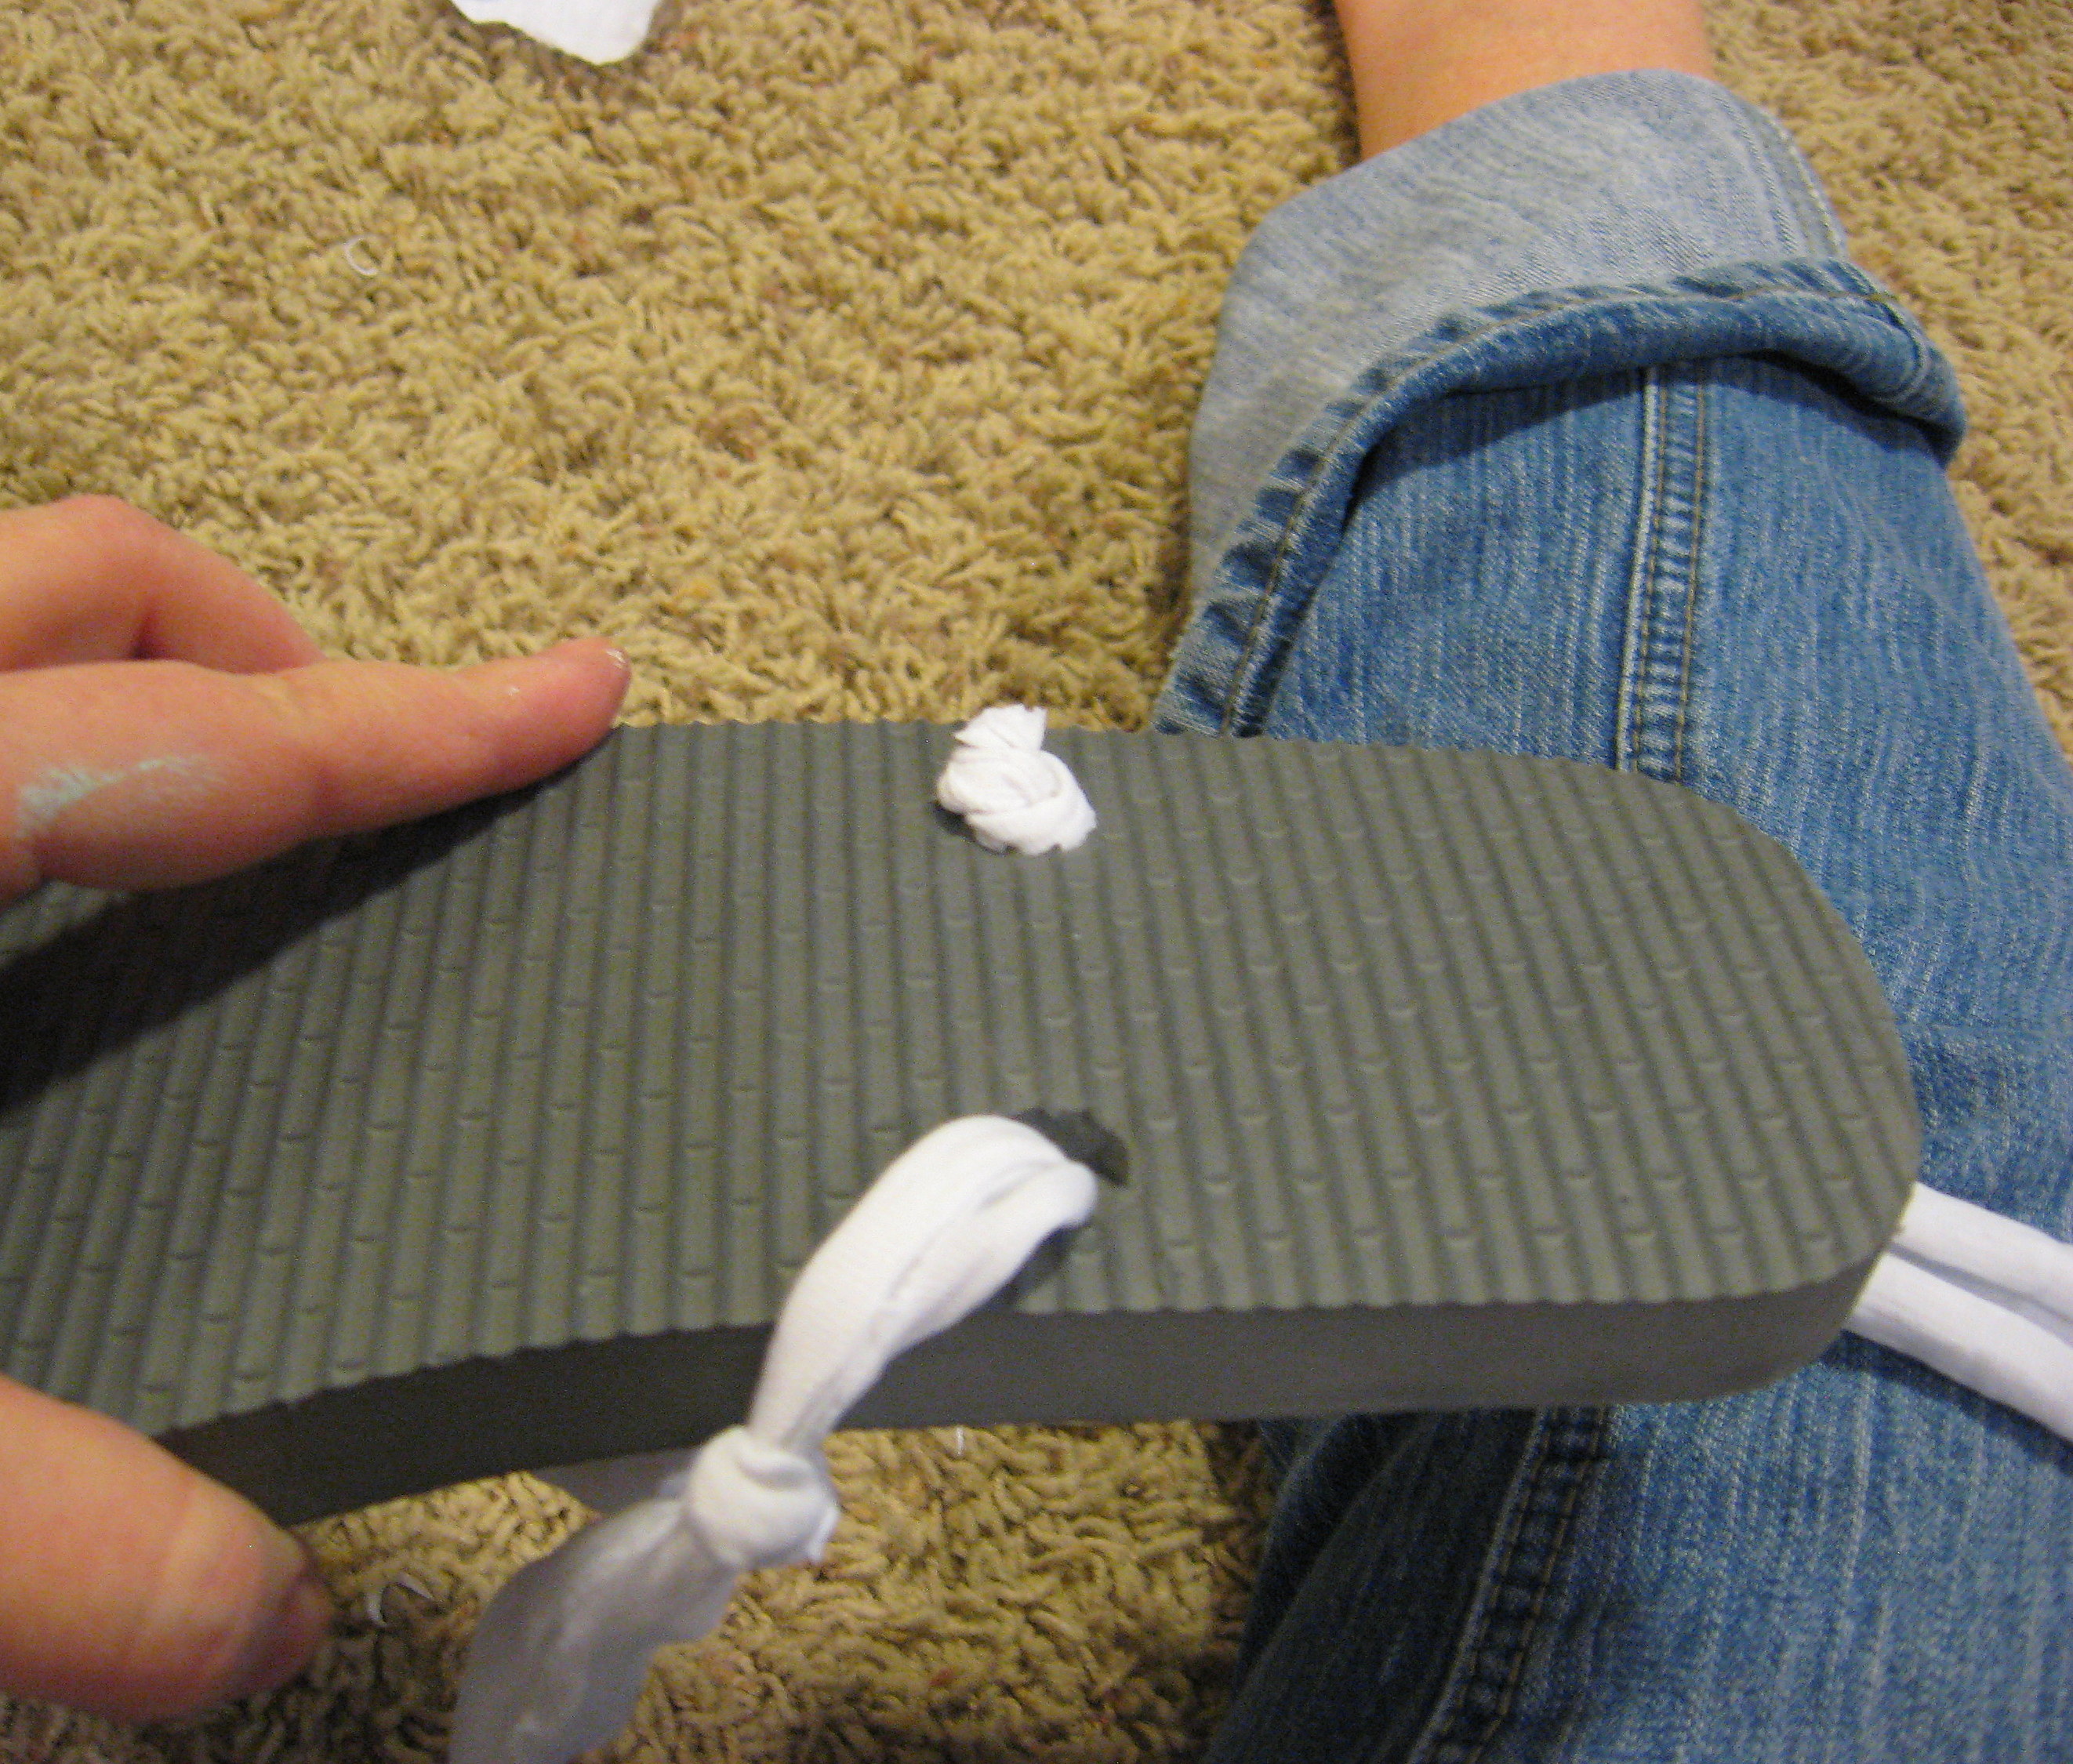
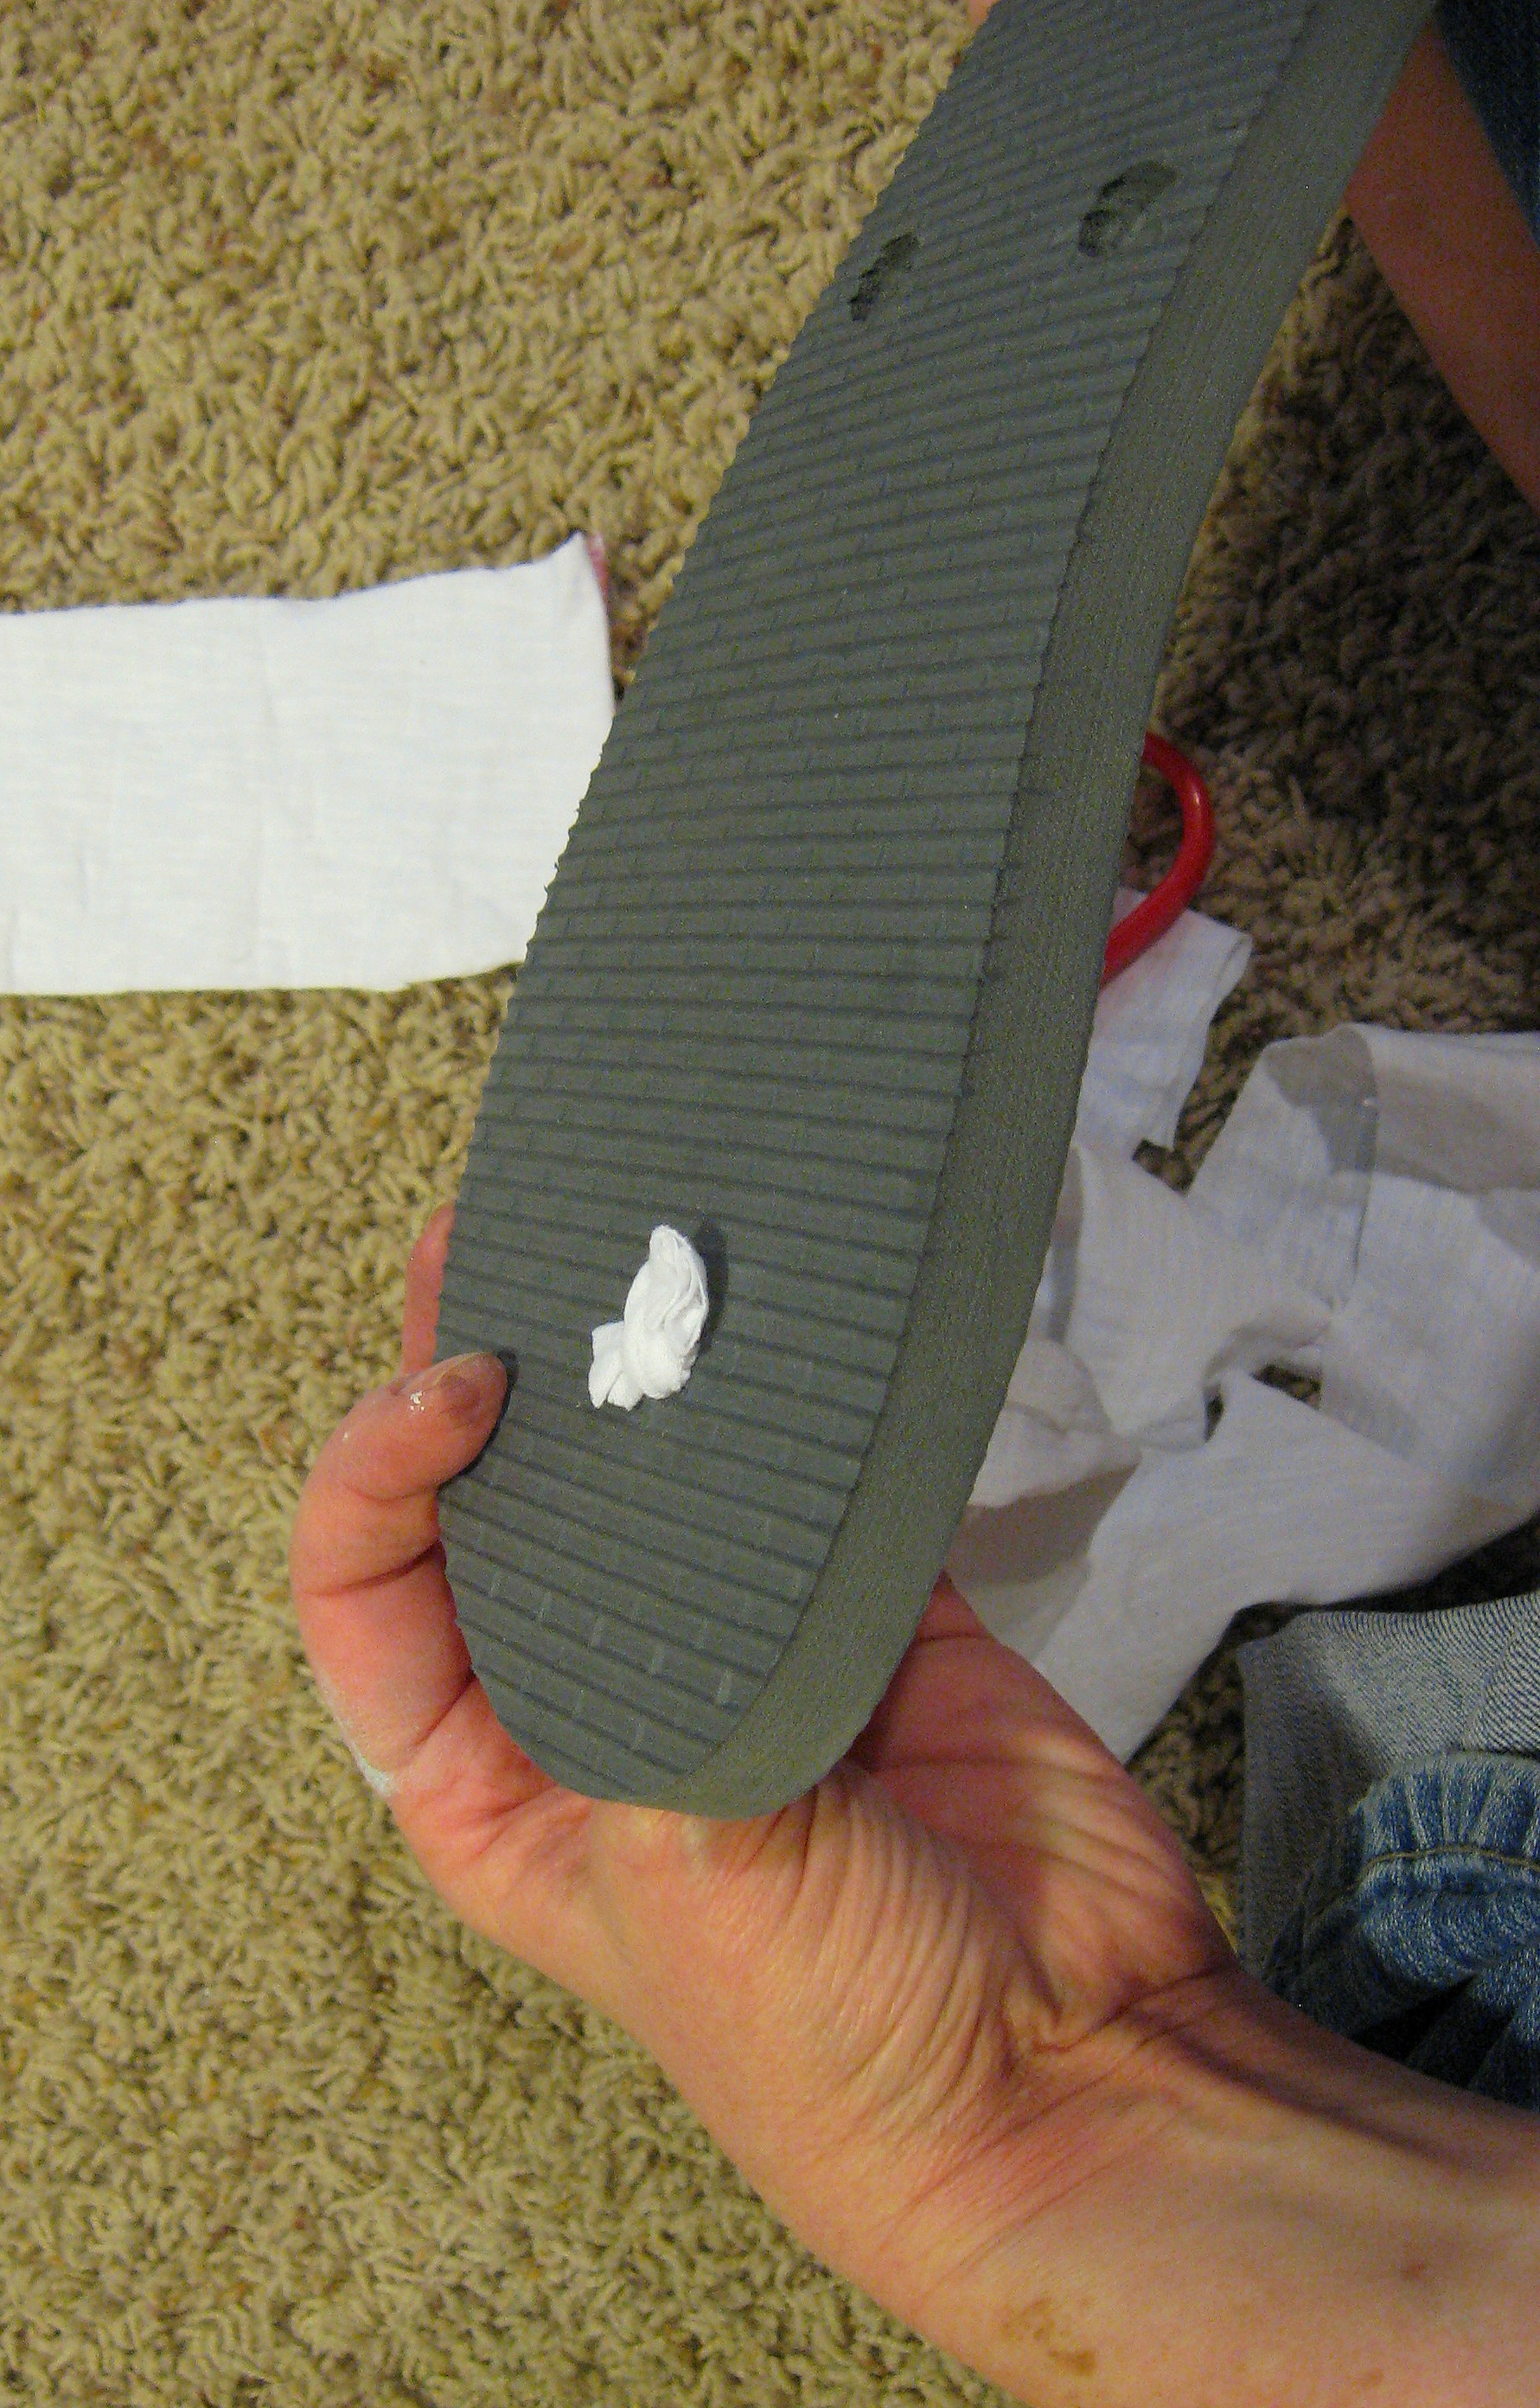
Try the shoe on again and adjust the knots if needed. Once you are sure they are where you want them to be, trim the excess fabric off the ends. Put a little dab of glue on each knot and let it dry.
Now go out and enjoy the sunshine and your fabulous cheap new shoes!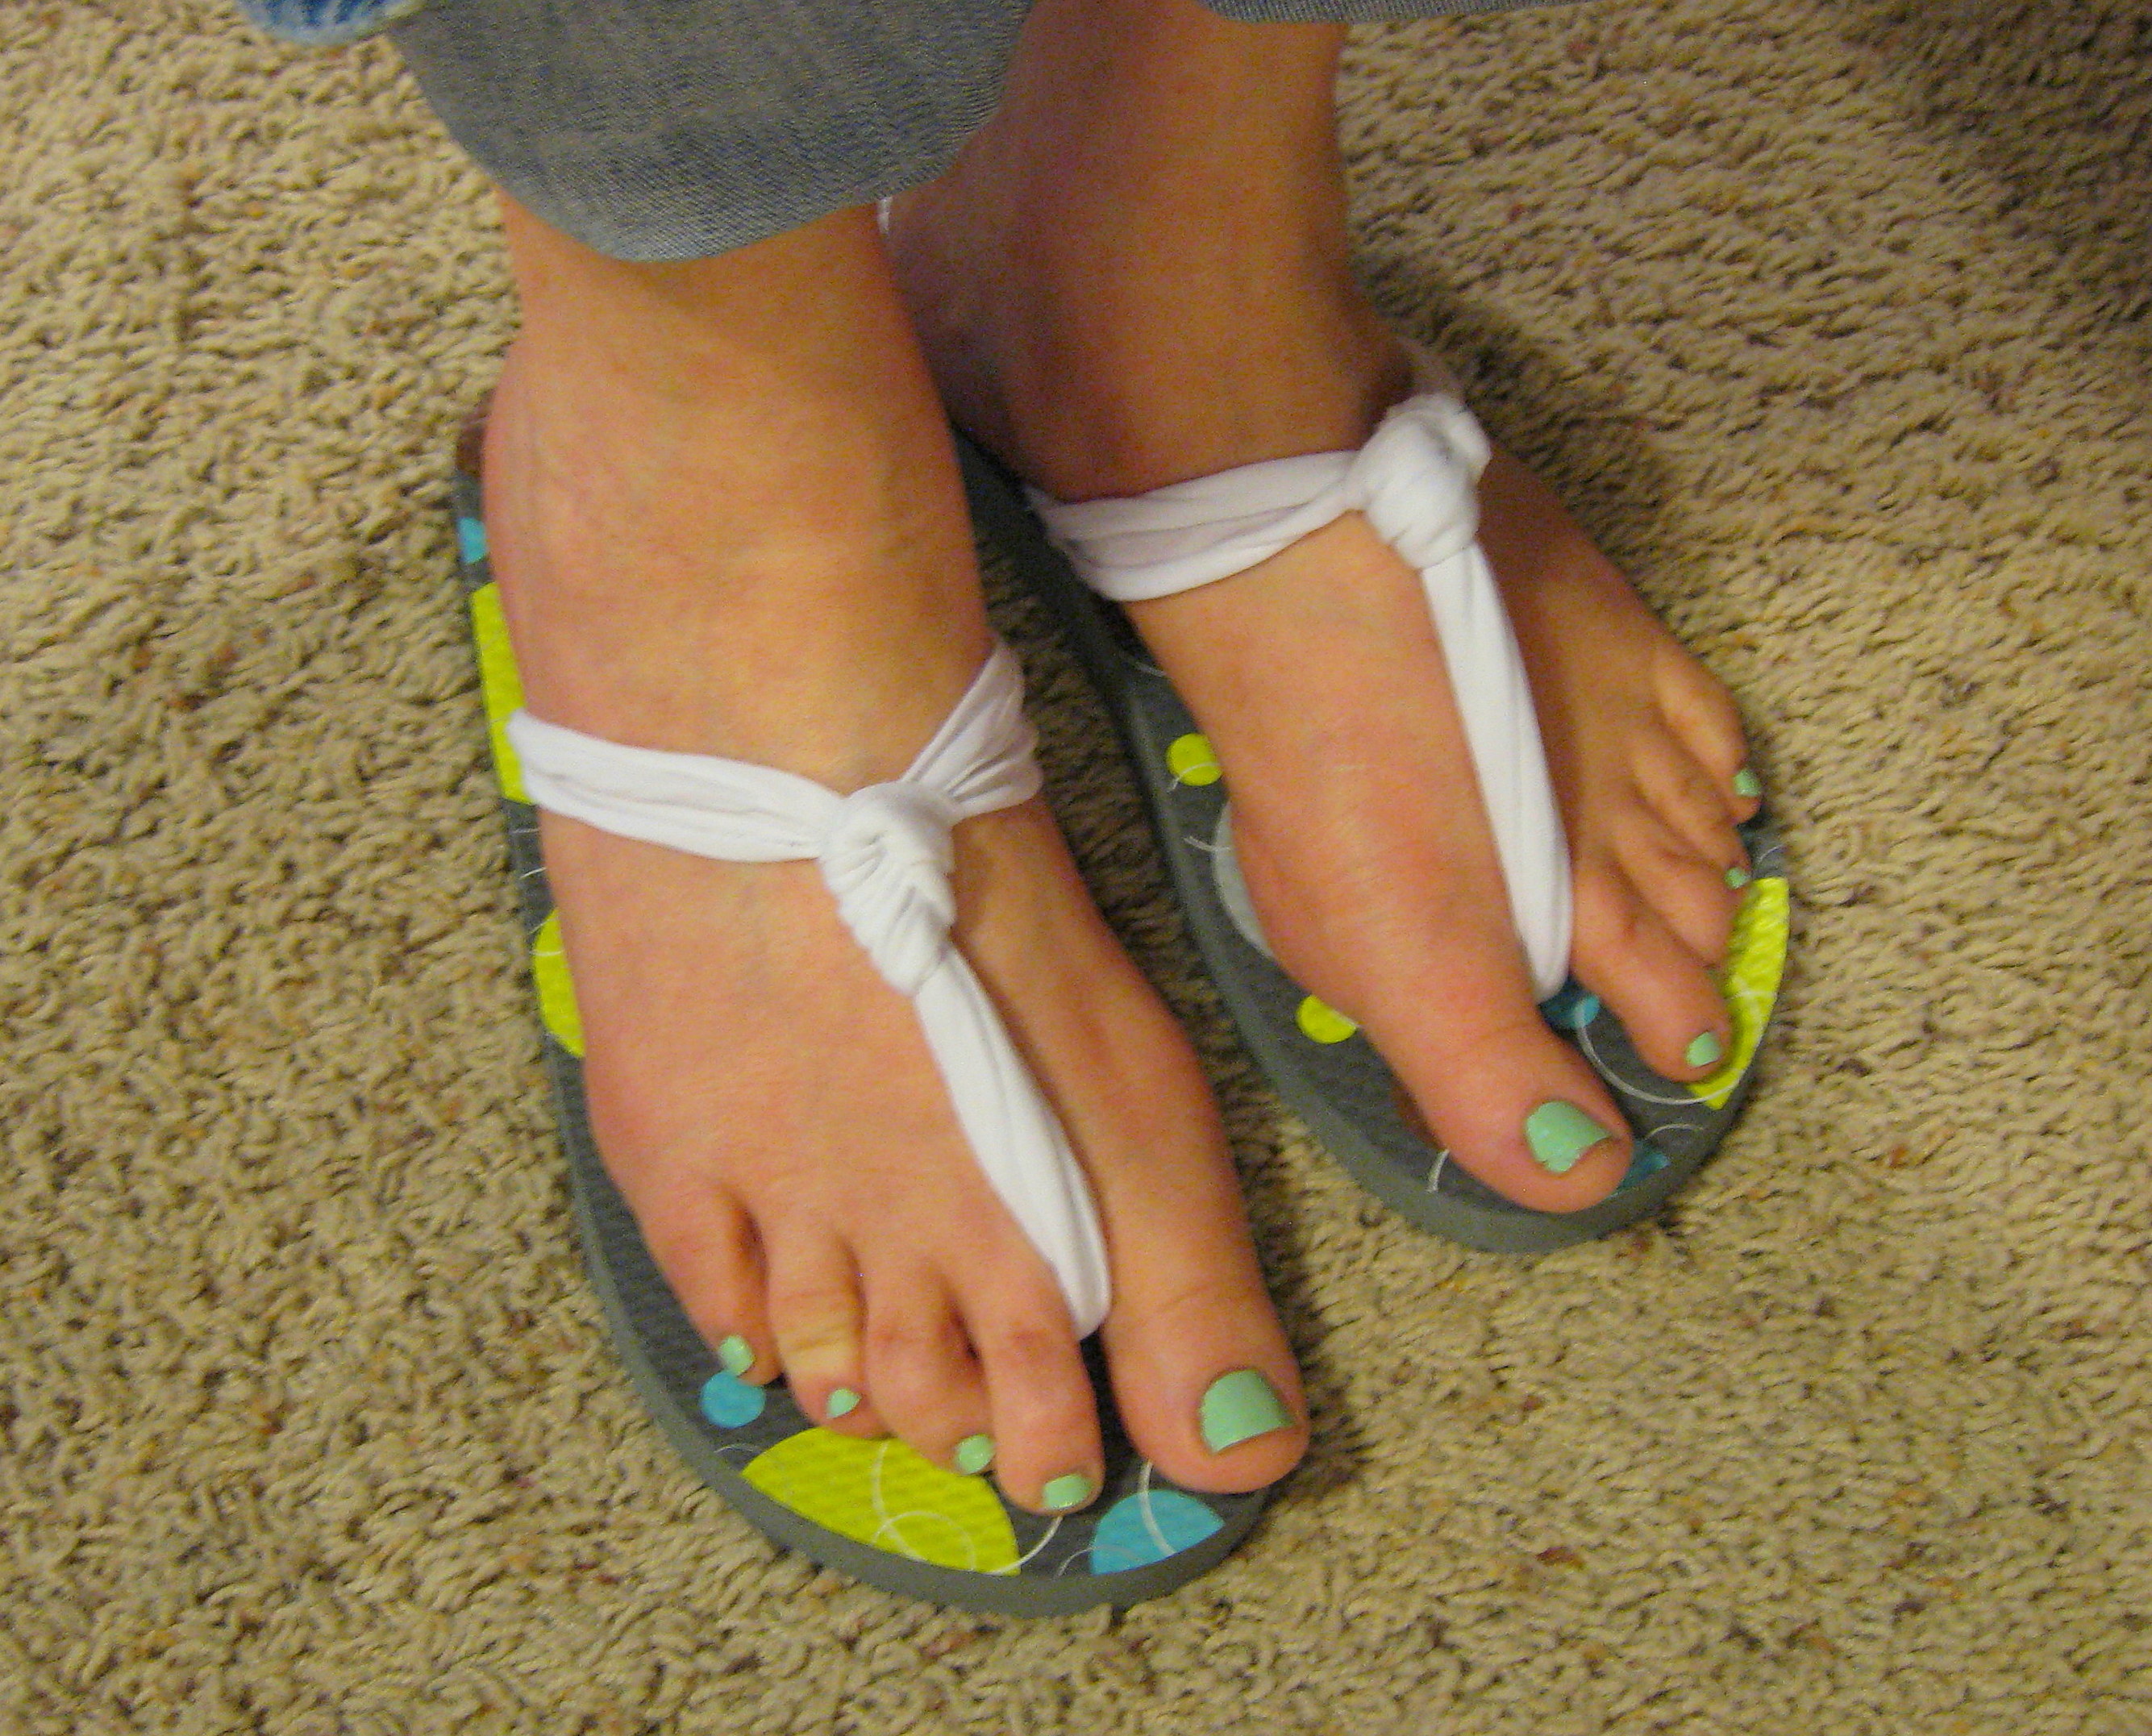

Try RitzPix.com For Free – Choose from 4 Special Offers
Select one of these offers:
20 FREE 4×6 Prints TRY38U92 OR
4 FREE 5×7 Prints TRY54K21 OR
2 FREE 8×10 Prints TRY63B78 OR
1 FREE 5×7 Folding Card TRY41Q3F
Plus, combine this offer with one of the FREE offers above…
Get 8×10 Prints Only $1 Each BIGPRINT – exp 5/15/12
Plus, get 25 FREE 4×6 Prints when you join!
Order online and pick up almost all imaging products in 1 Hour, OR have them delivered right to your door in 1 Day.
History Store Spring Sale – Buy 1 DVD Get 1 Free!
The History Store Spring Sale. Buy 1 DVD Get 1 Free! Use Coupon Code BUY1GET1.
Lots of sale priced DVDs and sets are part of the B1G1 promo!
 American Pickers The Complete Season 1 DVD Set was $29.95 now $11.99 |
 The Nostradamus Files DVD Set was $19.95 now $11.99 |
 Swamp People Season 1-2 Set was $49.90 now $29.99 |
 The Universe The Complete Season 2 DVD Set was $44.95 now $19.99 |
 The States & The Presidents DVD Set was $64.90 now $30.99 |
 WWII in HD DVD Set was $29.95 now $14.99 |
The History Store Spring Sale. Buy 1 DVD Get 1 Free! Use Coupon Code BUY1GET1.
*HOT* I Can’t Believe It’s Not Butter $1.25/1 Printable Coupon!
 Print this I Can’t Believe It’s Not Butter Product $1.25/1 coupon quickly, before it disappears. These are $0.74 after coupon at two of my local grocery stores this week! Remember, you can print each coupon twice.
Recipe: Sweetened Condensed Milk – What?!
 So, I just found out that you can make your own sweetened condensed milk. Why didn’t I think to look it up before? It is super easy and much less expensive than the alternative.
.
Ingredients: Sugar, Powdered Milk, Water, Butter
.
What you do: Put 1/2 C water + 1 T butter into a microwave safe dish and bring to a boil in your microwave. Then combine that with 1 C sugar and 1 C powdered milk in a blender and blend until well combined.
.
Besides the savings, another great reason to make your own is that you can make it sugarless by using Splenda or some other sugar substitute for your sweetening! This is best used right away, but you can refrigerate and use later with some remixing.
.
Have you ever made your own sweetened condensed milk? What did you think?
Sheet Set – Cotton Sateen 300tc – $25 Twin, $30 Full, $35 Queen, $37 King Shipped!

Real Cotton Sateen Bordeaux Luxury 300TC Stripe Sheet Set
$149.95 Retail
$19.99 + $4.99 shipping shipping
Available in Lime Green, Lemon, Beige, White, Blue & Aqua Colors and Twin, Full, Queen & King Sizes!
Please Note: The Full size sets are an additional $4.99, the Queen size sets are an additional $9.99 & the King size sets are an additional $11.99 in price.
These are real cotton bed sheets that have an 87% cotton (for comfort and softness) and a 13% polyester (for durability and longevity) combination and comes with a standard & fitted sheet and 2 pillowcases!
Discover desirable American style at its most opulent with expertly crafted and immaculately finished bedlines from the Sheradian signature range. Treat yourself to a taste of high society for a price that won’t break the bank. These brand new, luxurious 300 thread count sheets, in a stripe sateen design include two pillowcases. These sets will surely provide a lifetime of luxurious comfort!
Certified Refurbished Kindle Fire $139 shipped
Today only, while supplies last!
Link to Amazon.com Gold Box Deals

Certified Refurbished Kindle Fire – Full Color 7″ Multi-touch Display, Wi-Fi
Refurbished
Was $169.00
Now $139.00 + free shipping
Today’s Freebie Roundup 5/2
- Personalized Mother’s Day Card for your mom or mom-like figure for FREE at Cardstore.com! Mother’s Day card, add your own sayings or photos, and use coupon code LUVMOM during checkout. Shipping is FREE! Offer valid thru 05/06
- Free 30 Free Craft Projects for Mother’s Day eBook featuring 30 Mother’s Day crafts to make for Mom. Make a pretty pansy card (p. 6), candle slip covers (p. 29), mosaic bath jars (p. 42), and much more with this free eBook.
- Free Mother’s Day Jewelry Gifts: 8 Free Jewelry Making Tutorials eBook featuring 8 jewelry projects from talented craft bloggers and designers. Make a beautiful glass photo pendant (p. 7), a thumbprint heart necklace (p. 9), a thoughtful trinket keepsake necklace (p. 22), and much more with this free eBook.
- FREE Quart of Clark+Kensington Paint at ACE Hardware (5/5)
- Link to Free Android App Promo @ Amazon.com Today’s app is the Word Run Pro app
- Free Sample of Pet ‘n Shape Dog Treats.
- Participating Cinnabon bakeries will be offering one FREE Cinnabon Classic Roll to each nurse who shows his or her healthcare ID badge during National Nurses Week, May 6-12, 2012. Limit one free roll per nurse during promotional period. Valid only at participating U.S. locations.
- Dr. Oz is giving away a bunch of giveaways today. I posted a list/link HERE
- Register for L’Oreal Gold Rewards! Enroll for FREE hair color products, limited-time offers and more from L’Oreal!
- Get premium coupons now in the Coupons.com Savings Club
- FREE Garnier Miracle Skin BB Cream Sample
- FREE Pack of Oscar Mayer Selects (Coupon)
- Many CVS and Target stores have the OneTouch Ultra Mini Blood Glucose Meter for $10 this week. Use the $10 off UltraMini Meter print coupon to get it FREE after coupon.
- Amazon Prime FREE Trial
- Domino’s Pizza is giving away more FREE Artisan Pizza everyday through May 3rd. The giveaway will start at a random time each day during the giveaway period. Domino’s will give away a fixed number of FREE Artisan pizzas each day during the Giveaway Period as detailed in the chart below:
Wednesday, May 2, 2012 – 15,000 pizzas
Thursday, May 3, 2012 – 15,000 pizzas - Get a FREE Crayola Sidewalk Chalk Pack with Kids Meal purchase at Quiznos. Available at participating Quiznos locations for a limited time!
- Walgreens has Reach floss 55 yards for $0.99 this week. Use this $1 off print coupon to get it FREE after coupon. Walmart and Target sell Reach floss for around $0.99 as well.
- FREE TRESemme Split Remedy Shampoo & Conditioner Sample
- Send Mom a FREE Card and Make a Difference!
- FREE Sample Box of Quaker Oatmeal Squares Brown Sugar
- Today ONLY! FREE Gym Pass Courtesy of Fitness Magazine
- FREE Finish Quantum Dishwashing Sample
- “Like” Lakeshore Learning Facebook Page. When they reach 50,000 Facebook followers, they’ve promised to give a free educational software download to all of their Facebook followers.
- Meow Mix Sample
- Free Depends Sample Pack
- Treat.com Create a card and enter code FREETREAT at checkout to make it FREE! (There is a new code that you may want to try first TRYTREAT – it may be good for new customers only)
- “Like” Blockbuster Express on Facebook to get your promo code for a $1 discount off your next movie rental. Expires 05/03/2012.
- Food on the Table – the better way to plan meals and save money. SPECIAL OFFER: New Members can Use promo code: SPRINGFREE, throughout the month of April, and get the premium version of the service for FREE for life!
- My Survey – Take Surveys, Earn Rewards, It’s Easy & Free!
Cinnamon Lunch – Cinnamon Raisin Bread Recipe
 One the way home from school yesterday with my 6 year old we were discussing his day. He began telling me about his friends and all the exciting things that happened in his kindergarten class that day. Including how he feel asleep during math and drew a great big line down his paper when his hand slipped. It’s interesting to listen to him relate his feelings of school and friends in our one on one conversations. These times in the car result in some of the best conversations I have with my kids. When I have them all to myself in the car I feel like they are willing to share things they wouldn’t speak up and share at our crowded dinner table. I love how if I will listen to them just for a minute, during this one on one time, they start to talk about almost everything they could possibly be thinking.
When I asked my talkative six year old what we should have for lunch, he paused for a minute as if in deep thought and then replied, “ We should have a cinnamon lunch!” As he grinned at me from ear to ear. I started to think of all the things we could make with cinnamon. By the time we pulled into our driveway we had decided that we would make cinnamon bread.
As I pulled out the ingredients, mixed the bread and baked it he was actively by my side. This a simple everyday moment but one that has changed the way I think about cinnamon. As I pulled the bread out of the oven I thought “mmmm, cinnamon lunch!”
Cinnamon Raisin Bread Recipe
1 1/2 cups milk
1 cup warm water
2 packages active dry yeast
3 eggs
1/2 cup white sugar
1 teaspoon salt
1/2 cup margarine, softened
1 cup raisins
8 cups all-purpose flour
2 tablespoons milk
3/4 cup white sugar
2 tablespoons ground cinnamon
2 tablespoons butter, melted
1. Warm the milk in a small saucepan or microwave until it bubbles, then remove from heat and let cool.
2. Dissolve yeast in warm water, and set aside until yeast is frothy. Mix in eggs, sugar, butter or margarine, salt, and raisins. Stir in cooled milk. Add the flour gradually to make a stiff dough.
3. Knead dough on a lightly floured surface for a few minutes. Place in a large, greased, mixing bowl, and turn to grease the surface of the dough. Cover with a damp cloth. Allow to rise until doubled.
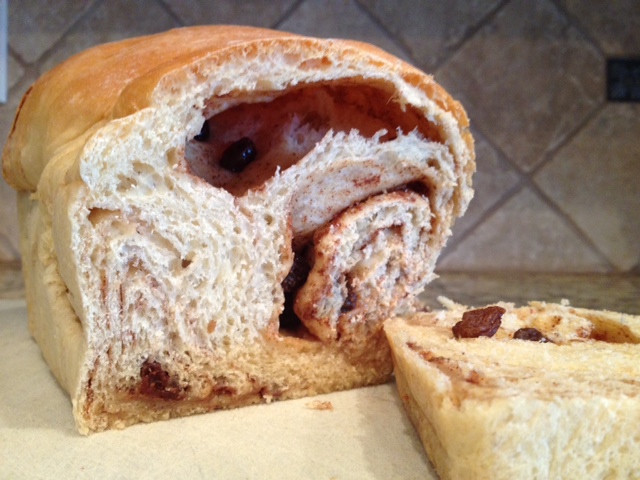
4. Roll out on a lightly floured surface into a large rectangle 1/2 inch thick. Moisten dough with 2 tablespoons milk. Mix together 3/4 cup sugar and 2 tablespoons cinnamon, and sprinkle mixture on top of the moistened dough. Roll up tightly; the roll should be about 3 inches in diameter. Cut into thirds, and tuck under ends.
5. Place loaves into well greased 9 x 5 inch pans. Lightly grease tops of loaves. Let rise again for 1 hour.
6.Bake at 350 degrees F for 45 minutes, or until loaves are lightly browned and sound hollow when knocked. Remove loaves from pans, and brush with melted butter or margarine. Let cool before slicing.
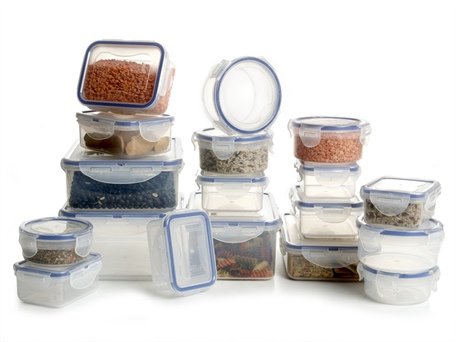 Lock & Lock 36-Piece Set