
How to Save the Most with Amazon’s Subscribe & Save
 Shopping from home is so easy these days. I love being able to score amazing deals from the comforts of my own home. Amazon’s subscribe and save is awesome and can save a TON of money. However, there are some tips you need to know to make the most out of your money. Here are 6 tips you want to check out before you shop.
- Prices on Amazon change all of the time. When you buy an item with subscribe and save, the price will be different the next time you get that shipped to you. So be aware and ALWAYS check your subscribe and save orders each month before they ship out. If there is a great price still, then keep it going. If it’s higher, then be sure to unsubscribe.
- Buy 5 or more items for your delivery and you will save an added 15% off EACH item instead of the normal 5% off. This is a definite must if you are close to 5 items. I always check Freebies2deals Amazon SS category and see what deals are available to hit my 5 items. There are usually items I always need anyway. Some exclusions do apply, like diapers.
- Use coupons with your subscribe and save orders. Be sure to head here to the coupons page on Amazon. You can choose to display just the Subscribe and Save items. These coupons can be stacked with the subscribe and save price as well as the extra 15% off with your 5 or more items.
- Join Amazon Family and save up to 20% on your items of 5 or more for diapers, wipes, baby food and more. If you have little kids, this is a definite must!
- Each item you buy will have an option on how often you want your item to be delivered. You can do every month or up to every 6 months. I would choose every 6 months just to give you a lot of time to cancel if needed.
- Skip or Cancel anytime. Amazon is actually really good at sending email reminders of when your Amazon SS delivery will be delivered. So set reminders to skip or cancel your orders. Just head to your Amazon account and go to your subscribe and save items. It will show you the items and delivery date. Then you can change the date or unsubscribe.
How to Make Cake Mix Cookies- Perfect for Santa’s Christmas Eve Cookies
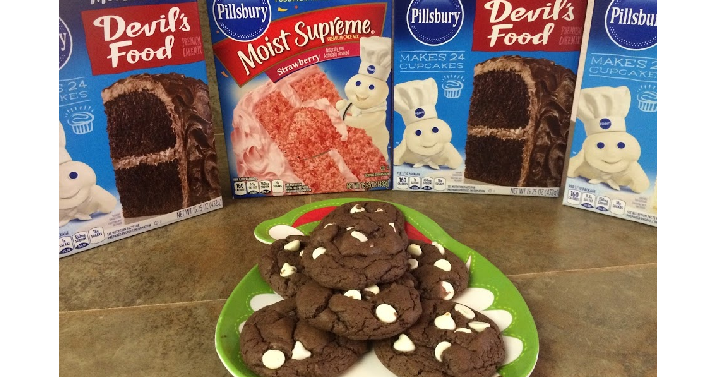 I love making cookies, especially at this time of year. I turn on a little Christmas music and get baking. I had to share with you one of my most favorite cookie recipes. These cake mix cookies are AWESOME. What makes them awesome? They are fool proof. Seriously. It requires little ingredients, not a lot of time, and they turn out great! You can also make them with a variety of cake mixes and add in different candies, chips and sprinkles. YUM! Kids can even help with this recipe. I like to have them help me with these cookies for Christmas Eve. Then we leave a few out for Santa. I hope you enjoy these as much as our family does.
Ingredients:
1 Package Dry Cake Mix of your choice
1/3 Cup Oil
2 Eggs
Directions:
Mix all ingredients together well with a fork or spoon. Roll balls into 1-1 1/2 inch balls. Place on a greased cookie sheet. Bake at 350 for 10 minutes. Don’t over bake. Once they start to crack on top they are done!
**You can mix and match cake mixes and add ins. Try making a devils food cake mix with mint chocolate chips. You can also get a vanilla or lemon cake mix and add in sprinkles. Try a chocolate cake mix and add in crushed peanut butter cups. There are so many different ways to make these and they are always yummy!
How to Make a Christmas Centerpiece for Under $5
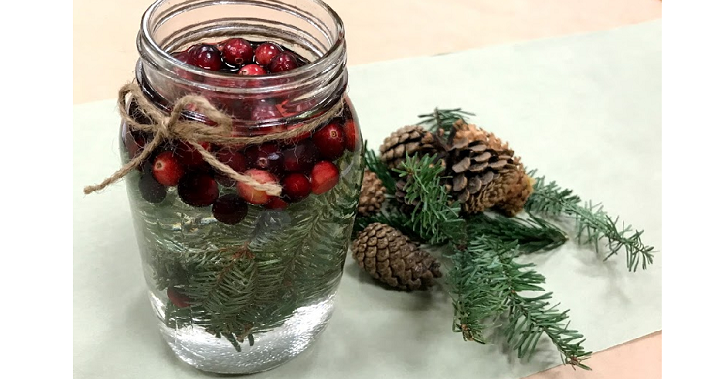 If you want a super cute Christmas centerpiece but don’t want to spend a lot of money, check this out. Recently I was in charge of a large Christmas dinner where we had to feed 350 people. I had 36 tables to decorate with only $40 dollars to spend on decor. Crazy right? For the center piece I came up with a super simple, yet classy idea of a mason jar, cranberries, fresh pine, water and a cute burlap tie. Then on the tables I gathered cute pine cones from outside (free!), left over pine branches and spread them down the table. We had the tables covered in white paper, then ran a green paper down the middle for the table runner. That’s it! Super simple and we stayed under our $40 budget. It looked really nice too. If you want a cute Christmas centerpiece on a budget, then be sure to try this out.
Christmas Cranberry Jar Centerpiece
Items you will need:
Mason Jar or Glass Vase (use ones you have on hand or borrow from a neighbor if you need a lot)
Fresh Cranberries- about a 1/2 cup- 3/4 cup per jar (found at your local grocery store in the produce area)
Water
Burlap twine
Fresh Pine tree branches (go to a local tree farm and ask for the leftover branches-FREE!)
Directions:
Wrap the burlap twine around the top of the vase or mason jar
Add the fresh pine branches to the bottom and add in your cranberries
Fill the mason jar or vase with water so the cranberries get to the bottom of the ring
That’s it! You can make a ton of these for super cheap.
Ultimate Stocking Stuffer List for the Whole Family!
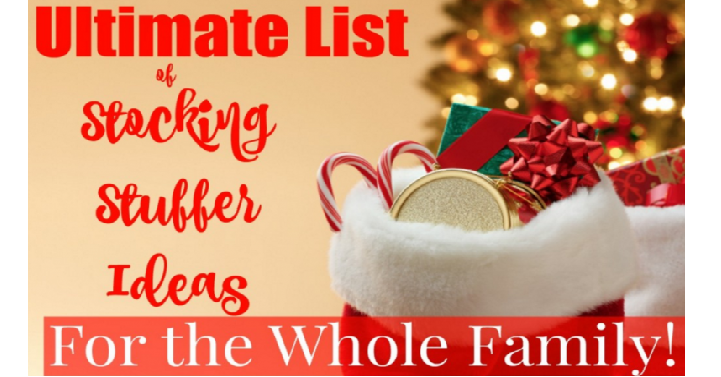
Christmas is just a few weeks away. If you’re getting done with your presents, you may still have your stockings to finish. I like to have some fun, unique ideas to put in stockings. Here is a fun list for dad, mom, teenagers, kids, babies, and pets. A good place to find most of these items is your local dollar store. If you want to shop from home for these items you can always use Amazon, Target and Walmart. These stores have competitive prices and you can get them shipped right to your home!
Stocking Stuffers for Dad
- Deck of Cards
- Canned Nuts
- Golf Balls
- DVD’s
- Hand Warmers/Feet Warmers
- Gum/Tic Tacs
- Deodorant/Body Spray
- Cologne
- Magazines
- Sunglasses
- Drill Bits
- Mini Flash Lights
- Gift Cards- Home Depot, Movie Theaters
- Socks
- Tie/Bow Tie
- Tie Clip
- Texting gloves
- Hair Gel
- Razor & Shaving Cream
- Pocket Knife
Stocking Stuffers for Mom
- Hand Lotion
- Lip Balm/Lipstick
- Face Mask
- Hair Elastics
- Note Book
- Gift Cards- Spa, Restaurants
- Nail Polish
- Favorite Candy/Chocolate
- Nylons/Tights
- Jewelry- Earrings, Necklace, Bracelet or Rings
- Tide Stain Sticks
- Makeup
- Texting Gloves
- Flower Seeds
- Beanie
- Perfume
- Dry Shampoo or Hair spray (Trial Size to fit)
- Scarf
- Makeup Remover Wipes
- Candles
Stocking Stuffers for Teen Boys
- Mini Cereal Box
- iTunes Gift Card
- Body Spray/Deodorant
- Hair Gel
- Key Chain
- $1.00 bills
- Tie/Bow Tie
- Pencils/Pens
- Texting Gloves
- Beanie/Hat
- Favorite Soda
- Card Games
- Favorite Candy
- Gum
- Flash Drive
- Comic Book
- Ear Buds
- Hacky Sack
- Car Air Freshener
- Phone Case
Stocking Stuffers for Teen Girls
- Chapstick
- Nail Polish
- Gum
- Journal
- Ear Buds
- Magazines
- Texting Gloves
- Hair Spray/ Hair Gel
- Jewelry- Necklaces, Earrings, Bracelets or Rings
- Cute Socks
- iTunes Gift Card
- Mini Cereal Box
- Perfume
- Magnets for lockers
- Glitter Pens
- Beanies/Hats
- $1.00 Bills
- Key Chains
- Favorite Candy
- Favorite Soda
Stocking Stuffers for Boys
- LED Glow Sticks
- Books
- Book Light
- Favorite Candy
- Hot wheels Cars
- Slinky
- Life Saver Story Books
- Tie/Bow Tie
- Watch
- Piggy Bank
- Slime
- Electric Toothbrush
- Tsum Tsum
- Homemade Gift Cards- (“Stay up Late”, “No Chore Day”, “Out to Lunch”)
- Bath Color drops
- Bubbles
- Crayons
- Favorite Soda
- Character Gloves
- Mini Cereal Box
Stocking Stuffers for Girls
- Life Saver Story Books
- Electric Toothbrush
- Jump Rope
- Watch
- Silly Puddy
- Backpack Keychain
- Glow Sticks
- Tsum Tsum
- Homemade Gift Cards- (“Stay up Late”, “No Chore Day”, “Out to Lunch”)
- Character Gloves
- Favorite Soda
- Glitter Pens
- Chapstick
- Stickers
- Small purse
- Favorite Candy
- Hair Bows/Headbands
- Tights/Leggings
- Crayons
- Bubbles
Stocking Stuffers for Babies/Toddlers
- Tsum Tsum
- Bubbles
- Teething Toys
- Gerber Puffs
- Baby Food
- Mini Books
- Hair bows
- Soft mini blanket
- Bibs or Burp clothes
- Rattles/Small toys
- Hats & Gloves
- Shoes
- Fun Socks
- Plush Toys
- Finger Puppets
- Board Books
- Fruit Snacks
- Finger Paint
- Sunglasses
- Play-Doh
Stocking Stuffers for Dogs or Cats
- Chew Toys
- Leash
- Collar
- Teasers for cats
- Treats
- Holiday bows
- Tennis Balls
- Sweaters
- Stuffed Animals
- Dog shoes
- Grooming Supplies
- Clothing/Outfits
I hope this list will help you out and give you a few ideas of what you can add to your stockings. Do you have any other favorites? Comment and let us know!
25 Days of Christmas Activities on a Budget
 This a great time of year to spend time with family and friends. There are so many fun events and traditions to do during the month of December and you really don’t need to spend a lot of money on them. We love doing something every day in the month of December to get us in the Christmas spirit. Here are 25 activities that won’t cost you lot of money and will help you get ready for Christmas.
- Find a new sledding hill
- Host a “Favorite Things” party
- Decorate your home inside and outside with lights and decor
- Read a Christmas story and snuggle
- Find a family in need and drop off a Christmas goodie
- Go caroling around your neighborhood or to a care center
- Write Christmas cards to family members who live far away
- Make homemade ornaments for the tree
- Buy a favorite cereal, wrap it up, place it under the tree. In the morning have the kids open the boxes and eat their favorite cereal
- Make a gingerbread house. Make it extra special by inviting a neighbor over to help
- Family drive in search of Christmas lights
- Shovel driveways for your neighbors
- Make snowflakes out of paper and put them around the house
- Make sugar cookies and deliver to neighbors
- Host a “Polar Express” night where friends come in pjs, you watch the movie and have hot chocolate and popcorn
- Shop for presents for siblings or cousins
- Go visit Santa at a new location
- Watch a new holiday movie
- Attend a local Christmas party, tree lighting, or holiday parade
- Donate a toy(s) to a local shelter or family that may be in need
- Build a snowman and make a snow angel
- Attend a Christmas church service
- Make and wear an ugly sweater
- Have a snowball fight
- Read Luke 2 in the Bible and act out the Christmas story
5 Tips When Hosting Thanksgiving Dinner
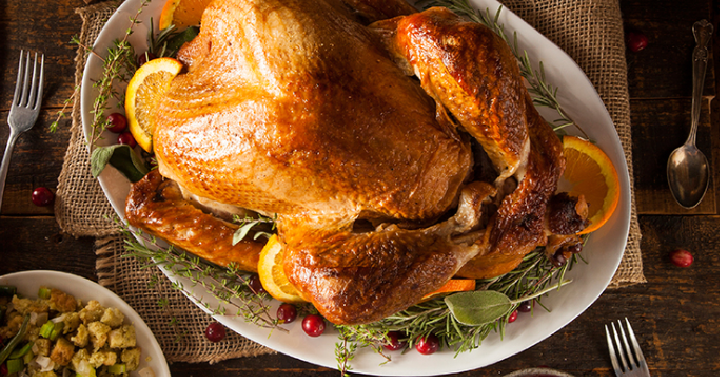
I love Thanksgiving, it makes me happy having family together and the conversations we get to have. It’s a great time to catch up on life and strengthen those relationships. If you are the lucky ones hosting the big day, then you’ll know it’s quite a big undertaking. You need to think about the food, table settings, decor, and entertainment. Hopefully these 5 big tips will help you have a successful Thanksgiving.
- Get ready now. If you don’t have the day planned out, you’ll want to sit down and write it out now. Schedule out time of when people will be arriving, what you will be eating, food assignments, and then take note of what how many will be coming. Take time of when you should thaw the turkey -it’s days before, so be aware of that! Also, be sure you know the times you will be cooking the rest of the food.
- It’s best to have more than not enough. After you have the number of people coming, then plan out how much food you need of each. It’s so much better to have more food than not enough. So go big! Leftovers are just fine.
- Set the table and get house ready the day before. This is a huge help to have your home cleaned and your table set the night before you start cooking. That way you can focus on the food and welcoming your guests and not be too overwhelmed.
- Make as much food ahead as possible or delegate. This will help you out too if you can make the pies and other items ahead of time. This will save not only time but on clean up. You’ll have a few items already make and the mess cleaned. Be sure to delegate out food too that might be time consuming.
- Be prepared with games or activities for kids to keep them busy. This will definitely help with noise and happiness when everyone has something to do, including the kids. You can have someone in charge of bringing activities or crafts for the kids.
Tips For Shopping Black Friday 2018
 Black Friday ads are already out, are you ready? Every year the ads come out earlier and earlier and it actually makes me excited. I love saving money and getting my Christmas shopping done early. There are so many deals and stores that participate so it can be a little overwhelming too. Here are a few tips while shopping this Black Friday.
Make a list. You can’t start your shopping unless you know what you are shopping for. It’s also a good idea to right a price point for each item. That way you can know what a good deal is. Have your whole family write down their lists as well. Be sure to include gifts you need to buy for in-laws and neighbors. Once your list is written down, you are ready to shop!
Compare Stores for the Best Deals. Now that most ads are out, you can compare the items you want with the different stores that have them for Black Friday. Which store has it for the best price? If you don’t want to hunt each store, be sure to follow Freebies2deals to help you out!
Buy Now if Possible. Once you have your items written down, your price points, and where you will buy them, then be on the look out for those items going on sale NOW. If you see that price or even a lower price, then buy them NOW. Seriously, a lot of stores are doing doorbuster deals which might include some of your items, so be on the lookout.
Have your Coupon Codes, Gift Cards Ready. Each store will have added ways to save money. So check their website for coupon codes. Be sure to grab those gift cards you may have on hand. You want to use them! You can also sign up for emails. This is a great time to have these deals emailed directly to you.
Be Quick! You’ve probably experienced Black Friday where you have all of the items in your cart, just to find out that when you check out half of your items are already out of stock. That can be frustrating! There are limited number of items for just about every Black Friday deal. So, when you are online and ready to purchase your items, be quick and check out fast. Most items can be returned if you change your mind.
How to Make a Christmas Countdown Chain Using Your Halloween Candy!
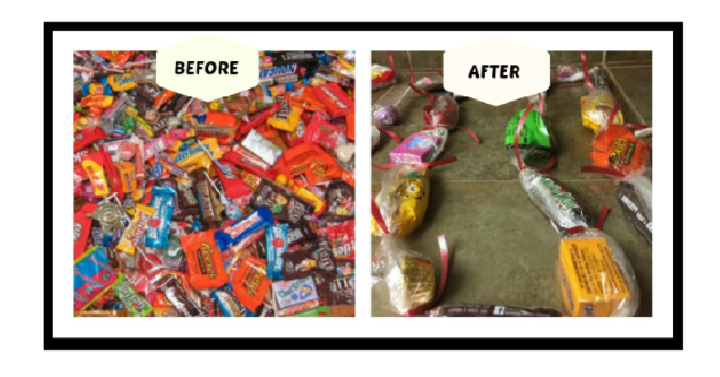 Now that Halloween is over, do you have a TON of candy? What do you do with it? How do you minimize the intake of sugar for your kids? Here is a great way to solve all of your questions- Make a Christmas Countdown Chain! This chain seriously saves me from kid tantrums and tears. Instead of them asking every 10 minutes if they can have another piece of candy, they know that they get one piece a day and each day means it’s closer to Christmas! It does take some time, but the kids can help you out! Here’s how you do it:
Supplies you need:
Plastic Wrap
Ribbon or Yarn- cut into strips long enough to tie
Scissors
Halloween Candy (# depending on when you start your chain-days to Christmas.)
Directions:
Stretch your Plastic Wrap out and keep it straight. Don’t cut it off until you are completely done. Tie Ribbon on the end and add in your first piece of candy. Next you’ll want to wrap the plastic wrap around the candy and twist the end a few times so the candy doesn’t fall out. Then add another ribbon. Repeat this step until you have all of your pieces in your plastic wrap. End the chain with another ribbon-twisting before you tie. That’s it!
Tips:
#1: If you have more than one child, consider using different colors of ribbon or yarn for each kid. That way they know which chain is theirs just by looking at the color.
#2: Remember to twist the wrap after each candy, otherwise they tend to fall out.
#3 If you don’t have enough pieces to go all the way until Christmas, consider going until Thanksgiving or even through the month of November. There can be different ending times, depending on the amount of candy you have.
Tahiti Village Resort & Spa: 7 Tips to Know Before You Go
 You may have heard of Tahiti Village Resort and Spa located just outside of the Las Vegas strip. It’s a family friendly resort with an amazing pool and a lazy river. To make it even better there are a lot of things that are free and available to you while you are staying at the resort. Here are a list of 7 tips you’ll want to know before you go.
- When you check in as for a “Welcome Packet.” This is basically a pile of coupons that you can use on your stay. They also give you a paper with a list of 100 free things to do in Vegas. Another quick note-if you are hoping to do a Las Vegas show-once you are on the strip you will see a lot of booths with 1/2 price show tickets available. Check those out, they really do have cheaper tickets than what you may find online.
- There is a free shuttle to the Las Vegas Strip. This is offered every 30 minutes. You can check the front desk to see what the times are for that day. This was super helpful for our family. That way you don’t need to find and pay for parking on the strip.
- The resort offers free activities and crafts throughout the week. While we were there they had free root beer floats, Halloween crafts, bingo and more. You’ll see the schedule for your week at the front desk. Just take a picture of it and you’ll be ready to go. These are perfect if you have some down time and want to keep the kids entertained.
- Wiki Wiki Shop offers some staples in case you forget them. If you have a kitchen in your hotel room, you can buy things like eggs, milk or microwave items. The shop also has some ice cream and cookies to purchase. This was a fun treat after a days swim.
- The resort has a big size pool with a nice sand area for the little kids to build sand castles and play. It also has a shallow end for young kids and deeper ends for older kids. It also has a volleyball net which is fun. It is large enough to bring your own pool toys and play. The lazy river is huge and they provide free tubes to use as well. The water was nicely heated in the cooler months.
- When booking your stay, be aware that weeknights are a ton cheaper than the weekend nights. If you stay Friday, Saturday or Sunday nights you will be paying a few hundred more PER night. So if possible stay the week days to save on money.
- Another great way to save on money at the resort is to share a big room with another family. If you are going with friends and family anyway, check out their Royal Tahitian room where you have two separate suites joined together. It was cheaper for us to do that than to get our own suite.
5 Fun & Easy Halloween Party Ideas for the Classroom
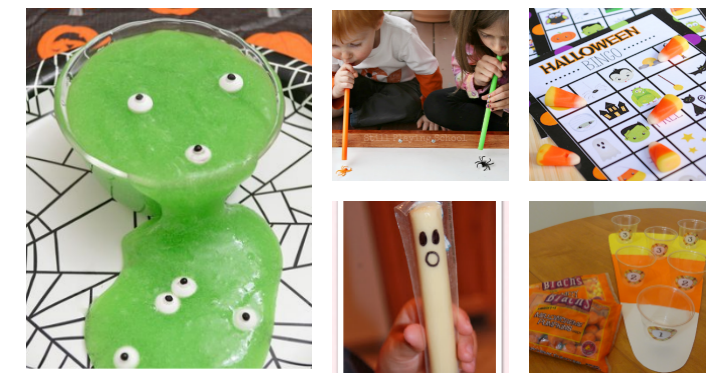 Halloween is just a few short weeks away. My kids are already counting down the days until their school Halloween party. If you are in charge, you may need some ideas to keep these kids entertained. I love a good Halloween game, but I don’t like spending a ton of money or time on every game/craft/treat. I’ve found 5 fun and easy party games/treats that the kids are sure to enjoy, and you won’t be spending a ton of money either. I also love these ideas because they don’t require a ton of supplies or sugar!
- Halloween Bingo: This game is a classic, every kid will LOVE it! The best part? It’s super easy. Check out the free printable you can get here too.
- Easy String Cheese Ghosts: If you’re trying to find a good alternative to sugar and candy, what about having the kids draw and create their own ghosts? Then after they make a fun face, show them to their friends and then let them eat it!
- Candy Corn Toss. Who doesn’t love a little candy corn? This candy corn toss game is super easy and the kids all love to see how many they can get in the cups. You can let the kids eat them after they are finished too. Yum.
- Spider Races. Here is another super simple game that doesn’t take a lot of time to put together and one that the kids would love to do. See how far the kids can get their spiders and then let them keep their souvenirs.
- Eyeball Halloween Slime. This would definitely be a crowd pleaser. Let the kids help you make their own slime. Then they get to take it home too. You can find all the instructions here.
The Perfect Pumpkin Roll Recipe
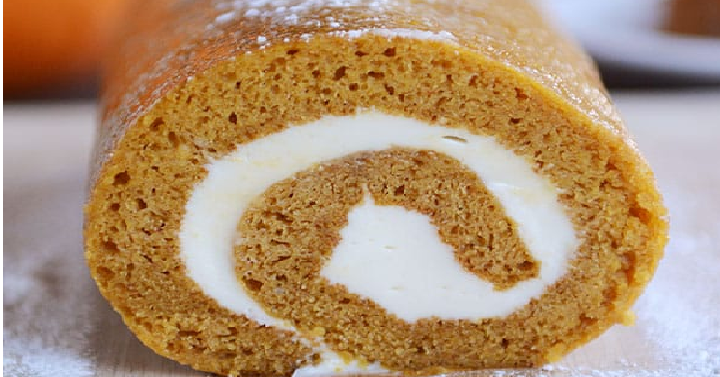 (Recipe & pic by Me’ls Kitchen Cafe)
Oh pumpkin. This time of year I eat, sleep and breath pumpkin. Yes, it’s that good. If you haven’t tried a pumpkin roll you are really missing out. It’s just the right amount of sweet and fluff. This recipe is one of my all time favorites and my family sure enjoys it too. It does take a bit of time and love, but in the end it will all be worth it.
Ingredients:
Cake:
- 1 cup (7.5 ounces) granulated sugar
- 3/4 cup (3.75 ounces) all-purpose flour
- 1/2 teaspoon salt
- 1 teaspoon baking soda
- 1/2 teaspoon cinnamon
- 3 large eggs
- 2/3 cup canned pumpkin puree
- 1/2 cup chopped walnuts (optional)
Filling:
- 8 ounces cream cheese, softened (see note)
- 1 tablespoon butter, melted
- 1 teaspoon vanilla
- 1 cup (4 ounces) powdered sugar
- Additional powdered sugar, for dusting
Directions:
- Preheat the oven to 350 degrees. Grease a 15- by 10-inch jelly roll pan. Cut parchment paper to fit the bottom of the pan and leave an inch overhang on each of the short ends of the pan. Lightly grease the bottom and sides of the jelly roll pan.
- In a large bowl, mix the sugar, flour, salt, soda, cinnamon, eggs and pumpkin until just combined and no dry streaks remain.
- Spread the batter evenly in the prepared pan. Sprinkle the walnuts, if using, on top of the mixture. Bake for 14-15 minutes until edges pull away from the sides of the pan and a toothpick inserted in the center comes out clean.
- Lay a large kitchen towel on the counter top (it is best to use a dishtowel without any texture – a tea towel or flour sack towel works best). Spread a dusting of powdered sugar all over the towel.
- When the cake comes out of the oven, turn the pan upside down on the powdered sugar-laden towel so the cake falls out onto the towel. Peel off the parchment paper, being careful not to tear the cake roll.
- Starting at one of the short ends, roll the pumpkin cake up with the towel and let it cool completely while rolled up.
- While the roll is cooling, mix the cream cheese, butter, vanilla, and powdered sugar together with an electric mixer until it is light and creamy.
- Once the cake roll is cooled completely, unroll (but don’t flatten out the cake roll; it’s ok if it’s slightly curved still), and with an offset spatula, carefully spread the filling in an even layer over the cake.
- Roll up the cake without the towel and place it in the refrigerator, covered with plastic wrap, to firm up, at least an hour.
- Dust the top with powdered sugar, if desired, and cut into slices.
Enjoy!
How to Save Money On Fall Fashion Must-Haves
 Now that the weather is changing, the shorts are being put away and the pants and cozy items are coming out. You may be looking at your fall clothing and thinking- blah. Right? I definitely need a few new fall pieces to help my wardrobe out. There are some great ways to save money on fall fashion must-haves of 2018.
- Compare prices. If you have a specific item you are looking for, then be sure to compare prices from a few different stores. If you need a fleece jacket, then don’t pounce on the first deal you see. Check out a few more stores and see what the price is at. You may be surprised to find a cheaper one somewhere else.
- Use Coupons. Be sure to check the websites of all stores that you are shopping- even if you are shopping in-stores. There are usually always coupons or codes that you can use to lower the price. You can even check out their social media sites for promotions.
- Buy Secondhand. If you don’t mind that your clothes are gently used, then you can save a TON of money if you shop a secondhand store. You can find popular name brands for half the cost. Shop your local consignment shops or even online. There are also Facebook pages that are local garage sale pages that sell clothing.
- Shop Boutiques. If you love new items and variety, then you’ll want to check out boutiques. Jane is one of our favorite and they have really good prices on a ton of items.
- Wait to shop. If you notice your items you need are not on sale, then wait. Chances are in the next few weeks they will be on sale. Black Friday is around the corner and you will start seeing some crazy good deals. Be a little patient and you’ll start seeing some great prices on every fall fashion item you will want.
Ham and Potato Corn Chowder Recipe
 Can you feel the change in the air? I sure can and It’s getting chilly. Now that it’s officially Fall, I love making these comfort soups. They warm me from inside and out. This recipe comes from the closetcooking.com and it’s fabulous. It’s one that the whole family will enjoy.
Ingredients:
- 3 tablespoons oil or butter
- 1 onion, diced
- 2 carrots, diced
- 2 stalks celery, diced
- 2 cloves garlic, chopped
- 1 teaspoon thyme, chopped
- 1/4 cup flour (or rice flour for gluten free)
- 2 cups ham broth or chicken broth
- 2 cups milk
- 1 1/2 pounds potatoes, diced small and optionally peeled
- 8 ounces ham, diced
- 1 cup corn
- salt and pepper to taste
Directions
- Heat the oil in a large sauce pan over medium-high heat, add the onions, carrots and celery and cook until tender, about 8-10 minutes.
- Mix in the garlic, thyme and flour and cook until the flour is lightly browned, about 2-3 minutes.
- Slowly stir in the broth, deglazing the pan as you go, add the milk and potatoes, bring to a boil, reduce the heat and simmer until the potatoes are tender, about 10-12 minutes.
- Add the ham and corn, cook until heated and season with salt and pepper.
How to Make a DIY Family Command Center on a Budget
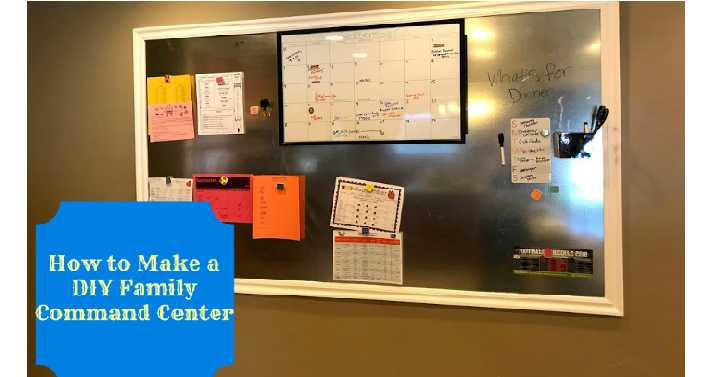 Staying organized can be quite the task when you have a family. Kids come home with papers, invitations, permission slips and more. I get so frustrated with papers! I’ve decided we need one central location where we can see these important papers and be organized all at once. These family command centers are awesome. You can have your papers, calendars, meal planning and more all in one place and in view. If you were to buy these out right you would pay a TON, so save some money and make your own. Here’s how we made ours:
Materials:
Galvanized Steel Metal Sheet- cut to the dimensions you want.
Moulding/Trim
Picture Hanging System
Construction Adhesive
Paint
Accessories: Calendars, Magnets, Meal Schedules, Markers.
Directions:
- Outline with painters tape where you want your board. Measure and order your metal sheet. We went through Metal Supermarkets.
- Measure lengths for moulding and purchase that at a home improvement store.
- Cut corners of moulding to make a picture frame. You could do this yourself or ask Home Depot or Lowe’s to do it for you.
- Paint your moulding to the color you want- we just did a normal white. Then let dry completely.
- Attach moulding to metal sheet with the constructive adhesive.
- Use clamps or heavy objects to weigh down the moulding so it sticks completely. Follow directions of the adhesive-may require 48 hours to dry.
- Follow directions of the picture hanging system and attach on the back of your sheet metal board.
- Hang board on the wall and add nails into the moulding at the bottom if you want. We added 2 at the bottom to make it completely flat against the wall. Then you can putty and paint over the nail holes.
- Add accessories and enjoy!
**Tips- Be super careful with the sheet metal. It is really sharp, so you’ll want to wear gloves and keep kids away. Be sure to completely cover the metal with the moulding so no sharp edges are showing.
5 Birthday Party Ideas Your Kids Will Love
 Birthday parties can get a little routine and dare I say, boring? My kids always want something different and unique, but I’m just not that creative every year! We’ve come up with 5 different ideas that aren’t your normal games/present and cake parties. This will keep the kids busy the whole time!
- Nerf War Games. If you have boys, you know that Nerf parties are so fun. They love the energy and competition. If you are on a budget just gather up Nerf guns and make your own Nerf zone, divide into two teams and start the war. If you have some money set for the party, you could take the kids to an actual Nerf/dart gun arena.
- Swim/Beach Party. This is always a popular type of party. If you are near the beach, then use it! If you aren’t then find a local pool you could take the kids to.
- Tea/Dress up party. If you have young girls, have them dress up in their best and throw a tea party. They could even bring their favorite stuffed animal.
- Bounce House Mania. This one could get a little expensive, but it’s super easy to do. Rent your favorite bounce house and invite the friends over. You don’t have to do a lot with this party since the company usually will come set it up and take it down. That’s my kind of party!
- Cook it up party. If you have a young chef then this would be super fun. Create a menu and let the kids help make their meal. Then after you could all eat it or even invite the moms to come join you for the final creation. Let the kids serve their moms and all enjoy cake afterwards. This is one they won’t forget.