
15 After School Snack Ideas that are Easy & Healthy
 When school started I was so worried about making a healthy and easy lunch that I totally forgot about what to feed them when they got home from school. Let’s be honest, it’s exhausting. I feel like there is so much unhealthy food out there that my kids would be happy eating Cheetos and cookies after school. Yes, that does happen on those crazy after school days and before sports/dance/art/music classes. However, I didn’t want that to happen EVERY day. I decided to make a list of after school snacks that are both easy and healthy. I wanted these snacks to fill my boys up so the are good for their after school activities and can be happy until dinner. You know what? It works!
- Hard Boiled Eggs
- Hummus- My boys like pita chips to go with this. But you can use any veggies or crackers.
- Peanut Butter- I either put PB in between Ritz crackers or I cut up applies-sliced and put PB in between those
- Muffins- Bought from a store, packaged or home made
- Ham & Cheese Crescent Roll-ups
- Smoothies- I use any fruits I need to use up and I add in some frozen spinach just to give it some greens
- Popcorn- SO easy and they love it!
- Cinnamon toast- Just toast your favorite bread and add a little butter & cinnamon on top.
- Cheese & Crackers
- Cheese Quesadillas
- Trail mix- Either store bought or you can even make your own. Just buy a variety of nuts, add in M&Ms of course!
- Frozen Blueberry Bites
- Applesauce
- Fruit filled cereal bars
- No Bake Oatmeal Energy Balls – This is a little more work, but you can freeze these and use them for weeks!
Hopefully this list will help your sanity once the kids get home from school. You can even write this list down, put it on the fridge and have it there for the kids to look at and choose what they want to eat.
Easy Zucchini Bread Recipe
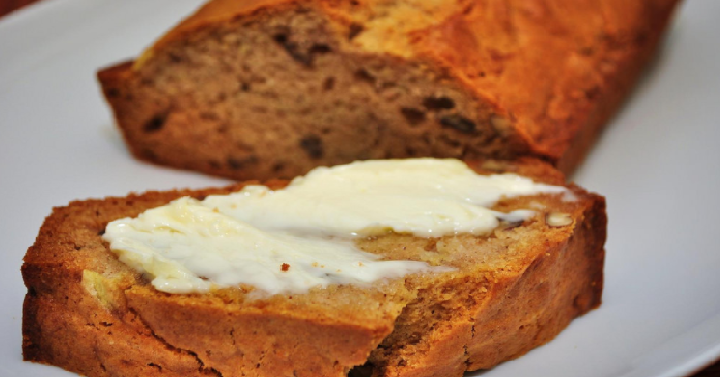 It’s that time of year when zucchinis are growing non stop. If you have a garden you may be overwhelmed with what you can do with all of the zucchinis. This bread is a great option to use all of those zucchinis up! My kids absolutely love zucchini bread and it’s a great after school snack for them.
Easy Zucchini Bread
3 Cups all purpose flour
1 Tsp Salt
1 Tsp Baking Soda
1 Tsp Baking Powder
3 Tsp Cinnamon
3 Eggs
1 Cup Vegetable Oil ( healthier option- you can substitute half with half applesauce)
2 1/4 Cups Sugar
3 Tsp Vanilla
2 Cups grated Zucchini
1/2-1 Cup chopped walnuts (optional)
Directions:
Grease and flour 8×4 inch pans and preheat overn to 375 degrees. Mix together the flour, salt, baking soda, baking powder, and cinnamon together in a big bowl. Beat eggs, oil, vanilla, and sugar together in a large bowl. Add dry ingredients the creamed mixture and beat well. Sir in the zucchini and walnuts until it’s well combined. Pour batter into prepared pans. Bake for 50 minutes or until a toothpick comes out clean.
Benefits of a Target REDcard- Is it Worth it?
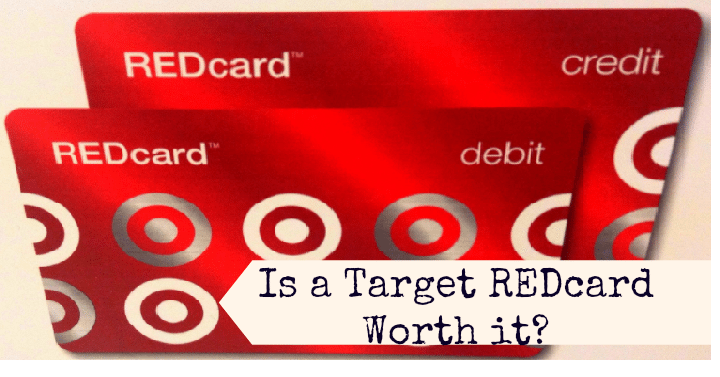 The holidays are quickly approaching and now is the time to get ready to save money on all of your purchases. In almost every store they ask if you want to sign up for their store credit card. Which cards are really worth it? One card that has so many benefits that you’ve heard us talk a lot about is the Target REDcard. There is a Credit and a Debit version. So, is it worth it?
Here are the benefits of the debit and credit Target REDcards:
debit card
- links to your existing checking account
- cash withdrawal at checkout up to $40
- view transactions & manage your PIN at Target.com/myREDcard
- stack your savings with Cartwheel, Target Subscriptions & other discounts
- 5% savings every trip to Starbucks within Target stores
- Save an extra 5% at Target & Target.com each & every day
- Free shipping on most items at Target.com
- Extended returns for 30 extra days at Target or Target.com
- **New: get early access to special events, products & promotions just for being a REDcard holder
- **New: REDcard holders get exclusive extras, including special items, offers & 10% off coupon as a gift on your REDcard anniversary each year
credit card
- charge your Target purchases in-store & at Target.com
- receive a monthly bill
- check balance, make payments & review statements at Target.com/myREDcard
- stack your savings with Cartwheel, Target Subscriptions & other discounts
- 5% savings every trip to Starbucks within Target stores
- Save an extra 5% at Target & Target.com each & every day
- Free shipping on most items at Target.com
- Extended returns for 30 extra days at Target or Target.com
- **New: get early access to special events, products & promotions just for being a REDcard holder
- **New: REDcard holders get exclusive extras, including special items, offers & 10% off coupon as a gift on your REDcard anniversary each year
With all of these benefits, I would definitely say this card is worth it! I would suggest going the Debit Card route. That way you don’t need to get your credit pulled, you won’t have a balance you need to pay off, there are no fees, no interest- nothing. The amount just goes directly out of your account. With the holidays coming up, saving an additional 5% off EVERY purchase and getting FREE shipping from Target is a definite bonus. The savings will add up and it will be worth it. So if you don’t have a Target REDcard you can apply for one now and start your savings.
Do you have a Target REDcard? What do you think about it?
Easy Fresh Peach Pie Recipe
 It’s peach season! Right now is a great time to load up on peaches and make all sorts of yummy desserts. If you have peach trees and are overloaded with peaches, be sure to check out this easy step by step guide to canning peaches. Then with all of your leftovers, make this yummy dessert. This easy peach pie recipe is a yearly tradition that the whole family loves.
Easy Fresh Peach Pie
This recipe makes 2 pies
1 Can Frozen Orange Juice (slightly melted)
2 Cans Water
1 1/4 Cup Sugar (less if peaches are super sweet)
1/2 Cup Cornstarch
1/4 teaspoon Salt
Cut up Peaches (4-5 depending on size)
2 Pastry Pie Shells (cooked)
Whip Cream (optional)
Directions:
Cook sugar, cornstarch, salt, and water until thick. Cool slightly and add in the frozen orange juice. Stir until orange juice has melted and mixed in. Chill slightly and add peach slices. Put the mixture in your cooked pie crusts. Chill in the refrigerator until set. Top with whip cream and serve! YUM.
How to Build Your Own Emergency Kits – Easy Step-by-Step Guide
 With all of the devastation of Hurricane Harvey, a lot of us have emergency preparedness on our minds. If you haven’t already made your own emergency kit, now is the time to do it. With an emergency kit you will be better prepared to survive when a catastrophe happens. Here is an easy step-by-step guide to help you build your own emergency kit.
Step #1
Make a Plan. You can make a 24 hr or 48 or or 72 hour kit for your family. I would recommend making a 72 hour kit for your family. List out how many people you have in your family and think about each person as you go through this list.
Step #2
Gather Bags. You will need to get a bag for each person in your family. Look around your home. Get old backpacks that you aren’t using or buy some new ones. Now is the perfect time to grab backpacks since they are going on clearance in just about every store.
Step #3
Get Water. You need about 1 gallon of water per person for the 72 hours. That would be (8) 16 oz water bottles to make up a gallon or you can get bigger bottles to make it more manageable.
Step #4
Gather your food. You will need to gather enough food for 3 days for each person in your family. The easiest thing to do is get food that you will actually eat. You will want to get items that has a long shelf life too. Some suggestions are: Canned soup, peanut butter, granola bars, canned meat, canned fruits, canned vegetables, freeze dried fruits or meats, fruit snacks, hard candy, specially packaged milk, honey, protein bars, vitamins. I always thought I had to get certain emergency foods, but that’s not the case. Just get long shelf life foods and change them out every 5 years or so. Remember you don’t need a gourmet meal when you are in survival mode, just enough food to keep you sustained and healthy.
Step #5
First Aid Kit. This can be a DIY first aid kit or a store bought one. It doesn’t need to be anything fancy. Get a container like a pencil box and add the following items to it: Band aids (variety of sizes), Antibacterial ointments, plastic gloves, gauze and tape, small scissors, Q-Tips or cotton balls, medicines (cold, pain, baby, allergy), thermometer, tweezers.
Step #6
Batteries & Other Essentials. You’ll want to put in the following that would be super helpful for emergencies. Flashlights, batteries, hammer, wrench, pet supplies (if applicable), manual can opener, whistle, blankets and a change of clothes for each person. I would recommend doing long sleeve and pants per person in their bags. That way if it’s winter you are prepared, if it’s warmer you can cut them down to size.
Those are the basics of what you would want to gather for your emergency kits. Now you can get more fancy or make it super simple. Either way you will be better off than not having anything at all.
How to Throw an Inexpensive Birthday Party
 Oh birthday parties. I have such a love/hate relationship with them. My kids absolutely love going to parties and having them, but for the mom it can be a little overwhelming and expensive! There are a few quick tips to help you out when throwing a party on a budget. Here are a few ideas that should keep you from spending too much:
- Start planning early- If you procrastinate you will be buying items on the whim which usually will end up costing more money. If you have a theme then start months before hand and watch for when items go on sale.
- Digital birthday invites- There are so many ways to make an invite that can be e-mailed for FREE. This will save on making and printing out invites.
- Use what you have on hand- Look around your home and see what decorations and games you already have at home. No need to re-invent the wheel right? Use leftover plates, balloons, and games.
- Have the party at your home or a free location- No need to go somewhere and spend a fortune to have a good time. Have a party at your home, a local park, or on the beach.
- Make your own cake and treats- making your own cake will save you tons of money. Grab a $0.99 cake box and decorate it with fun items from the dollar store. There are super cute ideas on Pinterest that can help with decoration.
- Play games and activities that don’t cost money- there are so many fun games that kids enjoy that don’t require you to buy an extra items. Play classic games like: Red Rover, Duck Duck Goose, Pin the Tail on the Donkey (or other variations), scavenger hunts with clues, relay races and more.
I’ve noticed if I’m enthusiastic about whatever we are doing, it will naturally rub off to the kids. They will be excited about whatever activity we have planned and I don’t have to pay a lot of money for that!
School Lunches Made Easy- Mix & Match These Lunch Ideas
 For most of us school will be starting soon if it hasn’t started already. I don’t know about you, but I’m stressing about school lunches. My kids are pretty different in their eating habits which makes me frustrated at times. I’ve decided to try something new this year and mix and match different combinations of entrees/snacks, veggies/fruits, treats, and a drink. This way I can have those different items that will please all types of eaters. Hopefully this will help you out too! Here is what you do…
Depending on how big of appetite your kids have will determine how many items to put in. I would normally choose 1-2 items from each of the categories below. Treats would only be once or twice a week.
Entree/Snacks:
Sandwich (Meat, PB&J, Tuna)
Pizza
Quesadilla
Muffins
Hot Dog
Pita & Hummus
Make your own lunchable- cut up meat, cheese & crackers
Spreadable cheese & crackers
Boiled Eggs
Go-Gurts
Cheese Sticks
Popcorn
Pretzels
Peanuts
Granola Bars
Fruit/Veggies:
Carrot Sticks
Celery with peanut butter
Broccoli with ranch
Cucumbers
Cherry Tomatoes
Watermelon
Grapes
Apple Slices
Orange Slices
Banana
Dried Fruits
Peach Slices
Pear Slices
Mandarin Oranges
Cherries
Cantaloupe
Kiwi
Treats:
Fruit Snacks
Rice Krispie Treat
Brownies
Cookies
Fruit Leather
Drinks:
Water
Milk
Chocolate Milk
Capri Suns
Juice Bottles
I always like to write a quick note and hide it in my kids lunches. Sometimes it’s a good luck note, an I love you note, or even a joke or riddle. They love it!
The BEST Homemade Ice Cream Recipe
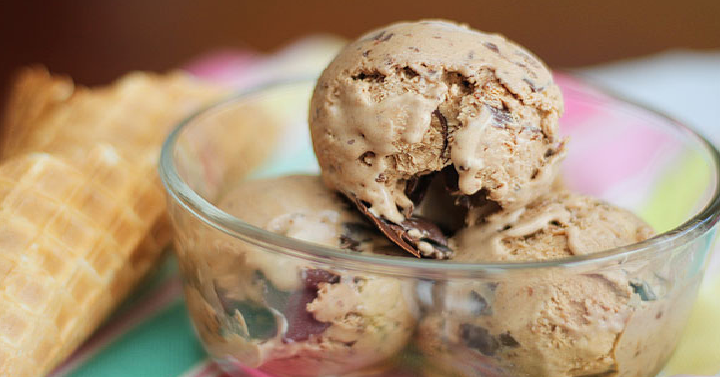 During the hot summer all I want to do is sit in the shade outside and eat a big bowl of ice cream. I don’t even care what flavor. Just cold, yummy ice cream. Anyone else? I’ve found out that homemade ice cream has that yummy taste that brings be back to my childhood and reminds me of these summer nights. I just love it. Here is a recipe that I’m sure you’ll enjoy!
Homemade Ice Cream
1 quart half and half
1 pint heavy cream
2 cups sugar
1 teaspoon vanilla extract
whole milk
chopped candy bars of your choice to add in- (5) peanut butter cups, or (5) Snickers or (5) Butterfingers
- In a bowl, combine the first 4 ingredients until sugar is dissolving.
- Pour that mixture into your ice cream maker freezer container.
- Add whole milk to the fill line.
- Start your ice cream maker according to your machines directions.
- After about 20 minutes or so, check for a slightly thick consistency and add in your chopped candy bars. Then continue until done.
- Enjoy!
5 Awesome Last Minute Summer Getaway Ideas
 Summer is quickly coming to an end. Can you believe it? If you still want to squeeze in a quick summer getaway before school starts, it’s still possible and there are so many fun things to do. Here are 5 awesome last minute summer getaways that will definitely bring those fun long lasting memories.
- Visit a National Park. There are so many national parks around the nation. Pick one that you have never been to and plan a quick visit. If you are taking kids with you, be sure to check out the Junior Ranger program. It will keep them entertained as you explore!
- Visit a new County or State Fair. This is the time for fairs around the country and they are so much fun. Find a new city or county fair that you have never been to. This can be a weekend adventure or even a day trip.
- Visit a Relative. Find a relative that you don’t visit very often and plan a trip to their town. Find things to do nearby and explore a new area as well as getting reacquainted with family.
- Visit a Ski Resort. Even though there won’t be any snow, you will find ski resorts to be so fun during the summer. You can usually find better priced hotel rooms at ski resorts as well. Look at their website for additional activities which usually involve bike riding, hiking and more.
- Visit your College Campus. Yes, bring back those college memories. Grab your family and head to your Alma mater. Walk around the campus and reminisce with stories of the good old days. Stay for the weekend or do this as a day trip!
Amazon Hiring Thousands of People in 1 Day
 Next Wednesday, August 2nd, Amazon is planning on making thousands of on-site job offers. The big holiday season is coming soon and Amazon wants to be ahead of the game. With all of the new hires now, Amazon won’t be competing with other retailers later when hiring seasonal workers. Amazon wants to fill 50,000 job openings and most of them in that one day. Nearly 40,000 of those jobs will be full time. “Amazon Jobs Day” is what they are calling this hiring event will take place in Amazon centers around the nation.
The hiring events will take place from 8 a.m. until noon local time in Baltimore, Maryland; Chattanooga, Tennessee; Etna, Ohio; Fall River, Massachusetts; Hebron, Kentucky; Kenosha, Wisconsin; Kent, Washington; Robbinsville, New Jersey; Romeoville, Illinois; and Whitestown, Indiana. They will also have off-site events for part-time opportunities in Buffalo, New York and Oklahoma City.
Yellowstone Bear World: 8 Tips to Know Before You Go
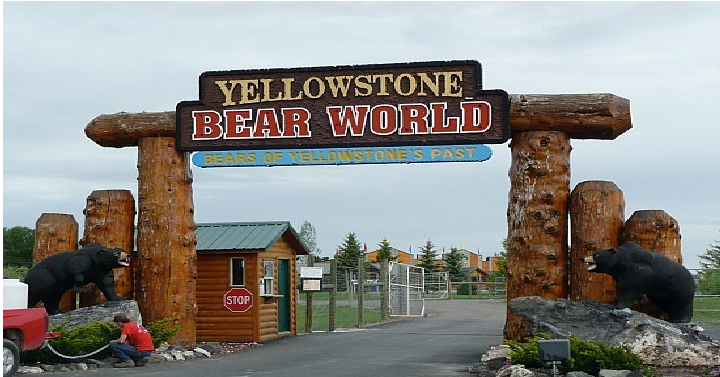 Are you planning a trip to Yellowstone Bear World? It’s such a fun adventure for the entire family. If this is your first time or even your second time going, here are a few tips you’ll want to make sure to take advantage of. They will save you money and hopefully help your Bear World experience run smoothly.
- Entrance Fees: If you have a larger group of people, use the Group Rating for 15 or more people. You can do this even if you are in different cars. This saved us a TON of money per person. Also be sure to use the Senior discounts if applicable.
- Use the Group rating for feeding the bears. It’s only $45 for up to 7 people which is only $6.42 per person. Otherwise you will be paying $12.95 each.
- If you want to hand feed the baby bears you need to sign up online EARLY. Like weeks or even months in advance. We didn’t realize that until too late. So when you have your dates planned, sign up and get registered because they have limited spots.
- If you don’t want to spend the money to feed the bears in the truck, then make it so you get behind the truck on your drive through the park. It’s seriously so cool. You follow the truck and they stop right in front of you. Then you can watch all the bears gather around the truck and watch the people feed them. This way you can stay in your air-conditioned car, see all the bears at once, and not pay extra!
- Drive through the park more than once. This way you will see different animals each time you go.
- Bring your own water bottles. There are NO drinking fountains at Bear World. The best thing to do is have a water bottle for each person and you can refill it for free at their cafe.
- Bring your own lunch. To save some money, bring your own lunch and eat at their covered pavilions which are super nice.
- Last but not least, you need to try out their FREE samples of fudge. There are different kinds all of the time, and they are super yummy.
Back To School Price Points You Need to Know – 2017
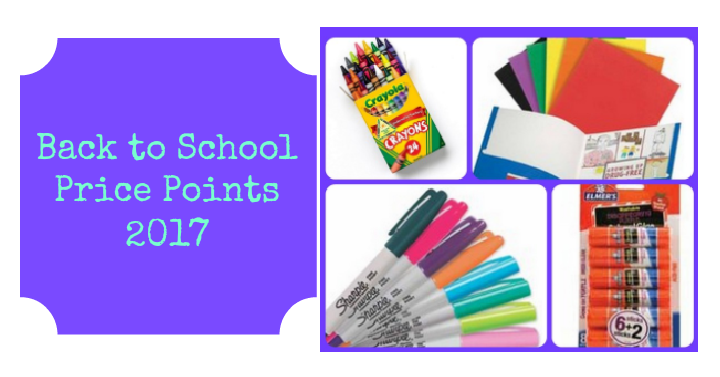 Okay guys, this is one of the best times of the year to grab your school supplies, craft supplies or office supplies. Since I’m already starting to see CRAZY back to school deals going, I thought it would be good to give you a list of price points you want to look for when shopping. There are SO many, and sometimes you’re really not getting a deal at all. So check these prices and keep them in mind when shopping Back to School!
- Pens pack of 10 $1.00 or under
- Gel Pens 12 pack $1.97 or under
- Box of Crayola Crayons $0.25 or under
- Index Cards $0.48 or under
- 2-Pocket Folders $0.10 is a good price, but we see them as low as $0.02 each!
- 1 Subject Noebooks $0.17 and under
- Sharpie Marker $0.25 each
- Backpacks $10-$13 is the price you want to shoot for.
- Elmer’s or Store Glue $0.29 and under
- Washable Glue Sticks $0.31 and under
- Washable markers 8-10 pack $1.00 or under
- Scotch Tape $0.25 to $0.50 each
- Crayola Colored Pencils 12 pack $0.97 and under
- Binders 1 inch $0.97 or under
We keep updating current deals, so head to my Back-to-School Category here at any time. ENJOY!!
8 Creative S’mores Ideas
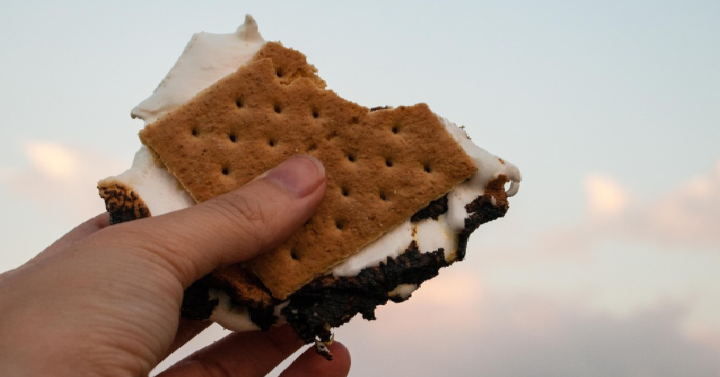 Summer is all about camping, camp fires and S’mores! If you’re like me you may get tired of the same old S’mores recipe. Well shake things up and get excited once again for these yummy treats. Here are 8 different ways you can make S’mores. They are all truly yummy and super easy to make. Enjoy!
Fudge Stripe S’mores
Use Keebler Fudge Stripe cookies as the outside and place marshmallows inside. This way you get a cookie, chocolate and marshmallow. Super easy!
Peanut Butter Cup S’mores
Use graham crackers as the outside, and have marshmallows, and peanut butter cups for the inside. This adds a hint of peanut butter which is super yummy.
Chocolate Chip Cookie S’mores
Use any store bought or homemade chocolate chip cookie for the outside, marshmallows for the inside. You get the chocolate in the cookie. I like using the soft and chewy cookies for this one.
Nutella S’mores
Use Graham crackers as the outside, smear a good portion of nutella in the crackers and add marshmallows inside. You can’t go wrong with Nutella.
White Chocolate S’mores
Use Graham crackers as the outside, white chocolate and marshmallows inside. One yummy white chocolate bar to use is the Hershey’s Cookies and Cream bars.
Oreo S’mores
Use any flavor of Oreos as the outside and add marshmallows inside. There are a ton of different oreo flavors that would make this fun for everyone.
Strawberry Chocolate S’mores
Need to add a little fruit to your S’mores? Use a shortbread cookie as the outside and add sliced strawberries, chocolate, and marshmallows for the inside.
Raspberry Pie S’mores
Use a Ritz Cracker as the outside, raspberry jam for the inside with white chocolate and marshmallows.
5 Genius & Easy Camping Hacks
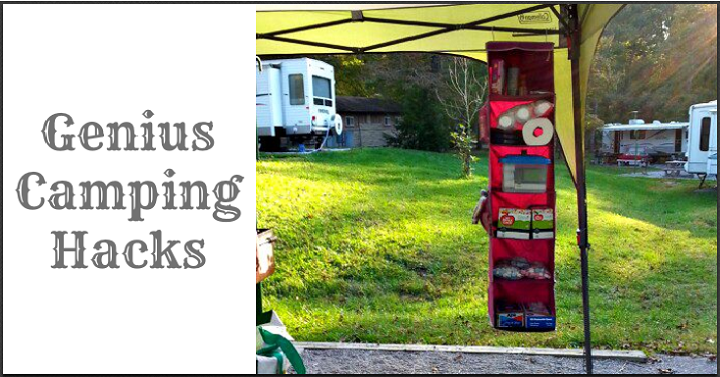 Summer is the season for camping are you ready? I love camping, but I feel like each time I’m a little unorganized and things get everywhere! Here are a few absolutely genius camping hacks that will keep me both organized and happy while I’m enjoying nature.
Pre-Scrambled Eggs in a Bottle. This is awesome and super easy. I’m always trying to keep my eggs alive while transporting them to our camp site. This way you won’t have to worry about accidentally cracking them. You can pre-mix them and keep them nice and cold. Then have it ready to pour for your meal.
Use a 5 Shelves Hanging Closet Organizer. Do you need a little help organizing your kitchen items while camping? This would really help you out and it’s super easy to set up and store. Amazon has them for a good price here.
Hand Washing Station. This is essential if you have little kids who get super messy while camping. It’s nice to to have a spot to clean up quickly before you eat your meals. This is super easy and you may just have everything you need at your house.
Toilet Paper Holder. Grab a folders or hot chocolate (big) container. Stick a roll of toilet paper in it and cut a whole to let it go through. Super easy and it won’t keep falling in the dirt!
Use Pencil Boxes to Keep your Utensils organized. If you are like me, I like to have colored coding for items so I can tell what they are at a glance. Grab a couple of pencil boxes from the dollar store and use them for your spoons, knives and forks. Easy and they have a lid!
Do you have any camping hacks that you love? I’d love to hear them in the comments.
5 Ways to Save on Summer Bills
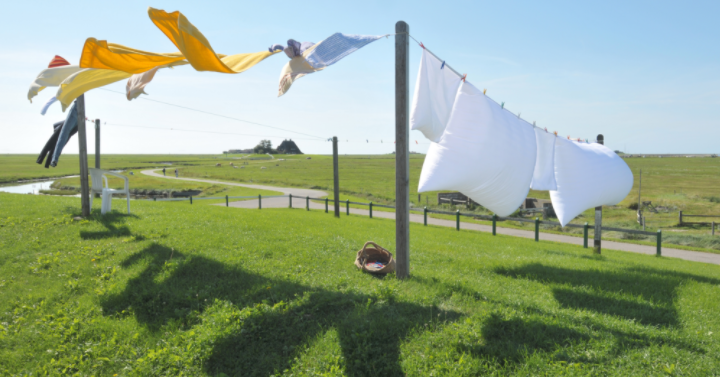 Now that it’s officially summer you may see a few bills hit their ultimate high. If you’re not careful you’ll be paying a lot in bills when you really don’t have to be. Here are a 5 ways to save on your summer bills. Some you may not have thought of!
- Air dry laundry. Save on electrical bills by drying your clothing outside on a line or a clothes rack. Have the kids get involved and get outside and dry those clothes all while saving money.
- Install a smart thermometer. Changing your thermometer even while you are out and about will save you a lot of money. Keep the air low or off when you are out of town.
- Save on gym memberships. With the great weather it’s a great time to be outside and exercise or play sports. With those options it’s a great time to put your gym membership on hold.
- Plant a garden. Save on your food bills by planting a garden and eating the in season veggies and fruits. This will save on your weekly grocery bills.
- Add weather stripping. This will help keep the warm air out and the cool air in. Seal any cracks along windows and doors and you’ll notice a difference.