
National Preparedness Month – Useable Food Storage!

Last week we talked about how much I love September! There are so many fun things about September rank among my favorites. One is the fact that September is National Preparedness Month. I love to talk/think/do things about preparedness. You can listen to lectures and read articles and find dozens of ways to be prepared during National Preparedness Month. All month we are going to break National Preparedness Month up into smaller topics. Remember we tend to be able to process it better and make more progress with preparedness when we think about smaller topics. Last week we even made these small sections in the preparedness binder we made. One of our sections was on food storage. Today I want to talk about making a subsection in that section called useable food storage.
One of my favorite preparedness things is having well organized useable food storage or a home store. No matter what you call it, it is pretty much the same thing. You buy multiples of something you use when it is on sale. This is why everyone’s useable food storage is going to look a bit different. You are storing what your family uses all of the time. When items I use are at rock bottom prices I try to buy as much as my family will realistically use before the items go bad. Then when you need the items you shop from your home store or food storage. Buy new as needed and remember to rotate your useable food storage.
Well organized useable food storage is a great way to help ensure your family will have enough to eat if it becomes temporarily hard to purchase groceries. This could be because of finances or some sort of environmental emergency. It could also be from illness or simply being really busy. It’s great to have useable food storage on hand. Having well-organized, useable food storage is a great way to be prepared.
Why is having well organized useable food storage important? Why won’t a bunch of things tossed on a shelf work just as well? If you can’t find it, see it, use it – it can’t help you when you need it. This well organized useable food storage is pretty easy to maintain if you follow a few basic tips. If you don’t follow them, you will have food storage chaos. (Trust me, I know from experience.) There are a few basic tips I like to follow to help me keep on top of things.
Put items away
I try to put my items away shortly after I purchase them. Having everything where it belongs helps you see what you have and helps you keep track of your food storage. Sometimes life is crazy and I put the bags of groceries on the floor near the shelf. If I don’t get it put away soon after, more bags pile up. This leads to that dreaded chaos. You forget what you have and may buy unneeded items. Getting items put away quickly is an important part of having well organized food storage.
Store like items together
This step may be a little different for everyone, just do it how it works for you. I try to store things together that are related or seem to go together. I think if it like how a grocery store is organized. When you go to look for something in your food storage, it will be easier to find because it is on the shelf where it makes sense to you. This makes your organized food storage much easier to use.
Keep storage areas as close together as possible
I’ve lived in some places that had great food storage areas and some that had none. In many of those hard food storage places it took a lot of creativity to have well organized food storage. Even in the hardest of places, keeping the storage areas as close together as possible was a great help. Running all over the house to locate items can defeat the helpfulness and discourage the use of items. Again you may end up buying things you don’t need.
Set rules about use
Having a great, well organized useable food storage can lead kids (or adults) to feel like that can just grab a snack and use whatever they want. Be sure to set some basic rules with your family about who can take things from the food storage and when that can happen. It will help items last longer and keep people from using up that one favorite snack or other item too quickly.
Know what you have
Find some way to have a basic idea of the inventory in you well organized food storage. If it is organized and easy to find, this could be as simple as taking a visual look before you shop. Some people keep detailed lists and itemize everything. There are lots of ways to do it in between those two extremes. Find what works for you and make a habit of knowing what you have in your well organized food storage. This is the perfect time to use that useable food storage section in your binder. Keep a list of the most used useable food storage items in your binder. Keep track of inventory and keep lists of things you need to buy.
Earn up to $33 from Checkout 51 this week just for grocery shopping!
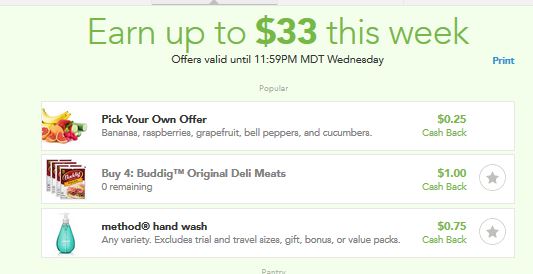
- Browse the offers that are updated every Thursday
- Buy the products from any store
- Take a photo of your receipt to redeem your deal
- Get cash back!
DEAL OF THE DAY – FoodSaver Vacuum Sealing System with Starter Kit – $86.50!
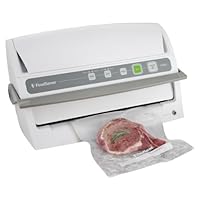
List: $139.99
(38% off)
$86.50
LINK to Gold Box Deals at Amazon
Eligible for free shipping on $35+ orders or on ANY order with Amazon Prime.
Don’t have a Prime membership? Get a one month free trial! Click here for details!
National Trail Mix Day!

You all know how I love random obscure holidays. You know the ones, the holidays that you hear about on the internet or in your email. Today is one of those days and it sounds like a very fun one! Today, August 31st is National Trail Mix Day. It’s a day devoted to that yummy snack that is versatile and yummy. It is a great day to ditch your diet and have a snack or two. Sometimes it is nutritious and sometimes it is not. Is it crunchy, salty or sweet? Is it fruity? How about chocolaty or otherwise gooey? Maybe it is spicy? There are so many kids of trail mix to choose from if you want to indulge on National Trail Mix Day.
We love trail mix at our house. I love to pack it for my kids to snack on at their sporting events or practices. Each of my kids likes their trail mix made a little bit differently. Some of them like fruit and others don’t. One of them likes it a bit spicy. They all like trail mix when there are chocolate chips or M&Ms in it. Trail mix is portable and easy to make in a hurry. Sometimes we get a little creative with our trail mix and make cookies out of it. We have a really fun trail mix cookie recipe. My kids all love these cookies. This is another fun way to enjoy trail mix. Have you tried Trail Mix Cookies? If not, it is a great idea to celebrate National Trail Mix Day. If you try the recipe, let us know how you liked it. We love to hear from you!
Trail Mix Cookies
Ingredients:
1/2 cup applesauce
1/2 cup white sugar
1/2 cup brown sugar
1 1/2 teaspoons vanilla extract
2 egg whites
1 1/4 cups all-purpose flour
1 teaspoon baking soda
1/2 teaspoon salt
3/4 teaspoon ground cinnamon
1 1/4 cups quick cooking oats
1/2 cup semisweet chocolate chips
1/2 cup chopped walnuts
1/3 cup dried cranberries
Directions:
- Preheat oven to 350 degrees. Grease 2 baking sheets.
- Beat applesauce, white sugar, brown sugar, and vanilla in a large bowl.
- In another bowl, use an electric mixer to beat egg whites until they are frothy and begin to firm up.
- Fold egg whites into applesauce mixture.
- Combine the flour, baking soda, salt, and cinnamon. Fold into the egg mixture. Stir in the oats, chocolate chips, walnuts, and cranberries.
- Drop by heaping teaspoons on prepared baking sheets.
- Bake cookies in preheated oven until set and lightly browned, about 10 minutes.
- Place on wire racks to cool.
Favorite Football Snacks – Salsa!

For the last couple of days we have talked about how it is the end of August which makes me so very happy. It is one of my favorite times of year. If you follow our blog you know I love football. My kids have started playing little league football, our friends on the high school team have started to play, college play starts next week and the NFL is on television. I am surrounded with football and I love it! I went to two high school games last night and another tonight and they were awesome. Football is here! Now we are getting ready to watch some football on TV this weekend. One of the things my family loves about watching football on TV is the snacks that we make. We make lots of different snacks and another one of our favorites is any sort of salsa and chips.
One of our very favorite football snacks is salsa and chips. Every single member of my family loves salsa and chips – it is one of those miracle snacks that makes everyone happy. There are a few store bought salsa options that are really good but there is nothing like homemade salsa to go with your chips. Pair yummy homemade salsa with some good chips and any game is instantly more fun. Do you make your own salsa? If not, you should try it! There are lots of different kinds of salsa you can make. It is a perfect football snack. Here are few of our family favorite unusual salsa recipes to get you started.
Mango Salsa
Ingredients:
1 mango – peeled, seeded, and chopped
1/4 cup finely chopped red bell pepper
1 green onion, chopped
2 tablespoons chopped cilantro
1 fresh jalapeno chile pepper, finely chopped
2 tablespoons lime juice
1 tablespoon lemon juice
Directions:
- In a medium bowl, mix mango, red bell pepper, green onion, cilantro, jalapeno, lime juice, and lemon juice.
- Cover, and allow to sit at least 30 minutes before serving.
Green Salsa
Ingredients:
8 tomatillos, husked
3 shallots
2 cloves garlic, peeled
1 (4 ounce) can chopped green chile peppers
1/4 cup chopped fresh cilantro
1 fresh jalapeno pepper, seeded salt to taste.
Directions:
- In a food processor, place tomatillos, shallots, garlic, green chile peppers, cilantro, jalapeno pepper and salt.
- Using the pulse setting, coarsely chop.
- Cover and chill in the refrigerator until serving.
Avocado Salsa
Ingredients:
1 (16 ounce) package frozen corn kernels, thawed
2 (2.25 ounce) cans sliced ripe olives, drained
1 red bell pepper, chopped
1 small onion, chopped
5 cloves garlic, minced
1/3 cup olive oil
1/4 cup lemon juice
3 tablespoons cider vinegar
1 teaspoon dried oregano
1/2 teaspoon salt
1/2 teaspoon ground black pepper
4 avocados – peeled, pitted and diced
Directions:
- In a large bowl, mix corn, olives, red bell pepper and onion.
- In a small bowl, mix garlic, olive oil, lemon juice, cider vinegar, oregano, salt and pepper.
- Pour into the corn mixture and toss to coat.
- Cover and chill in the refrigerator 8 hours, or overnight.
- Stir avocados into the mixture before serving.
Football Snacks – Queso Dip!

Yesterday we talked about how it is the end of August which makes me so very happy. It is one of my favorite times of year. If you follow our blog you know I love football. My kids have started playing little league football, our friends on the high school team have started to play, college play starts next week and the NFL is on television. I am surrounded with football and I love it! I went to two high school games tonight and they were awesome. Football is here! There are so many different things that my family and I love about football. One of the things my family loves about watching football is the snacks that we make. We make lots of different snacks but an all-time favorite is queso dip.
My kids love making fun football snacks and they have quite a few favorites. One of our very favorite football snacks is queso dip. We all love homemade queso dip. There are a few take out options that are really good but there is nothing like homemade queso dip. Pair that with some good chips and any game is instantly more fun. Do you make your own queso dip? If not, you should try it! It is a perfect football snack. Here are few of our family favorite recipes to get you started.
Super Easy Queso Dip
Ingredients:
1 (16 ounce) package VELVEETA, cut into 1/2-inch cubes
1 (10 ounce) can RoTel Original Diced Tomatoes & Green Chilies, undrained
Ro-Tel Diced Tomatoes & Green Chilies Diced Tomatoes & Green Chiles,
Directions:
- Combine ingredients in microwaveable bowl.
- Microwave on HIGH 5 min. or until VELVEETA is completely melted and mixture is well blended, stirring after 3 min.
From Scratch Queso Dip
Ingredients:
1 tablespoon butter
1 tablespoon cornstarch
3/4 cup sour cream
1 cup shredded Cheddar cheese
1 tablespoon salsa
Directions:
- In a medium saucepan over medium heat, melt the butter.
- Thoroughly stir in the cornstarch. Stir in the sour cream.
- When the mixture becomes hot and bubbly, mix in Cheddar cheese and salsa.
- Continue stirring until cheese has melted and mixture begins to thicken, about 10 minutes. Serve hot.
Super Easy Chili Queso Dip
Ingredients:
1 (2 pound) loaf processed cheese food
2 (15 ounce) cans chili without beans
1 pinch chili powder
Directions:
- In a medium saucepan over medium low heat, melt the processed cheese food.
- Stir in chili without beans and chili powder.
- Serve warm when thoroughly blended.
Authentic Queso Dip
Ingredients:
2 tablespoons vegetable oil
1/2 onion, diced
1 tomato, diced
10 large roasted green chile peppers, seeded and chopped
1/2 cup shredded white Mexican cheese
1/4 cup shredded Monterey Jack cheese
1/4 cup milk
salt to taste
Directions:
- Heat the vegetable oil in a skillet over medium heat.
- Stir in the onion and tomato; cook and stir until the onion has softened and turned translucent, about 5 minutes.
- Add the green chile; cook for 2 minutes then stir in the cheese and milk. 4. Reduce heat to low and simmer, stirring frequently, until the cheese has melted.
Fall football snacks – Chex Mix!

The end of August has arrived and it makes me so very happy. It is one of my favorite times of year. (No it is not back to school because the kids are gone.) If you follow our blog you know I love football and football season is here! My kids have started playing little league football, our friends on the high school team have started to play, college play starts next week and the NFL is on television. I am surrounded with football and I love it! There are so many different things that my family and I love about football. One of the things my kids love, and it is probably the favorite of at least one of them, is the football snacks that we make on Sunday when we watch football.
They love making fun football snacks and they have quite a few favorites. One of their very favorite football snacks is chex mix. They love chex mix from the store but they love the home made kinds so much more. Do you make your own chex mix? If not, you should try it! It is a perfect football snack. Here are a couple of our family favorite recipes to get you started.
Microwave Original Chex Mix
Ingredients:
3 cups Corn Chex cereal
3 cups Rice Chex cereal
3 cups Wheat Chex cereal
1 cup mixed nuts
1 cup bite-size pretzels
1 cup garlic-flavor bagel chips, broken into 1-inch pieces
6 tablespoons butter or margarine
2 tablespoons Worcestershire sauce
1 1/2 teaspoons seasoned salt
3/4 teaspoon garlic powder
1/2 teaspoon onion powder
Directions:
- In large microwavable bowl, mix cereals, nuts, pretzels and bagel chips; set aside.
- In small microwavable bowl, microwave butter uncovered on High about 40 seconds or until melted.
- Stir in seasonings. Pour over the cereal mixture; stir until evenly coated.
- Microwave uncovered on High for 5 to 6 minutes, thoroughly stirring every 2 minutes.
- Spread on paper towels to cool. Store in airtight container.
Parmesan Ranch Chex Mix
Ingredients:
9 cups Corn Chex, Rice Chex or Wheat Chex cereal (or combination)
2 cups bite-size pretzel twists
2 cups bite-size cheese crackers 3 tablespoons butter or margarine, melted
1 (1 ounce) package ranch dressing and seasoning mix
1/2 cup grated Parmesan cheese
Directions:
- In large microwaveable bowl, microwave butter uncovered on High about 30 seconds or until melted.
- Stir in cereal, pretzels and crackers until evenly coated.
- Stir in dressing mix and cheese until evenly coated.
- Microwave uncovered on High 3 minutes, stirring each minute.
- Spread on waxed paper or foil to cool, about 15 minutes. Store in airtight container.
Chex Muddy Buddies
Ingredients:
9 cups Rice Chex, Corn Chex, or Chocolate Chex cereal (or combinbation)
1 cup semisweet chocolate chips
1/2 cup peanut butter
1/4 cup butter or margarine
1 teaspoon vanilla
1 1/2 cups powdered sugar
Directions:
- Place cereal into a large bowl, set aside.
- Microwave chocolate chips, peanut butter and butter uncovered on High 1 minute; stir. Microwave about 30 seconds longer or until mixture can be stirred smooth.
- Stir in vanilla.
- Pour mixture over cereal, stirring until evenly coated.
- Pour into 2-gallon resealable food-storage plastic bag.
- Add powdered sugar. Seal bag; shake until well coated.
- Spread on waxed paper to cool. Store in airtight container in refrigerator.
FREE $10 Staples ePromo Card when you buy $50 in Staples eGift Cards!

FREE $10 Staples ePromo Card when you buy $50 in Staples eGift Cards!
While supplies last or exp 8/29.
FREE Shipping to store!
Lunch box ideas – Wraps!

This week we have been talking about how it is that time of year again – Back to School time. We talked about packing lunches and how it seems that some parents just popped right out of Pinterest and have more lunch box ideas than the rest of us. Then we talked about how there is the rest of us. We shop and pack and do our best. We try hard to make lunches our kids will love. My kids don’t always like sandwiches, but they do love wraps – almost anything wrapped in a tortilla. There are so many different things you can do with wraps, so keeping a few recipes is a must. How about recipes for a few favorites? Here you go!
Healthy wraps are great items for lunches! They are filling and can be made with healthy ingredients. They can contain fruits, vegetables and more. Here are a few of our favorite wraps recipes. If you try one, let us know how you liked it.
Banana Wraps
Ingredients:
4 teaspoons peanut butter
2 tablespoons honey
1/4 cup shredded coconut
1/2 cup granola
1 banana, peeled and halved lengthwise
2 large whole wheat tortillas
Directions:
- Stir together the peanut butter and honey in a bowl until smooth.
- Mix in the coconut and granola.
- Divide the mixture in half, and spread half over each tortilla.
- Place a banana half in the center of a tortilla, and roll up.
- Slice the rolls in half and wrap with plastic wrap or foil.
Turkey Taco Wrap
Ingredients:
1/2 cup pico de gallo salsa, drained
2 tablespoons taco seasoning
6 (8 inch) flour tortillas
1 cup shredded Mexican cheese blend
1/2 pound thinly sliced deli turkey breast
Directions:
- Mix sour cream, pico de gallo, and taco seasoning in a bowl; spread onto each flour tortilla.
- Sprinkle Mexican cheese blend over sour cream mixture layer.
- Top each with turkey. Roll each tortilla around the filling. Wrap each with aluminum foil and refrigerate 8 hours to overnight.
- Remove aluminum foil and slice each wrap cross-wise into 3/8-inch slices. Rewrap for lunch box.
Morning Wrap
Ingredients:
2 (10 inch) flour tortillas
1 cup cottage cheese, divided
1 cup chopped fresh pineapple, divided
1/2 cup granola cereal, divided
2 tablespoons brown sugar, divided
2 bananas, sliced lengthwise
Directions:
- Place the tortillas into a microwave oven, and heat on high until warmed and pliable, 10 to 15 seconds.
- Spread each tortilla with cottage cheese and pineapple, sprinkle with granola cereal and brown sugar, and top with a sliced banana.
- Fold the top and bottom of each tortilla down, enclosing the filling, and roll the wrap tightly into a compact cylinder.
- Slice each wrap in half across the middle and wrap in foil or plastic wrap.
Veggie Wraps
Ingredients:
1 ripe avocado – peeled, pitted, and diced
1 tablespoon mayonnaise
1/2 teaspoon salt
1/2 teaspoon garlic powder
1/4 teaspoon onion powder
1/8 teaspoon cayenne pepper, or to taste
8 (8 inch) flour tortillas 2 tomatoes, diced
1 cucumber, sliced
1 green bell pepper, cut into strips
1 head lettuce, chopped
1 (8 ounce) package fresh mozzarella cheese, sliced
Directions:
- Prepare spread: mash diced avocado, mayonnaise, salt, garlic powder, onion powder, and cayenne pepper in a bowl with a fork until well blended.
- Spread tortillas with a layer of avocado spread.
- Place diced tomatoes, cucumber slices, bell pepper strips, lettuce, and mozzarella cheese slices onto each wrap, leaving about 2 inches of space at the bottom.
- Fold bottoms up. Roll tortillas over vegetables firmly to enclose fillings.
- Wrap in foil or plastic wrap.
Lunch box ideas – Back to school!

Last week we talked about how it is that time of year again – Back to School time. We talked about packing lunches and how it seems that some parents just popped right out of Pinterest and have thousands of great lunch box ideas. Their home lunches are not only nutritional they are cute, fun and Instagram worthy. They foods are always pretty and so very fun to look at not to mention eat. Their kids show off their lunchtime creations with pride as they enjoy the oohs and aahs of their classmates. Then there is the rest of us. Our lunches are usually nutritious; we try really hard for that point. We shop and pack and do our best. The lunches are nothing to Instagram but our kids have something good to eat. But wait! There are some fun lunch box ideas that aren’t that hard!
There are a few lunch box ideas that I love. These lunch box ideas aren’t really fancy recipes but they are good, yummy lunch ideas. Here are three recipes that I love. I’ll be sharing these lunch box ideas and recipes all week. Have one you’d like me to share? Send us an email and it might be featured in one of this week’s blogs.
Easy Turkey Wraps
Ingredients:
12 (10 inch) flour tortillas
1 (8 ounce) package cream cheese
1 head lettuce
1 (6 ounce) package sliced deli-style turkey
2 cups shredded carrots
2 cups minced tomato
Directions:
1. Spread cream cheese evenly over the tortillas.
2. Top the cream cheese with lettuce leaves.
3. Arrange the turkey slices in even layers on top of the lettuce.
4. Sprinkle the carrots and tomato over the turkey slices.
5. Roll the tortillas into wraps.
6. Cut the wraps diagonally into bite-sized pieces.
7. Secure with toothpicks.
Lunch Box Pita Pockets
Ingredients:
1/2 cup deli ham, chopped
1/2 cup shredded lettuce
1/4 cup shredded carrot
1/4 cup Ranch dressing
1 pita bread round, cut in half
Directions:
1. Place ham, lettuce, and carrot in a resealable plastic bag.
2. Pour ranch dressing into a small resealable container.
3. Wrap the pita bread in plastic wrap.
4. Pack the ham mixture, ranch dressing, and pita bread along with a spoon in a lunch box or bag until lunch time.
5. Assemble pita pocket by spooning the ham mixture into each pita half and drizzling the Ranch dressing on top.
Easy Granola Bars
Ingredients:
2 cups rolled oats
1/2 cup shredded coconut
1/2 cup honey
2 tablespoons creamy peanut butter
1 teaspoon vanilla extract
1/8 teaspoon salt
Directions:
1. Preheat oven to 325 degrees. Grease a 9-inch square baking dish.
2. Spread the oats and coconut evenly across a baking sheet.
3. Toast oats and coconut in preheated oven until browned, about 10 minutes; transfer to a large mixing bowl.
4. Mix honey, peanut butter, vanilla extract, and salt in a saucepan over medium-low heat. Cook and stir until smooth.
5. Pour the honey mixture over the oats and coconut; stir to coat. Spread the mixture evenly into the prepared baking dish.
6. Bake in preheated oven until beginning to dry, about 15 minutes for crunchy granola bars, less if you like them chewy. Cool completely before cutting.
Home lunch tips and tricks!

Yesterday we talked about how it is that time of year again – Back to School time. We talked about packing lunches and how it seems that some parents just popped right out of Pinterest and have thousands of great ideas about packing home lunch. Their home lunches are not only nutritional they are cute, fun and Instagram worthy. They foods are always pretty and so very fun to look at not to mention eat. Their kids show off their lunchtime creations with pride as they enjoy the oohs and aahs of their classmates. Then there is the rest of us. Our lunches are usually nutritious; we try really hard for that point. We shop and pack and do our best. The lunches are nothing to Instagram but our kids have something good to eat. We are the crowd that burns out. We are the ones that ask, “How do they do that?” There is an answer to that question, actually many answers! And I’ve found a lot of them – there are quite a few good home lunch tips and tricks to make packing home lunch easier and maybe a bit fun. I promise there is no culinary arts degree or Pinterest fan club needed!
One of the hardest parts of making home lunches can be the amount of time it takes. There are some great home lunch tips and tricks that will help you save time when making home lunches.
Make a plan
Just like with everything else, one of the very first home lunch tips and tricks is to make a plan. Make a list of things your kids like in their lunches. Make a list of things you want to make. Sometimes a list of ideas is all it will take to get you out of a lunch making rut.
Get supplies ready ahead of time
This sounds like common sense but it isn’t always easy to remember. Scrambling around and packing a lunch at the last minute isn’t going to help you feel good about packing that lunch. Have all of the packing supplies like baggies and containers ready and in an easy to find place. Keep the lunch boxes ready to go and in the same place. Keep the ice pack in the same place in the freezer.
Prep ahead of time
Put pantry lunch items like crackers or pretzels into single serving baggies ahead of time. Do the same with carrots, grapes or other fridge items. It will make putting lunches together quicker and easier. Do any of the prep that you can when you purchase the items. You’ll thank yourself later.
Create lunch stations
Keep all of the lunch items together in the fridge or the pantry. If the items are easy to find and stored together, grabbing what you need will be easy. I think this is one of the best home lunch tips and tricks. Non refrigerated lunch items can be kept together in the pantry. Refrigerated items can be kept together in the fridge. This makes it easy to grab what you need without wasting time. You can even pair items up and rubber-band or baggie them together.
Have more home lunch tips and tricks to help save time? Let us know! We love to hear from you!
Back to school – Packing home lunch!

It is that time of year again! If your kids haven’t gone back to school already, they will be going back soon. We are right in the home stretch at our house. School starts next week and there is still so much to do! Every year there are clothes and shoes to buy – who told these kids to grow so fast! There are notebooks, pencils, paper, glue, crayons, and so many other things on the shopping list. There is one thing about back to school that always seems to spark debate among friends and family. Lunch time – it seems to bring endless discussion about school lunch and home lunch. Which is better and which should you do? The debates get heated and talking can quickly turn to ranting. I’m not going to have any of that here today – whew! I’ve seen enough online already! I want to talk about a few good ideas assuming some of you have already made the lunch time decision. Let’s talk about packing home lunch.
There are so many reasons that parents choose packing home lunch instead of school lunch. Some people like it because it is cheaper. Some like it because they think it is more nutritious. Some like it because meals can be adapted to fit picky eaters or food allergies. Some people like it because they just like packing home lunch. Whatever the reason, lots of people are starting this school year packing home lunch.
Sometimes packing home lunch gets really discouraging. It might seem easy now, but as the days go on it seems it gets harder to think of good lunch ideas. It seems like many people start the year saying they will be packing home lunch for their children but end up purchasing school lunch for ease or out of frustration. Many times that switch to school lunch leaves parents feeling guilty or frustrated. It has happened to me many times. So that made me wonder, what is it about packing home lunch that is so easy for some parents and so frustrating for others?
It seems that some parents just popped right out of Pinterest and have thousands of great ideas about packing home lunch. Their home lunches are not only nutritional they are cute, fun and Instagram worthy. They foods are always pretty and so very fun to look at not to mention eat. Their kids show off their lunchtime creations with pride as they enjoy the oohs and aahs of their classmates. Then there is the rest of us. Our lunches are usually nutritious; we try really hard for that point. We shop and pack and do our best. The lunches are nothing to Instagram but our kids have something good to eat. We are the crowd that burns out. We are the ones that ask, “How do they do that?” There is an answer to that question, actually many answers! And I’ve found a lot of them and see that there are quite a few good tips and tricks to make packing home lunch easier and maybe a bit fun. I promise there is no culinary arts degree or Pinterest fan club needed! If you come back tomorrow I’ll share the tips and tricks with you too. Let’s take the guilt and frustration out of packing home lunch.
What is a gift stash or gift closet?

What is a gift stash or gift closet? I’ve had a couple of questions about this because I mention it quite frequently when I post online deals here on Pinching Your Pennies! It’s simple! I find great deals on awesome items now that I will use later as great gifts. It is what allows me to give crazy good gifts at discount store prices. It is easy to do and can help you save lots of money. I am going to bring back a few tips that can make this an easy thing to do.
Decide where you are keeping your gift stash or gift closet and prepare a place.
This is a huge and very important tip. It is what will make your gift stash or gift closet work well for you or drive you crazy. Whenever you purchase an item for the gift stash or gift closet put it right where it goes. Hiding things all over the house leads to lost gifts and gifts being seen by the kids and spouses ahead of time. I have some large plastic totes on a shelf in my garage. The gift items go in the totes the same day I buy them.
Keep an inventory.
I’ll admit I don’t always do this. I will also tell you that it is so much easier when I actually do keep a quick list of the items in my gift stash or gift closet. You avoid overbuying and know what you can give before you even start looking through the items in your gift stash or gift closet.
Know your gift recipient base.
Think about who you give gifts to and the situations in which you’ll be giving them. Think about relatives’ ages and likes. Think about the ages of friends and potential birthday parties. Knowing who you will be giving future gifts to will help you grab those bargains to use as great gifts later.
Know where and how to shop.
Have a favorite item to gift? Do you know when it goes on sale? Do you know where the sale and clearance departments are at your favorite stores? When you are out shopping, take a look at the clearance and sale items. Swing by the toy department and watch for clearance bargains. Don’t forget to shop online for your gifts. There are always great deals on Pinching Your Pennies that would perfect gift stash or gift closet items. When you have a really good grasp on building up your gift stash or gift closet you’ll be great at spotting items for gifting events that are months away. This is why it is important to know your recipient base like I mentioned above. It is easy once you start.
Know your budget.
Don’t spend too much trying to build a gift stash or gift closet quickly. Stick to all of the above tips and build your gift stash or gift closet slowly. Overspending and breaking your budget will defeat the purpose of building up a gift stash or gift closet.
Include giftwrap and cards.
Pretty simple tip but it can save you big. Pick up some extra wrapping paper, gift bags and cards when you see them on great deals or sales. Keep it all together with the gift stash or gift closet or in another easy to find place.
Have fun and enjoy giving the gifts.
That’s the whole point of creating a gift stash or gift closet. Enjoy giving your gifts and have fun buying them.
Crock Pot Buying Tips!

All week we’ve been talking about crock pots and about how football season started in my house and how that means little league times three for me. That’s because I have three boys playing little league football this year and a daughter who swims on a swim team. That means every weekday night we are at four different practices at four different places but the times all overlap. I decided that I need to find a good answer to making dinner even though I won’t be home. Otherwise we will end up eating lots of fast food, sandwiches, cereal and hot dogs! Yuck! The need for good healthy but quick dinners made me think I need to start using my crock pot, or slow cooker, again. As we’ve been talking about this I’ve been thinking that it might be time to replace one of my crock pots. It just doesn’t seem to be heating up and cooking food very well. Because I might be crock pot shopping soon, I decided I better start thinking about crock pot buying tips.
When you set out to buy a crock pot there are so many things to consider – basic crock pot buying tips are good to keep in mind. If you ignore these tips, crazy things happen. You may end up owning the cutest purple crock pot that looks fun and adorable. But that fun and adorable purple crock pot won’t cook your food well and you’ll be sad and disappointed. (Reason I need to buy a new crock pot in paragraph #1.) I learned the hard way that all crock pots are not created equal. Here are a few of the crock pot buying tips to keep in mind when you go shopping for your next crock pot.
Manual vs Programmable
This seems like a pretty basic option – but sometimes it can be tricky! If I had listened to this important one of the crock pot buying tips I wouldn’t have my purple crock pot disaster. Manual is pretty easy to figure out – the crock pot has a few basic settings and you have to adjust it and turn it off or on when you want. Programmable is much more complicated. Pay attention to how many different setting it has. Look for features like timers and keep warm settings. Some programmable crock pots will come with probes to help get foods to the correct temperatures. Just because it says it is programmable does not mean there are all of the settings and features you want.
Removable Crock
This one would be a deal breaker for me but I see crock pots with non-removable liners all of the time. I need to be able to wash the crock and really scrub it. If you can’t put the whole thing in the sink, there is no way it will work for me.
Where’s the Lid?
When it comes to crock pots, all lids are not created equal. Once again, if I had listened to this important one of the crock pot buying tips I wouldn’t have my purple crock pot disaster. Lids are either attached or unattached. Attached lids may be held in place with a strap or lock. Some lids are actually permanently attached or attached so strangely that they are too hard to remove. Check the lid before you buy your crockpot.
Size and Shape Matter
Crock pots come in lots of shapes and sizes. Pay attention to the size – a too small or too big crockpot will cause problems with uneven cooking and incorrect cooking times. If you want to fit roasts, hams or chickens or other odd shaped foods into the crock pot, get the appropriate shape. Ovals might work better for some larger items.
Do you have crock pot buying tips that aren’t listed here? Let us know – we love to hear from you!
Family favorite crock pot recipes!

For the last couple of days we have talked about how football season started in my house and how that means little league times three for me. That’s because I have three boys playing little league football this year and a daughter who swims on a swim team. That means every weekday night we are at four different practices at four different places but the times all overlap. I decided that I need to find a good answer to making dinner even though I won’t be home. Otherwise we will end up eating lots of fast food, sandwiches, cereal and hot dogs! Yuck! The need for good healthy but quick dinners made me think I need to start using my crock pot, or slow cooker, again. I’ve gathered a couple of family favorite crock pot recipes that make crock pot cooking easy and yummy.
Sometimes the most simple crock pot recipes are the ones that end up being family favorites. That’s what these recipes are – simple family favorite crock pot recipes. My whole family loves them all. Do you have some simple family favorite crock pot recipes? If you do, share them with us! We’ll feature a few in an upcoming blog.
Crock Pot Taco Soup
Ingredients:
1 pound ground beef
1 (1.25 ounce) package taco seasoning mix
1 (1 ounce) package ranch dressing mix
1 (14.5 ounce) can diced tomatoes and green chiles, undrained
1 (15.5 ounce) can corn, undrained
1 (15.5 ounce) can black beans, undrained
1 (15 ounce) can sliced black olives
1 onion, diced
1 green bell pepper, diced
1 cup tomato juice
Directions:
- Heat a large skillet over medium-high heat; cook and stir beef until crumbly, evenly browned, and no longer pink.
- Drain and discard any excess grease.
- Transfer beef to a slow cooker and sprinkle with the taco seasoning mix and ranch dressing mix.
- Add the diced tomatoes and green chilies, corn, and black beans, all with their liquid, to the slow cooker.
- Stir the black olives, onion, bell pepper, and tomato juice into the ground beef mixture.
- Cook on low until the vegetables are completely tender, about 5 hours.
Crock Pot Pulled Pork
Ingredients:
1 (2 pound) pork tenderloin
1 (12 fluid ounce) can or bottle root beer
1 (18 ounce) bottle your favorite barbecue sauce
8 hamburger buns, split and lightly toasted
Directions:
- Place the pork tenderloin in a slow cooker; pour the root beer over the meat.
- Cover and cook on low until well cooked and the pork shreds easily, 6 to 7 hours. The actual length of time may vary according to individual slow cooker.
- Drain well. Stir in barbecue sauce.
- Serve over hamburger buns.
Crock Pot White Chili
Ingredients:
2 cups chopped, cooked chicken breast
1 (15.5 ounce) can white beans, drained
1 (14.5 ounce) can chicken broth
1 (15.25 ounce) can white corn, drained
1 (7 ounce) can green salsa
1 (4 ounce) can chopped green chilies
1 large tomato, chopped
1/4 cup chopped fresh cilantro
2 green onions, chopped
1 tablespoon lemon juice
1 tablespoon lime juice
Directions:
- Stir chicken, white beans, chicken broth, white corn, green salsa, green chilies, tomato, cilantro, green onion, lemon juice, and lime juice together in the crock of a slow cooker.
- Cook on low until hot, about 1 hour.