
Taste Of Home Magazine – Just $9.95 for 1 Year!

Deal of the Day – Taste Of Home Magazine – Just $11.99 for 1 Year
October 6th Only – Use Coupon Code FALL17and Save an Additional 17%!
PYP’s Freezer Meal Plan: The Chicken Edition

Here is how PYP Member “Dori” makes 9 meals in 3 hours for about 50 bucks
Each meal serves 4-6 people
The meals:
- Chicken Spaghetti (Two times)
- Fruity Curried Chicken
- Chicken Chili
- Honey Lime Chicken Enchiladas
- Cheesy Chicken and Rice Bake
- Cheesy Chicken Shells
- Chicken and Veggie Soup (Two times)
The Grocery List:
- 3 whole roasting chickens (Approx 4-5 pounds each)
- 1/3 cup parmesan cheese
- 4 cups (1 pound) shredded cheddar cheese
- ¾ cup shredded mozzarella
- 4 cups (1 pound) shredded Monterey jack cheese
- 15 oz ricotta cheese
- 10 oz package frozen spinach leaves, thawed
- 5 cups assorted veggies of your choice, finely diced. Example: green beans, corn, peas, broccoli, zucchini, cabbage, mushrooms. Check your fridge and freezer. You might already have them!
- Small bag (9 oz) of fresh baby spinach leaves.
- ½ lb broccoli florets
- 1 green bell pepper
- 1 red bell pepper
- 4 small onions or 2 large
- 2 or 3 stalks of celery
- 1 large carrot
- 2 limes
- 1 lemon
- 1/3 cup raisins
- 3 – 15oz cans of white beans. Navy or cannellini.
- 7 oz can diced green chilies
- 5 quarts plus 1 can chicken broth I used this homemade veggie broth powder. BIG money saver!
- 1 – 8.75 oz can apricots
- 1 large or 2 small cans green enchilada sauce
- 15 oz can tomato sauce
- 1 can condensed cheddar cheese soup
- 2 cans cream of chicken soup
- ½ pound dried pasta in small shapes (stars, mini shells, etc)
- 12 oz package thin spaghetti noodles
- 12 uncooked jumbo pasta shells
- 10 flour tortillas
- 1 ½ cups uncooked long grain rice
Check the pantry to make sure you have:
- 1 egg
- garlic
- honey
- oil
- Creole seasoning
- Ground white pepper (black is fine if you don’t have white)
- Cumin
- Dried oregano
- Cinnamon
- Garlic powder
- Seasoned salt
- Cayenne pepper
- Chili powder
- Curry powder
- Dried basil
- Bay leaves
You’ll need a few gallon sized Ziploc bags and at least one 8X8 pan and one 9X13 pan that can go into the freezer.
For less stress and best results, start with a clean kitchen and an empty dishwasher.
You should be able to pull these all together within 3 hours or as soon as you can handle the chicken to remove it from the bones.
Preheat the oven to 400 degrees while you rinse and pat dry the chickens.
Place them in a large roasting pan. Rub them down with some olive oil or vegetable oil and sprinkle them with some Creole seasoning or seasoned salt, your choice. Just trying to give them a hint of flavor and retain the juices by crisping up the skin.
Place the chickens in the oven and roast for 30 minutes. Then reduce the oven temperature to 350 and continue roasting for 45 minutes to an hour, until juices run clear or thermometer placed in thickest part of thigh reaches 165 degrees.
When they’re done, remove from oven and place the pan on a cooling rack to help them cool off faster.
While the chickens are roasting and cooling put together each meal.
Meal 1 and 2:
Start the Chicken and Veggie Soup.
In a very large stock pot, heat 2 tablespoons of oil, over medium heat.
Chop one onion, the celery, the carrot, half of the green bell pepper and half of the red pepper. Toss them in the pot with the heated oil. Add 2 Tablespoons of minced garlic, 1 Tablespoon dried basil, 2 teaspoons Creole seasoning, and 2 bay leaves.
Sauté veggies for about 4 minutes.
Add the 5 cups of finely diced assorted veggies and a pinch of red pepper flakes. Sauté for 1 minute.
Add 3 quarts of chicken broth.
Turn off the heat and let stand.
Meal 3:
Start the Chicken Chili.
Heat 1 Tablespoon oil in large pot over medium heat. Add 1 chopped onion and 3 cloves minced garlic and sauté until onions are soft, about 5 minutes. Add the canned green chilies, 1 Tablespoon ground cumin, 1 Tablespoon dried oregano, ½ teaspoon cinnamon, dash of cayenne pepper and dash of white pepper. Saute 5 more minutes. Drain 2 cans of white beans and add them to the onion and spice mixture. Add five cups chicken broth.
Take the third can of white beans and puree the beans with their liquid in a blender or food processor. Add this to the pot. Bring to a boil.
Remove from heat, stir in 2 cups shredded Monterey jack cheese. Stir until cheese is melted.
Let stand.
Put a large pot of water on to boil for the pasta shells.
If you need a pot, you can put the chicken chili in a large bowl to cool and rinse and reuse that pot.
While you wait for the water to boil and the shells to cook…
Meal 4:
Mix the ingredients for the Cheesy Chicken and Rice Bake
In a large bowl combine the cheddar cheese soup, 2 cups water, 1 cup shredded cheddar cheese, ¾ cup uncooked long grain rice, ½ pound broccoli florets.
Set aside.
When the pasta shells are done, rinse with cold water and lay out on waxed paper so they won’t stick together.
Fill that pot with water again and bring to a boil for the spaghetti. Break the spaghetti into fourths and cook according to package directions. Do not overcook! When it’s done, drain and rinse with cold water.
While you wait for the water to boil and the spaghetti to cook…
Meal 5:
Make the filling for the Cheesy Chicken Shells
Squeeze the water from the thawed spinach and then chop it finely.
In a medium bowl, combine the ricotta, 1 egg (slightly beaten), the thawed spinach, 1 teaspoon garlic powder, and 1 Tablespoon dried oregano. Mix until well combined. Stir in ¼ cup parmesan and ¼ cup shredded mozzarella cheese.
Set aside.
Meal 6 and 7:
Make the Chicken Spaghetti
In a large bowl combine the 2 cans cream of chicken soup, 2 cups shredded cheddar cheese, the other half of the red bell pepper (chopped), the other half of the green bell pepper (chopped), one chopped onion, 2 cups chicken broth, 1 teaspoon seasoned salt, black pepper, pinch of cayenne pepper and the cooked spaghetti. Mix well. Set aside.
Meal 8:
Fruity Curried Chicken
In a medium saucepan, heat ¾ cup long grain white rice, 1 chopped onion and 2 ½ cups chicken broth to a boil. Stir, cover and reduce heat to low. Simmer on low for 18 minutes without lifting lid. Then turn off the heat.
While the rice cooks, it’s time to pick all that chicken off the bones. Get as much chicken off as you can and put it in a big bowl. No need to worry about the size for now. Just get it off the bones.
Save all the skin and bones for later. Just leave them in the roasting pan for now.
Now let’s finish a few things up.
Turn the Chicken and veggie soup back on. Bring it to a boil and add the ½ pound of small pasta. Continue to boil until the pasta is slightly underdone. Turn off heat.
Meanwhile, Grab a couple of handfuls of chicken and chop it in large chunks (1/2 to 1 inch sized pieces). Add 2 cups of the chunks to the Chicken Chili. Mix well.
Divide the Chicken Chili between two gallon size freezer bags. Seal tightly, expelling as much air as possible.
Label bags as follows – Chicken Chili: Thaw in fridge. Bring to boil, reduce heat, simmer 10 minutes.
Lay bags flat and place in freezer. Both bags = 1 meal. I like to tape the bags together since they are for one meal.
Back to the Fruity Curried Chicken –
Grab another couple of handfuls of chicken and chop it into large chunks. Put 2 cups of the chunks into the pan of cooked rice. Drain the can of apricots and cut them into chunks. Put the apricots, ¾ teaspoon salt, 1 teaspoon curry powder, ¼ teaspoon black pepper, juice from half the lemon, and 1/3 cup raisins in the saucepan with the rice and chicken. Gently stir till combined.
Place in gallon sized Ziploc bag. Seal tightly, expelling as much air as possible without smashing the rice too much. Flatten the bag to conserve freezer space.
Label bag as follows – Fruity Curried Chicken: Thaw, place in baking dish treated with non stick spray. Cover with foil. Bake for 1 hour at 350 degrees. Check the dish at 30 minutes. Add small amount of water if the rice is becoming too dry.
Place in freezer.
Finish up the Chicken and Veggie Soup –
Grab a couple of handfuls of chicken and chop into large chunks. Add 3 cups to the soup. Stir in the fresh spinach leaves until wilted. Let the soup cool while you finish other dishes.
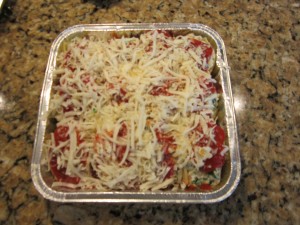
Finish up the Cheesy Chicken Shells –
Grab one hand full of the chicken. Chop it very finely. Add 1 cup to the ricotta mixture and mix well.
In 8X8 baking dish (foil pan if you prefer) pour half the can of tomato sauce. Fill the cooked shells with the ricotta mixture. Place the stuffed shells in the pan, on top of the tomato sauce. Pour remaining tomato sauce evenly over the stuffed shells. Sprinkle ½ cup shredded mozzarella cheese and the remaining parmesan over the shells. Cover tightly with foil and label as follows – Cheesy Chicken Shells: Thaw, remove foil, bake 30 – 45 minutes at 350 degrees, until center shells are heated through.
Place pan in freezer.
Finish up the Chicken Spaghetti-
Grab a couple of handfuls of chicken and chop into smallish pieces, ½ inch or less. Add two cups of chicken pieces to the bowl of chicken spaghetti. Mix well. Divide in half between two 8X8 baking dishes (foil pans if you prefer). Top each pan with ½ cup shredded cheddar cheese. Cover tightly with foil. Label as follows:
Chicken Spaghetti: Thaw, Remove foil, bake at 350 degrees for 45 minutes or until hot and bubbly throughout.
Place pans in freezer.
Note: You can also put each half of the recipe into a gallon bag. Place the additional cheese for topping in smaller bags and tape one to each of the gallon sized bags.
Finish up the Cheesy Chicken and Rice Bake –
Grab two handfuls of chicken and chop it into large chunks.
Add 2 cups of chicken to the bowl of broccoli, rice and soup mixture. Mix well.
Place in gallon sized Ziploc bag. Seal tightly, expelling as much air as possible and flattening the bag to save freezer space. Label as follows:
Cheesy Chicken and Rice Bake: Thaw, place in 9X13 pan treated with nonstick spray, cover tightly with foil, bake 45 minutes at 375 degrees.
Place bag in freezer.
Note: This could also be frozen in a pan rather than a bag.
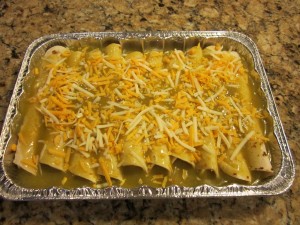
Meal 9: Make the Honey Lime Chicken Enchiladas.
Combine 6 Tablespoons honey, 4 ½ Tablespoons lime juice, 1 Tablespoon chili powder, ½ teaspoon garlic powder. Mix completely.
Chop the remaining chicken very finely. Add it to the above mixture and stir well.
Let that marinate while you package the Chicken and Veggie Soup.
Divide the Chicken and Veggie Soup evenly between two gallon sized freezer bags. Seal tightly, expelling as much air as possible. Label as follows:
Chicken and Veggie Soup: Thaw, Bring to a boil and simmer 10 minutes.
Each bag is one meal. Two bags = two meals.
Place bags in freezer.
Finish up the Enchiladas.
Pour half the large can (or 1 small can) enchilada sauce on the bottom of a 9X13 baking dish which has been treated with non stick spray.
Place 10 flour tortillas on counter top.
Evenly divide the marinated chicken among the tortillas.
Top each one with a bit of shredded Monterey Jack cheese, reserving about a 1 cup of cheese.
Roll each tortilla tightly and place in pan on top of enchilada sauce.
Pour remaining enchilada sauce on top of rolled tortillas.
Top with remaining Monterey Jack Cheese.
Cover tightly with foil and label as follows:
Honey Lime Chicken Enchiladas: Thaw, Remove foil, bake at 350 degrees for 30 minutes or until heated completely through.
You’re done!
Now, about those bones…you can turn them into delicious broth for the next time you do this. See this link for instructions.
If you don’t want to do that right now, you can put all the bones and the drippings from the pan into freezer bags and put them in the freezer to make broth another day.
Chicken and Veggie Soup – my original recipe
Chicken Chili – my original recipe
Honey Lime Chicken Enchiladas – posted by Wengmama and a popular favorite here on PYP
Cheesy Chicken and Rice Bake – adapted from a recipe here on PYP
Chicken Spaghetti – adapted from Pioneer Woman Cooks website
Cheesy Chicken Shells – adapted from a Weight Watcher’s recipe
Fruity Curried Chicken – from Once a Month Cooking by Mimi Wilson and Mary Beth Lagerborg
Fresh Pear Cobbler Recipe
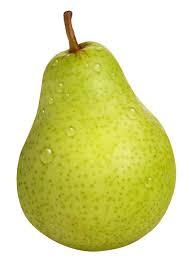 I decided today to share with you a recipe for super yummy Fresh Pear Cobbler and another great way to use up the abundance of pears.
In my neighborhood there are a lot of pear trees! None of these trees are in my yard, but there are so many people watching to share their produce with us. I love it when people share their pears! There is a cute man that always puts them out on the sidewalk in front of his house with a sign says they are are free. I think I am the only one that takes them. You know when you buy produce from the grocery store it is usually picked way before it’s prime, and you never know how long it has been sitting there. Pears from the grocery store always seem so hard and dry to me. The neighborhood pears are perfect! Full of juice and yummy!
I love to just eat pears plain and without fuss. BUT, when there are so many pears in my kitchen I need to do some other things with them.
A couple of years ago I did a search online and found THE BEST Fresh Pear Cobbler recipe on Good Stuff Maynard. This instantly became a family favorite recipe! My sister even has me make a couple for her family each year too. The only tweak I make to the recipe is that I cut the sugar in 1/2 – the original recipe is amazing, but a little too sweet for my taste
Here is the recipe:
Fresh Pear Cobbler
Ingredients:
- 3 ripe pears, sliced
- 1 cup white sugar
- 1/4 cup butter
- 3/4 cups flour
- 2 teaspoons baking powder
- 1 teaspoon cinnamon
- 1/4 teaspoon salt
- 3/4 cups milk
- 1 egg
- Preheat oven to 325*
- Put butter in 2-quart casserole and place in oven until melted, then remove from the oven.
- Mix pears with 1/2 cup white sugar and let stand.
- Combine all dry ingredients and mix well.
- Whisk together the milk and egg; slowly combine with dry ingredients & remaining 1/2 cup of sugar to make a batter.
- Pour the batter over melted butter, (do not stir). Then spoon pears over the batter (do not stir) and bake for 50 to 60 minutes.
Serve hot or cold with ice cream or whipped cream.
Another thing that I love to do with my pears is to make pearsauce – yup, just like applesauce, but with pears. I do it sugar free and I freeze it in small containers for use throughout the next several months. All I do it make it is cut up pears and cook them in my crockpot until they are soft. I usually use a little cinnamon and sometime cloves for added flavor, but that is it! Once they are cooked I drain the excess liquid and mash them up good! Simple as that!
Halloween Food – Instructables Halloween Book 3 – Kindle Edition – FREE!
So fun! Perfectly creepy recipes and ideas! Love it!
 Halloween Food – Instructables Halloween Book 3 – Kindle Edition
Digital List Price: $1.99
You Save: $1.99 (100%)
Kindle Price: $0.00
Eligible for free shipping on $35+ orders or on ANY order with Amazon Prime.
Don’t have a Prime membership? Get a one month free trial! Click here for details!
A PYP Best Blog! Grocery Budget Crack-Down Plan: Menu Planning!
Just in case you missed this article on menu planning the first time we shared it a couple of years ago, we are republishing it. After Marne wrote this blog originally, we got an awesome response. This is one of the PYP Best Blogs!
Menu planning has always been daunting to me. I go through phases when I do it, and don’t do it. I am always glad when I have it done, though. Over the years I have learned a few things about menu planning that work for me and my family.

1. Simple is best. Sure…trying new recipes is fun but simple, basic recipes is when my family is happiest. That means mom is happy too.
2. Involve children in menu planning. They are more apt to not complain when they have a say in what is being eaten. There can be a kids choice night, they can help you decide the month in advance, or you can schedule fun food nights. No matter how you do it they will know you are thinking of them.
3. Prep more than one meal at once. If you are cooking hamburger for tacos one night, cook double and freeze the rest for your soup later in the week. Saves so much time.
4. Plan meals around leftover ingredients in your fridge and what you have in your food storage. If you are planning simple. basic meals that don’t have a lot of fluff you will most likely have everything you need on hand, except perishables. Making a quick weekly trip to the store for perishables is much easier than huge stock-up trips.
I have tried many different ways to menu plan over the years. I have spent hours and hours online looking at menu planning websites, cooking blogs, and recipe sites to get ideas. Sure, I was reading lots of great ideas but it was only overwhelming me not helping me. Binders, boxes, files….ACK!!! I decided that I was making things too complicated….and I just need to keep my menu planning simple, easy, and clean.
I started by going through my recipes and writing down lists of everything we like to eat…soups, meats, chicken, sides etc, so I had an idea of where to start with my meals.
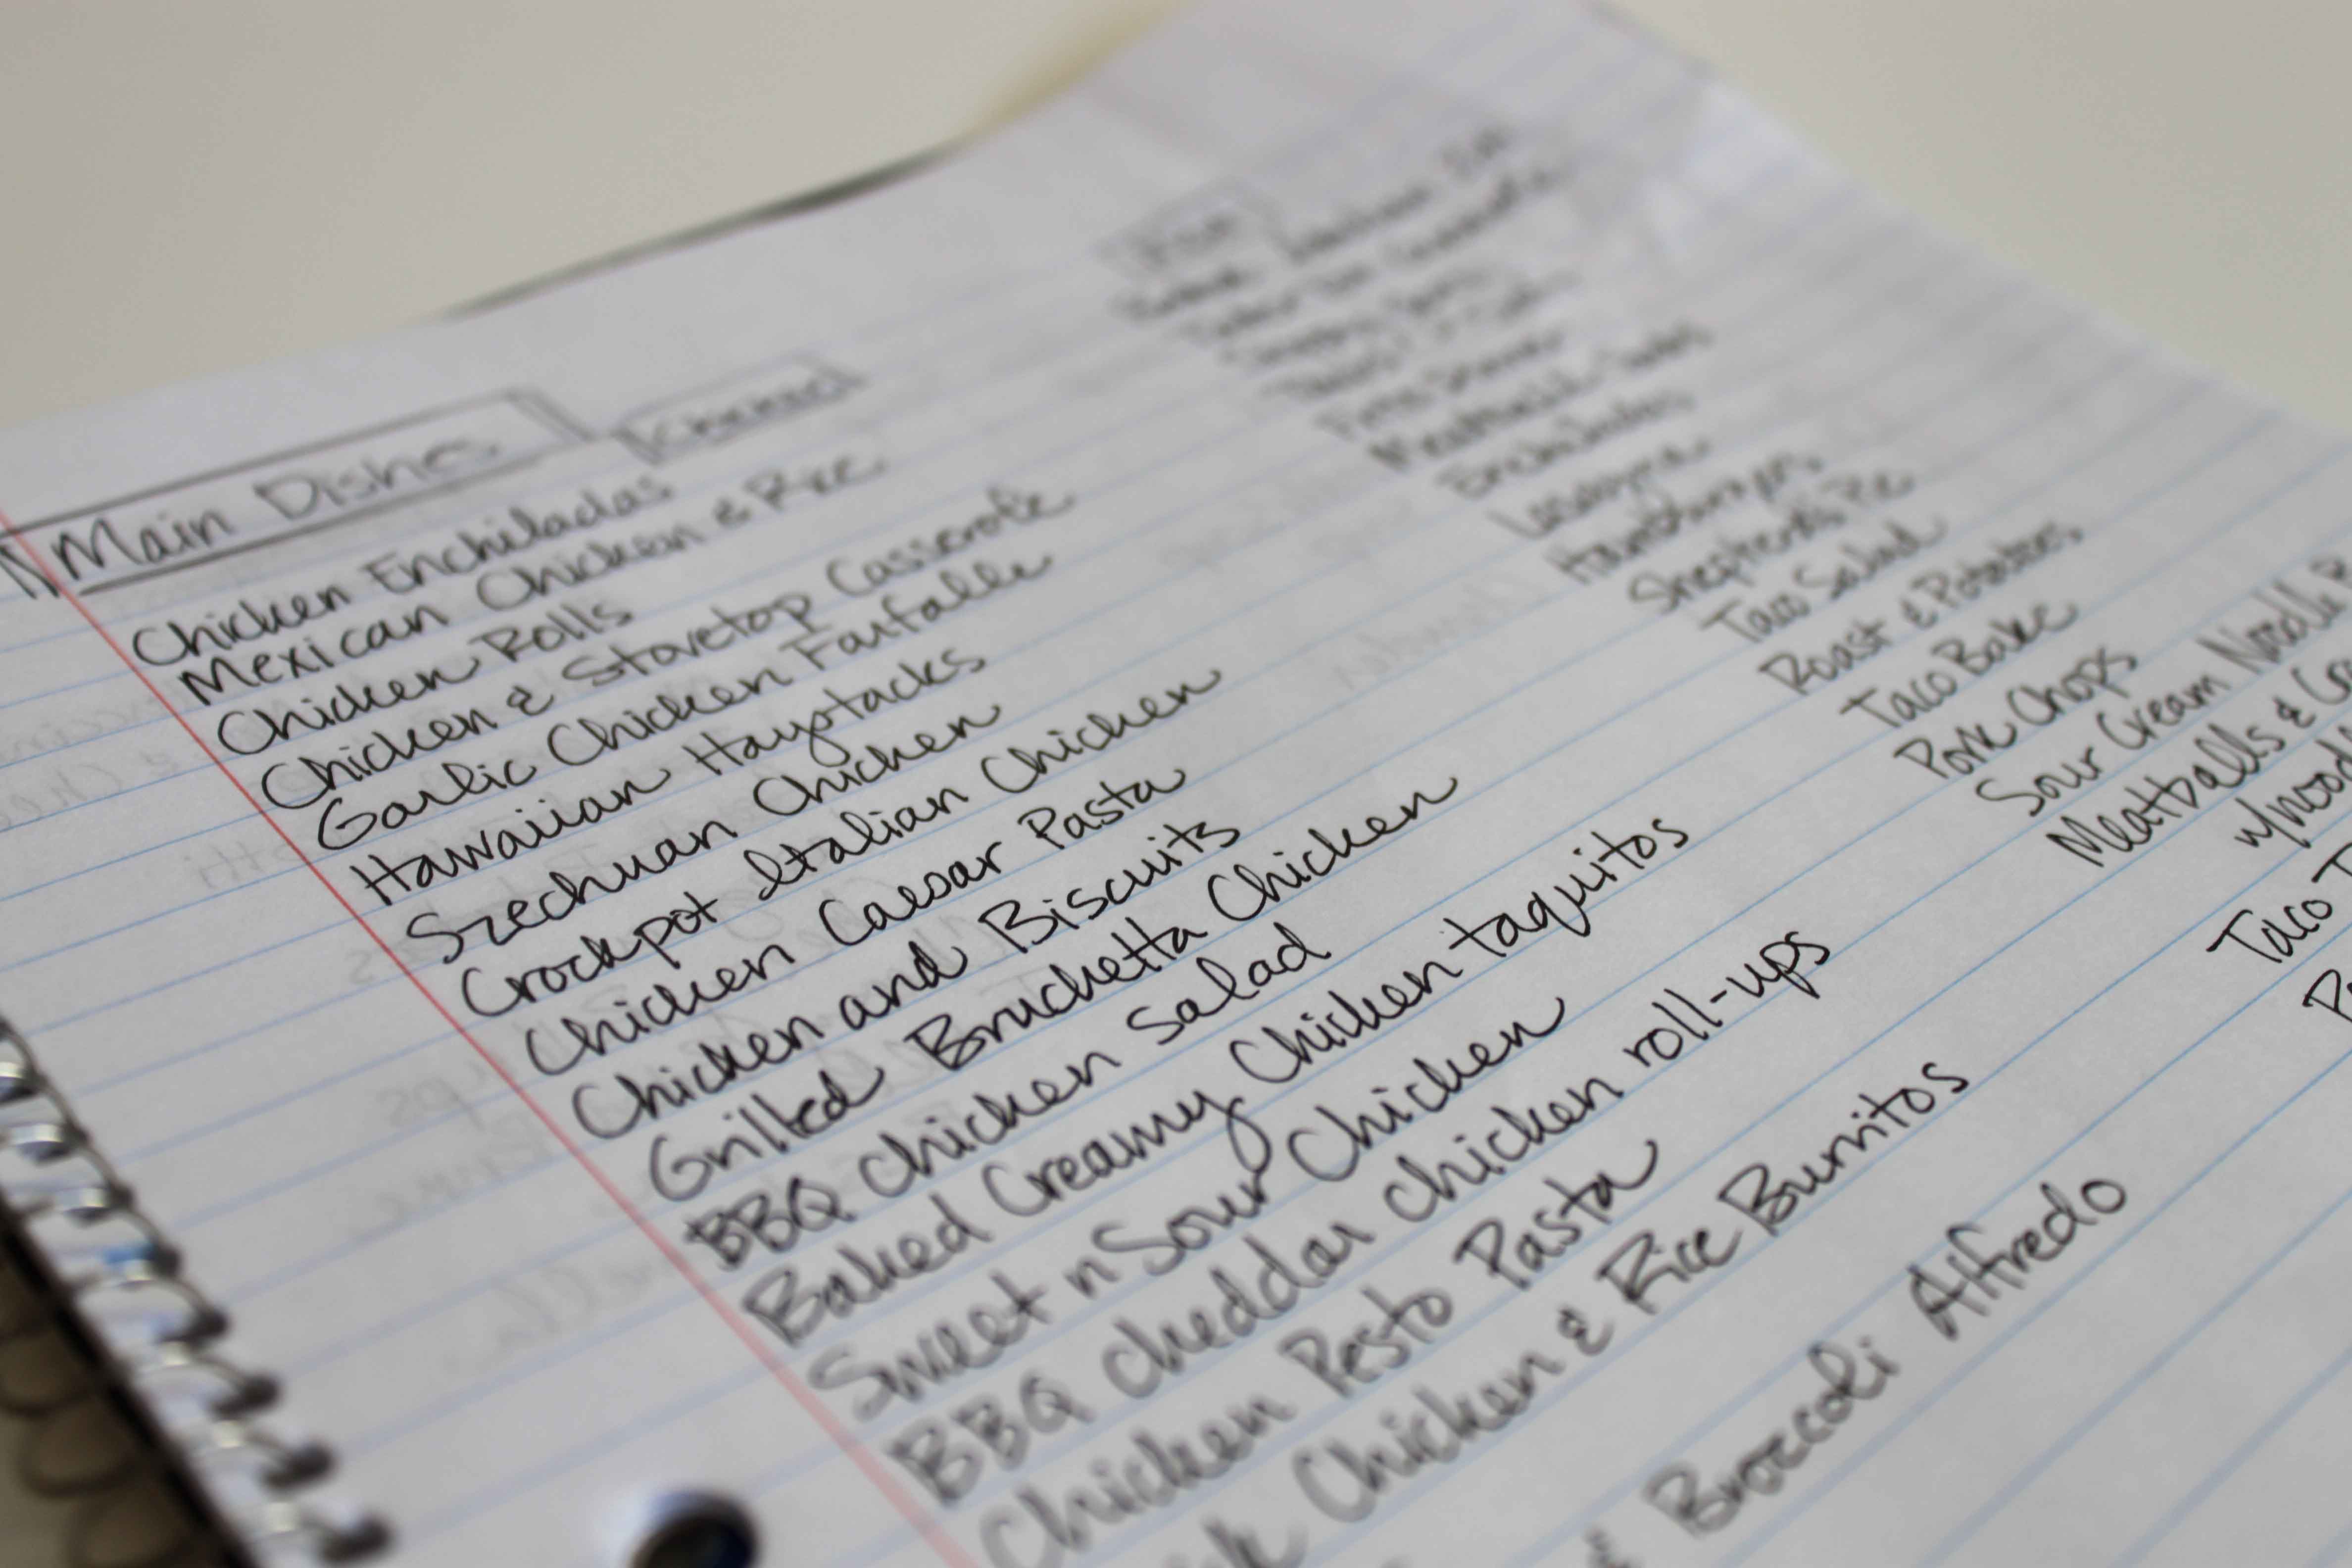
For now, I will be planning on a monthly basis. I am first beginning with dinners, as that seems to be the most difficult. I left a spot at the bottom to write in treats I want to make during the month and breakfasts I want to make. I will fill those in later and as I see fit.
A PYP Best Blog! DIY Recipes: Homemade Meatballs!
Just in case you missed this DIY article on making homemade meatballs the first time we shared it a couple of years ago, we are republishing it. After Marne wrote this blog originally, we got an awesome response. This is one of the PYP Best Blogs!
Tuesday I picked up my 40 lb box of ground beef from Zaycon and needed to prep it. One of my favorite things to have ready in the freezer are homemade meatballs. I don’t particularly like making them, but I love having them all ready for meals. So I just remind myself of that. I made and froze 208 meatballs!! Holy cow.
Here is how I like to do homemade meatballs!
HOMEMADE MEATBALLS
1 1/2 lbs lean hamburger
3/4 cup quick oats
1 egg
1/4 cup finely diced onion
1/4 cup milk
1 tsp salt
1 tsp ground pepper (use another teaspoon of pepper if you love pepper flavor)
1 tsp Worcestershire sauce
2 Tbsp ketchup
1 Tbsp dry parsley
Put all ingredients into a large bowl (I love using glass bowls as they clean easily from all the germs from raw meat).
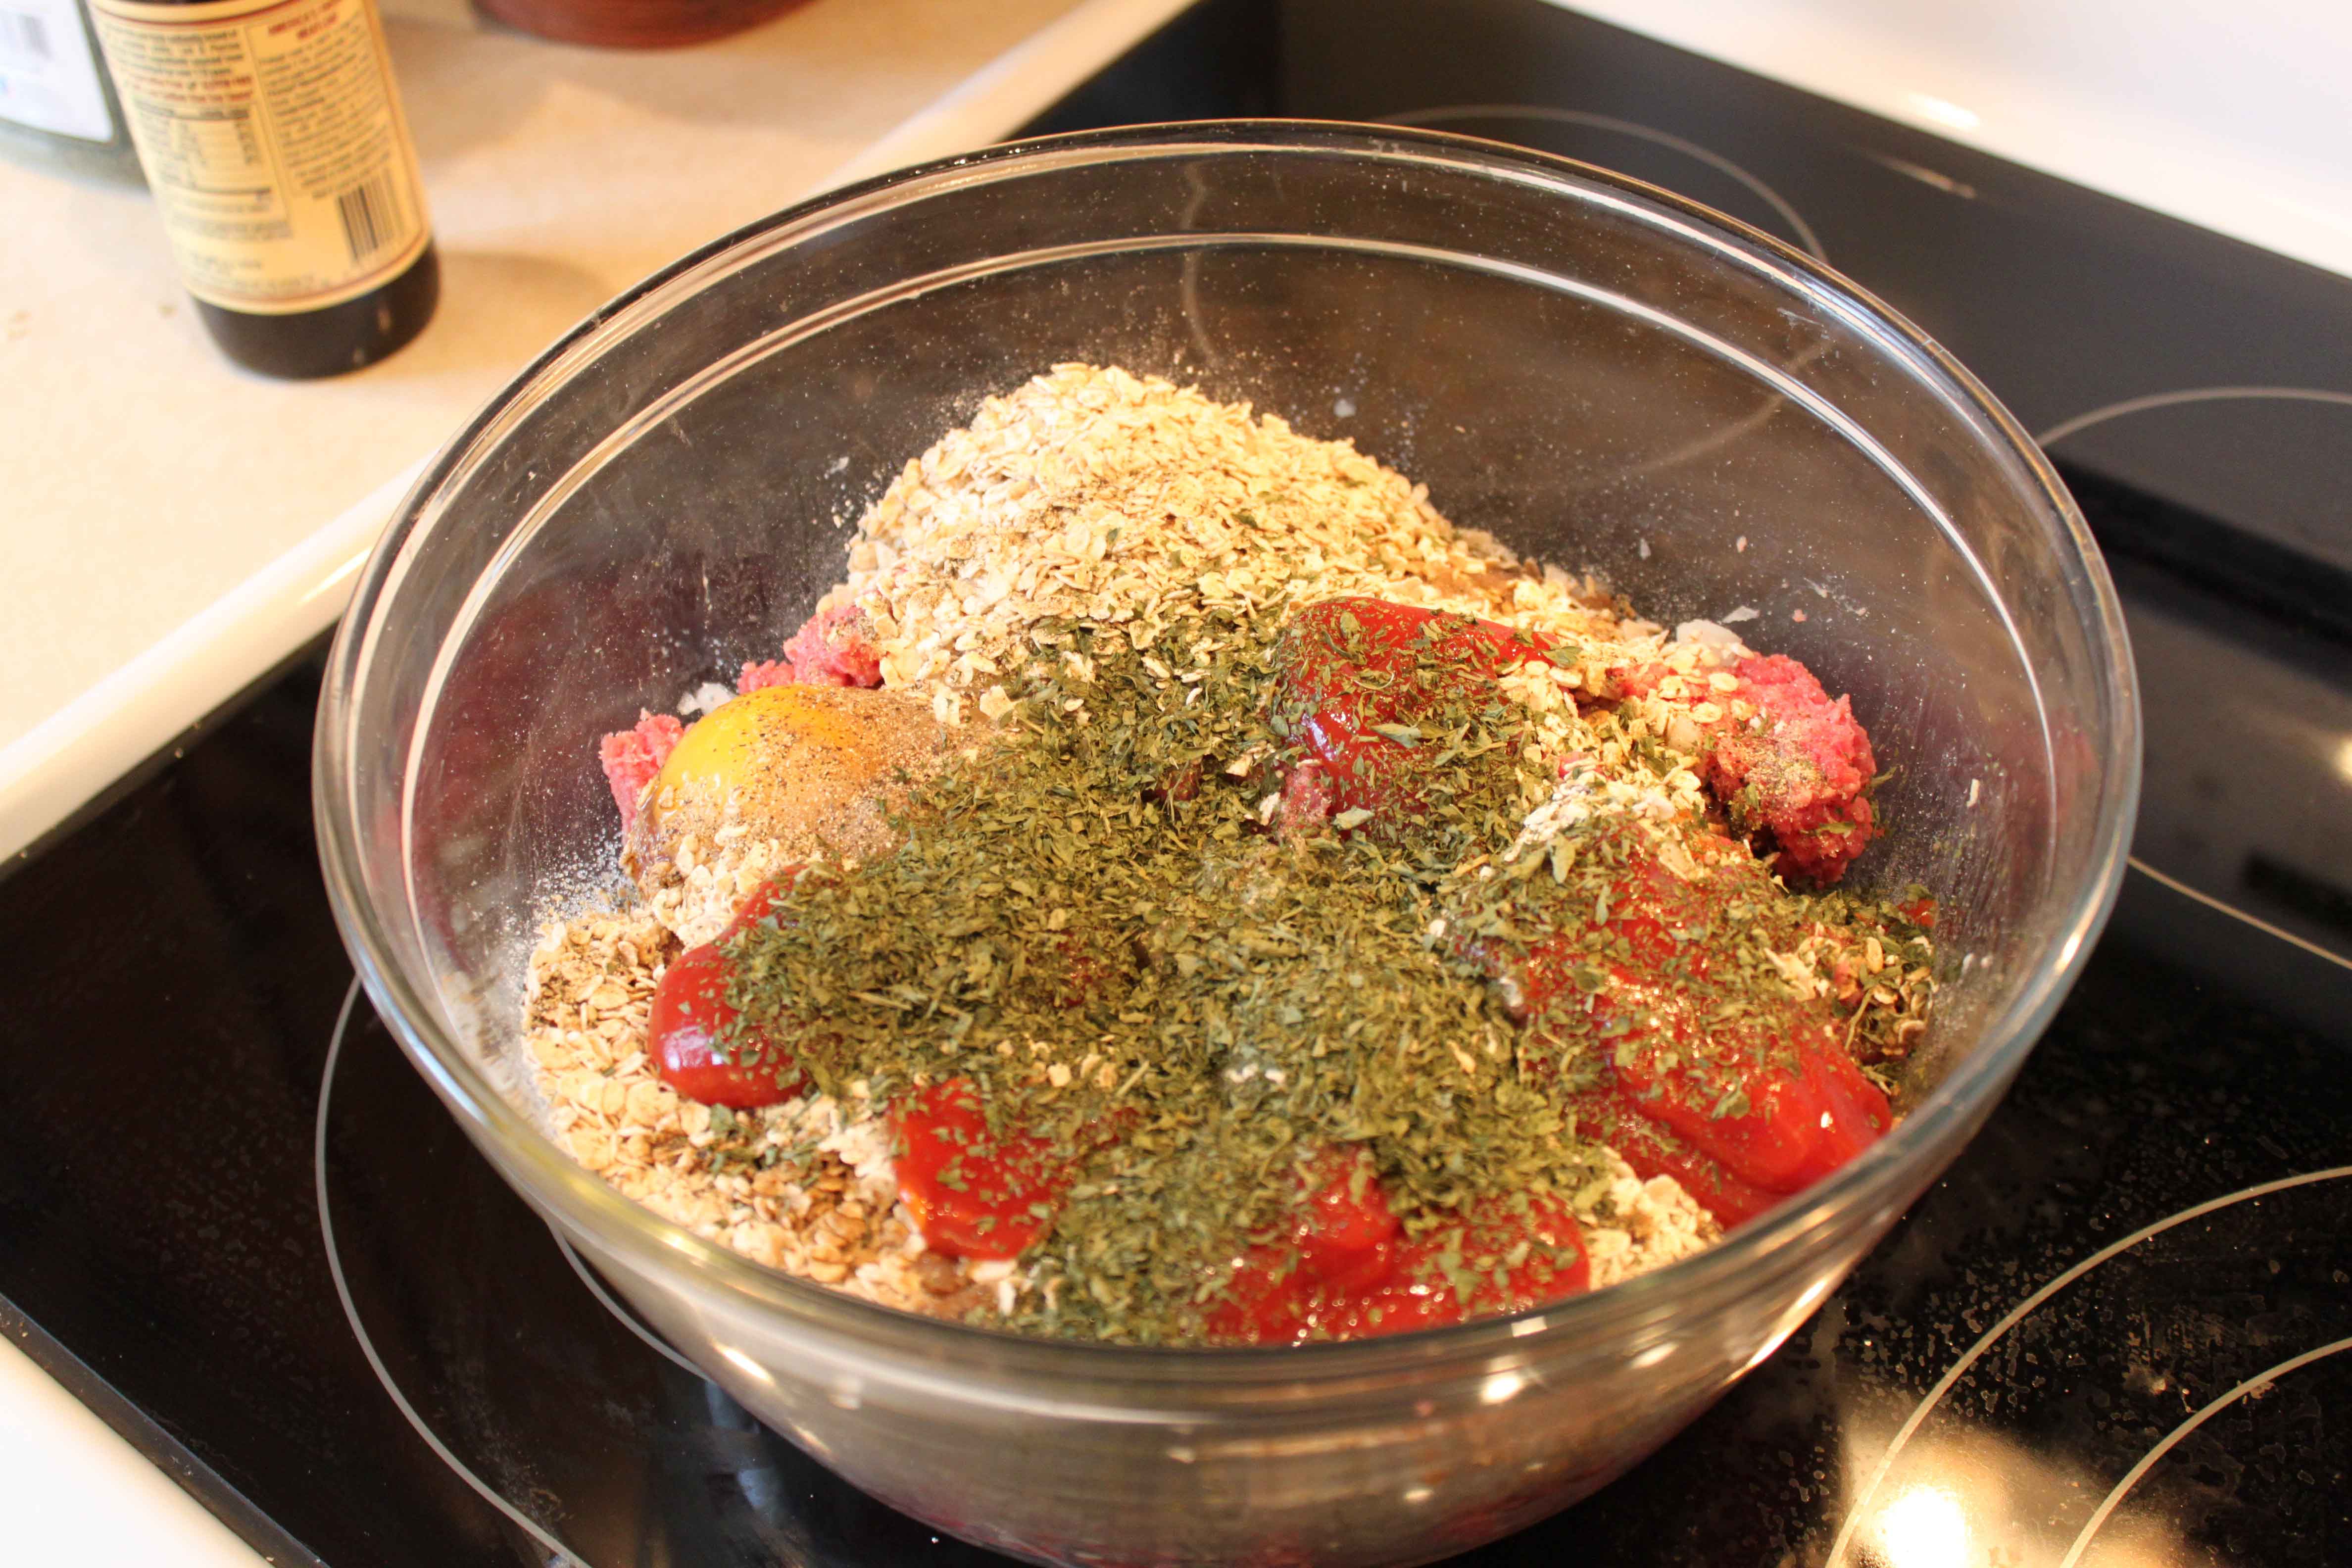
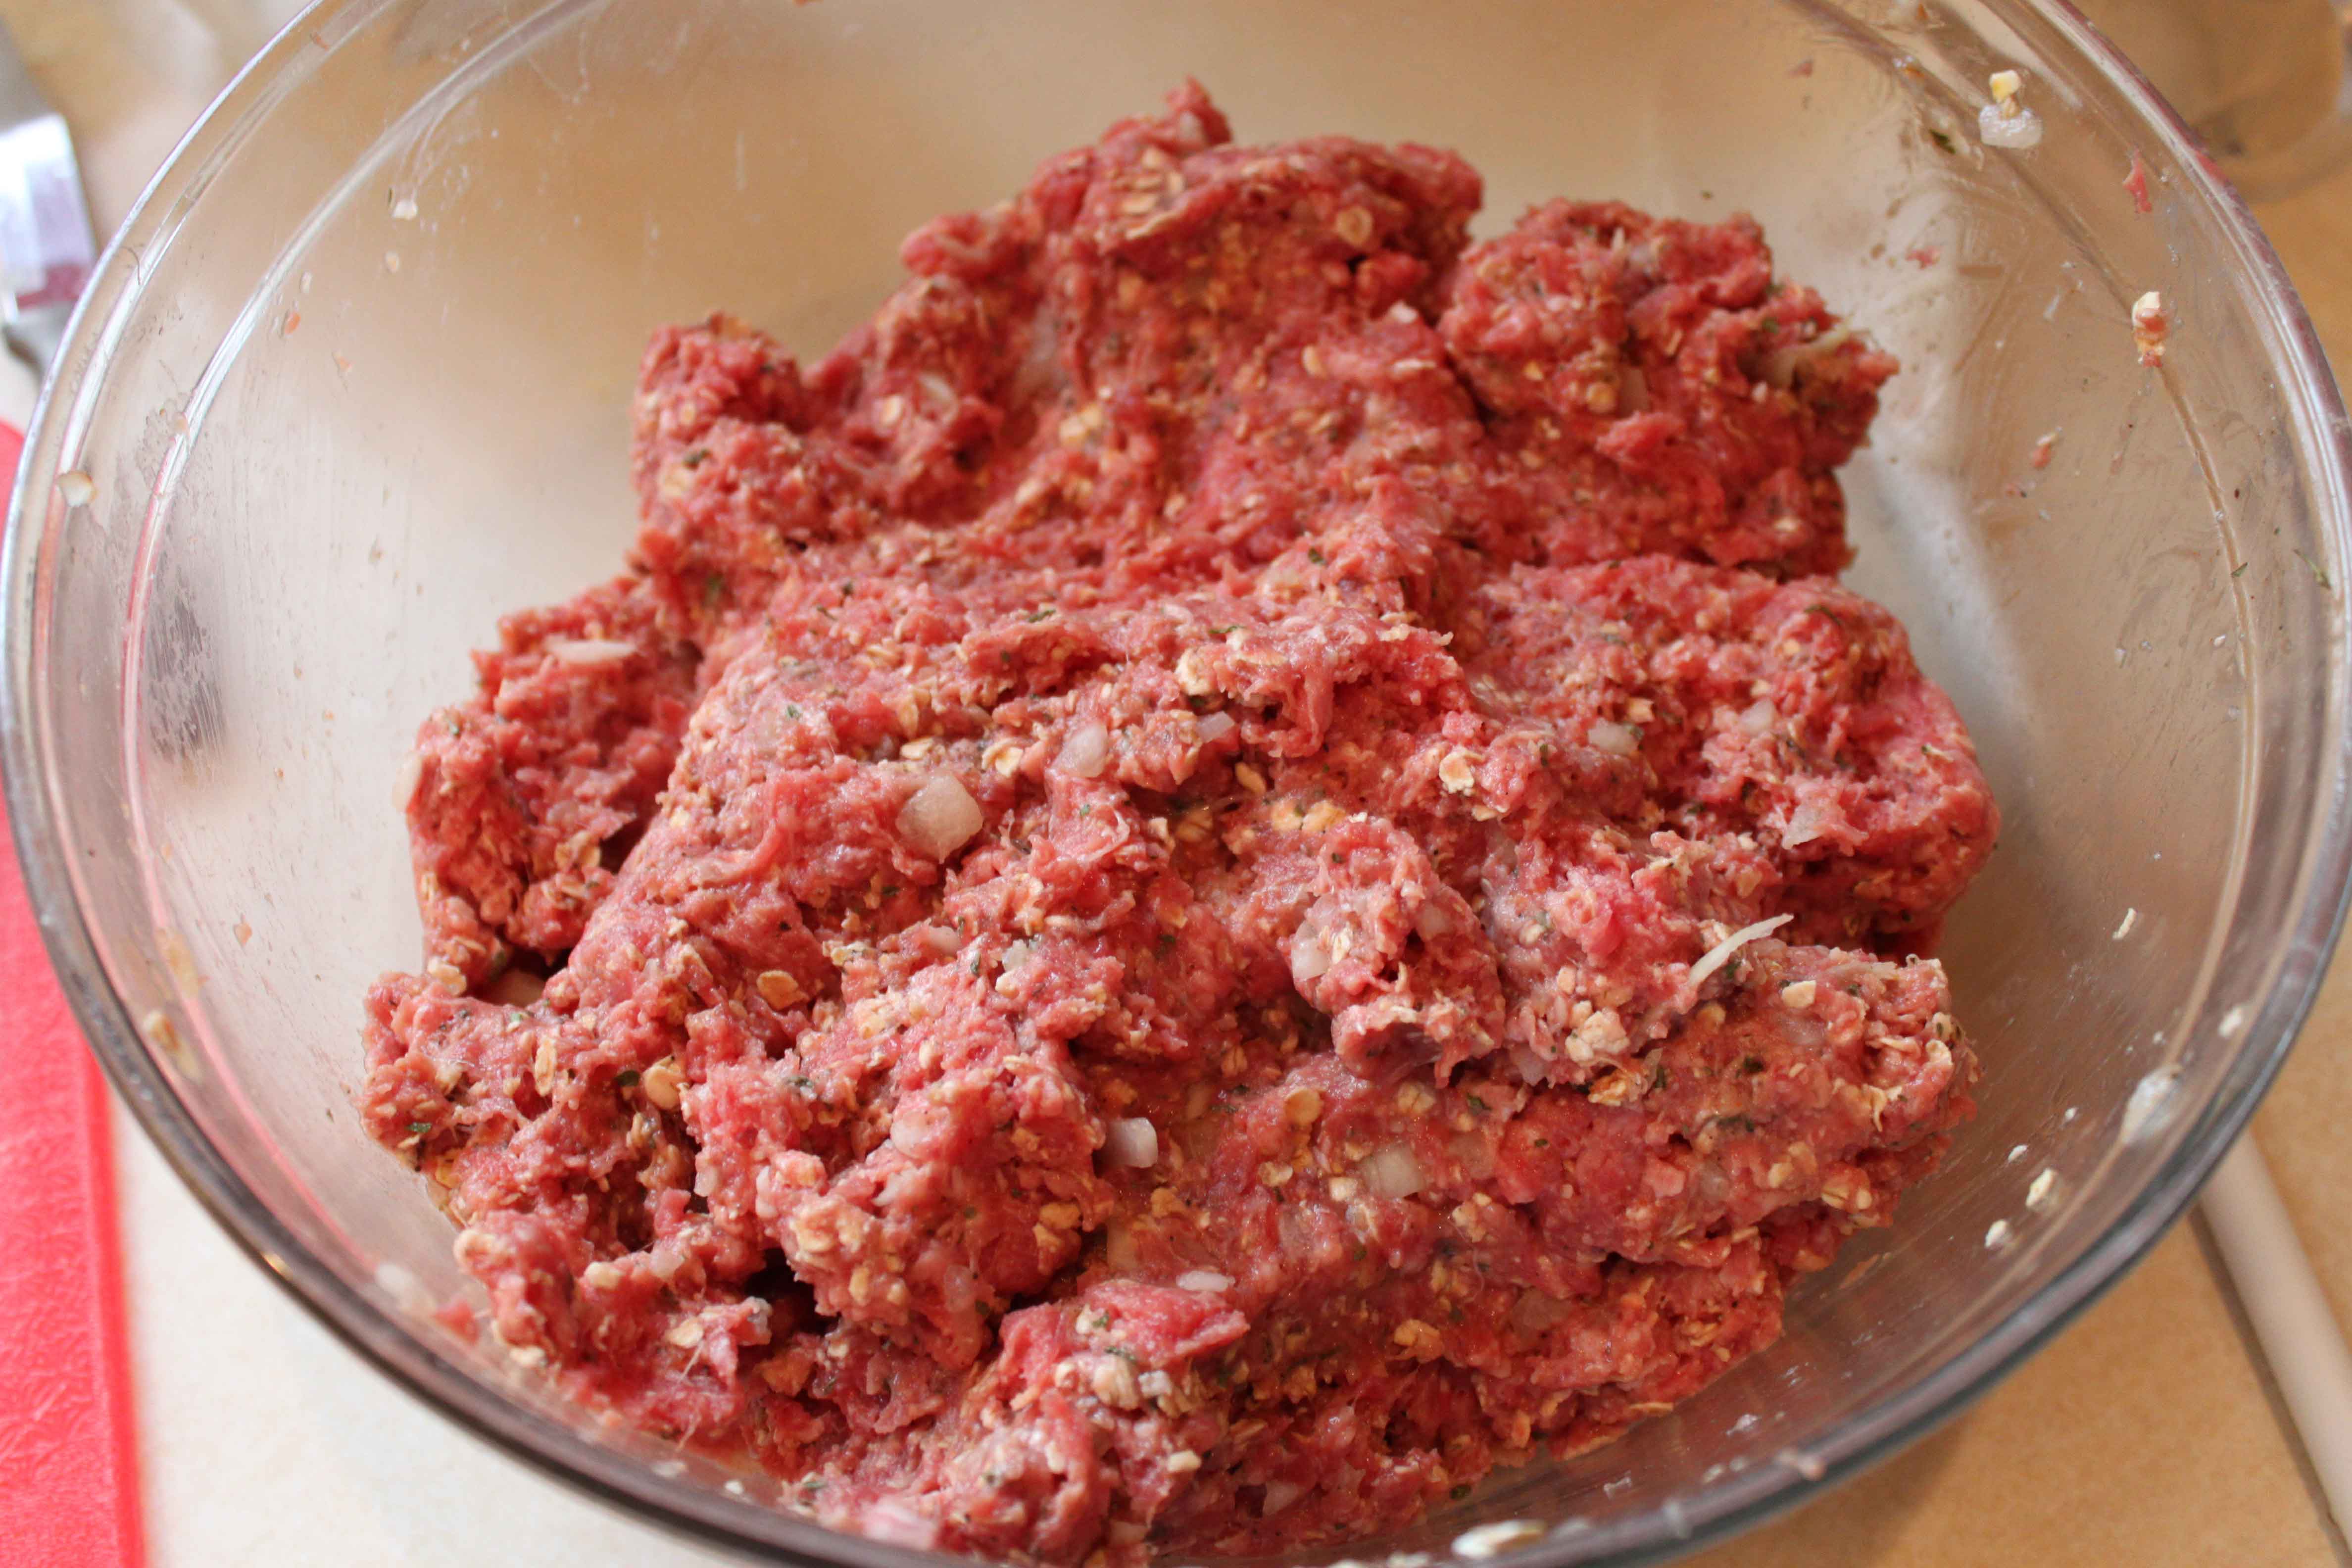
Mix all together WELL. Use your hands to make sure it is well-incorporated. Make sure you take any rings off. 🙂 It will look like this:
Now, form the meat mixture into balls and place on a cookie sheet lined with foil (it makes clean up a breeze! Bake at 400 for about 18 minutes, shaking or stirring occasionally.
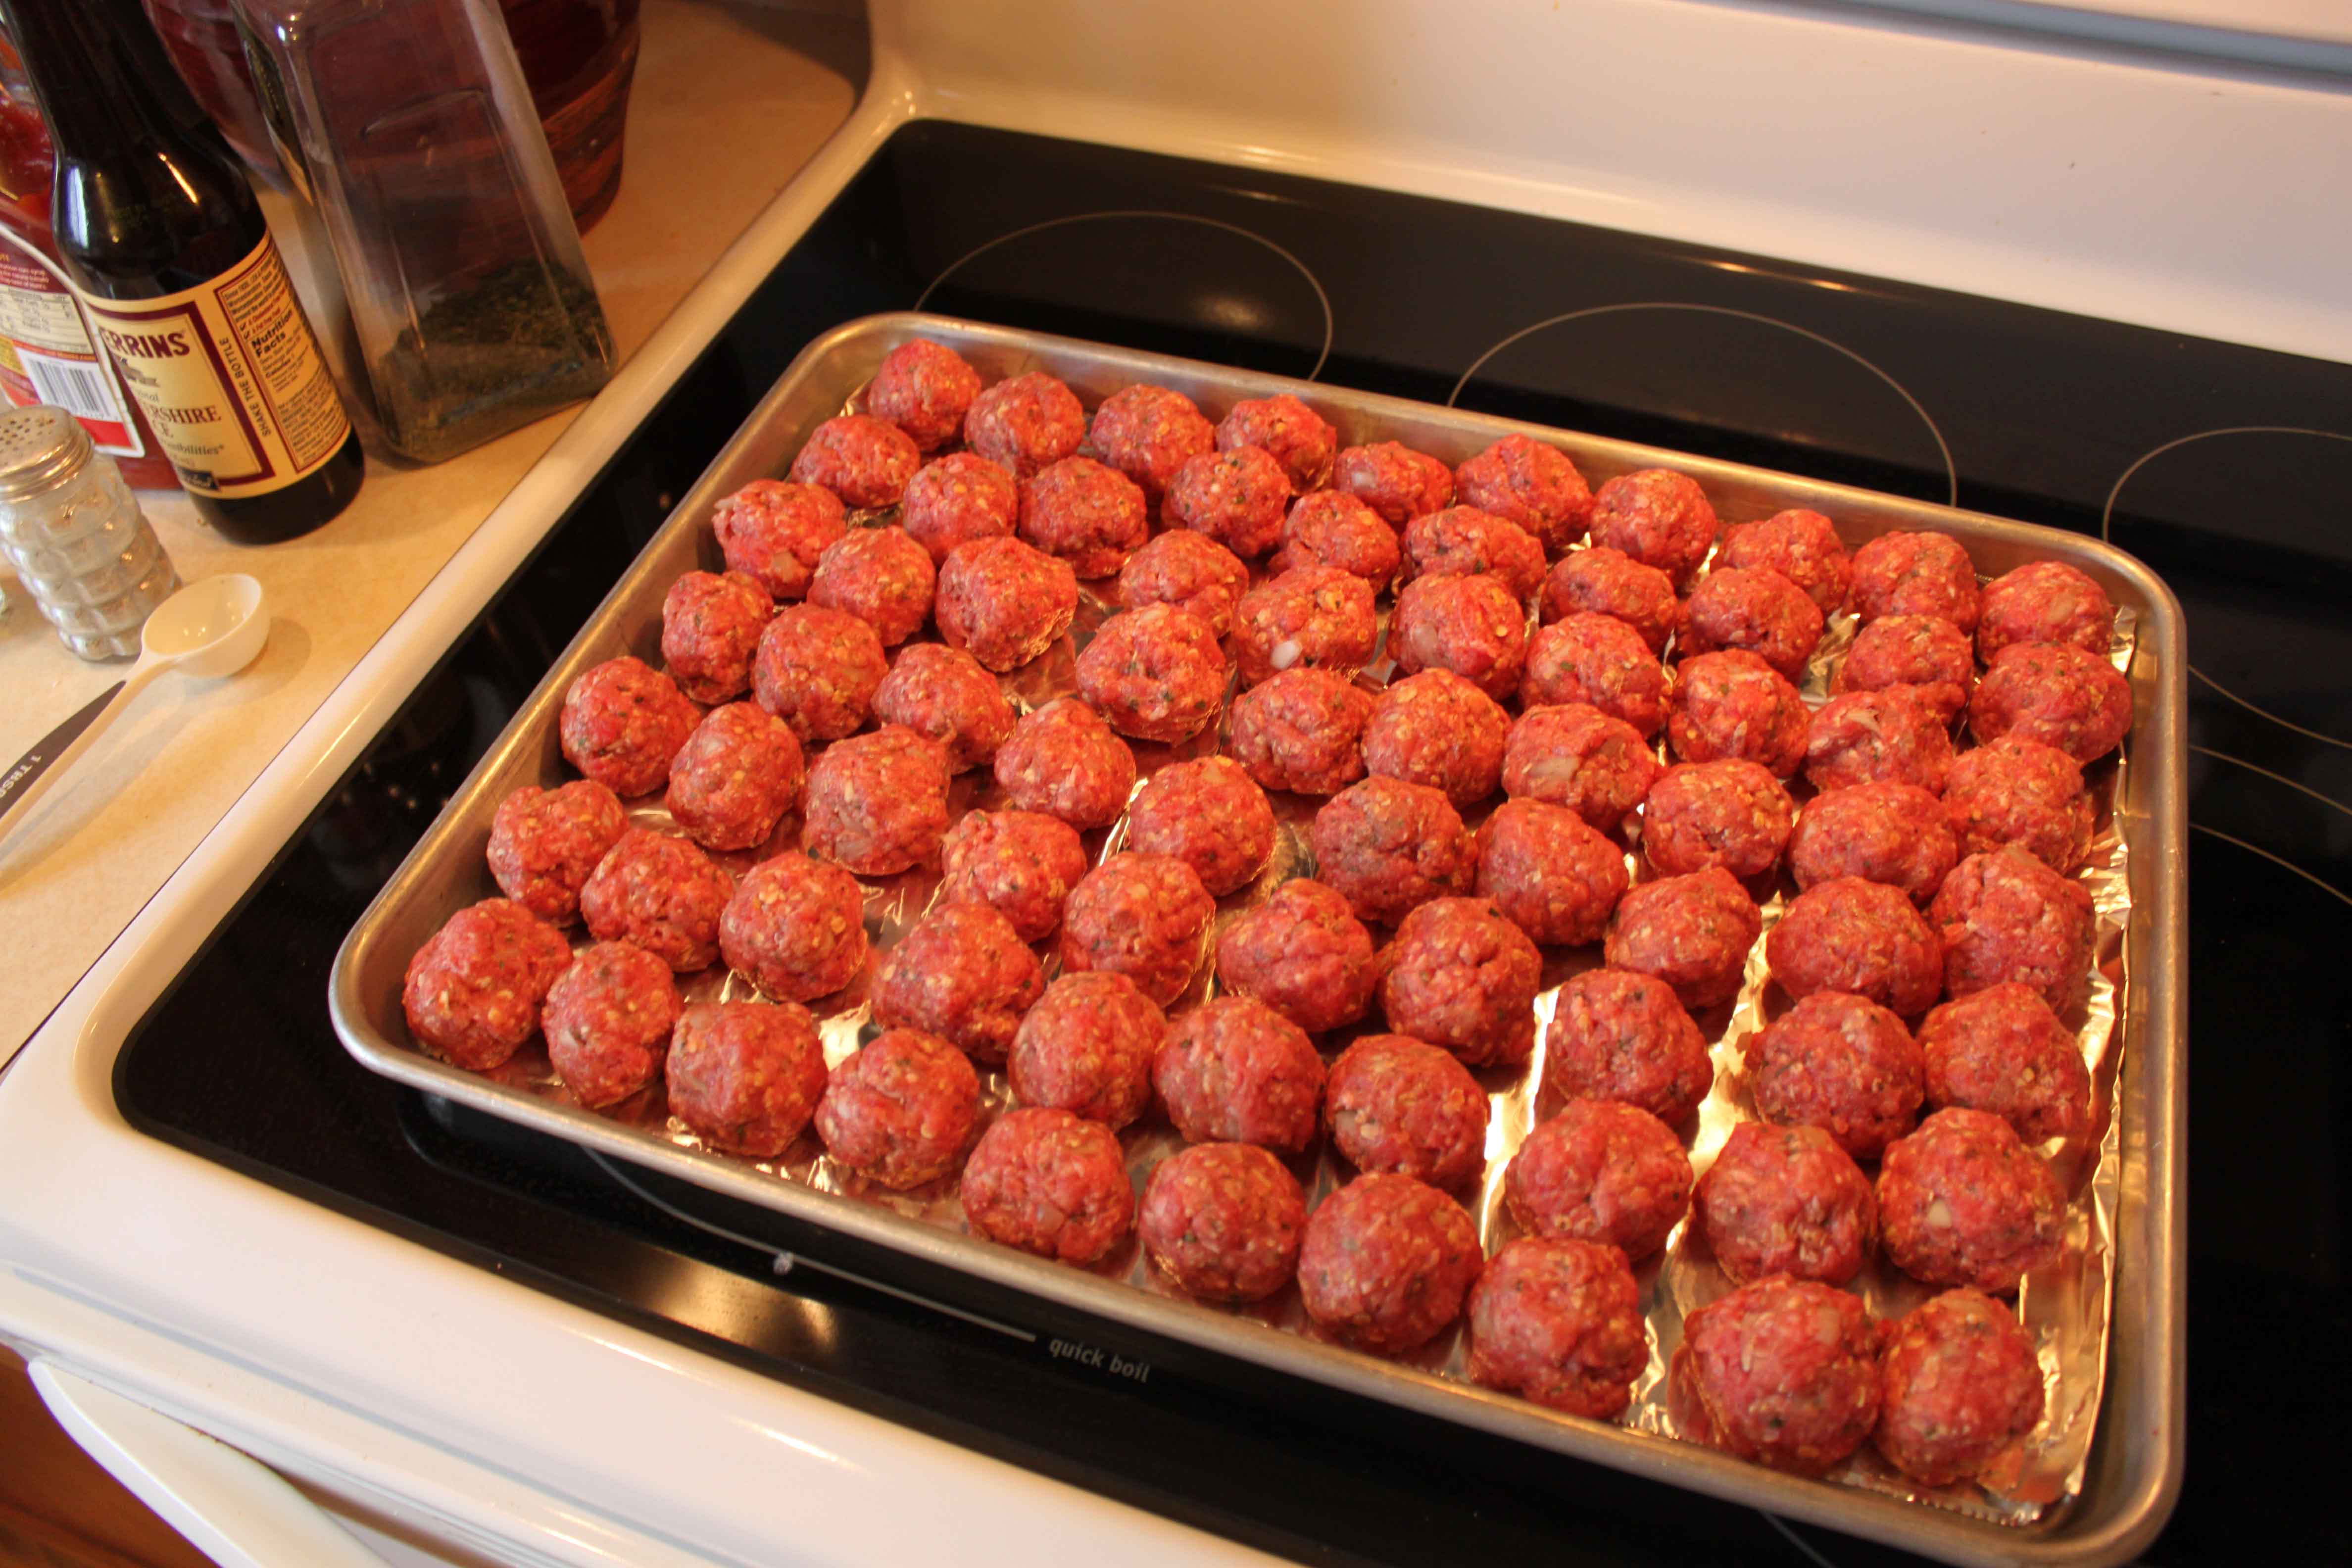
When they are done cooking, they look like this, and smell soooo good!

Then what I like to do is freeze them. I have a Foodsaver which is fantastic. It is totally worth the investment if you like to freeze foods. It really does help keep foods fresher longer! All the air is sucked out so there will be no freezer burn. Here are all the meatballs I froze yesterday.
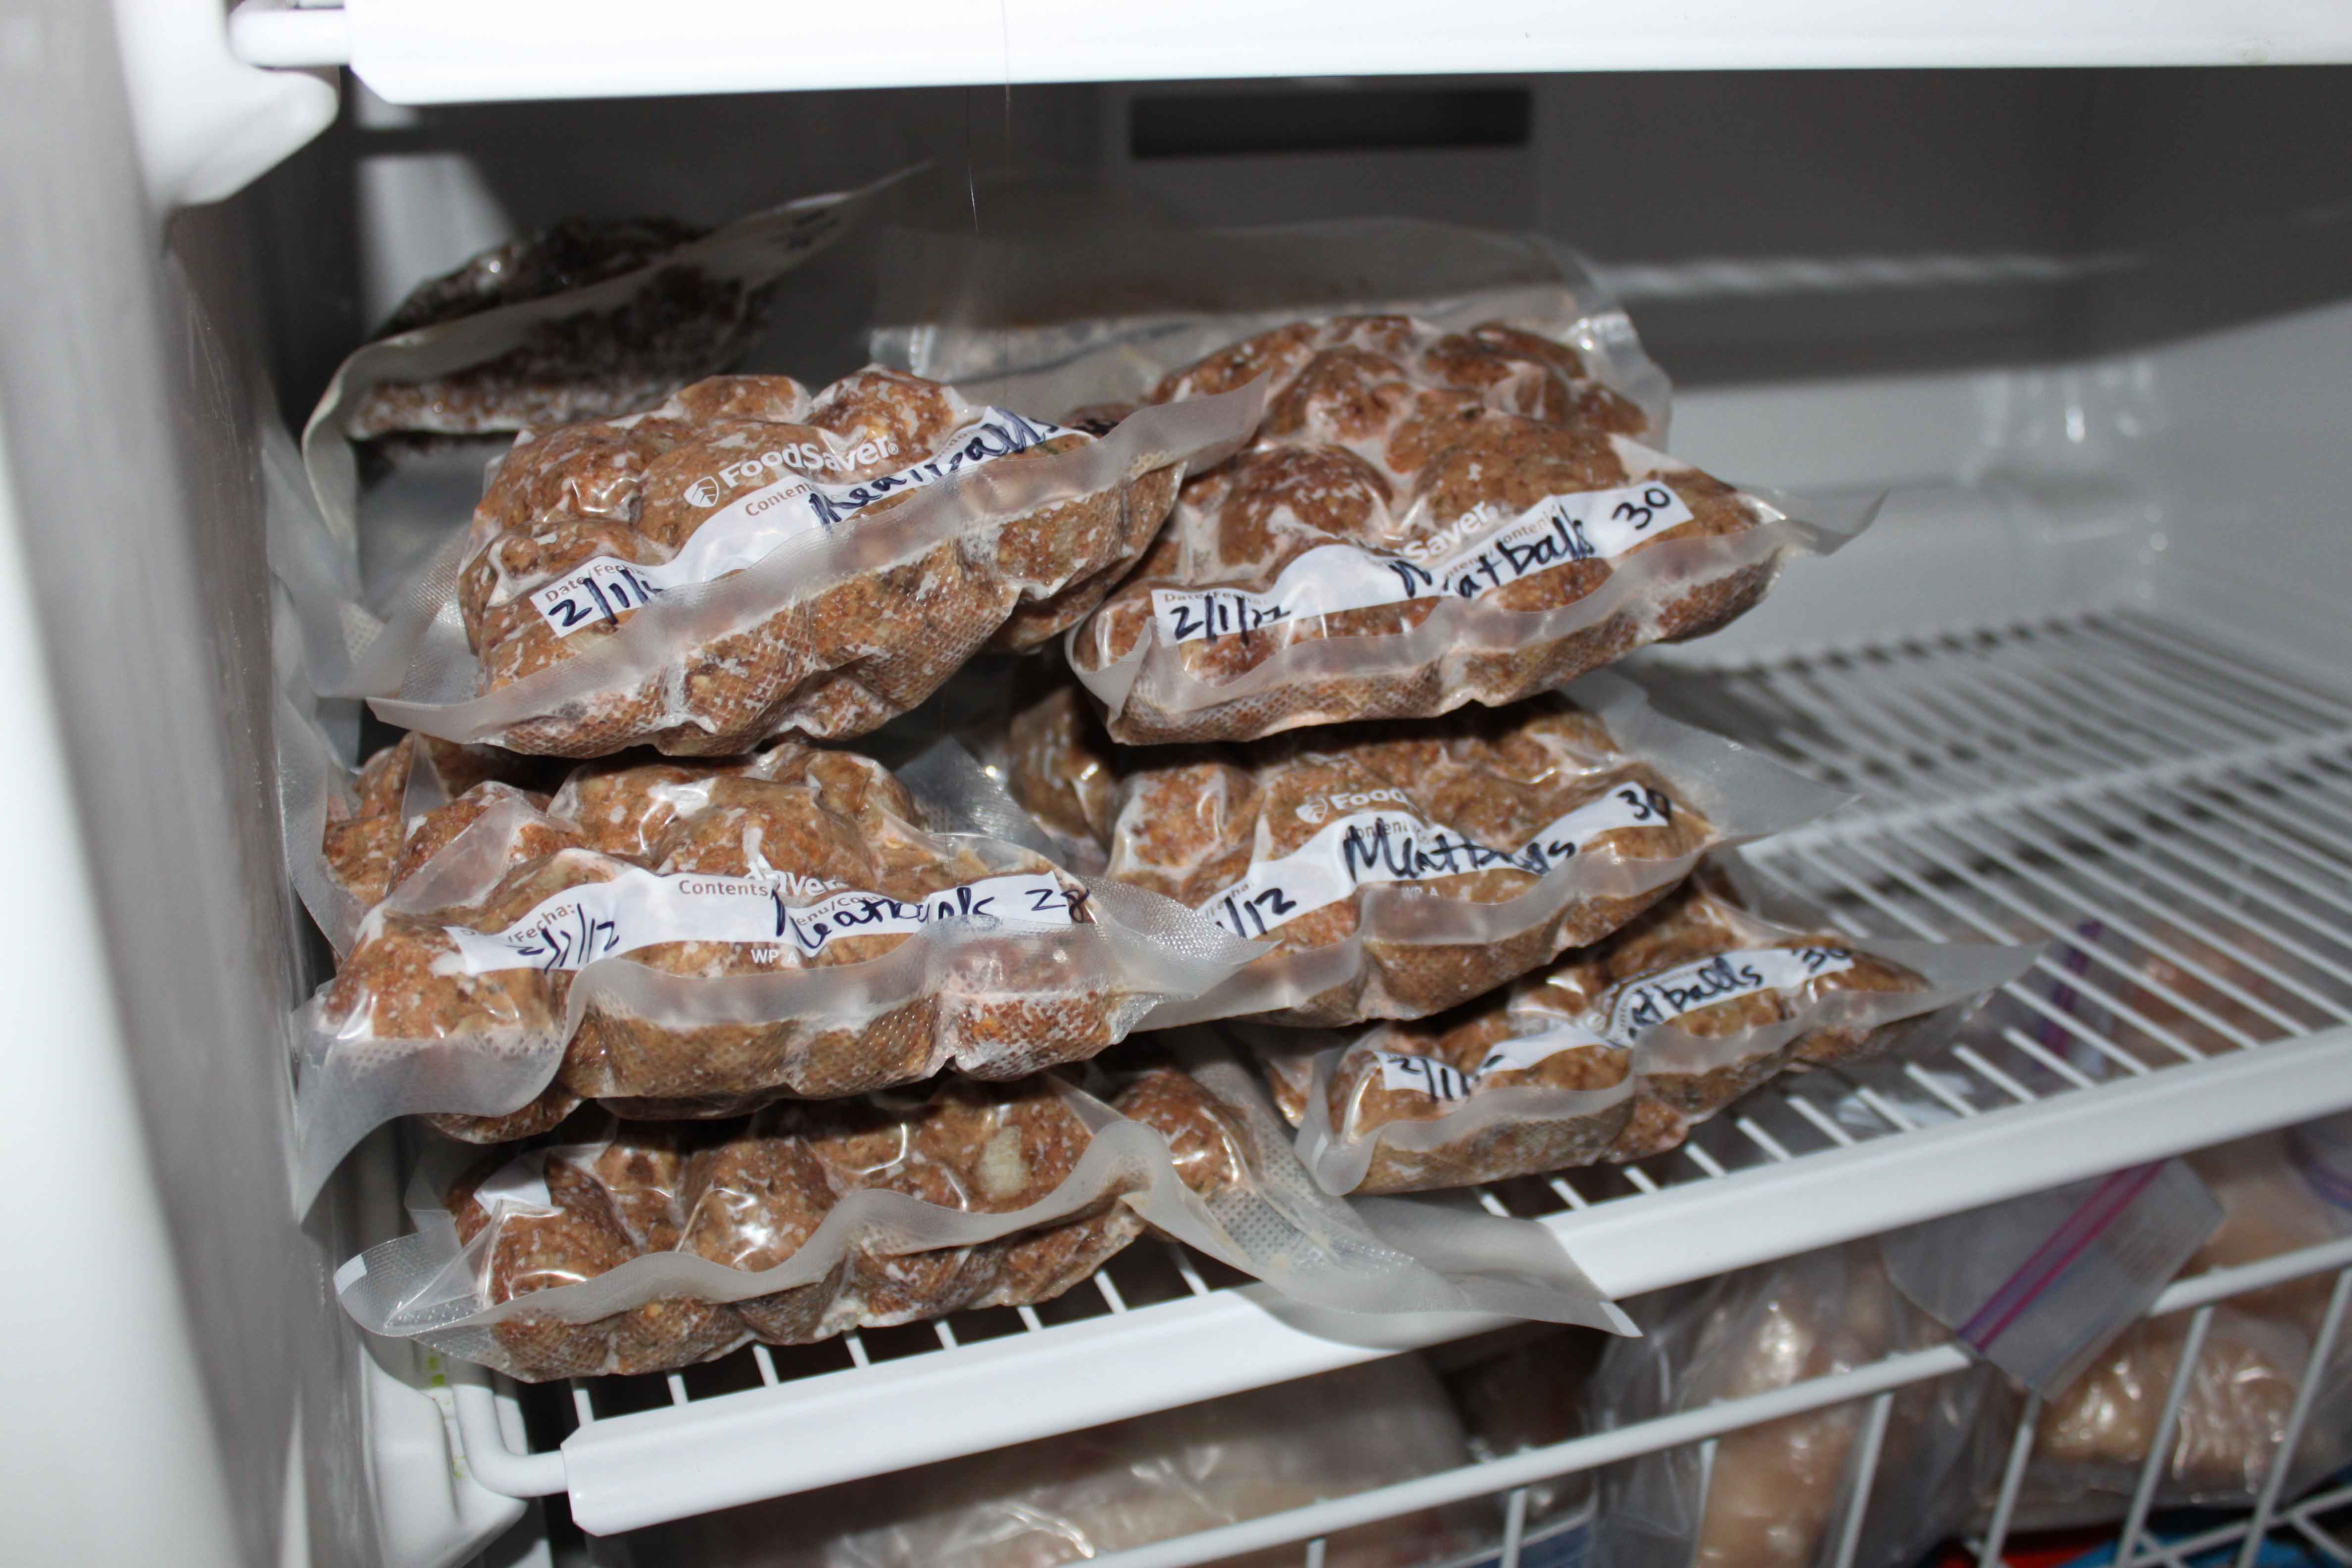
I also cooked about 10 lbs into regular ground beef to use later in recipes. I froze that in Foodsaver bags too. After cooking 20 pounds of meat today, I still have 20 more pounds to cook up. Wish me luck!
A PYP Best Blog: Crock Pot Dinners Save Time and Money
 Just in case you missed this post on Crock Pot Dinners Saving Money the first time we shared it a couple of years ago, we are republishing it. After Tiffany wrote this blog originally, we got an awesome response. This is one of the PYP Best Blogs!
Life seems to just keep getting busier and busier. It never really feels like we have time to slow down and enjoy the time we have. I know most of this is probably my own fault. I could choose to have the kids involved in less activities and make time to enjoy life’s simple pleasures but the truth is it just isn’t going to happen this week.
So instead of hurrying dinner along handing out a quick PB & J or grabbing take out on the way home, I’ve been looking for ways to have dinner ready to go when we walk in the door. Dinner time is about the only time we are all together and I love every minute of it. I’ve found the use of the crock pot to slow cook dinner is a great option for having dinner ready on the nights I know are going to be busy.
The crock pot is a great tool to have in the kitchen because it helps you make the most of the time you have. It makes me feel like I’m saving time because I am able to prepare a meal when I’m not in a crunch for time. Using a crock pot you can easily prep dinner ahead of time. In my free time the night before or in the morning I’ll prepare dinner, this will ensure that one can come home to a homemade healthy dinner ready to go. I love that it takes the stress out of the question, “What are we having for dinner?”, which I am sure to hear as soon as we get home. This is a welcomed thought on busy nights when we are running from tennis to scouts, basketball, swimming etc.
With careful planning the use of the crock pot can be a great money saving tool as well. On a busy week night the use of the crock pot keeps us on schedule. The small amount of preparation keeps me from having to make a stop for fast food and there by keeps money in my bank account. I can easily make dinner for much less than I would spend in the drive through and still have leftovers for tomorrow’s lunches.
Recipe for the Crock pot:
BBQ Pork for Sandwiches
Ingredients:
1 (14oz) can beef broth
3 pounds boneless pork ribs
1 bottle BBQ sauce
Directions:
Pour beef broth into the slow cooker and add the boneless pork ribs. Cook on high for 4 hours, or until the meat shreds easily.
Place meat in a skillet and add BBQ sauce.
Bake in a preheated oven for 30 mins or until it is heated through.
A PYP Best Blog: Recipe – Pumpkin Muffins from scratch!
Just in case you missed this article on making pumpkin muffins from scratch the first time we shared it a couple of years ago, we are republishing it. After Marne wrote this blog originally, we got an awesome response. This is one of the PYP Best Blogs!
For quite awhile I have been trying to do all my baking with NO store-bought mixes. I make muffins several times a month for breakfast and school lunches so I am always on the lookout for a good muffin recipe. This one is fantastic! I haven’t found a good pumpkin muffins from scratch recipe until this one. Try it! It is easy and delicious. I make a double batch and freeze a bunch for school lunches. Plus, I use whole wheat flour instead of white and the pumpkin muffins turn out great. It’s an easy way to increase the nutrition.

PUMPKIN MUFFINS
original recipe source
1½ cups all-purpose flour (I use whole wheat flour and they turn out great!)
1 teaspoon baking powder
1 cup canned solid-pack pumpkin
1/3 cup vegetable oil
2 large eggs
1 teaspoon pumpkin-pie spice
1¼ cups (plus 1 tablespoon) sugar
½ teaspoon baking soda
½ teaspoon salt
1 teaspoon cinnamon
1/2 cup chocolate chips (optional)
Preheat oven to 350°. Put liners in muffin cups.
Whisk together pumpkin, oil, eggs, pumpkin-pie spice, 1¼ cups sugar, baking soda, and salt in a large bowl until smooth, then whisk in flour and baking powder until just combined.
Stir together cinnamon and remaining 1 tablespoon sugar in another bowl.
Divide batter among muffin cups (each should be about three-fourths full), then sprinkle tops with cinnamon-sugar mixture. Bake until puffed and golden brown and wooden pick or skewer inserted into the center of a muffin comes out clean, 25 to 30 minutes.
Cool in pan on a rack 5 minutes, then transfer muffins from pan to rack and cool to warm or room temperature.
A PYP Best Blog! The Little Ways to Save: Homemade ‘Drano’!
Just in case you missed this DIY article making your own homemade drano the first time we shared it a couple of years ago, we are republishing it. After Marne wrote this blog originally, we got an awesome response. This is one of the PYP Best Blogs!
As I posted last month, this year I am trying to do better on my grocery budget. I want to not only bring my cost down, I want to be more thrifty in how I feed my family. Make more things from scratch, eat out less, etc. In January I was very close to my goal and so far in February I have spent $343.14. A little more than where I was in January but this is all a process, right? A learning curve. For me, its not always about the exact penny spent but if I am improving in the way I feed my family. More on that later.
Not only am I wanting to save in the grocery budget department, I also want to save money in every way I can. Today I wanted to share with you an old trick. At least that is what I learned when I did some searching online.
If you have a slow or clogged drain, don’t go out and buy Drano (which is super expensive and contains hazardous chemicals), you can clear that drain with 3 simple things you already have in your house!

Here is what you will need:
1/2 box baking soda
1/2 c. white vinegar
1 qt. boiling water
1 washcloth
Take the baking soda and dump it down the drain as good as you can. Pour in the vinegar. IMMEDIATELY plug the drain with the washcloth so the foaming action stays in the pipe, and not in the sink.
Let sit for 30 minutes.
After the time is up, dump the boiling water down the drain. VOILA! A clear drain with haveing to buy drano. This works almost every time.
And I can vouch for this method. I did it this morning, and it worked fabulously! Try out your homemade drano and let me know what you think.
TWO PYP Best Blogs! Making crinkly fries and using leftover uncooked pasta! Dinner saving ideas!
Just in case you missed these articles on making crinkly fries and using leftover pasta the first time we shared them a couple of years ago, we are republishing it. After Marne wrote these blogs originally, we got an awesome response. These are two of the PYP Best Blogs!
Making crinkly fries!
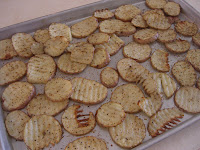
My kids like making snacks every now and then. These crinkly fries are easy and fun to make, and much better than potato chips from the store!
Crinkly Fries
3 baking potatoes
3 Tbl butter
any type of seasoning salt, for example: Mrs. Dash, lemon pepper seasoning, herb seasoning, etc.
Preheat oven to 450 degrees. After scrubbing potatoes with a vegetable brush, cut with a crinkle cutter or a sharp knife leaving the peel on. Put the potato slices into a large Ziploc bag. Melt the butter and add seasoning to it, mix together. Pour into the bag and mix with the potatoes to coat. Add as much or as little seasoning as you want. Shake well.
Layer the potatoes on a shallow pan or cookie sheet in a single layer. Put in oven and bake for about 25 minutes or until lightly brown and tender. Longer if you want them crispy. Turn the potatoes halfway through the baking process. End result = yummy crinkly fries.
Nutrition Facts per serving: 144 calories, 7 g total fat (1 g sat. fat), 0 mg col., 153 mg sodium, 19 g carbs, 2 g fiber, 3 g protein
Use up that leftover uncooked pasta!
If you you like me, then periodically you find yourself with several boxes of pasta with only about 2/3 or less in the box. Lots of different varieties. None is enough to make for a meal. Here is what I do to make sure I still use up what I have and not waste anything.
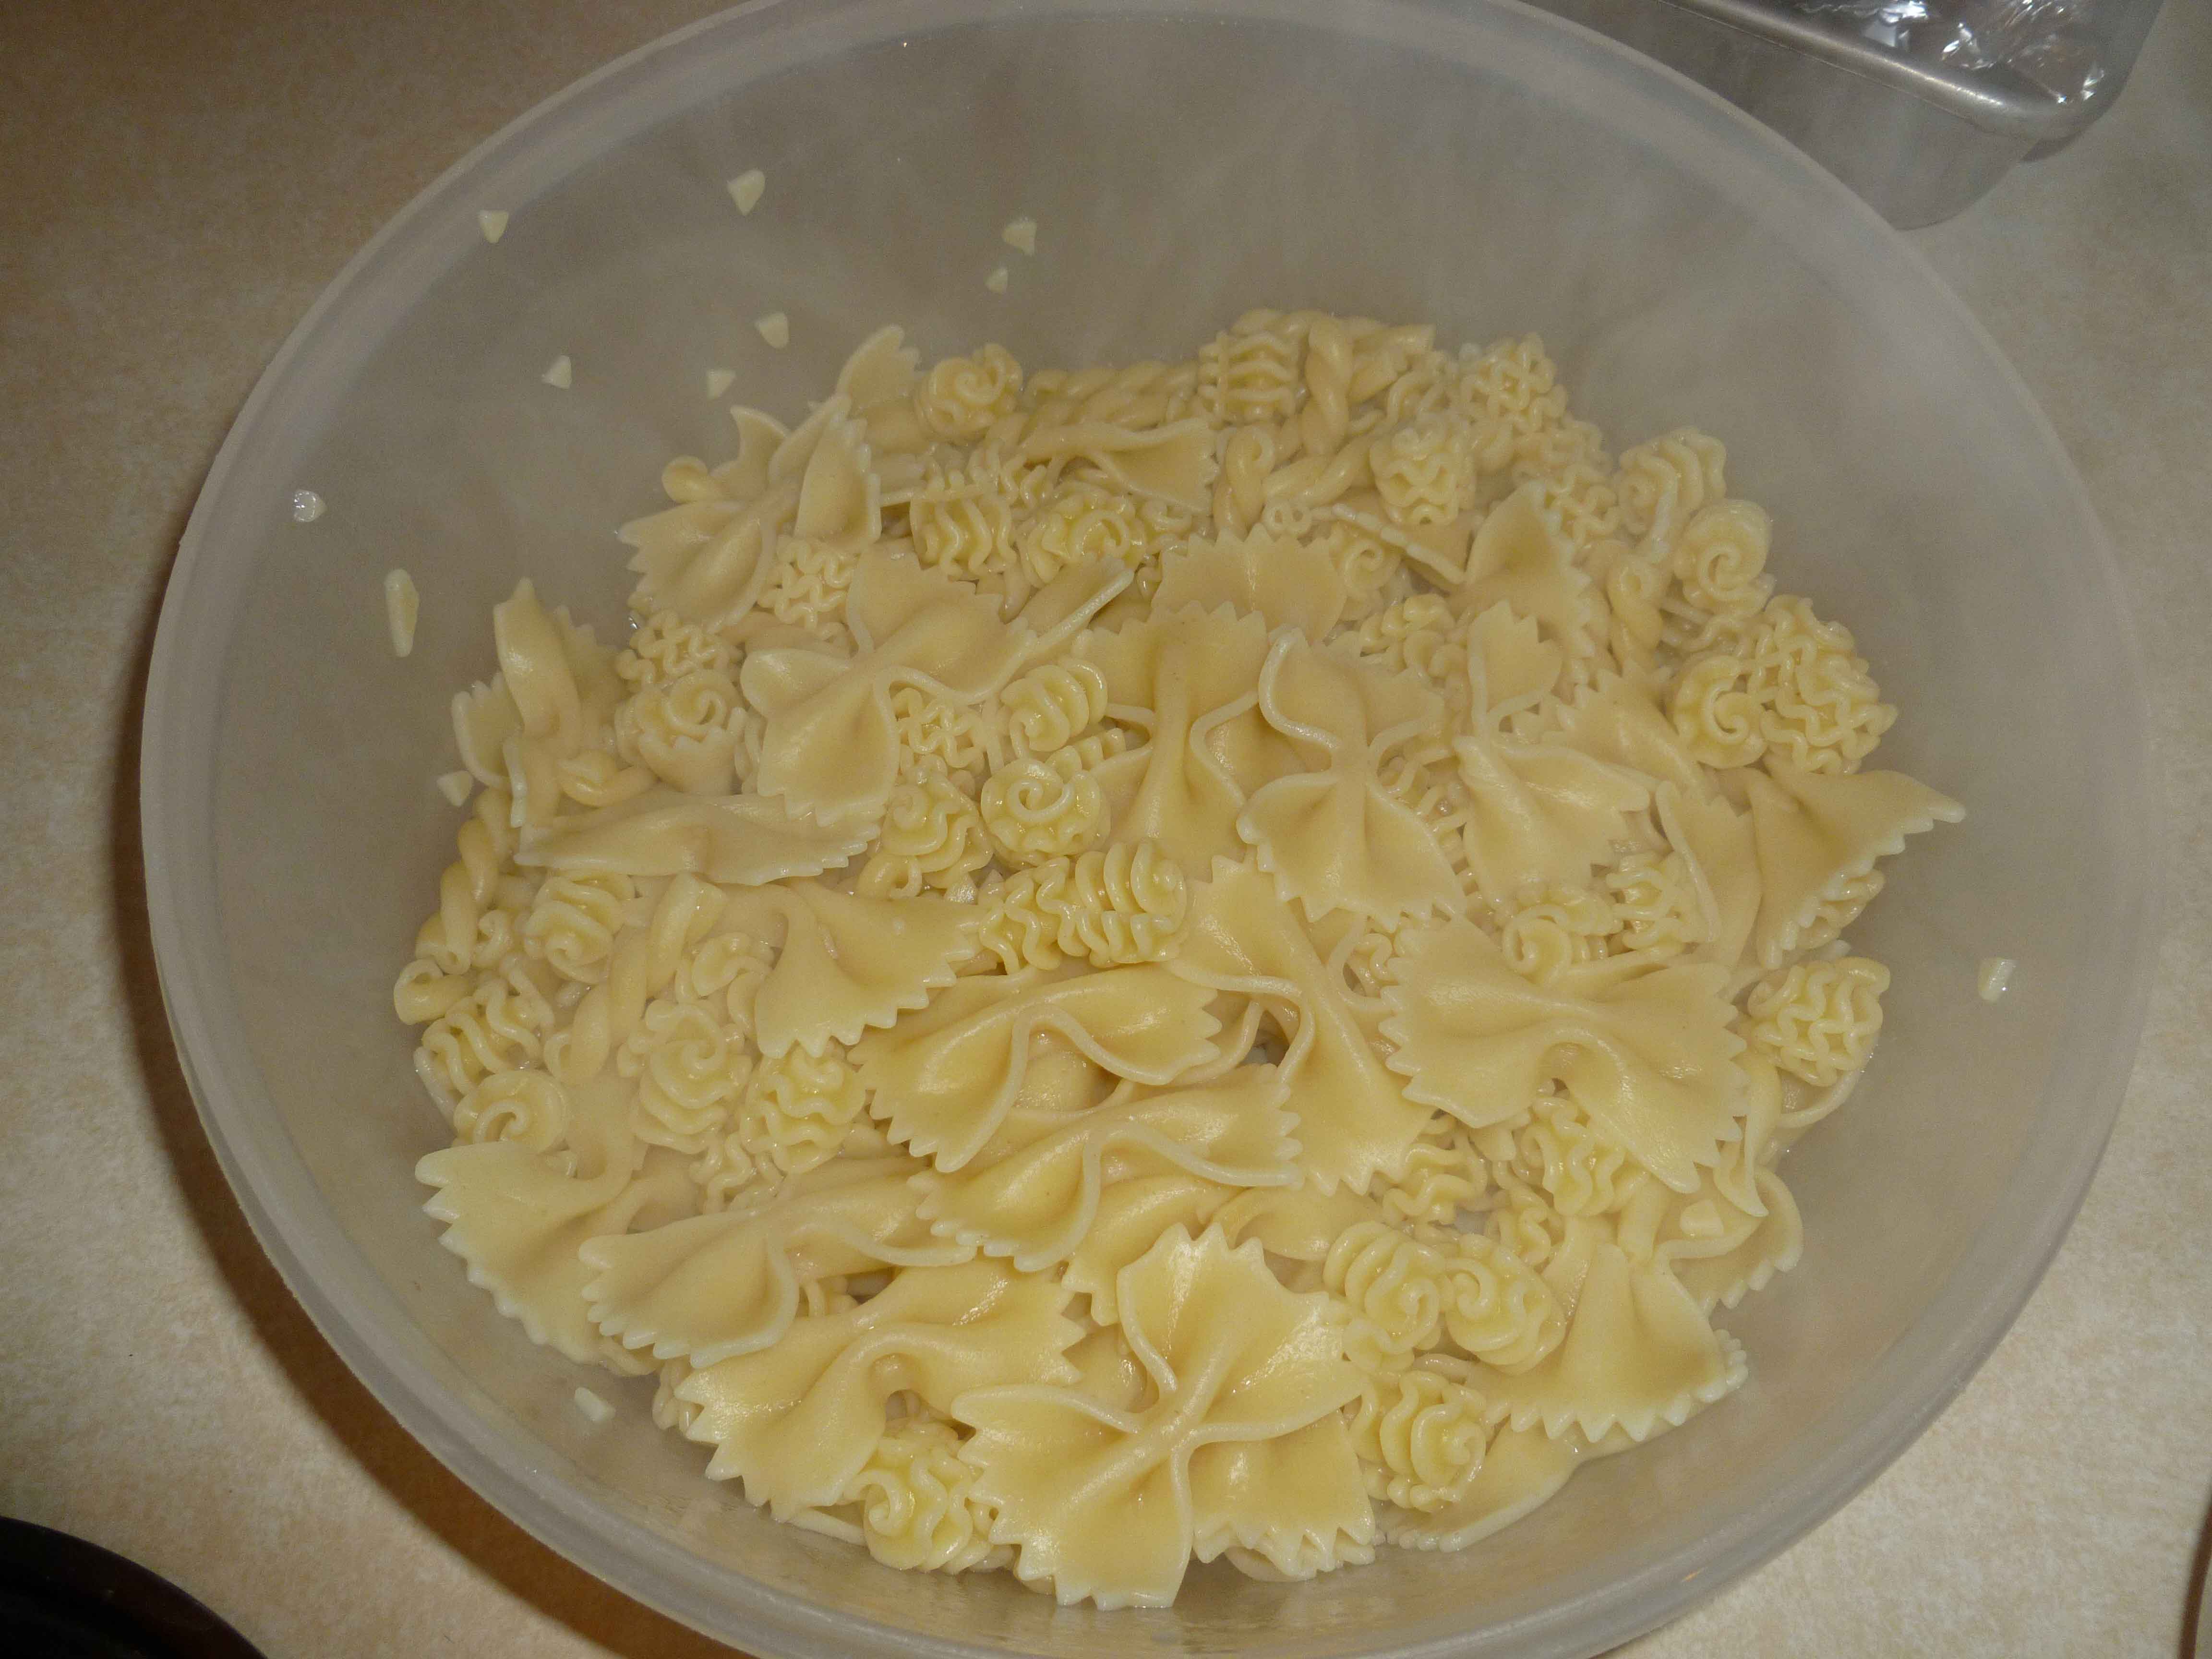
On Tuesday night I had these 3 boxes of pasta in my cupboard needing to be used:
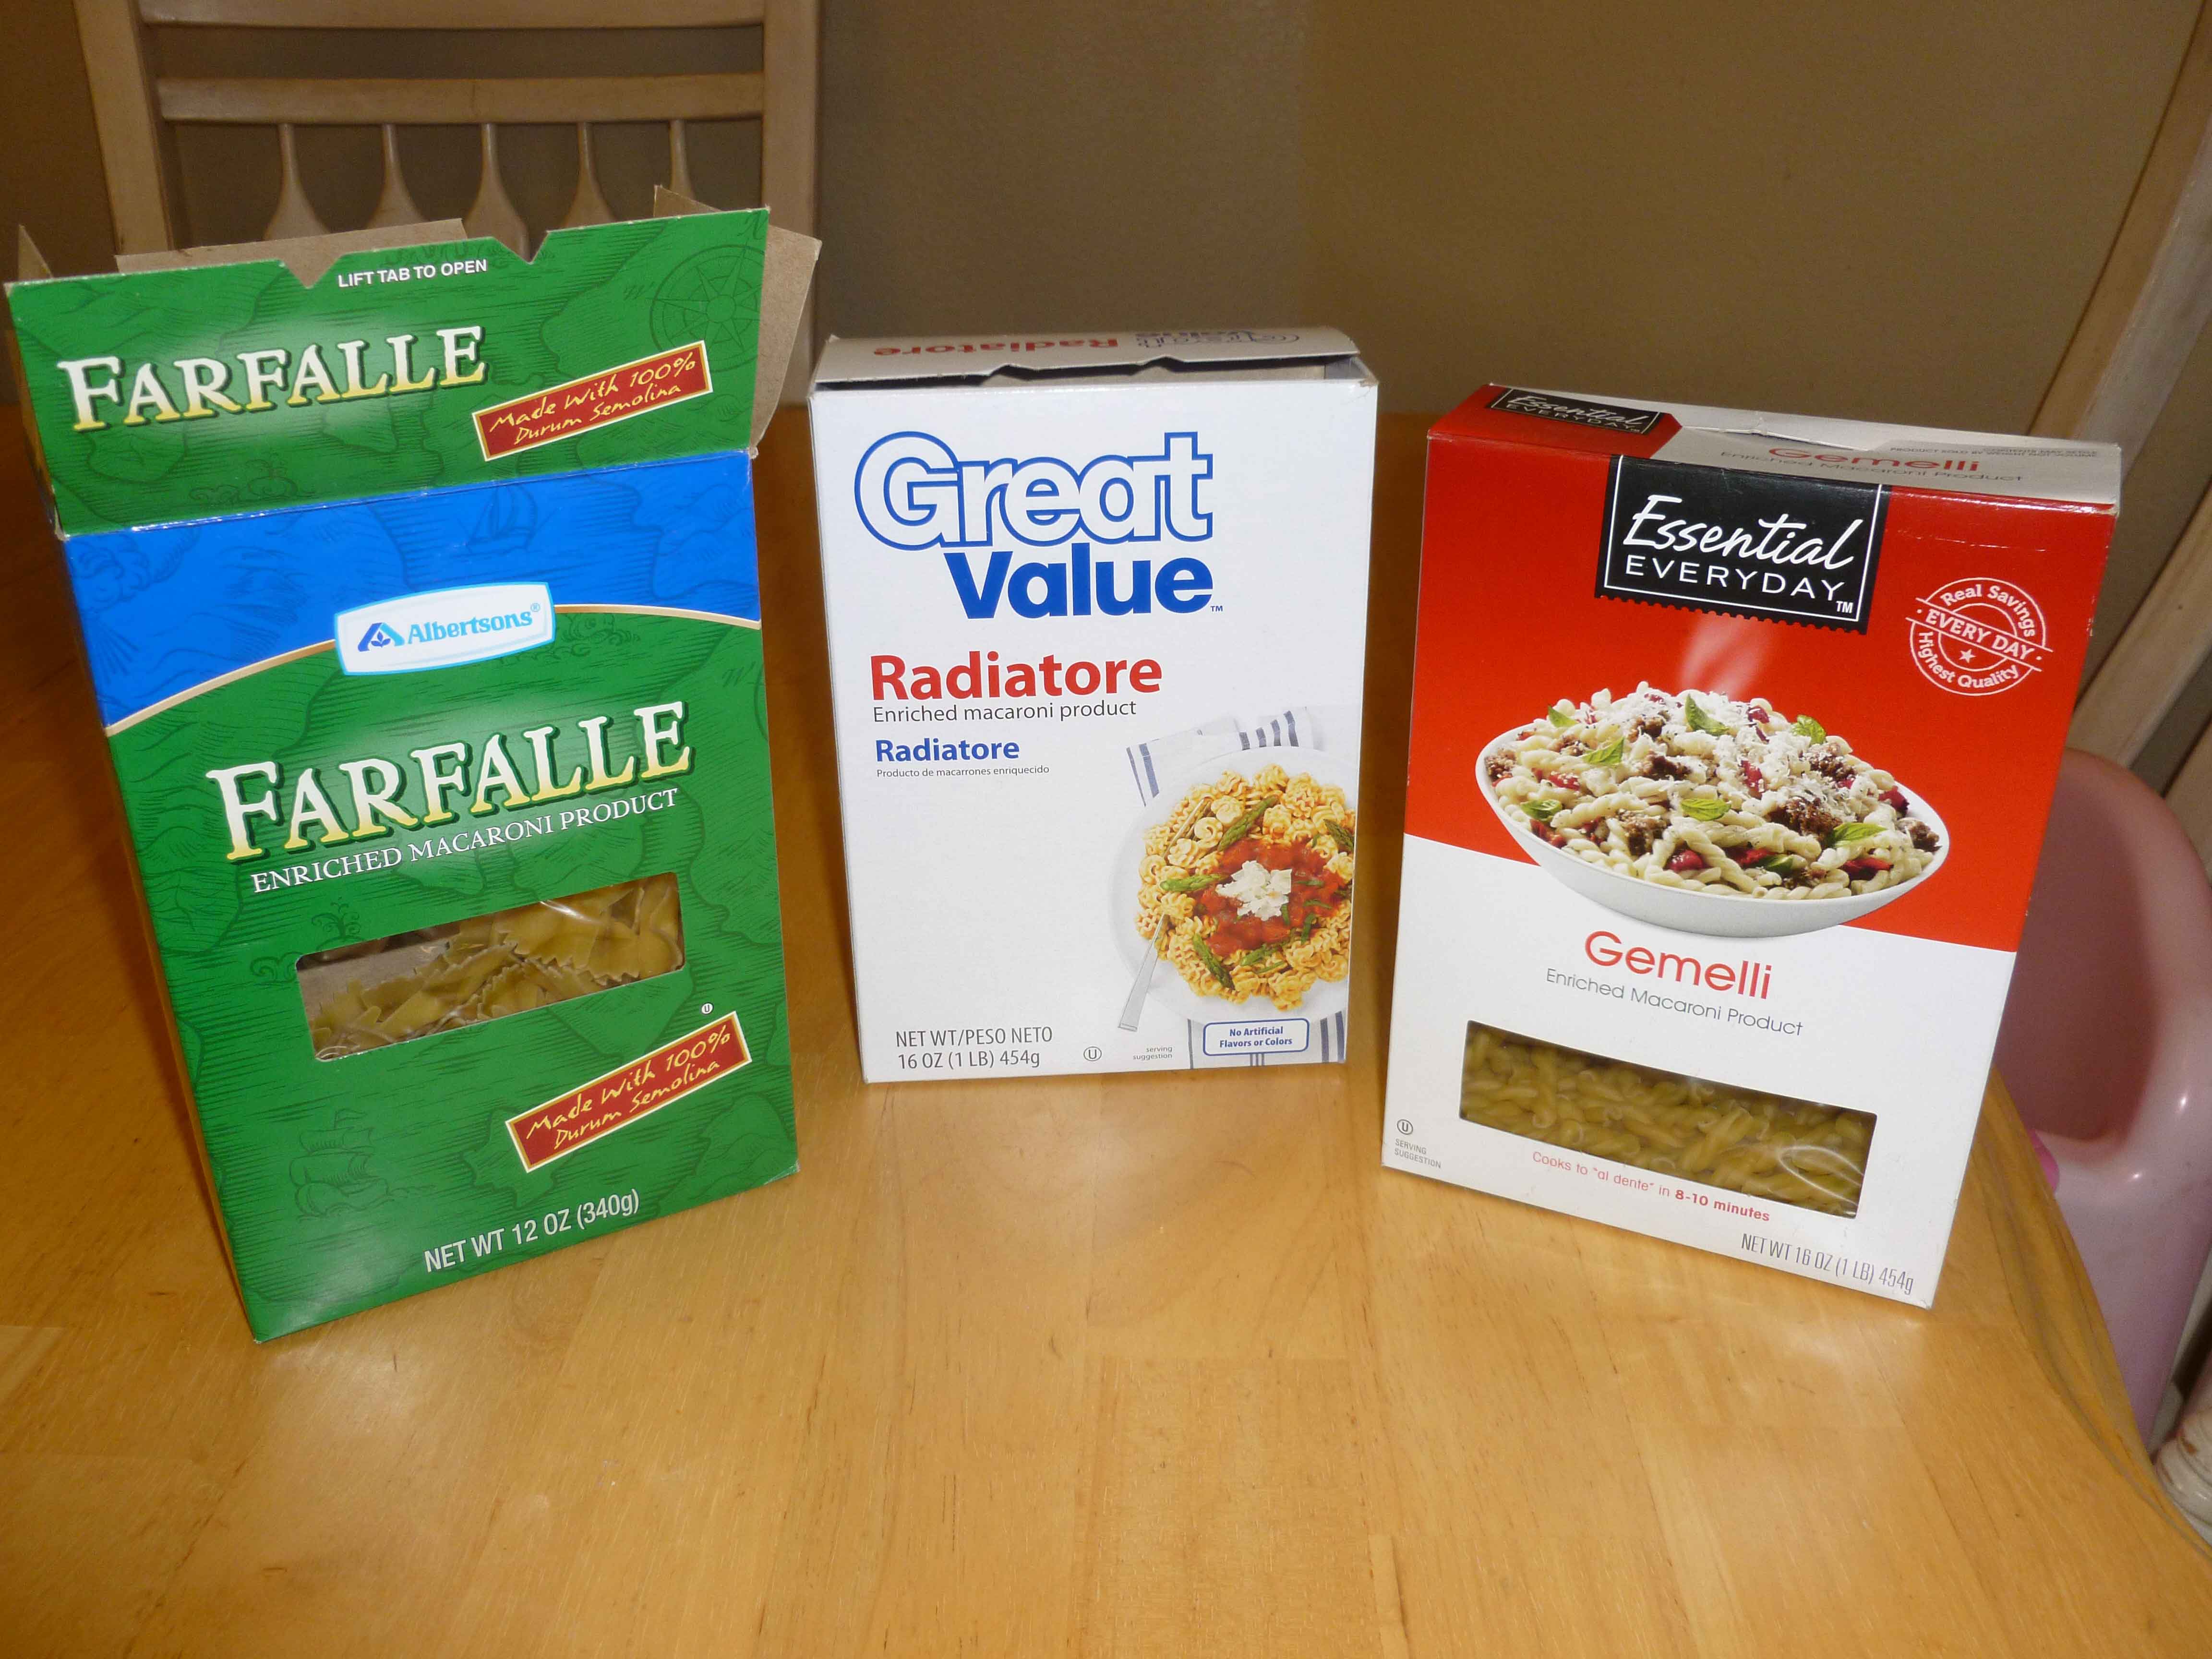
We were having Garlic Chicken Farfalle for dinner (SO GOOD!) so I decided to use all 3 kinds of pasta. But I didn’t want to be cooking them in different pots. So read the back of the boxes and start cooking the pasta that takes the longest.
Then I set the timer and added the next pasta four minutes later, then the last pasta 1 minute later. Each pasta cooked for the right amount of time, and I was able to cook them all at once. I ended up with a nice batch of pasta for dinner!
What do you do with your small amounts of pasta?
A PYP Best Blog! Yummy Recipe: Apple Pie Bars!
Just in case you missed this article on making apple pie bars the first time we shared it a couple of years ago, we are republishing it. After Marne wrote this blog originally, we got an awesome response. This is one of the PYP Best Blogs!
Even though Spring is coming, I think there is still enough chill in the air for a winter dessert like this. If you like apple pie, you can get your fill without the fuss! I can my own apple pie filling each year and if you do too, this is a great way to use it up! My family says these apple pie bars taste better than apple pie! You make them and be the judge.
I found this recipe online a few years ago and altered it to meet my families needs. This recipe make half a baking sheet. So if you want to make a full sheet (or jelly roll pan size) then double this recipe.

Apple Pie Bars
Crust:
3/4 c. butter, softened
6 Tbl. sugar
1 1/2 c. all purpose flour
1/8 tsp. nutmeg
1/4 tsp. cinnamon
1/4 tsp. salt
Topping:
1 1/2 c. quick oats
1 c. all purpose flour
3/4 c. light brown sugar
1/2 tsp plus 1/8 tsp cinnamon
1/4 tsp baking soda
1/4 tsp salt
3/4 c. cold butter, cut into small cubes
Prepare the crust: Preheat oven to 375 degrees. Line a 13×9.5 jelly roll pan with foil or parchment paper. Using an electric mixer, beat the butter and sugar until light and fluffy, about two minutes. At low speed, beat in the flour, spices, and salt until a soft dough forms. Press the dough over the bottom of the prepared pan. Bake in the center of oven for about 15 minutes or until golden and set. Set on wire rack to cool slightly.
Prepare the topping: In a large bowl, mix the oats and the flour, brown sugar, cinnamon, baking soda and salt. Using your fingers or a pastry tool, put the butter cubes into the oat mixture and crumble together until the mixture resembles a coarse meal. Press the mixture into clumps.
Dump on the quart bottle of your apple pie filling and spread evenly over the crust. Scatter the crumb topping on top, pressing it lightly into the mixture. There will be a lot of topping, don’t worry. It will fit. Bake for 30 minutes or until the topping begins to look slightly crispy on top. Let cool and enjoy!
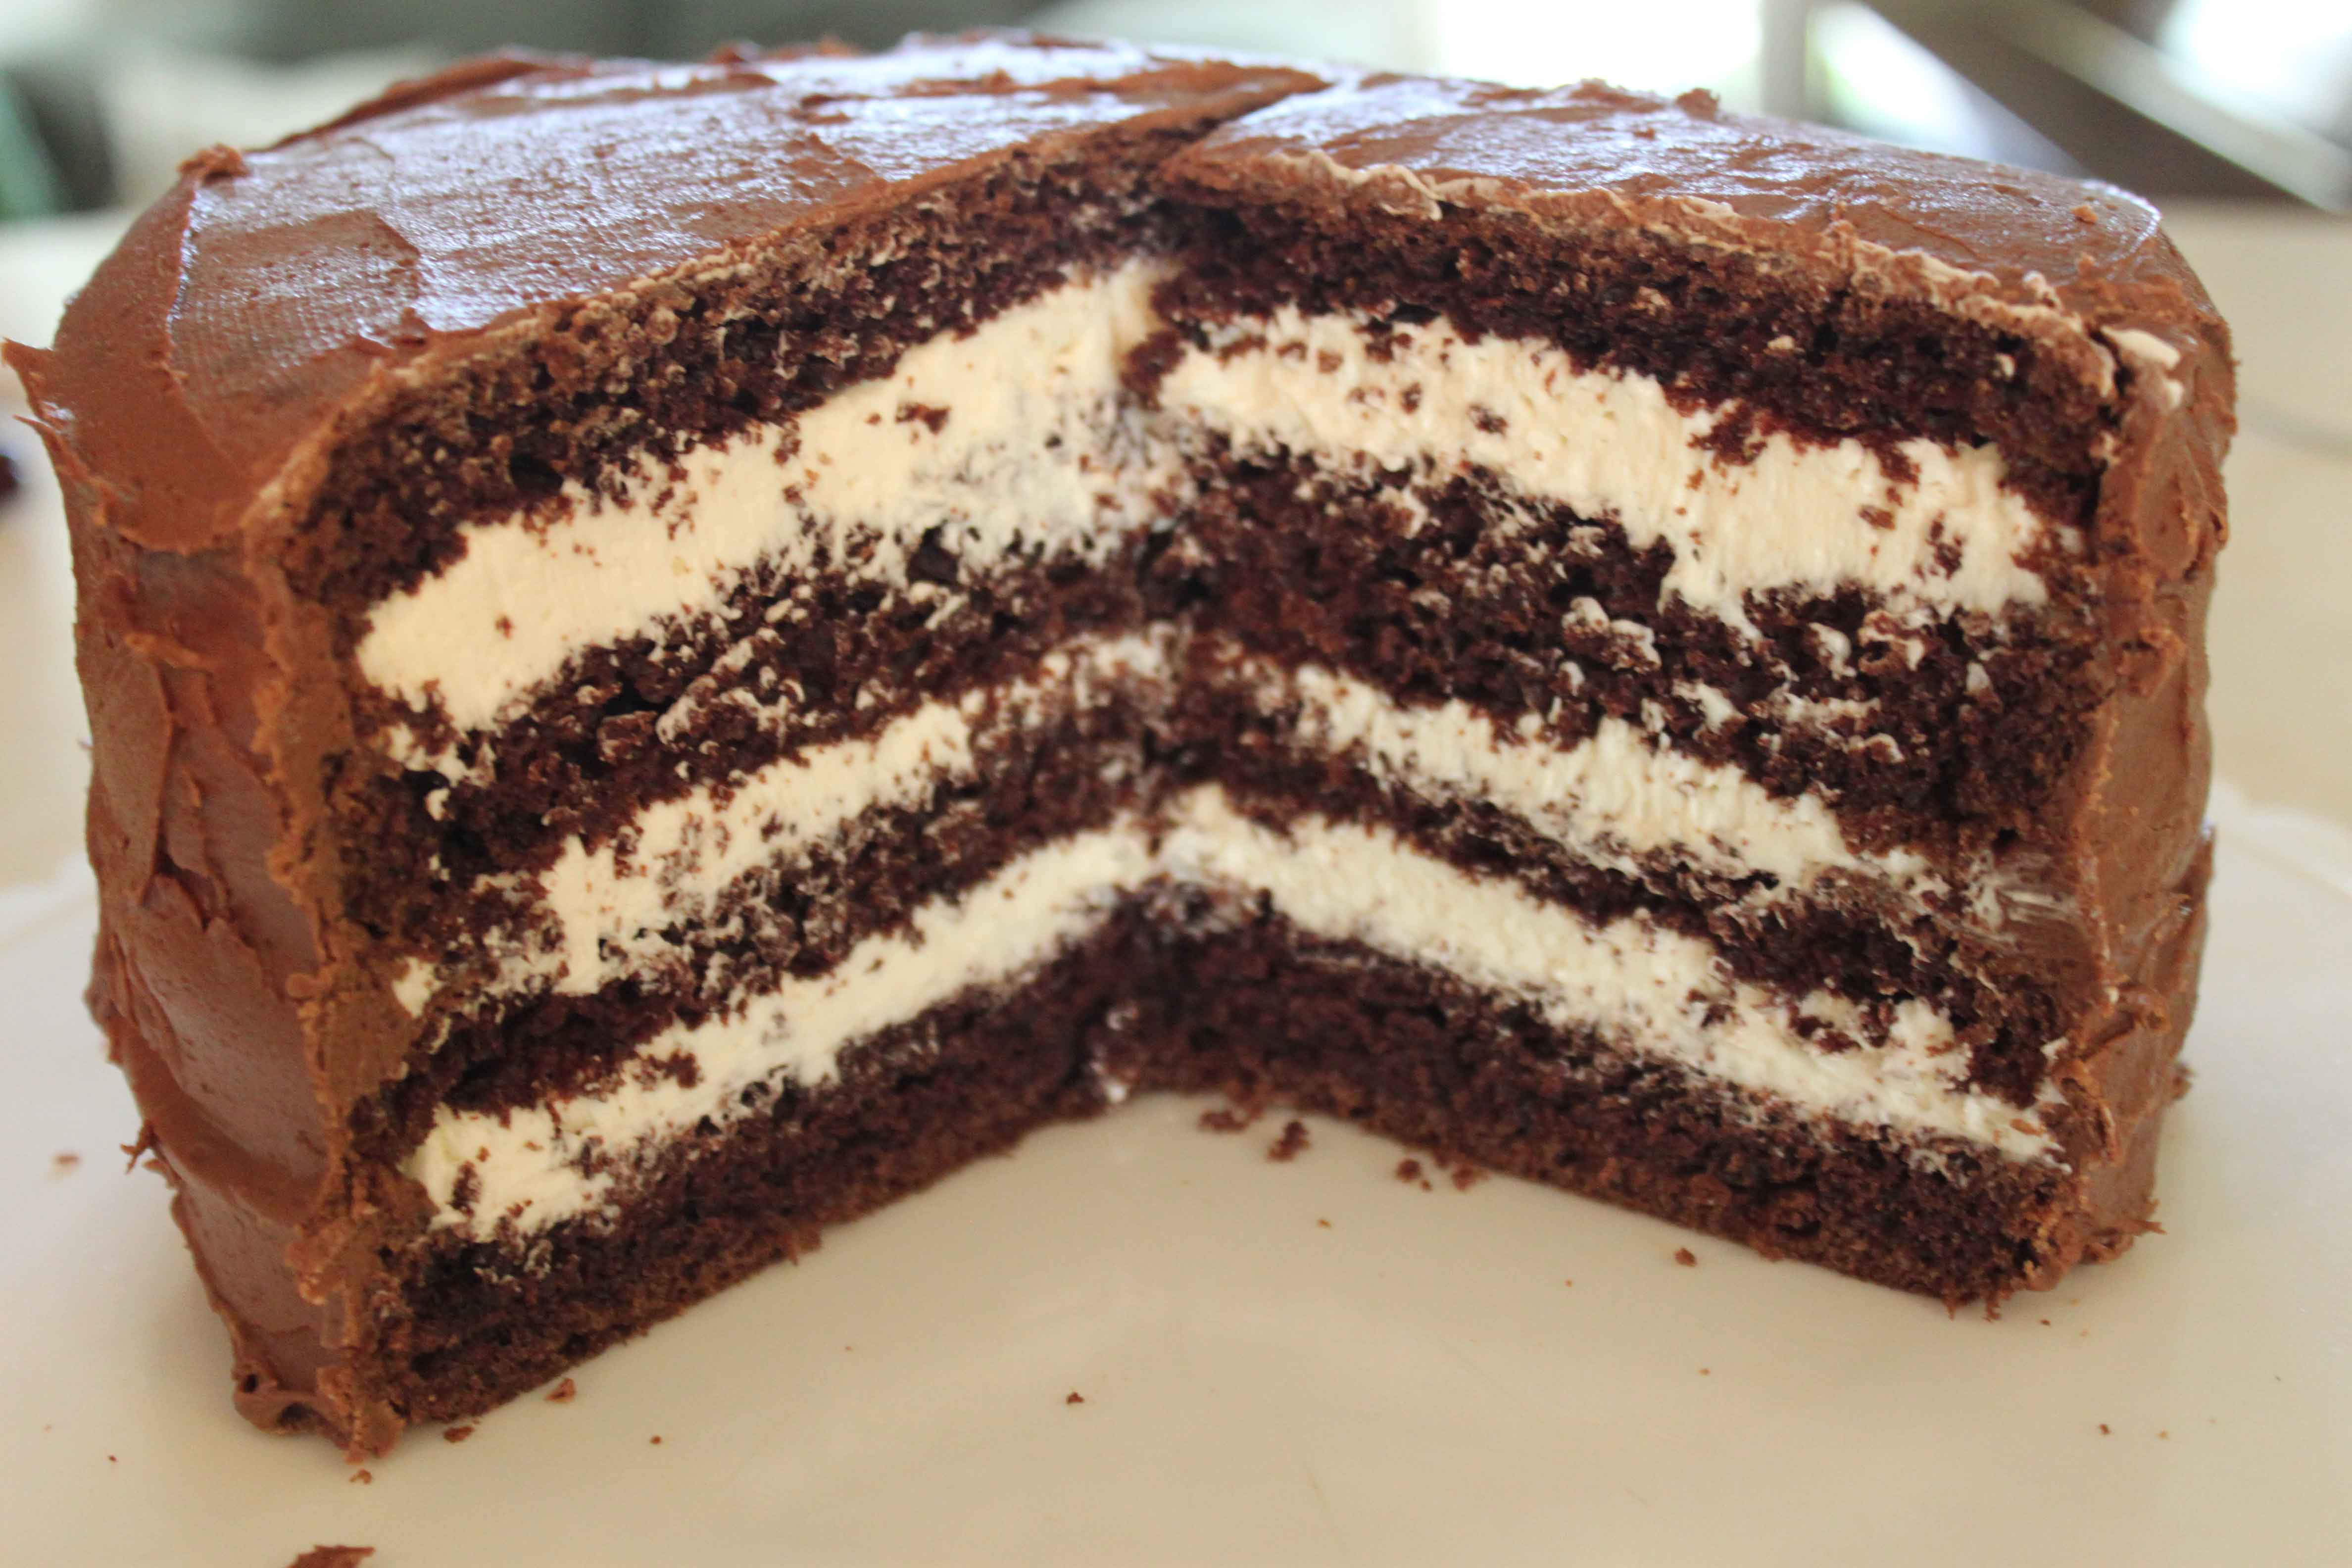
A PYP Best Blog! Make a Ding Dong Cake!
Just in case you missed this article on a yummy copycat recipe for a ding dong cake the first time we shared it a couple of years ago, we are republishing it. After Marne wrote this blog originally, we got an awesome response. Many of you told us you tried this recipe and it became a new family favorite! Cooler temperatures are here and baking sounds fun again. Try this recipe out and let us know what you think. This is one of the PYP Best Blogs!
I tried a copycat recipe for a ding dong cake last week, and it turned out fantastic! Really was easy too. I made a slight change to the original recipe and it was a crowd pleaser! The filling in the middle is really like a ding dong…nice and fluffy, with the right amount of sweetness.
Ding Dong Cake
1 box Devils Food cake mix
FILLING
1 cup milk
4 tablespoons flour
1/2 cup butter
1/2 cup shortening
1 cup sugar
1 teaspoon vanilla
ICING
1 tablespoon butter
1 teaspoon vanilla
3 tablespoons milk
2 tablespoons cocoa
powdered sugar, to desired consistency
1. Bake the cake according to the instructions on the box. Bake using two 8 or 9 inch round baking pans. Cool on rack in the pan for 10 minutes, then take cake out of pan to completely cool. While the cake is cooling, mix up the ingredients for the filling. Combine milk and flour. Cook until thick, then cool. Mix butter and shortening for 4 minutes. Add sugar and vanilla and mix 4 more minutes. Add flour mixture and beat 4 minutes more.
2. When cake is cooled, cut each round in half, so you end up with 4 smaller round cakes. Start spreading the icing inbetween the layers of the cakes and stack.
3. Mix up the ingredients for the icing. Combine butter, vanilla, milk, cocoa and mix. Add powdered sugar until quite thick. Spread over the cake.
ENJOY!!
Win a Trip to NYC With Your Recipe!
If you’re a seasoned cook, you might want to try your hand at the ! You could win a trip to NYC and meet Chef Alex Guarnaschelli!
Weight Watchers Chips & Salsa – A PYP Best Blog!

Yesterday I shared with you my favorite Weight Watchers taco soup recipe. Today I wanted to share with you a couple of other great Weight Watchers recipes that you may have missed the 1st time we posted them.
My favorite WW swap is making this yummy chips & salsa recipe that Whit shared with us. She said, “I’ve had Mexican food on the brain lately. I grew up in AZ and sometimes I just crave chips & salsa. Not exactly a healthy option on Weight Watchers. UNLESS you bake your own chips.
What I do: Take 2-3 delicious corn tortillas (I prefer white corn) and use a pizza cutter to cut them into strips. You can cut them into triangles like the photo, I just think it’s easier to cut them into strips and I also prefer dipping/eating them that way. Put your tortilla strips into a bowl and drizzle your healthy oil on top of them. Rub the oil into the strips and put onto a baking sheet. You can also use cooking spray for this step. Bake at 450* for about 5-7 minutes on each side. Flip them when the top side has browned. They are done when the second side has browned and they are crisp.
For my hot sauce, I take some Pace Salsa (or whatever I bought on sale) & blend it (just in my blender) with some El Pato Jalapeño Salsa (you can usually find this in the Mexican food section of your local grocery store and it’s worth looking for). The more El Pato you use, the hotter your sauce, so pour it to taste. This makes for some yummy hot sauce!
Then I have a bowl of black beans (maybe a little lime juice on top) with my chips and salsa and I’ve eaten a nice low point Mexican food meal! Points Plus values depend on the tortillas that you purchase. You can find tortillas that are 1-1.5 points/each. The hot sauce is FREE and the black beans are also free if you’re doing the Simply Filling Technique. Black beans are 2 PP for 1/2 C if you’re not doing SFT.”
What goes great with chips & salsa? Ice cream. Here is a great way to enjoy ice cream while doing Weight Watchers:
Simply take frozen fruit (I prefer either sliced up ripe bananas or peaches) and put it into your favorite blending appliance. This appliance needs to be able to really chop through frozen fruit. For one portion of fruit (i.e., 1 banana or peach frozen) you will add about 1-2 Tablespoons of skim milk or coconut milk or almond milk or whatever you prefer (you can add chocolate almond milk to the bananas – delicious!) and a dash of vanilla. Blend all of this until it is the consistency of soft serve ice cream. Add more liquid as needed.
You can add whatever you you want to count points for (or 0 points items like cocoa powder!) into your ice cream or on top of your ice cream. I just purchased peanut butter powder to add in with my banana ice cream. Mmmmmmm!
Leave a comment and let me know what combination is your favorite.
.
Weight Watchers Taco Soup
Fall is in the air here in Northern Utah. For me that means it’s time to be making soup. I love rich hearty creamy soups, but since I do Weight Watchers it’s not the best choice for me. My go to soup for fall is a super simple taco soup. In fact it’s just 2 points plus on Weight Watchers. It’s hot, delicious, and extremely filling. Everyone that I have shared this taco soup recipe with absolutely loves it! One of the best parts of this taco soup is that it is also extremely easy to make and it’s very easy on the budget. I make this probably every 10 days or so and it feeds my family of 4, plus gives me 4-5 more servings for lunches.
Ready to take a look and get started? Take a look at the ingredients below!
- 2 Cans of Cut Corn
- 1 Cans of Black Beans
- 1 Can of Kidney Beans
- 1 Can of Great Northern Beans
- 1 Can of Fat Free Re-fried Beans
- 2 Cans of Diced Tomatoes
- 2 Cans of Broth of your choice
- 1 Can of Diced Chiles
- 1 Onion
- 1 Garlic Clove
- 1 Packet of Taco Seasoning
Simple right? Good! These are the only ingredients that will need unless you like to top your soup with crackers, sour cream, cheese, tortilla chips, or whatever you like. Of course adding things to the top will increase the points plus per serving. I use fat free cheese and sour cream.
Not only are the ingredients easy, it’s super easy to make! Just dice the onion and sautee it up in your stock pot. Add the crushed garlic. Then just start opening cans and dumping everything in. I always end with the re-fried beans. They really thicken it all up.
Bring it all to a boil and then reduce the heat and allow it to simmer for about 30 minutes.
Just another tip – buy reduced sodium beans & broth. You don’t need all the sodium!
Get to the grocery store or wherever it is that you shop so you can get your hands on everything needed to make this affordable taco soup. Anyways, we hope you like this recipe!
If you a doing the Simply Filing program on Weight watchers you won’t need to count any points for this taco soup. Enjoy!