
National Donut Day
 Yes, it is the first Friday in June and thus it is National Donut Day. A day declared to indulge in those sweet rings we know as donuts. The celebration of Donut Day started in Chicago back in 1938 by the Salvation Army. It was a day set aside to honor all of the ladies who served donuts to the U.S. armed forces during World War I. These ladies were known as the Salvation Army Lassies. This tradition also continued during World War II. So in keeping with tradition each year the first Friday in June is celebrated as the day of the donut.
Freebies Today:
Krispy Kreme is offering a free donut to all of their customers
Participating Dunkin’ Donuts locations are offering a free donut with the purchase of a beverage.
Enjoy the traditional version of the donut with the Salvation Army’s original recipe.
SALVATION ARMY LASSIES’ DOUGHNUT RECIPE
Yield: 4 doz. doughnuts
5 C flour
2 C sugar
5 tsp. baking powder
1 ‘saltspoon’ salt
2 eggs
1 3/4 C milk
1 Tub lard
DIRECTIONS
Combine all ingredients (except for lard) to make dough.
Thoroughly knead dough, roll smooth, and cut into rings that are less than 1/4 inch thick. (When finding items to cut out doughnut circles, be creative! Salvation Army doughnut girls used whatever they could find, from baking powder cans to coffee percolator tubes.)
Drop the rings into the lard, making sure the fat is hot enough to brown the doughnuts gradually. Turn the doughnuts slowly several times.
When browned, remove doughnuts and allow excess fat to drip off.
Dust with powdered sugar. Let cool and enjoy.
On Top Of Spaghetti – Meatball Recipe
 School is ending this week for us and I would like to think that our life is about to slow down. But the truth is it’s just going to get busier. We may be minus the homework but summer means lots of activity and little rest around our house. So still my quest to stay in my budget and not eat out will still have to be conquered. Baseball, tee ball, tennis and trips to the lake, park and splash pad are just a few of the things that will send my hungry crew into a million different directions.
As I have said before I love meals that are quick and easy. They rank even higher on my list if I can prepare them ahead of time. This meatball recipe is one of those quick and easy meals. I can prepare it in the morning and toss it in the crock pot for later that night. I often make a double batch and quick freeze part of them to have for another night.
Meatball Recipe:
You will need,
1 pound extra lean ground beef
1/2 teaspoon sea salt
1 small onion, diced
1/2 teaspoon garlic salt
1 1/2 teaspoons Italian seasoning
3/4 teaspoon dried oregano
3/4 teaspoon crushed red pepper flakes
1 dash hot pepper sauce (such as Frank’s RedHot®), or to taste
1 1/2 tablespoons Worcestershire sauce
1/3 cup skim milk
1/4 cup grated Parmesan cheese
1/2 cup seasoned bread crumbs
Directions:
Mix then ingredients together in a larger bowl. Make sure to work all the flavors together until well blended. I find it works best to mix it with my hands.
Shape small balls about 1 to 1 1/2 in round.
Bake in a preheated oven at 400 degrees for 20 minutes.
This recipe works well with any type of sauce that you desire. We love to add them to spaghetti sauce or BBQ sauce.
Herbed Butter Recipe – Add A Special Touch To Your Meals
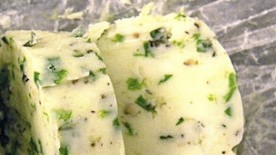
Have you ever been to a nicer restaurant and ordered a steak that comes out with a lovely dab of melting herbed butter on top? I love the look and taste of herbed butter. Not only is it beautiful in presentation, it is delicious and easy to make. It feels fancy and what girl doesn’t love to dress things up a bit? For me that even drizzles down to the food I eat. Try dressing your next meal up with herbed butter. It is a great addition to meats, pastas, breads and vegetables.
Memorial Day like other most other summer holidays is often celebrated with friends and families enjoying campouts or BBQs. This week I thought I’d whip up a batch of herbed butter to serve with the steaks my hubby has become so addicted to cooking outdoors on the BBQ grill. If your having a dinner party it just adds that extra special touch that makes people think “mmmm.”
Herbed Butter
Ingredients:
4 oz. Butter (1 stick), softened
1/4 Cup Herbs (your choice), finely chopped
1 Teaspoon Lemon Juice
Sea Salt, to taste
Directions:
1. Start by choosing a combination of your favorite herbs. This is where you get to be creative. Think about all your options and mix it up for new flavors each time. Or pick your favorite single herb to add flavor to the butter.
Herbs Ideas:
Tarragon, Chives, Parsley, Dill, Rosemary, Thyme, Sage
2. Mesh the butter and herbs together with a fork. Add the lemon juice, then salt to your taste.
3. On a piece of plastic wrap and shape the butter into a one inch round log. Finish wrapping the log in the plastic wrap and place in the fridge.
4. This will keep in the fridge for about a week or for a month in the freezer.
5. To use take out of the fridge or freezer and slice a piece off to use. Place it directly onto hot food just before serving.
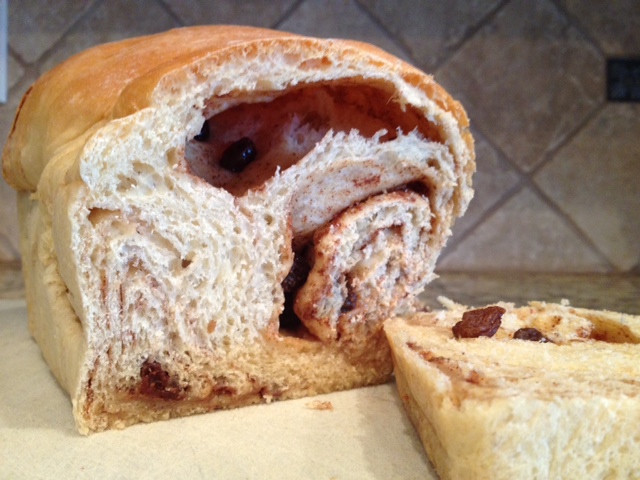
Cinnamon Lunch – Cinnamon Raisin Bread Recipe
 One the way home from school yesterday with my 6 year old we were discussing his day. He began telling me about his friends and all the exciting things that happened in his kindergarten class that day. Including how he feel asleep during math and drew a great big line down his paper when his hand slipped. It’s interesting to listen to him relate his feelings of school and friends in our one on one conversations. These times in the car result in some of the best conversations I have with my kids. When I have them all to myself in the car I feel like they are willing to share things they wouldn’t speak up and share at our crowded dinner table. I love how if I will listen to them just for a minute, during this one on one time, they start to talk about almost everything they could possibly be thinking.
When I asked my talkative six year old what we should have for lunch, he paused for a minute as if in deep thought and then replied, “ We should have a cinnamon lunch!” As he grinned at me from ear to ear. I started to think of all the things we could make with cinnamon. By the time we pulled into our driveway we had decided that we would make cinnamon bread.
As I pulled out the ingredients, mixed the bread and baked it he was actively by my side. This a simple everyday moment but one that has changed the way I think about cinnamon. As I pulled the bread out of the oven I thought “mmmm, cinnamon lunch!”
Cinnamon Raisin Bread Recipe
1 1/2 cups milk
1 cup warm water
2 packages active dry yeast
3 eggs
1/2 cup white sugar
1 teaspoon salt
1/2 cup margarine, softened
1 cup raisins
8 cups all-purpose flour
2 tablespoons milk
3/4 cup white sugar
2 tablespoons ground cinnamon
2 tablespoons butter, melted
1. Warm the milk in a small saucepan or microwave until it bubbles, then remove from heat and let cool.
2. Dissolve yeast in warm water, and set aside until yeast is frothy. Mix in eggs, sugar, butter or margarine, salt, and raisins. Stir in cooled milk. Add the flour gradually to make a stiff dough.
3. Knead dough on a lightly floured surface for a few minutes. Place in a large, greased, mixing bowl, and turn to grease the surface of the dough. Cover with a damp cloth. Allow to rise until doubled.
4. Roll out on a lightly floured surface into a large rectangle 1/2 inch thick. Moisten dough with 2 tablespoons milk. Mix together 3/4 cup sugar and 2 tablespoons cinnamon, and sprinkle mixture on top of the moistened dough. Roll up tightly; the roll should be about 3 inches in diameter. Cut into thirds, and tuck under ends.
5. Place loaves into well greased 9 x 5 inch pans. Lightly grease tops of loaves. Let rise again for 1 hour.
6.Bake at 350 degrees F for 45 minutes, or until loaves are lightly browned and sound hollow when knocked. Remove loaves from pans, and brush with melted butter or margarine. Let cool before slicing.
Quick and Easy Banana Bread
My family LOVES banana bread.
I hate making banana bread.
I can’t tell you how many black bananas I’ve thrown away because I just swore I was going to get around to it – eventually. I’ve even put them in the freezer to save for later, then I eventually throw away the freezer burned bananas, too.
So when I started seeing this recipe for banana bread pop up all over Pinterest, I knew I had to give it a try.
Ingredients
1 Yellow Cake Mix
3-4 very ripe Bananas (I used 4)
2 Eggs
Chocolate Chips (optional)
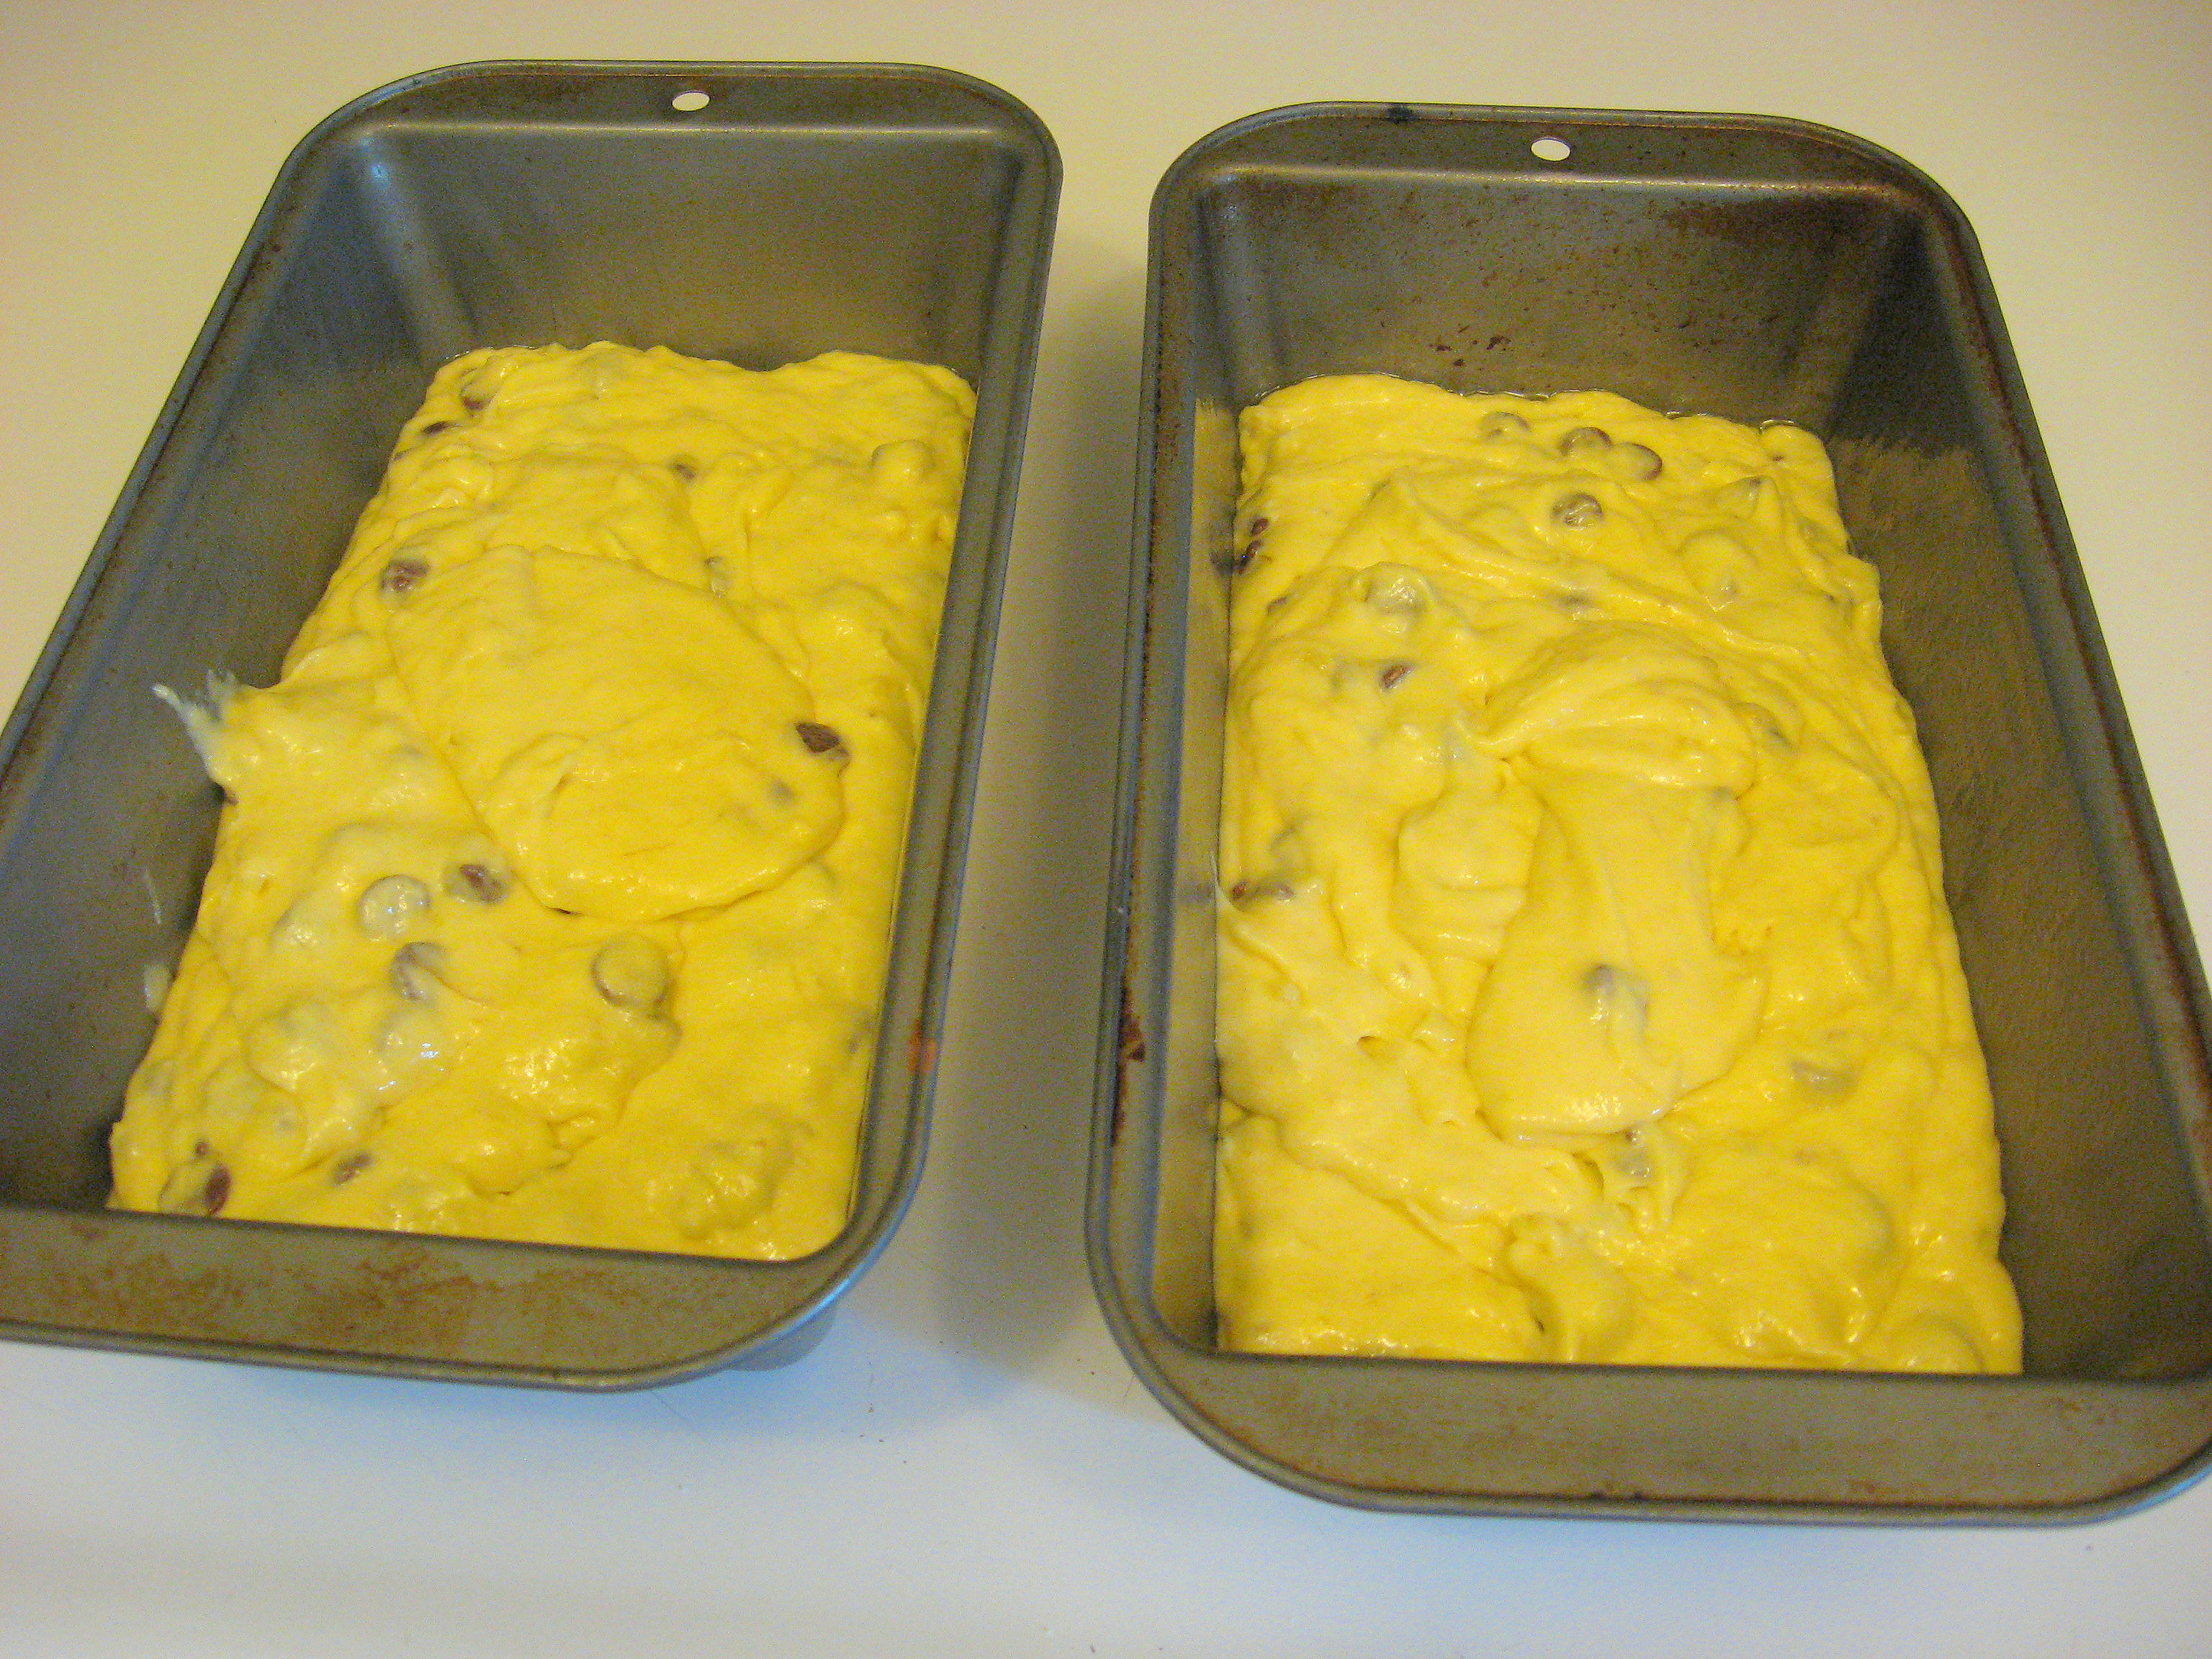
Preheat oven to 350*. Prepare 2 regular or one large loaf pan(s) by spraying WELL with cooking spray (or by greasing and flouring. Do people still do that?)
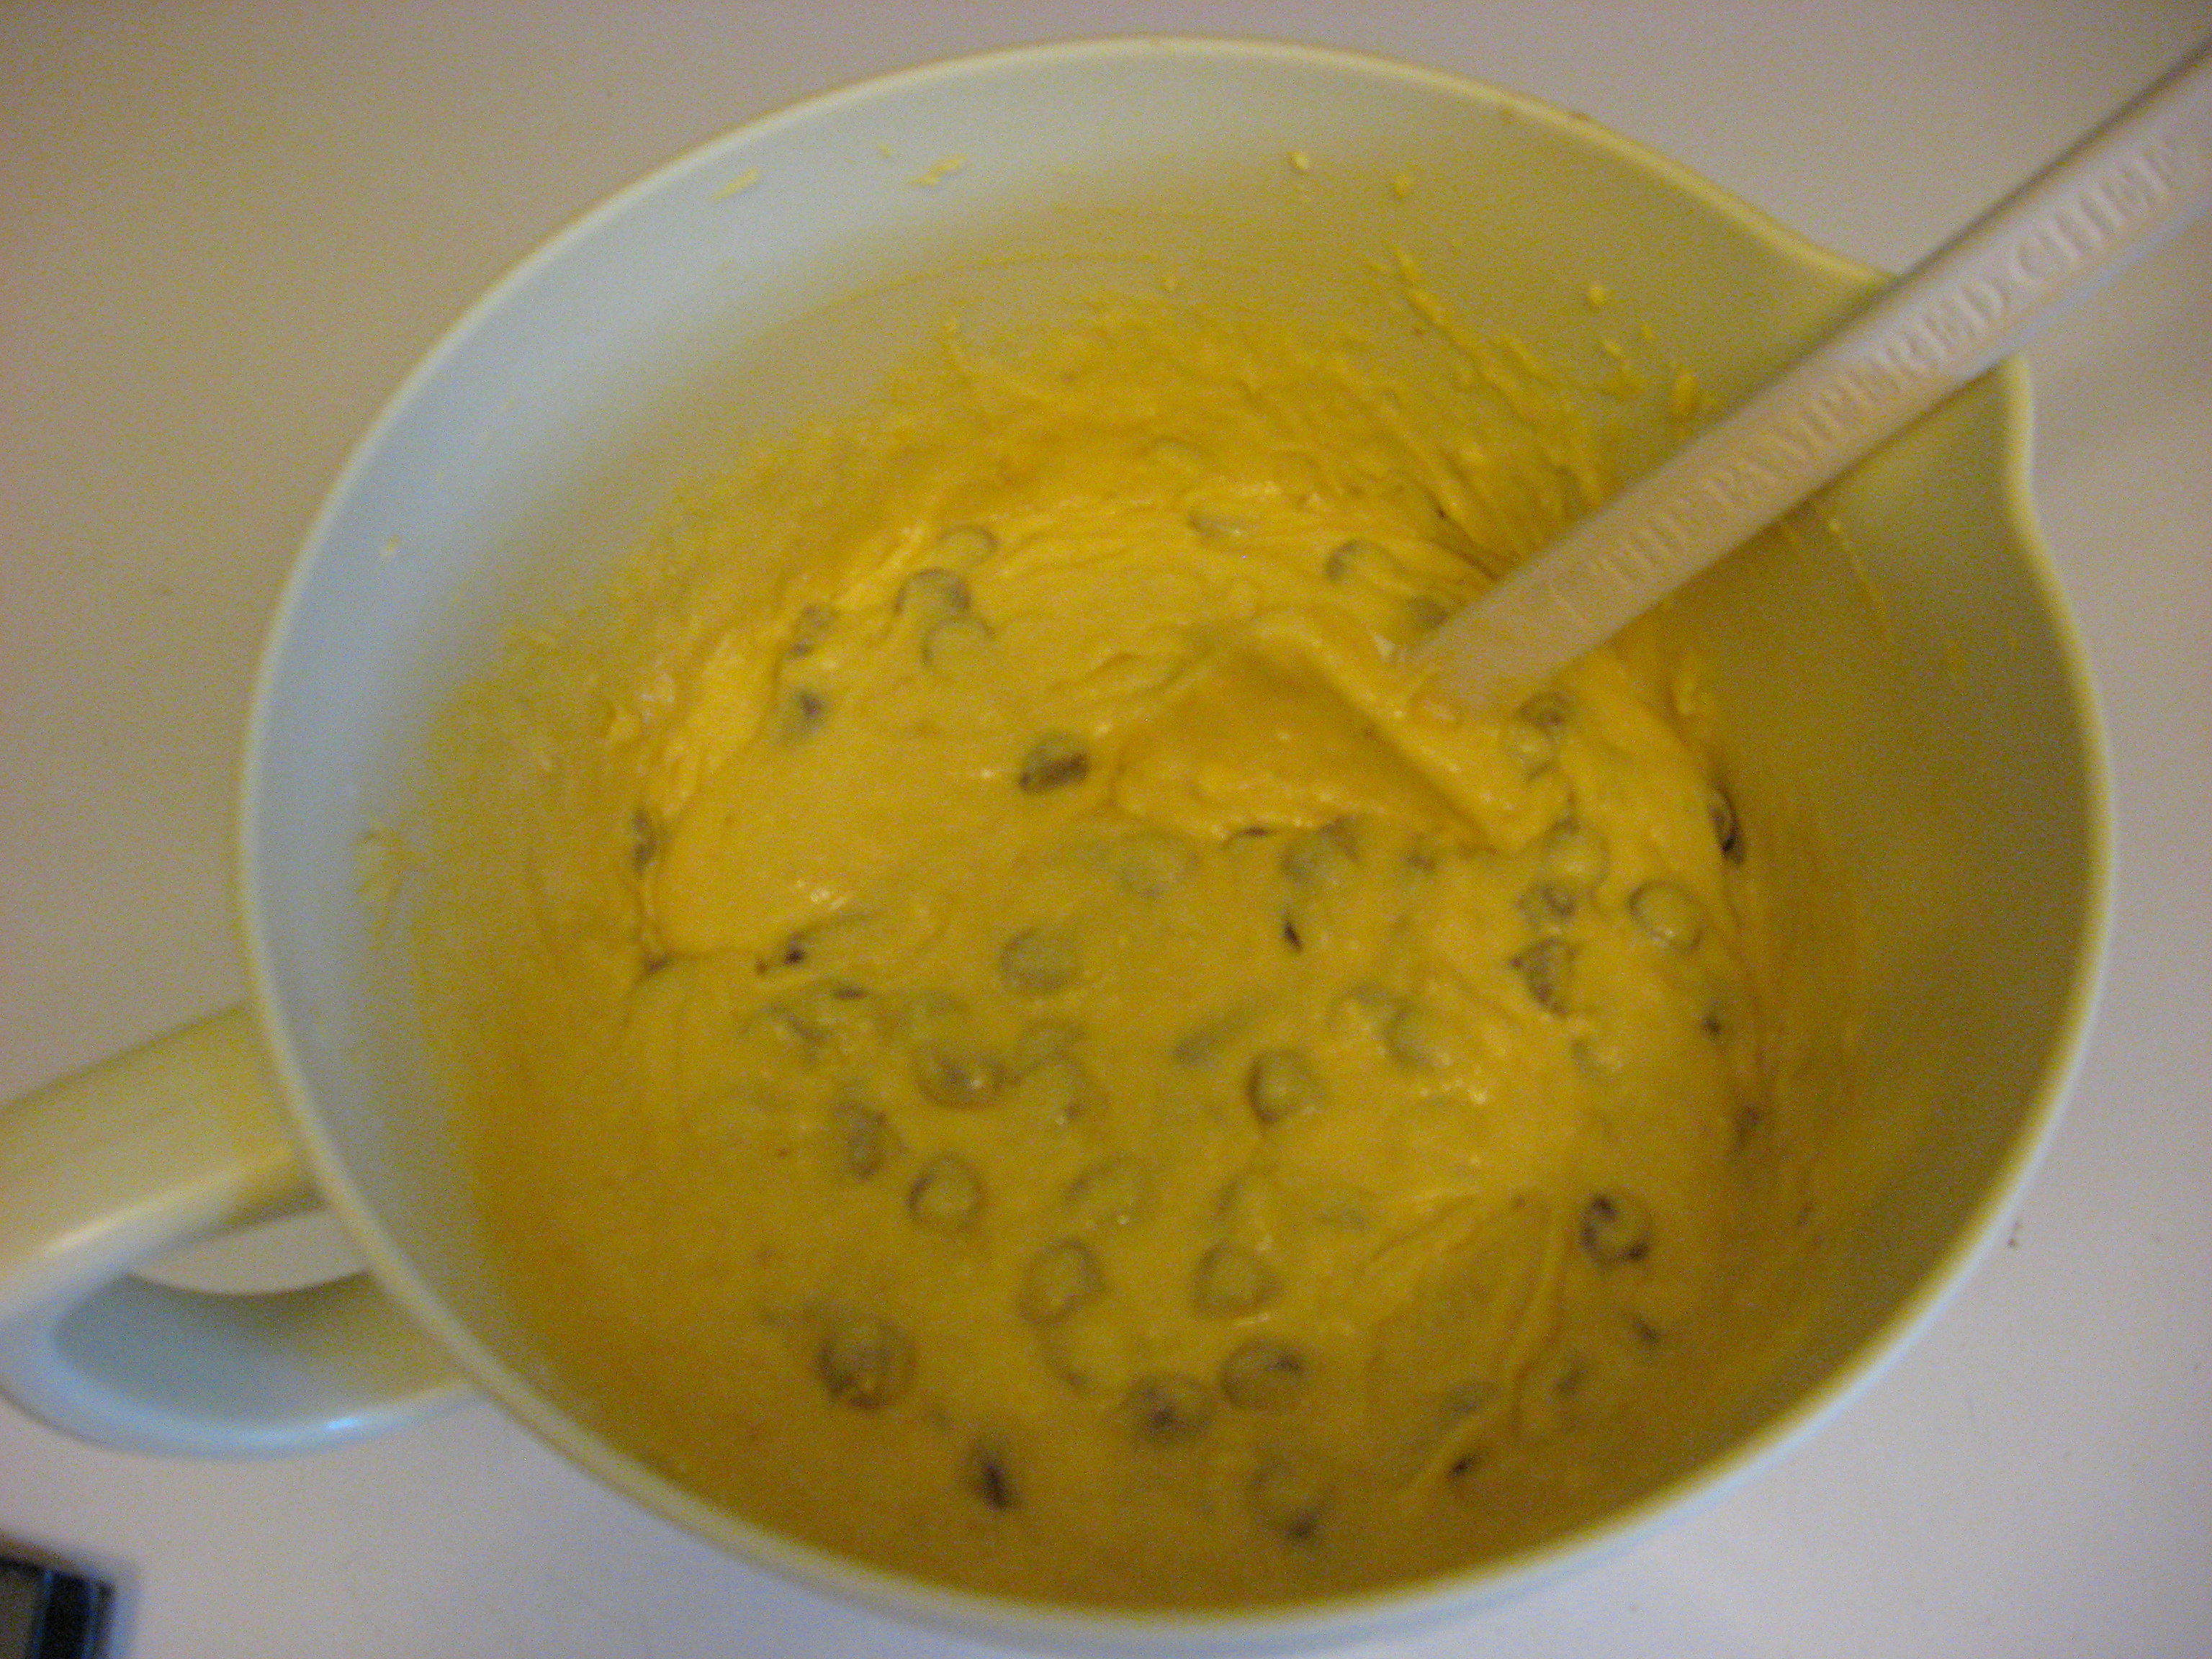
Peel the bananas and throw them all in a big bowl; use your mixer to mash them all up.
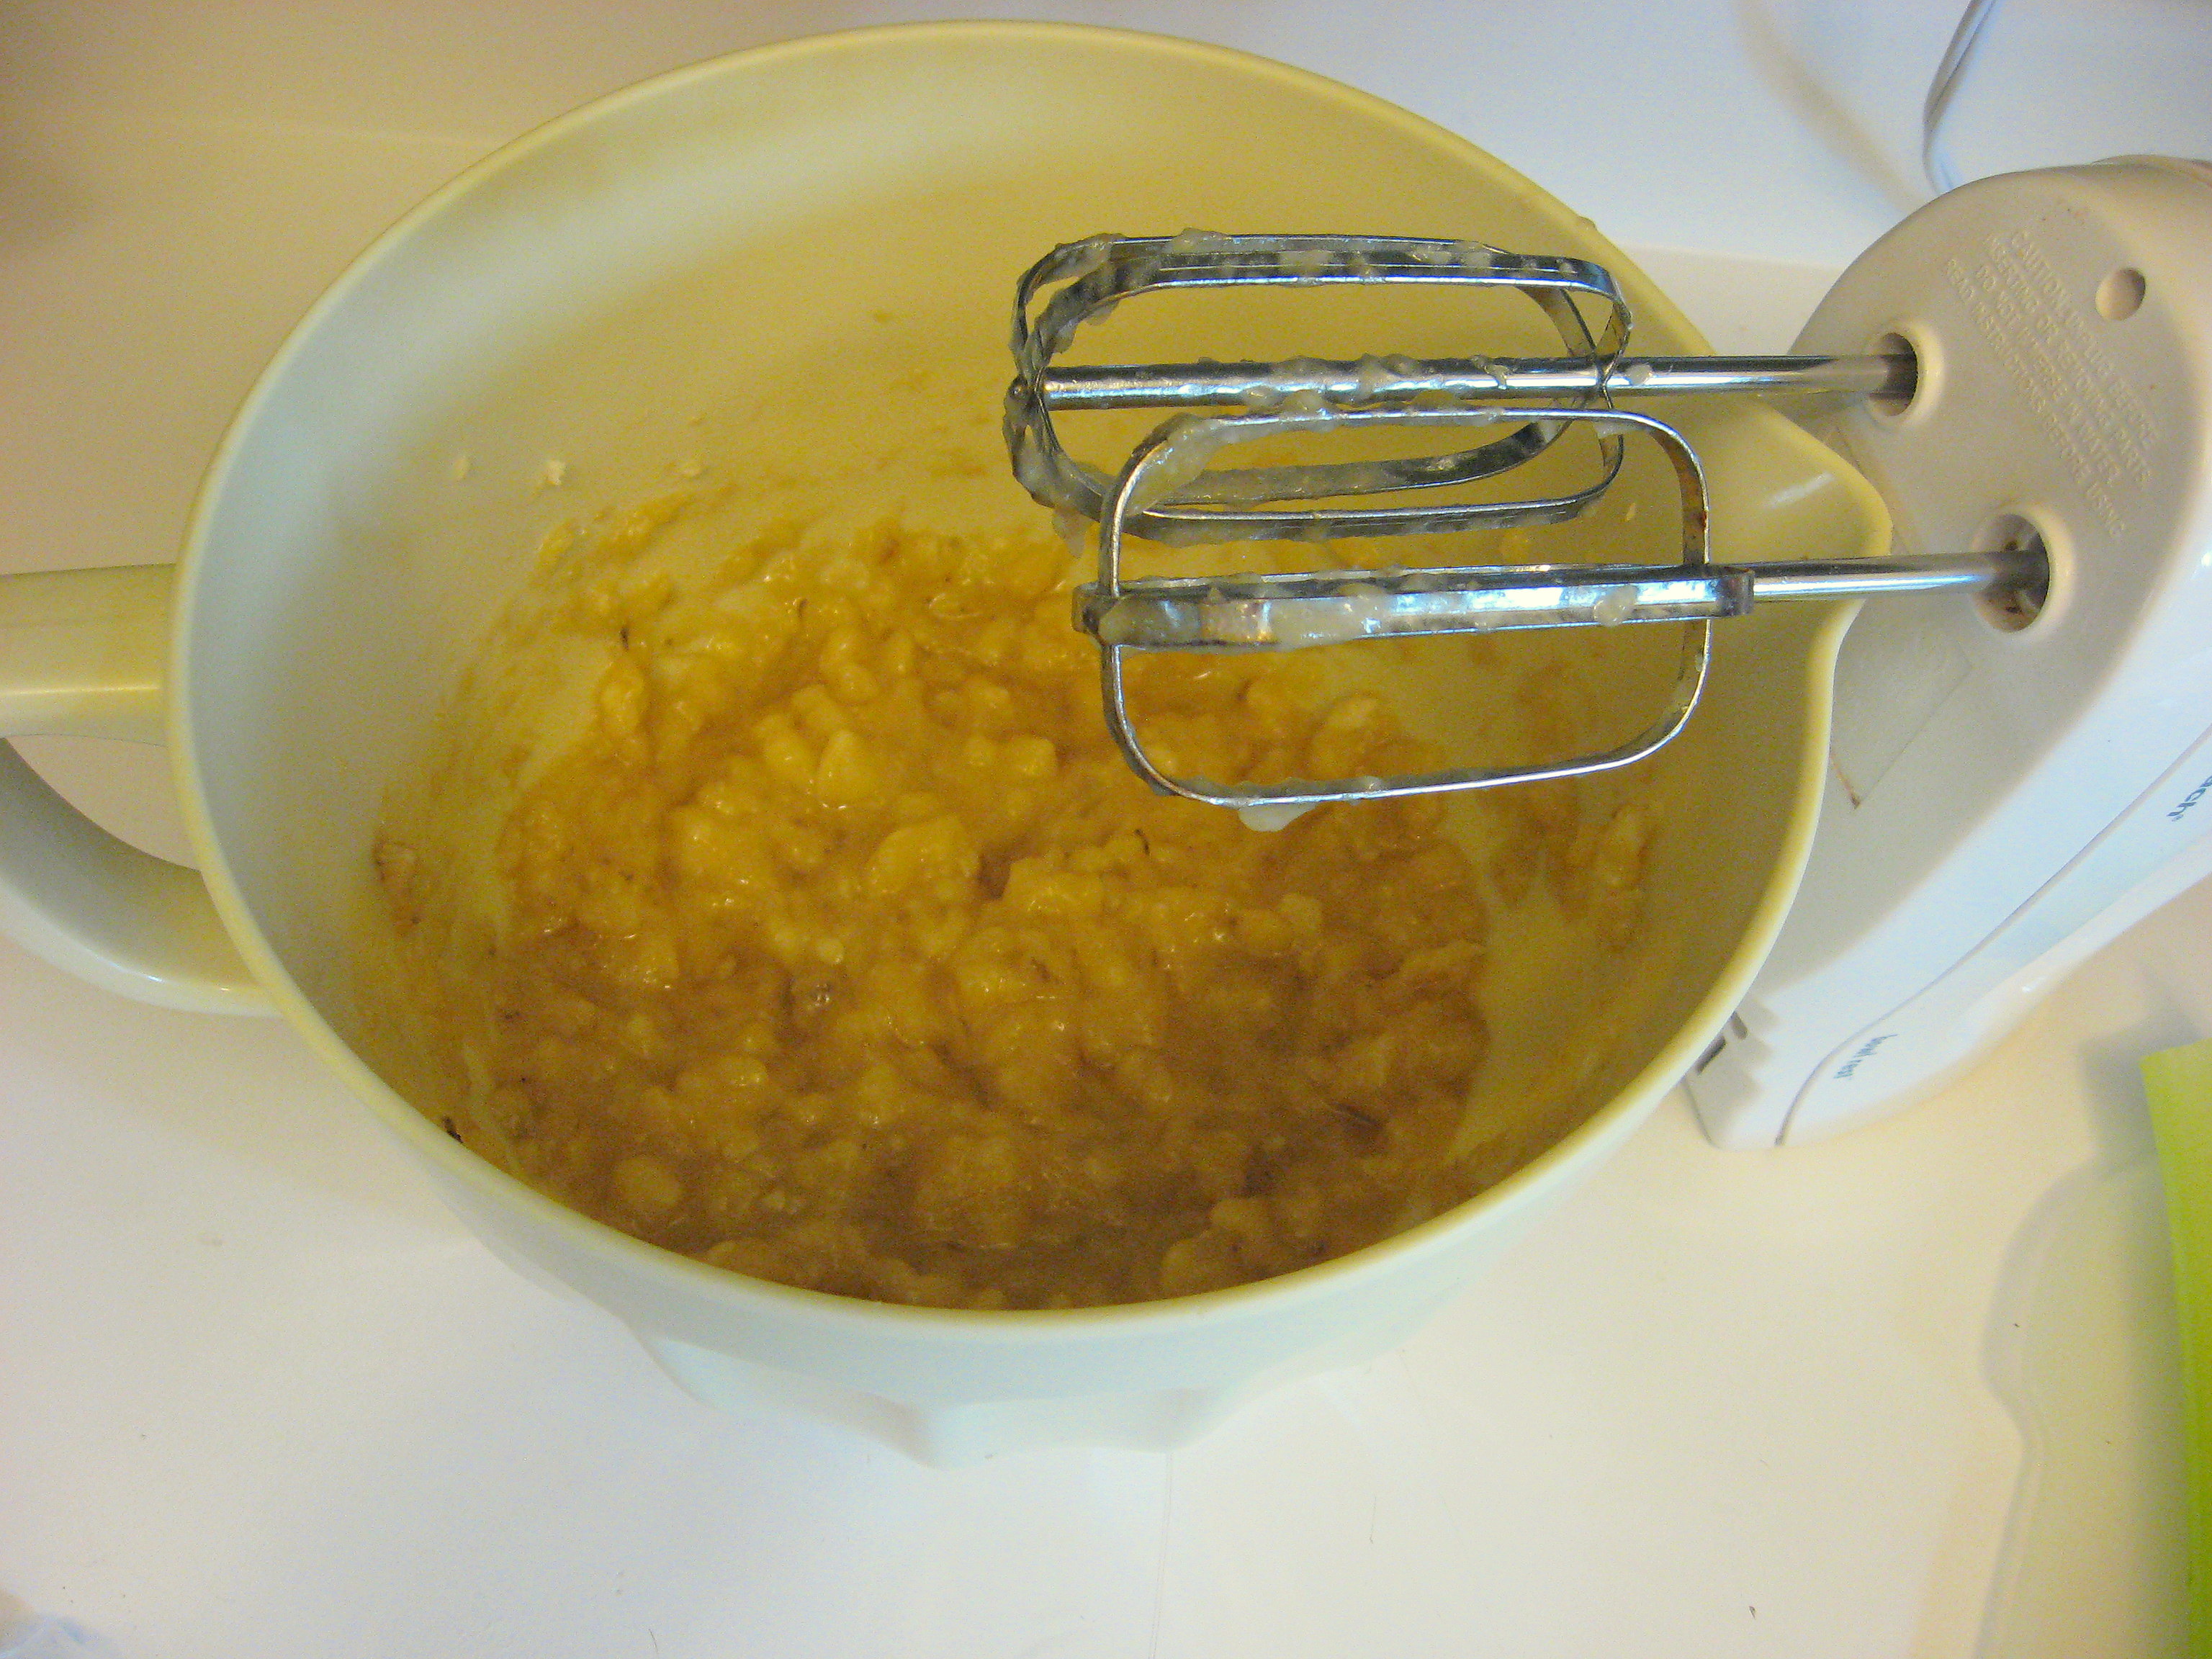
Now just dump in the cake mix and the eggs, and mix well. Then stir in the chocolate chips. The recipe calls for 1/2 cup to 1 cup. (I am lazy, so I just threw in the whole bag. I thought that was a little too chocolately and would only use 1/2 bag next time.)
Pour into the prepared loaf pans
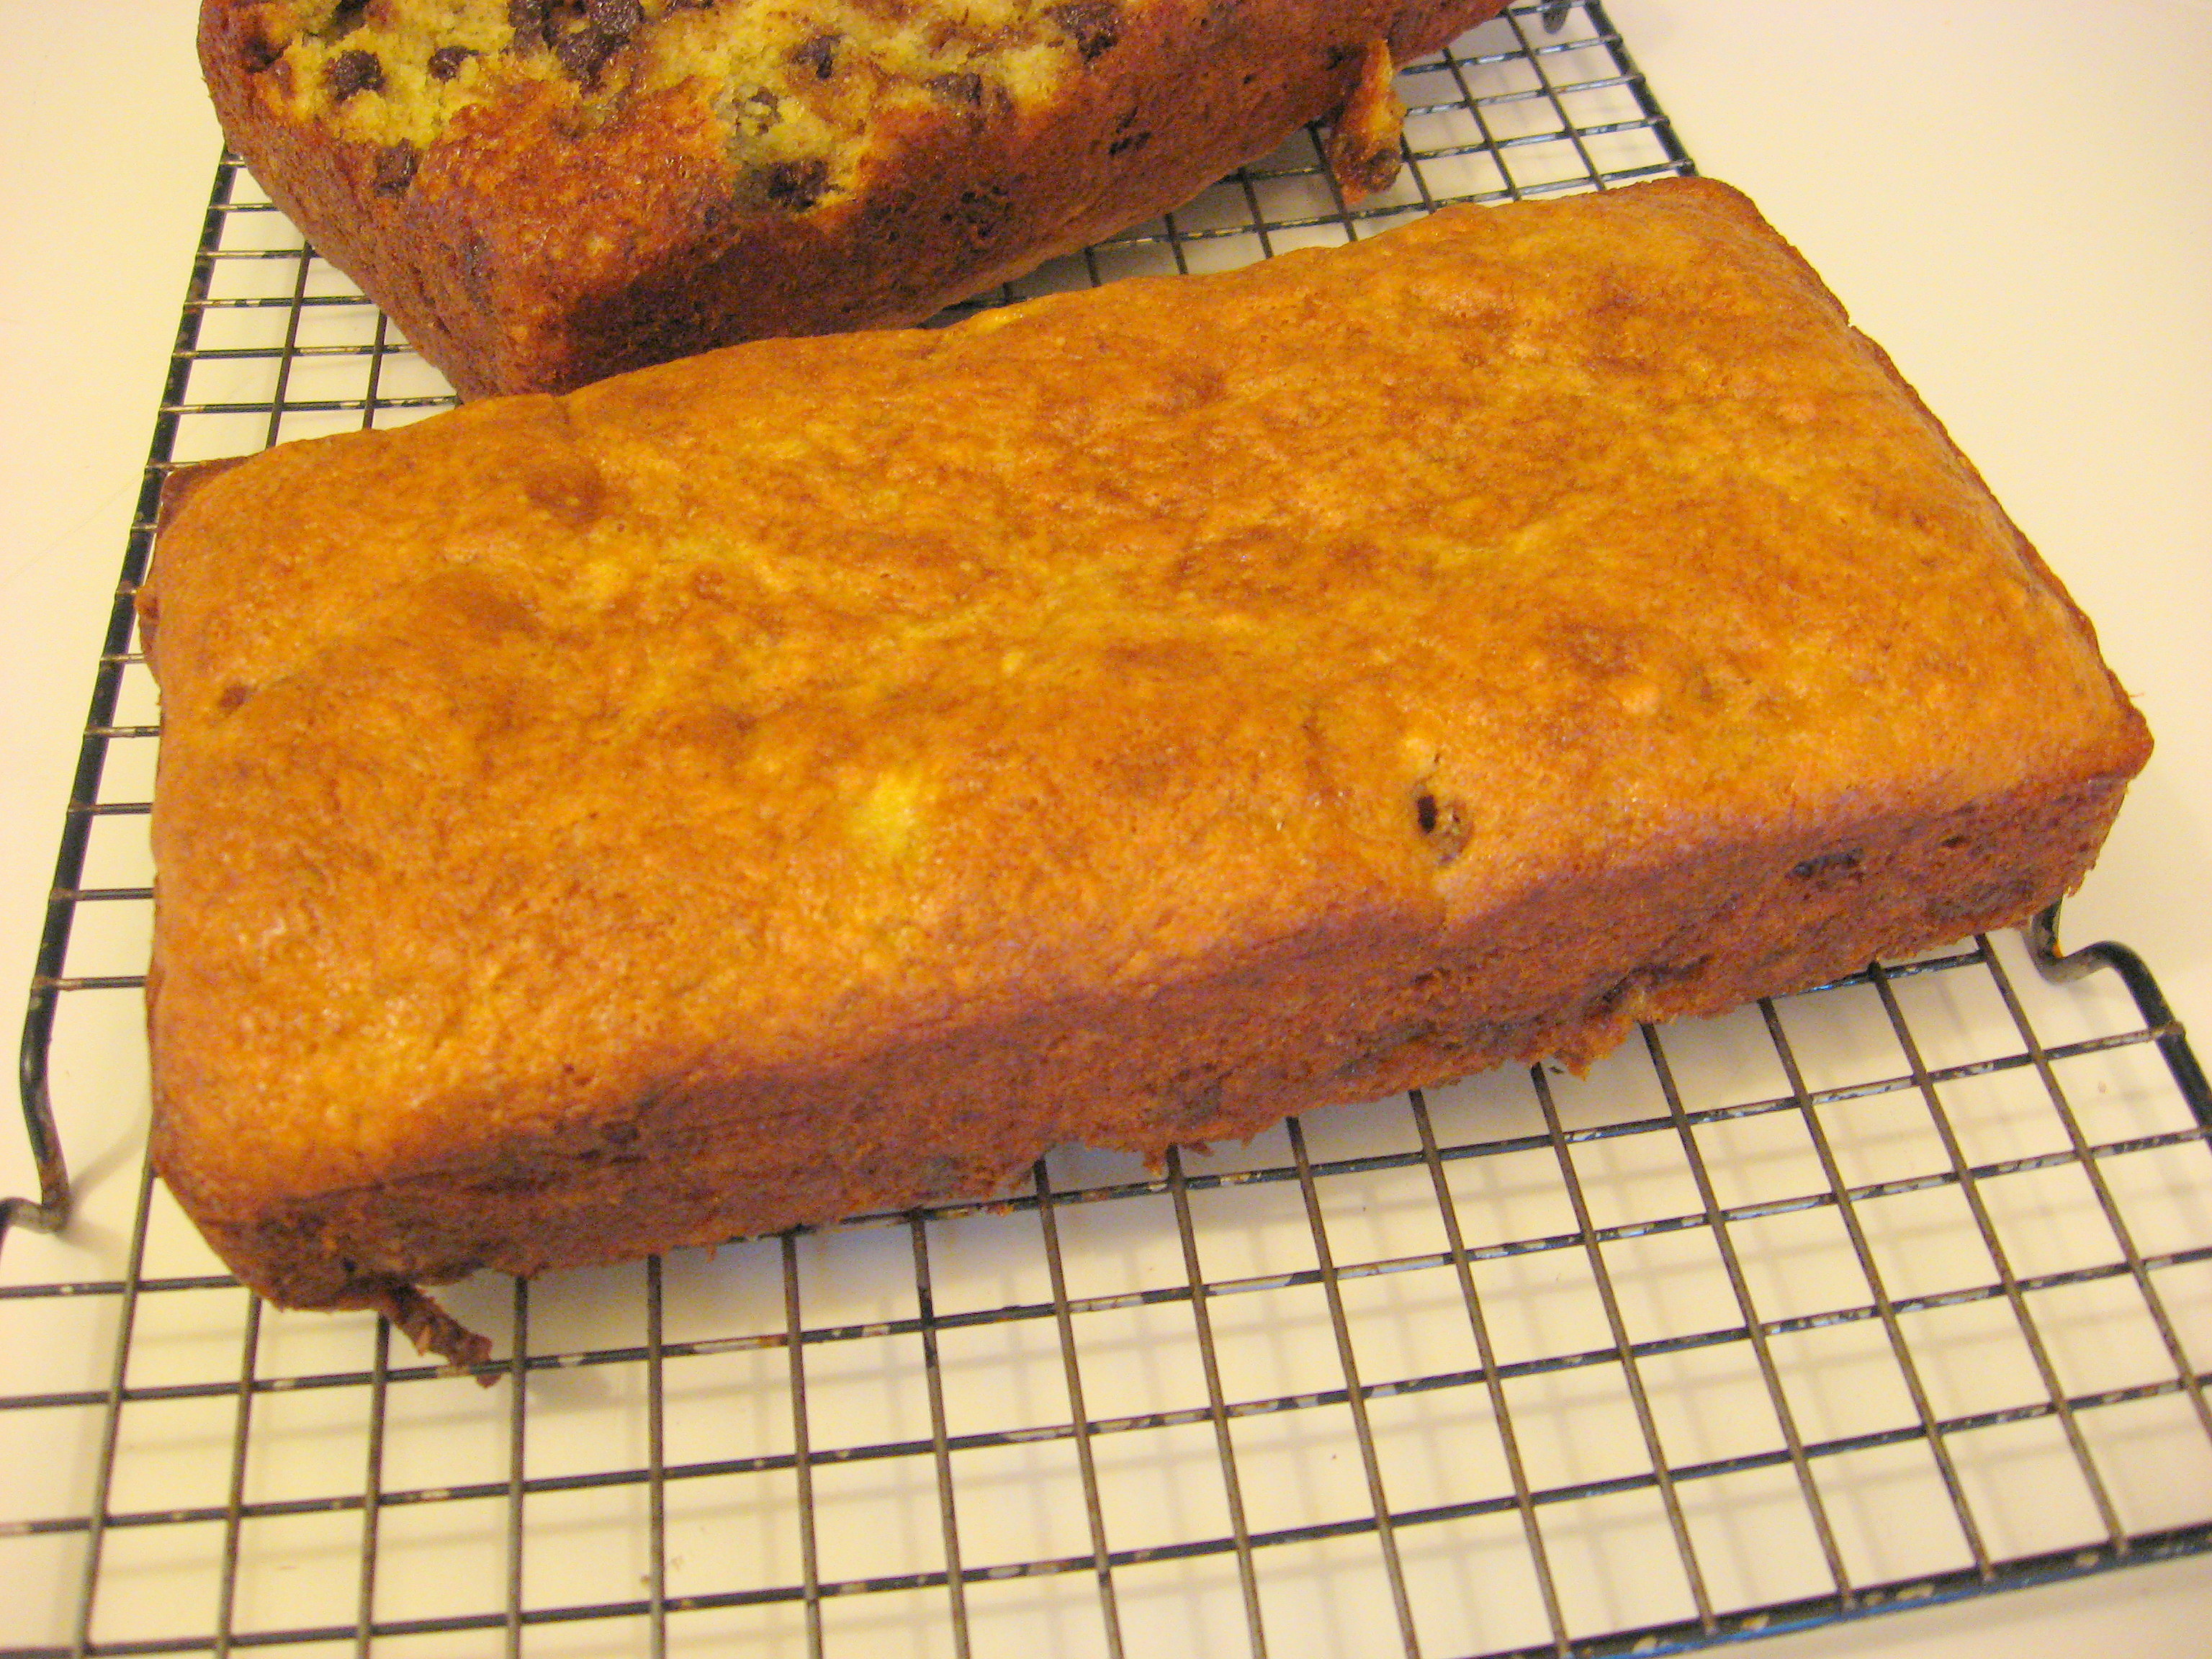
and bake for 35-40 minutes (mine took 45. It will also take longer if you are doing one big pan). Remove from the oven and let cool slightly, then turn out onto a cooling rack to finish cooling.
Uh…I told you to spray the pan well…
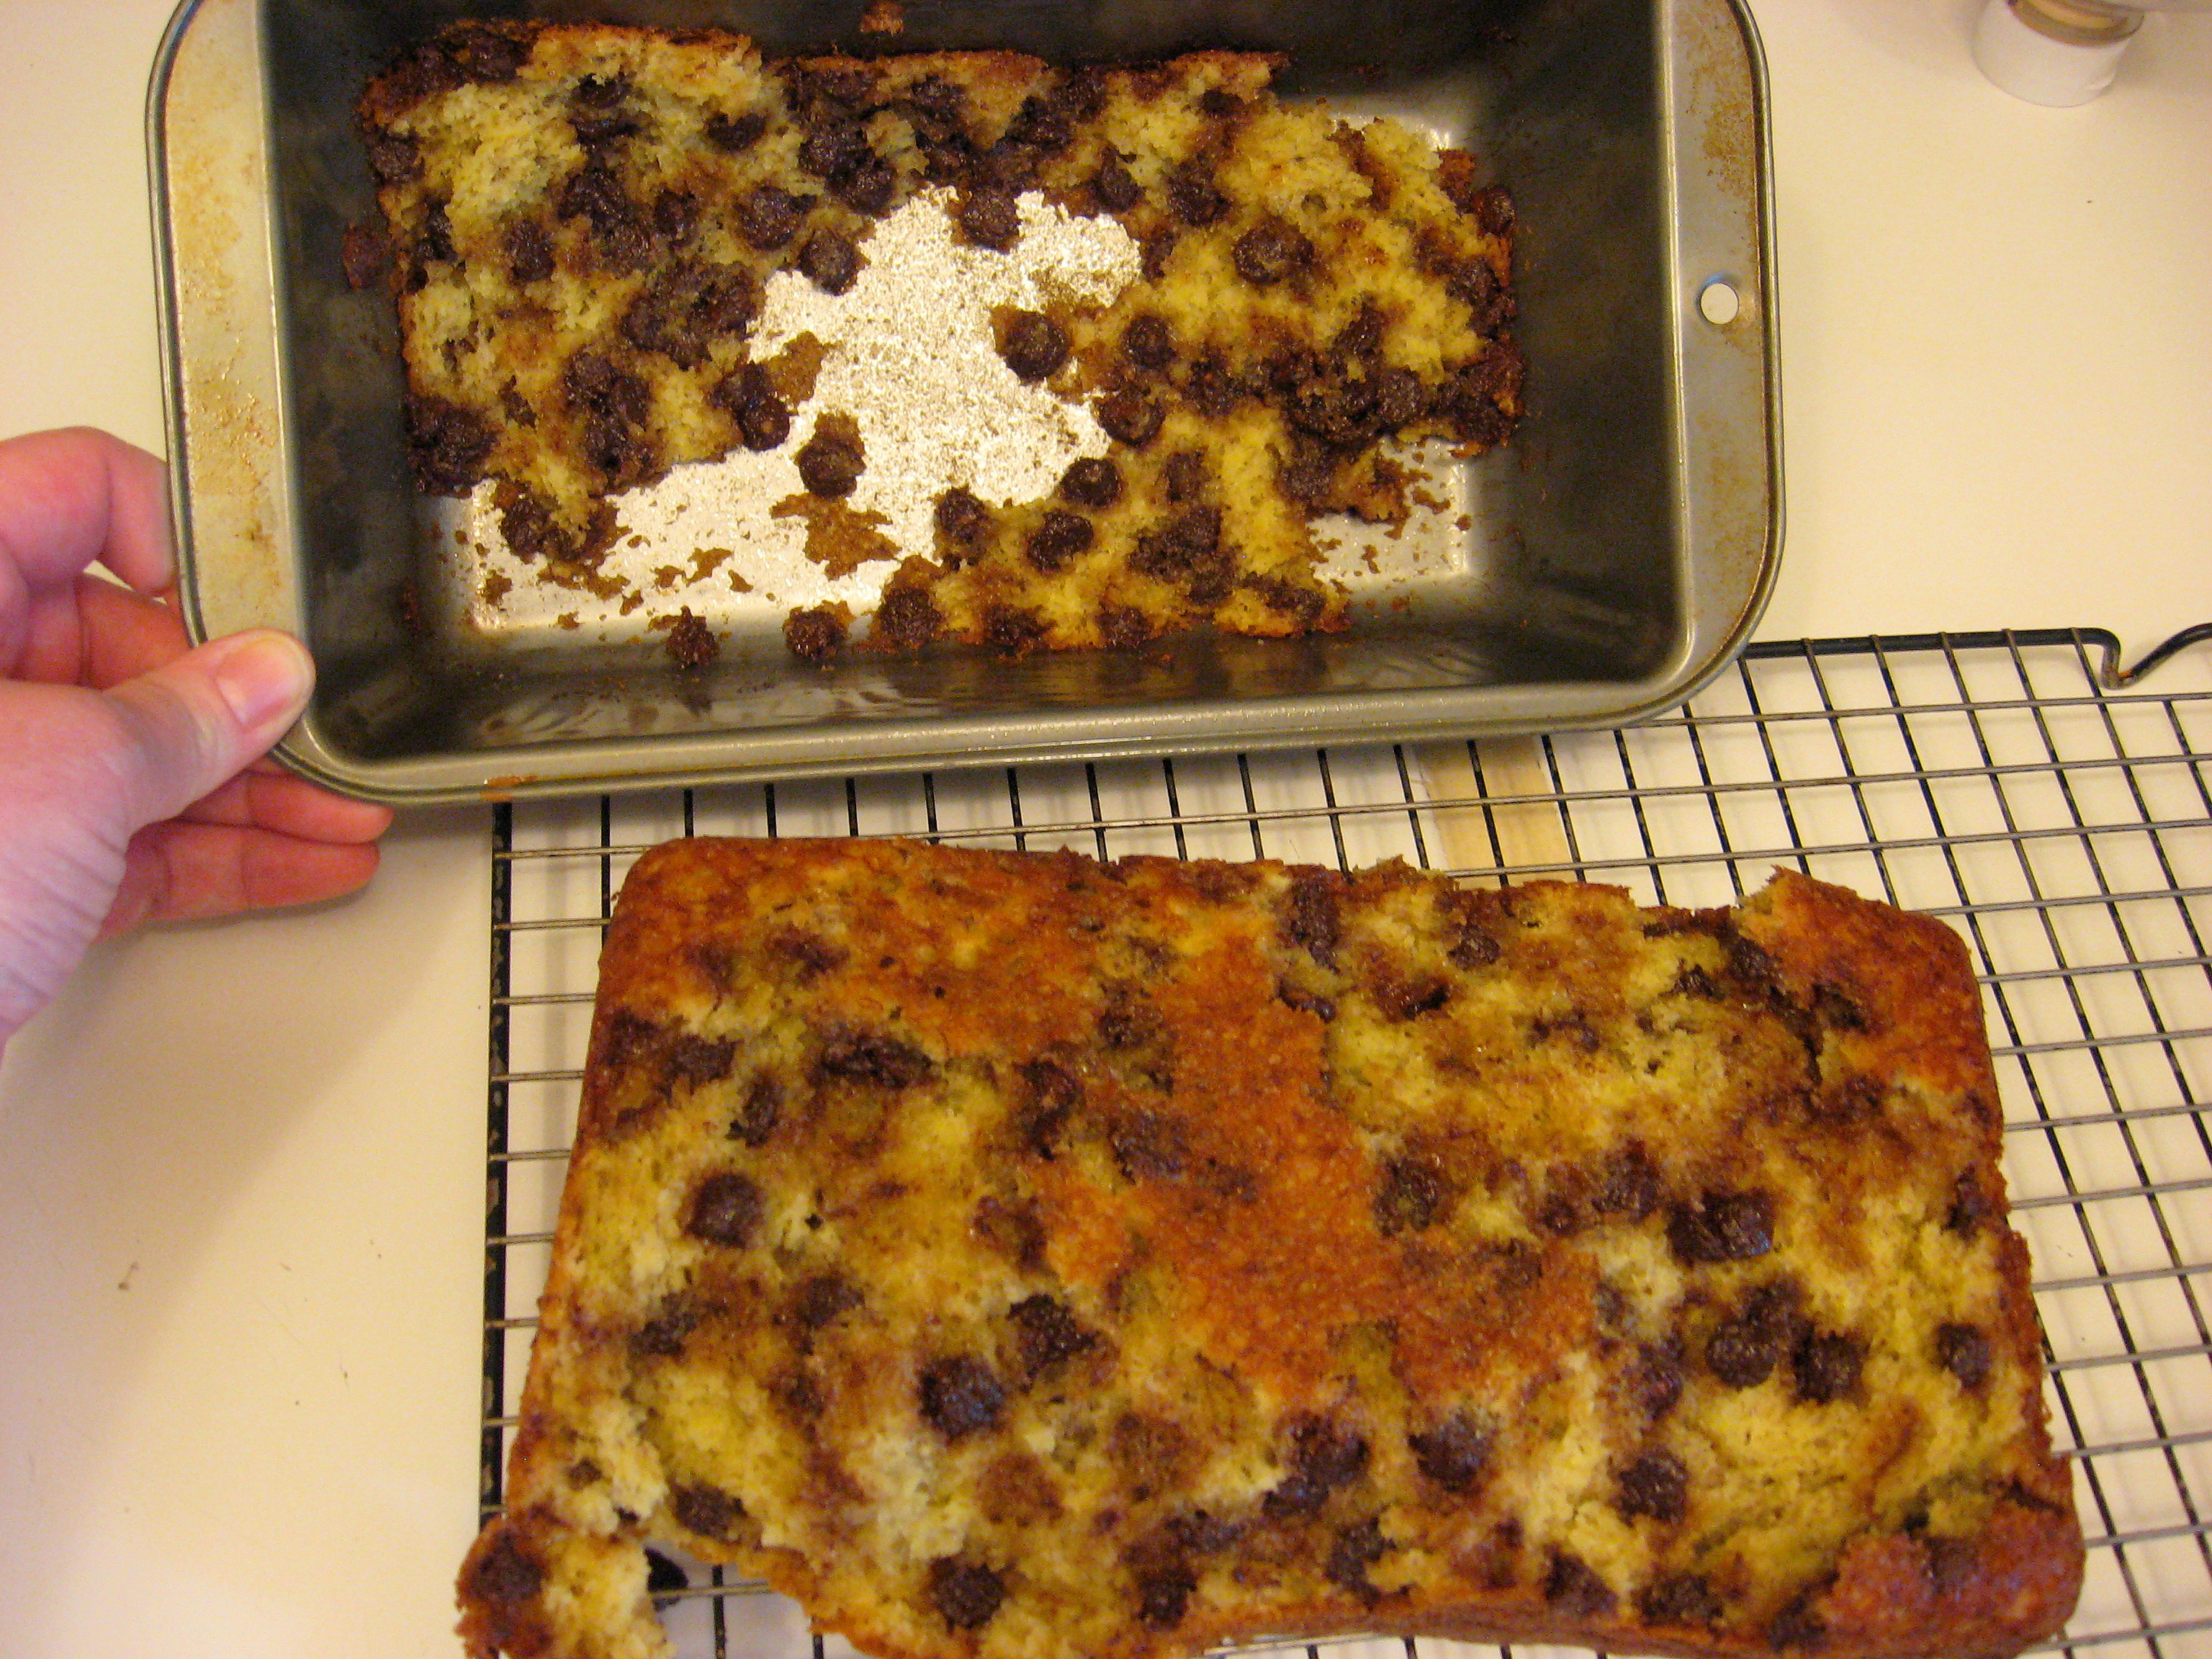
It was DELICIOUS. I will never make regular banana bread (or waste all those bananas!) again!
Recipe: Apple Pie Bars
Even though Spring is coming, I think there is still enough chill in the air for a winter dessert like this. If you like apple pie, you can get your fill without the fuss! I can my own apple pie filling each year and if you do too, this is a great way to use it up! My family says these apple pie bars taste better than apple pie! You make them and be the judge.
I found this recipe online a few years ago and altered it to meet my families needs. This recipe make half a baking sheet. So if you want to make a full sheet (or jelly roll pan size) then double this recipe.

Apple Pie Bars
Crust:
3/4 c. butter, softened
6 Tbl. sugar
1 1/2 c. all purpose flour
1/8 tsp. nutmeg
1/4 tsp. cinnamon
1/4 tsp. salt
Topping:
1 1/2 c. quick oats
1 c. all purpose flour
3/4 c. light brown sugar
1/2 tsp plus 1/8 tsp cinnamon
1/4 tsp baking soda
1/4 tsp salt
3/4 c. cold butter, cut into small cubes
Prepare the crust: Preheat oven to 375 degrees. Line a 13×9.5 jelly roll pan with foil or parchment paper. Using an electric mixer, beat the butter and sugar until light and fluffy, about two minutes. At low speed, beat in the flour, spices, and salt until a soft dough forms. Press the dough over the bottom of the prepared pan. Bake in the center of oven for about 15 minutes or until golden and set. Set on wire rack to cool slightly.
Prepare the topping: In a large bowl, mix the oats and the flour, brown sugar, cinnamon, baking soda and salt. Using your fingers or a pastry tool, put the butter cubes into the oat mixture and crumble together until the mixture resembles a coarse meal. Press the mixture into clumps.
Dump on the quart bottle of your apple pie filling and spread evenly over the crust. Scatter the crumb topping on top, pressing it lightly into the mixture. There will be a lot of topping, don’t worry. It will fit. Bake for 30 minutes or until the topping begins to look slightly crispy on top. Let cool and enjoy!
Recipe: Crinkly Fries
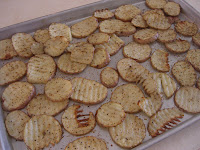
My kids like making snacks every now and then. These crinkly fries are easy and fun to make, and much better than potato chips from the store!
Crinkly Fries
3 baking potatoes
3 Tbl butter
any type of seasoning salt, for example: Mrs. Dash, lemon pepper seasoning, herb seasoning, etc.
Preheat oven to 450 degrees. After scrubbing potatoes with a vegetable brush, cut with a crinkle cutter or a sharp knife leaving the peel on. Put the potato slices into a large Ziploc bag. Melt the butter and add seasoning to it, mix together. Pour into the bag and mix with the potatoes to coat. Add as much or as little seasoning as you want. Shake well.
Layer the potatoes on a shallow pan or cookie sheet in a single layer. Put in oven and bake for about 25 minutes or until lightly brown and tender. Longer if you want them crispy. Turn the potatoes halfway through the baking process.
Nutrition Facts per serving: 144 calories, 7 g total fat (1 g sat. fat), 0 mg col., 153 mg sodium, 19 g carbs, 2 g fiber, 3 g protein
12 Days of Holiday Treats – Day 1: Peppermint Pretzels

The holidays are my excuse to bake and make treats for my family and friends. Each year I have a goal to try something new. If it passes the family taste test it will be added to our collection of holiday recipes.
As a child I remember my mother putting together elaborate plates of treats to deliver to neighbors, friends and members of the church we attended. Each plate was assembled and delivered to those we cared about. They brimmed with homemade goodies like carmel popcorn, a variety of cookies and candies that she made with love. My childhood memories are relived each year as now I try to create these goodies for my family and friends.
Life now just seems busier and continues to get busier and busier as my children grow and I take on new roles. I am sure that many of you are experiencing this same feeling of fleeting time that I do. Really, are there ever enough hours in a day? In the past few years it seems like I have been lucky if I get a batch of our families favorite sugar cookies made to leave out for Santa with his glass of milk.
So this year in an effort to continue with tradition and in order to make memories for my children I have made a goal to make and share 12 holiday treats. To keep up with the fast paced world we live in I have also tried to find quick holiday treats that even the busiest of the busy can find time to make. This recipe is one of those perfect for the holiday party you were supposed to bring a treat to and just didn’t have time to get it made.
Peppermint Pretzels

Ingredients:
Hershey Candy Cane Hugs
Pretzels (I chose square ones because I like the look.)
M&M’s (Holiday colors to make them look festive.)
Directions:
Step 1: Preheat oven to 200 degrees.
Step 2: Line pretzels on a cookie sheet.
Step 3: Unwrap hugs and place one on each pretzel.

Step 4: Place cookie sheet in oven for 5 to 8 minutes.
Step 5: Take out of oven and top each treat with a M&M. Be careful the chocolate will be hot. Let cool. For best results place in the refrigerator or on top of another cookie sheet filled with ice until they have set up.
So simple and still they taste so good! These easy treats taste just as good with traditional Hugs just in case your not a fan of peppermint. This is a truly easy and quick holiday treat for the busy family on the go. Check back tomorrow to follow Day 2 of Holiday Treats.
Recipe: Marilyn’s Cheese Soup
I am entrusting you today with my favorite all-time soup recipe. I love you PYP’ers that much. Not only is this my favorite soup recipe, it is a family recipe. This soup conjurers up wonderful memories for me each time I eat it. My mother, Marilyn, made this soup all the time when I was young. My husband loves it so much that I can seriously change his mood if I make this soup.I know what to make for dinner if I want something. 🙂
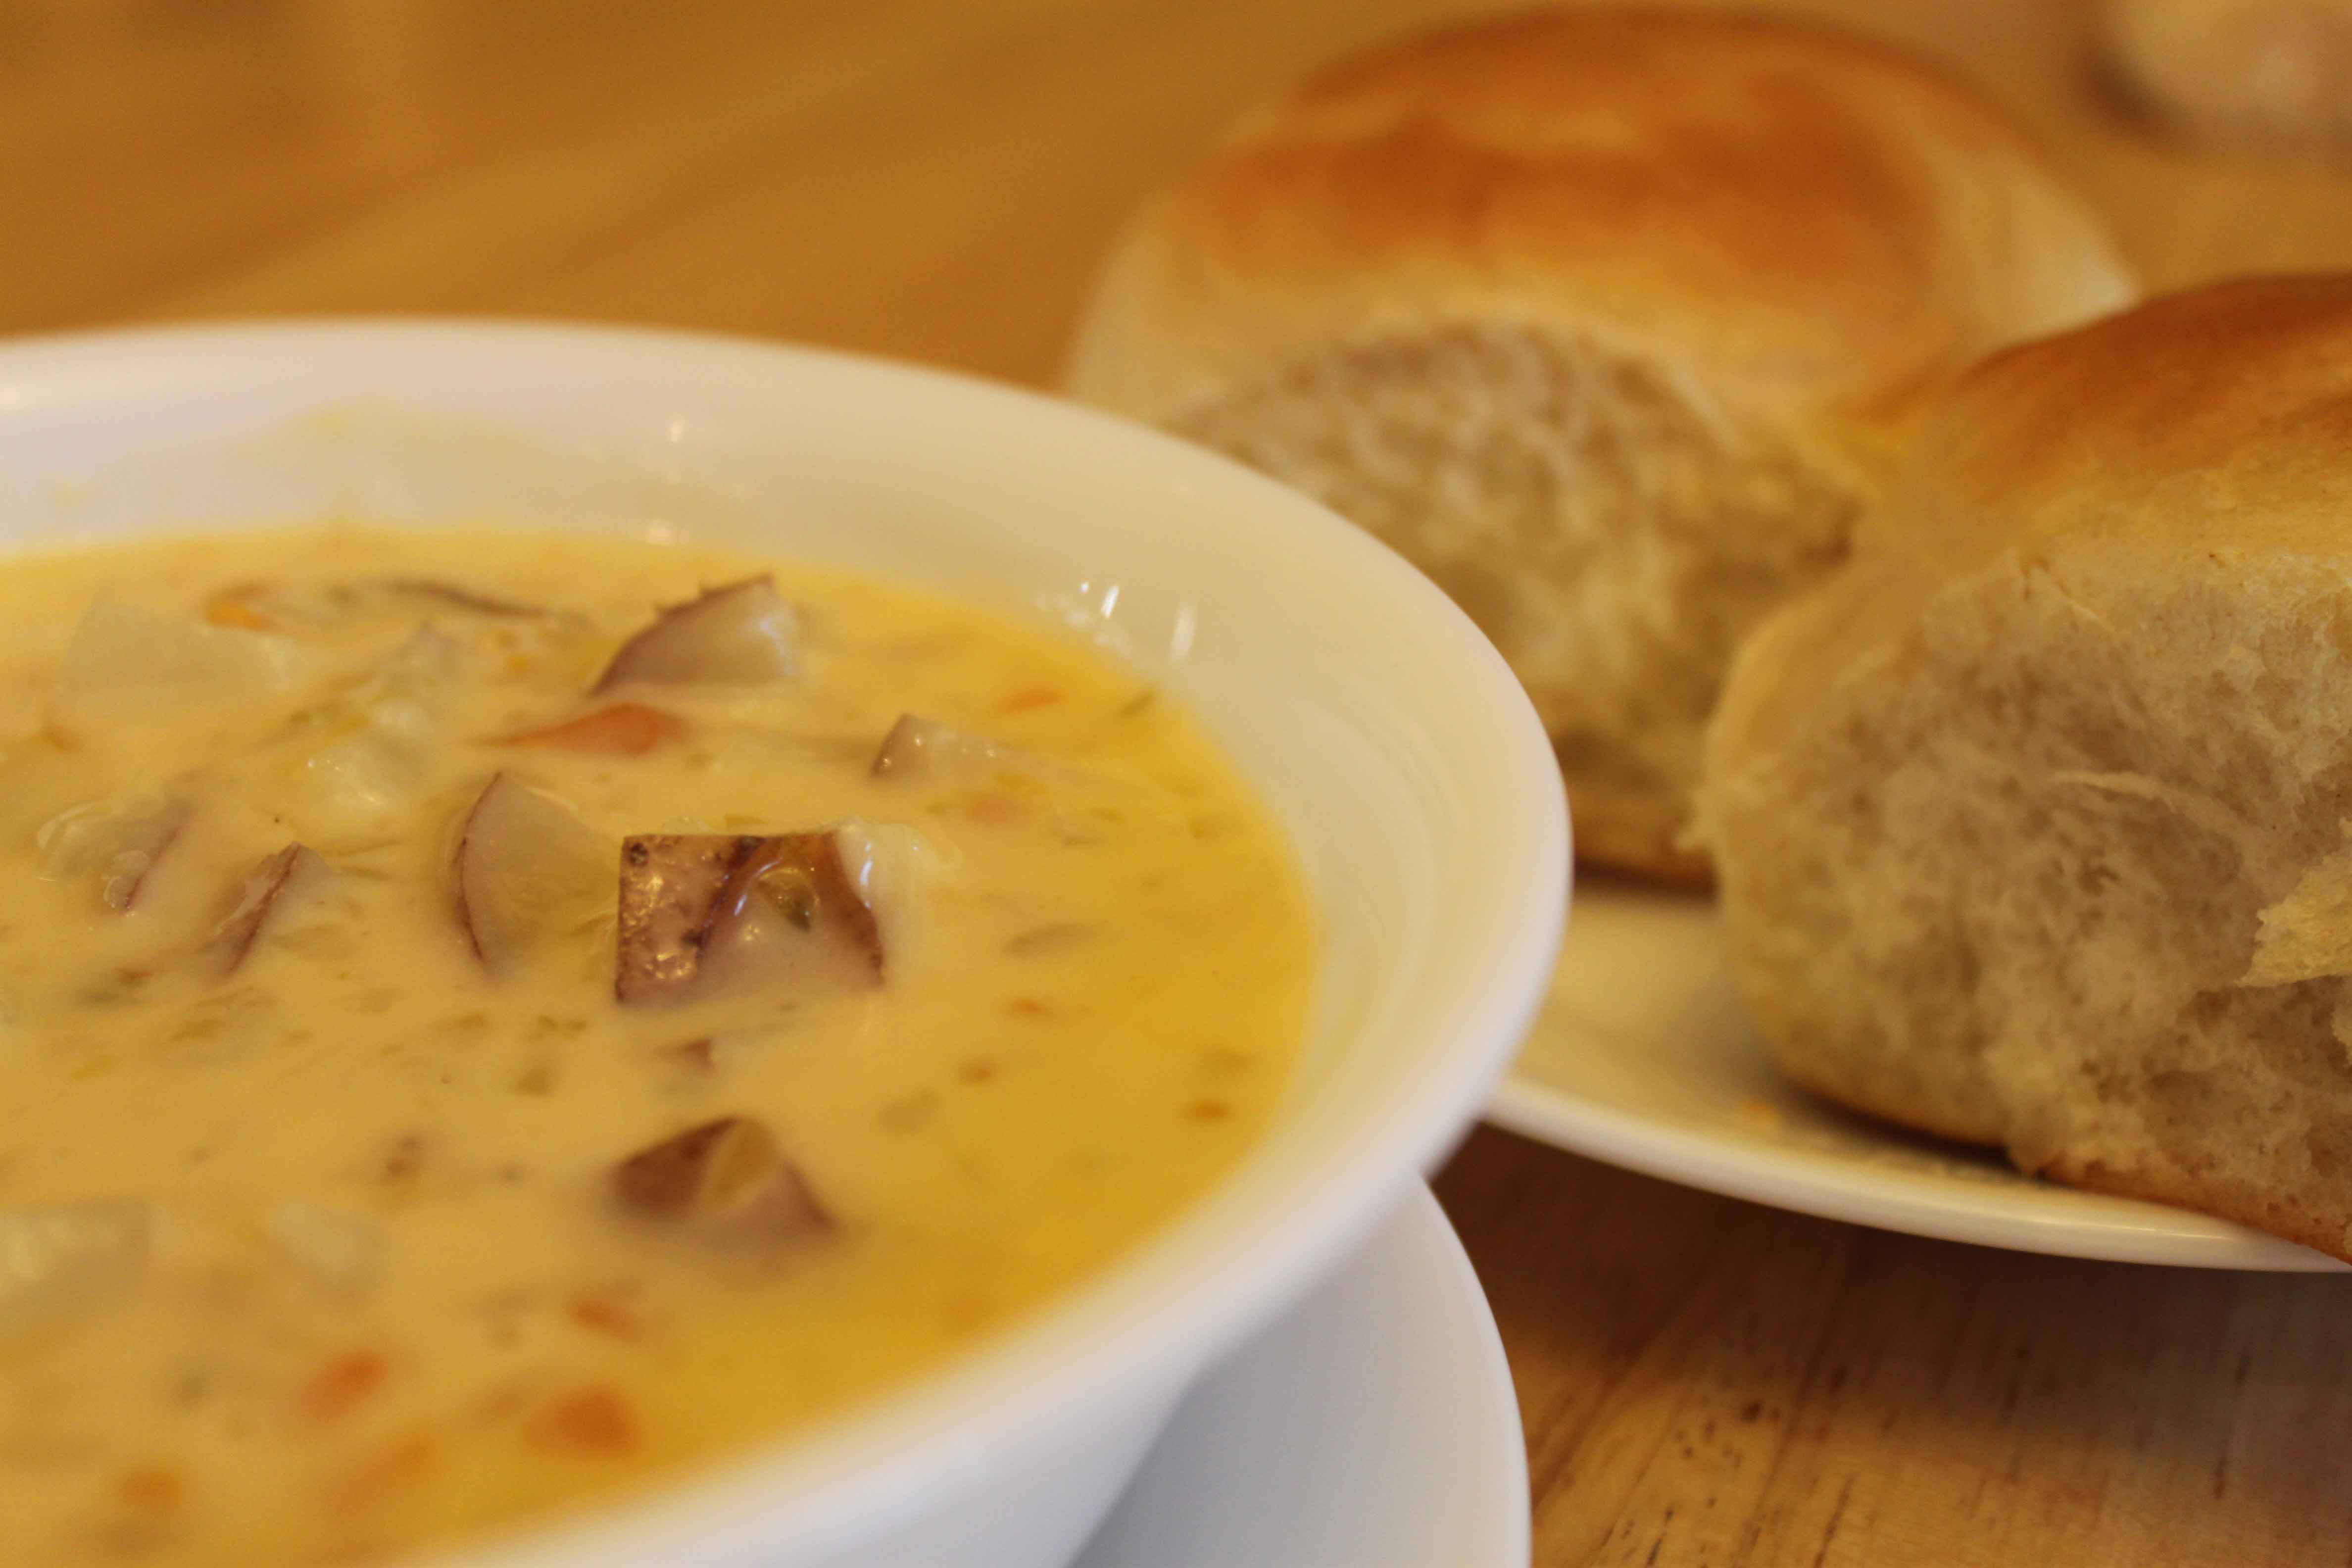
This recipe is a penny-pinching one. Perfect for using garden produce. The only things I bought for this soup was the cheese, celery & butter, and I got those at great prices. Everything else was either from my garden or my mother-in-law’s garden. It is also a good recipe to use food storage in…use up that dry milk! I made this for dinner last night with homemade dinner rolls. Because most of it was garden produce and I made the rolls, dinner last night cost me around $3 total for our family of six! Awesome.
So I warn you….make it just once and you will be hooked! Oh, and I always double this recipe every time. Or there just wouldn’t be enough.
Marilyn’s Cheese Soup
2 c. finely diced potatoes (I like red)
1/2 c. finely diced celery
2 c. boiling water with salt and garlic (I use 1 clove)
1/2 c. carrots, grated
1/4 c. finely diced onion
Cook all vegetables in the boiling water until tender, about 20 minutes. Make the cheese sauce while the above is cooking:
1/4 c. butter
1 c. grated cheddar cheese
1/4 c. flour w/ dash of pepper
2 c. milk
Make a roux with the butter and flour (melt butter in the saucepan, then whisk in the flour until smooth.) Gradually add the milk and heat slowly until boiling, stirring constantly. Remove from heat. Add the grated cheese, stirring until melted. Add the cheese sauce to the vegetables. Make sure you take the pot of veggies off the stove first before you add the cheese sauce. Because if it boils after the cheese is melted in, it will curdle.
Serve with dinner rolls or in a bread bowl. Also makes great leftovers. 🙂 Enjoy!
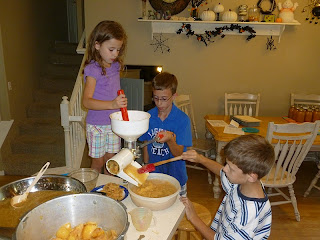
How to Can Your Own Applesauce
I love making applesauce. I grew up canning applesauce with my parents, around 100 quarts per year! I love making it for my family now, and my kids love to help.
This is how I make my applesauce, but you can vary the amounts of sugar and flavoring if you want. I don’t add extra flavoring (like kool-aid or red hots) as I try to keep my applesauce as natural as possible and no food dyes. I have made applesauce with golden delicious, gala, rome, jonathon, jonagold, and honeycrisp. All are delicious! For apples that are more tart like jonathons you can add less sugar.
I use a Back to Basics strainer and I love it! There is no need to peel, core or take the seeds out. Saves so much time.
1. Put apples in sink and wash well.
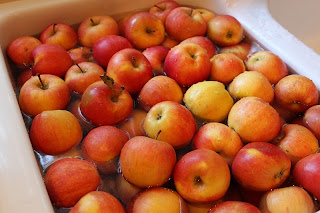
2. Cut apples into quarters, only cutting out the blossom at the bottom. I put the quartered apples into large bowls.
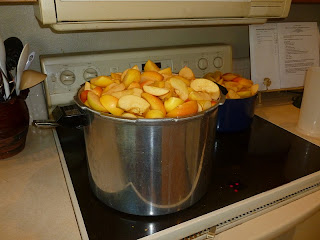
3. Dump the apples into large pots to cook until soft. Make sure you add them heaping to the pots…they cook down quite far. Add water to the apples, but don’t add too much or your applesauce will be watery. I cook my apples in my pressure cooker and I add 1 qt to this large pot. It helps make the apples soft and cook down without burning. To the smaller pot I add 1 cup water.
4. Cook on medium and keep stirring until apples are really soft and squishy. This usually takes me about 45 minutes or so.
5. Squish through your strainer. Tip my dad taught me: Put the skins through twice, and it will give you more sauce! It really does and makes the apples go farther.
6. After I have a large bowl full of hot applesauce, I add the correct amount of sugar and cinnamon that we like. I measure my sauce into the large bowl as I go so I know exactly how many quarts I have in my mixing bowl.
For each quart of sauce, I add 2 Tbl. sugar and 1/4 tsp. cinnamon. I usually make sauce with galas and this is the perfect amount of spices for our family. I have it written down with figured measurements so I can mix quickly. So for 8 quarts of sauce, add 1 c. sugar and 1/4 tsp cinnamon.
7. Fill jars with hot applesauce, put on hot lids and rings, and process for 25 minutes. (Check your elevation for processing time. This is my elevation time. It is important to process according to your elevation in order to safely preserve your food).
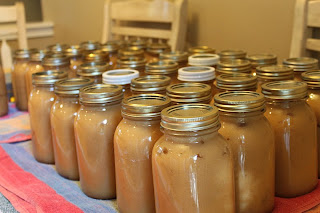
ENJOY YOUR APPLESAUCE!
Recipe: Olive Garden Chicken & Gnocchi Soup
Remember last week when I posted one of my favorite copycat soup recipes from Olive Garden? Here is another one. This one is delicious also! Impress your family tomorrow with some good soup at home. The photo is not mine, I forgot to take one. Too busy eating good soup!

1 cup chicken breasts, cooked and diced
4 cups chicken broth
2 cups cream (I just use evaporated milk and works great!)
½ cup celery, finely diced
1 garlic clove, minced
½ cup carrots, finely shredded
½ cup onion, finely diced
1 cup fresh spinach, coarsely chopped
1 tablespoon extra virgin oil
½ teaspoon thyme
½ teaspoon parsley
Freshly grated parmesan cheese – optional
1 pound potato gnocchi – can buy this in the gourmet section of many supermarkets or find a recipe for homemade in the resource section
Sauté the onion, celery, garlic, spinach, carrots in the olive oil till the onion is nearly translucent. Add the chicken, chicken broth, and spices. Bring to a boil. Slowly add the gnocchi into the boiling broth. Turn down the heat and let simmer for about 10 minutes.
(If you want a thicker soup, add 1 tablespoon corn starch to the cream before you add it into the broth). Add the cream. Slowly allow the mixture to come to a boil and then turn it off.
Homemade Granola Bars
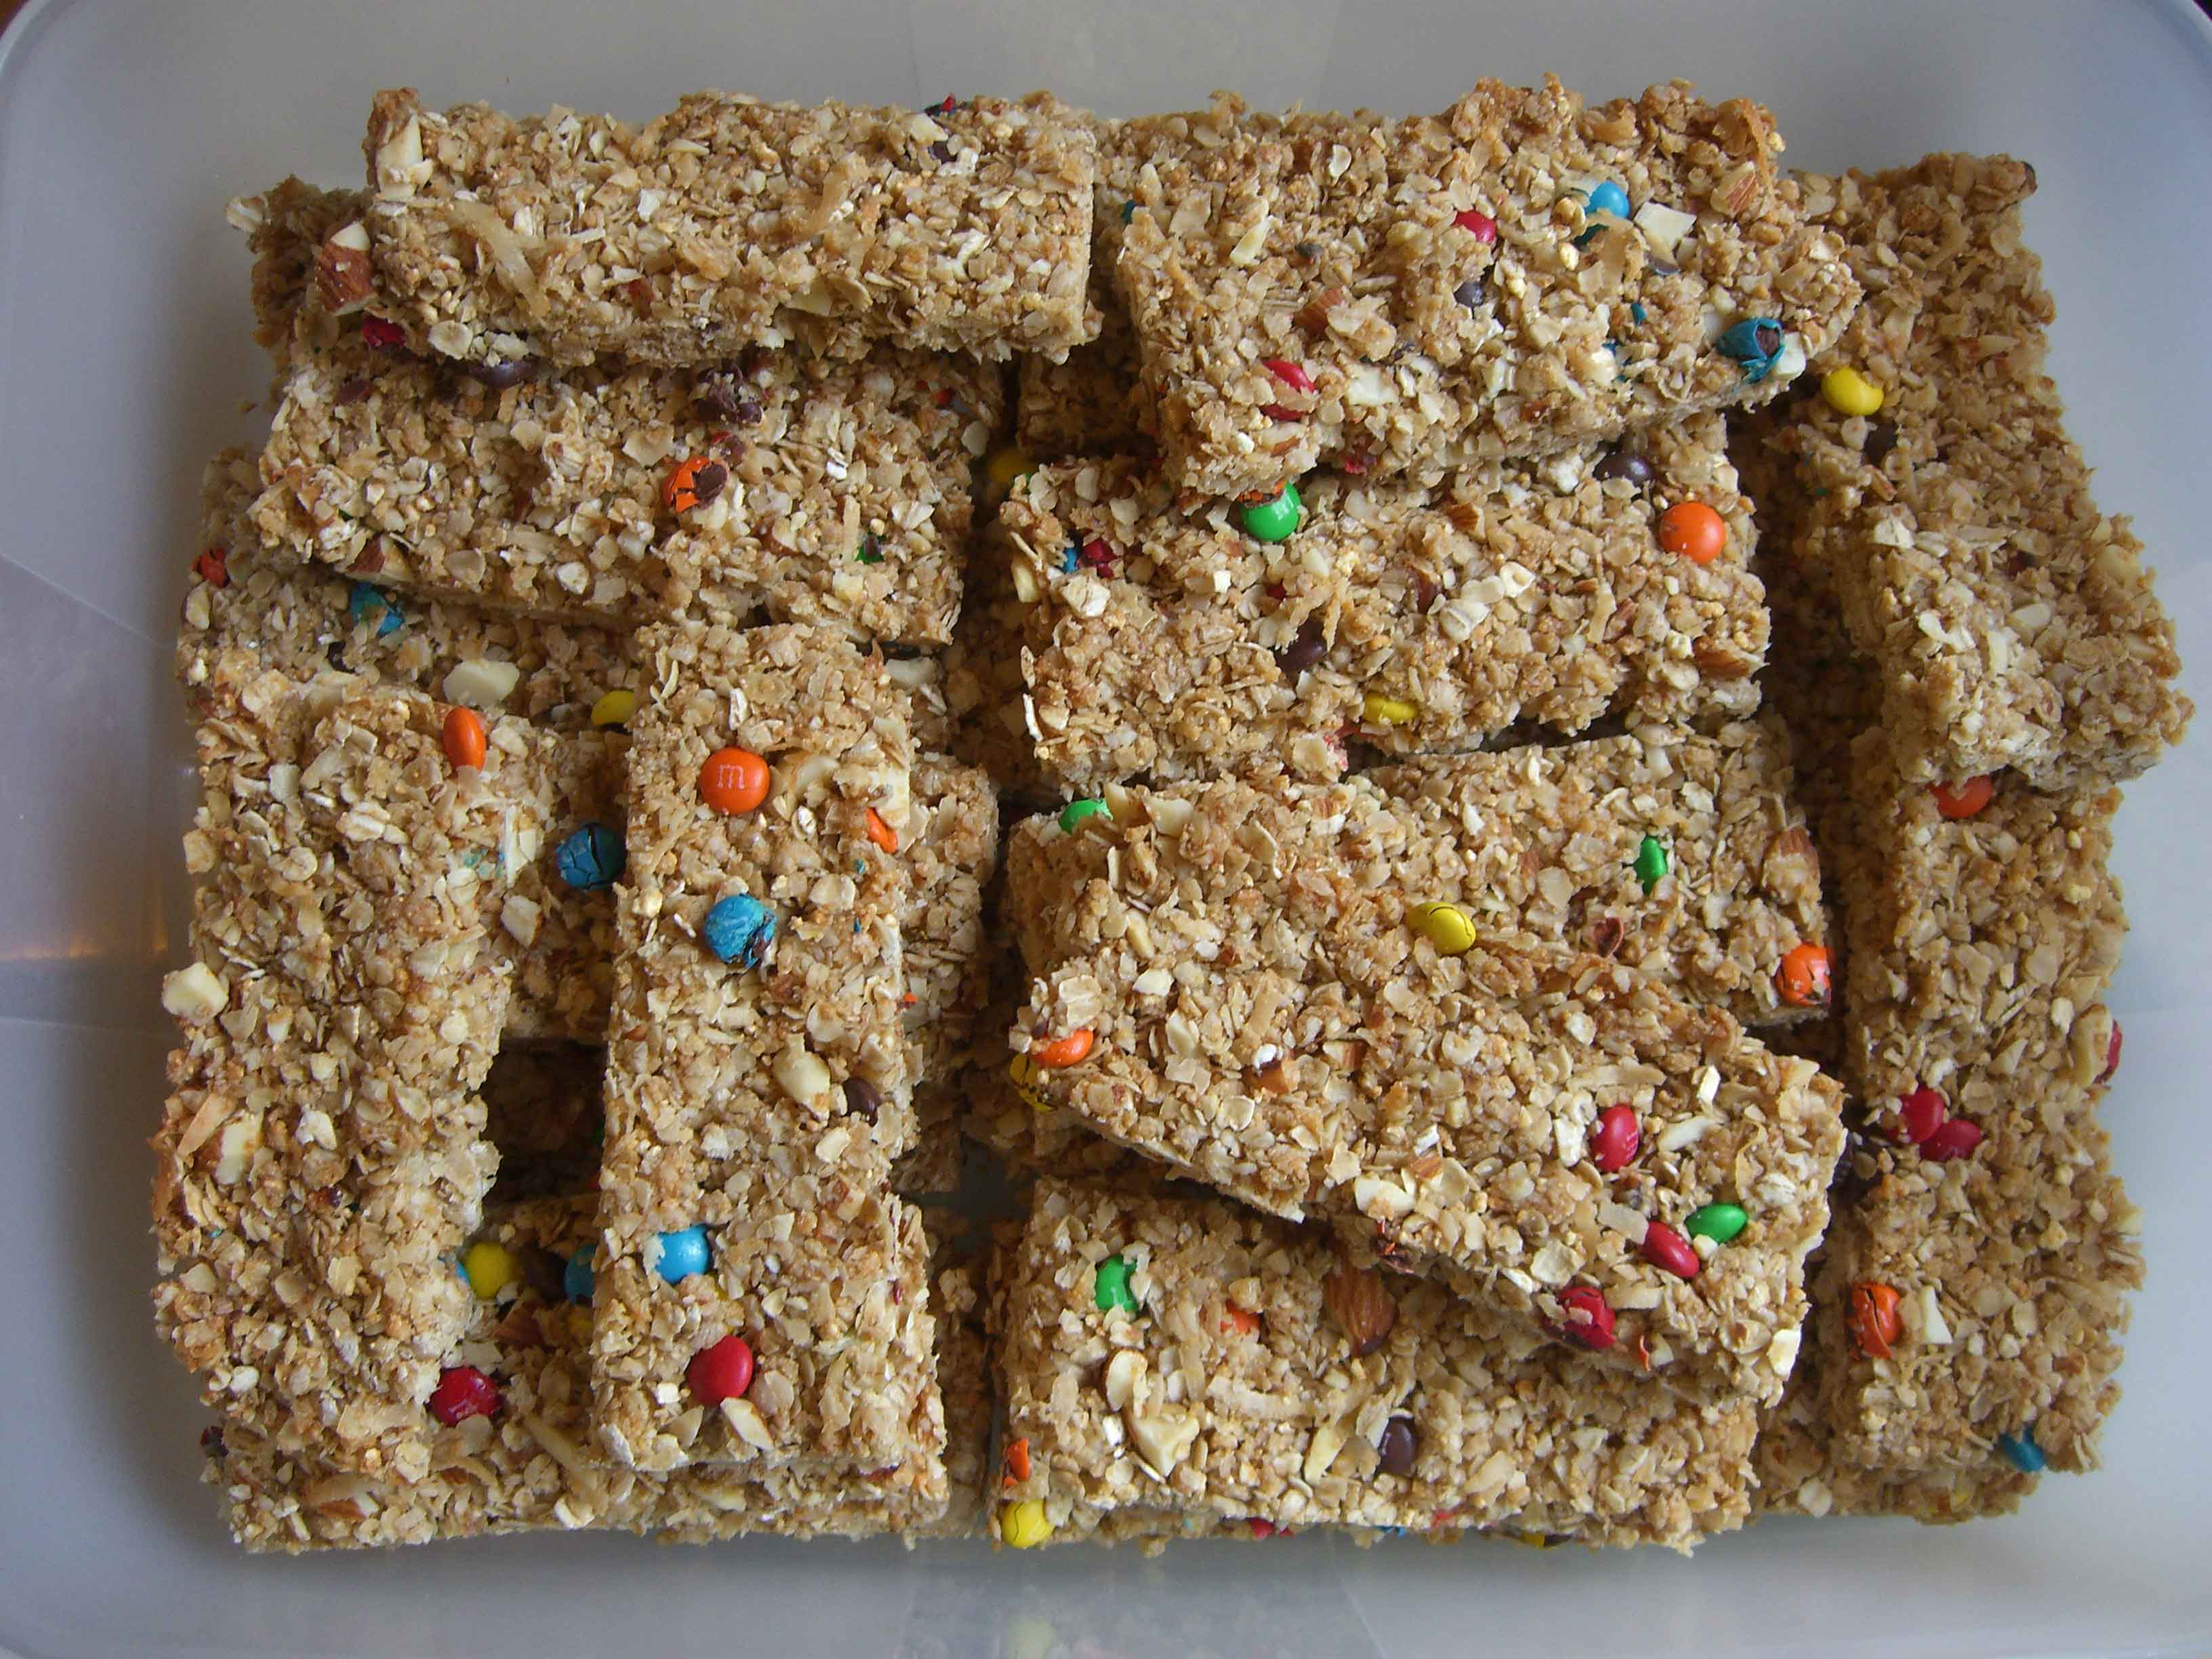
I have tried many recipes for homemade granola bars. Most of them are either too dry or too sweet. After trying several I combined things that I liked from many of them and came up with what we like. Finally! I love making homemade granola bars for my family. Much healthier and cheaper too.
I like being able to customize my granola bars for my family. In just one recipe, I can make half with chocolate chips, and half without. Or throw in some mini m&m’s. Or some dried cranberries. Whatever floats my boat at the moment.
1/2 c. honey
1/4 c. brown sugar
1/4-1/2 c. coconut (optional)
1/2 c. peanut butter
1/4 c. ground flax seed
2 c. quick oats
2 c. Rice Krispies
3 Tbl. wheat germ
1 c. mix-in (like mini m&m’s, dried fruit, etc)
In a large bowl, mix oats, Rice Krispies, flax seed, wheat germ, and coconut. Set aside. Mix honey and brown sugar in a small sauce pan over medium heat until dissolved. Remove from heat. Stir the peanut butter into the hot mixture. Once it is smooth and creamy, pour peanut butter mixture over dry ingredients and mix well.
Stir in your mix-ins, if any.
Press tightly into a 9×13 pan. I like to line my pan with tin foil. Makes clean up easy! Cool and let set up (like you would Rice Krispie treats). Then cut and enjoy!
I will cut them all and wrap them in plastic wrap so they are ready for school lunches or snacks. It is nice being able to quickly grab them out of the cupboard.
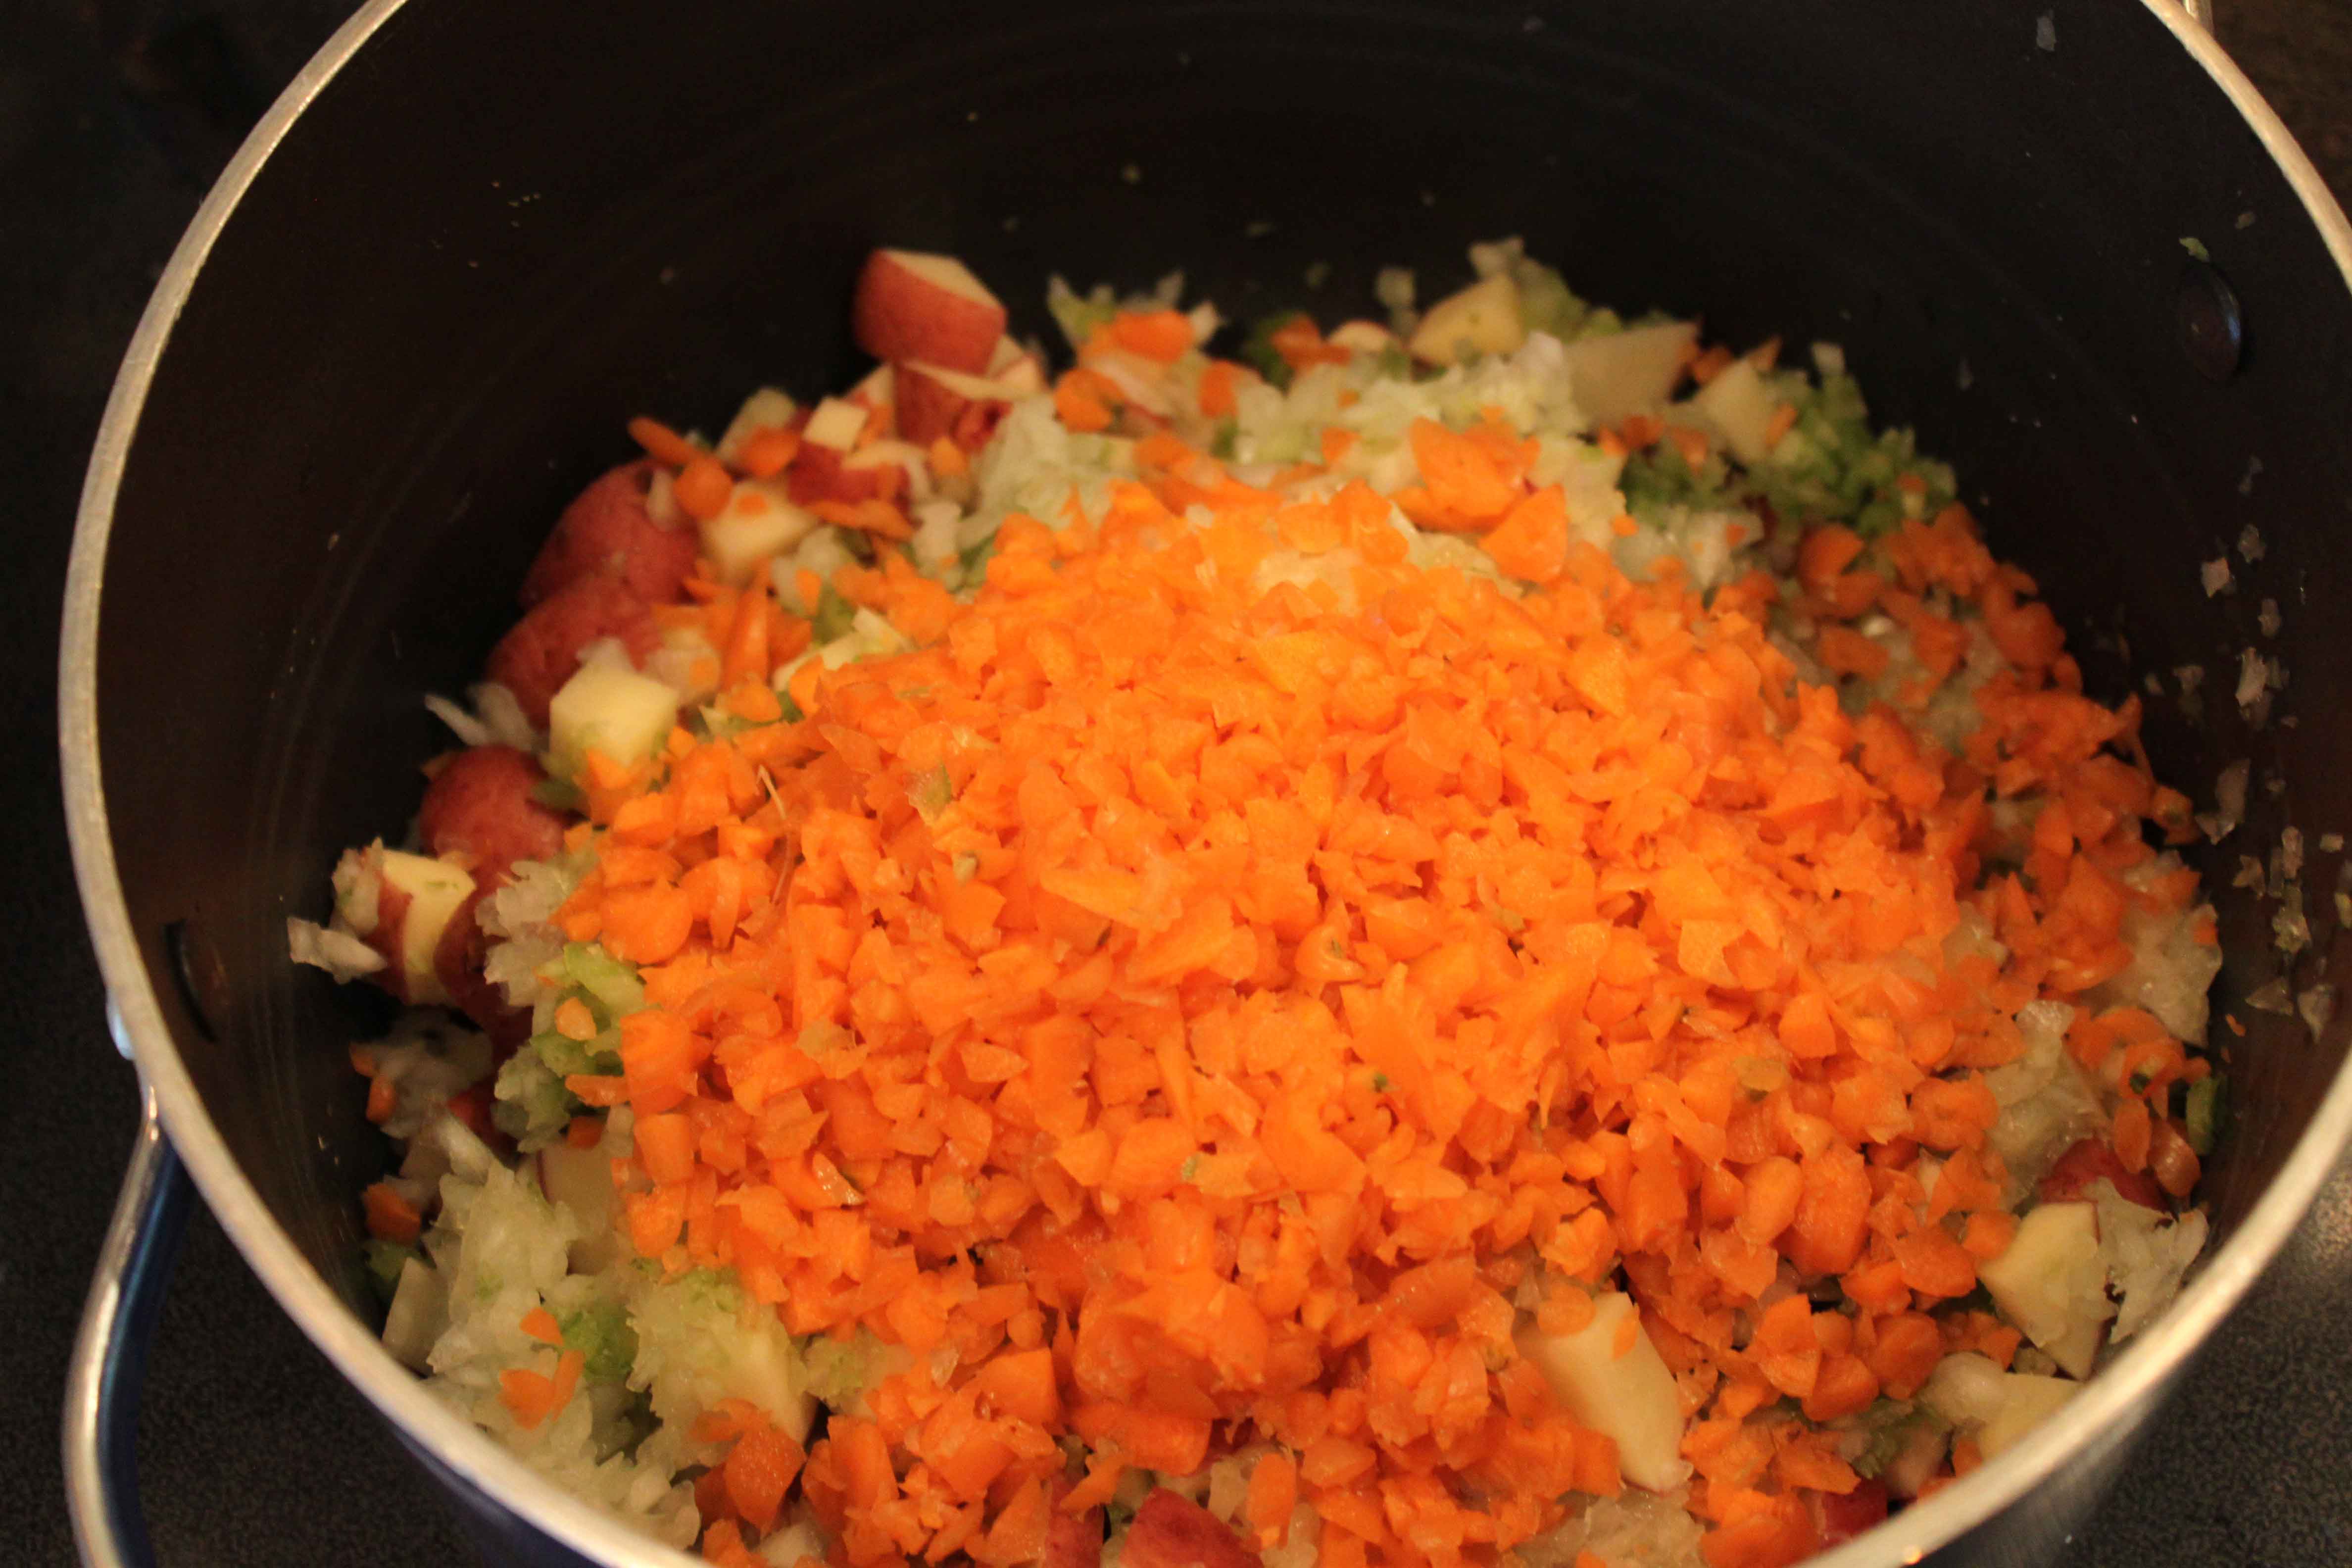
Recipe: Quick & Easy Italian Vegetable Soup
Here is this week’s soup recipe! It is raining here and nothing says comfort better than a good bowl of soup and hot rolls. YUM. We love this soup at our house! Great crockpot recipe.
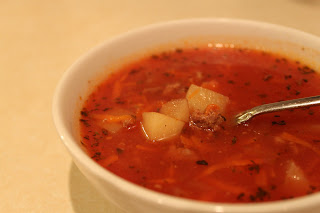
Quick & Easy Italian Vegetable Soup
1 lb. ground beef or turkey, browned and drained (I used 1/2 lb)
3 carrots, sliced (I grate mine)
4 potatoes, peeled and cubed (I leave the peel on mine)
1 small onion, diced
1 tsp garlic powder
1 tsp Italian seasoning
3/4 tsp salt
1/4 tsp pepper
15 oz can diced Italian tomatoes or 2 fresh tomatoes, chopped
6- oz. can Italian flavored tomato paste
4- 1/2 c. water
1 qt. beef broth
Combine all ingredients in slow cooker. Cover and cook on high for 3-4 hours or on low for 6-8 hours or until vegetables are tender.
NOTE: This is a great recipe to use frozen tomatoes in. I freeze most tomatoes from my garden instead of canning them and they are great for soups.