

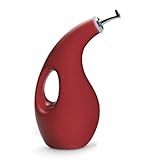
Rachael Ray EVOO Oil Bottle – $15.29!
Eligible for free shipping on $35+ orders or on ANY order with Amazon Prime.
Don’t have a Prime membership? Get a one month free trial! Click here for details!
Toshiba 750GB Hard Drive – $49.99! Free shipping!

was $79.99
Save 37%
now $49.99
Kindle eBooks Under a Penny! (9/17/14)
Business & Money
- Saving Money: The Top 100 Best Ways To Save Your Money And To Spend Your Money Wisely
- The Scholarship System: 6 Simple Steps on How to Win College Scholarships and Secure Financial Aid
Children’s eBooks
Cookbooks, Food & Wine
- Fruit Smoothie Recipes: 50 Simple and Healthy Smoothies That Anyone Can Make! (Quick and Easy Cooking Series)
- Peace, Love and Low Carb – Slow Cooker Soups and Stews – 30 Recipes to Keep You Warm During Winter
Mystery, Thriller & Suspense
- Death in a Summer Colony (A Ray Elkins Thriller Book 7)
- Midnight Sun
- EYESHOT: The most gripping suspense thriller you will ever read
- MOUSE (a psychological thriller and murder-mystery)
Parenting & Relationships
- My Child Won’t Sleep: A Quick Guide for the Sleep-Deprived Parent
- Host the Best Picnics Ever!: Create Memorable Moments Outdoors
- Mean People
Romance
Satellite Purple Electric Scooter $89.99 (reg $99.99) Today Only
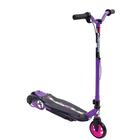
$89.99 (reg $99.99)
Save $5 off orders $50 or more w/ code KMART5OFF50
May be available for FREE Store Pickup!
Certified Refurbished Rowenta IS6200 Full Size Garment Steamer – $49.99!

Bonus Deal of the Day – Certified Refurbished Rowenta IS6200 Full Size Garment Steamer
List Price: $129.99
You Save: $80.00 (62%)
Deal of the Day: $49.99
LINK to Gold Box Deals at Amazon
Eligible for free shipping on $35+ orders or on ANY order with Amazon Prime.
Don’t have a Prime membership? Get a one month free trial! Click here for details!
Igloo – 7.2 Cu. Ft. Chest Freezer – $159.99!
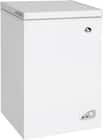
Igloo – 7.2 Cu. Ft. Chest Freezer – Seashell White
Regular Price: $249.99
You Save: $90.00
$159.99
Free shipping on $35 orders! Free in store pick up!
Isaac Mizrahi Oversized Square Sunglasses – LA Style $6 Shipped!
 Isaac Mizrahi Oversized Square Sunglasses – LA Style
REG PRICE: $16.99
DEAL PRICE: $4.99
SHIPPING: $0.99
Plus lots more!
10% off Any Order Today Only from 6PM! Plus Free Shipping on Everything!

10% off any order today only with code 6PMEU91720141077
Plus Lots More Deals & Free Shipping!
Deal of the Day – 33% or More Off Select Aquasana Water Bottles, Sleeves and more!

Deal of the Day – 33% or More Off Select Aquasana Water Bottles, Sleeves and Filtration Systems
Enjoy filtered water at home and on the go while minimizing waste. Bottles and sleeves are dishwasher-safe, reusable, and BPA-free. Filtration systems feature easy installation and easy-change filters.
LINK to Gold Box Deals at Amazon
Eligible for free shipping on $35+ orders or on ANY order with Amazon Prime.
Don’t have a Prime membership? Get a one month free trial! Click here for details!
9/17/14 Coupons: Well Beginnings Diapers, Feline Pine, Scope, and More!
Here are the new printable coupons available this morning!


PickYourPlum! Children’s Dresses, Baby Leg Warmers, Fleece Tunic Hoodies, Leggings!


Cuties on the Loose – Children’s Dresses
The funnest dresses are patterned dresses.
$10.99 (56% off) Retail: $24.99
Baby, You’re Gonna Love These – Leg Warmers
Baby’s got style.
Starting at $1.49 (78% off) Retail: $6.99
Wrap Up! – Brushed Inner Fleece Tunic Hoodies
Sure to be your new favorite.
$16.99 (57% off) Retail: $39.99
Cozy Warm – Fleece Lined Leggings
Comfort to the max!
$6.99 (72% off) Retail: $24.99
Plus lots more CUTE deals!
LOTS of cute deals! Inexpensive shipping!
Fall & Halloween Buntings $8.99 *Today Only*

Fall & Halloween Buntings
REG PRICE: $19.99
DEAL PRICE: $8.99
SHIPPING: $3.49
3 Pairs: Girls’ Fleece-Lined Warm Leggings $11.99
 3 Pairs: Girls’ Fleece-Lined Warm Leggings
REG PRICE: $49.95
DEAL PRICE: $11.99
SHIPPING: $2.99
Plus lots more!
Cowboom Laptop Flash Sale! Deals change all day!

Current Deal: Toshiba L505D-GS6000 Laptop X2 2.2GHz 4GB 320GB DVDRW
Was $699.99
Now $149.99 + Shipping
Cow-BOOM! Get an explosive deal on a pre-owned laptop featured in today’s flash sale! Save BIG on top brands including Sony, Toshiba, Samsung and much more! Get yours while supplies last.
While supplies last!