
*HOT* Muir Glen .50/1 Printable Coupon & New Coupons For October!
 There are some great new Group A coupons for October! Like this Muir Glen Product .50/1 coupon. The tomato paste is $0.96 daily at my local Walmart, so just $0.46 after coupon. This coupon could make for a better deal if your local store doubles coupons. Remember, you can print each coupon twice.
Walgreens photo deals this week!

- 50% Off Photo Cards Coupon Code: CARDIT50
- 33% Off Photo Gifts Coupon Code: DISCNTGIFT
- 50 4×6 Prints for $5.99 Coupon Code: PRINTIT50

Essential Home complete bed sets – Any Size $29.99!


Essential Home complete bed sets
Any size, one price!
Was $49.99
Sale $29.99
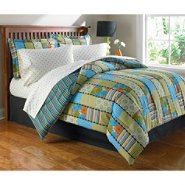
Free in store pick up!
Skechers Women’s Resistor Resistance Runner & Kinetix Response Sneakers $40
Skechers Women’s Resistor Resistance Runner & Kinetix Response Sneakers
Available in 5 Different Colors!
$39.99 + Free Shipping
Massive Board Game Markdown! Prices starting at $.99

Massive Board Game Markdown! Prices starting at .99
 Malta the Card Game Was $20.00 Now $.99 |
 Campaign Manager the Board Game Was $30.00 Now $7.99 |
Payless BOGO! Buy One Get One Half Off! LAST DAY of BOGO is TODAY.
20% off your order with coupon code 70110
Free shipping with a $35 order – no code needed. – exp 10/1
or
Free Shipping to a store near you, otherwise $5.95 flat rate shipping on orders under $35.


Boys Multipack Socks
$4.99-$6.99
$3.99-$5.59 after code
*$2.99-$4.19 when you buy two packs!


Girls Multipack Socks or Tights
$4.99-$6.99
$3.99-$5.59 after code
*$2.99-$4.19 when you buy two packs!


Boy’s Slippers
$9.99-$17.99
*$7.99-$14.39 after code!
$5.99-$10.79 when you buy two pair!


Girl’s Slippers
$9.99-$24.99
*$7.99-$19.99 after code!
$5.99-$14.99 when you buy two pair!


Kids’ Kicks Lo
$19.99
$15.99 after code!
*$11.99 each when you buy 2 pair!
20% off your order with coupon code 70110
Free shipping with a $35 order – no code needed. – exp 10/1
or
Free Shipping to a store near you, otherwise $5.95 flat rate shipping on orders under $35.
LAST DAY! Payless BOGO! Buy One Get One Half Off! LAST DAY!
Take an extra 15%, 20%, or 30% off everything when you use your Kohl’s Charge!
Codes:
Take an extra 20% off everything when you use your Kohls card – FALL20 – 9/26-10/3
Take an extra 15% off everything when you use your Kohls card – CIDER15 – 9/26-10/3
Take an extra 15% off everything – FALLFUN – 9/26-10/3
Can stack with:
Free shipping on ANY order with your Kohls card – SHIP2MEFREE
Take an extra 15% Off Juniors Plus with coupon code JRSPLUS15 – exp 10/4
Free Shipping on $50. No code required.
 Earn $10 in Kohl’s Cash for every $50 you spend from 9/26-10/3.
LOTS of cute Halloween Decor!
 Halloween Ceramic Jack-O’-Lantern Bowl original $19.99 sale $11.99 $8.39 after 30% off code PLUS earn $10 Kohls Cash for every $50 you spend! |
 Halloween Tombstone Photo Clip original $6.99 sale $3.49 $2.44 after 30% off code PLUS earn $10 Kohls Cash for every $50 you spend! |
 Halloween Ceramic Spider Bowl original $19.99 sale $11.99 $8.39 after 30% off code PLUS earn $10 Kohls Cash for every $50 you spend! |
 Halloween Owl Spinner Lawn Stake original $24.99 sale $14.99 $10.49 after 30% off code PLUS earn $10 Kohls Cash for every $50 you spend! |
 Halloween “The Witch is In/Out” Wall Decor original $19.99 sale $11.99 $8.39 after 30% off code PLUS earn $10 Kohls Cash for every $50 you spend! |
 Monster Mini Snowglobe original $9.99 sale $5.99 $4.19 after 30% off code PLUS earn $10 Kohls Cash for every $50 you spend! |
 Halloween “Enter If You Dare” Wall Decor original $19.99 sale $11.99 $8.39 after 30% off code PLUS earn $10 Kohls Cash for every $50 you spend! |
 3-pc. Halloween Mercury Glass Bottle Set original $29.99 sale $17.99 $12.59 after 30% off code PLUS earn $10 Kohls Cash for every $50 you spend! |
 Halloween “Twisted Treats” Glass Jar original $19.99 sale $11.99 $8.39 after 30% off code PLUS earn $10 Kohls Cash for every $50 you spend! |
Halloween Twisted Tree Decor
original $19.99
sale $11.99
$8.39 after 30% off code PLUS earn $10 Kohls Cash for every $50 you spend! Kohls.com LINK

ShopKo: FREE shipping plus promo code!!
 Shopko.com is currently offering FREE shipping with NO minimum on all clothing and accessories plus you can save an extra $5 off a $20 purchase with the promo code SAVE202.
They have some awesome clearance deals right now including these colored skinny jeans for only $19.99!
FujifilmFinePix 16MP Digital Camera w/ 5x Optical Zoom, 720p HD Video $70! List $200
 FujifilmFinePix 16MP Digital Camera with 5x Optical Zoom, 3″ Screen, 720p HD Video & Easy Social Media Upload SearsItem# SPM6879925513 | Model# JX580-BK Reg Price: $199.99 Savings: $130.00 NOW $69.99 Free Shipping |

FujifilmFinePix 16MP Digital Camera with 5x Optical Zoom, 3″ Screen, 720p HD Video & Easy Social Media Upload |
 FujifilmFinePix 16MP Digital Camera with 5x Optical Zoom, 3″ Screen, 720p HD Video & Easy Social Media Upload SearsItem# SPM6879925713 | Model# JX580-RD Reg Price: $199.99 Savings: $130.00 NOW $69.99 Free Shipping |
Insignia NS-D7PDVD 7in Dual Screen Portable DVD Player~Pre-owned $25!

Insignia NS-D7PDVD 7in Dual Screen Portable DVD Player
MSRP: $129.99
Today: $24.99
+ $5.00 shipping
Condition: Pre-owned
Honey-Can-Do 3-Shelf 24 in. W x 30 in. H x 14 in. D Steel Commercial Shelving Unit $29
 Honey-Can-Do 3-Shelf 24 in. W x 30 in. H x 14 in. D Steel Commercial Shelving Unit
 Model # SHF-01905
Internet # 202627534
WAS $54.27
NOW $29.00 /EA-Each
Free Shipping
Target: Webster Brand Clothing on Clearance!! CUTE!!

Target has an ADORABLE line of clothing called Webster which I first noticed in stores earlier this year. It is now on clearance for super cheap! You will also save an additional 10% off at checkout and shipping is also FREE with no minimum!! You can get THIS dress for $13.54 plus tax!! Hurry–things are selling out quick!
Check out all the Webster Clearance HERE
30% or 35% off from Gap, OldNavy & Banana Republic
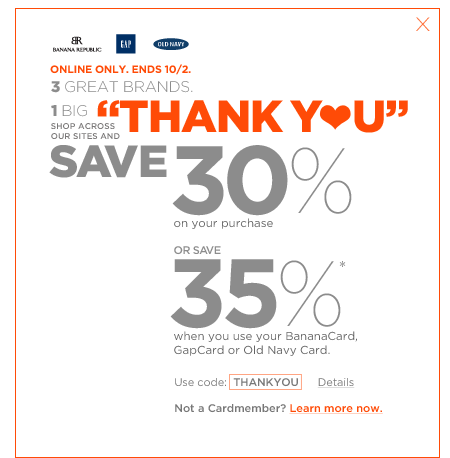
Shop Online with Gap, OldNavy, or Banana Republic
Save 30% off your purchase or 35% off when using your Gapcard, Old Navy card, or Bananacard. Use code THANKYOU at check out. Ends 10/2. Restrictions apply.
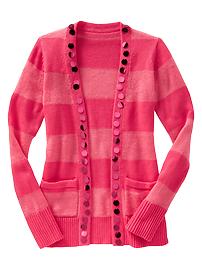 Striped paillette cardigan Was $29.95 Now $19.99 After code: $12.99 with Gap or Old Navy card or $13.99 without |
 Super skinny jeans (snake print) Was $34.95 Now $24.99 After code: $16.25 with Gap or Old Navy card or $17.49 without |
HOT Coupon~ FREE Kaytee Bird and Pet Treats!!
 There was a HOT coupon in the 9/30 Redplum coupon inserts for $2 off ANY Kaytee products!! Walmart has Kaytee Bird and Small Pet Treats products starting at just under $2!!! You will be able to score these FREE with your coupon!!