
How to Pressure Can Chicken
I first learned about canning meats when I was watching a show about surviving in Alaska, and the participants were catching salmon and canning it. Up until that time, for some reason it had just never even occurred to me that one could can meats, even though I had seen canned meats in the store plenty of times. My mother would can peaches and pears when I was little, but she never did pressure canning.
A year or so after watching that show, my local church asked me to help put together some ideas and plans for emergency preparedness for those who might be interested. I have to confess that I was not exactly an example of preparedness at the time. So I had to kinda learn it all from scratch. Some of the preparations we worked on involved having some food stored away in case of an emergency. And so I did more research on canning meats, and talked with a few people who had done it, and found it was a lot easier than I expected it to be. (Note: By “easy” I mean ‘not overly complicated’ rather than easy as in ‘quick’. Just want to throw that out there right now.)
I have since found that I really enjoy having canned meats around – they have been so helpful on nights when I need a quick and easy meal!
I usually can chicken when I can find it on sale in the 40lb boxes for about $1.30-$1.50/pound. Since we’ve had a few of those sales where I live recently, and with the Zaycon chicken deals being introduced into some new states and areas, I wanted to give you guys another option for storing/preserving all that chicken!
Now, I’m not going to go through all of the specific details for the actual canning part, because that will differ based on your particular model of pressure canner. So be sure to read through your canner’s instruction manual for the specifics. And for those who are new to pressure canning, please note that a pressure CANNER is different from a pressure COOKER (although a pressure canner can be used to pressure cook, a pressure cooker cannot usually be used to pressure can unless the manual specifically states that it is approved) – totally clear as mud?
For canning chicken using the raw-pack method (meaning that you don’t have to pre-cook the chicken), start by gathering all your supplies. You will need:
- pressure canner (this is NOT the same as a pressure cooker)
- chicken
- approved canning jars
- canning lids and rings (lids must be new, rings can be used)
- salt, preferably pickling salt if possible
- boiling water, chicken broth or chicken bouillon
You’ll also want to have some tools handy. Here’s what I use:
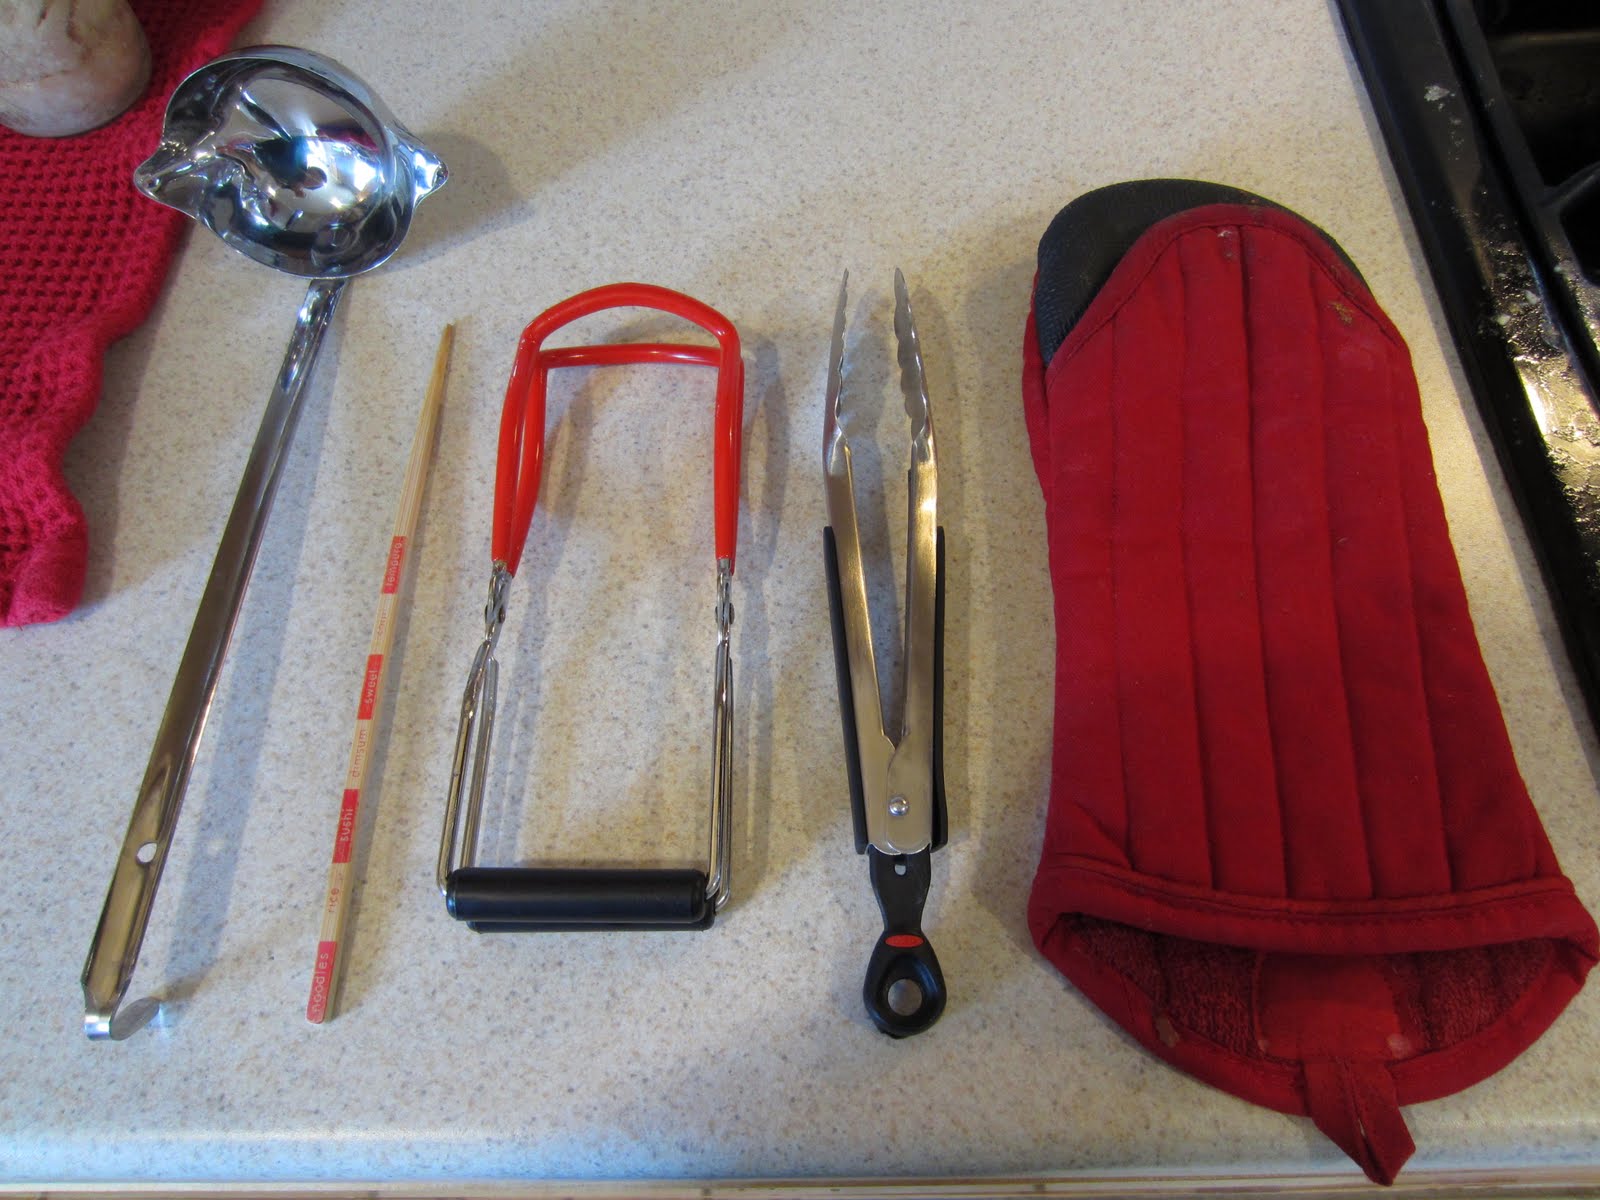
- ladle (for filling jars after chicken is in)
- wooden chopstick (for removing air bubbles from jars)
- jar lifter (for moving jars into and out of hot canner)
- tongs (for taking lids out of simmering water)
- hot pads or hot mitts
Start by preparing your jars. Wash and dry them. For chicken, I add 1/2 tsp of salt to each jar. (The official instructions say to use pickling salt, but I’ve used regular kosher salt in the past with no problems.)

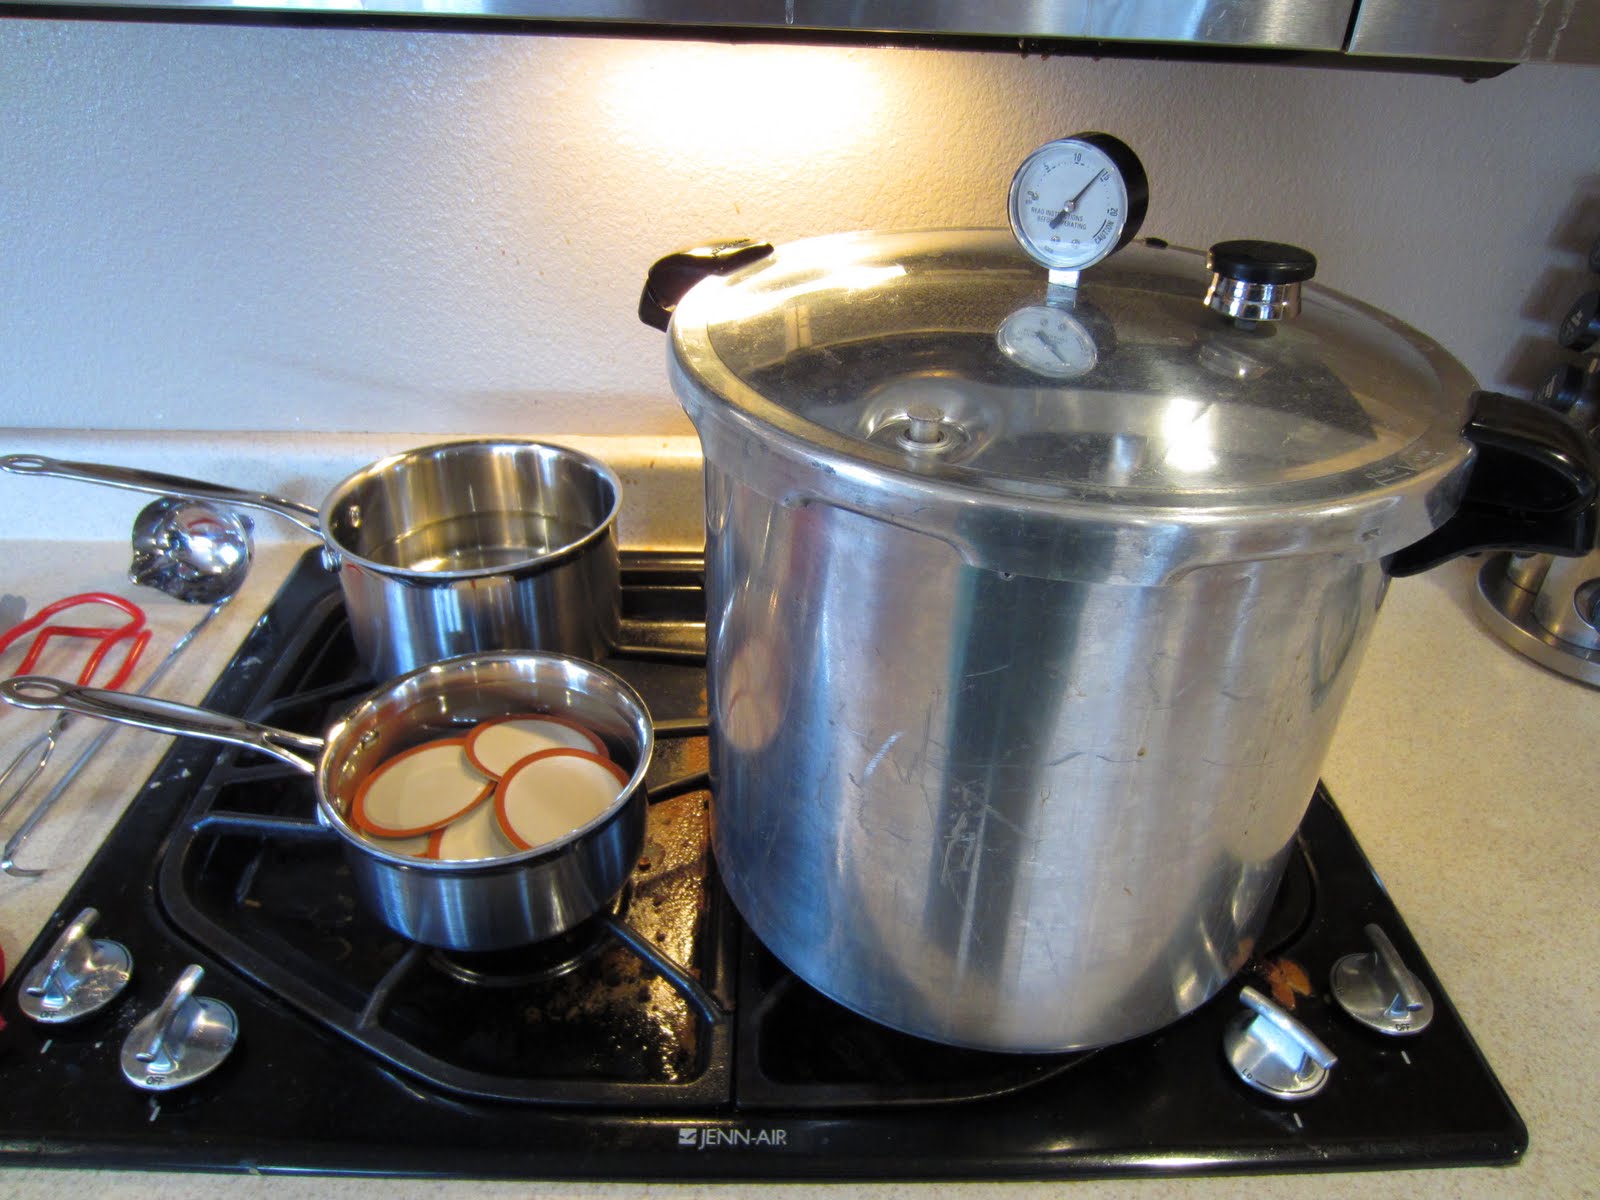
Then get your stove and pots all situated. You will need your pressure canner with the appropriate amount of boiling water (and vinegar to help reduce water spotting) – check your canner’s instructions for how much water you need. You will need another pot with boiling water (for adding to the jars), and a smaller pot with simmering water so you can heat the lids.
Here’s what my stovetop looks like on chicken-canning day:
Next, time to prep the chicken!
The big 40lb boxes pf boneless, skinless chicken breasts come with 4 bags inside. The breasts are butterflied, and have a little bit of fat on them which you’ll need to trim off.
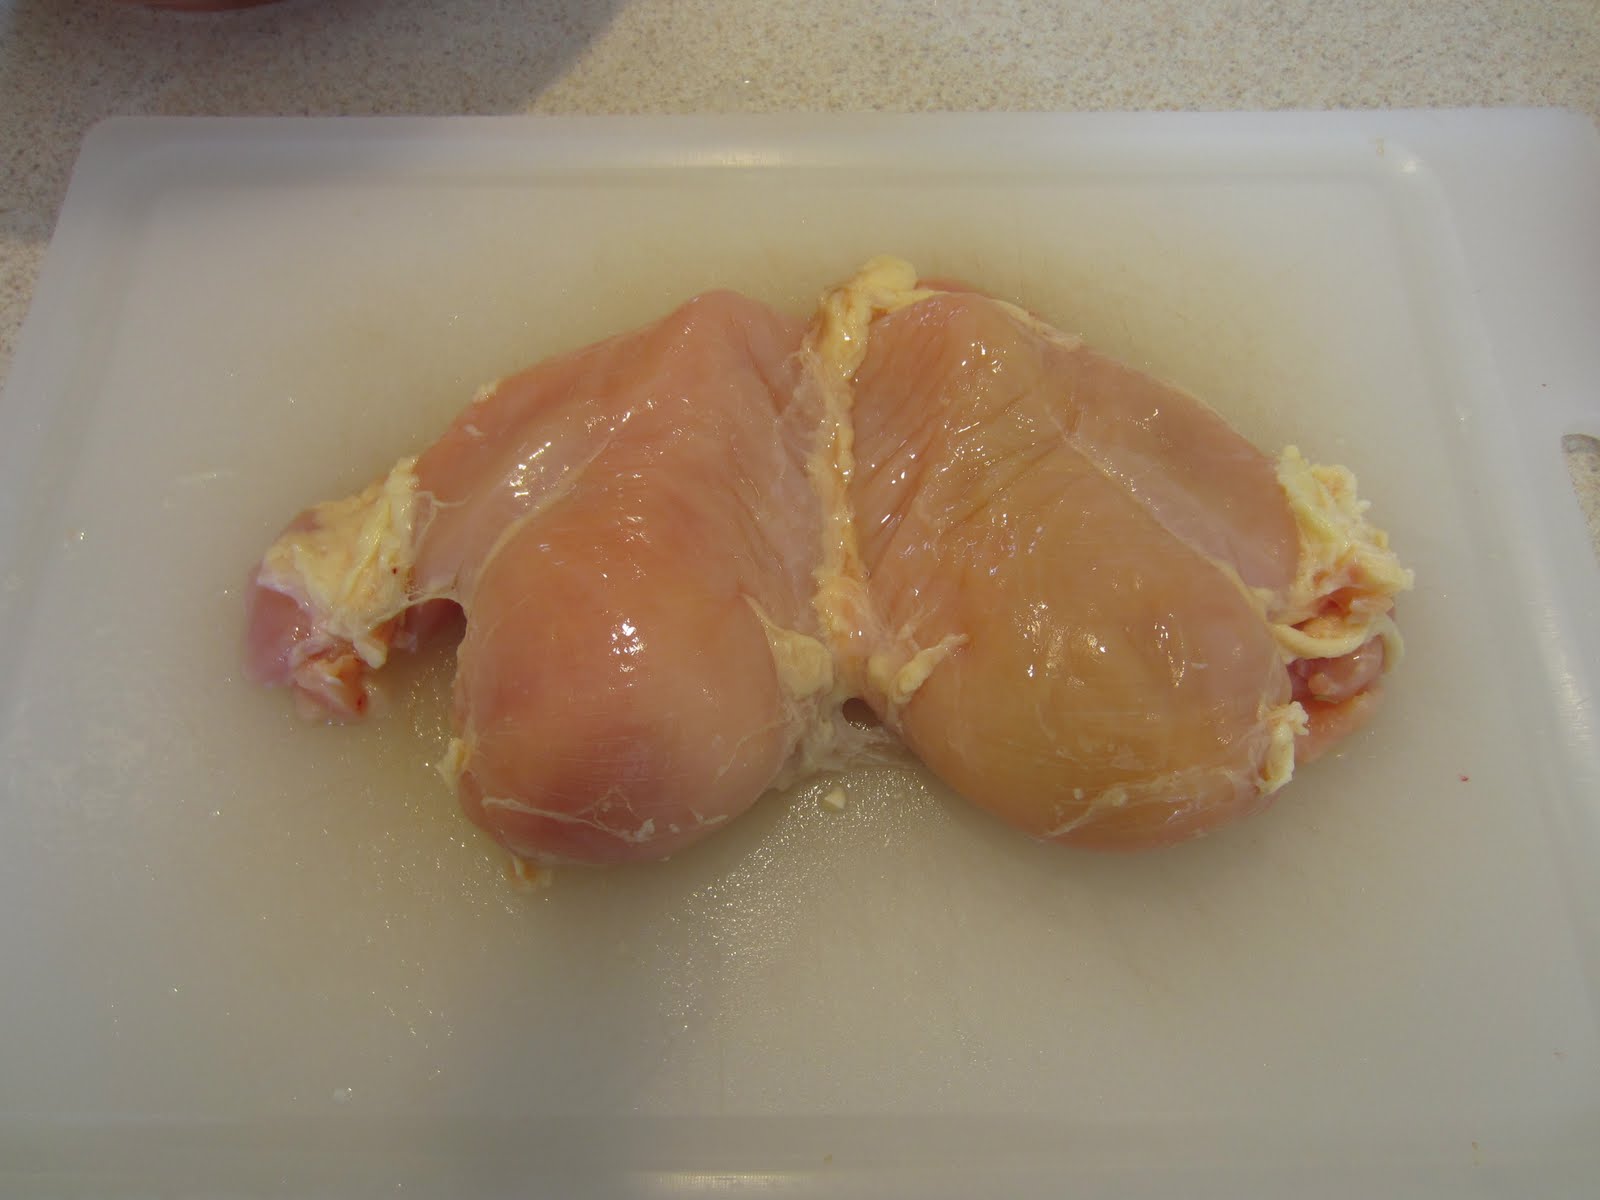
Cut the breast halves apart and trim any remaining fat. Keep the fat and trimmings in a separate bowl (you can use them to make chicken stock).
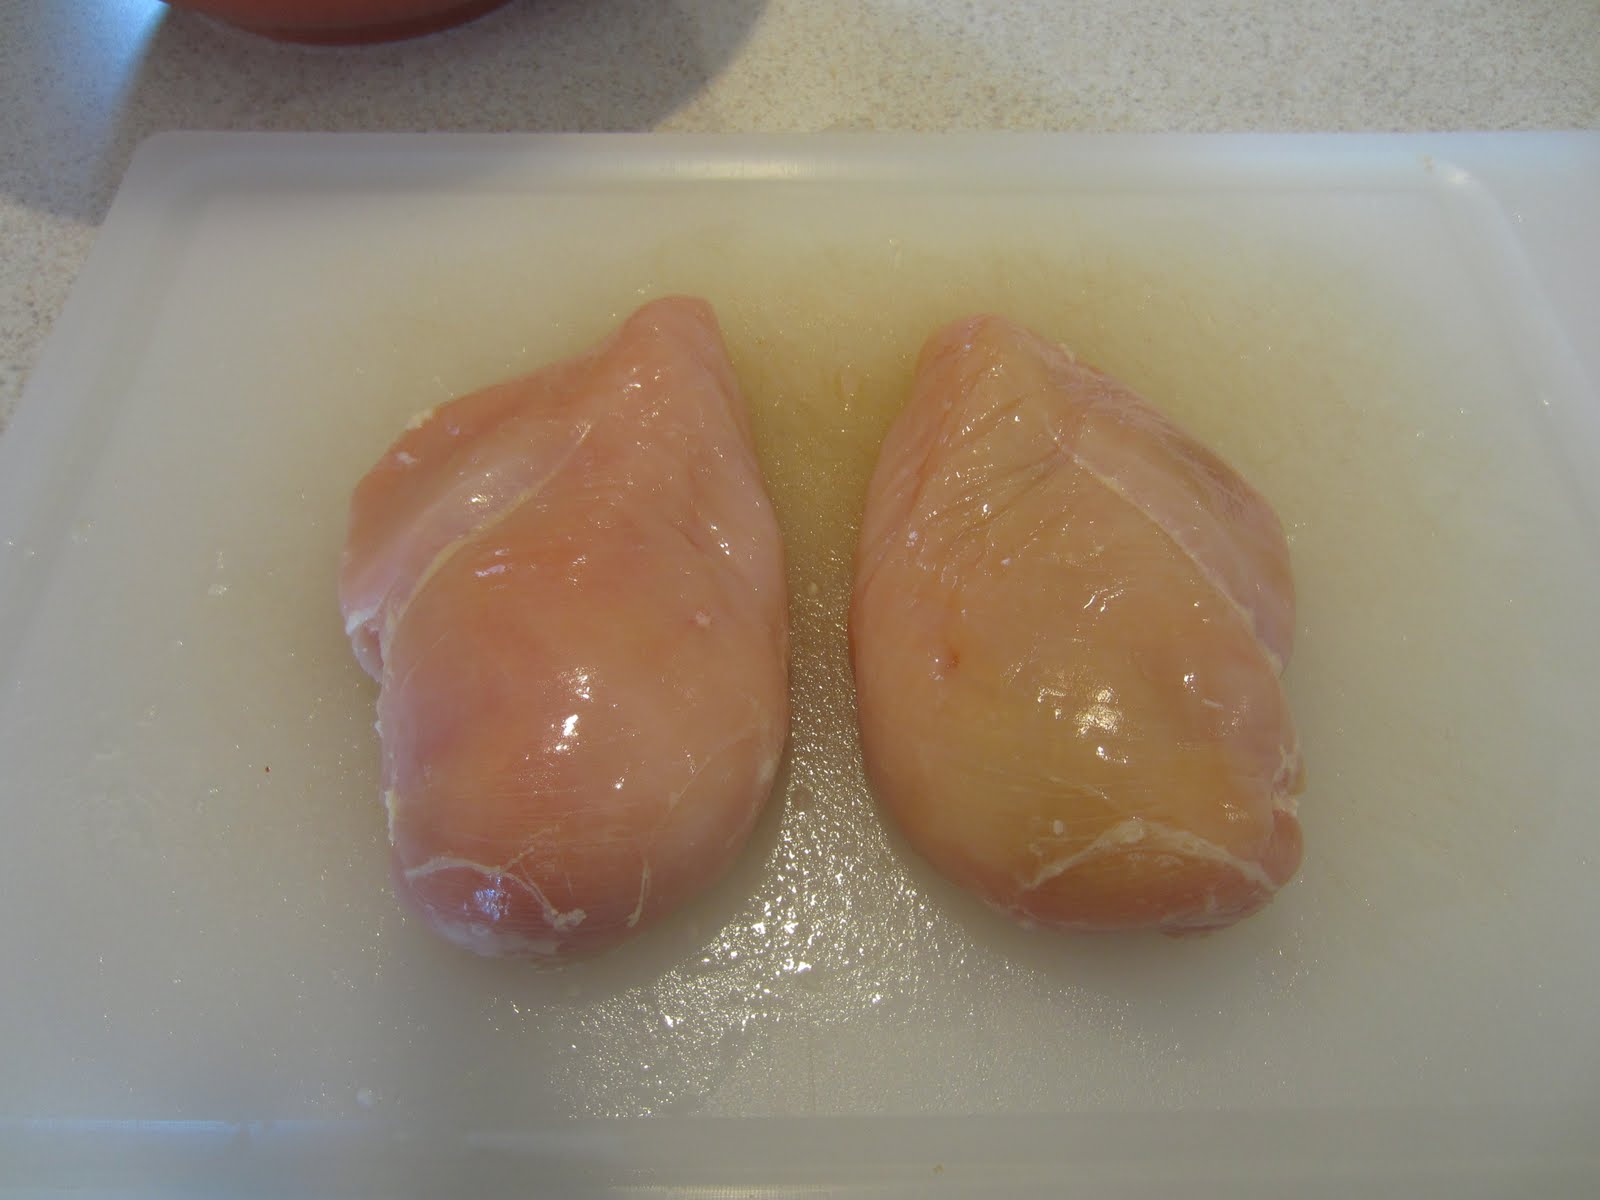
Cut each chicken breast into smaller chunks – doesn’t have to be precise, just so they are easier to stuff in the jars.
Pack the chicken pieces semi-loosely into the jars, leaving 1-inch of space between the top of the chicken and the top rim of the jar.
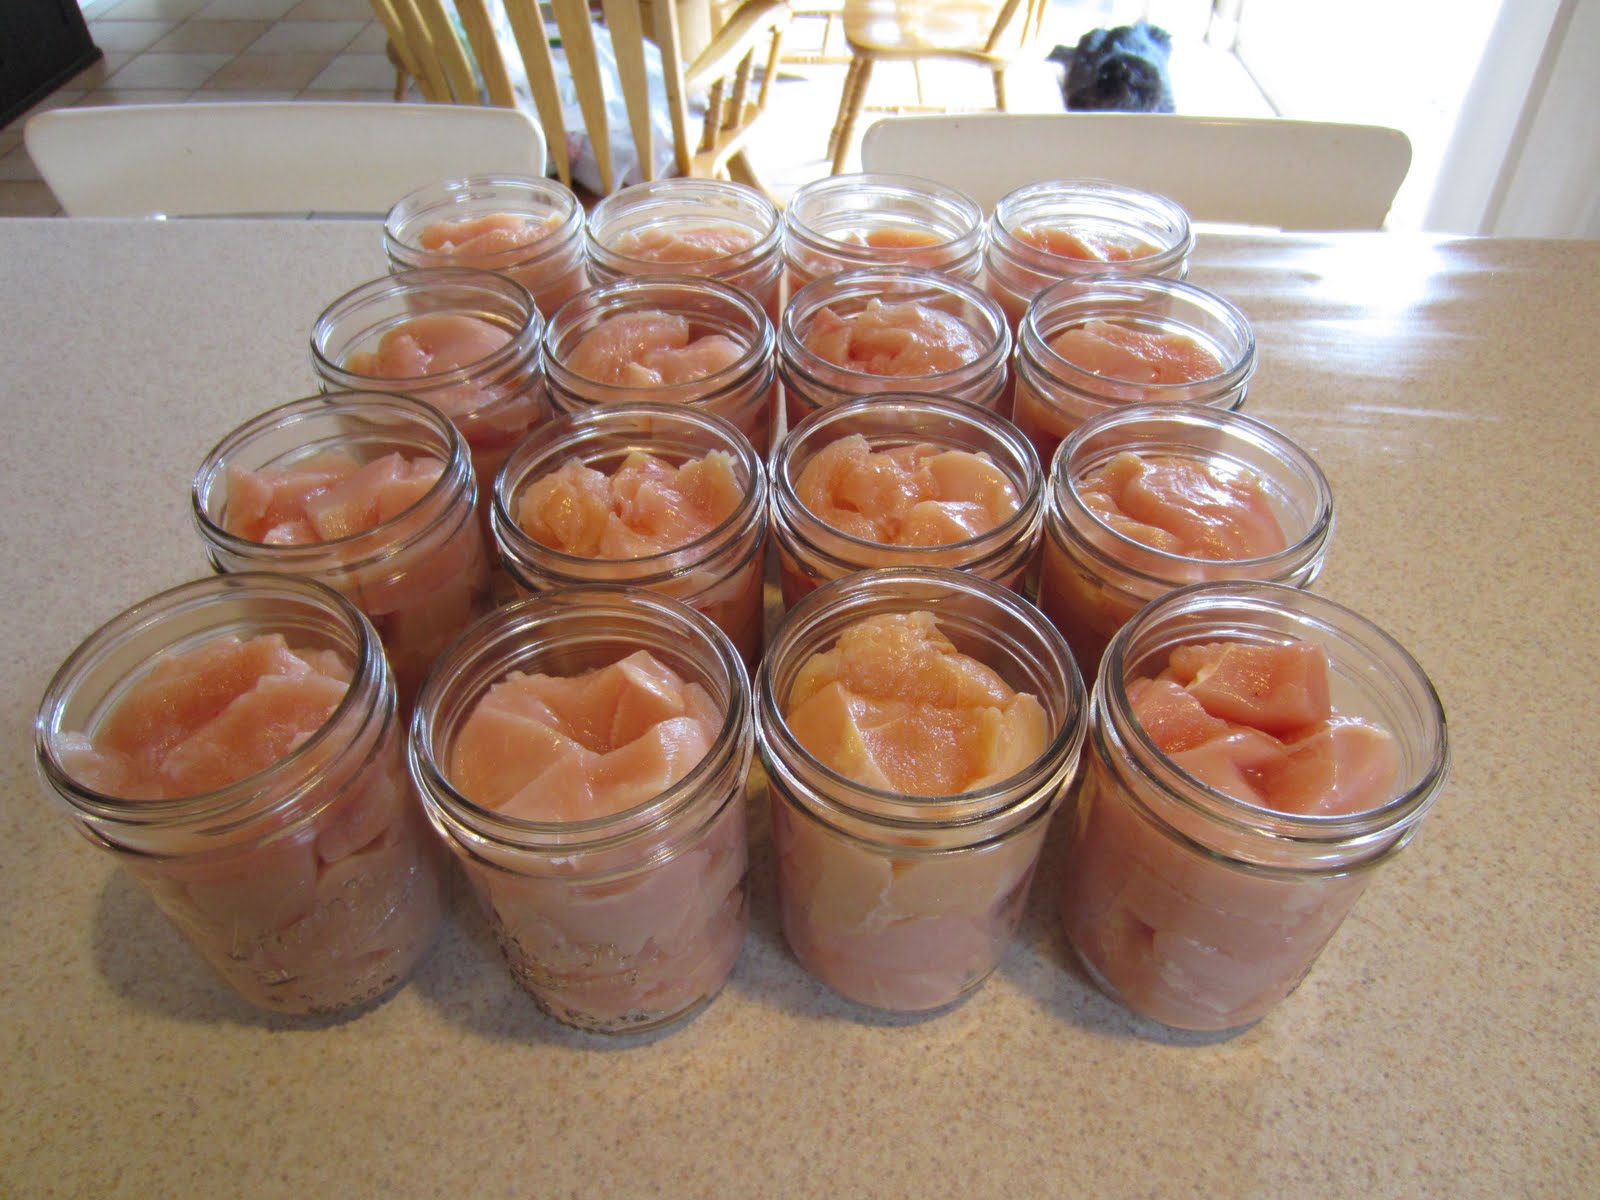
You don’t want a lot of big empty spaces, but you don’t want to smash it flat beyond recognition, either. The chicken will expand while processing, and then shrink. If you pack it too full, you may prevent the lid from being able to seal (more on that later).
Next, add boiling water (or you can use chicken broth if you’d like) to within 1-inch of the top rim of the jar. Pour some water in, poke around the sides with a spatula, plastic knife or chopstick, to help remove air bubbles, and then fill a little bit more if the water has settled below that 1-inch mark.
Once filled, take a clean wet rag or towel and wipe the rims of each jar to make sure they are clean and there is nothing there to impede the seal. Take a hot lid from your simmering pot, and place it on the jar, make sure it is centered, and then put on your ring.
Because the pressure canner uses steam that fills the entire container, you can double stack your jars in a pressure canner. Make sure the water in your canner is now at boiling. Place your jars in your canner according to the manufacturer instructions. Mine says to place the second layer of jars offset by half a jar, so the top jar rests on the edges of two bottom jars.
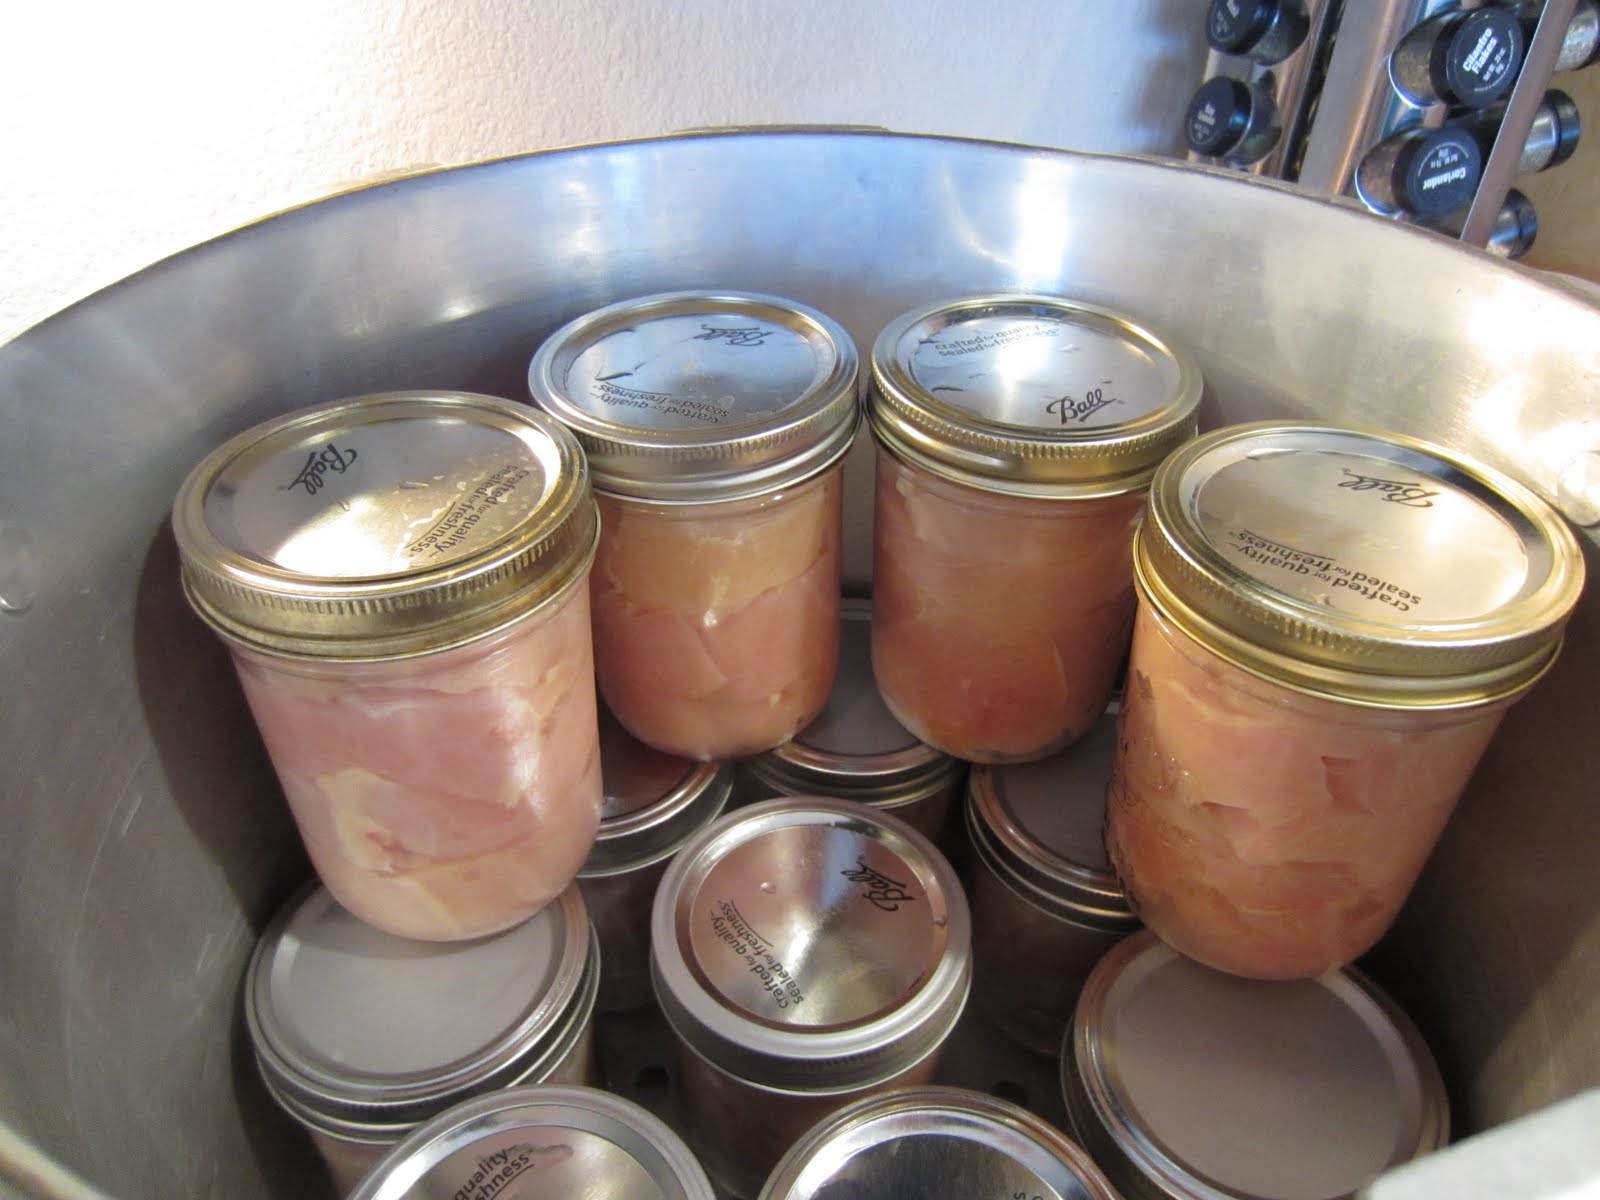
My particular model of canner can fit 16 pints jars at a time.
Once all your jars are in, put on the lid and process according to the instructions. (It’s basically a process of: create steam, let it vent for 10 minutes to get all extra air out, put on stopper/weight, bring to pressure, then hold at pressure for specified time, turn heat off after time is up, let pressure reduce to zero naturally, wait ten minutes, then open the lid and carefully remove jars.)
For chicken, the processing time is 75 minutes for pints, and 90 minutes for quarts. (One pint jar holds about 1lb of chicken, and a quart jar holds about 2lb.) You’ll need to look up in a canning book or in your canner manufacturer’s instructions to find out what pressure to can at – here where I live it is 13 psi. You must keep your pressure at that amount (or higher) throughout the processing time – if it dips below that, you’re supposed to start the time all over again. Because of that, I usually end up processing at 14 psi, because for the first little while the pressure will fluctuate as you get the heat settings figured out, and that way I have a few moments to adjust the heat before dipping below the 13 mark.
Once the jars are in, and you’ve vented the canner and brought it to pressure, there isn’t much to do but sit and wait. I usually bring a book with me and just sit in the kitchen so I can keep an eye on the pressure. You will need to adjust your burner settings periodically, as the heat and steam builds up and the pressure increases. I start out at high for getting to a boil, venting and getting to pressure. Once at pressure, I can turn down to med-high, then turn it down little by little every 10-15 minutes or so, until by the end I’m down to med-low for the last half hour or so.
Once your jars are out of the canner, leave them alone for 12-24 hours and then test for seal. Press the middle of the lid – if it flexes down, it isn’t sealed. If you can barely move it, then you’ve got a good seal. Any jars that don’t seal can be reprocessed (with a new lid) or moved to the refrigerator to be used soon. After 24 hours, you can remove the rings, wash the jars, label them with the date, and store them away!
[For specific instructions on the actual canning process, which I have not gone into here, I recommend the Ball Blue Book or the National Center for Home Preserving’s web site at https://www.uga.edu/nchfp/.]
Here are a few of my favorite recipes for using canned chicken to make quick meals: (please forgive the terrible pictures – I have absolutely no photography skills whatsoever)
Hearty Chicken Noodle Soup
Chicken Vermicelli
Baked Creamy Chicken Taquitos
Curry Chicken Pot Pie
Note: The canned chicken works best in recipes calling for diced/chopped or shredded chicken.
The Twilight Saga: Eclipse DVD $5.25 at Amazon

The Twilight Saga: Eclipse (Single-Disc Edition) (2010)
List Price: $28.99
Price: $5.25 & eligible for FREE Prime Shipping or FREE Super Saver Shipping on $25
You Save: $23.74 (82%)
$25 for a $25 Target gift card and a $50 Restaurant.com gift card!


Today’s Save: $25 for both a Target gift card and a Restaurant.com gift card
Look on the right side under “Bonus Saves”
Save Details:
Pay just $25 for a $25 Target gift card and a $50 Restaurant.com gift card
Use your Target gift card on anything in-store or online
Restaurant.com offers deep discounts on thousands of participating restaurants and venues nationwide
Makes for a fun girls’ day out complete with shopping and dining
You’ll receive physical gift cards in the mail – perfect for stocking stuffers
For Restaurant.com, you will receive the physical card in the mail. Next, go online to Restaurant.com to pick out a certificate for your favorite place.
May buy up to 3 Saves
Valid for a $25 Target gift card and a $50 Restaurant.com gift card
All gift card sales final
Save Rewards can be earned, but may no longer be used toward this Save; Promo Codes may not be used toward this save
Code available immediately after purchase on Eversave
Promotional value expires
on Dec 20, 2011
Today’s Freebie Roundup 10/24

- Free eCookbook – Spooky Treats and Party Eats: 34 Halloween Recipes from Mr. Food.
- UPS My Choice – Sign up for Free!
- Stop by a participating Marble Slab location to get a free sample of Pink Pizza from Marble Slab Today from 3-6pm
- Suave CanYouTell Giveaway begins at 12:00:01 a.m. ET on every Monday. The giveaway will end at 11:59:59 p.m. ET on November 27, 2011. You have to watch the videos and answer the questions. Note: The answers are B, B , A, A, A, A, B, A.
- Free eCookbook: 23 Unforgettable Halloween Party Recipes eCookbook featuring 43 pages of Easy Dessert Recipes and Halloween Party Recipes + RecipeLion Quick and Easy Recipes newsletter for FREE!
- FREE Arthritis Guide. Learn to live better by taking control of your arthritis.
- Complete online surveys and earn cash from GlobalTestMarket.
- Ipsos I-Say Survey – US Young Adults
- Ipsos I-Say Survey – US African Americans
- Ipsos I-Say Survey – US Hispanics
- Link to Free Android App Promo @ Amazon.com
- Free Activate Vitamin Drink Sample
- Free NRG-X Labs Sport Supplements Samples
- Free BCAA Stack Grape Weightlifting Supplement Sample
- Free Get a Kit and Don’t be a Zombie CDC Posters
- Free Sample of BioFreeze Pain Relieving Gel
- Enter code 39HLG2 to Get one FREE DVD rental from Blockbuster Express. The code expires on November 4th and is valid on the $1 DVD rentals only.
- Many Walmart stores have Dulcolax Laxative Tablets 8ct and Dulcolax Stool Softener 10ct for $1.98. Use this $2 off print coupon to make it FREE.
- 2 Free Kotex Natural Balance Liners for Costco Members
- Free Sample of Poise Pads for Sam’s Club Members
- Free Sample of Truvia Natural Sweetener
- Sign up for Hut Lovers email program by November 1 for a fun Halloween trick – and a FREE delicious treat to add to your next order!
- Free Boss Orange Sunset Fragrance Samples
Jalapeno Poppers – WW style

I love the jalapeno poppers from a certain fast food restaurant. LOVE them! I looked up the nutrition info on their website, plugged it into the online WW points plus calculator, and came up with 15 points plus for 8 poppers and the yummy sweet dipping sauce they are served with.
(I’m skeptical about that nutrition info though. I was expecting the points to be MUCH higher for those deep fried delicacies)
I decided to try making a WW friendly version at home. I think they turned out great!
Crispy baked wonton wrappers give you the crunchy exterior. Diced jalapenos mixed with low fat cream cheese give you perfect melty, creamy heat. And Thai sweet chili sauce brings the sweet to the heat. Which is a perfect flavor marriage in my world. My mouth was happy!
Try them yourself
The recipe makes 8 appetizers.
If you share with someone, it’s 5 points plus per 4 piece serving.
If you share with 3 of your friends, it’s 2 points plus per 2 piece serving.
Or, if you go a little crazy and eat all 8 yourself, it’s 9 points plus per serving. Hey, it happens!
Wonton Jalapeno Poppers
8 wonton wrappers
4 Tablespoons low fat cream cheese
2 finely diced jalapenos (more or less, depending on your heat tolerance)
2 Tablespoons Sweet chili sauce (found in the Asian foods section of your grocery store)
Preheat oven to 375 degrees
In a small bowl, mix the cream cheese and diced jalapenos until well combined. Set aside
Lightly spray a baking sheet with non stick spray.
Lay 8 wonton wrappers on baking sheet.
Place a tablespoon or so of the cream cheese mixture onto each wrapper, dividing the cream cheese mixture evenly among the wonton wrappers.
Dip your fingertip into some water and wet two sides of the wrapper, then fold over, forming a triangle. Press gently to seal. Repeat for all 8 wrappers.
Spray the poppers lightly with non stick cooking spray.
Bake for approximately 15 minutes or until the poppers are golden brown and crispy.
Serve with the sweet chili sauce for dipping.
If you are thinking of joining Weight Watchers, now is a great time.
*Pinching Your Pennies is a compensated affiliate of Weight Watchers.
*HOT* Bar-S Franks or Bologna Printable Coupon and More!
 Group C added some great new printable coupons this morning. This Bar-S Franks or Bologna .75/2 coupon is just one of them. The everday price at my Walmart on these is $1.28, so just $0.91 after coupon. Group C coupons tend to disappear fast, so print quickly! Remember, you can print each coupon twice.
Alvin and the Chipmunks Scare-Riffic Double Feature $4.99

Alvin and the Chipmunks Scare-Riffic Double Feature (2008)
Was: $14.98
Now: $4.99 & eligible for Free Prime Shipping or Free Super Saver Shipping on $25
You Save: $9.99 (67%)
Betty Crocker Fun-Da Middles Printable Coupon and More!
 Coupon Network still has some great coupons, like this Betty Crocker Fun-Da Middles cupcake mix .50/1 coupon. Make sure to check out and print the other great coupons! Remember, you can print each coupon twice.
Free in-store activities and events taking place this weekend
Here is a list of in-store activities and events taking place this weekend across the county. Click on the links below to get complete details about the events before heading out.
- Halloween Monster Truck Build and Grow clinic for kids at Lowes on Saturday
- Masquerade Mask crafts at Lakeshore Learning on Saturday
- Disney Store Halloween Dress Rehearsal Party on Friday and Saturday
- Sesame Street Event at Toys R Us on Saturday
- Beyblade Tournament at Toys R Us on Saturday
- Halloween events at Bass Pro Shops
- Halloween costume event at AC Moore on Saturday
- Getting Comfy With Baby event at Babies R Us on Saturday
- Mixing and Publishing Workshop at Guitar Center on Saturday
- Halloween Party and Customer event at CVS on Sunday
- How to Entertain with Style decorating class at Pottery Barn on Sunday
- Vitamix Technique Class at Williams Sonoma on Sunday
- Adult workshops at Home Depot
- Free sample events at Walmart
Bali Bras – $14 Shipped! FREE Shipping on ALL orders today only @ Just My Size!
![]()
Bali Double Support� Wirefree Brawas: $25.99
sale: $13.99
Flower Bali Underwire Bra
was: $25.99
sale: $13.99


FREE Shipping on any order *today only* @ JustMySize.com
Make Your Own Reusable Produce Bags
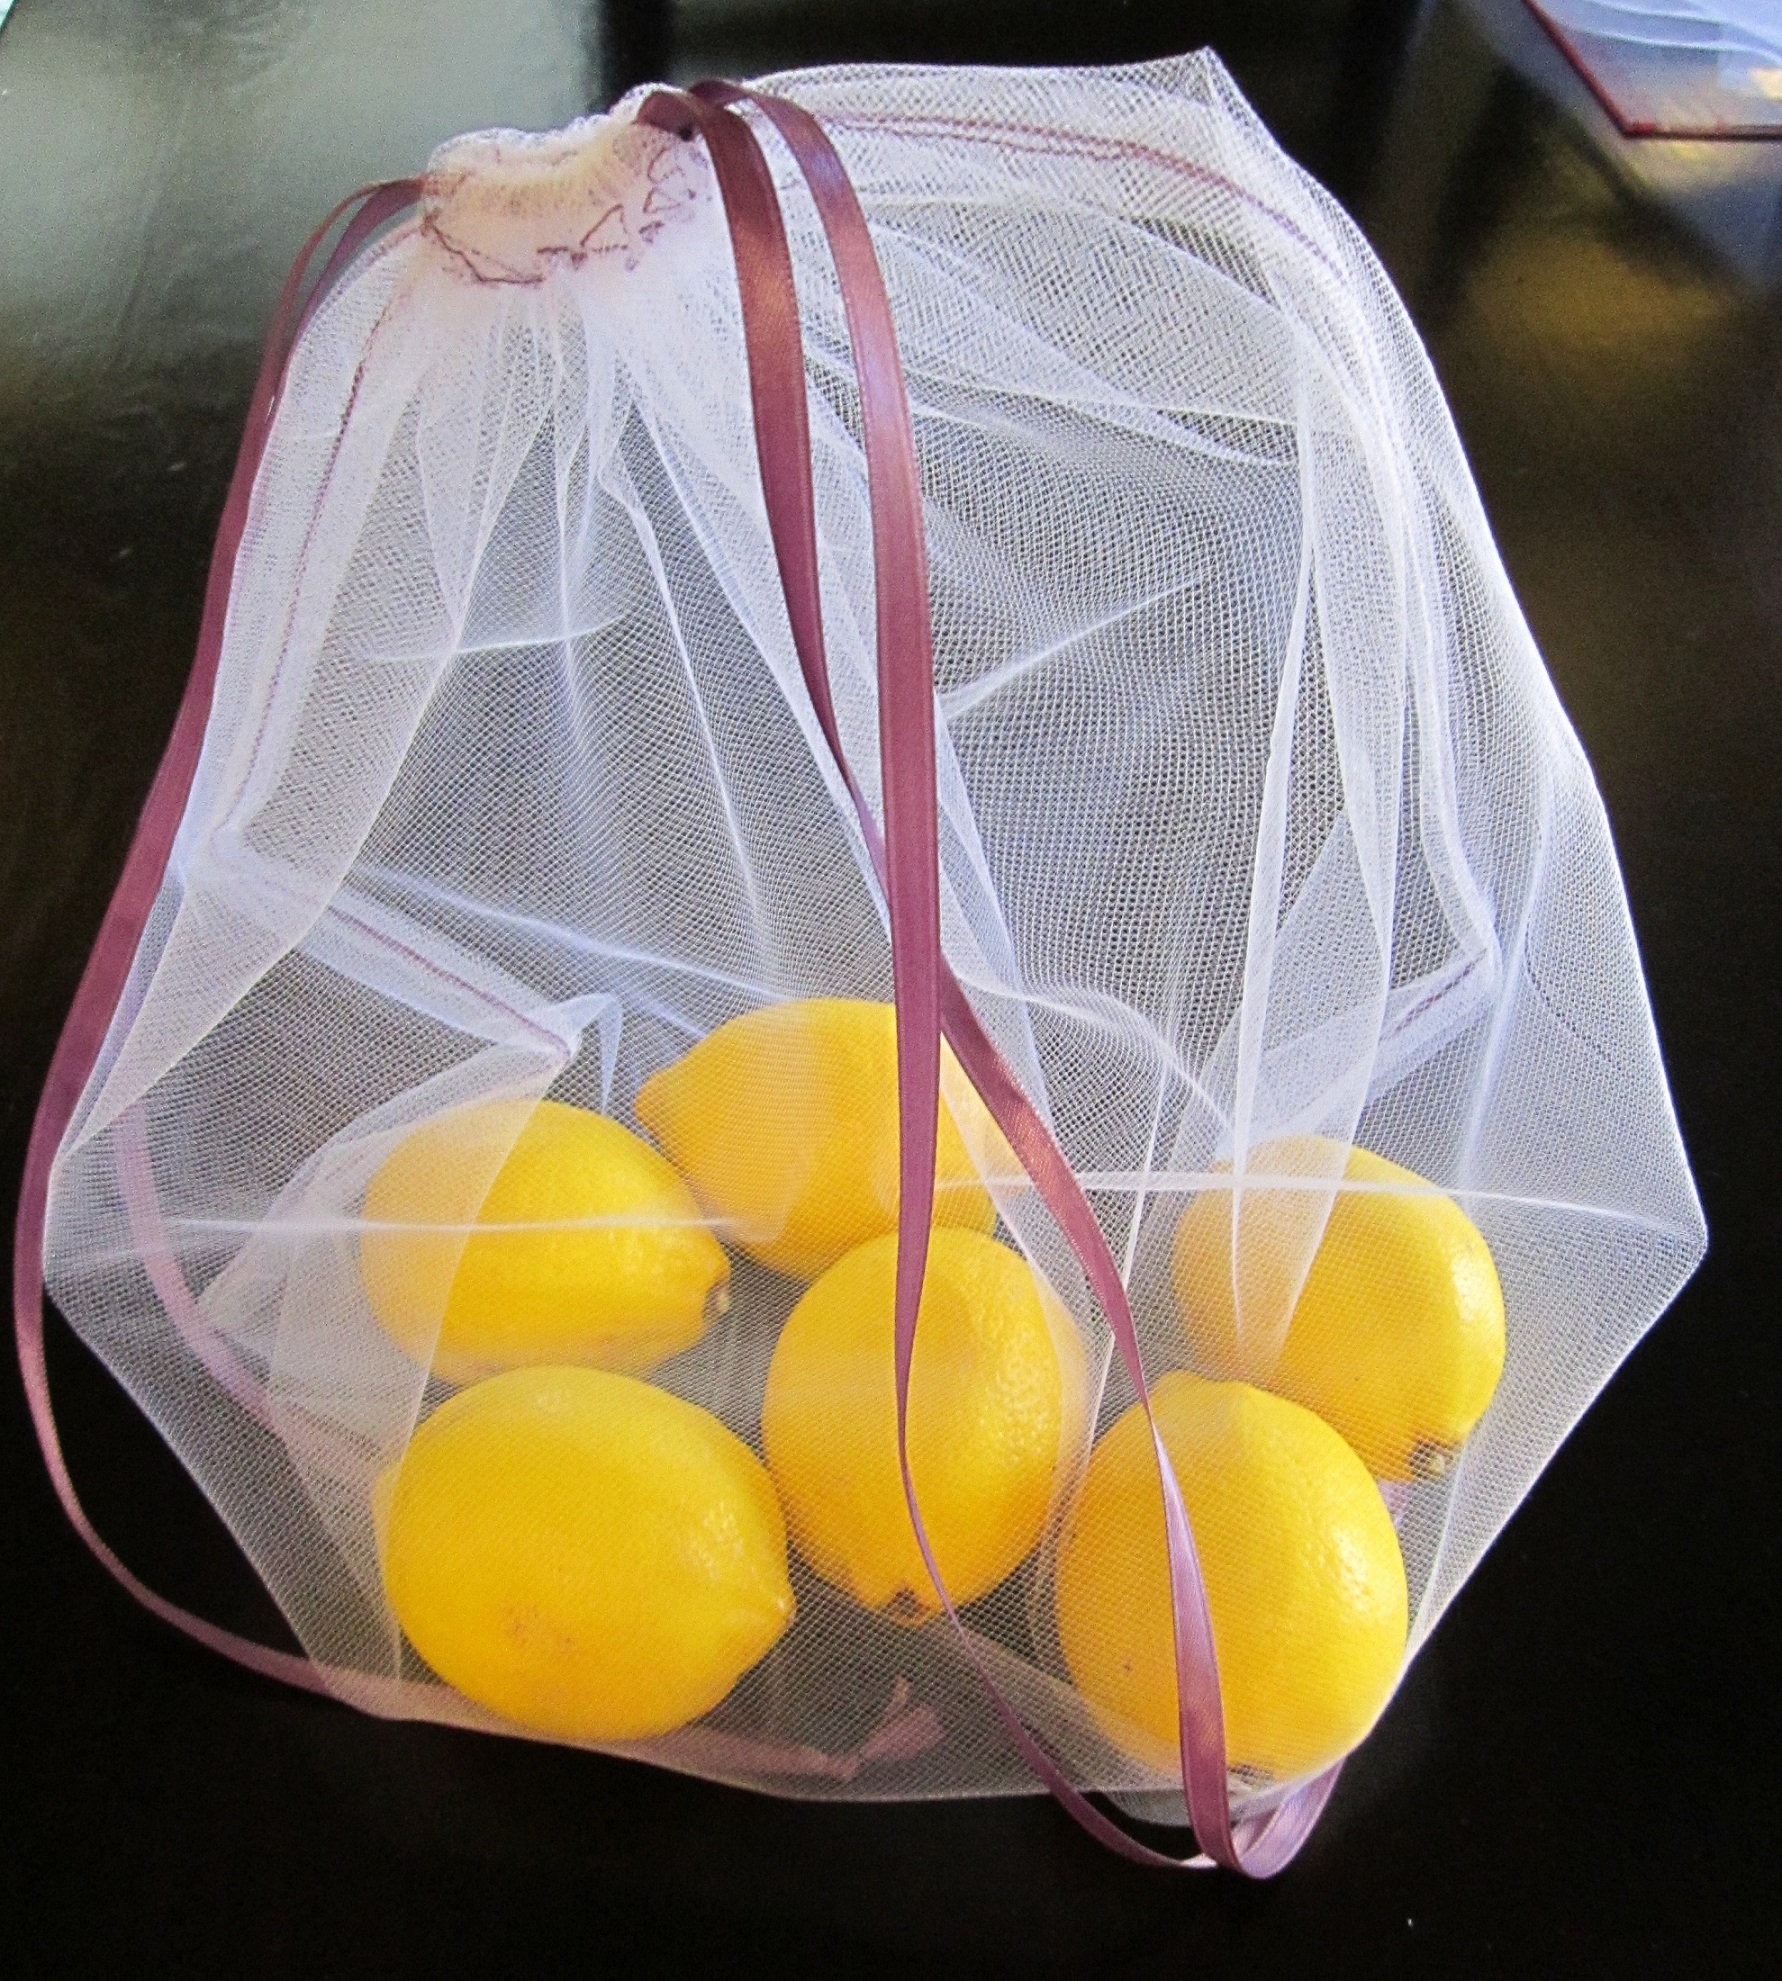
One more way to eliminate the amount of waste coming into your home and going out to the landfill or recycling facility.
For four bags you will need one yard of tulle and 8 yards of ribbon.
These are super simple to make if you can sew a straight line.
I used tulle to keep them as lightweight and easy to clean as possible.
The yard of tulle that I purchased was 56 inches wide. I cut it into four pieces that were 18 inches by 28 inches to maximize the full yard of tulle.
Turn the long sides up about a 1/2 inch and stitch.
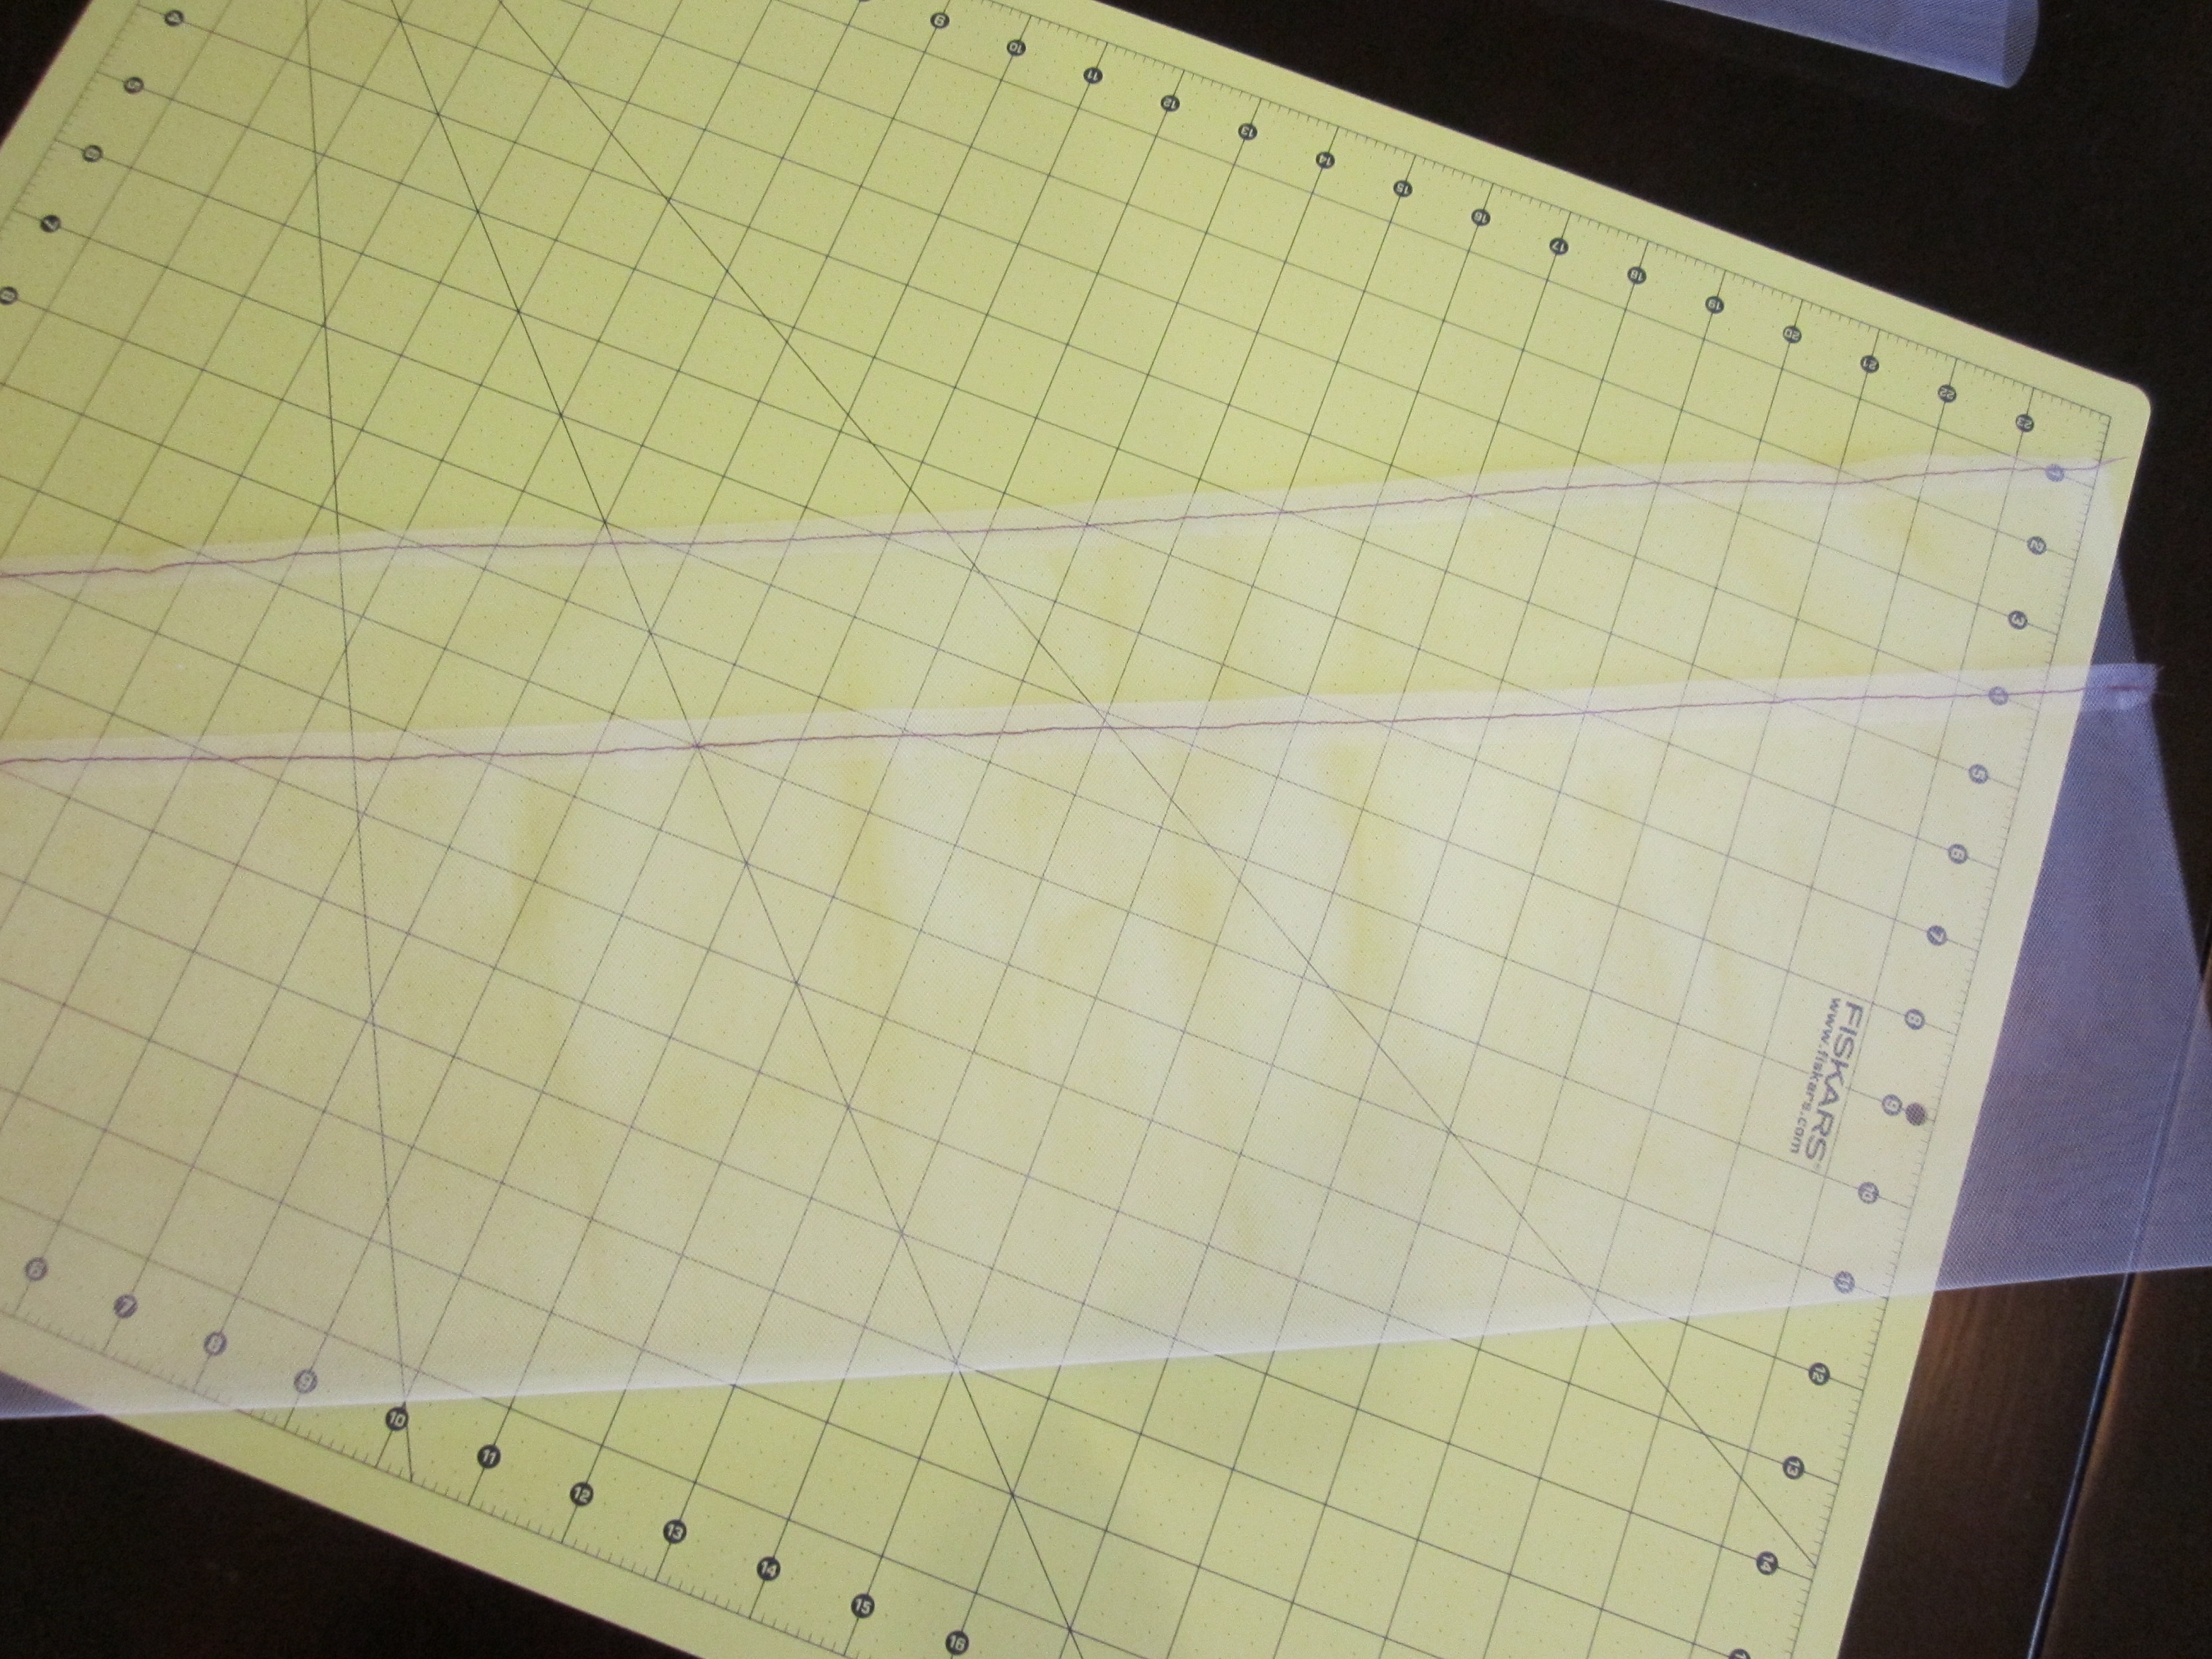
Turn the short sides up about 3/4 of an inch inch toward the same side of the fabric as you did the sides and stitch. This will make the casing for the drawstrings.
The side of the fabric that you turned those edges to is the WRONG side.
Fold the piece in half, with RIGHT sides together, so that the two short ends meet up. Stitch up the sides starting BELOW the casings you made previously and down to the folded edge. You need that casing to remain open to thread the drawstring through.
Repeat on the other side, exactly the same way.
Now turn your bag right side out.
Slip a safety pin onto the end of one yard of ribbon and thread it through one side of the casing and into the other, coming back out where you started.
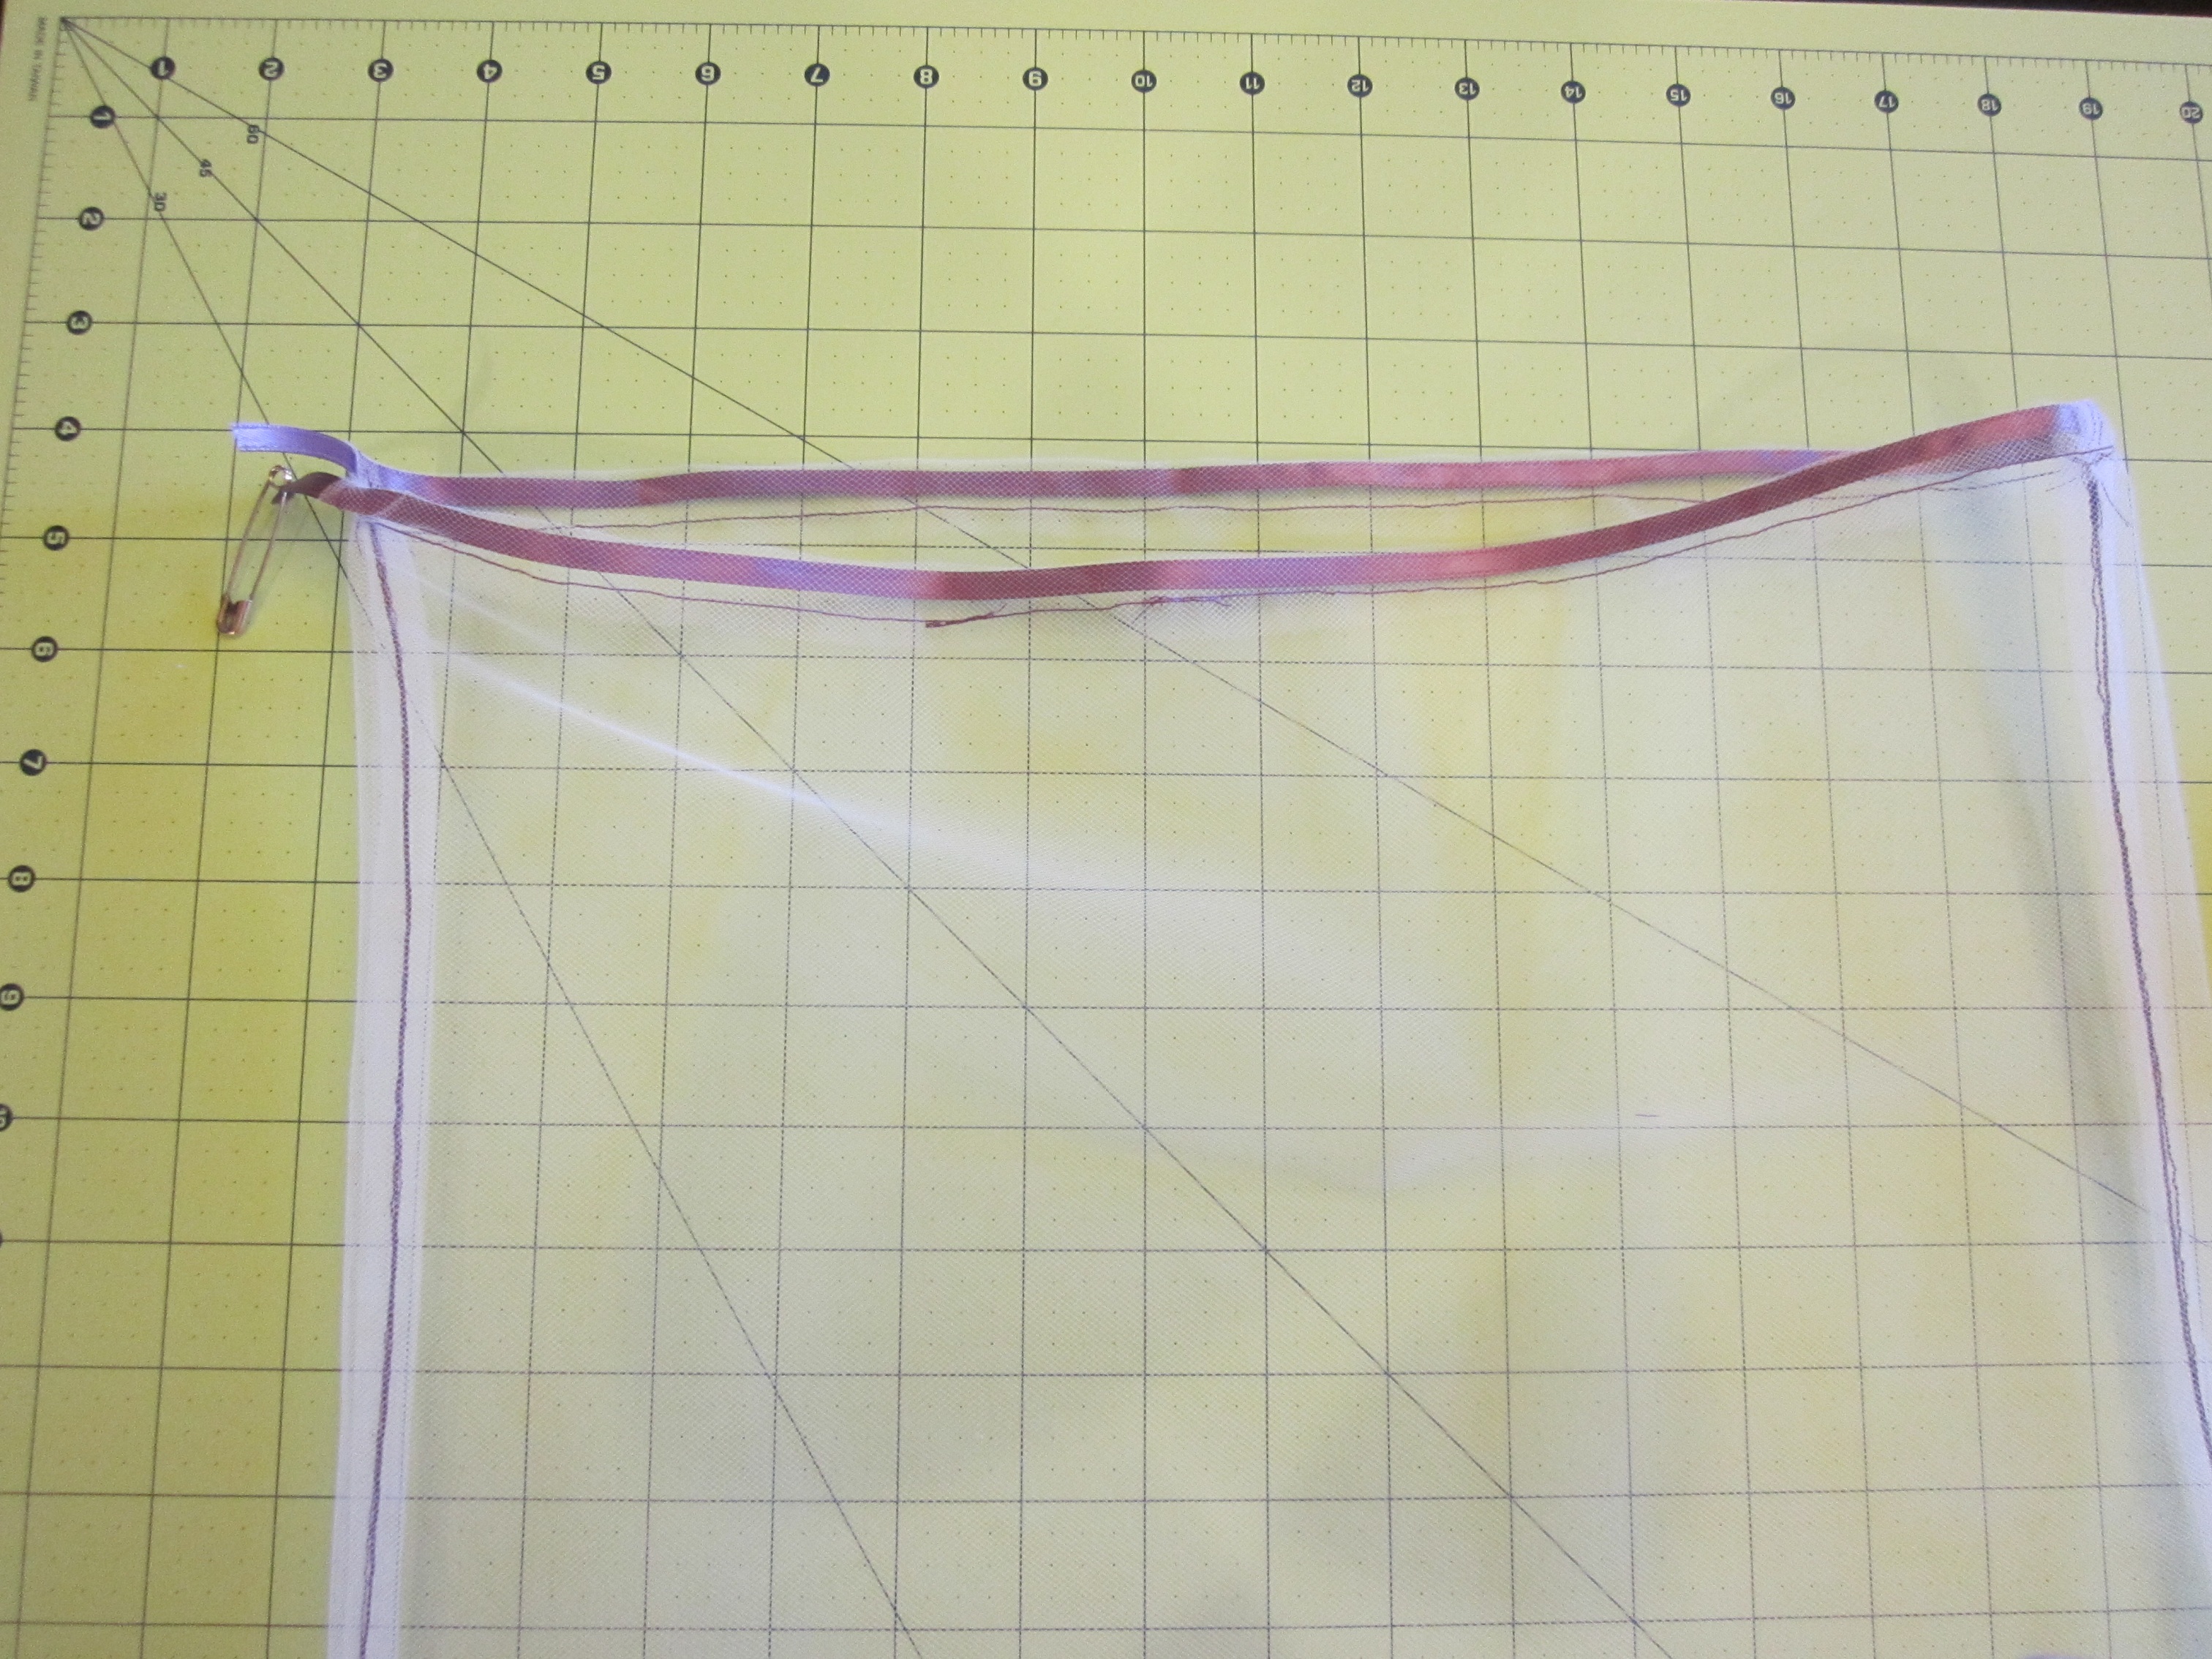
Tie those ends together in a knot.
Attach the safety pin to another yard of ribbon and feed it into the casing on the opposite side as before. Take it through the casing on one side and into the other, coming back out where you started again. Tie the ends together in a knot.
This makes the drawstrings cinchable.
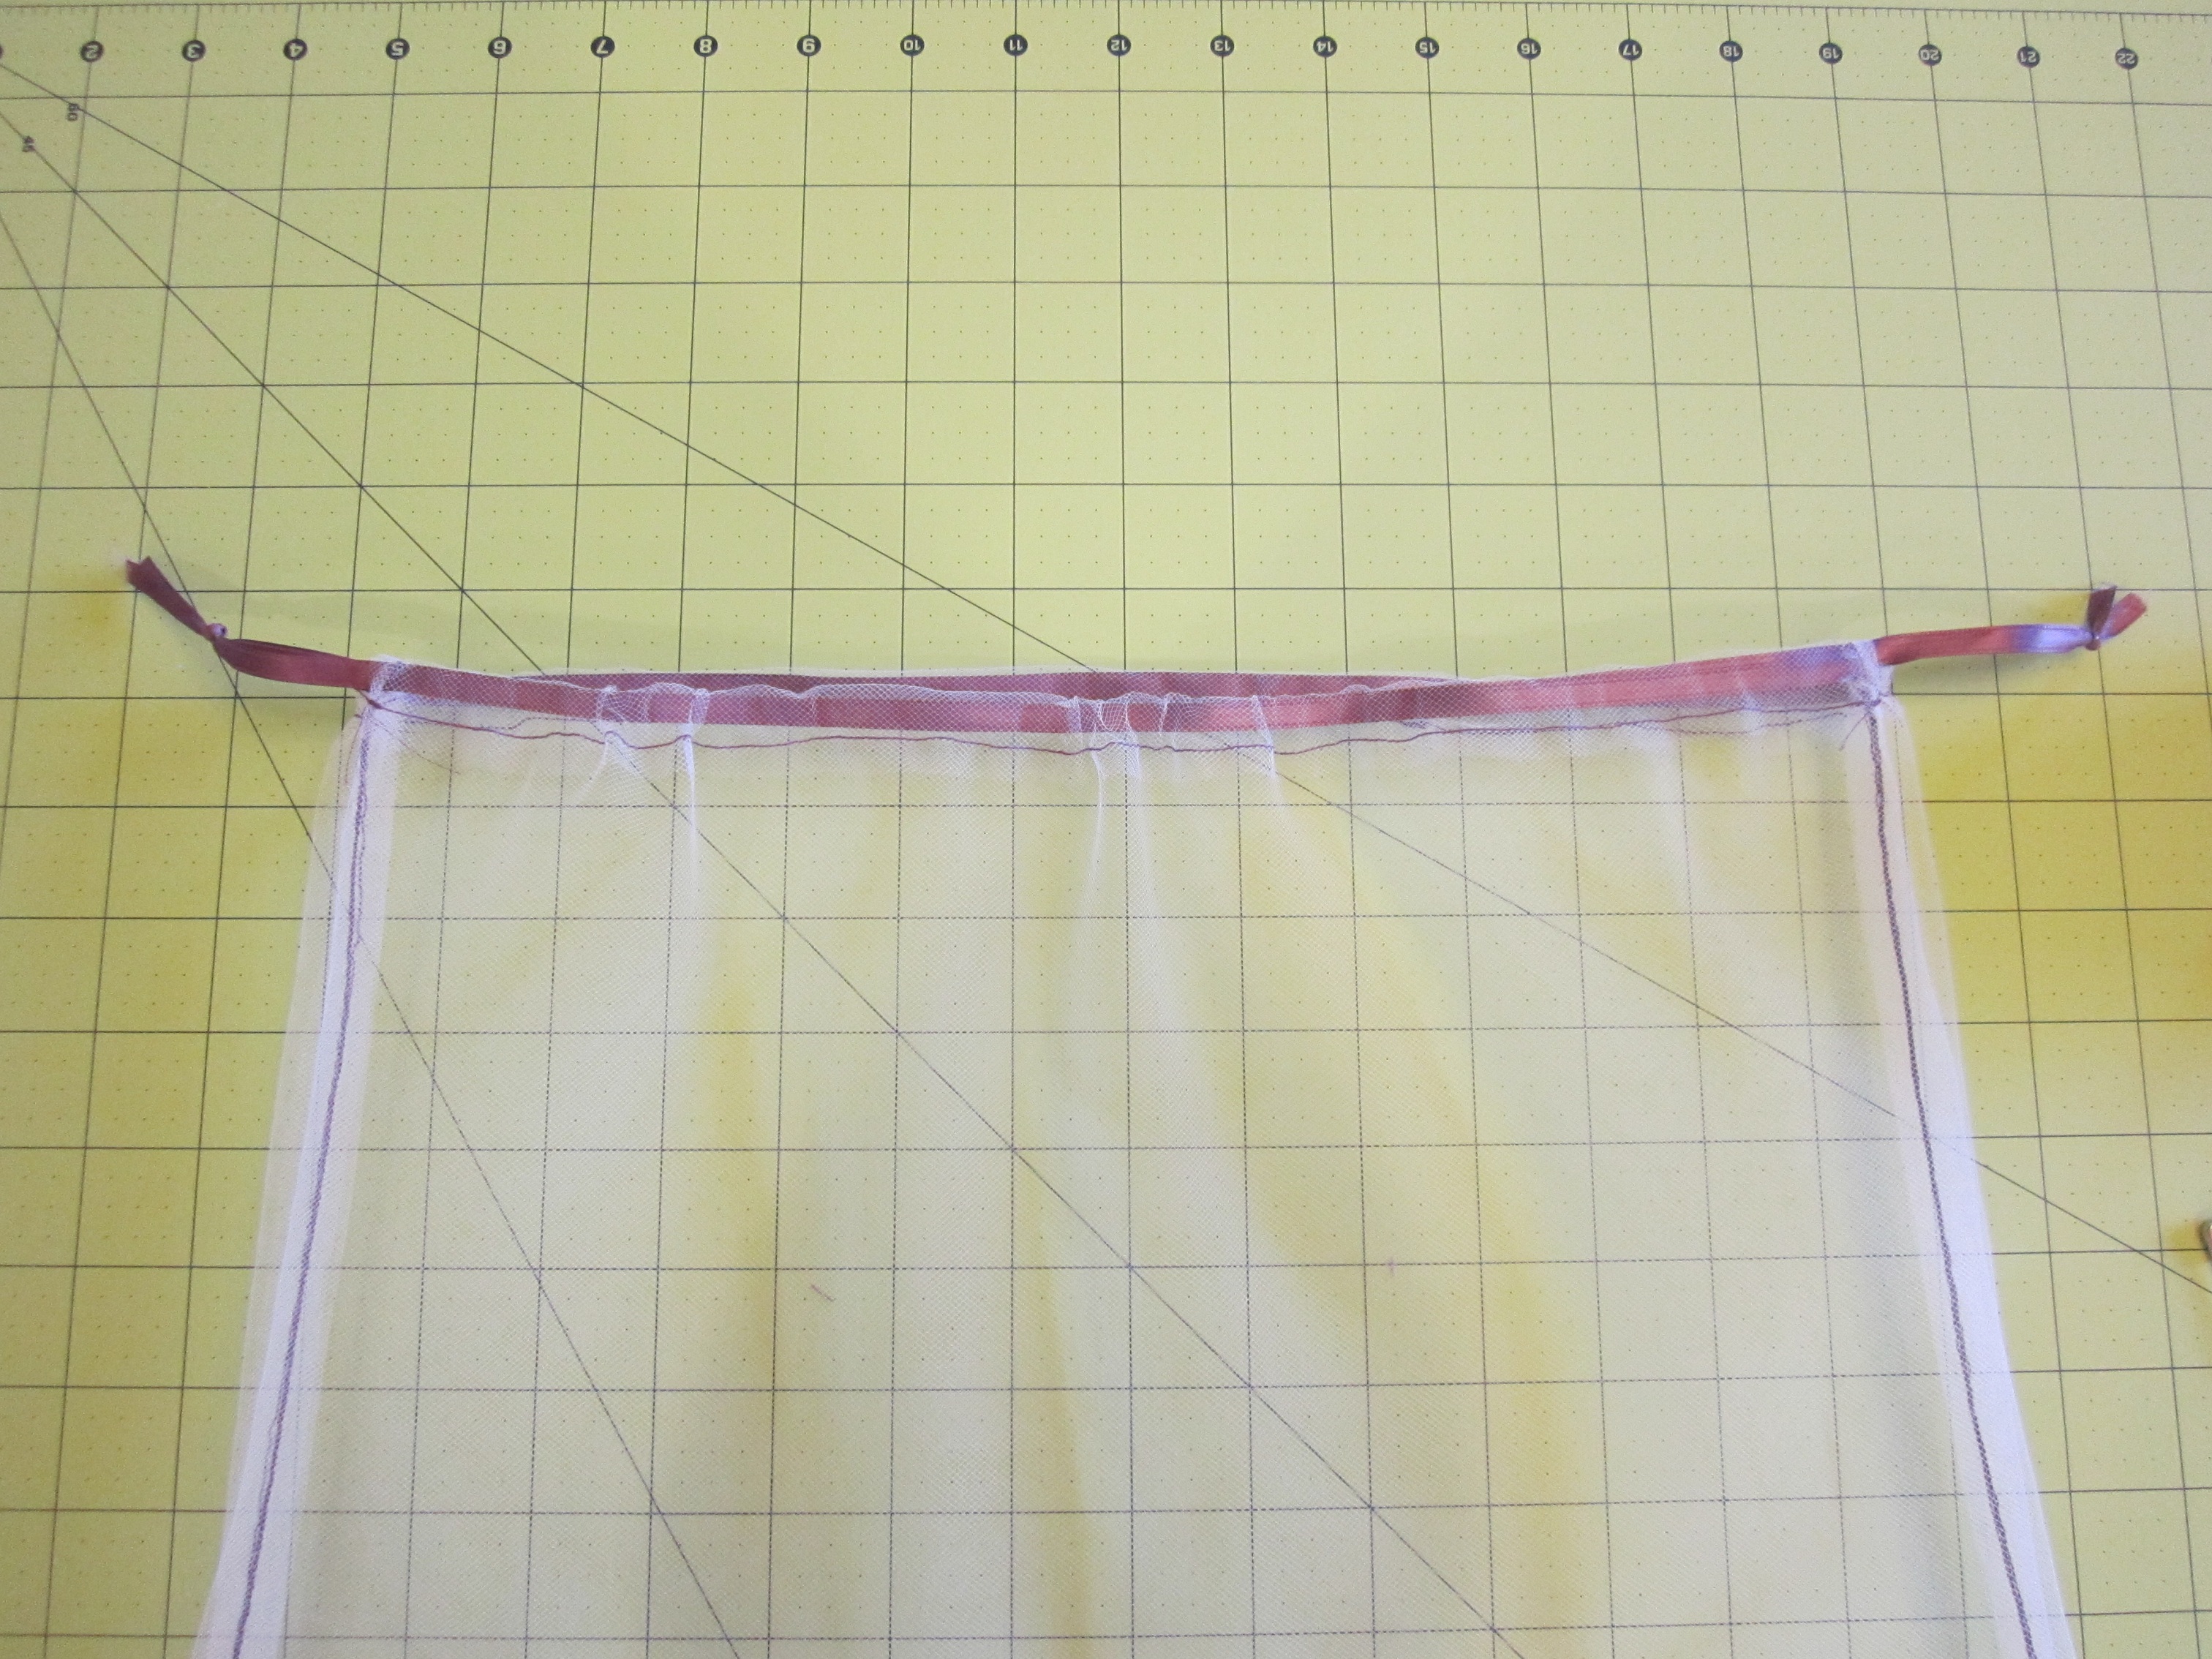
That’s it! You’re done!
I made four bags in just under an hour. I spent only $1 on the yard of tulle. I had the ribbon and thread on hand.

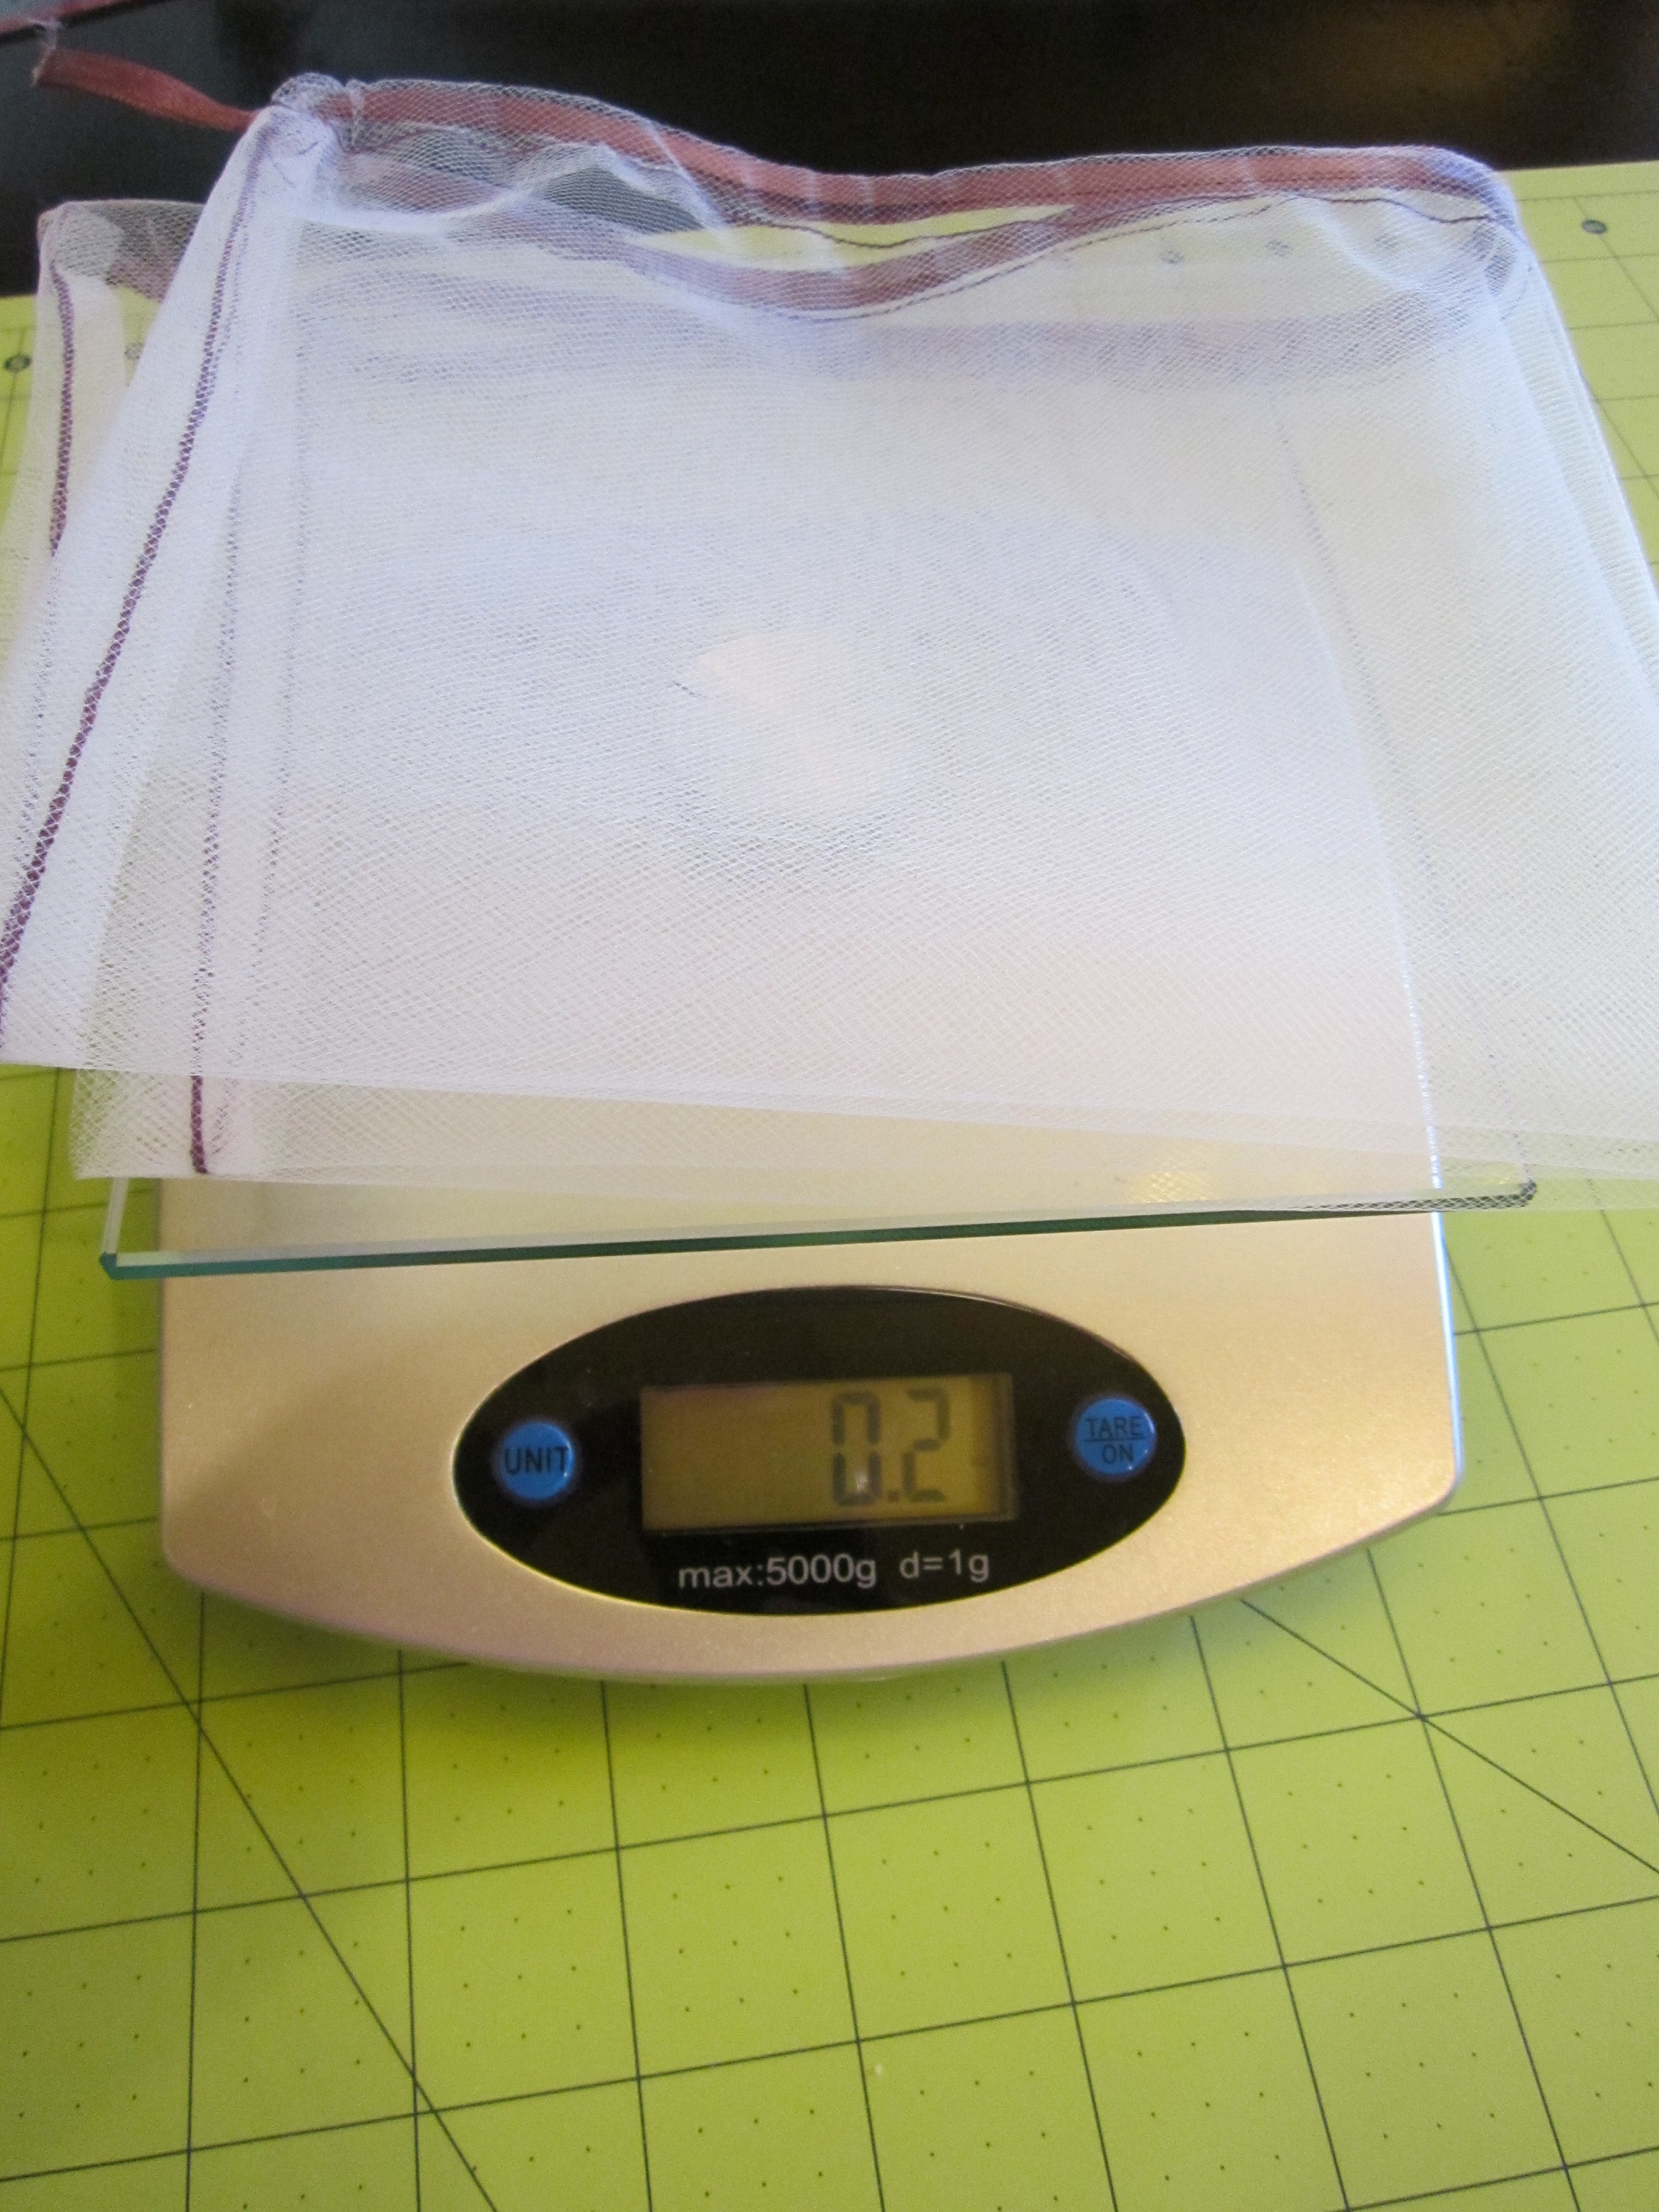
Here are the comparisons between the plastic and reusable bags.
The plastic bag from the grocery store weighs 1/10th of an ounce.
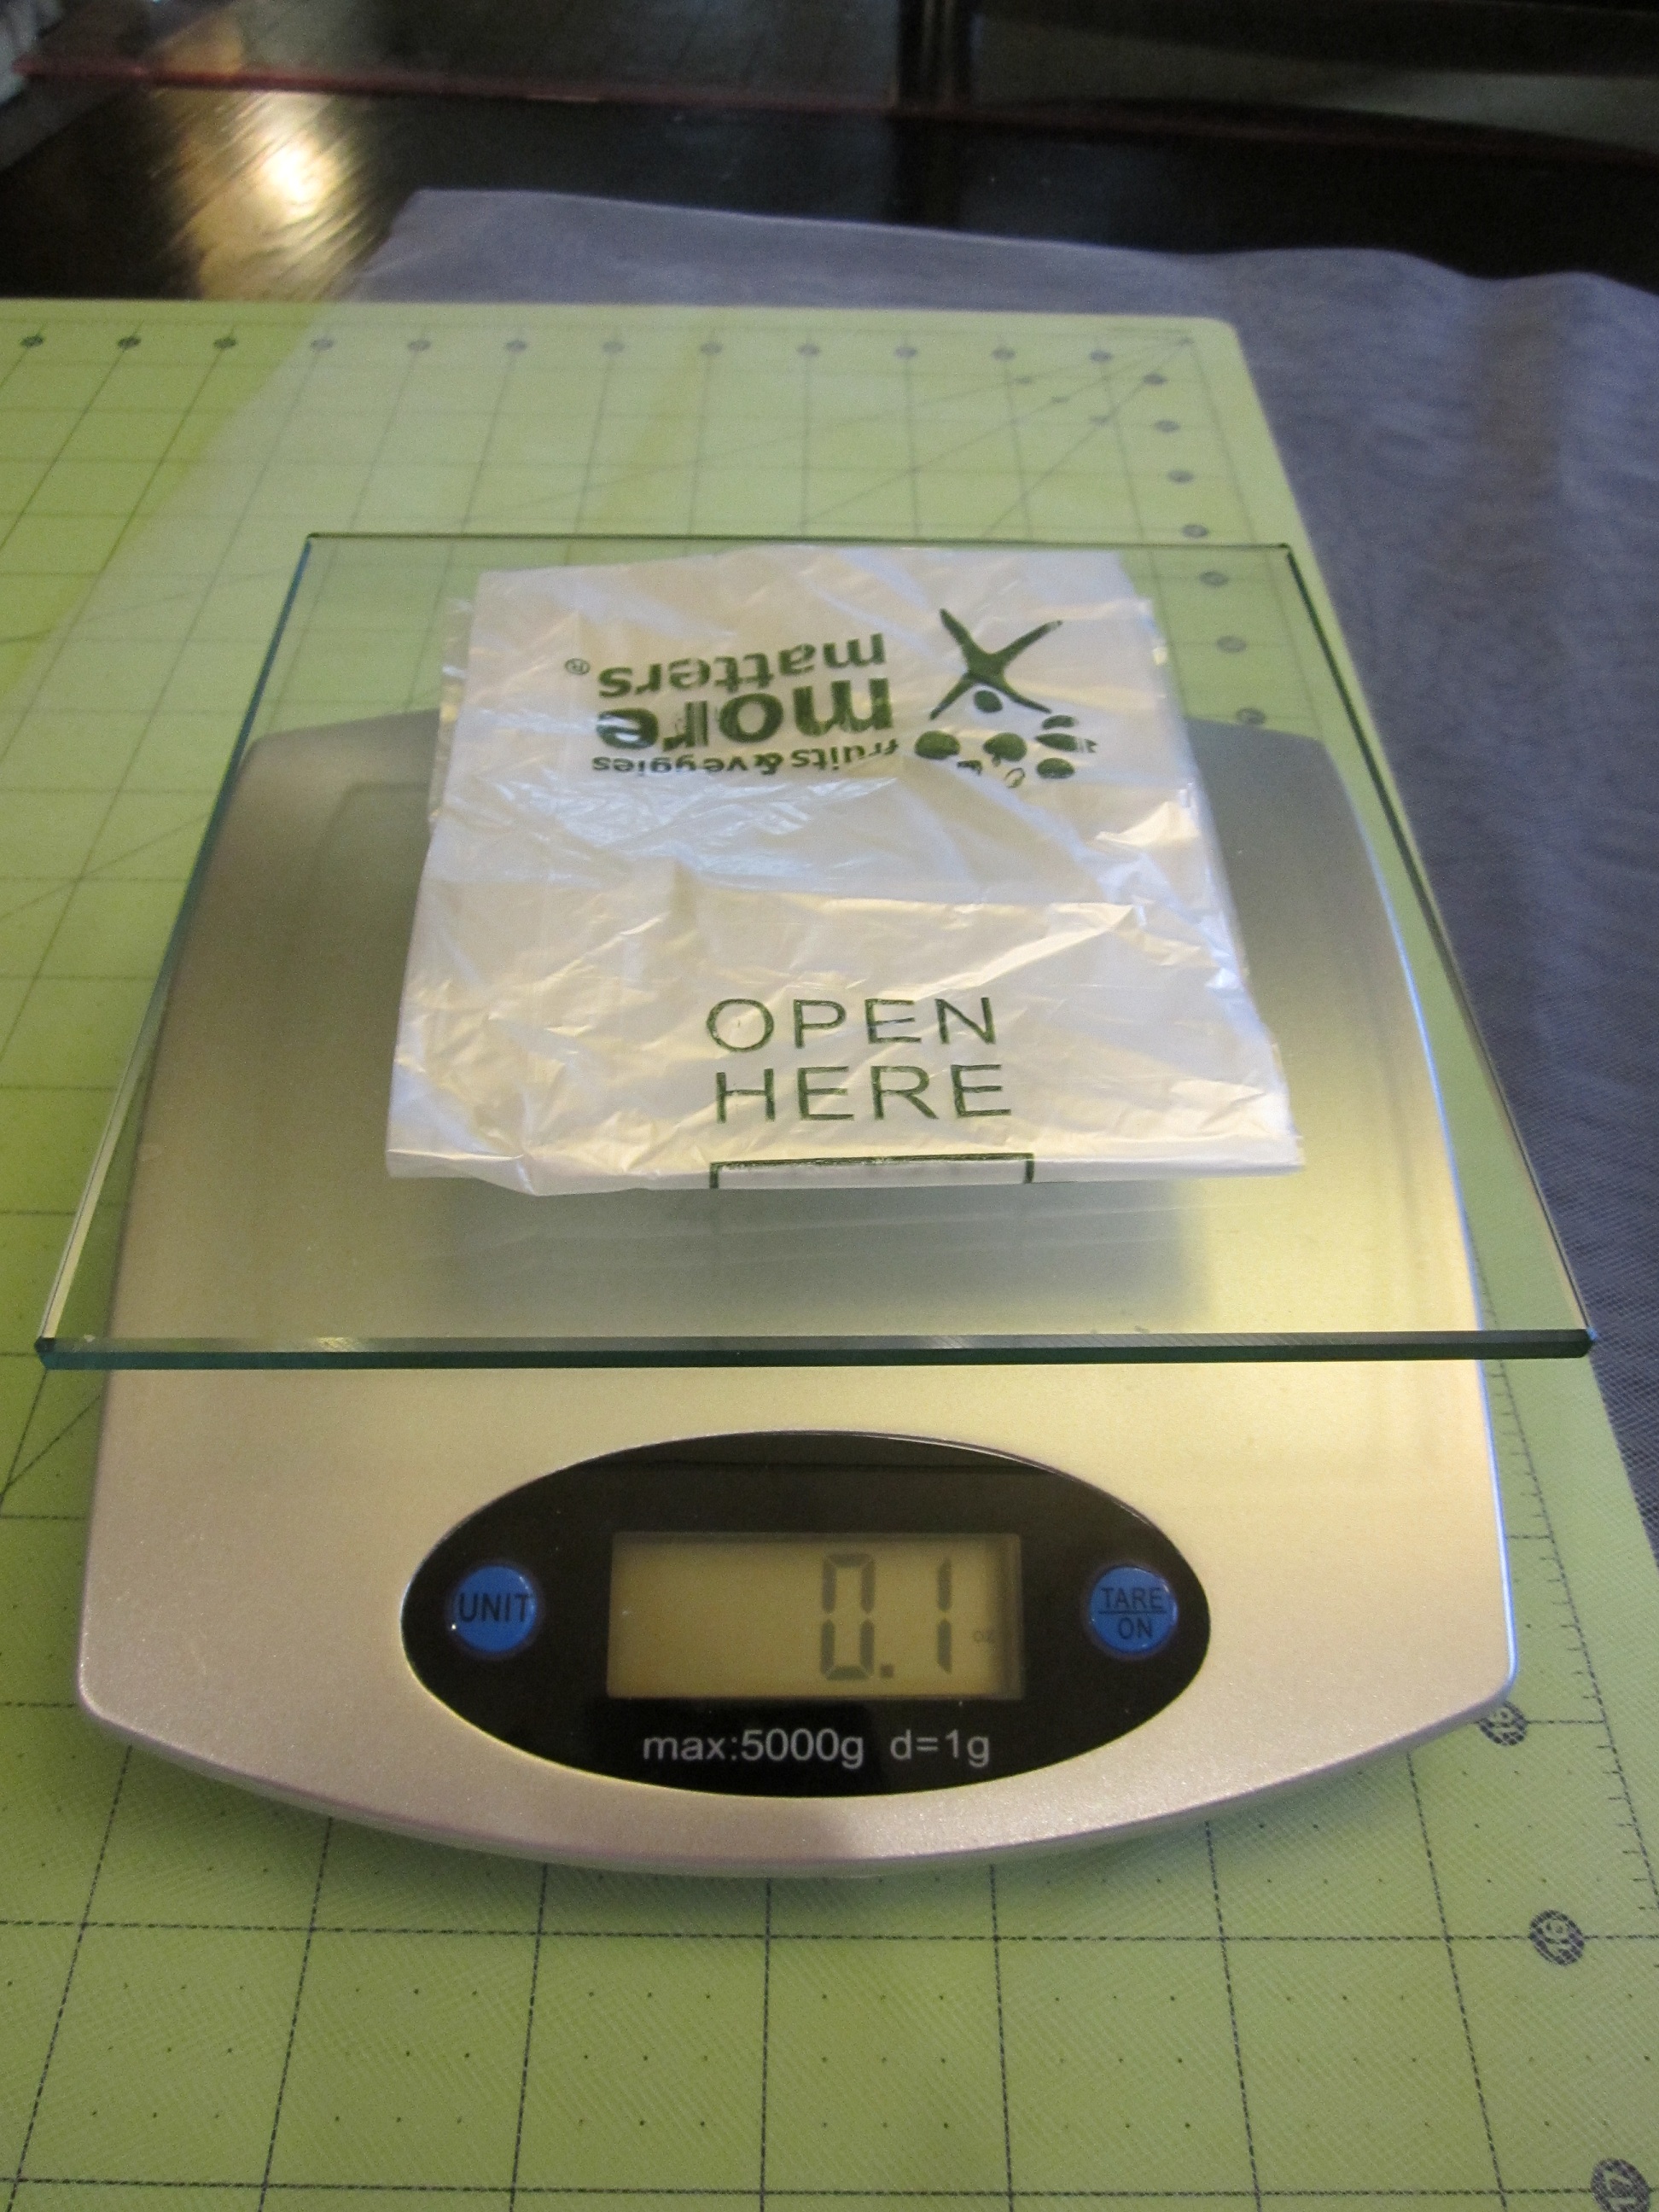
The reusable bag weighs 2/10ths of an ounce.
My scale is pretty sensitive and couldn’t decide between .1 and .2.
I snapped the picture at .2.
When fully opened, the size of the plastic bag is about 14 inches by 14 inches.
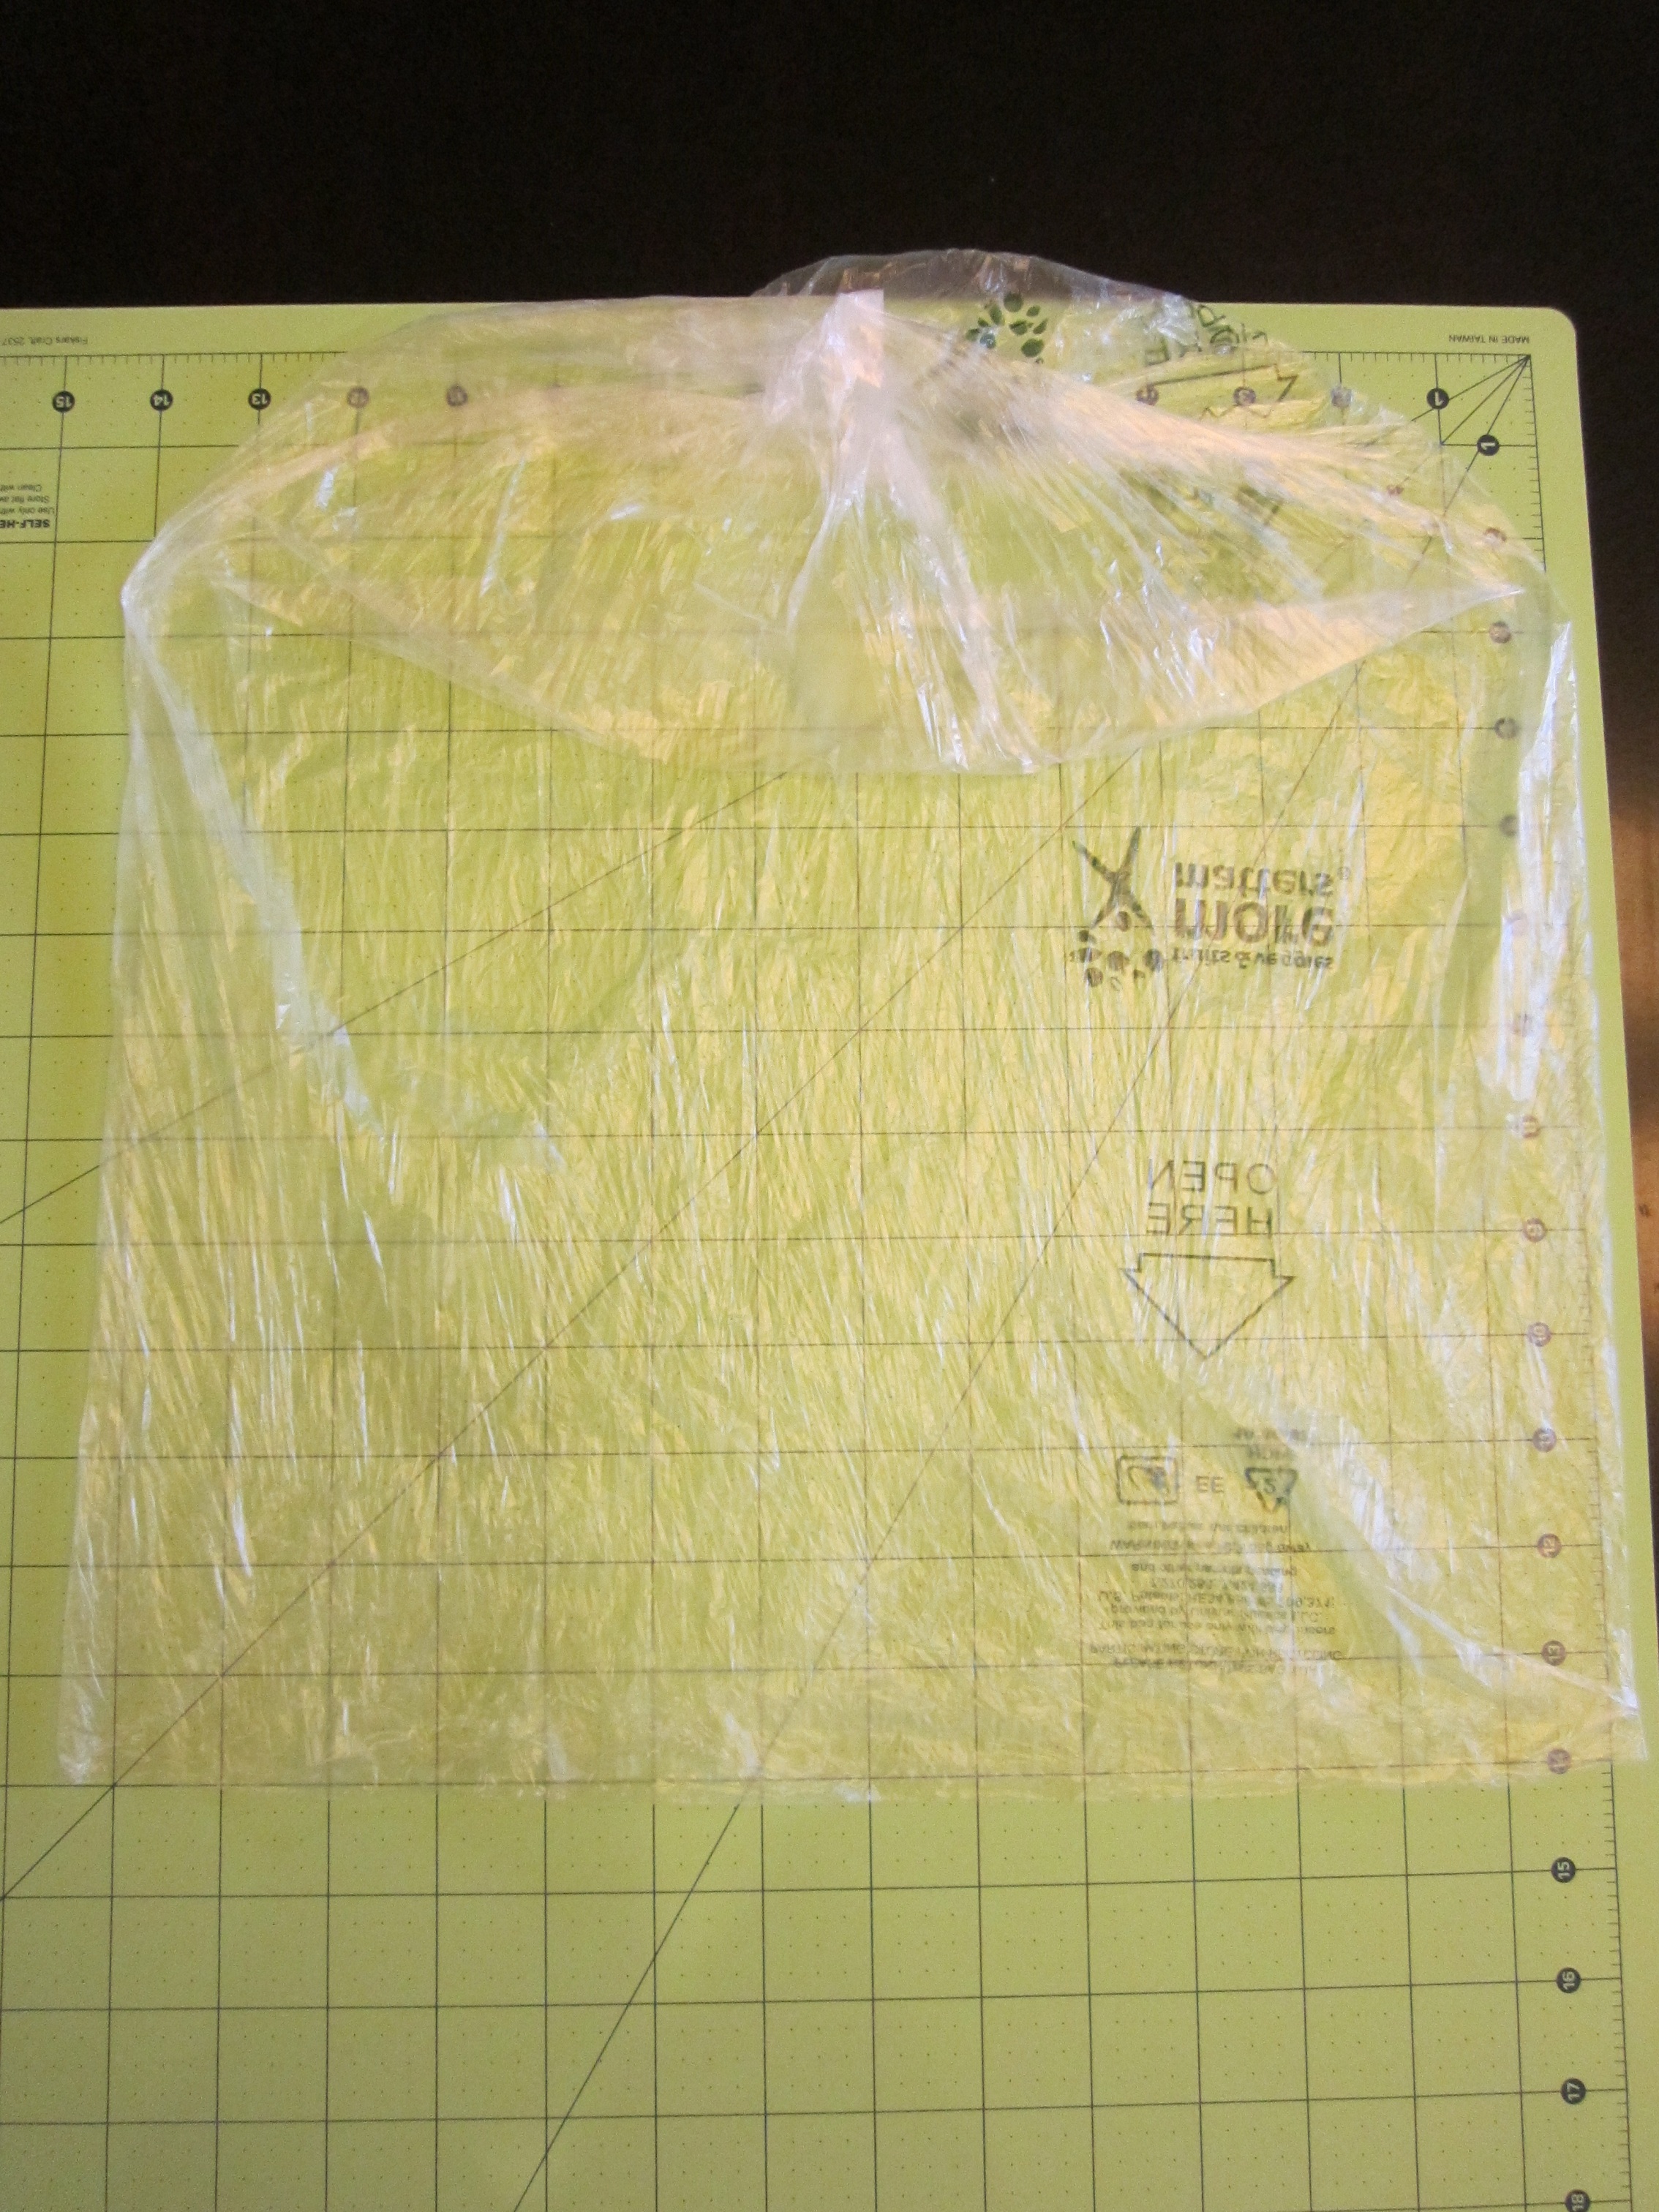
The reusable bag is about 13 inches by 16 inches.

Plastic bag: Can possibly be reused once or twice. Then it goes in the garbage. OR to the recycling bin where it will go to a recycling facility which may or may not be in the U.S. and will consume energy in the recycling process.
Reusable bag: Keep it and use it over and over again.
Tulle can be machine washed and tumble dried on low according to the care label on the bolt of fabric.
I think it would be just as easy to wash the bags in a sink full of soapy water, rinse, and air dry. Which won’t take long at all for the tulle.
Some of my reusable grocery bags have a zippered pocket inside them. I’ve never had a use for that pocket but now I think it will be the perfect place to store my produce bags until I need them in the store. 🙂
Pin It
Recipe: Marilyn’s Cheese Soup
I am entrusting you today with my favorite all-time soup recipe. I love you PYP’ers that much. Not only is this my favorite soup recipe, it is a family recipe. This soup conjurers up wonderful memories for me each time I eat it. My mother, Marilyn, made this soup all the time when I was young. My husband loves it so much that I can seriously change his mood if I make this soup.I know what to make for dinner if I want something. 🙂
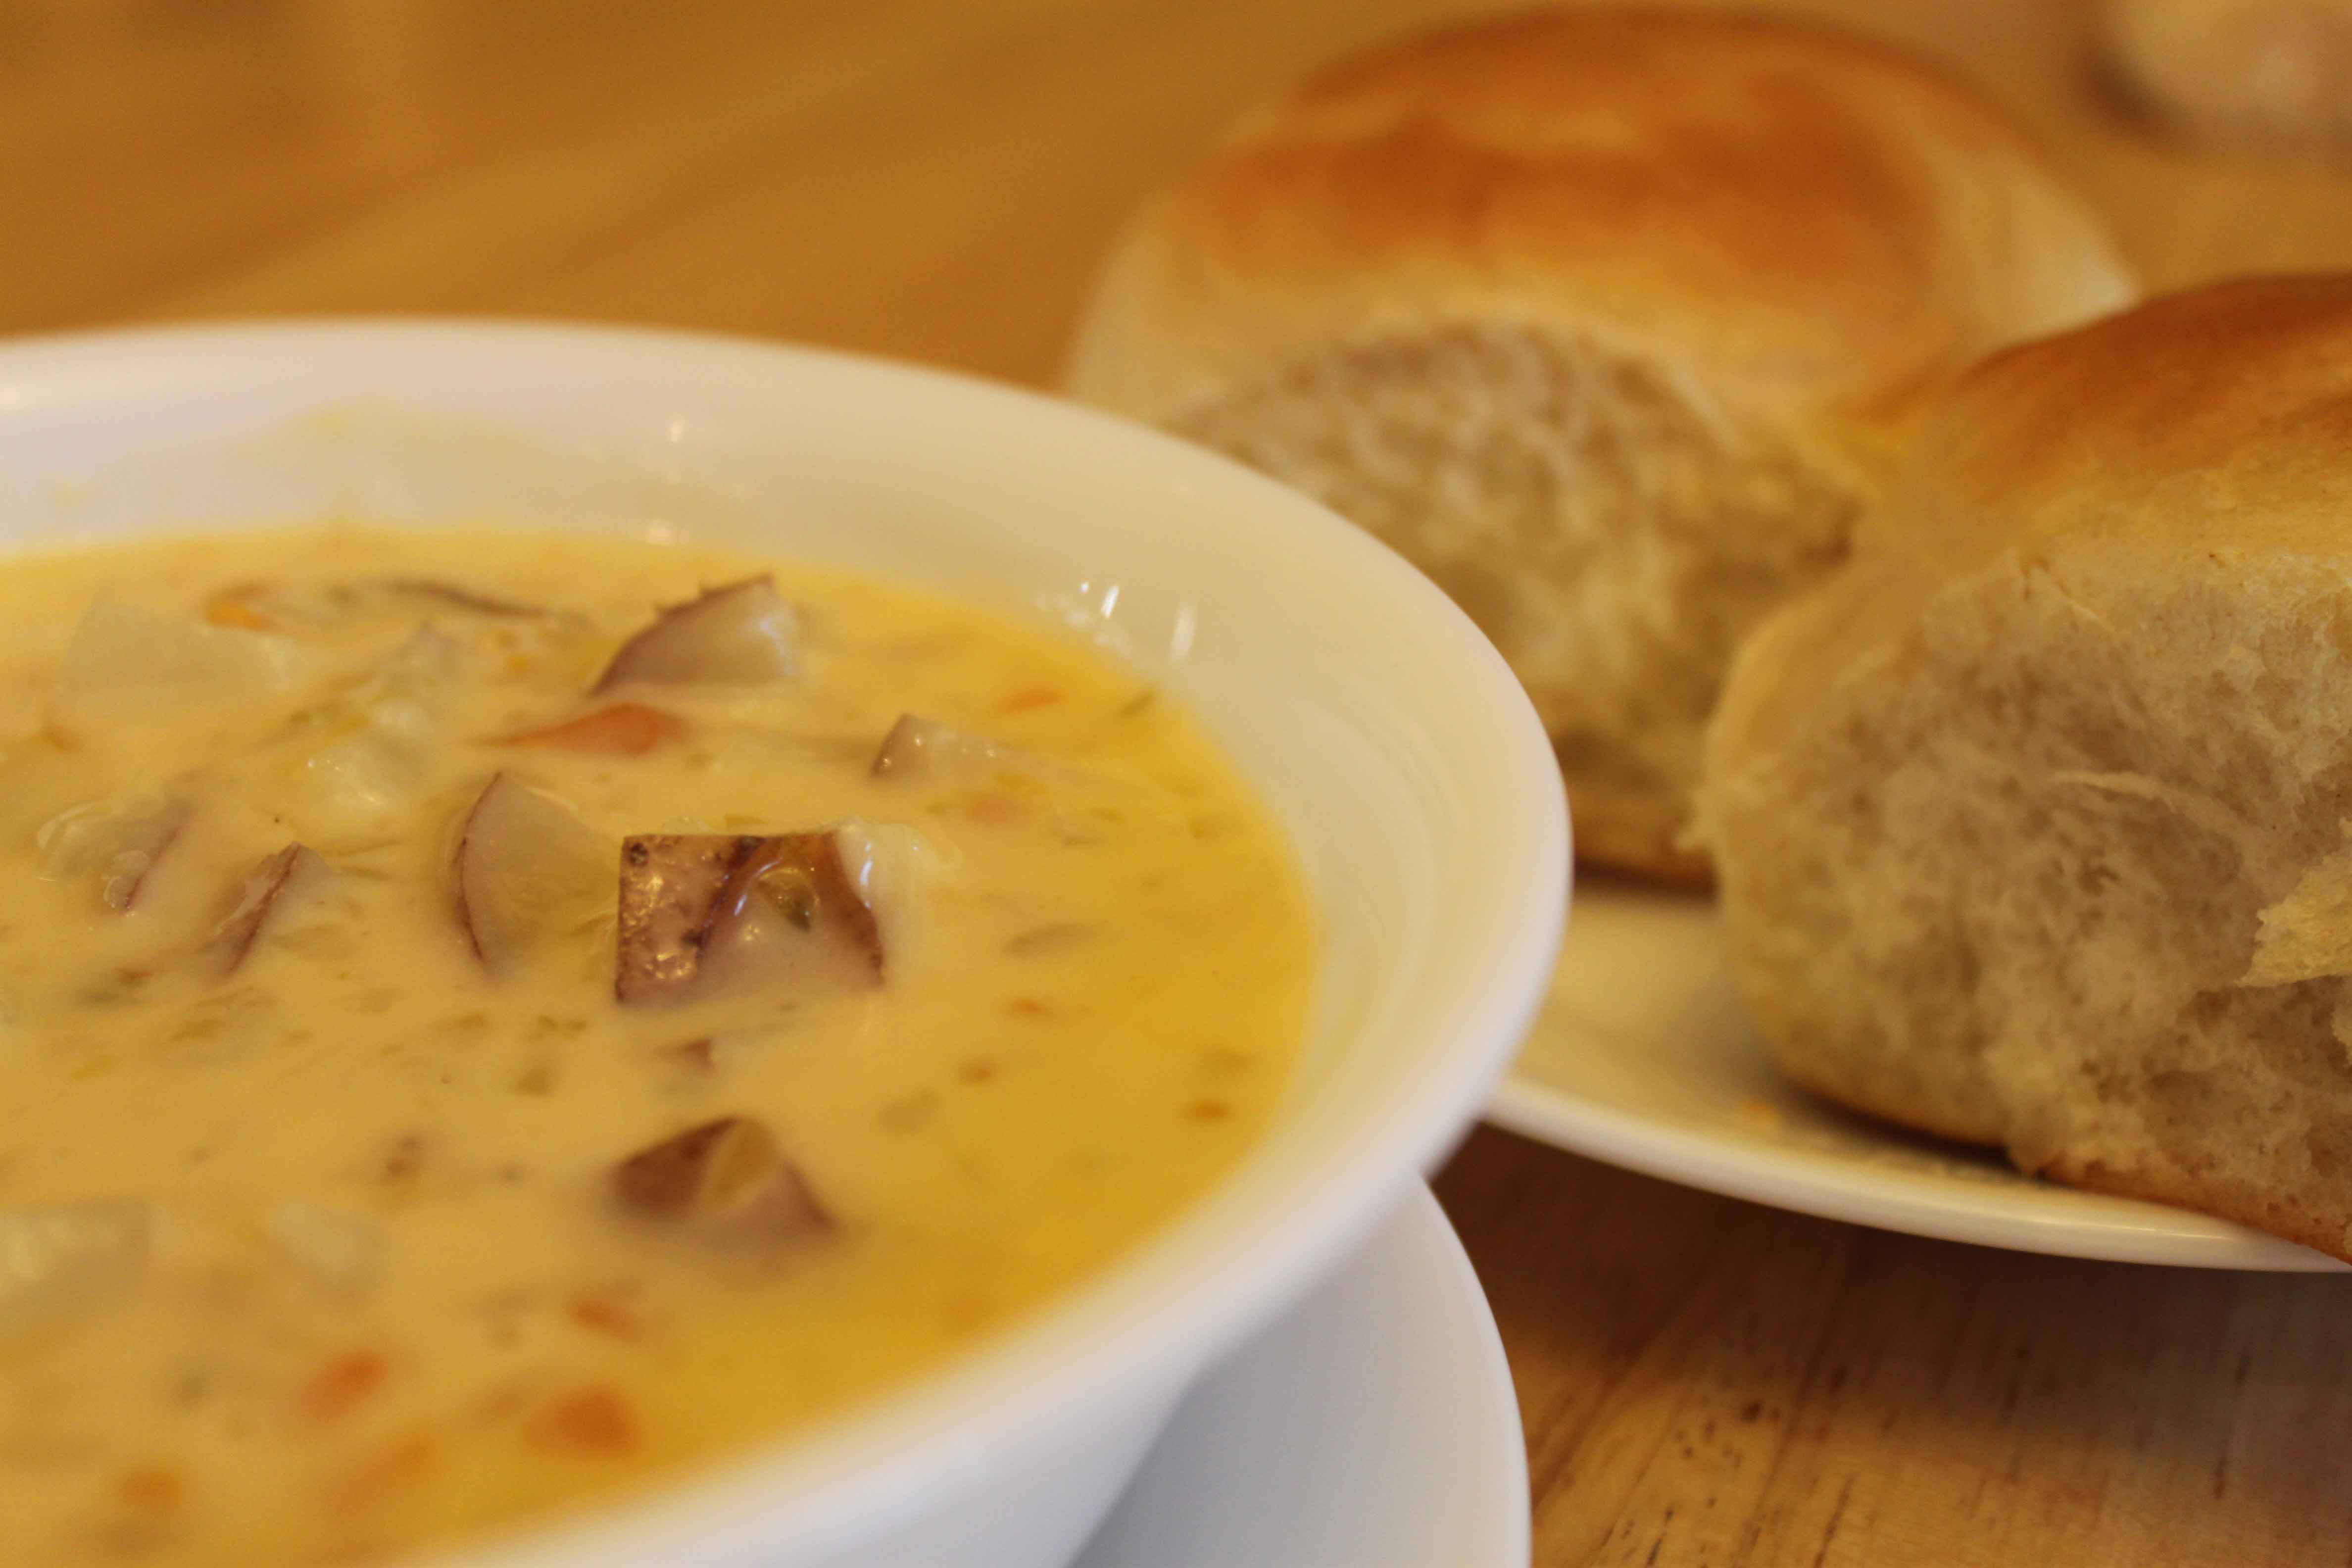
This recipe is a penny-pinching one. Perfect for using garden produce. The only things I bought for this soup was the cheese, celery & butter, and I got those at great prices. Everything else was either from my garden or my mother-in-law’s garden. It is also a good recipe to use food storage in…use up that dry milk! I made this for dinner last night with homemade dinner rolls. Because most of it was garden produce and I made the rolls, dinner last night cost me around $3 total for our family of six! Awesome.
So I warn you….make it just once and you will be hooked! Oh, and I always double this recipe every time. Or there just wouldn’t be enough.
Marilyn’s Cheese Soup
2 c. finely diced potatoes (I like red)
1/2 c. finely diced celery
2 c. boiling water with salt and garlic (I use 1 clove)
1/2 c. carrots, grated
1/4 c. finely diced onion
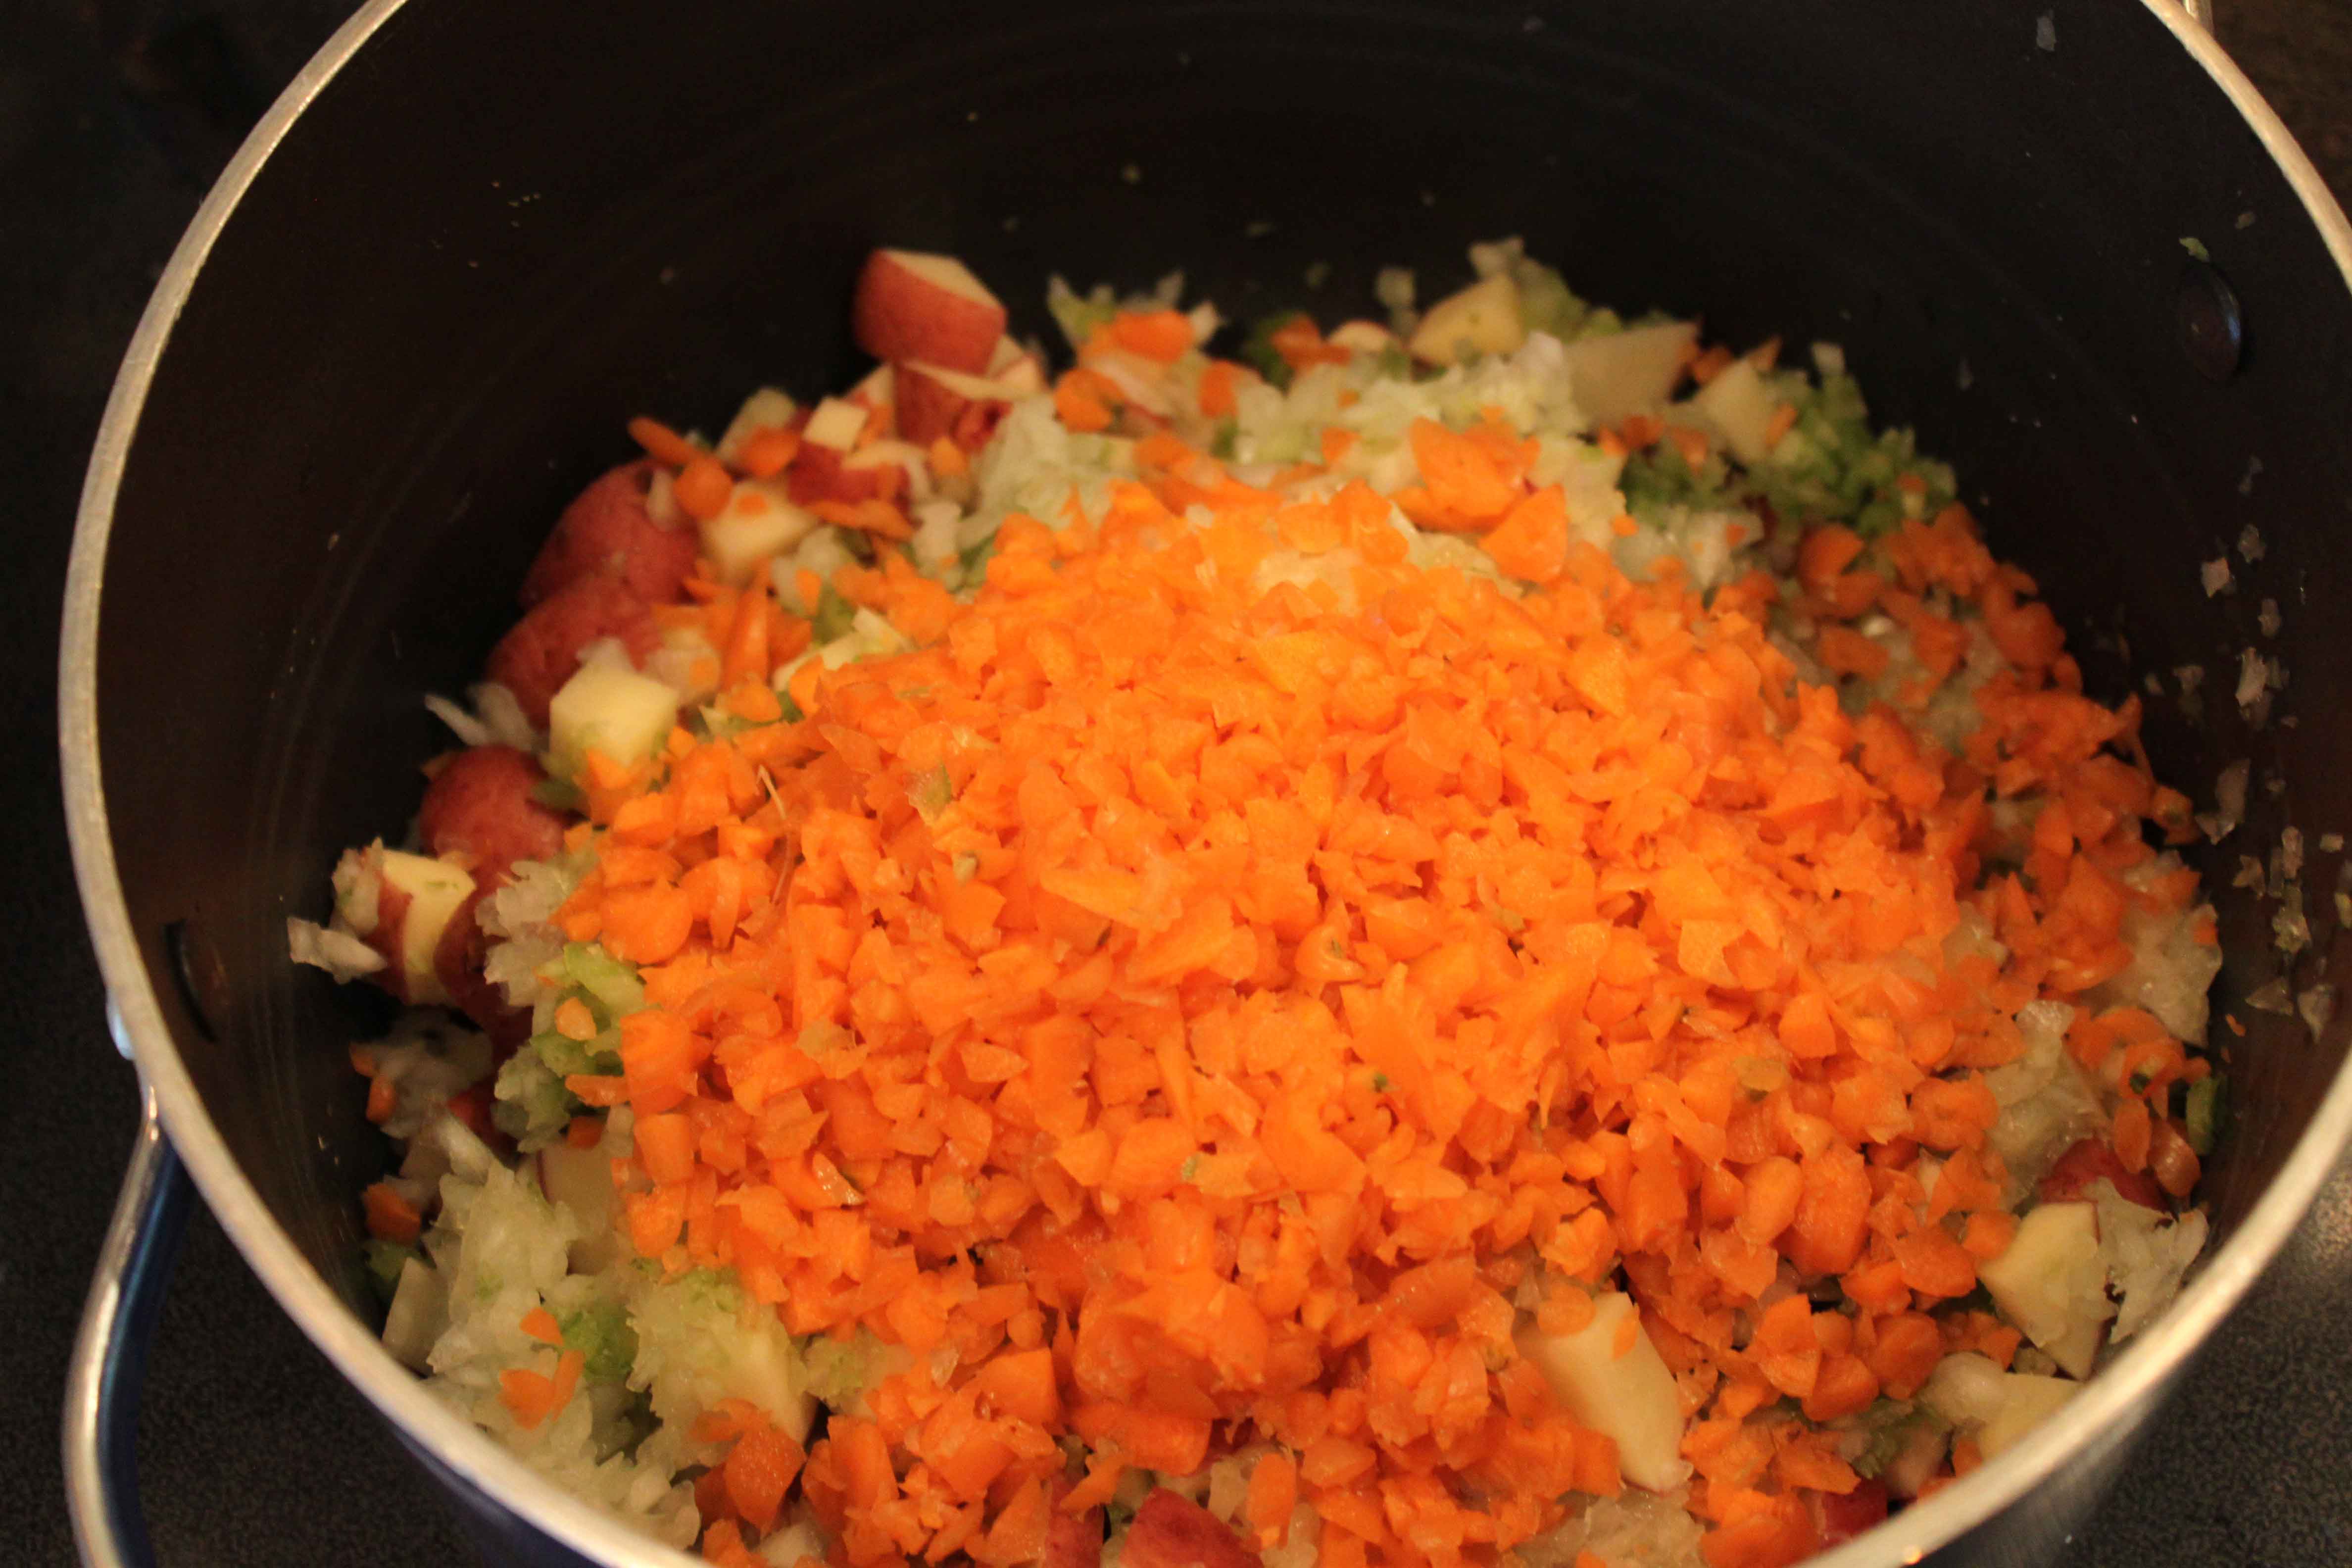
Cook all vegetables in the boiling water until tender, about 20 minutes. Make the cheese sauce while the above is cooking:
1/4 c. butter
1 c. grated cheddar cheese
1/4 c. flour w/ dash of pepper
2 c. milk
Make a roux with the butter and flour (melt butter in the saucepan, then whisk in the flour until smooth.) Gradually add the milk and heat slowly until boiling, stirring constantly. Remove from heat. Add the grated cheese, stirring until melted. Add the cheese sauce to the vegetables. Make sure you take the pot of veggies off the stove first before you add the cheese sauce. Because if it boils after the cheese is melted in, it will curdle.
Serve with dinner rolls or in a bread bowl. Also makes great leftovers. 🙂 Enjoy!
Boots – Women’s Myra Short Boot – Airwalk – $21 w/code! (Were $40)


Payless LINK
Women’s Myra Short Boot – Airwalk
Reg. $39.99
SALE $29.99
$20.99 w/code: 56302
*Select in-store pick-up to avoid shipping. Otherwise, flat rate $5.95.
Free Shipping on any order at Bare Necessities~Vanity Fair Half Slip $2 shipped!
Free Shipping on any order with code SHIPFREEOCT exp 10/25
Vanity Fair 11085

18” Perfectly Yours Half Slip
$2.00 (90% Off!)