30% OFF Plastic Storage Totes and Bins at Staples!
Save 30% off plastic storage totes and bins at Staples!
Use code 97484
Free store pickup, or free shipping for Staples Rewards members!
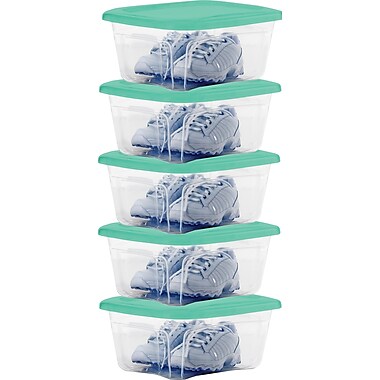
Essential Home Clear 71 Quart Locking Storage Bin—$7.99 (Reg $12.99)
The Essential Home Clear 71 qt locking storage bin is marked down to only $7.99 at Kmart right now! (Reg $12.99)
Free store pickup available in most areas
Kids’ Multi-bin Toy Storage From $23.50 at Walmart!
Check Walmart for kids’ storage bins!
- TinkerBell
- SpongeBob
- Marvel
- Nickelodean
- Sesame Street
- …and more!
Free store pickup or free shipping on $50!
LEGO® Storage Orange Transparent Round Brick 1 with Retro LEGO® T-shirt $9.98 clearance

LEGO® Storage Orange Transparent Round Brick 1 with Retro LEGO® T-shirt
$9.98 clearance
Reg. price $19.99
This is Online Only At Target
Free Shipping on orders of $50 or More.
Plus get an extra 5% off + Free Shipping on all orders with Red Card – get yours here!
Pyrex Storage 14-Piece Round Set, Clear with Blue Lids – $19.66!
I’m switching over to using glass to store leftovers. I am so tired of replacing stained and ruined plastic. Set includes one 7-cup, four 2-cup, and two 4-cup round bowls; seven blue plastic lids.
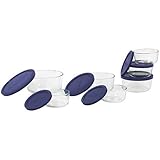
Pyrex Storage 14-Piece Round Set, Clear with Blue Lids
List Price: $31.99
You Save: $12.33 (39%)
Price: $19.66
Eligible for free shipping on $35+ orders or on ANY order with Amazon Prime.
Don’t have a Prime membership? Get a one month free trial! Click here for details!
New at Zulily! Storage Blow-Out!

New at Zulily! Storage Blow-Out!
During this special time of year, what’s not to celebrate? Fabulous savings are here to accompany the winter cheer, keeping extra cash in your pockets while you load up on stylish finds. You’re guaranteed to discover new favorites for the whole family as the laughter and fun go on and on.
New at Zulily! Neatnix up to 50% off!

New at Zulily! Neatnix up to 50% off!
Dedicated to “simple solutions to life’s little problems,” Neatnix has been creating storage solutions since 1989. In a crowded, complex and confusing world, this innovative brand cuts through the clutter to provide sleek, eye-catching ways to arrange and access belongings with smart and stylish products.
Ziploc Space Bag 15 Bag Space Saver Set – $27.30!
Packing away summer clothes and linens? These bags are great for organizing and storing all of the extras that clutter up your space! 15 bags – that is a lot of organizing!
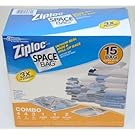 Ziploc Space Bag 15 Bag Space Saver Set
List Price: $47.99
You Save: $20.69 (43%)
Price: $27.30
Eligible for free shipping on $35+ orders or on ANY order with Amazon Prime.
Don’t have a Prime membership? Get a one month free trial! Click here for details!
Happy Birthday Silicone Cake Mold, Women’s Double Breasted Jacket & More!
Plus lots more!
Household Essentials Tapered Bin with Wood Handles – Just $14.99!
Get organized with these cute baskets! Love it!
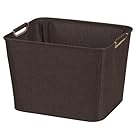 Household Essentials Tapered Bin with Wood Handles
List Price: $29.99
You Save: $15.00 (50%)
Price: $14.99
Eligible for free shipping on $35+ orders or on ANY order with Amazon Prime.
Don’t have a Prime membership? Get a one month free trial! Click here for details!
Deal of the Day – Up to 40% on Select Rubbermaid Products!

Deal of the Day – Up to 40% on Select Rubbermaid Products
Stay organized with durable and leak-proof Rubbermaid food storage containers that work together to maximize space in your lunch bag. All containers are microwave-, dishwasher, and freezer-safe, as well as BPA-free.
LINK to Gold Box Deals at Amazon
Eligible for free shipping on $35+ orders or on ANY order with Amazon Prime.
Don’t have a Prime membership? Get a one month free trial! Click here for details!
Mountain Pine Twin Size 3-Drawer Storage Bed $109.99
 Mountain Pine Twin Size 3-Drawer Storage Bed
$109.99 $189.99 42% off List Price
$5 flat rate shipping
A PYP Best Blog! DIY Stuffed Animal Storage!
Just in case you missed this article on creating DIY stuffed animal storage the first time we shared it a couple of years ago, we are republishing it. After Sharon wrote this blog originally, we got an awesome response. This is one of the PYP Best Blogs!
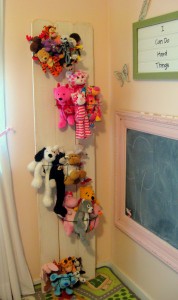
My daughter has an addiction – a stuffed animal addiction! Although I don’t mind enabling her, I don’t like how they end up piled in an ugly heap on the shelf, and I don’t like how she can never find the specific critter she’s looking for – especially the little ones. Here is how we solved the problem.
If you are DIY’ers with a well stocked garage you can do this project very inexpensively. Even if you have to buy everything, it should only cost about $15.
What you’ll need
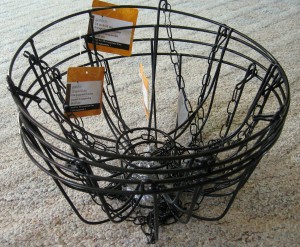
- Wire hanging planter baskets. I used 5 and I got them at Dollar Tree.
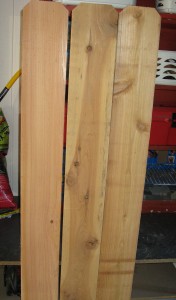
- Board(s); as tall as you would like, and wide enough to accommodate the baskets; I used 3 6-ft. tall cedar fence boards. These are about $1.90 at Home Depot but they regularly go on sale this time of year for less than $1. (I use these for crafts all the time, so I buy a stack whenever they are on sale.)
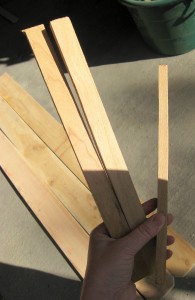
- Thin boards to connect the fence boards together; I used scraps from my garage, but if you have to buy something, ask for lathing strips. You should be able to get one long board for about $1.
- Nuts and bolts a bit longer than the board is wide – look for these hanging in little bags in the same aisle as screws and nails. Should be less than $1 per bag and if you follow my design you will need 10.
- Screws
- Drill
- Saw
- Sander or Sandpaper
- Strong Wire cutters
- Paint
Let’s get started!
Start with the wire baskets; take off the hanging chain and either throw them out or save them for another project; you won’t be using them for this project.
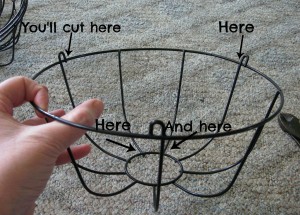
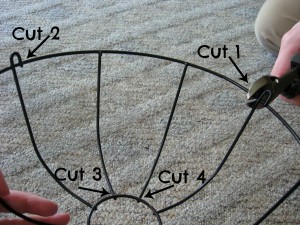
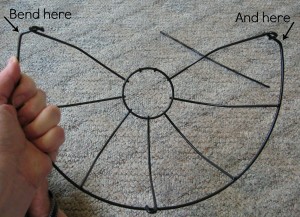
Here is a close up of what my basket looks like. You will cut out a section of the basket so that it sits flat against the board. Make sure you keep the little loops that held the chain; that is where you will screw the basket into the board.
Use heavy duty wire cutters and cut as close to the intersections as you can, so you don’t leave a sharp end.
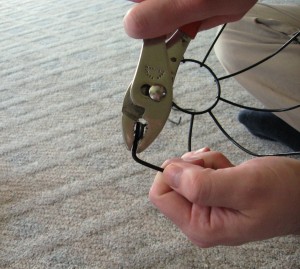
Now you’ll have a basket that has one whole “side” cut away. Next, with pliers, bend the little wire loops in at a 90* angle like this:
Bend the loops on each side, in towards each other.
Now it should look like this:
Cut and bend all of your baskets. Now take a minute to make sure you don’t have any sharp points, and if you find one, either cut it closer or file it down with a metal file.
Now we will put the boards together. A couple of notes about the boards that I used; I chose the dog eared cedar fence boards because that is what matches the style of my daughters room. You could easily change the style of this project by using one board that is wide enough for the baskets. You could even skip this part and attach the baskets straight to the wall. I considered attaching the baskets to the boards the other way. I decided that it fits better in her room vertically, but horizontally would be super cute too!
Here we go… cedar fence boards are notoriously warped and wonky. Again, for the style I was going for I didn’t mind if they didn’t fit together really tight, but if that matters to you make sure to take the time in the store to sort through the pile and find the straightest, flattest ones you can find.
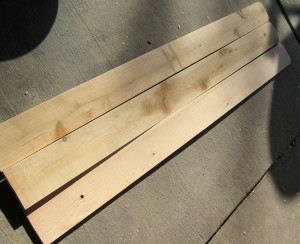
The wood is very rough so start by giving them a quick sanding on all sides. Lay them out on the ground face down. Push them together and line up the bottoms so they are straight and perfectly lined up. See how mine are warped? That is fine; they’ll still go together. Just make sure the bottoms are even.
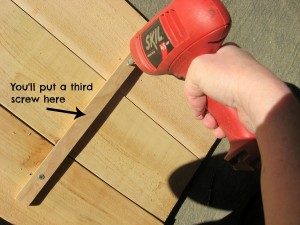
Now you will attach them together by screwing three strips of wood across them through the back. This is the wood I used – sorry for the shadows!
Hold the fence boards together tightly as you screw the cross boards in – use an extra set of hands, a large clamp or even some heavy cinder blocks on either side of the boards. Make sure you pre-drill all the holes so you don’t split the wood.
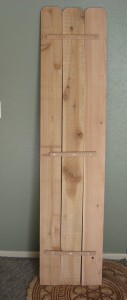
Here is what the back will look like when you’re all done:
Paint the boards in the color of your choice; I went with white and gave them a good sanding to distress them once it was dry.
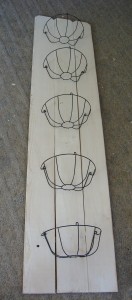
Now we will attach the baskets to the boards. Lay the boards out on the floor and decide where you want the baskets. I worked on this for a long time, getting them perfectly lined up and spaced evenly.
Then my son came home and moved them so that they were offset. After I freaked out, I looked at them again and realized I liked it better this way. Just make sure that once you know for sure where you want them, use a pen to mark the placement of each basket through the wire loop before they get moved again 😉 This marks where you will drill.
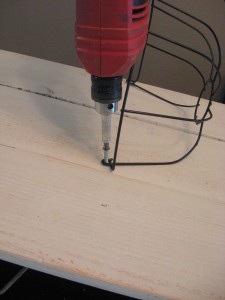
You could just use a screw into the wood, but since the baskets will get a lot of action, I decided I wanted them to be really secure, so I used a nut and bolt. Drill a hole just big enough for the bolt to go through on each of your markings. Then, hold each basket in place and screw the bolt through the wire loop on the basket and through the board.
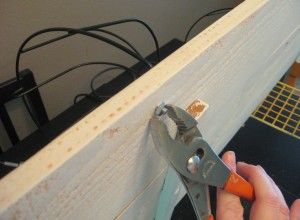
When all the baskets are screwed into place, flip the board onto its side and screw all the nuts into place using pliers or a…. ummm…. nut-tightening-tool (shoot!! What is that called?)
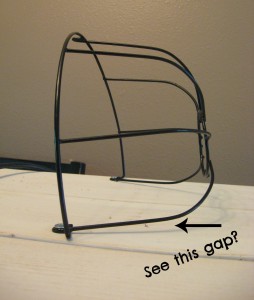
When you tighten all the nuts and bolts, it will make the baskets pop up away from the surface of the board.
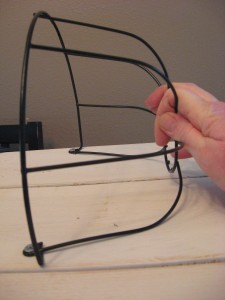
I’m sure it isn’t a big enough gap for the critters to fall through, but I didn’t like the way it looked. I found that if I just pushed it down against the board,
the wires of the basket would bend enough that the basket would sit flat against the board again.
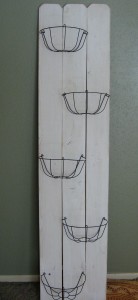
Here it is with all of the baskets attached:
**NOTE – Once this is full of critters, it is very front heavy. My intention is to hang this on the wall as part of my daughters room redo this summer. In the pictures here it is just leaned against the wall. My daughter is old enough that I feel safe leaving it this way until her room is finished, but if your kids are small and you think they might pull this over on themselves, PLEASE attach it to the wall before you fill it!
And here it is all filled with critters.
A PYP Best Blog! Best Practices for Produce Storage!
Just in case you missed this article on the best storage practices for produce the first time we shared it a couple of years ago, we are republishing it. After we published this blog originally, we got an awesome response. This is one of the PYP Best Blogs!
 For a couple of years now I have been participating in produce cooperatives. I sometimes end up with more produce than I can use in a week, and sometimes I only participate in a monthly coop so I want to extend the life of my produce as long as possible.
After a bit of research I found that there were things that I was storing incorrectly. Now I am finding that not only do I have more refrigerator space, but my produce is maintaining the quality longer.
Apples – Avoid washing apples before storing. Remove any spoiled apples. Put in a plastic bag in the coldest part of the fridge or store in a cool place no longer than 6 weeks. Warning: storing apples next to produce like broccoli, cabbage, cucumbers, greens or cauliflower will cause these veggies to spoil faster. Apples give off ethylene gas, which causes faster ripening. (Or, put an apple in a bag with fruits such as peaches, plums and bananas to speed up ripening.)
Artichoke – Refrigerator life: 4 to 5 days. Add a few drops of water to a plastic bag.
Butternut Squash – Store in a dry area with good air circulation up to 6 mos. Winter squash should not be refrigerated unless cut. Stored in a cool, dry, well-ventilated area away from light, it will keep for up to three months. Cut squash will keep 1 week when wrapped tightly and refrigerated.
Cabbage – Whole Refrigerator life: 1 to 2 weeks in a plastic bag.
Cabbage – Cut Refrigerator life: 1 to 2 days if wrapped tightly in plastic wrap.
Carrots – Refrigerator life: Very variable. Store in their original plastic bag.
Cauliflower – Whole, Refrigerator life: Up to 5 days. Store stem-side up in a plastic bag.
Celery – Refrigerator life: Up to 2 weeks. Store in a plastic bag.
Cherries – Cherries are highly perishable; refrigerate ASAP. Sort carefully and place loosely in a shallow container so that air can circulate. Wash cherries just before using. For highest quality, fresh cherries should be stored only 1 or 2 days. Cherries make a guilt-free snack: they’re fat-free, low in calories, and rich in vitamin C, vitamin A and beta-carotene. I love pitting them and freezing in a single layer and then transfer to a freezer bag.
Cilantro – Wash in cool water, remove dead stems/leaves, snip ends. Pat dry and place stems in cup with water but avoid submerging the leaves. Cover with a plastic bag/wrap and refrigerate. Change water if it becomes murky. Can also store, prepped as above, wrapped with a damp paper towel in a plastic bag. Most fresh herbs will last more than a week stored this way.
Corn – More than any other vegetable, sweet corn tastes best when it’s fresh from the garden. The minute it’s picked its sugar content starts turning to starch.
Cucumber – Refrigerator life: 1 week if waxed; less if not waxed.
Eggplant – Refrigerator life: 3 to 4 days. Store in a plastic bag.
Garlic – Shelf life: A few weeks to a few months, depending on size. Store in a dark, cool spot.
Grapes – Avoid washing grapes before storing them. Check through bunches for spoiled grapes and remove; put grapes in a plastic bag in your fridge and store for a week max. Wash under cold water just before serving.
Green beans – Refrigerator life: 3 to 5 days. Store in a plastic bag.
Jalapenos – Keep cool and dry. If you refrigerate them, first remove them from the plastic produce bag; otherwise they’ll become soft and moldy. Generally they’ll keep for 3-4 days. Once the skin begins to wrinkle, it loses potency, and if you’re roasting or blanching them, the skins will be difficult to peel.
Leafy Vegetables – Refrigerator life: 3 to 5 days. Wrap in a damp paper towel and place in a plastic bag.
Leeks – Refrigerator life: Up to 1 week. Loosely wrap in a plastic bag.
Lettuce – Refrigerator life: Lettuce stored in sealed plastic bags in the crisper will last from a few days to 2 weeks. The firmer the lettuce the longer it will keep; iceberg up to 2 weeks, Romaine 10 days, butter and leaf lettuces for 4 days. Do not store with melons, apples, pears, or other ethylene gas-emitting fruits as they will cause the lettuce to turn brown.
Mangos – A few black spots on the skin are typical of ripe mangoes. Put in a paper bag to ripen at room temp (two will ripen faster than one) and keep in a cool place, such as a cupboard. Move to fridge when ripe and use within a few days.
Mushrooms – Prepackaged mushrooms can be stored, unopened in the refrigerator for 5 to 7 days. Once opened, mushrooms should be moved to a paper bag and refrigerated.
Nectarines – Store at room temperature until fully ripe. Once fully ripe, store them in the fridge for no more than a 2 of days. Nectarines stored longer may lose their juicy flavor. Use a little lemon or other citrus juice on the cut areas to retard the browning affect.
Onions – Cut, Refrigerator life: 2 to 3 days if tightly wrapped in plastic wrap.
Onions – Green, Store green onions/scallions away from odor-sensitive foods such as corn and mushrooms, which will absorb the odor of the onions. Remove bands and damaged leaves and store in plastic bags in the crisper. They’ll last up to 5 days.
Onions – Whole, Shelf life: 3 to 4 weeks. Store in a cool, dry, open space. (Although my neighbor stores them for MONTHS in her garage!
Oranges – Store citrus at room temp if you’ll eat it in a week or so, or it will keep in the crisper for 6-8 weeks. Citrus is ripe when picked. Surface marks usually do not affect the fruit inside.
Peas – Refrigerator life: 1 to 2 days. Store in a plastic bag.
Peppers – Refrigerator life: Up to 1 week. Store in a plastic bag.
Potatoes – New, Shelf life: 1 week. Store in a cool, dark, dry place.
Potatoes – all-purpose and baking, Shelf life: Store in burlap, brown paper, or perforated plastic bags away from light, in the coolest, non-refrigerated, and well-ventilated part of the house. They can last up to 3 months, but more realistically, 3-5 weeks. Don’t store onions and potatoes together, as the gases they each give off will cause rot.
Pumpkin – Shelf life: Up to 1 month in a cool, dry place.
Spinach – Untie, remove blemished leaves, wash thoroughly in cold water, spin dry, and refrigerate in plastic bag for 2-3 days. Rich in anti-oxidants, loaded with folic acid, vitamin K, magnesium, manganese.
Squash (Winter) – whole, Shelf life: Up to 3 months. Store in a cool, dry place.
Squash (Winter) – cut, Refrigerator life: Up to 1 week if wrapped tightly in plastic.
Squash (Summer) – Refrigerator life: Up to 1 week. Store in a plastic bag.
Strawberries – Strawberries are extremely perishable and should be refrigerated immediately. Wash just before enjoying. Refrigerate in a single layer on a paper towel in a moisture-proof container. Eat them within 72 hours, or freeze up to 10 mos. Ideally, let come to room temp before serving to bring out best flavor. Nutritional powerhouses: vitamin C, fiber, folic acid, phytochemicals.
Sweet Potatoes – Shelf life: Up to 1 month if stored in a cool, dry place; up to 1 week if stored at room temperature. If refrigerated, their natural sugar will turn to starch and ruin the flavor.
Tomatoes – Shelf life: Up to 2 days once fully ripe. Store at room temperature for the best flavor. Tomatoes should never be in the fridge until they have been cooked, cut or put into a raw dish like a salsa, or are fully ripe and would spoil if left at room temp. Place tomatoes stem end up, in a sealed paper bag with or without ethylene-producing fruit such as bananas. Refrigerated ripe tomatoes will taste better if brought to room temp before eating.
Watermelon – Uncut watermelons keep at room temp for up to 2 weeks. Store cut watermelons in fridge. Cover cut surface loosely with plastic wrap.



 Food Storage Sets – 2 Styles


