
A PYP Best Blog! Max & Ruby Birthday Cakes plus Buttercream Frosting!
Just in case you missed this DIY article on making cute Max & Ruby birthday cakes with a great recipe for buttercream frosting the first time we shared it a couple of years ago, we are republishing it. After Marne wrote this blog originally, we got an awesome response. This is one of the PYP Best Blogs!
My youngest child turned 3 years old last Friday. I am so sad to see her growing up…..the more kids I have the longer I want them to stay little! She loves the show Max & Ruby, so she requested a Max & Ruby birthday cake.
I ordered this bunny cake pan off Amazon and got to work! Didn’t they turn out so cute? My daughter loved them!

Here is what I did:
You will need:
3 cake mixes (and ingredients to bake them)
bunny cake pan
9×13 cake pan
a large platter to put cakes on (I just used the bottom of my sheet pans)
a double recipe of buttercream frosting (below)
Wilton icing colors
Bake two bunny cakes. Then bake another cake in a 9×13 pan. After the cakes have cooled, cut the 9×13 cake in half and assemble beneath each bunny cake for the shirt. I cut a small oval out so it would fit nicely under the bunny. Then you can decorate as desired!
I found this idea on Pinterest and just printed off the photo and copied it as best as I could with the buttercream frosting and details. I always make homemade buttercream frosting on my cakes. Tastes so much better! Here is my favorite buttercream frosting recipe:
Homemade Buttercream Frosting
2/3 cup butter, softened
4 cups confectioners’ sugar
2 tablespoons milk
1 teaspoon vanilla extract (optional)
In a medium bowl, cream together the butter, confectioners’ sugar, and milk until light and fluffy, about 3 to 4 minutes. Beat in the vanilla.
PickYourPlum! Halloween Metal Stand Up Tabs! Halloween Garlands! Colorful Paper Tags!


Pick Your Poison – Halloween Metal Stand Up Tabs 3 Pack
For a beastly Halloween feast.
Starting at $14.99 (50% off) Retail: $29.99
Something Wicked This Way Comes – Halloween Garlands
Cackle all you want – this party’s gonna be off the chain.
Starting at $3.99 (69% off) Retail: $12.99
Light it Up – Colorful Paper Tag 40 Pack
Because the best packages are wrapped to the nines.
Starting at $2.49 (64% off) Retail: $6.99
Pencil You In – Striped Pencil Skirts
Write it down. Everyone needs one of these.
$12.99 (61% off) Retail: $34.00
Plus lots more CUTE deals!
LOTS of cute deals! Inexpensive shipping!
A PYP Best Blog! Make Your Own Quote Wall!
Just in case you missed this DIY article on making your own quote wall the first time we shared it a couple of years ago, we are republishing it. After Marne wrote this blog originally, we got an awesome response. This is one of the PYP Best Blogs!
I love quotes and inspirational thoughts. They lift me up and help inspire me to be a better person. I have seen ideas online on creating a quote wall, so I decided to improvise and make my own. There was a small blank wall by my kids’ bathroom and it was the perfect spot.
Instead of buying frames, I used canvases that I already had, except the 5×7 sizes. They had been under my bed for several years, so I knew they would be perfect! And I was able to use what I had a home. Love that. I got the 5×7 canvases for $1.99 each last week at Micheal’s at 60% off.
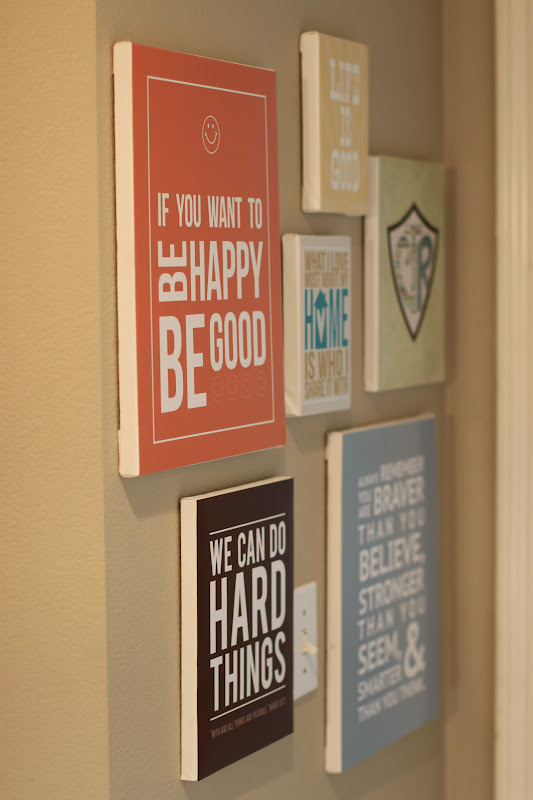
I printed my prints at Costco, high quality and the best price around. Then I just modge poged the prints onto the canvas…easy peasy. I didn’t put anything on top of the print. Then I stuck them to the wall with a 3M product…you know those one that come off clean and don’t damage the wall? It was a really fast project to do.
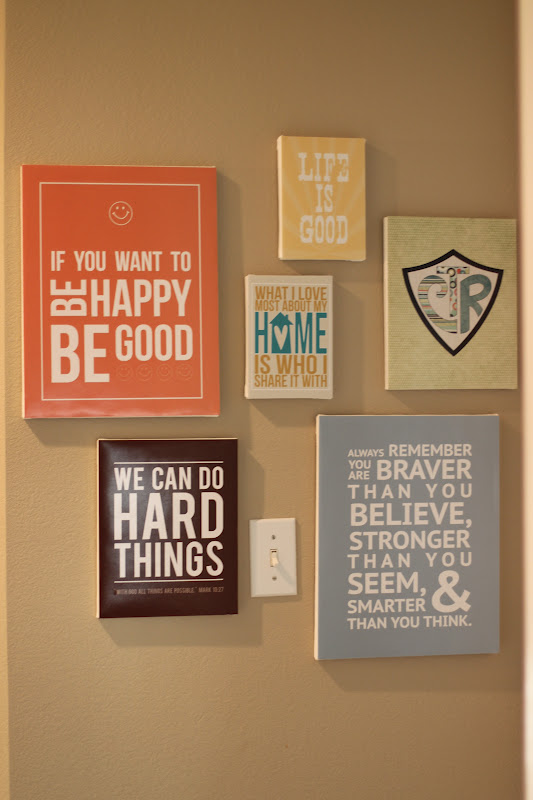
I am really pleased with it and my kids really like it. I heard them telling their friends the other day, “If you want to be happy, be good!” I love having positive quotes on the wall and reminders. The kids see them everyday and we talk about what they mean.
Here are where I got the free prints on my wall in case you are interested. There are so many places online where there are free prints to download!
CTR print..Choose The Right (free)
We can do Hard Things (free)
Home print…Eighteen25 (free)
The other 3 prints were not free, but very reasonably priced at Simply Fresh Designs.
A PYP Best Blog! Make Your Own Brownie Mix!
Just in case you missed this DIY article on making your own brownie mix the first time we shared it a couple of years ago, we are republishing it. After Marne wrote this blog originally, we got an awesome response. This is one of the PYP Best Blogs!
With one recipe of this homemade mix, I figure it is like having about 4-5 box mixes from the store. You can make several batches of things with one mix recipe. Besides brownies, you can also make fudge sauce and crinkle cookies. I made the brownie crinkle cookies yesterday and got 3 dozen cookies. With the cost of the ingredients figured in, I estimate the cost for a batch of brownies with this mix to be approximately about .30 cents . Not too bad, eh?
Plus, you are getting the satisfaction of knowing you are making something that you feel good about. You know what goes in there. There is so much crap in those box mixes, so much stuff that is really bad for us.
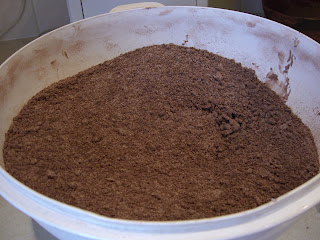
8 cups sugar (I do less, but that is just me)
4 cups all-purpose flour
4 tsp. baking powder
4 tsp. salt
2 1/2 c. baking cocoa
2 cups shortening
In a large bowl, combine the sugar, flour, cocoa, baking powder, and salt. Cut in shortening until the mixture resembles coarse crumbs, like this:
Store in an airtight container in a cool dry place for up to 6 months. I put mine in Tupperware, label it like so and stick it in my fridge in the garage. Yield: 18 cups.
Here are the recipes for the other treats from this mix:
Fudge Sauce
1 c. Brownie mix
2/3 c. water
In a saucepan, bring the brownie mix and water to a boil. Reduce heat, simmer for 1-2 miinutes or until thickened. Serve over ice cream.
Brownie Crinkle Cookies
4 c. Brownie Mix
2 eggs
2 tsp vanilla extract
In a mixing bowl, combine the brownie mix, eggs, and vanilla and mix well. Drop by tablespoonfuls 2 inches apart onto greased baking sheets. Bake at 375 degrees for 8-10 minutes or until the tops are cracked. Cool 2 minutes before removing from pans to wire racks to cool. Makes 3 dozen.
Walnut Brownies
4 c. Brownie Mix
4 eggs
2 tsp vanilla extract
1 1/3 cups chopped walnuts
1 c. semi-sweet chocolat chips
In a mixing bowl, combine the brownie mix, eggs, and vanilla; mix well. Fold in the walnuts and chocolate chips. Pour into a greased 9×13 pan. Bake at 350 degrees for 35 minutes or until a toothpick inserted near the center comes out clean. Cool on a wire rack. Makes 2 dozen.
A PYP Best Blog! Stop! Don’t throw out those glass jars!
Just in case you missed this article on re-purposing glass jars the first time we shared it a couple of years ago, we are republishing it. After Trish wrote this blog originally, we got an awesome response. And it landed her a quick spot on Good Things Utah. This is definitely one of the PYP Best Blogs!
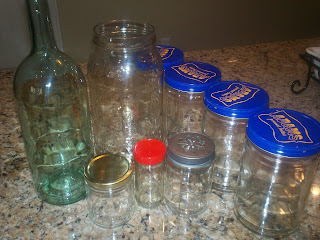
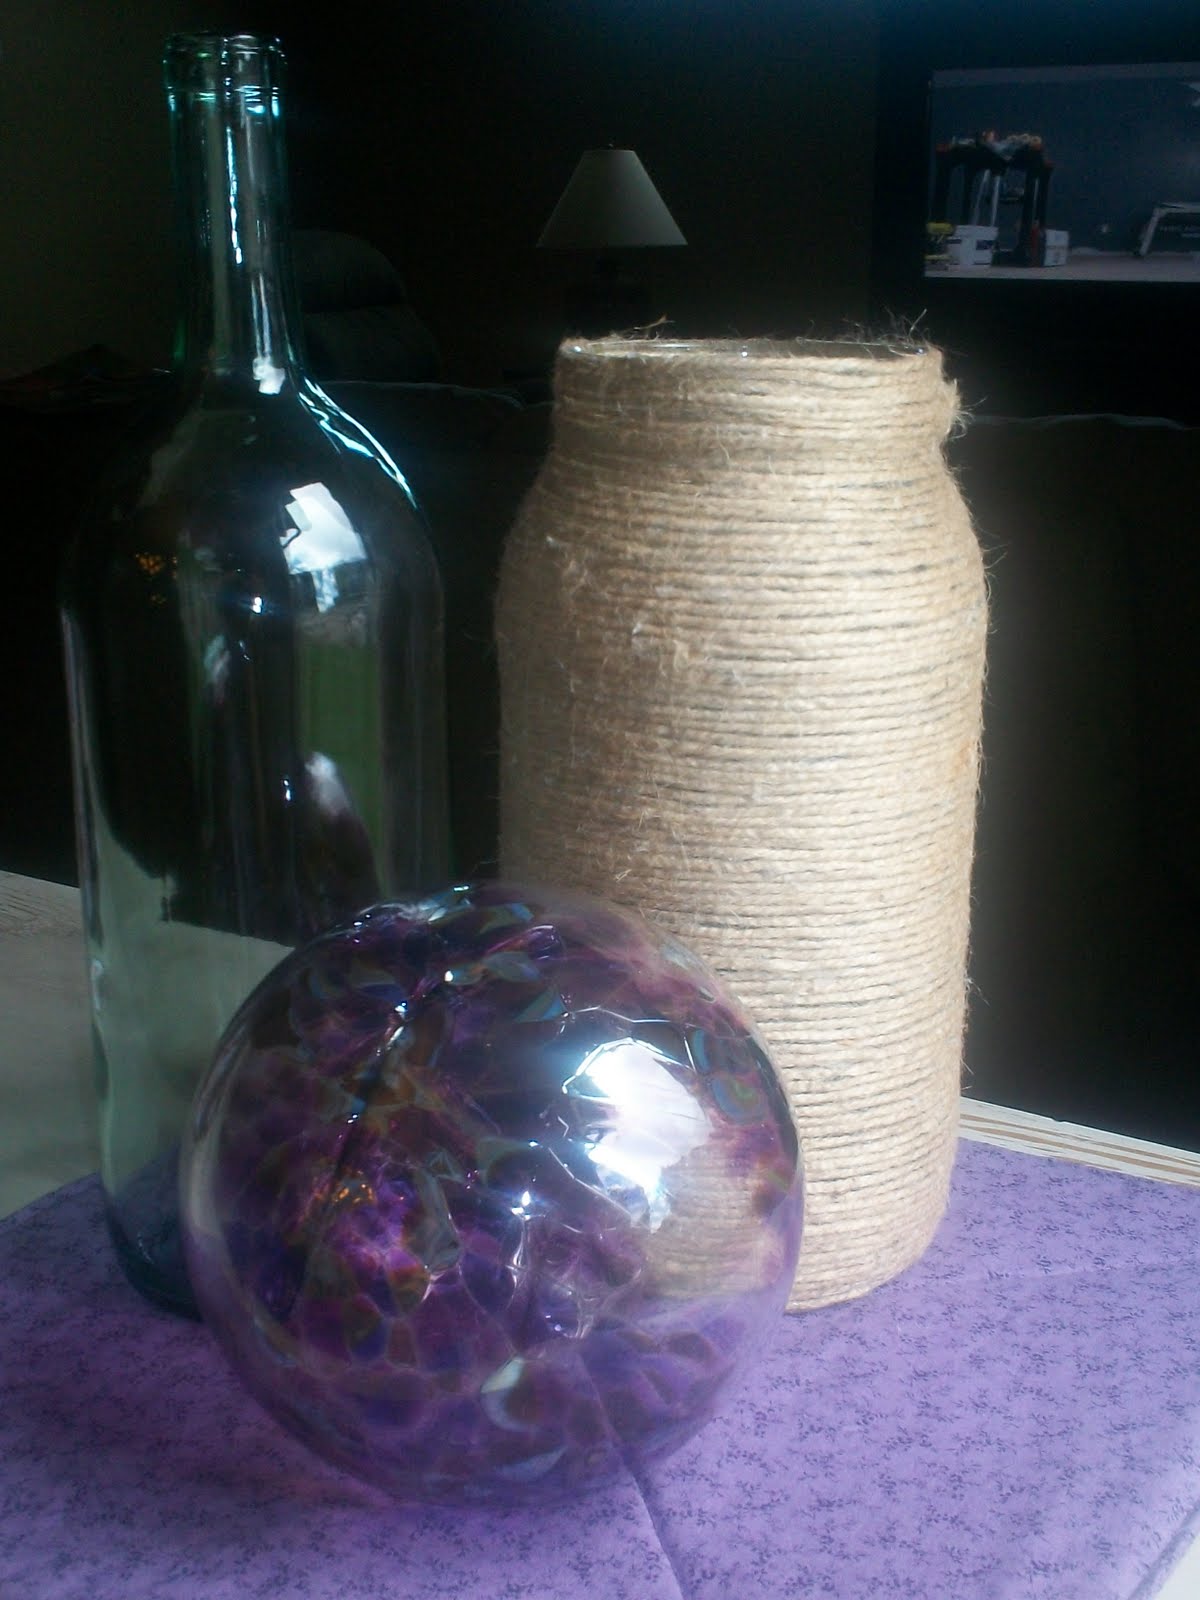
Our curbside recycling program does not accept glass at this time. So I often find myself pausing at the trash can, trying to think of a new purpose for these glass bottles.
I have started holding onto them, waiting for inspiration to strike. I figure that if I can’t find a use for them, I can deliver them to a recycling center myself.
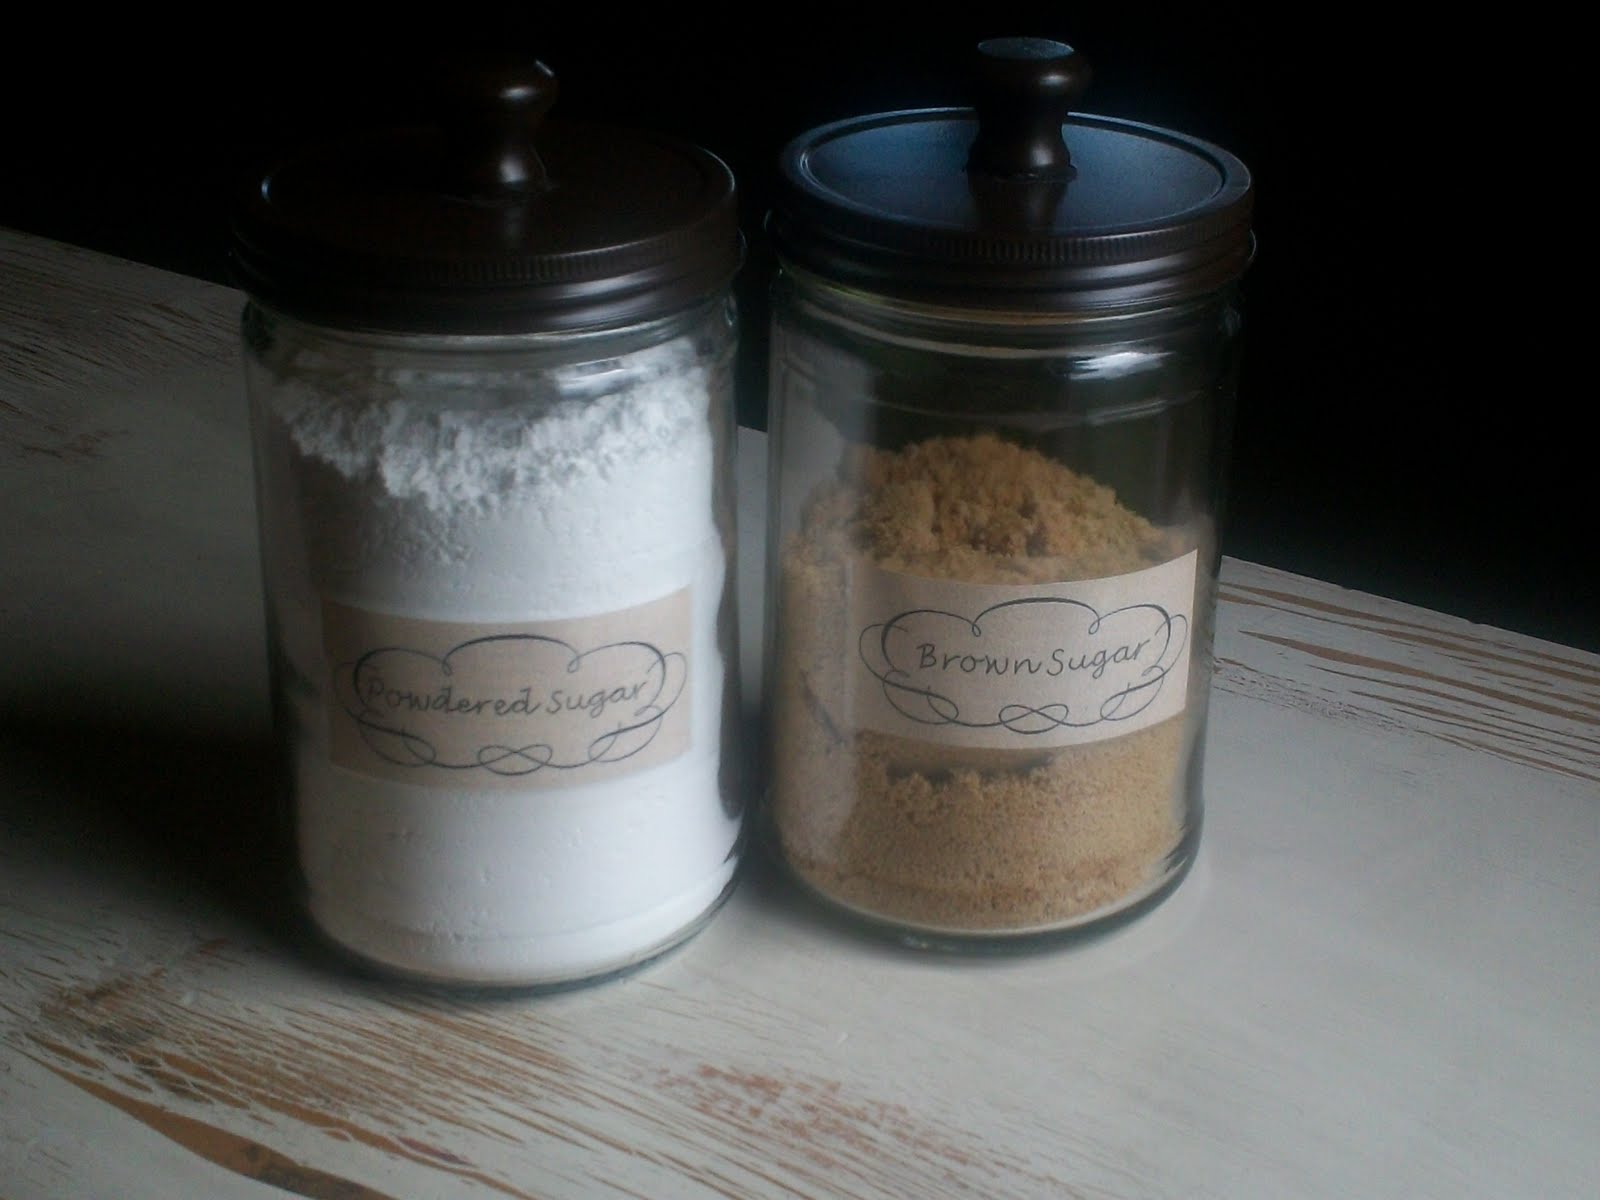
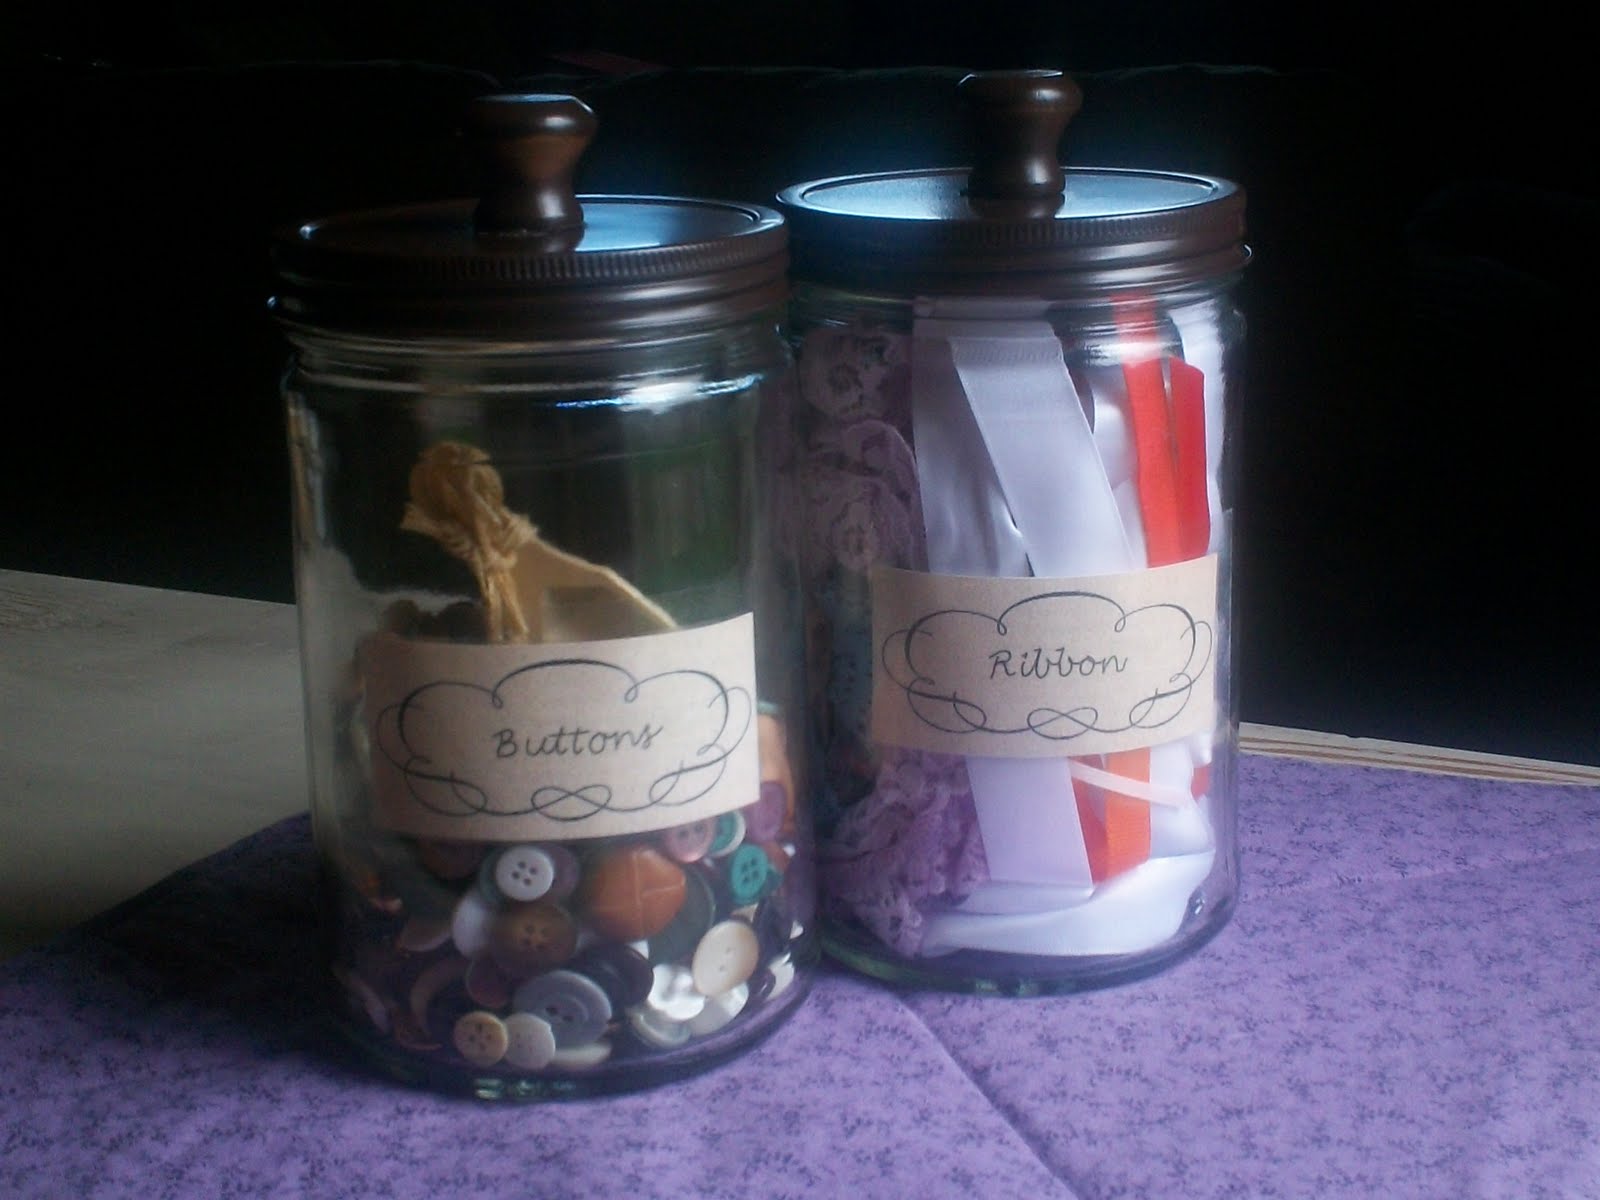
The straight walled, wide mouthed peanut butter jars, in particular, have really been on my mind lately.
For one thing, the peanut butter is pretty pricey! I’m a penny pincher so I know I could get Skippy or JIF for less, especially using coupons. A LOT less. But the Adams ingredient label appeals to my efforts to feed my family healthier foods so I pay a little more for it. We go through a jar every three weeks or so. I’m accumulating a good collection of them.
Because of their size, I thought they might make good canisters for the pantry. And finding a useful purpose for them might take a bit of the sting from the price of the peanut butter away.
After a little spray paint and some old dresser drawer knobs, I’m pretty happy to replace my 30 year old Tupperware canisters with these.
I’ll recycle the Tupperware of course! Or re purpose it somewhere.
I wonder what a set of vintage pea green Tupperware canisters is going for on Ebay?
Where was I?
A PYP Best Blog: Make Your Own Butter
Just in case you missed this article on DIY an update on making your own laundry detergent the first time we shared it a couple of years ago, we are republishing it. After Candi wrote this blog originally, we got an awesome response. This is one of the PYP Best Blogs!
There are many reasons why you might want to learn how to “churn” your own butter – self-reliance, avoiding preservatives, just for the fun of it, etc. 🙂
It’s actually pretty easy (although not necessarily any cheaper than buying it already made). Anyone remember doing this as an experiment in elementary school – passing around the glass jar with the cream and having everyone shake it until it turned into butter?
This is only my second time doing my own butter, but I thought I would take some pictures through the process in case it might help anyone else.
Here’s the skinny on the butter-making. The basic instructions? Take your cream and whip (churn) it until you can no longer do so. That’s it. 😉
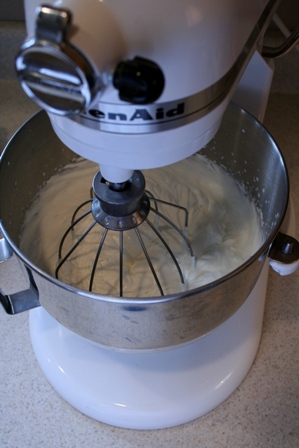
I did mine in my KitchenAid, but you could also use a handheld mixer, or even do it by hand or in a glass jar (add marbles) if you wanted to. The instructions below will assume you are using a mixer of some kind. (If you’re doing it in a glass jar, just shake until you can’t shake any more.)
Start with this, just as if you were going to make whipped cream (but do not add any sugar or vanilla):
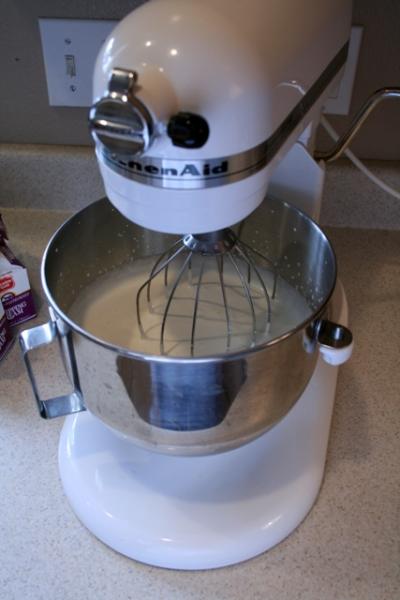
(I had actually whipped this for about a minute before I stopped to take a picture)
You’ll get to what they call the soft-peak stage:
Then the stiff-peak stage:
You’ll go through those first steps quite quickly. Just keep whipping…
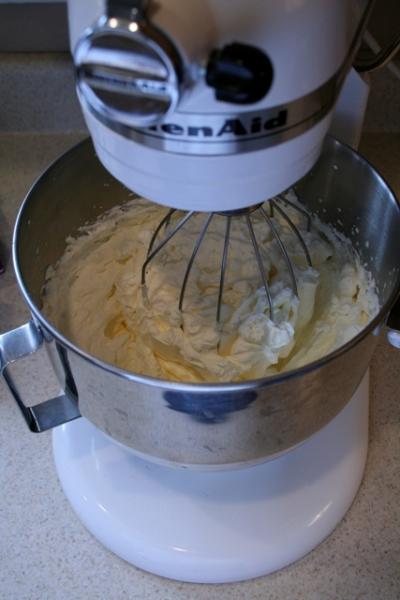
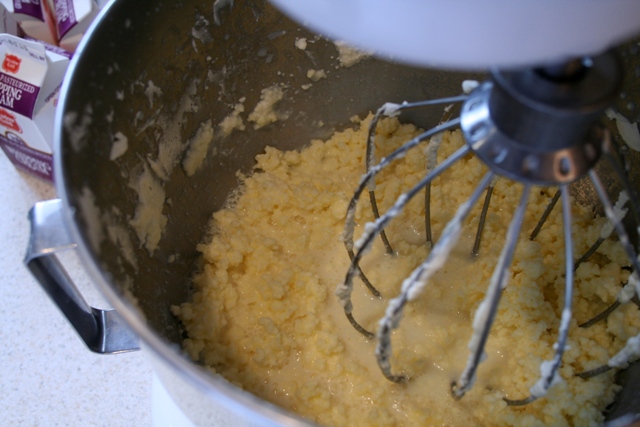
Then the cream will start to turn from white to a pale yellow:
It will start to look like really thick whipped cream (clotted cream anyone?) and will start to cling thickly to the sides of your bowl:
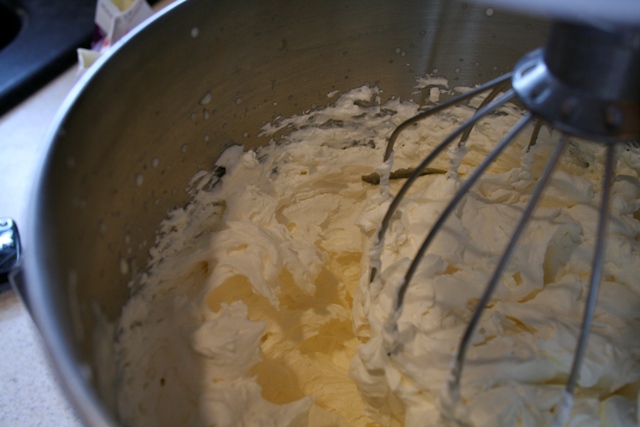
Keep going. (You might want to stop every few minutes to scrape down the sides of your bowl.) As you continue, you’ll start to see it turn a little grainy:
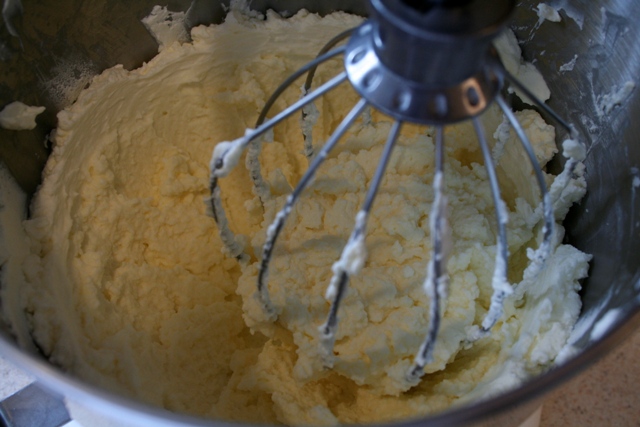
…and get grainier:
…and grainier. And you’ll start to see a little bit of “shine” on the top – it will begin to look “wet”:
(you can sortof see little spots of “shine” in the picture – that is the liquid being squeezed out as the fats and proteins coagulate)
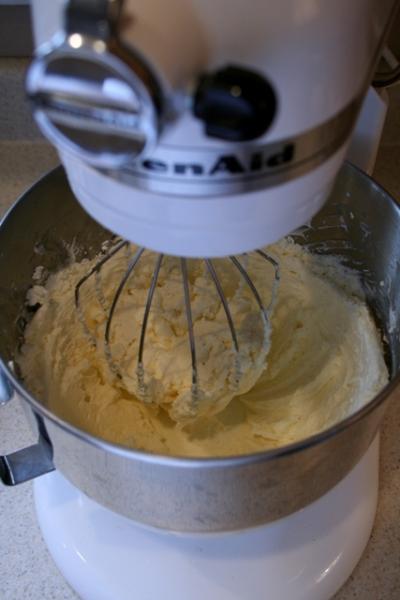
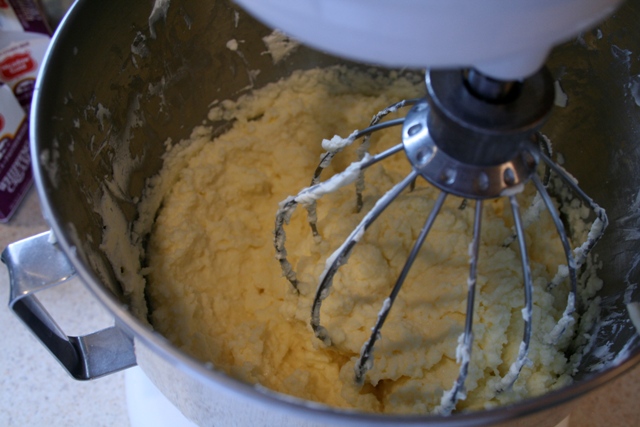
It will start to look almost like bread crumbs or cottage cheese or when you cut-in butter to a crumb topping:
At this point you’ll want to turn your machine down a bit (I turned mine down from 10 to about 7 or 6) because it will start to spit liquid at you. [These last steps happen very quickly, and you’ll go from the crumb topping look to a big chunk of butter in a puddle of buttermilk in about 5 seconds, literally. If you’re machine is still zipping away at highest speed, you’ll slosh buttermilk all over the kitchen before you have time to turn it off.]
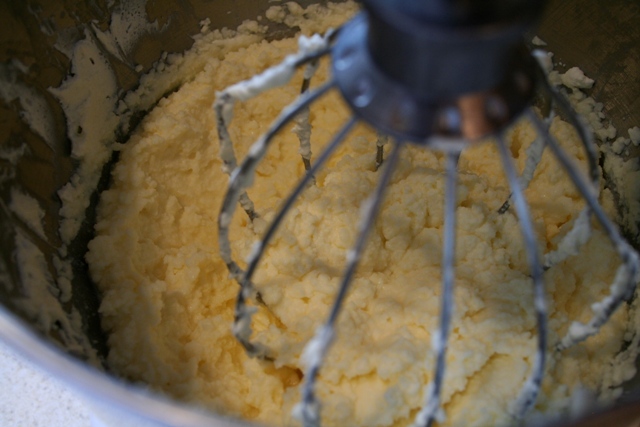
You’ll start to see more and more liquid accumulate on the top:
Keep going for another minute or two, at a medium speed, and watch carefully because in a matter of about 5 seconds it will go from the picture above, to THIS:
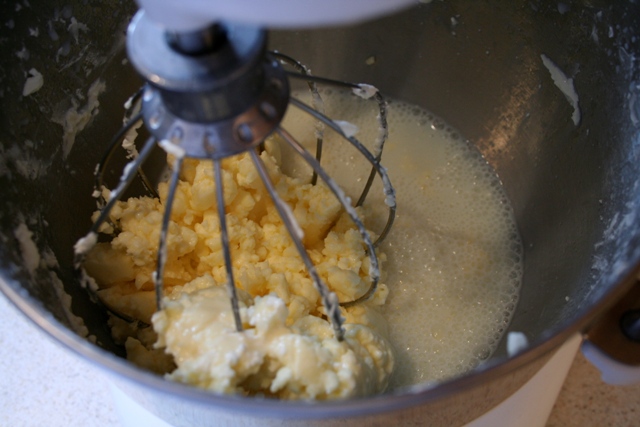
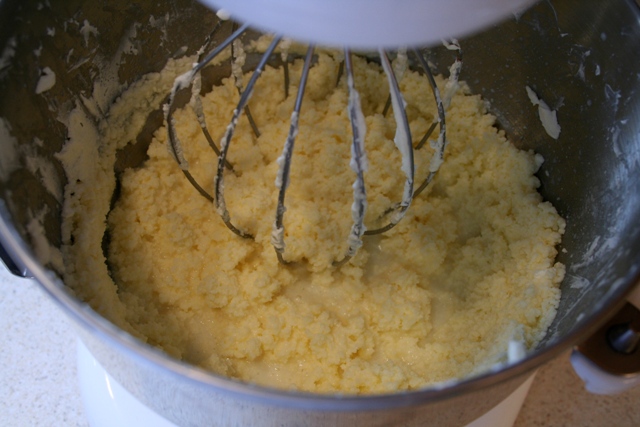
It will clump up all together in your whip attachment and you wont be able to whip it any longer. You’re now done (with the churning part, that is)!
You can now either pour off the buttermilk and save it (think cornbread, buttermilk pancakes, buttermilk biscuits, etc.) or you can just discard it.
With clean hands, press all of the butter solids into a ball. Squeeze it a little to get more buttermilk to drain out.
You can put it in a container in the refrigerator at this point, but I’ve read that it can still have buttermilk in it and that can tend to make it go rancid, so many places suggested to wash it.
I filled my mixed bowl with cold water (if you use warm you’ll melt the butter) and then kneaded it a few times under the water. Pour off the water, and repeat one more time, or until you feel like you’ve gotten most of the buttermilk out.
You’ll then end up with this:
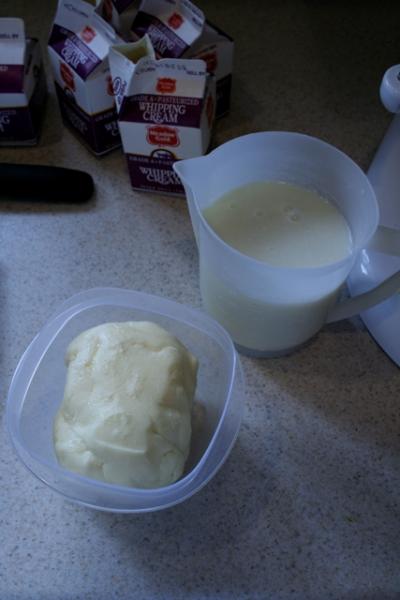
I started with 2.5 pints of whipping cream, and ended up with 11.2 ounces of butter and just under 2 cups of buttermilk. If you use heavy whipping cream (with a higher fat content) you’ll get slightly more butter.
The half-pints of whipping cream were .50 each on clearance after Christmas. I used 5 of them, for a total of $2.50. Extrapolating that out would give me the equivalent of 1 lb of butter for $3.63, definitely not cheaper than just buying it already made at the store. BUT, I also got buttermilk out of it, so I think when you add in that I’d have to buy that at the store as well, I think I come out about even, maybe just a little higher than the store-bought option.
If you have a source where you can get shelf-stable boxed whipping cream (Ultra High Temperature pasteurized), like through Gossner’s here in Utah, you can use that in place of the fresh stuff from the store, with the same results. However, you cannot use whipping cream that has been previously frozen (it denatures the proteins and fats and they will no longer coagulate or “whip” once thawed).
Have any of you ever tried making your own butter? What advice would you give to us newbies? Does anyone make specialty butters this way by adding additional ingredients? I’d love to hear about some of the possibilities!
PickYourPlum! Jewelry Holders! Metal Pennants! Bar and Loop Necklace! V Neck Tees!


All Things Pretty – Jewelry Holders
Organize your jewels on something pretty.
Starting at $12.99 (62% off) Retail: $34.99
It’s a Pennant Party (and You’re Invited) – Metal Pennants
For the soiree of all soirees.
Starting at $5.99 (53% off) Retail: $12.99
Simple is Good – Bar and Loop Necklace
It’s the kind of silver that takes the gold.
Starting at $12.99 (56% off) Retail: $29.99
A Wardrobe Must Have – Boyfriend V Neck Tees
It’s time you got your own v-neck tee.
$6.99 (73% off) Retail: $26.00
Plus lots more CUTE deals!
LOTS of cute deals! Inexpensive shipping!
A PYP Best Blog! Making popsicle stick bracelets! Plus bonus organizing tips!
 Just in case you missed this DIY article on making popsicle stick bracelets, the first time we shared it a couple of years ago, we are republishing it. After we first published this blog originally, we got an awesome response. This is one of the PYP Best Blogs! (I also included a couple oldie but goodie organizing tips! Perfect for all the back to school clutter and chaos!)
These are so much fun to make! You can recycle your popsicle sticks from the Summer – or purchase jumbo craft sticks to make these. They are so cute and simple to make and decorate.
What you need: Craft sticks (or popsicle sticks); modge podge; craft paper; paints; whatever you want to use to decorate your bracelets! You are only limited by your imagination. You will also need drinking cups/glasses, rubber bands (optional) and an emery board or some sandpaper.
Boil a pot of water and add your craft sticks to the water. Some sticks will break so make sure you boil more bracelets than you actually want/need. Let sticks boil for 30 minutes. Take off the heat and let sit in the pot of hot water for another 30 minutes.
Form your craft stick bracelets around cups or glasses or vases (measure wrists to get the right sizes!) and rubber band around. You can also form the bracelets inside the containers and you will not need rubber bands. Let dry overnight. Sand the bracelets with an emery board or sandpaper as necessary and…
Decorate!
~~~~~~~~~~~~

Back to school means back to school hair! Here’s an organizing tip you NEED if you’re not doing it already. Just purchase an inexpensive carabiner and voila – instant organization for one of the messiest things in the bathroom, your ponytail holders!
~~~~~~~~~~~~

With all of the white sales going on this week I was reminded of a project that I’ve been wanting to do. I’ve seen this idea in several places online and I’m sure I’ve pinned it at least once! This is such a simple way to organize scarves. You just put shower curtain rings on a hanger and voila, instant scarf organizer! This could be used for ties as well. This is one I need to do today! You could spend $14 and buy one, but you can make it yourself for so much cheaper.
$9.95 Darling Home Decor Blowout + So Much More!
 $9.95 Darling Home Decor Blowout
More cute stuff available today! Low shipping prices!
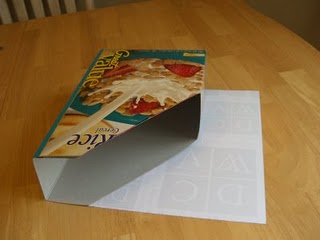
A PYP Best Blog! Making file boxes from cereal boxes!
Just in case you missed this DIY article on making file boxes from cereal boxes the first time we shared it a couple of years ago, we are republishing it. After we published this blog originally, we got an awesome response. This is one of the PYP Best Blogs!
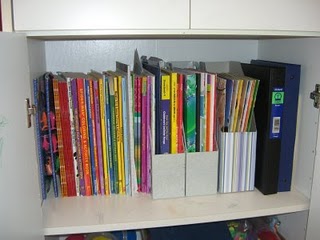
My kids love, love, love anything that has to do with art, coloring, drawing, etc. We have tons of coloring books, how-to-draw books, workbooks…you name it! But I get frustrated with the mess it can create…books all over the place! This isn’t even all of them!
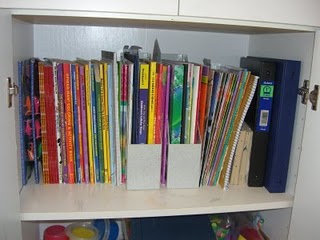
As you can see in the photo, I have a couple of plastic file boxes. I love organizers of any kind! I am working on organizing all these books, and I want more file boxes. But I am too thrifty to just go spend $7+ dollars on several more organizers….so I am making my own! We all have empty cereal boxes around the house. Here is one way to use them.
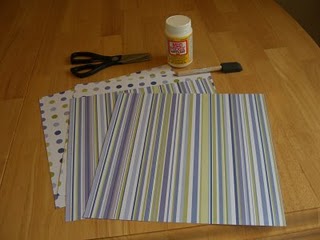
Supplies you will need:
a large cereal box (large enough to fit the books inside)
modge podge
brush
scissors
scrapbook paper to cover the cereal box
 You can see on the cereal box I took a permanent marker and drew the lines where I wanted to cut the box. I just used my current file boxes as a template. You can eyeball it with a ruler too.
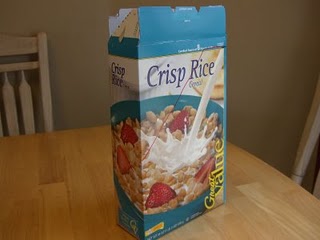
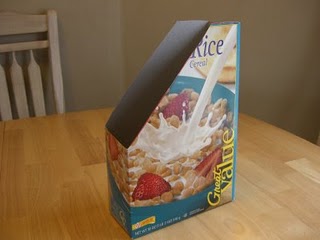
Then cut your box on the lines you drew. Here is what mine looked like after I cut it:
Then you will want to take your scrapbook paper and trace to cut.
At first I was going to use a couple of different kinds of paper on the box, but then I changed my mind. Here are all the paper pieces, ready to be put on the box.
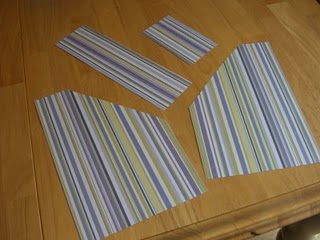
Take your modge podge and paintbrush and cover one side at a time. Line up the paper pieces that fit on that side and press firmly. Get out all the air bubbles and smooth out.
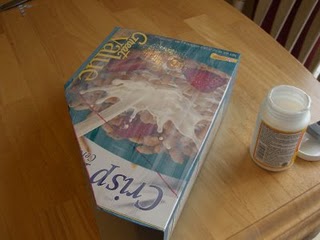
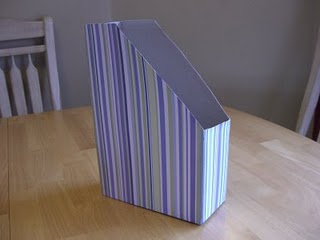
When you are all done with each side here is what it looks like. Pretty cute, huh!
After it dries for a bit, take your paintbrush and paint modge podge over the edges and corners to reinforce durability.
Now you have a cute file box! I put it in the cupboard…and it looks great! Now I need to make a few more. I will also label them with the book contents to make it easier for the kids to put things back where they belong.
 I already had all my supplies on hand for this project, so I didn’t have to spend any extra money to start organizing my kids workbooks. Next time you need to do some organizing, think thrifty and pinch your pennies!
A PYP Best Blog! Thrifty and Fun Birthday Cake Gift!
Just in case you missed this DIY article on making a thrifty and fun birthday cake gift the first time we shared it a couple of years ago, we are republishing it. After Marne wrote this blog originally, we got an awesome response. This is one of the PYP Best Blogs!
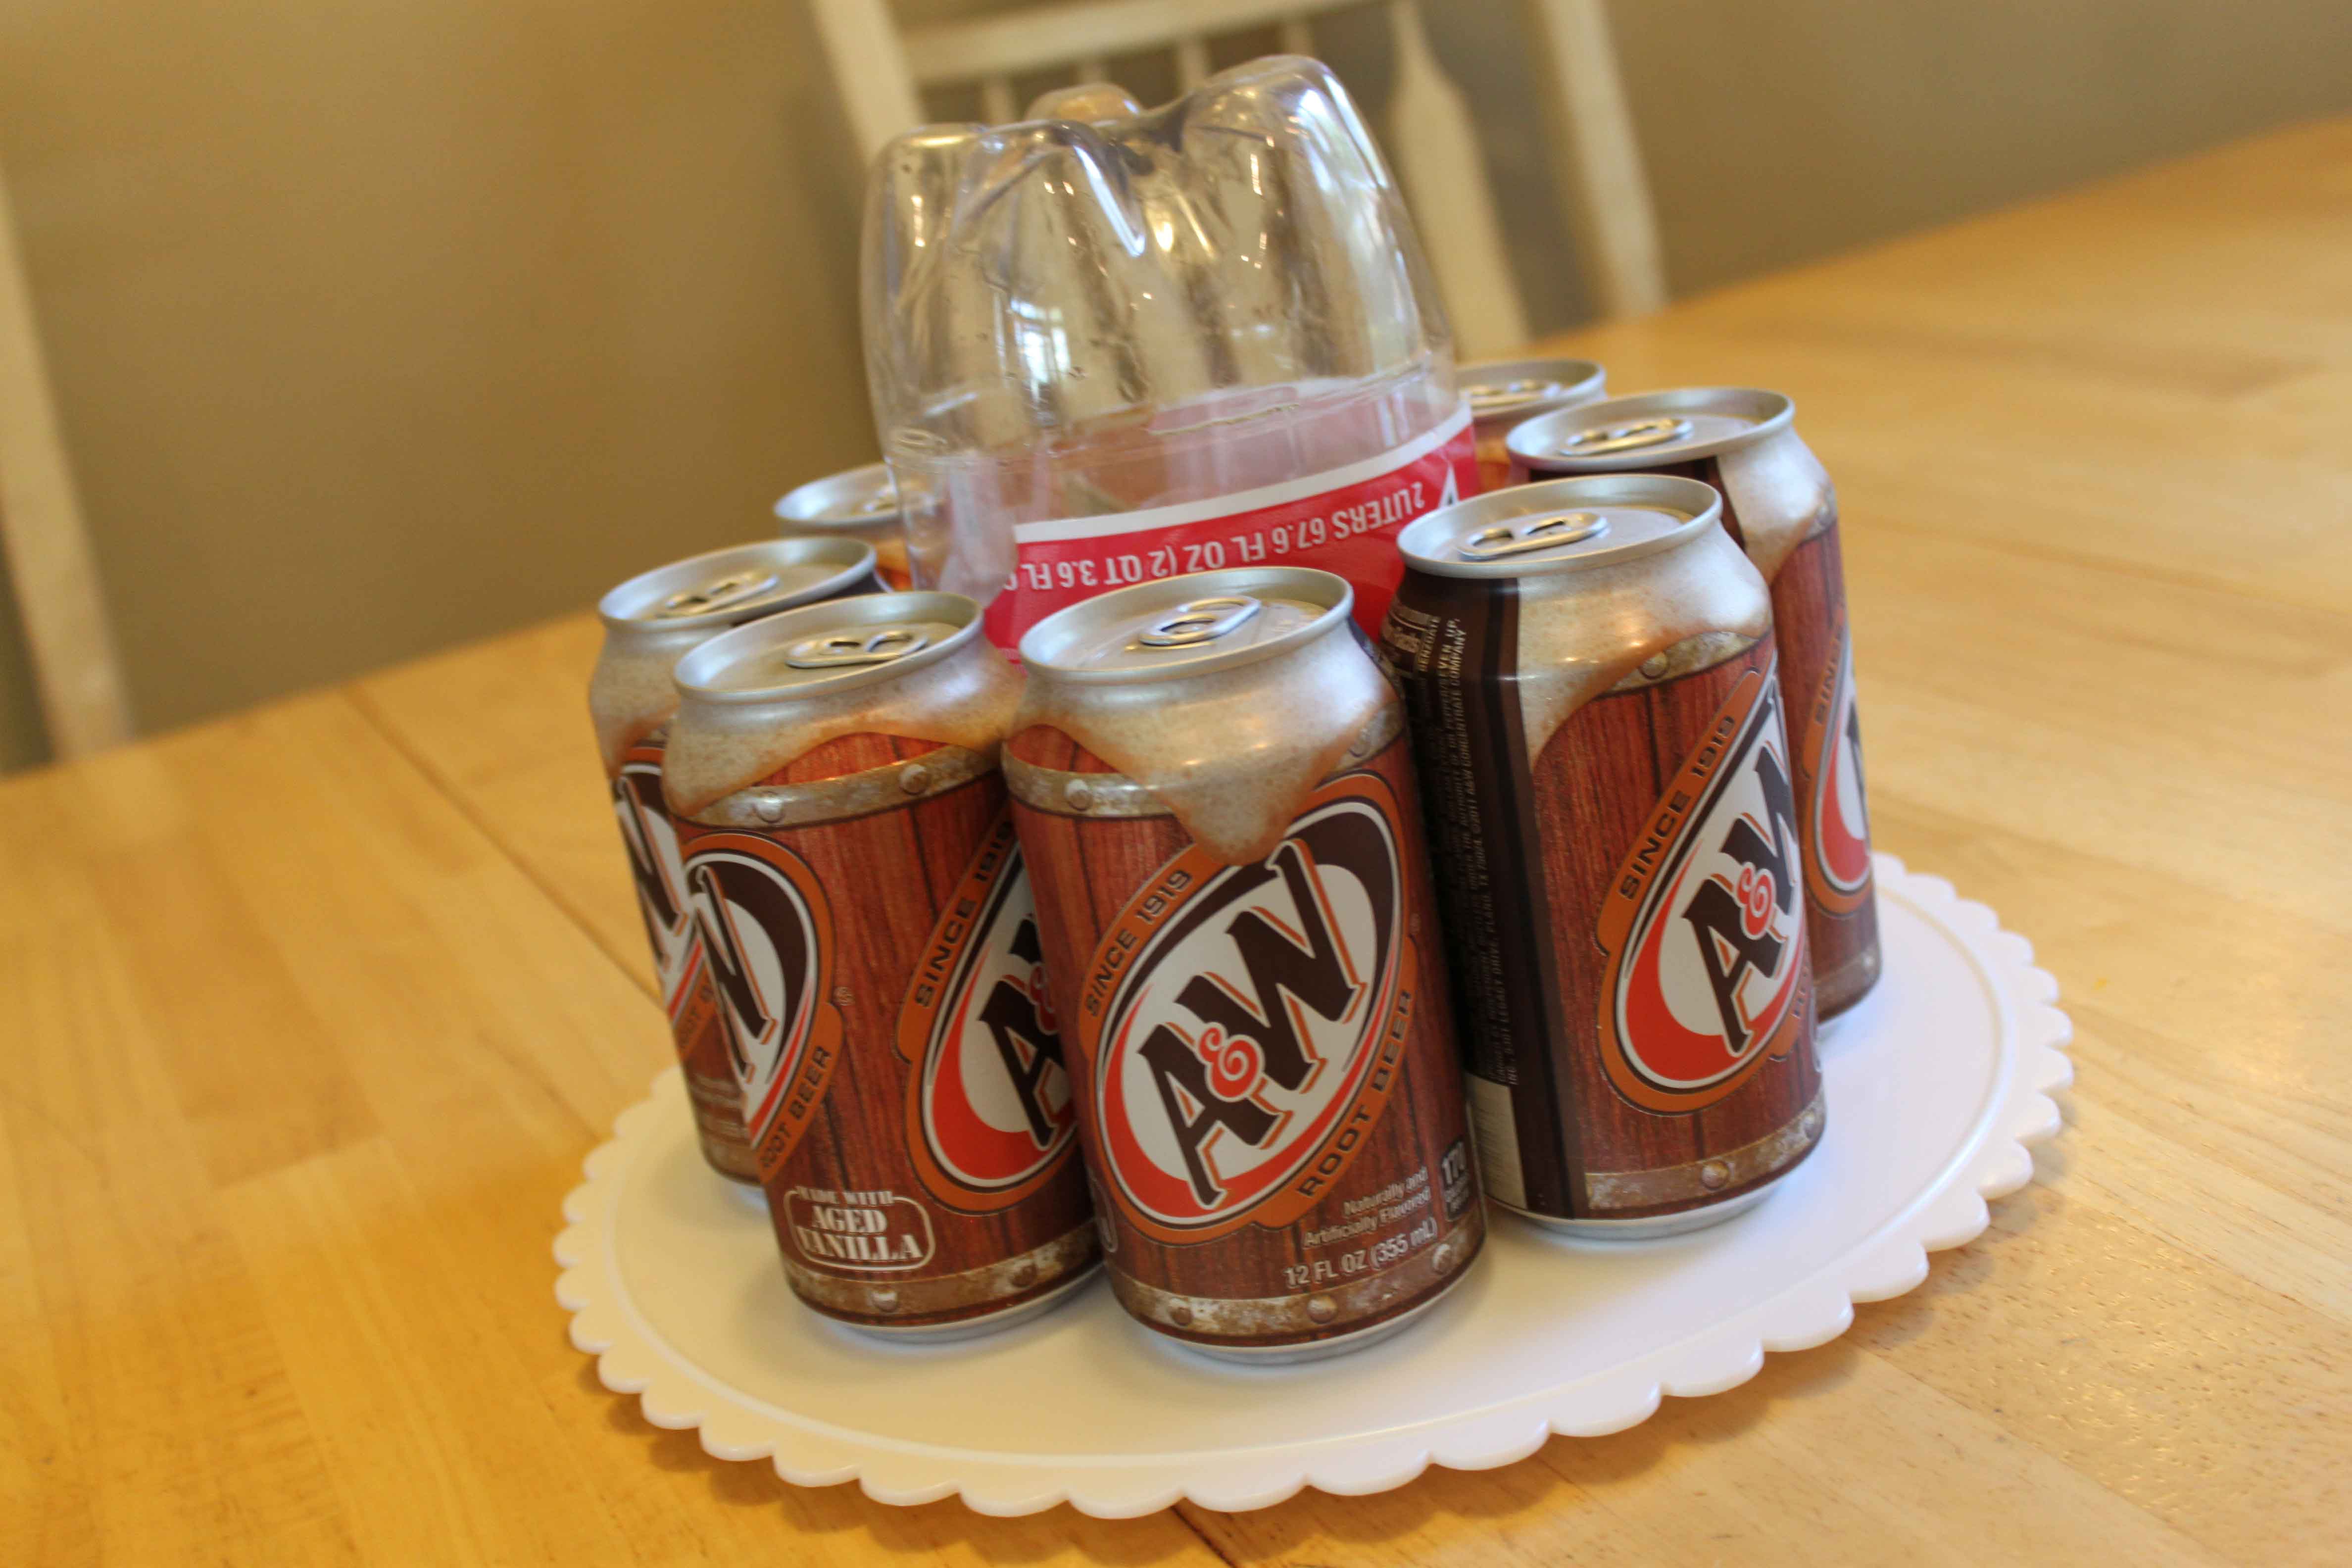
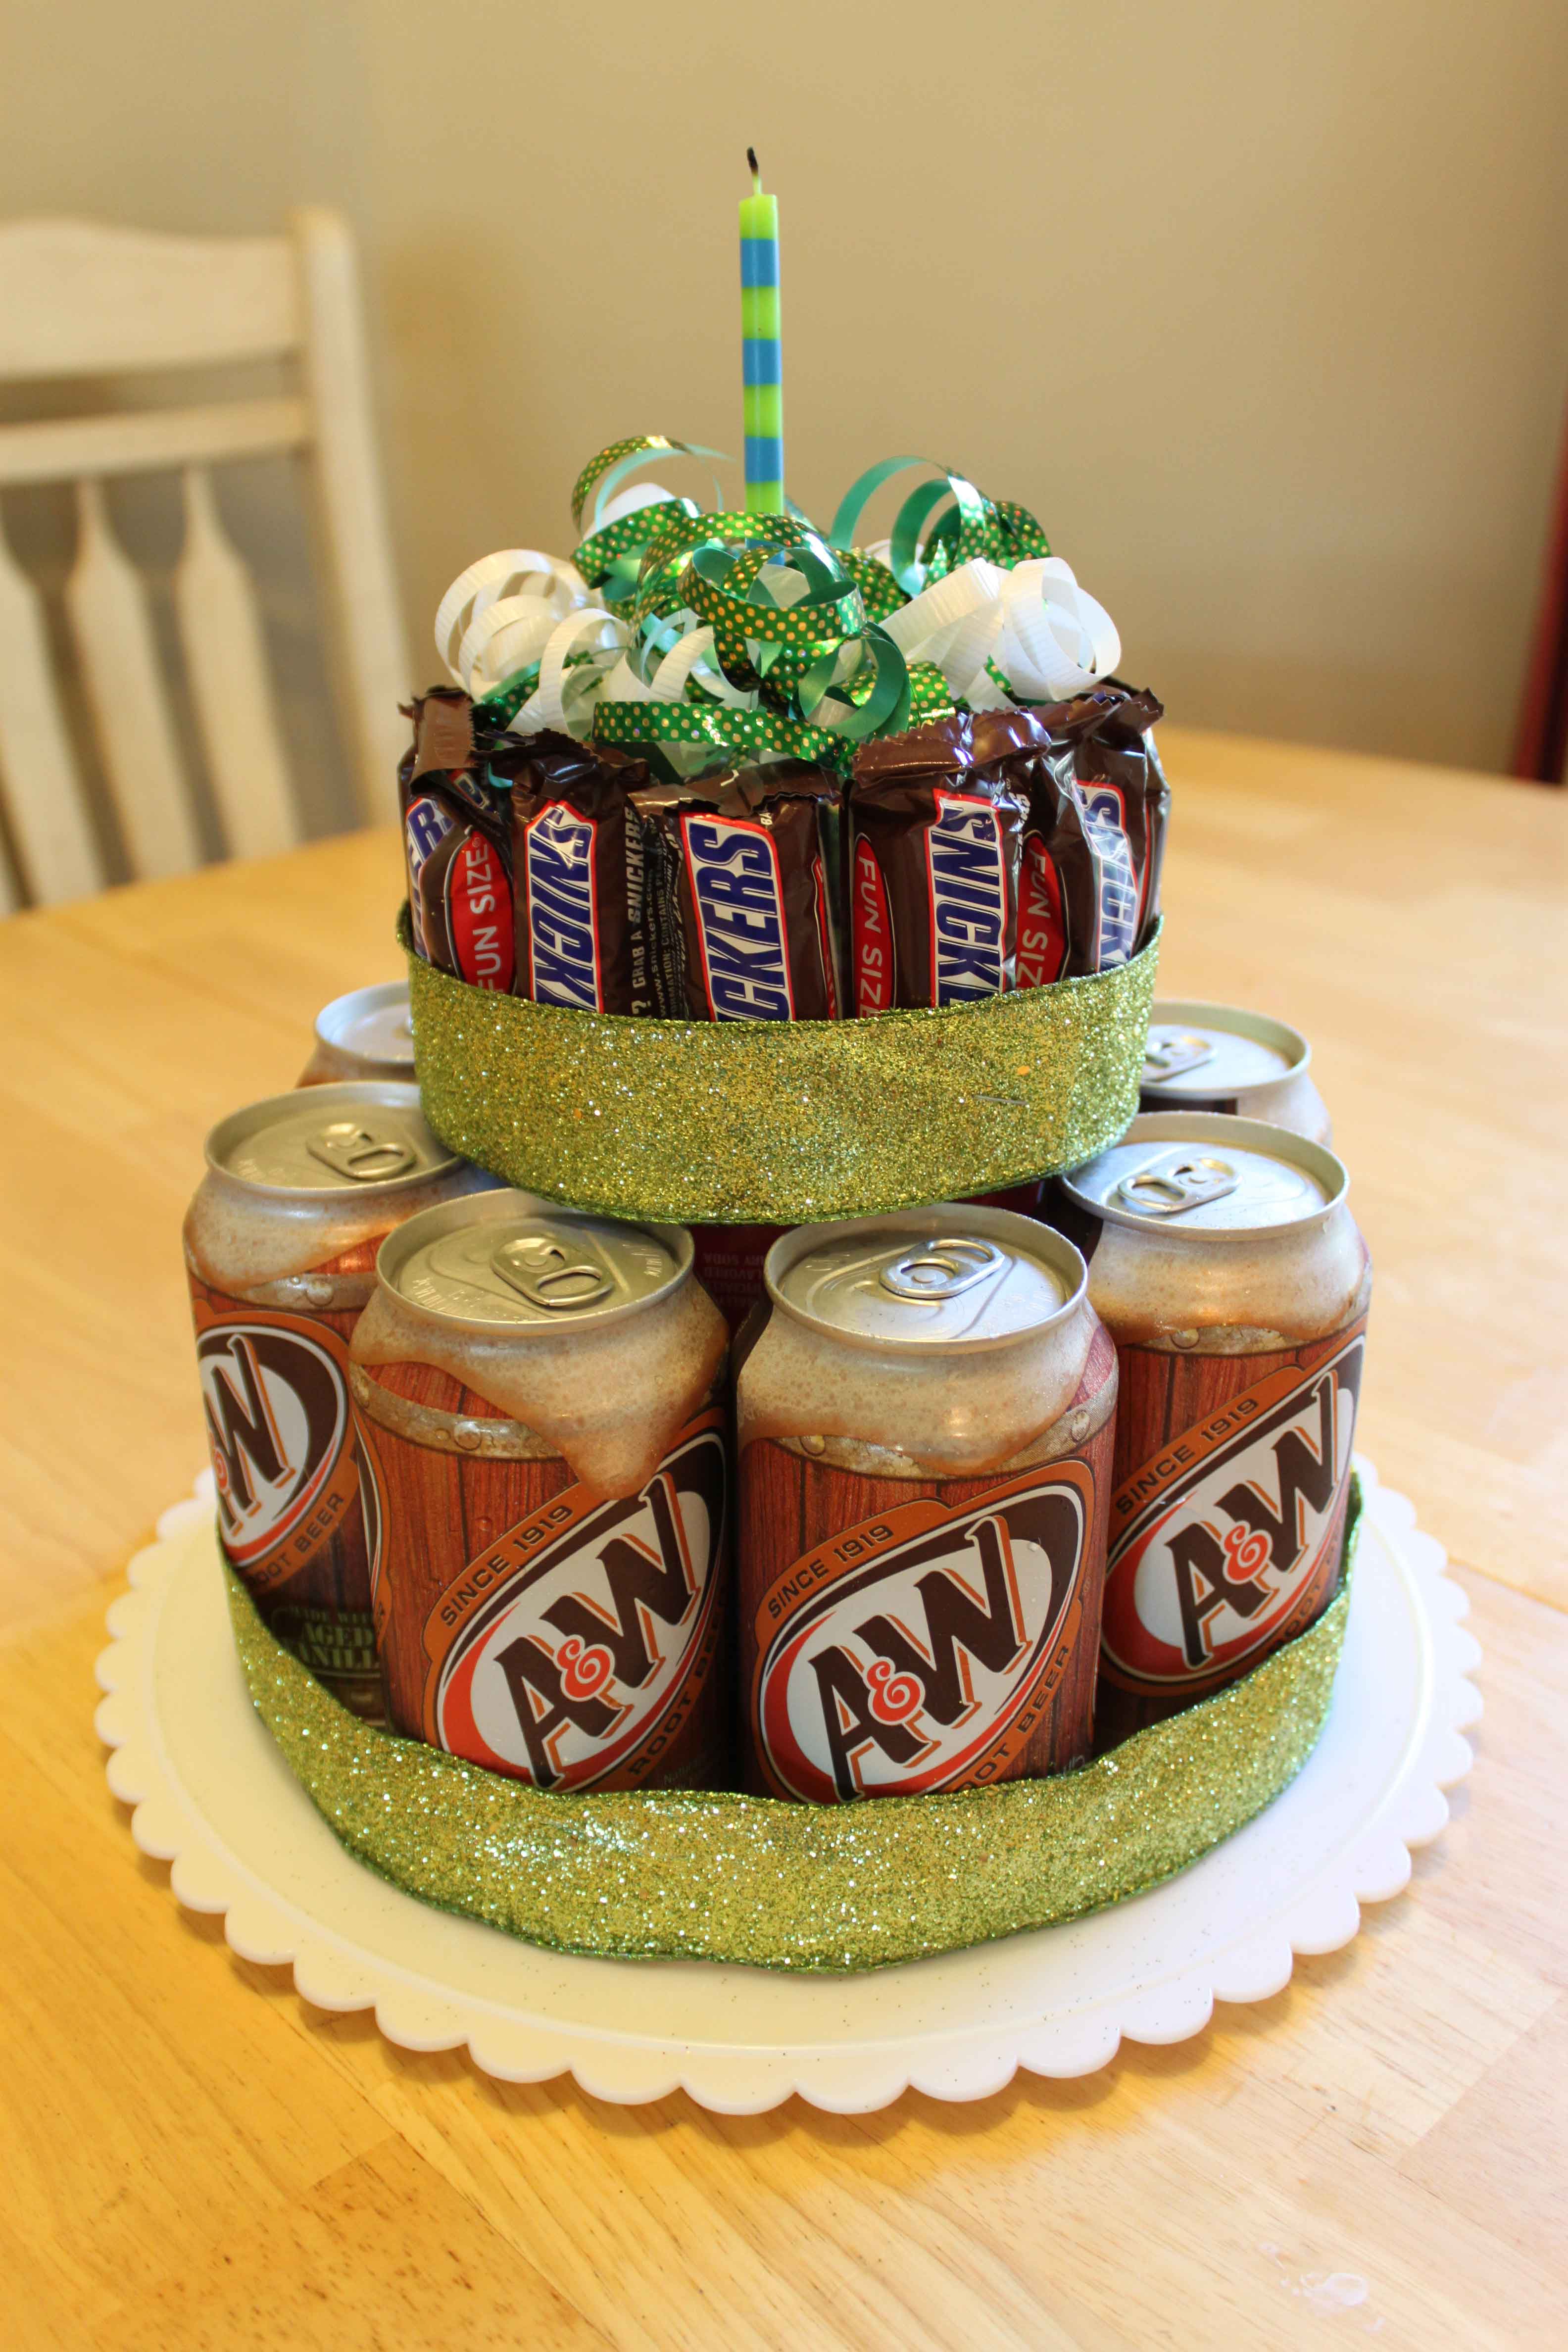
Are you looking for a gift to give a teenager or friend for their birthday? Look no further! This is a fun, quick, easy and satisfying gift idea for all ages! In fact, I made this today for my son’s 12th birthday…as his birthday cake! He LOVED it!

Here is what you need to make this fun birthday cake!

Empty 2 liter bottle (with the top cut off so it sits flat)
8 soda cans of your choice
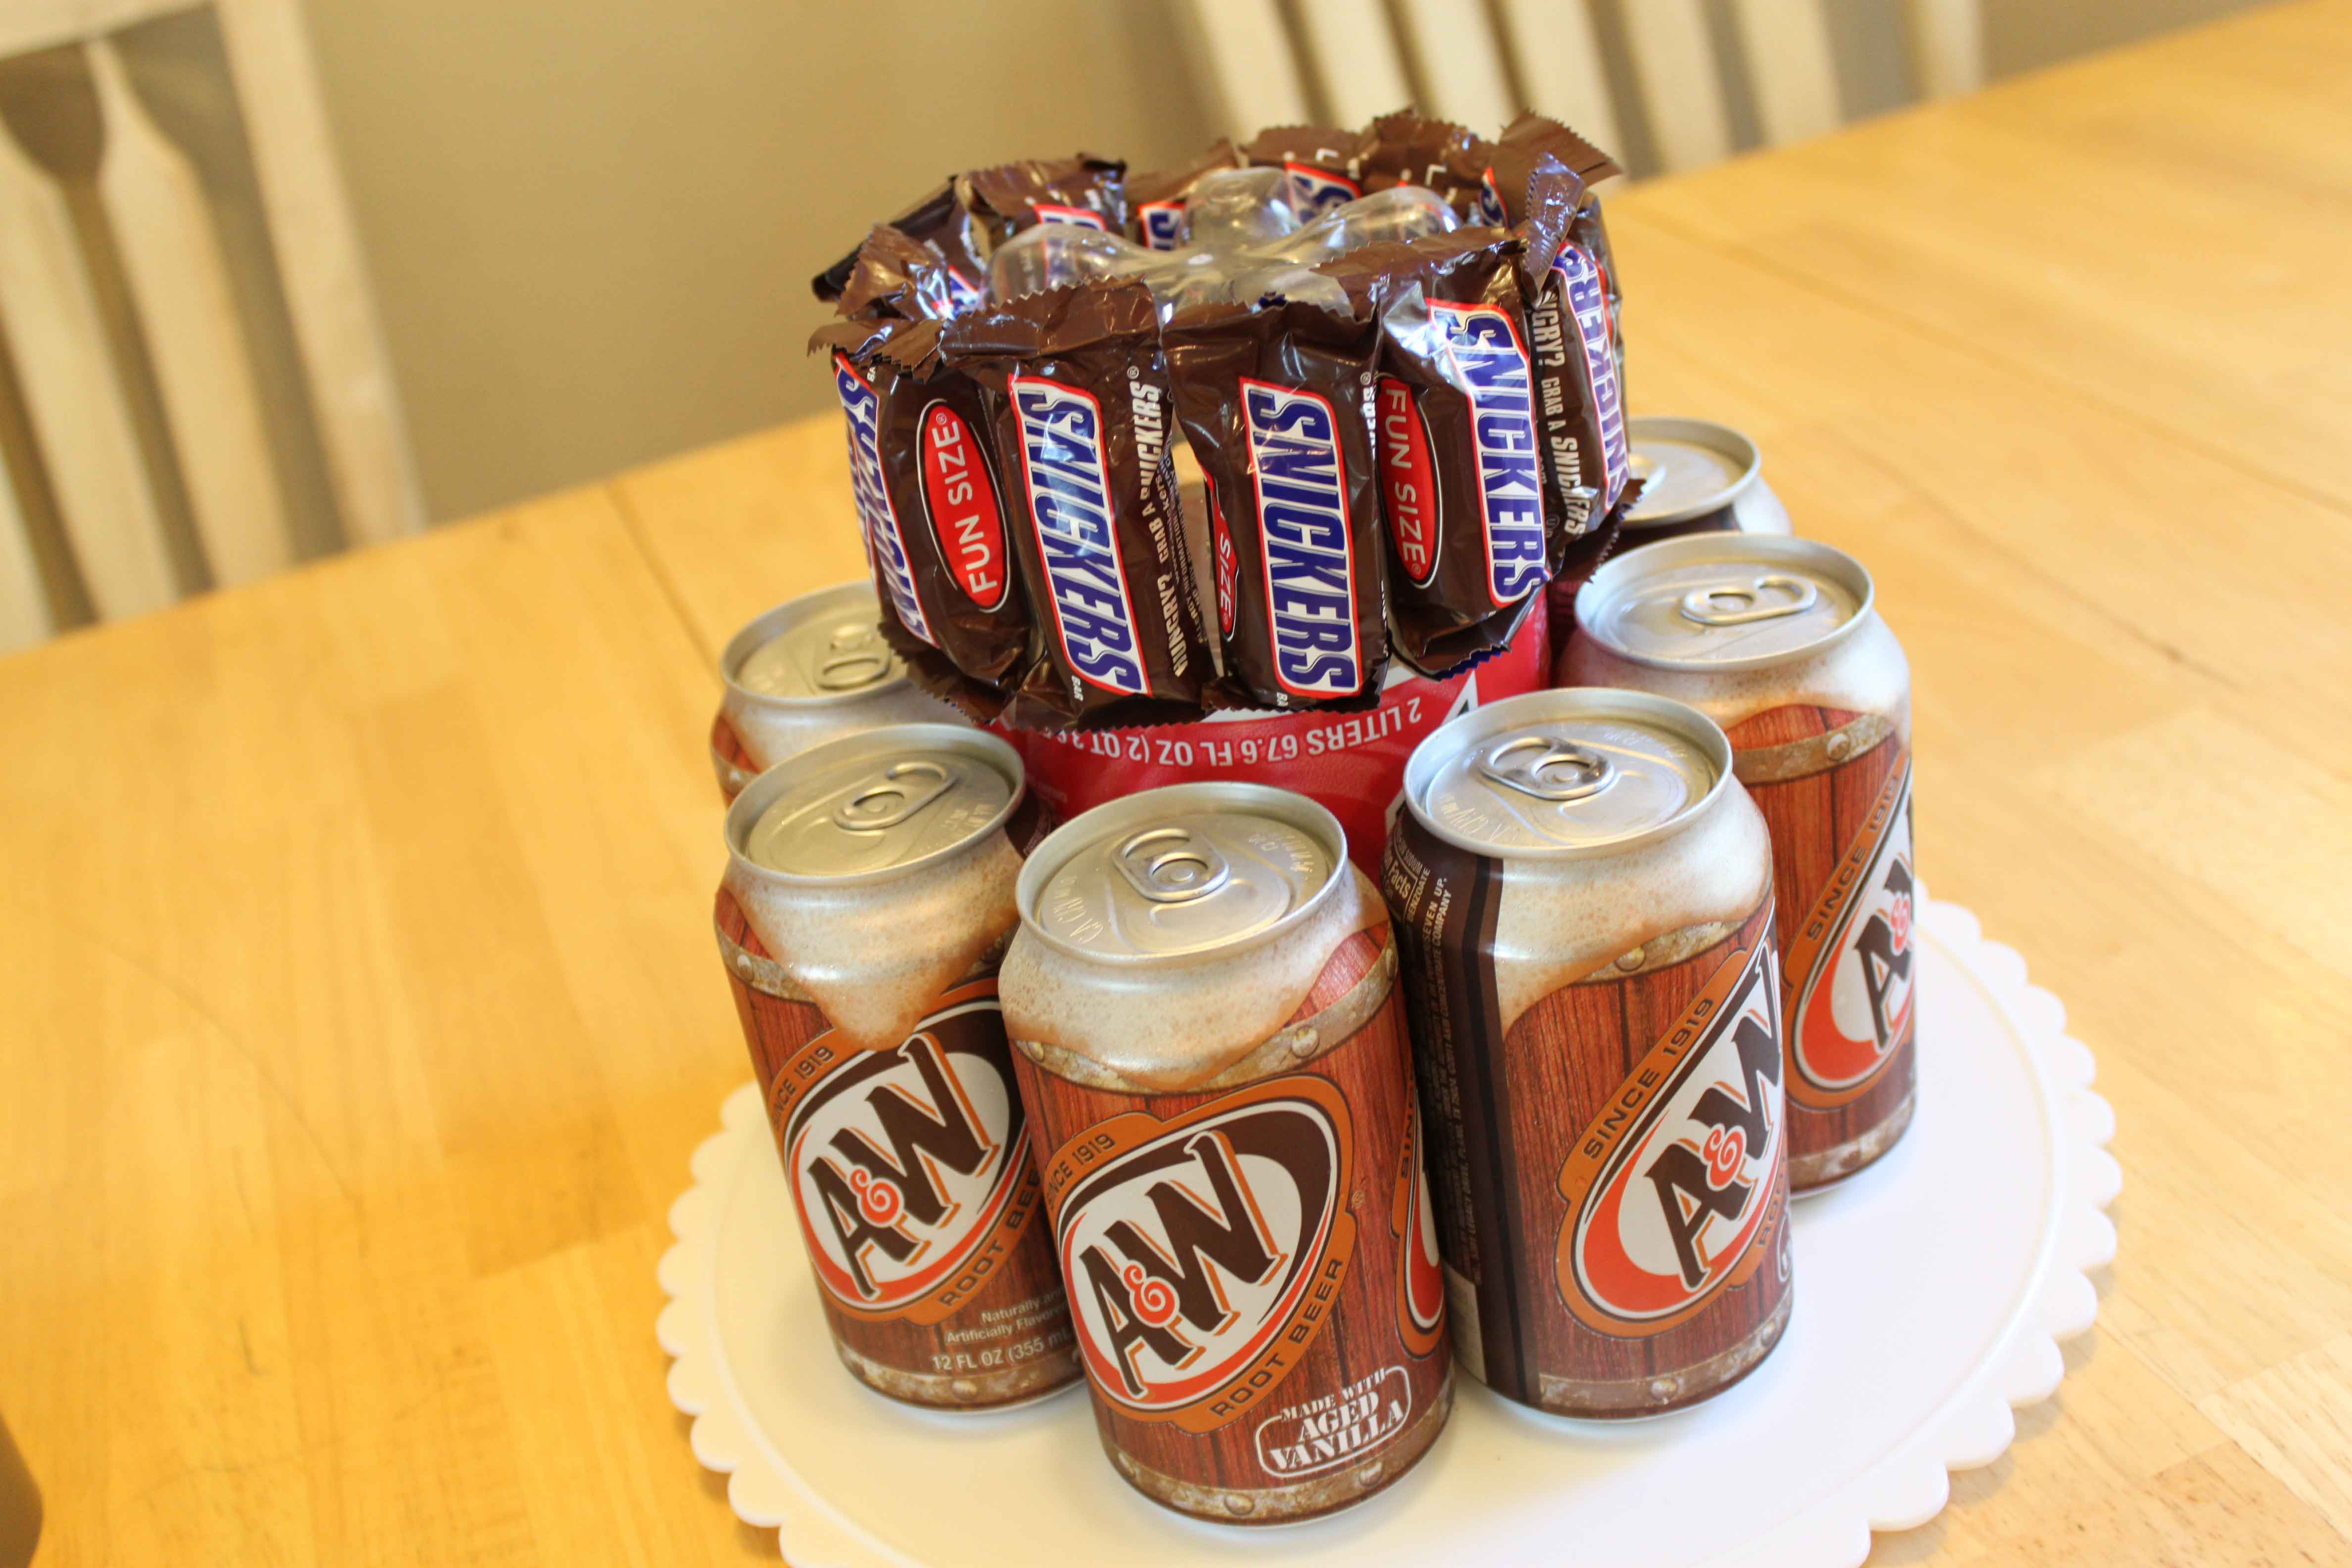
12-14 mini candy bars of your choice
wide ribbon for the cake
thin ribbon for the top
candle
cake plate
tape
Begin by placing the two liter on the cake plate upside down (so the rutted edge bottom is now the top) and place the soda cans around it. You can place tape on the soda cans so they stick to the plastic bottle and don’t shift.
Then place the candy bars around the same way. I also used tape so they didn’t fall. I placed them up a little higher as the wide ribbon would cover it.
Then cut the wide ribbon to size and put it around both spots as shown. I stapled my ribbon together after measuring it and cutting it, then slipped it over where it needed to go.
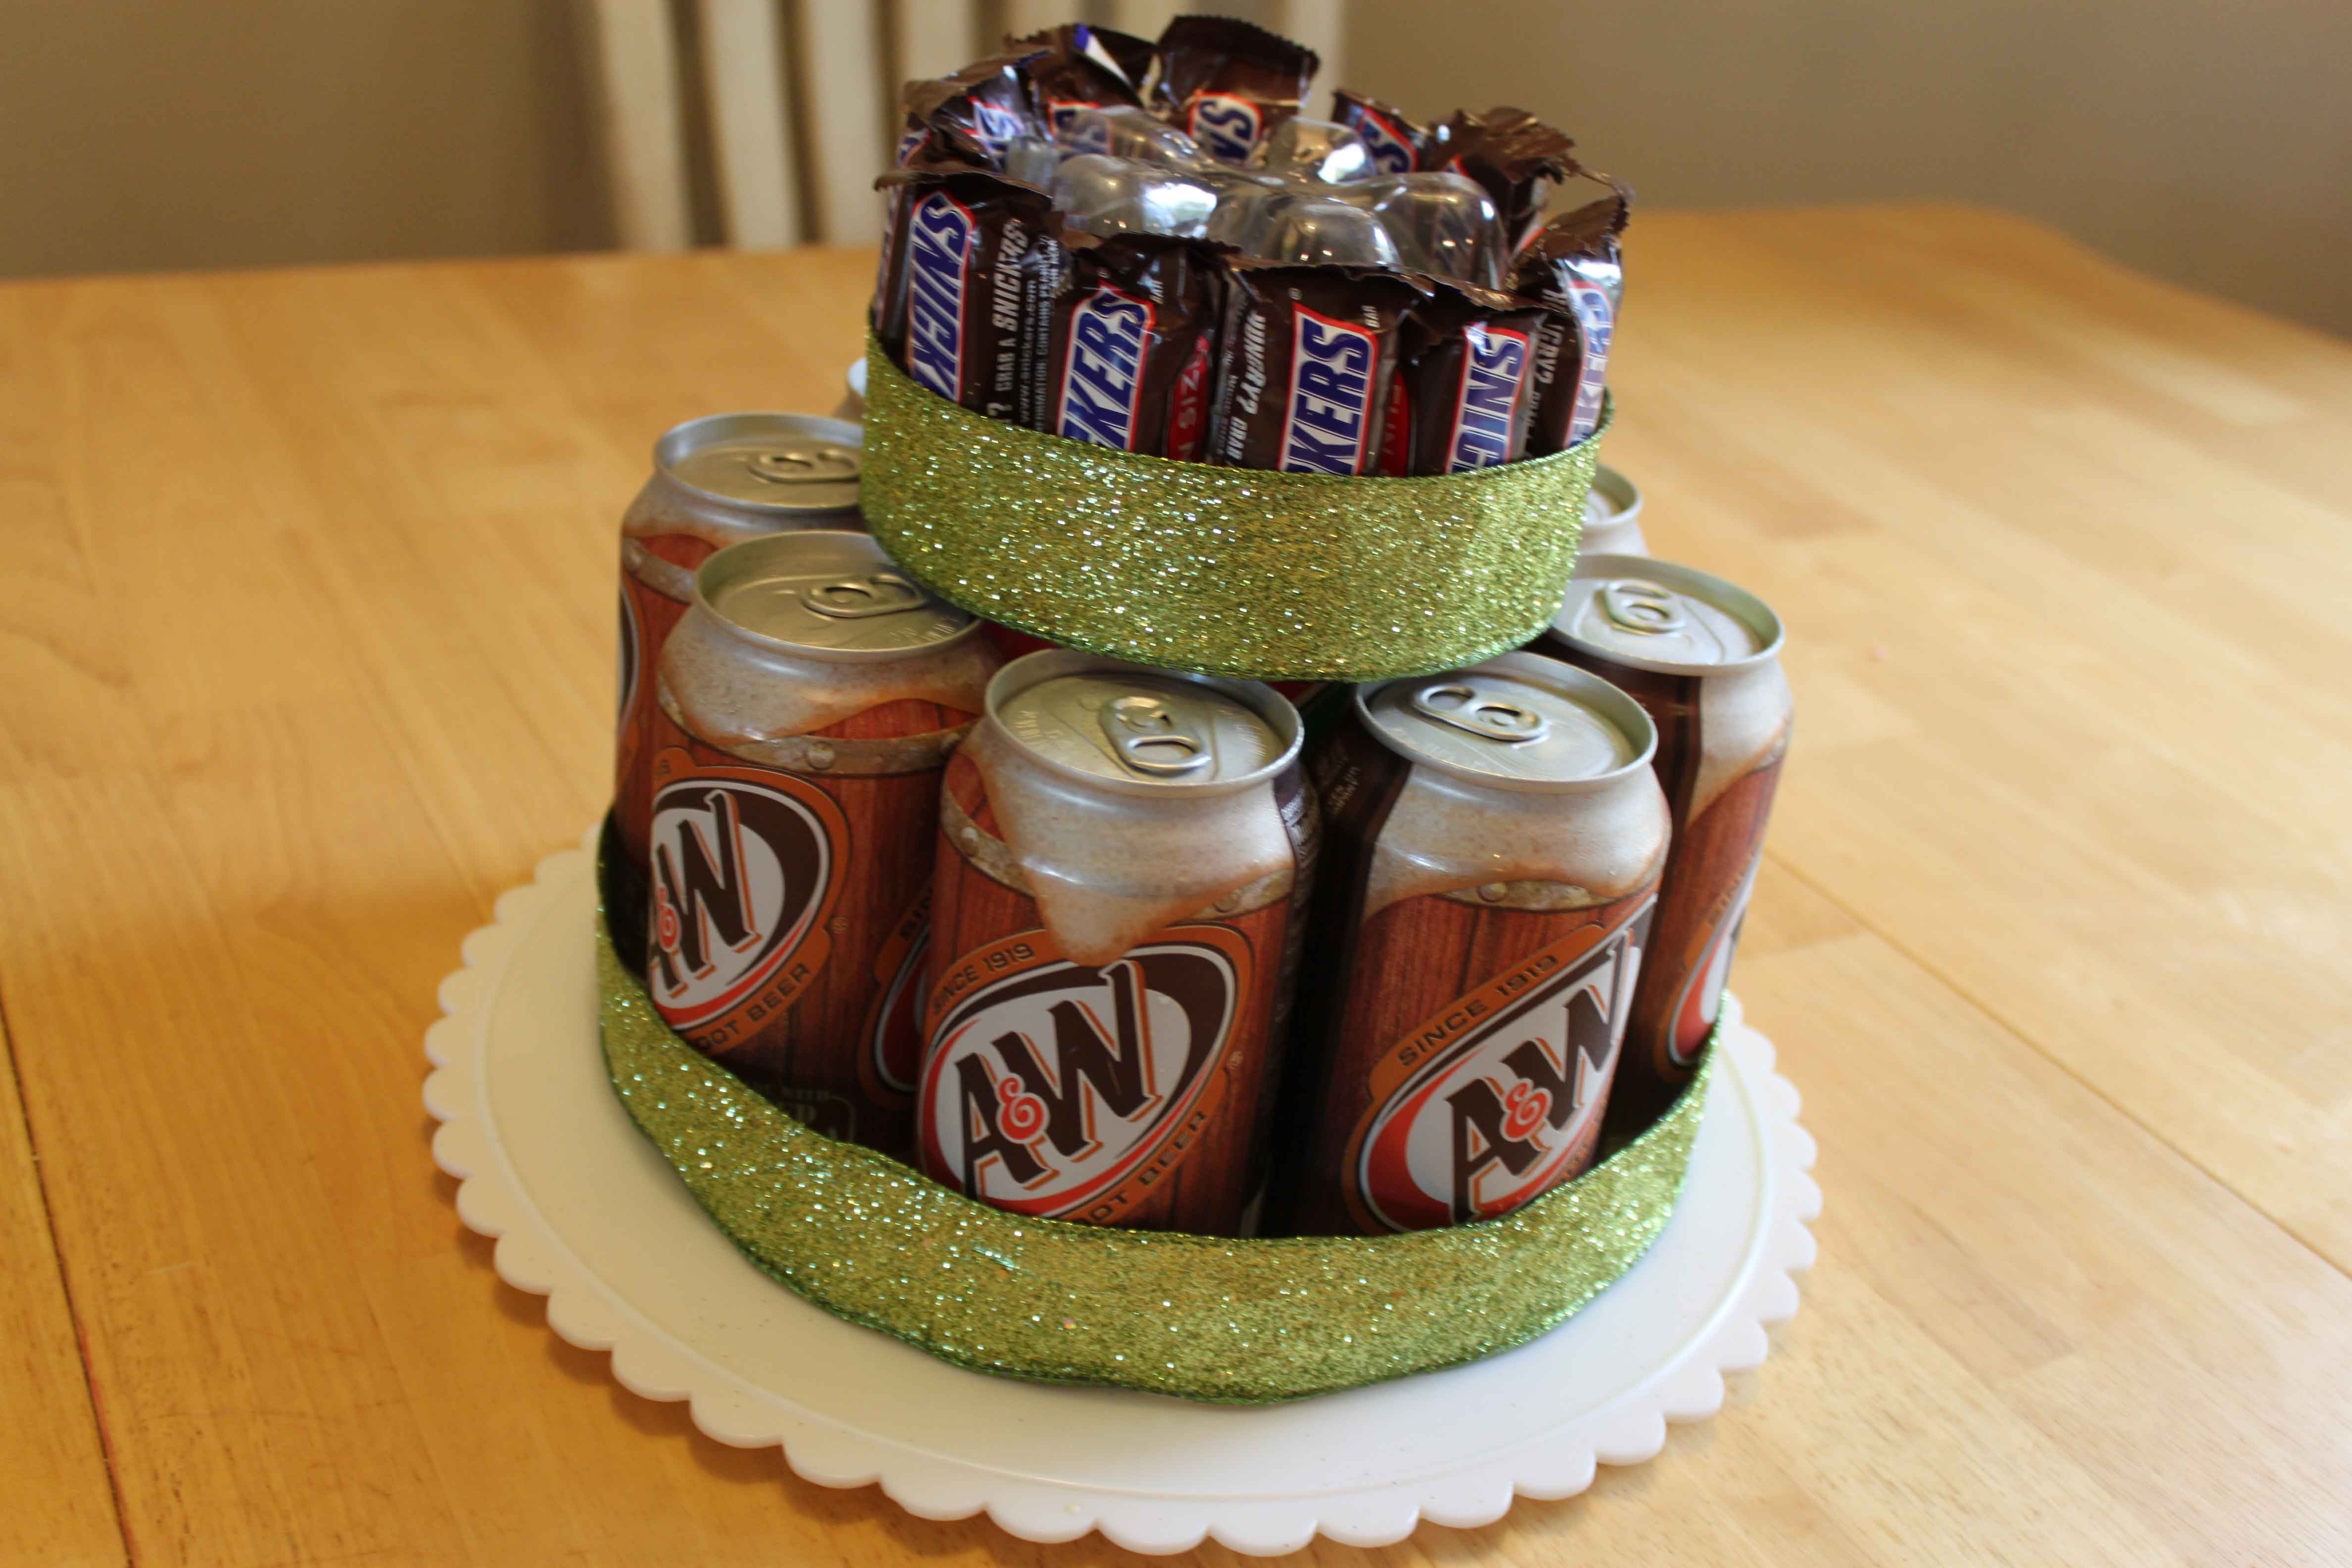
The last step is to poke a hole in the top of the bottle (in the middle of the notches) and put your candle in. I actually hot glued my candle on tonight, and it worked just fine! Then cut a bunch of thin ribbon, curl it, and tape it in place to cover the rest of the bottle. Now you have a totally fun, cute, thrifty and awesome gift for a birthday! This is a perfect idea for those who don’t bake.
PickYourPlum! Tin Bucket with Dividers! Fox Socks! Washi Tape! Striped Sweater!


Tin is In – Oval Tin Bucket with Dividers
There is such a thing as the perfect tin.
Starting at $13.99 (65% off) Retail: $39.99
The Big Bad Fox – Crochet Fox Socks
F-O-X
Starting at $9.99 (50% off) Retail: $19.99
You’ll Want to Washi Everything – Chalkboard Washi Tape
Once you start, you won’t want to stop.
Starting at $2.99 (57% off) Retail: $6.99
The Perfect Fall Sweater – Extra Long Striped Sweater
Cozy and stylish. What more could you ask for?
$11.99 (64% off) Retail: $34.00
Plus lots more CUTE deals!
LOTS of cute deals! Inexpensive shipping!
A PYP Best Blog! DIY Garage Mudroom on a Budget!
Just in case you missed this article on DIY garage mudroom on a budget the first time we shared it a couple of years ago, we are republishing it. After Marne wrote this blog originally, we got an awesome response. This is one of the PYP Best Blogs!
I have been looking at mudroom ideas online for months. The idea of making a garage mudroom is not a new one, but I needed to really tweak all these ideas I was finding. Simply because we have hardly any space. We have a 2-car garage and are pretty cramped. But I KNEW I could do it, and we did! My only regret was that I forgot to take before pictures! We were too anxious to get it done before we left for Thanksgiving. This post is proof that you don’t have to spend much money to have a functional and organized mudroom! Here is what we did.
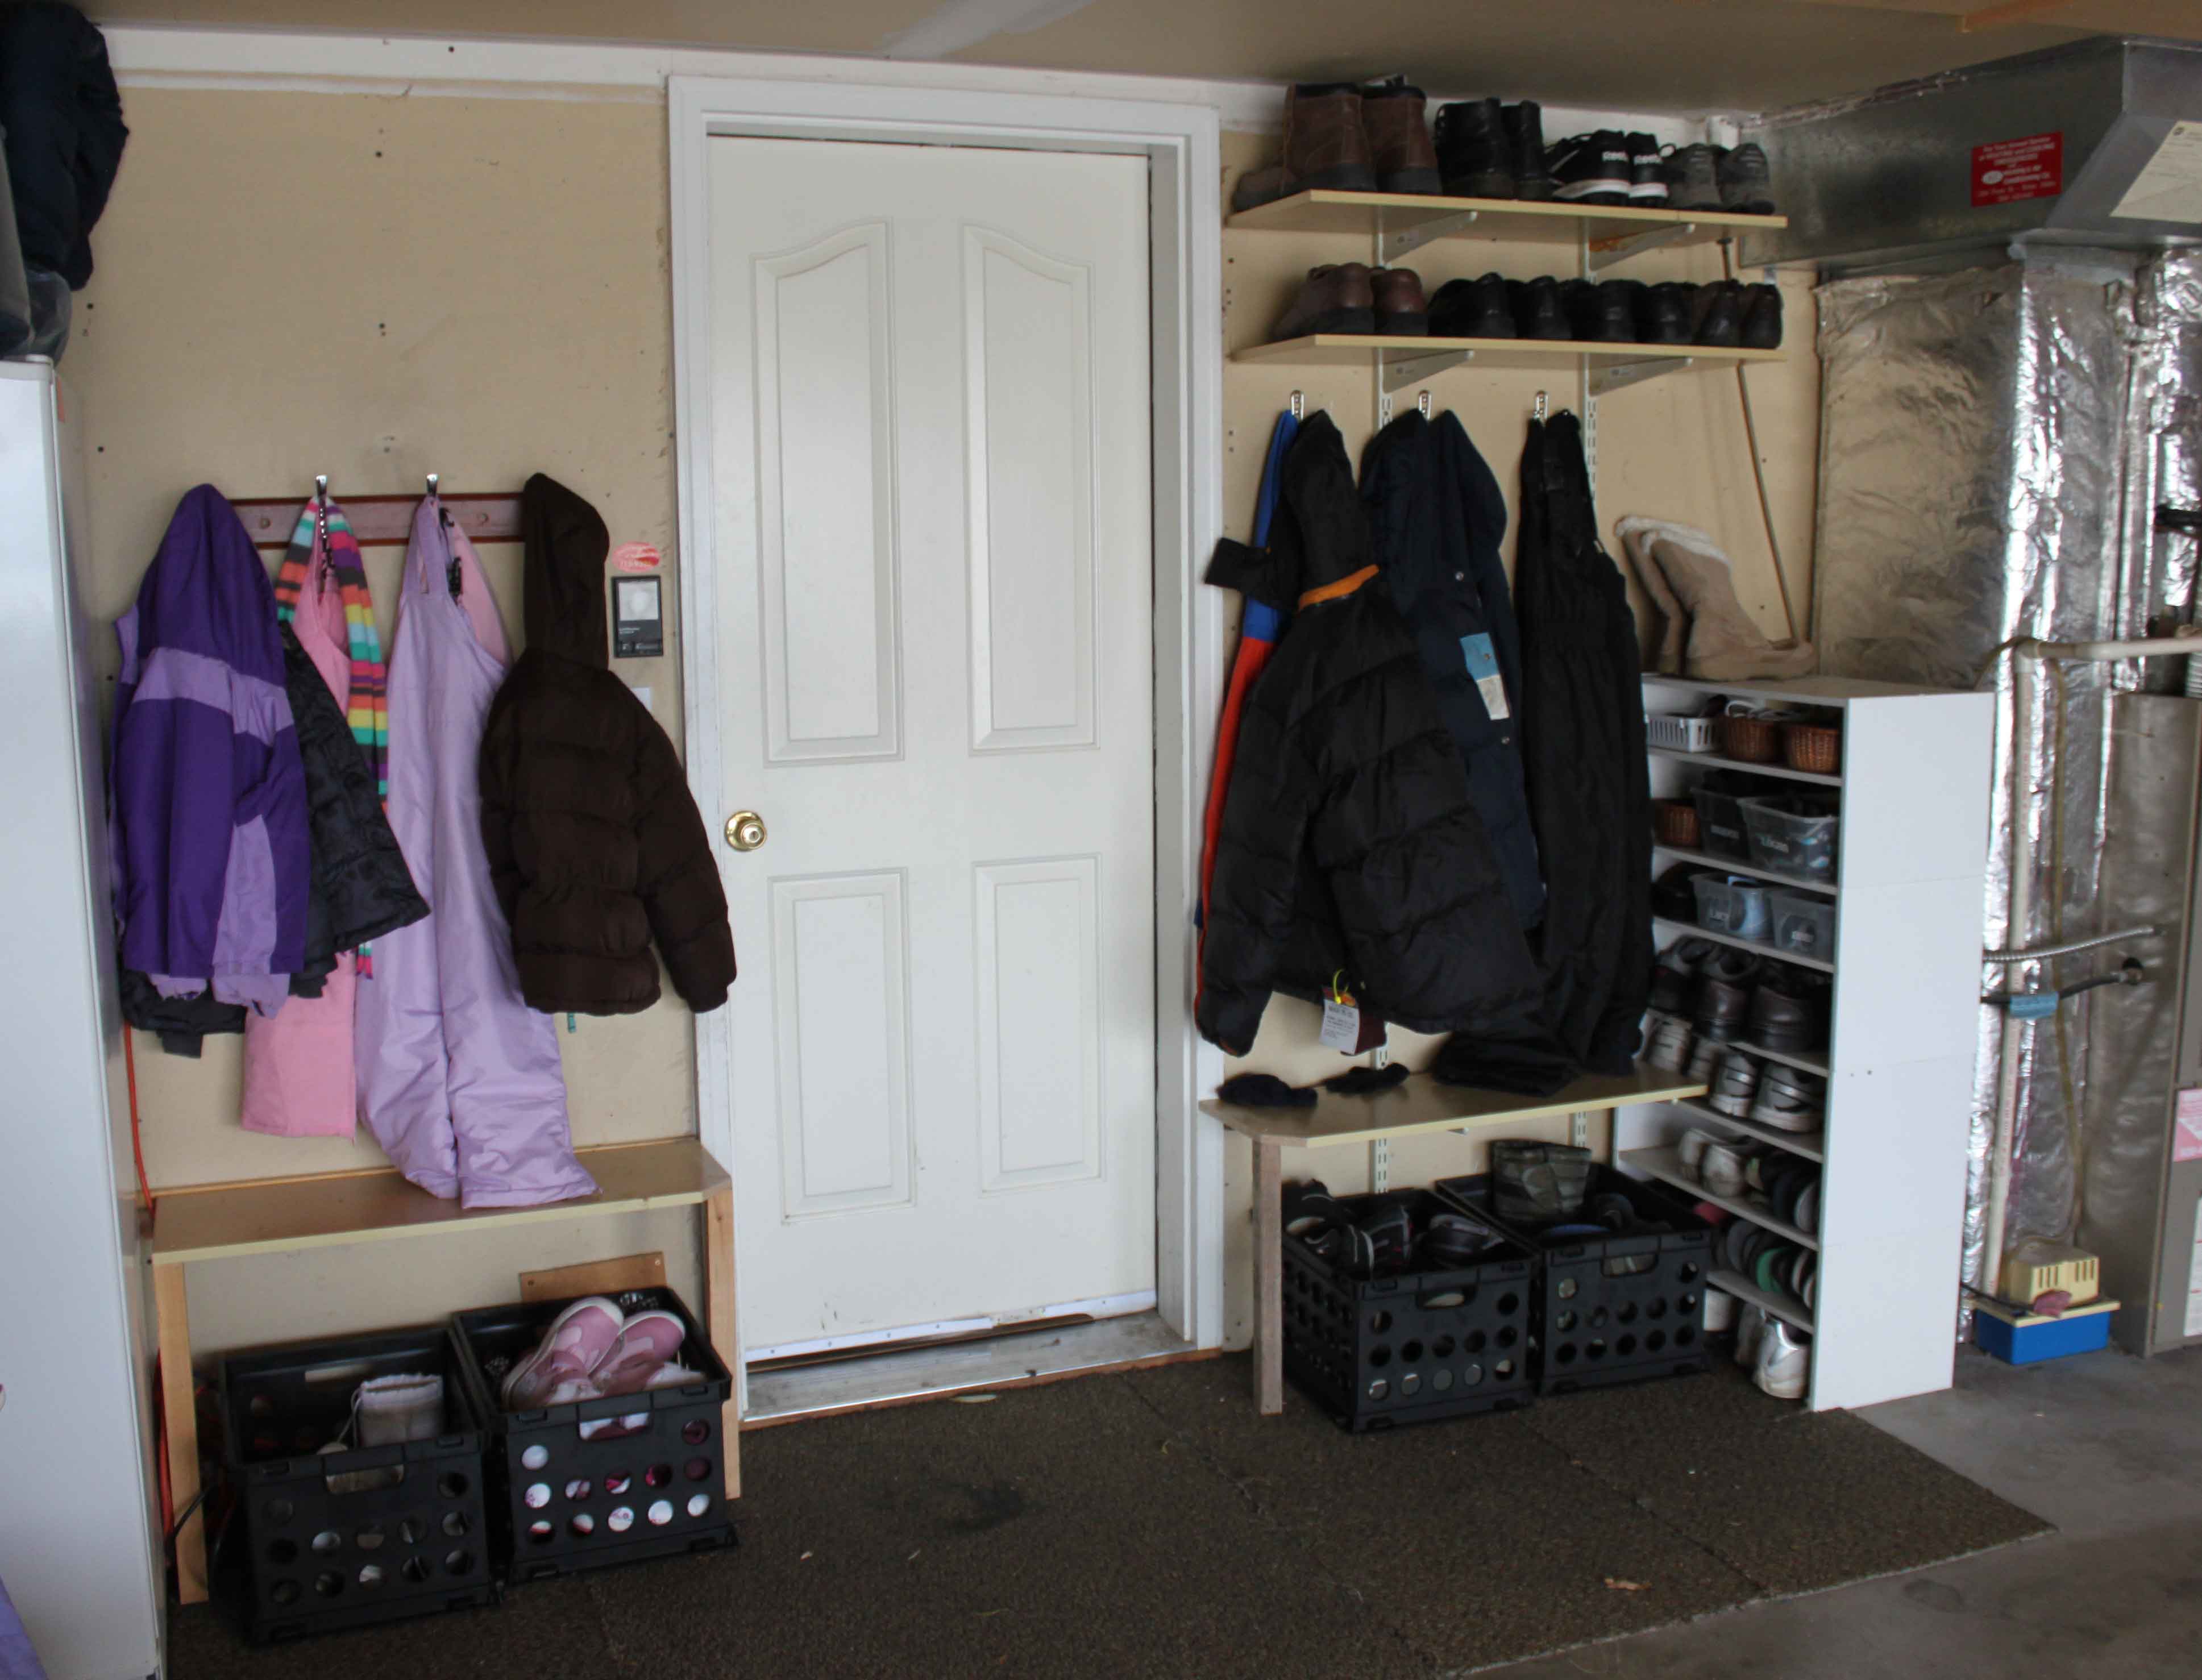
1. I originally wanted cubbies, but when I looked at the space we had, I realized that wasn’t possible. So we just did hooks. We already had the 4-hook one on the left, then I bought 3 hooks for the right side.
2. I bought a black bin for each child ($7 at Walmart in the office supply section) to put their shoes in.
3. My hubby build two benches for each side with wood scraps already in the garage.
4. We put two shelves up high (that we already had, just stored away) for hubby’s shoes. He can reach them!
5. We moved around & cut some carpet scraps we had to make them fit perfectly around the area.
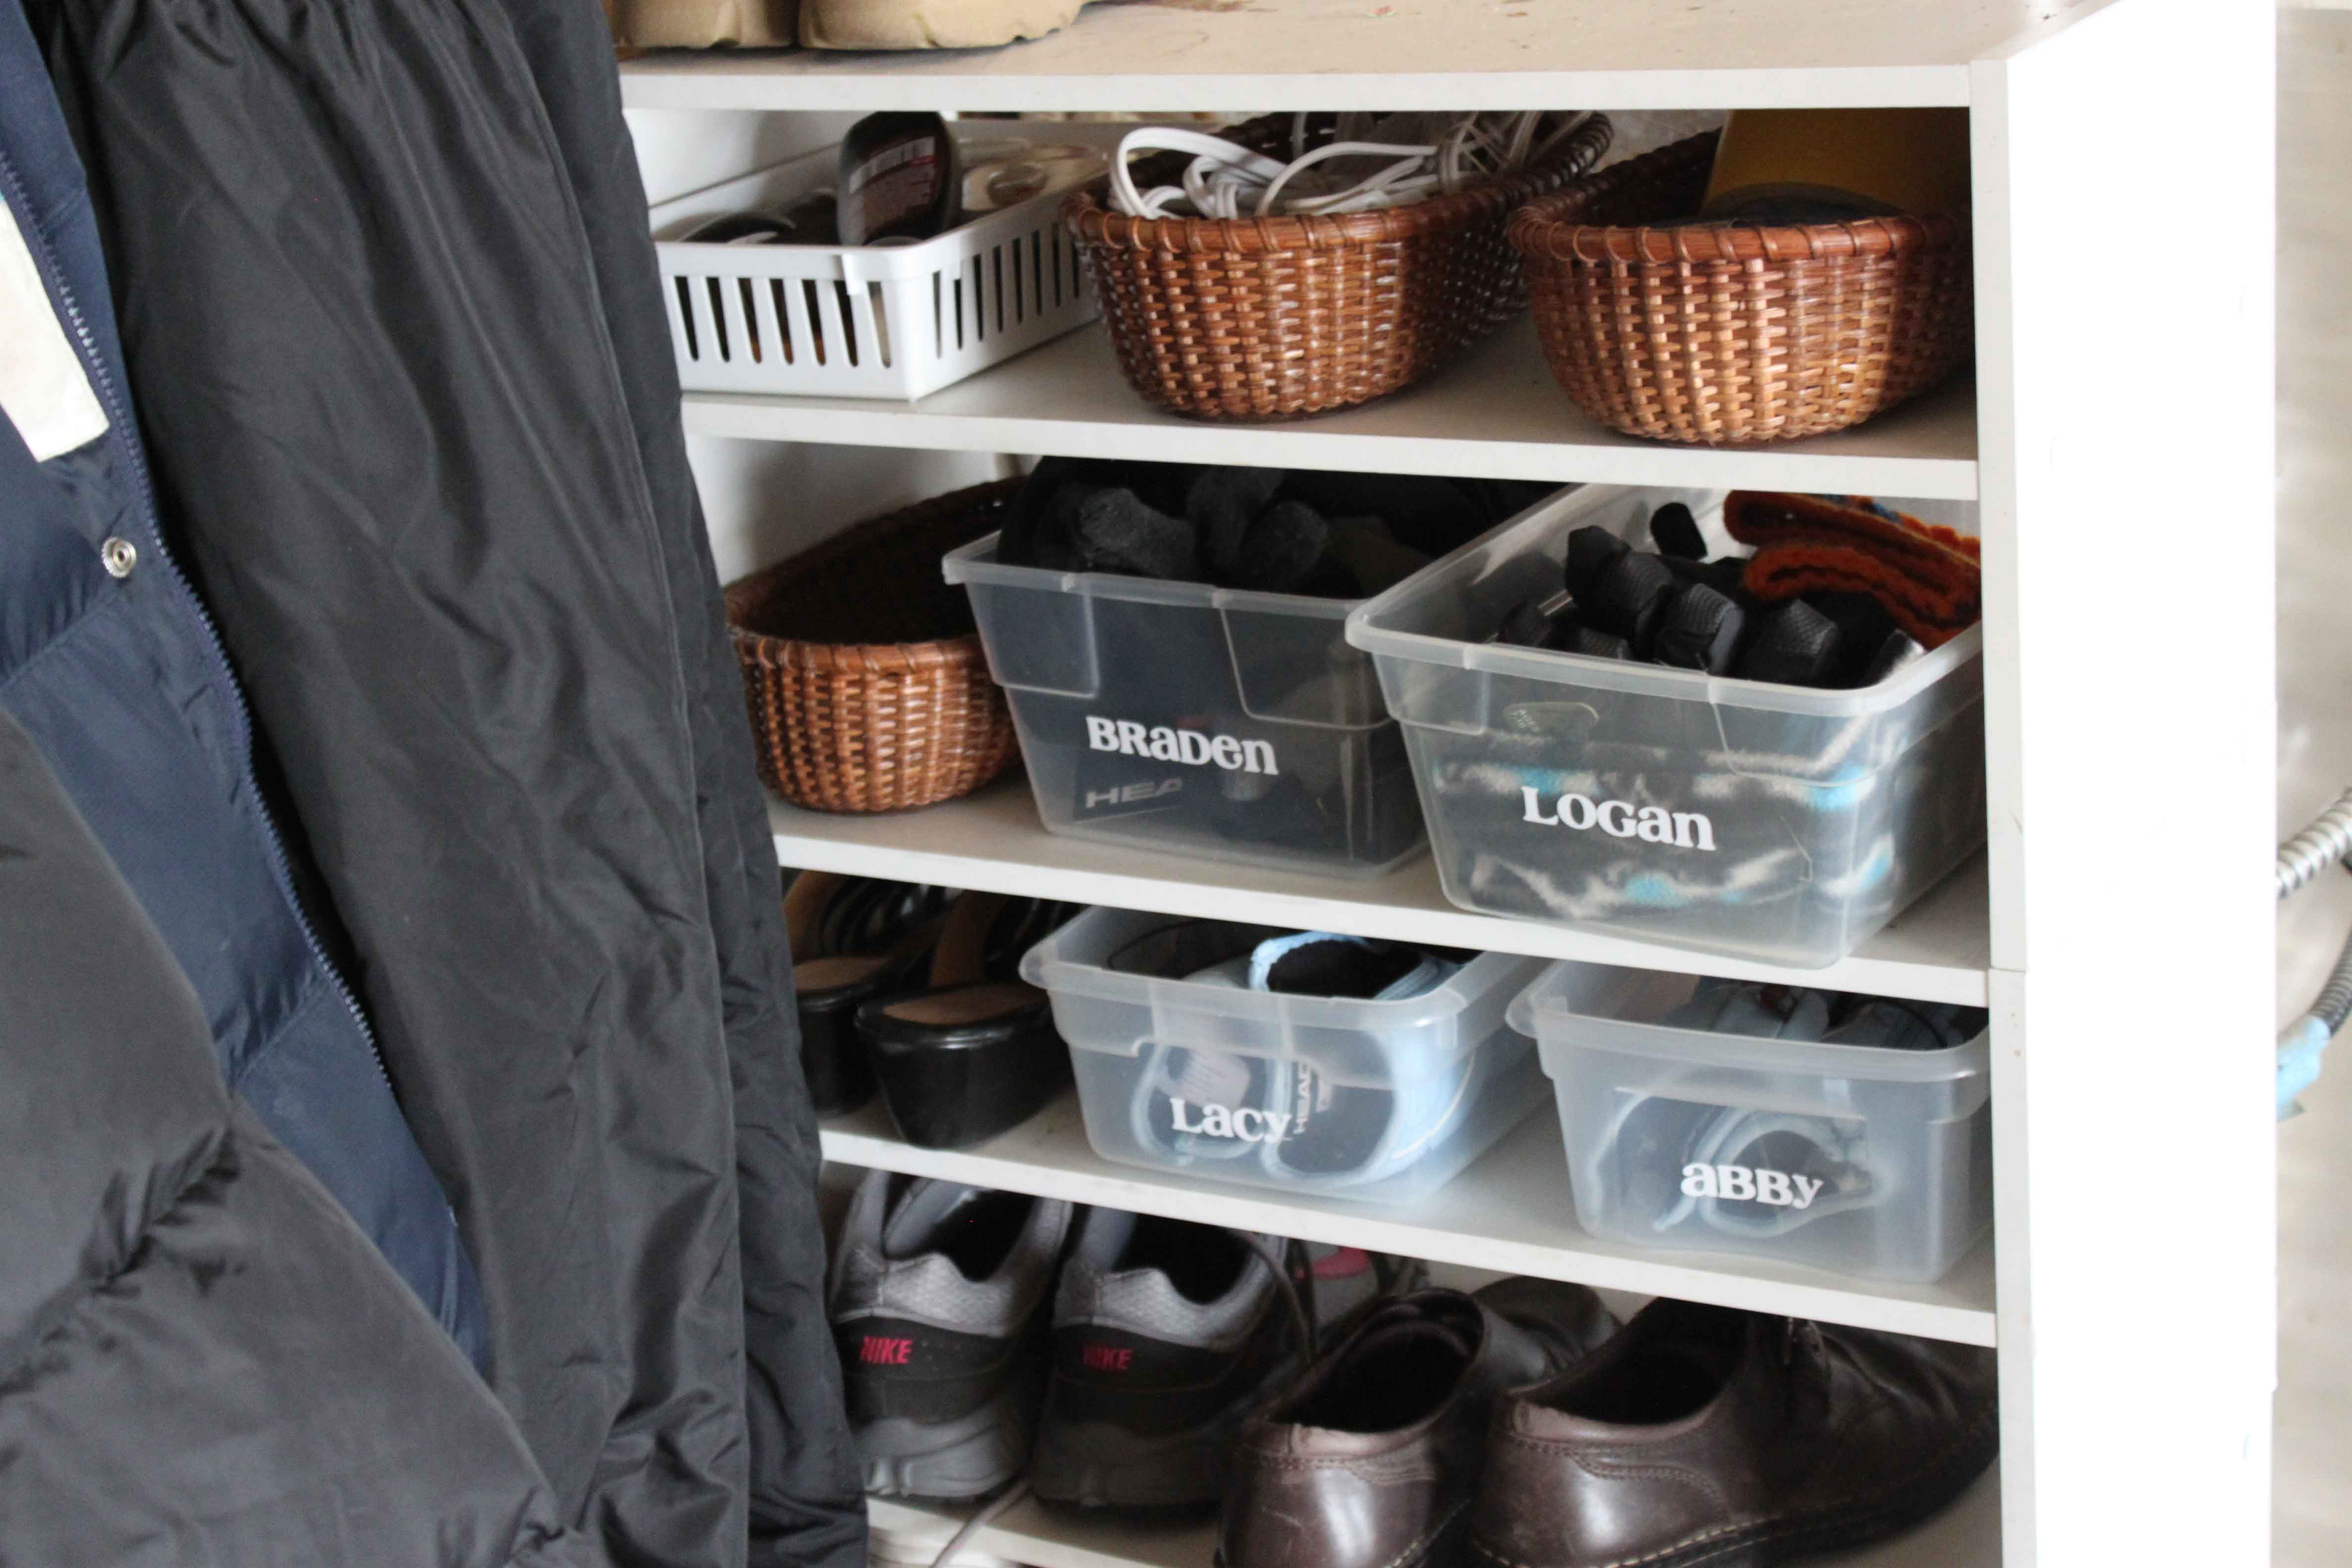
6. The original shoe shelf on the left still hold my shoes and hubby’s. As you can see, I gathered up 4 clear bins in my house I wasn’t using and made them homes for the kids’ winter gloves, hats, and scarfs. Then I used 3 small baskets I already had to store duct tape, shoe shine/shoe brush, and electrical cords that we always use.
We spent a grand total of $35.45 on this garage mudroom! I know it isn’t the fanciest, but if you saw the mess before (shoes EVERYWHERE, and coats all over the house & not enough room for them) you would be so impressed! I love that is is so functional for our family. I was proud of myself for trying hard to use what we already had instead of spending more money.
We are still planning on doing the following things:
1. Putting 4-5 more hooks on the left side above the girls’ hooks for all hats we have. That will also be a big help for us.
2. Putting a wire shelf (that we already have) on top of the white shoes racks to make one more level for the winter boots.
So what do you think? Have you done a garage mudroom for your family?
A PYP Best Blog! Taking Meals to Those in Need!
Just in case you missed this article on taking meals to those in need the first time we shared it a couple of years ago, we are republishing it. After Marne wrote this blog originally, we got an awesome response. This is one of the PYP Best Blogs!
Many of us have been in a position where we have taken a meal to a friend or someone else we know. Life circumstances like having a new baby, surgery, moving or lost of employment to those we care about can make us want to help them out a little. A good meal taken into someone can lift their spirits as well as keep the stress level for that day low…they don’t have to worry about fixing dinner that evening.
Here are a few tips if you are planning to take dinner into someone you care about.
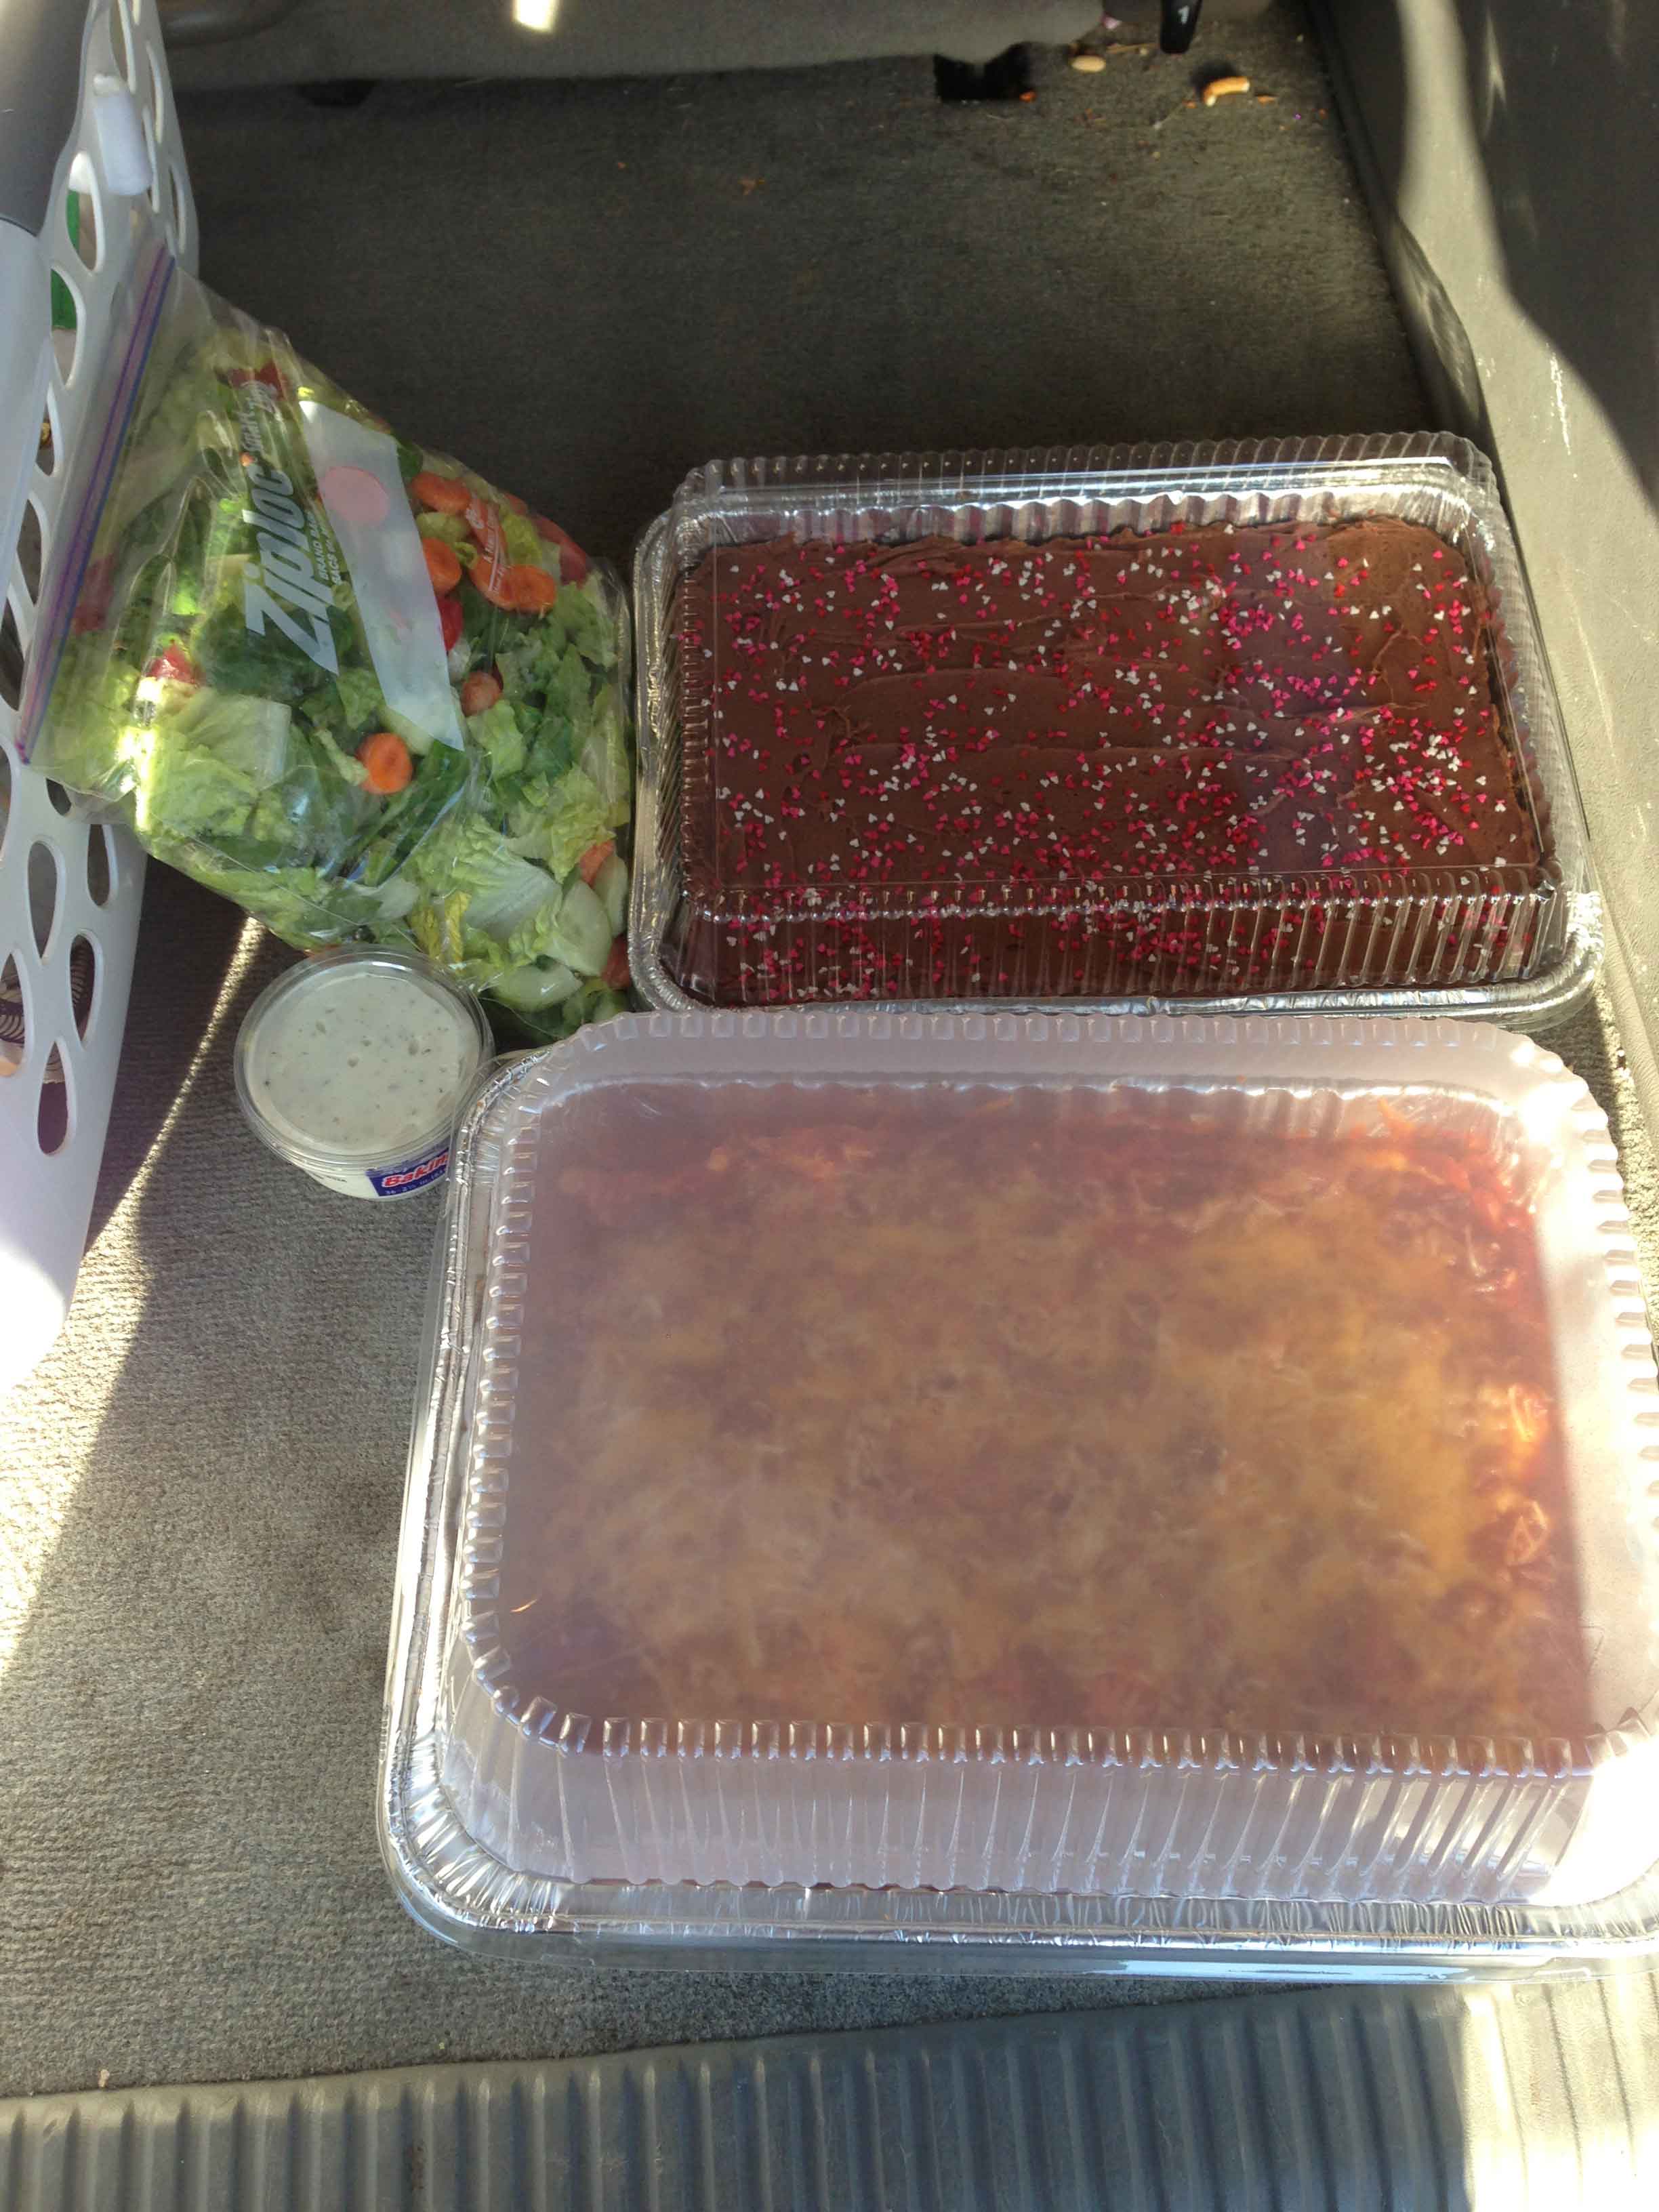
(The meal pictured above is one I took to a friend yesterday who is moving this week. I forgot to take a photo at home, so I took it in my car. Sorry about the photo quality.)
1. Find out if there are any food allergies or strong dislikes. You don’t want to make something they cannot eat.
2. Make something that is family-friendly, especially if they have children. Foods that most everyone will like and appreciate. This is not the time to try out a new recipe! Make something that you know will turn out and that your family enjoys. Some of my favorite take-in meals are homemade lasagna, baked ziti, lemon chicken, sloppy joes, chicken noodle soup, taco soup, and spaghetti pie.
3. Take the meals in containers that do not have to be returned. There is nothing worse that someone having extra dishes at home and trying to get them back to you. Invest a few small dollars in disposable pans that you can cook the food in and they can throw away when they are finished.
4. Take balanced meals. I like to take in a salad or side dish with the main dish, then a simple dessert. We all need a little sweet at the end!
5. Depending on the situation, make meals big enough for leftovers. Sometimes they might need leftovers the next day for lunch or dinner, or to freeze for next week. Gauge that by the individual situation.
6. Sometimes taking in meals that are not cooked, but can be immediately frozen, is a good idea. Then they can make it when they need it most. Just make sure you send cooking directions with the meals.
A PYP Best Blog: Homemade Shower Cleaner and the many uses for vinegar
 So for today’s PYP’s Best Blog post I am combining 2 of our best blogs into one post! I recently needed an amazing shower cleaner and I was reminded of this post that we did several years ago. Since one of the ingredients is vinegar I also wanted to re-share a post we did on the many uses of vinegar, bringing 2 of PYP’s Best Blog posts together!
Everybody’s making this stuff. Are you? Simply put 1 C white vinegar in the microwave until warm and mix with 1 C Dawn Dish. Put this into a spray bottle and you have an AMAZING shower cleaner. For tough soap scum, you can spray and leave overnight. This stuff really works!!
.
PS – You can actually use ANY amount of vinegar and an equal part of Dawn. Also, you don’t need to reheat this every time you use it. You just heat it once to get the ingredients to combine well.
The many uses of vinegar:
There are so many ways that you can use vinegar in your home. It is very inexpensive and not harmful at all to children or the environment. It is a go-to staple in my home. I have a gallon in my kitchen and laundry room at all times. It is also something that we keep in our food storage. I use it for cooking, cleaning, canning, and even in my dog’s water bowl!!
FOOD
When you can’t get the last bit of mayonnaise or salad dressing out of the jar, try dribbling a little of your favorite vinegar into it, put the cap on tightly and shake well. You’ll be amazed at how much you’ve been wasting.
Try soaking fish in vinegar and water before cooking it. It will be sweeter, more tender and hold its shape better. When boiling or poaching fish, a tablespoon of vinegar added to the water will keep it from crumbling so easily.
Cake icing can be prevented from becoming sugary if a little vinegar is added to the ingredients before cooking. The same is true when making homemade candy.
When boiling an egg and it’s cracked, a little vinegar in the water will keep the white from running out.
A teaspoon of white distilled or cider vinegar added to the water in which you boil potatoes will keep them nice and white. You can keep peeled potatoes from turning dark by covering them with water and adding 2 teaspoons of vinegar.
Freshen up slightly wilted vegetables by soaking them in cold water and vinegar.
Add 2 tablespoons white distilled vinegar to 1 pint water and use to wash fresh fruits and vegetables, then rinse thoroughly. Research has shown that vinegar helps kill bacteria on fruits and vegetables.
Before frying doughnuts, add ½ teaspoon of vinegar to hot oil to prevent doughnuts soaking up extra grease. Use caution when adding the vinegar to the hot oil.
Perk up a can of soup, gravy or sauce with a teaspoon of your favorite specialty vinegar. It adds flavor and taster fresher.
As a tenderizer for tough meat or game, make a marinade in the proportion of half a cup of your favorite vinegar to a cup of heated liquid, such as bouillon; or for steak, you may prefer to a mix of vinegar and oil, rubbed in well and allowed to stand for two hours.
Remove fruit or berry stains from your hands by cleaning them with vinegar.
For fluffier and great tasting rice, add a teaspoon of white distilled vinegar to the boiling water before adding rice. Rice will be easier to spoon and less sticky.
CLEANING
It is easy to take out the heavy stale smell often found in lunch boxes. Dampen a piece of fresh bread with white distilled vinegar and leave it in the lunch box overnight.
Get rid of cooking smells:
Let simmer a small pot of vinegar and water solution.
Soak a paper towel with 1-2 Tablespoons of white distilled vinegar. Wipe mixing bowl and beaters or whisk with the vinegar-soaked paper towel, then dry with a cloth or paper towel prior to whipping egg whites.
Bathtub film can be removed by wiping with white distilled vinegar and then with soda. Rinse clean with water.
Rub down shower doors with a sponge soaked in white distilled vinegar to remove soap residue.
Corrosion may be removed from shower heads or faucets by soaking them in diluted white distilled vinegar overnight. This may be easily accomplished by saturating a terry cloth towel in vinegar and wrapping it around the shower head or faucet.
Stubborn stains can be removed from the toilet by spraying them with white distilled vinegar and brushing vigorously. The bowl may be deodorized by adding 3 cups of white distilled vinegar. Allow it to remain for a half hour, then flush.
PETS
A teaspoon of white distilled vinegar for each quart bowl of drinking water helps keep your pet free of fleas and ticks. The ratio of one teaspoon to one quart is for a forty-pound animal.
Test the color fastness of the carpet with white distilled vinegar in an inconspicuous place. Then sprinkle distilled vinegar over the fresh pet accident. Wait a few minutes and sponge from the center outward. Blot up with a dry cloth. This procedure may need to be repeated for stubborn stains.
.
.