
A PYP Best Blog! Healthy, Make-Ahead School Lunch Ideas!
Just in case you missed this article on healthy, make-ahead school lunches the first time we shared it a couple of years ago, we are republishing it. After Marne wrote this blog originally, we got an awesome response. This is one of the PYP Best Blogs!
School time is now upon us. And for many moms that brings the dreaded “what do I pack for school lunch that is healthy and won’t break the bank?”
I have some great ideas for you today. These work really well for me and my kids.
1. Use Muffins Instead of Sandwiches. My kids are really picky when it comes to sandwiches. And they can only take so much pb&j. So one thing I like to do is make muffin ahead of time and freeze them. Then when packing their lunches in the morning all they have to do is grab a frozen muffin and it will be thawed by lunch time. Works great! I can make a couple different batches of muffins and they will last a few weeks. Here is a good healthy option if you want to do this.

Whole Wheat Banana Chocolate Chip Muffins
original recipe source
1/2 cup butter (1 stick or 4 ounces)
1/2 cup packed light or dark brown sugar
3/4 tsp baking soda
1/2 tsp salt
1/2 tsp ground cinnamon
1/4 tsp ground nutmeg
1 tsp vanilla extract
1 1/2 cups mashed ripe banana (about 3 bananas)
1/4 cup honey
2 large eggs
2 cups whole wheat flour
2/3 cups mini chocolate chips
Preheat the oven to 350. Line or grease a 12 cup muffin pan. (I usually make these in my mini muffin tins. Makes 34 mini muffins or 12 regular size and 24 mini muffins).
Beat together the butter, sugar, baking soda, salt, cinnamon, nutmeg, and vanilla in a medium bowl until smooth. Add the banana, honey and eggs, beating until smooth. Add the flour and chocolate chips, stirring until smooth. Divide batter into the muffin cups, they’ll be nearly full. Bake the muffins until a cake tester inserted in the center of one comes out clean, 23-28 minutes. Remove from oven and after a couple of minutes transfer the muffins to a rack to cool.
2. Forget Fruit Snacks! Another good energizing snack is these Peanut Butter Balls. My kids LOVE these, and I can sneak in whatever I want to make it healthier. The recipe is quite adaptable. Just like the muffins, the kids pop these in their lunch bag in the morning and they are thawed by lunch time. One of my kids likes chocolate chips, the other two don’t.

Peanut Butter Balls
Original recipe source
1 – cup honey
1 1/2 – cups creamy peanut butter
2 – cups dry powdered milk
3 – cups quick or old fashioned oatmeal, uncooked
1 – 2 – tablespoons wheat germ or flax meal
1/2 cup mini chocolate chips (optional)
Mix all together with hand mixer. Form into balls with hands and freeze on a baking sheet lined with waxed paper until firm. Remove from freezer and store in a large zip lock bag in the refrigerator.
3. Make Smoothies Ahead. Another idea for you is to make smoothies and freeze them in containers like this:
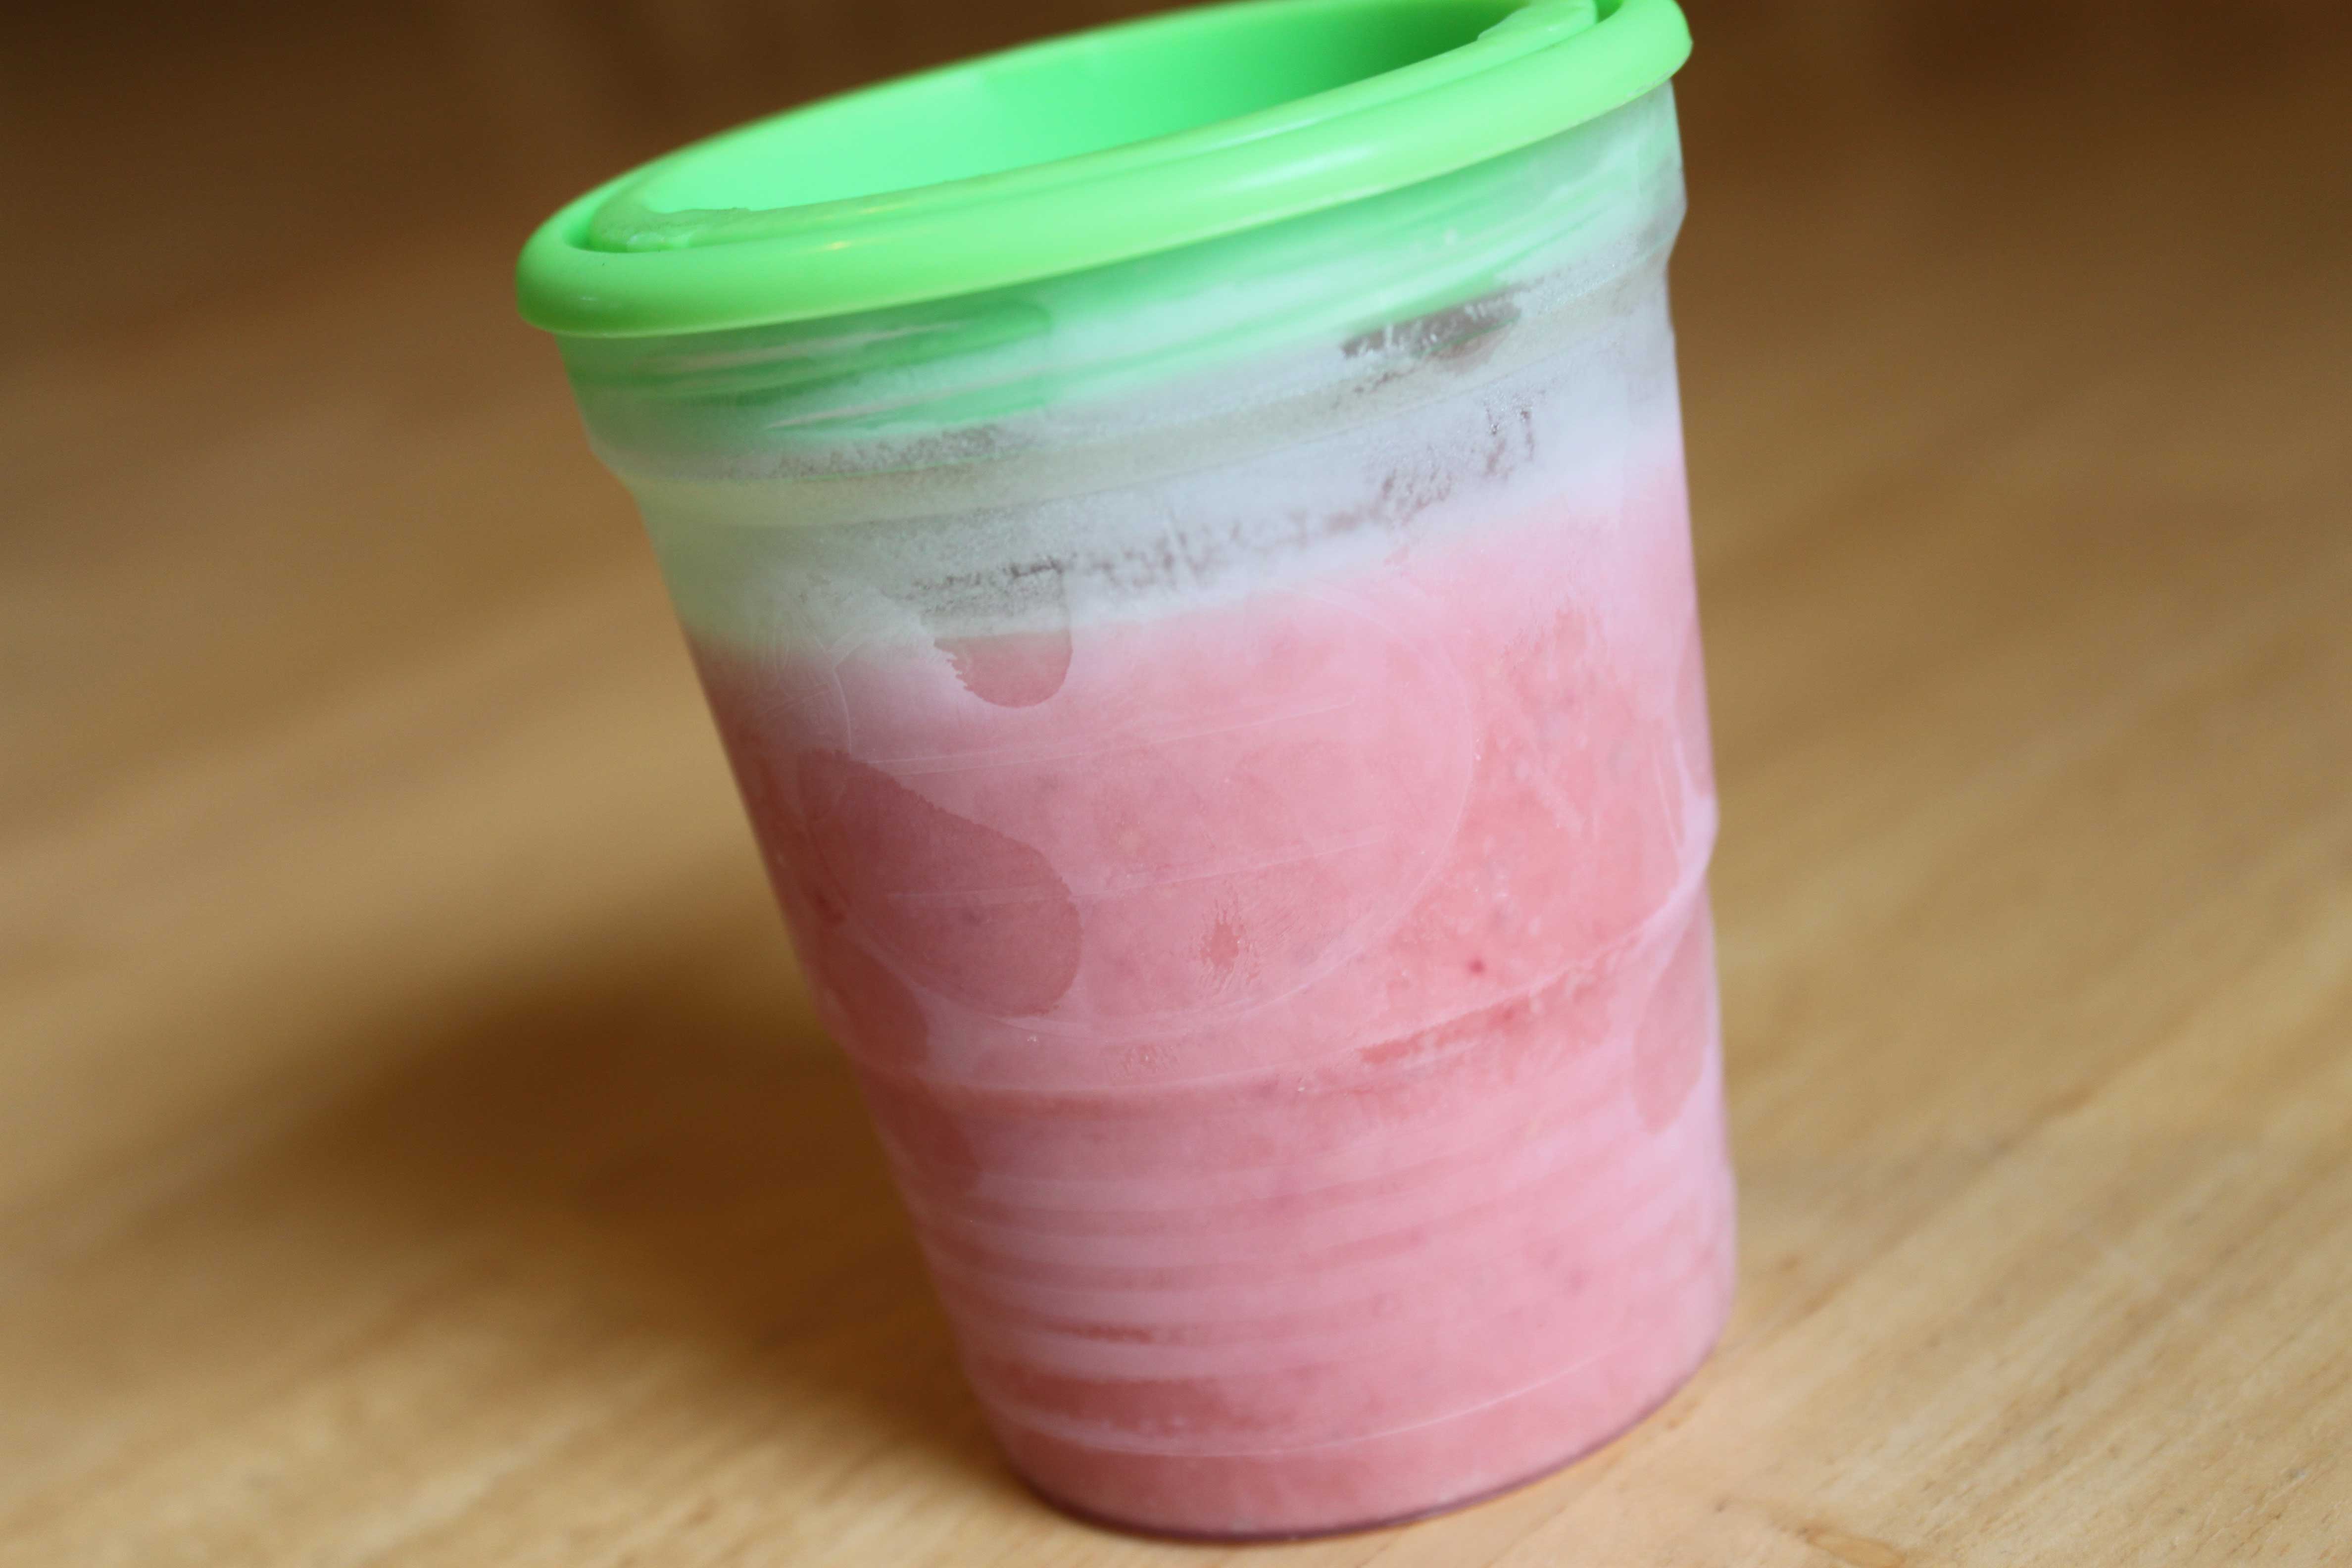
Then take them out of the freezer in the morning and they will be thawed by lunch! My kids love smoothies and I sneak all sorts of veggie and fruit goodness in them. It’s a great way to give them a boost during their day…a healthy boost! Here are some of my favorites to make. Keep in mind these measurements are approximate…I never measure when I make smoothies and I always use different ingredients..what I have on hand.
Orange Julius
1/2 c. orange juice concentrate
1 c. milk
1 or 2 bananas
3-4 raw baby carrots
handful of fresh pineapple
handful frozen peaches
half apple cut into chunks
1 c. vanilla yogurt
honey to sweeten (optional)
Blend until smooth! I use frozen fruit so I don’t add any ice. If you use canned or all fresh you will want to add ice. Can also add pears or any other yellow or orange fruit or veggie.
Purple Passion
1/2 c. vanilla yogurt
1 c. milk
handful of frozen blueberries & raspberries & strawberries
handful raw baby spinach
3-4 baby carrots
1 banana
honey to sweeten
Blend until smooth! Like I said above, if you don’t use frozen fruit add ice.
Peach Raspberry Smoothie
2 c. frozen peaches
1/2 c. frozen raspberries/strawberries
1 c. vanilla yogurt
1 c. milk
honey to sweeten (optional)
Blend until smooth.
Peanut Butter Blast
1/2 c. milk
1/2 c. peanut butter
1 banana
chocolate syrup
small handful of graham crackers
ice
Blend until smooth.
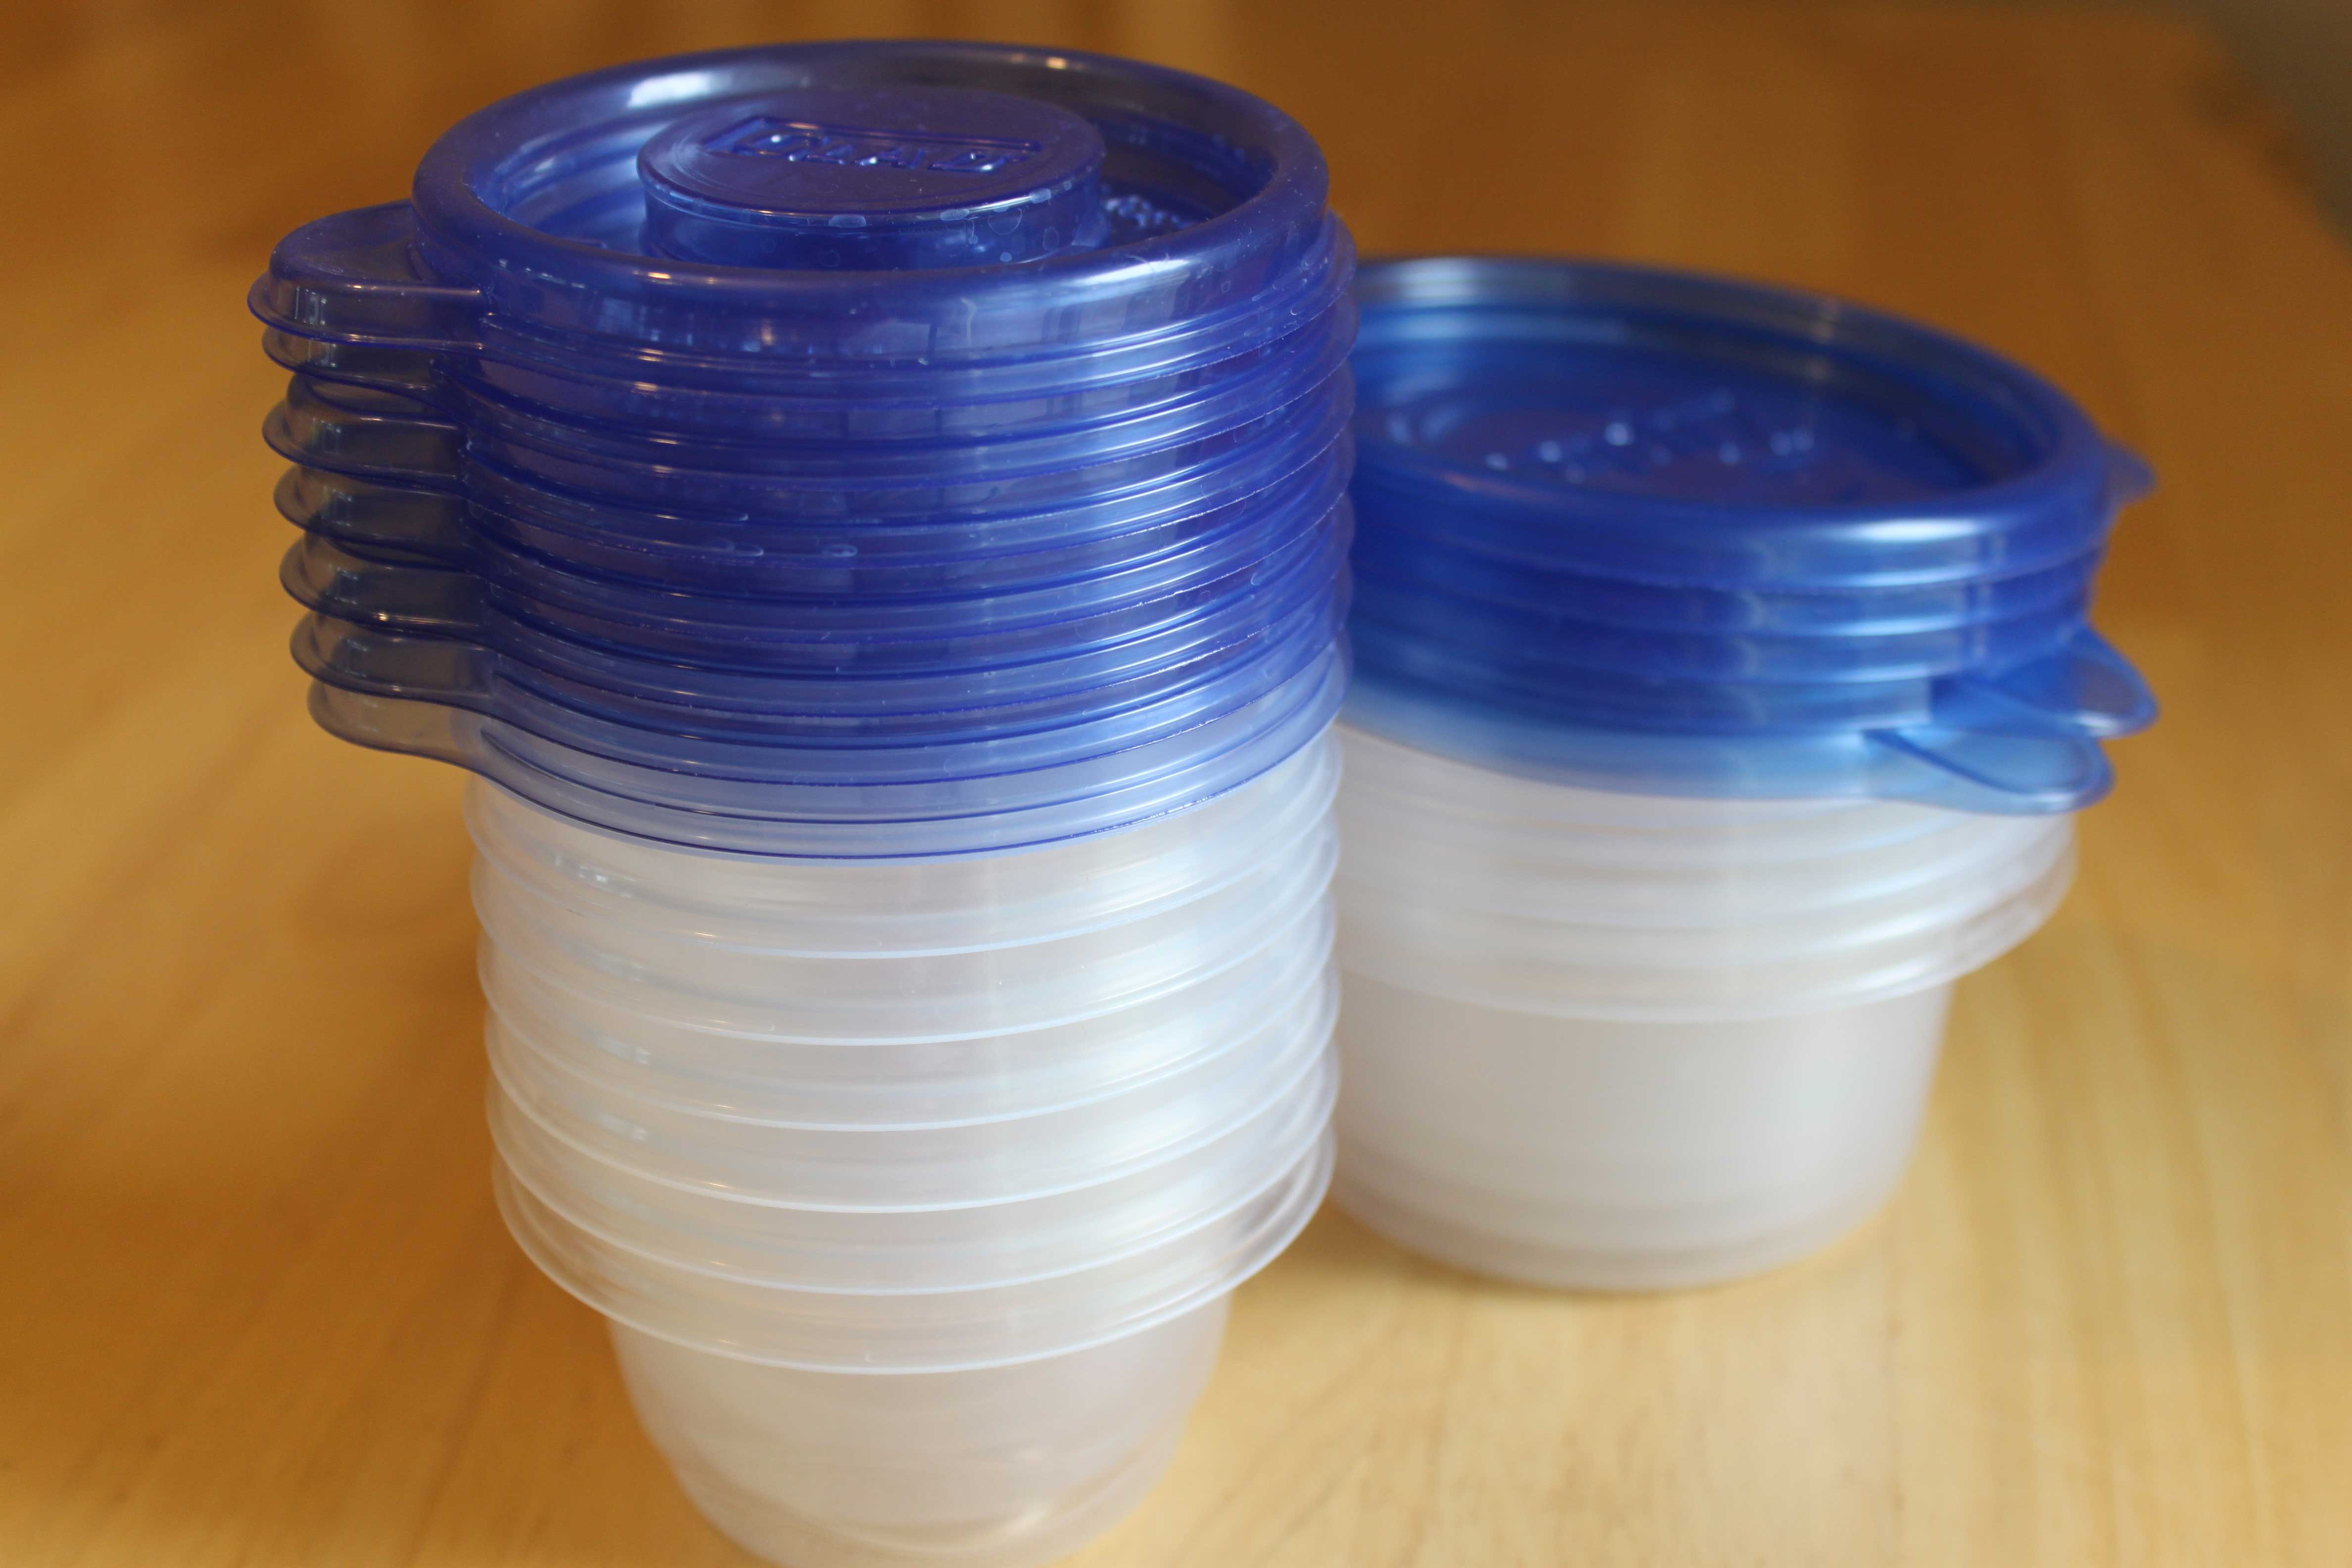
4. Make Your Own Kid-Sized Portions. The last tip I want to share is about planning ahead. Instead of purchasing pre-packaged smaller items at the store like applesauce and yogurt for your kids’ lunches, do it yourself! I bought these containers at Walmart, and I fill them with fruit, yogurt, applesauce and whatever else. This way I am saving money as well as giving them better food. For example, I can my own applesauce and fruit.
What back-to-school lunch ideas do you have to share?
A PYP Best Blog: Back-to-School Lunch Ideas
Just in case you missed this article on back-to-school lunch ideas the first time we shared it a couple of years ago, we are republishing it. After Marne wrote this blog originally, we got an awesome response. This is one of the PYP Best Blogs!
It is time for school again! I can hardly believe it. My kids started school today! Hooray on both ends. Now that I have to make lunches everyday again, I have ideas on my brain. Two years ago I did a post on Healthy, Make-Ahead School Lunches. In that post, I gave some ideas for muffins, smoothies, and other tips that you can do to make school lunches for your child healthy and less expensive. Check out that post if you haven’t seen it.
This year I wanted to add a few more items to the list. My kids have grown and their tastes have changed, and we have a few new ideas!
1. Pizza Rolls. I had seen a few versions of this on Pinterest, but I kind of made up my own version. They are super simple to make and my kids LOVE them. I will quadruple the batch and put them in the freezer, so that morning as we are doing their lunches they nuke it a little and its perfect for their lunch. In this photo the pizza rolls are made, but not baked yet. But they still look so delicious!!

I start by making my favorite pizza dough recipe. (This also works well using half wheat flour). Love this recipe.
After the dough has risen, I divide it up. If you make one batch of this dough, it will make one pizza roll and you don’t need to divide it up. I will quadruple the batch of dough in my Bosch mixer, and make 4 rolls to slice up and freeze! Make sense? Roll the dough out in a rectangle, like if you were making cinnamon rolls. I spread it lightly with butter, then sprinkle on garlic powder and Italian Seasoning (as much as you want), then sprinkle on cheese and mini pepperonis. Roll up the long way (again like if you were making cinnamon rolls). I use bakers twine to slice them up, the sizes like you see in the photo above. Then I place on my Silpat liner on a baking sheet and cook at 350 degrees for about 15-18 minutes or until slightly golden. They turn our lovely and are good alone or with marinara sauce!
2. Pasta. I don’t know why I didn’t think of this before, but a few of my kids love pasta. They love taking it in their lunch in a thermos. When I make a pasta dish during the week, I will make more to save for them for lunch. Plain pasta with butter and Parmesan, or a pasta dish, it doesn’t matter. It works great. Pasta will easily keep for a few days in the fridge so it is a great solution.
3. Breakfast Burritos. My 4th grader can put down these things! I will make them ahead and warm them up for his lunch. We put them in a thermos when hot and they are still nice and warm at lunchtime. He loves these the most out of anything else I send him for the ‘main part’ of his lunch. It really doesn’t take long to put together in the morning if you want to do one fresh. I’m lucky because he is simple…he likes eggs in a tortilla..that’s it!
What do you do in your kids’ school lunches?
A PYP Best Blog! Being Frugal and Saving Through the Little Things!
Just in case you missed this article on being frugal and saving money the first time we shared it a couple of years ago, we are republishing it. After Marne wrote this blog originally, we got an awesome response. This is one of the PYP Best Blogs!
Recently I went for a visit to my parents’ house. The house where I grew up. It had been a few years since I had been there and just walking in the door made me remember moments, events, and holidays. Isn’t it amazing how smells, items, and places do that to us? I was flooded with so many emotions that I didn’t know where to begin.
One thing I noticed was how frugal my parents still are. They passed that gene onto me, but I am not as frugal as I could be. They pinch pennies till they scream. Me…not so much. I suppose I go through phases like anyone else, but my parents never seem to falter. They are always able to get by with less and be happy. As I thought about this while I was visiting, I came up with some things I wanted to remember and implement better in my own life. Things I already know but don’t practice. Or things that I think I knew, but really didn’t understand as much as I thought.

1. Always be thankful for what you have, not what you don’t have. This is something we are taught from toddler ages, but I think it all sinks in differently for each of us. For me, actions spoke louder than words. My parents LIVE this principle, they didn’t just teach it. I am living debt-free today because this principle has been ingrained in me. I can do a better job at not complaining, however. My mom never complained. Ever. Art least not in front of me.
2. Make do with what you have, or do without. Now, this is easier said than done. But I really believe that there are many times I just throw something away that could be re-purposed. Or just buy new pants instead of fixing the hole on the old ones. My parents rarely bought anything without using the current item down to it’s threads. I never had new clothes unless I really needed them. How many of us can say that now? Trying to differentiate between a need and a want can be tricky, but being honest with yourself will help you see what you truly need or don’t need. I was shocked to see my mom still has clothes from when I was in high school (18 years ago). She truly doesn’t waste anything. The decor is the same. Looks the same as 20 years ago. And I like it that way too. If I went home to a newly decorated house it wouldn’t mean as much to me.
3. Find new purposes for everyday items. My parents were really good at this one. I was born in 1976, so obviously the internet was not there for ideas like it is now. Pinterest and Google didn’t exist. Mom and Dad came up with ideas or solutions on their own, or talked to friends and family. I thought it was normal to use empty shoeboxes to organize my drawers, use empty oatmeal canisters for my toys, and toilet paper rolls as cord holders. As I grew I realized not many people did those things, but it really helped me know that most needs can be met with what we already have on had. No need to spend lots of money or organizing bins or fancy tie holders. Just use a little creativity and imagination and we can solve our need without spending a dime.
4. Try making it homemade. This is beginning to become more popular thanks to Pinterest and the desire to stop eating processed foods. But it is true: making food from scratch saves lots of money, and it is healthier for you. Period. I won’t even tell you how old I was before I ate pizza that wasn’t homemade or mac and cheese from the box. My mom made everything and it was delicious!
These are not new concepts. Just tried and true that we all need to remember if we want to spend less and have a better quality of life.
Attention Northern Utah Shoppers! It is time for the fall Just Between Friends Sale!
![]()
Attention Northern Utah Shoppers! It is time for the fall Just Between Friends Sale!
Here’s the postcard we talked about yesterday! Print this postcard for free admission to the early bird sale on Thursday. You can also just show it on your phone to get into the early bird sale free!
 Bargain shopping moms in Utah LOVE, LOVE, LOVE this sale! If you’ve been before you know exactly what I am talking about. But if you are new to Just Between Friends – Don’t miss it! It is North America’s Leading Children’s and Maternity Consignment Sales Event! The sale is clean, bright and organized! It’s a retail experience with yard sale prices!
Over 10,000 sq. ft. filled with new and gently used:
· Clothing: sized newborn through juniors
· Shoes
· Toys: bikes, outdoor toys, small toys, educational toys, etc.
· Books
· Games
· Sports equipment
· Baby gear: carseats, strollers, carriers, play gyms, etc.
· Nursery and Kids’ furniture
· And more!
Salt Lake County – Fall/All Seasons 2014 Sale
Sales Event Dates and Location:
August 14-16, 2014
Salt Lake County Equestrian Center and Fairpark
2100 W. 11400 S., South Jordan, UT
EVERYONE is welcome! They accept cash, MasterCard, Visa and Discover.
Wednesday: Pre-sales by special pass only.
Thursday: OPEN TO THE PUBLIC! 9am-8pm. Admission at 9am is $5. From 10am through the rest of the sale, it’s FREE!
Friday: OPEN TO THE PUBLIC! 9am-8pm Most items will be 25% off on Friday.
Saturday: OPEN TO THE PUBLIC! 9am-2:30pm Most items will be 50% off!
Visit the Just Between Friends website for more information!
A PYP Best Blog! Shopping List Dry Erase Board!
Just in case you missed this article on creating a DIY shopping list dry erase board the first time we shared it a couple of years ago, we are republishing it. After Sharon wrote this blog originally, we got an awesome response. This is one of the PYP Best Blogs!
“Next time you’re going to Wal Mart, could you pick me up a notebook?”
“Next time I’m at the store, I have to remember we need baking soda.”
“When are you going to Lowe’s? I need some sandpaper.”
“I need new socks!”
There’s no way I can remember all the shopping requests that get hurled my way every week, and having them written down usually results in the bottom of my purse being littered with enough Post It notes and scraps of paper to ensure that something was always being missed. What I needed was a master shopping list all in one place. For my family, the refrigerator door is the best place, and it is so effective that it only took a week or two to have everyone trained to write their needs on the list on the dry erase board.
“Did you get my socks?”
“Did you write it on the list?”
Problem solved.
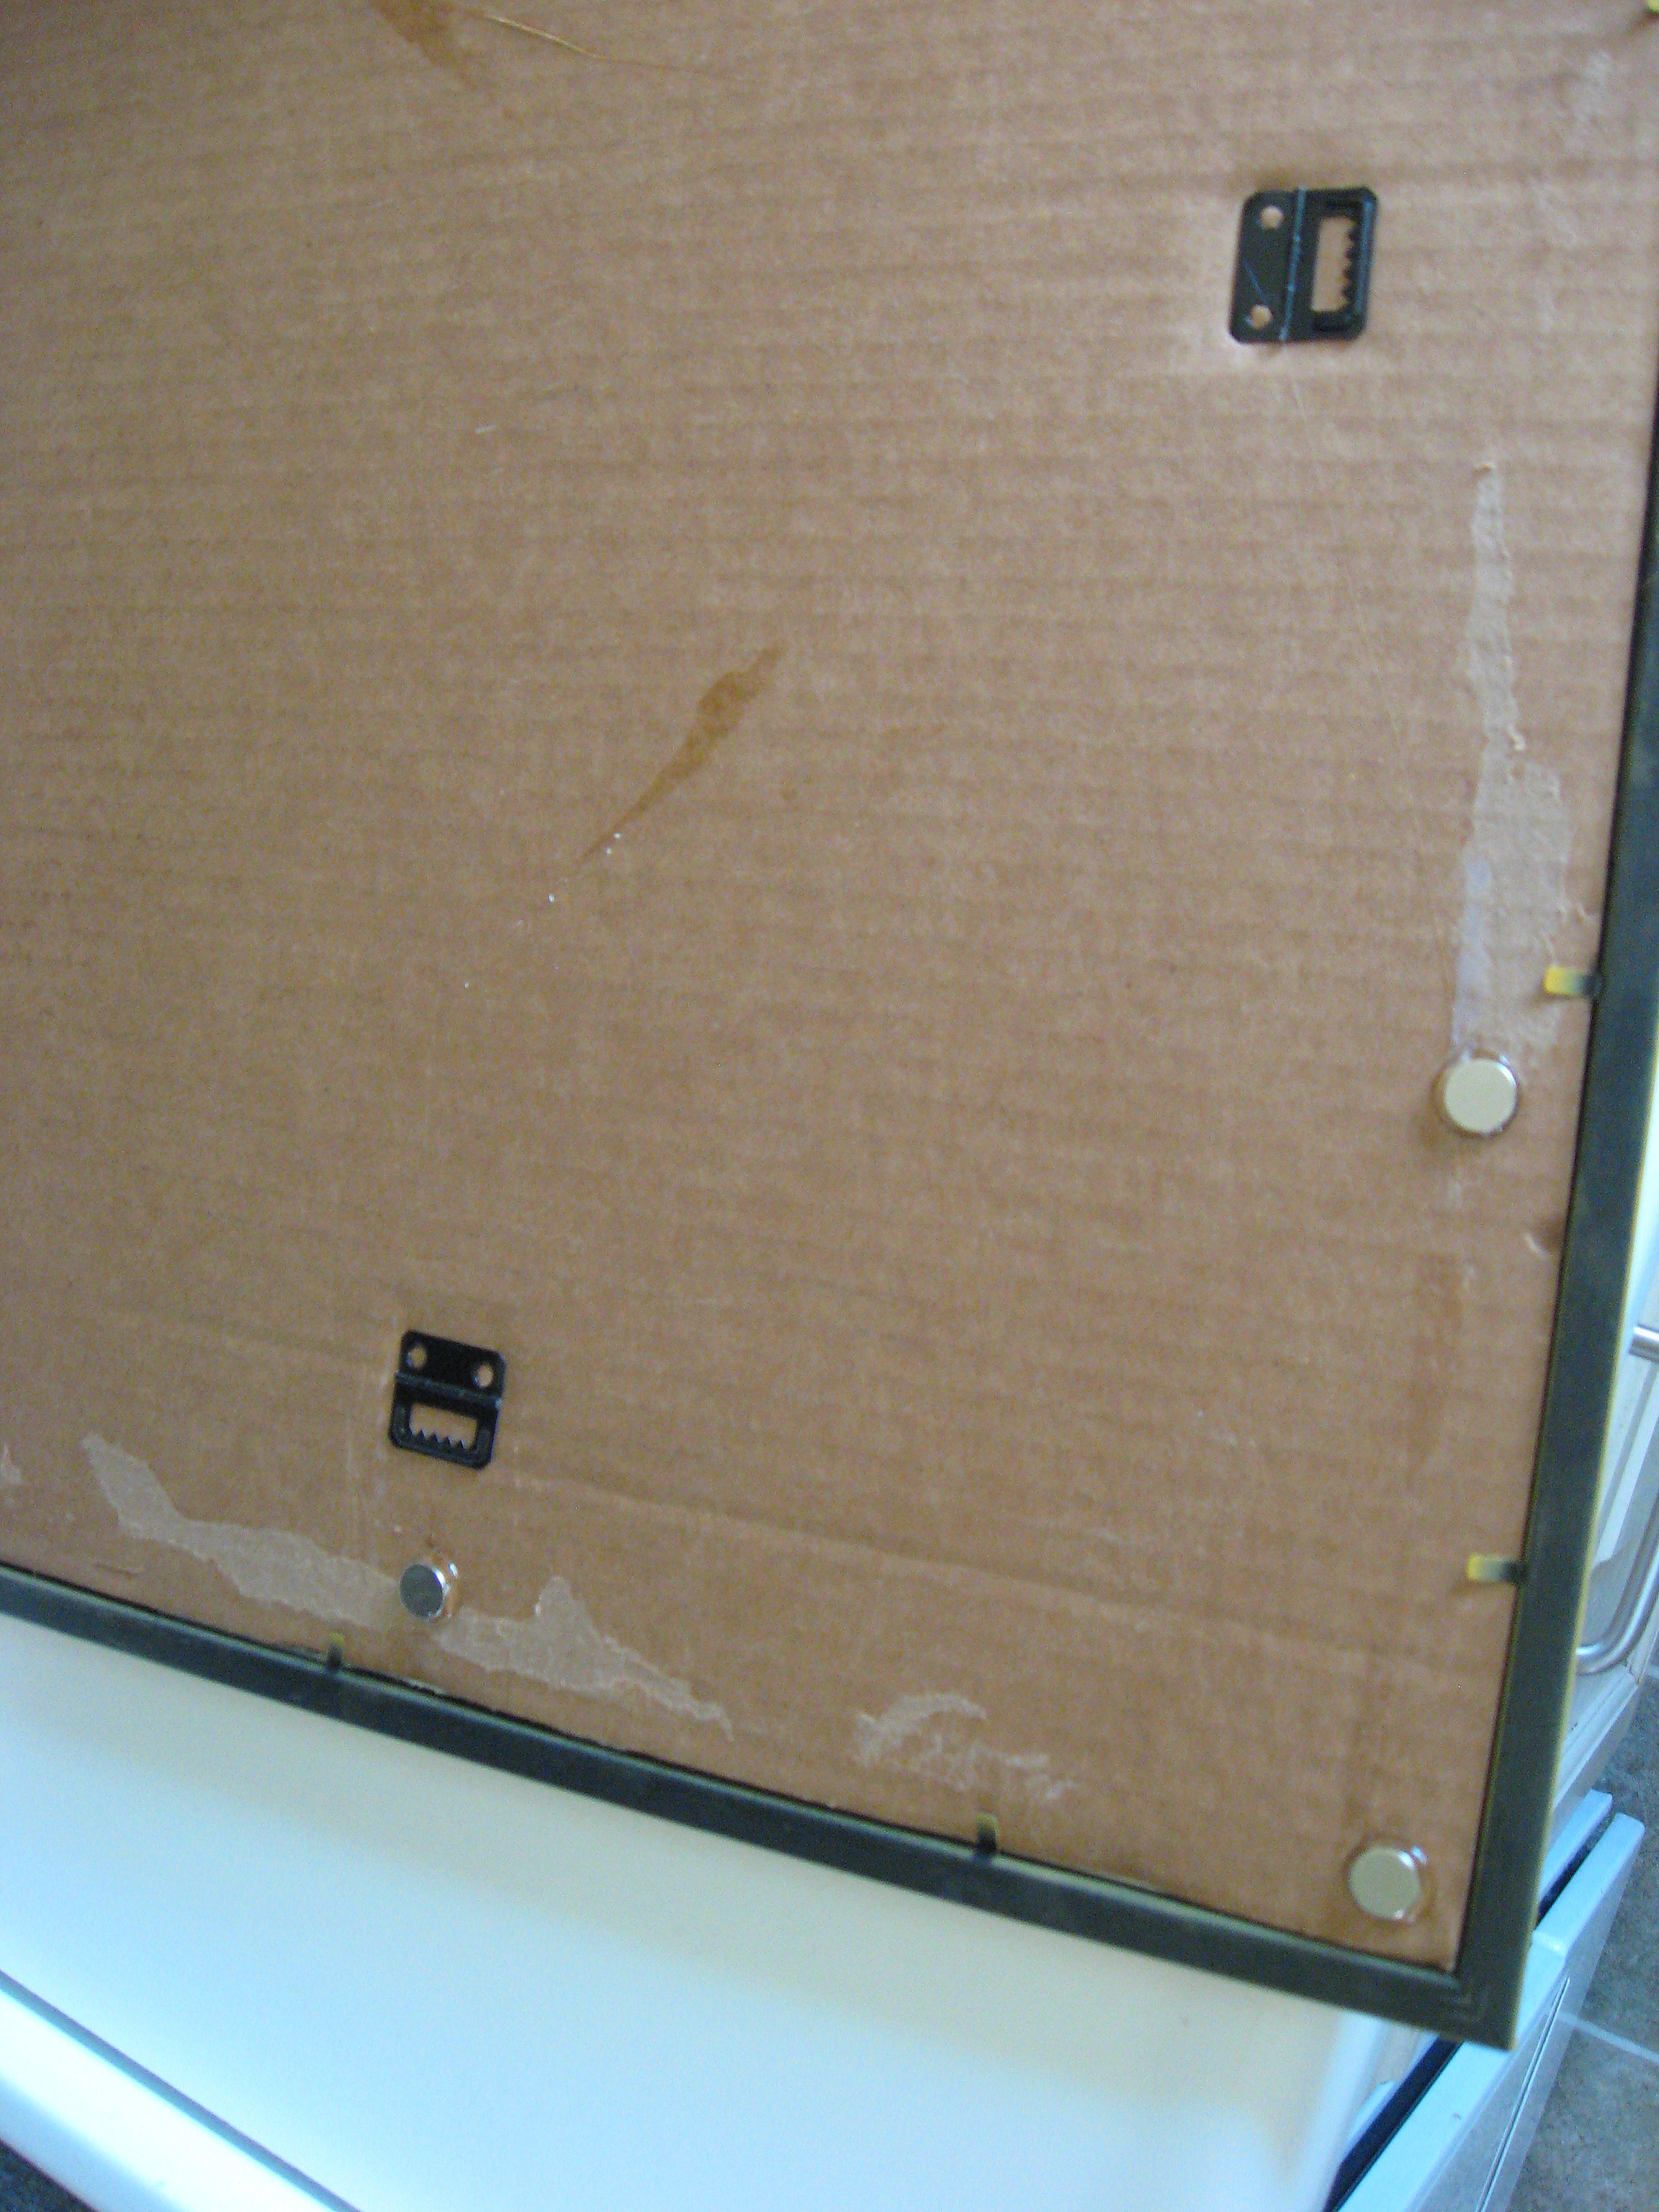
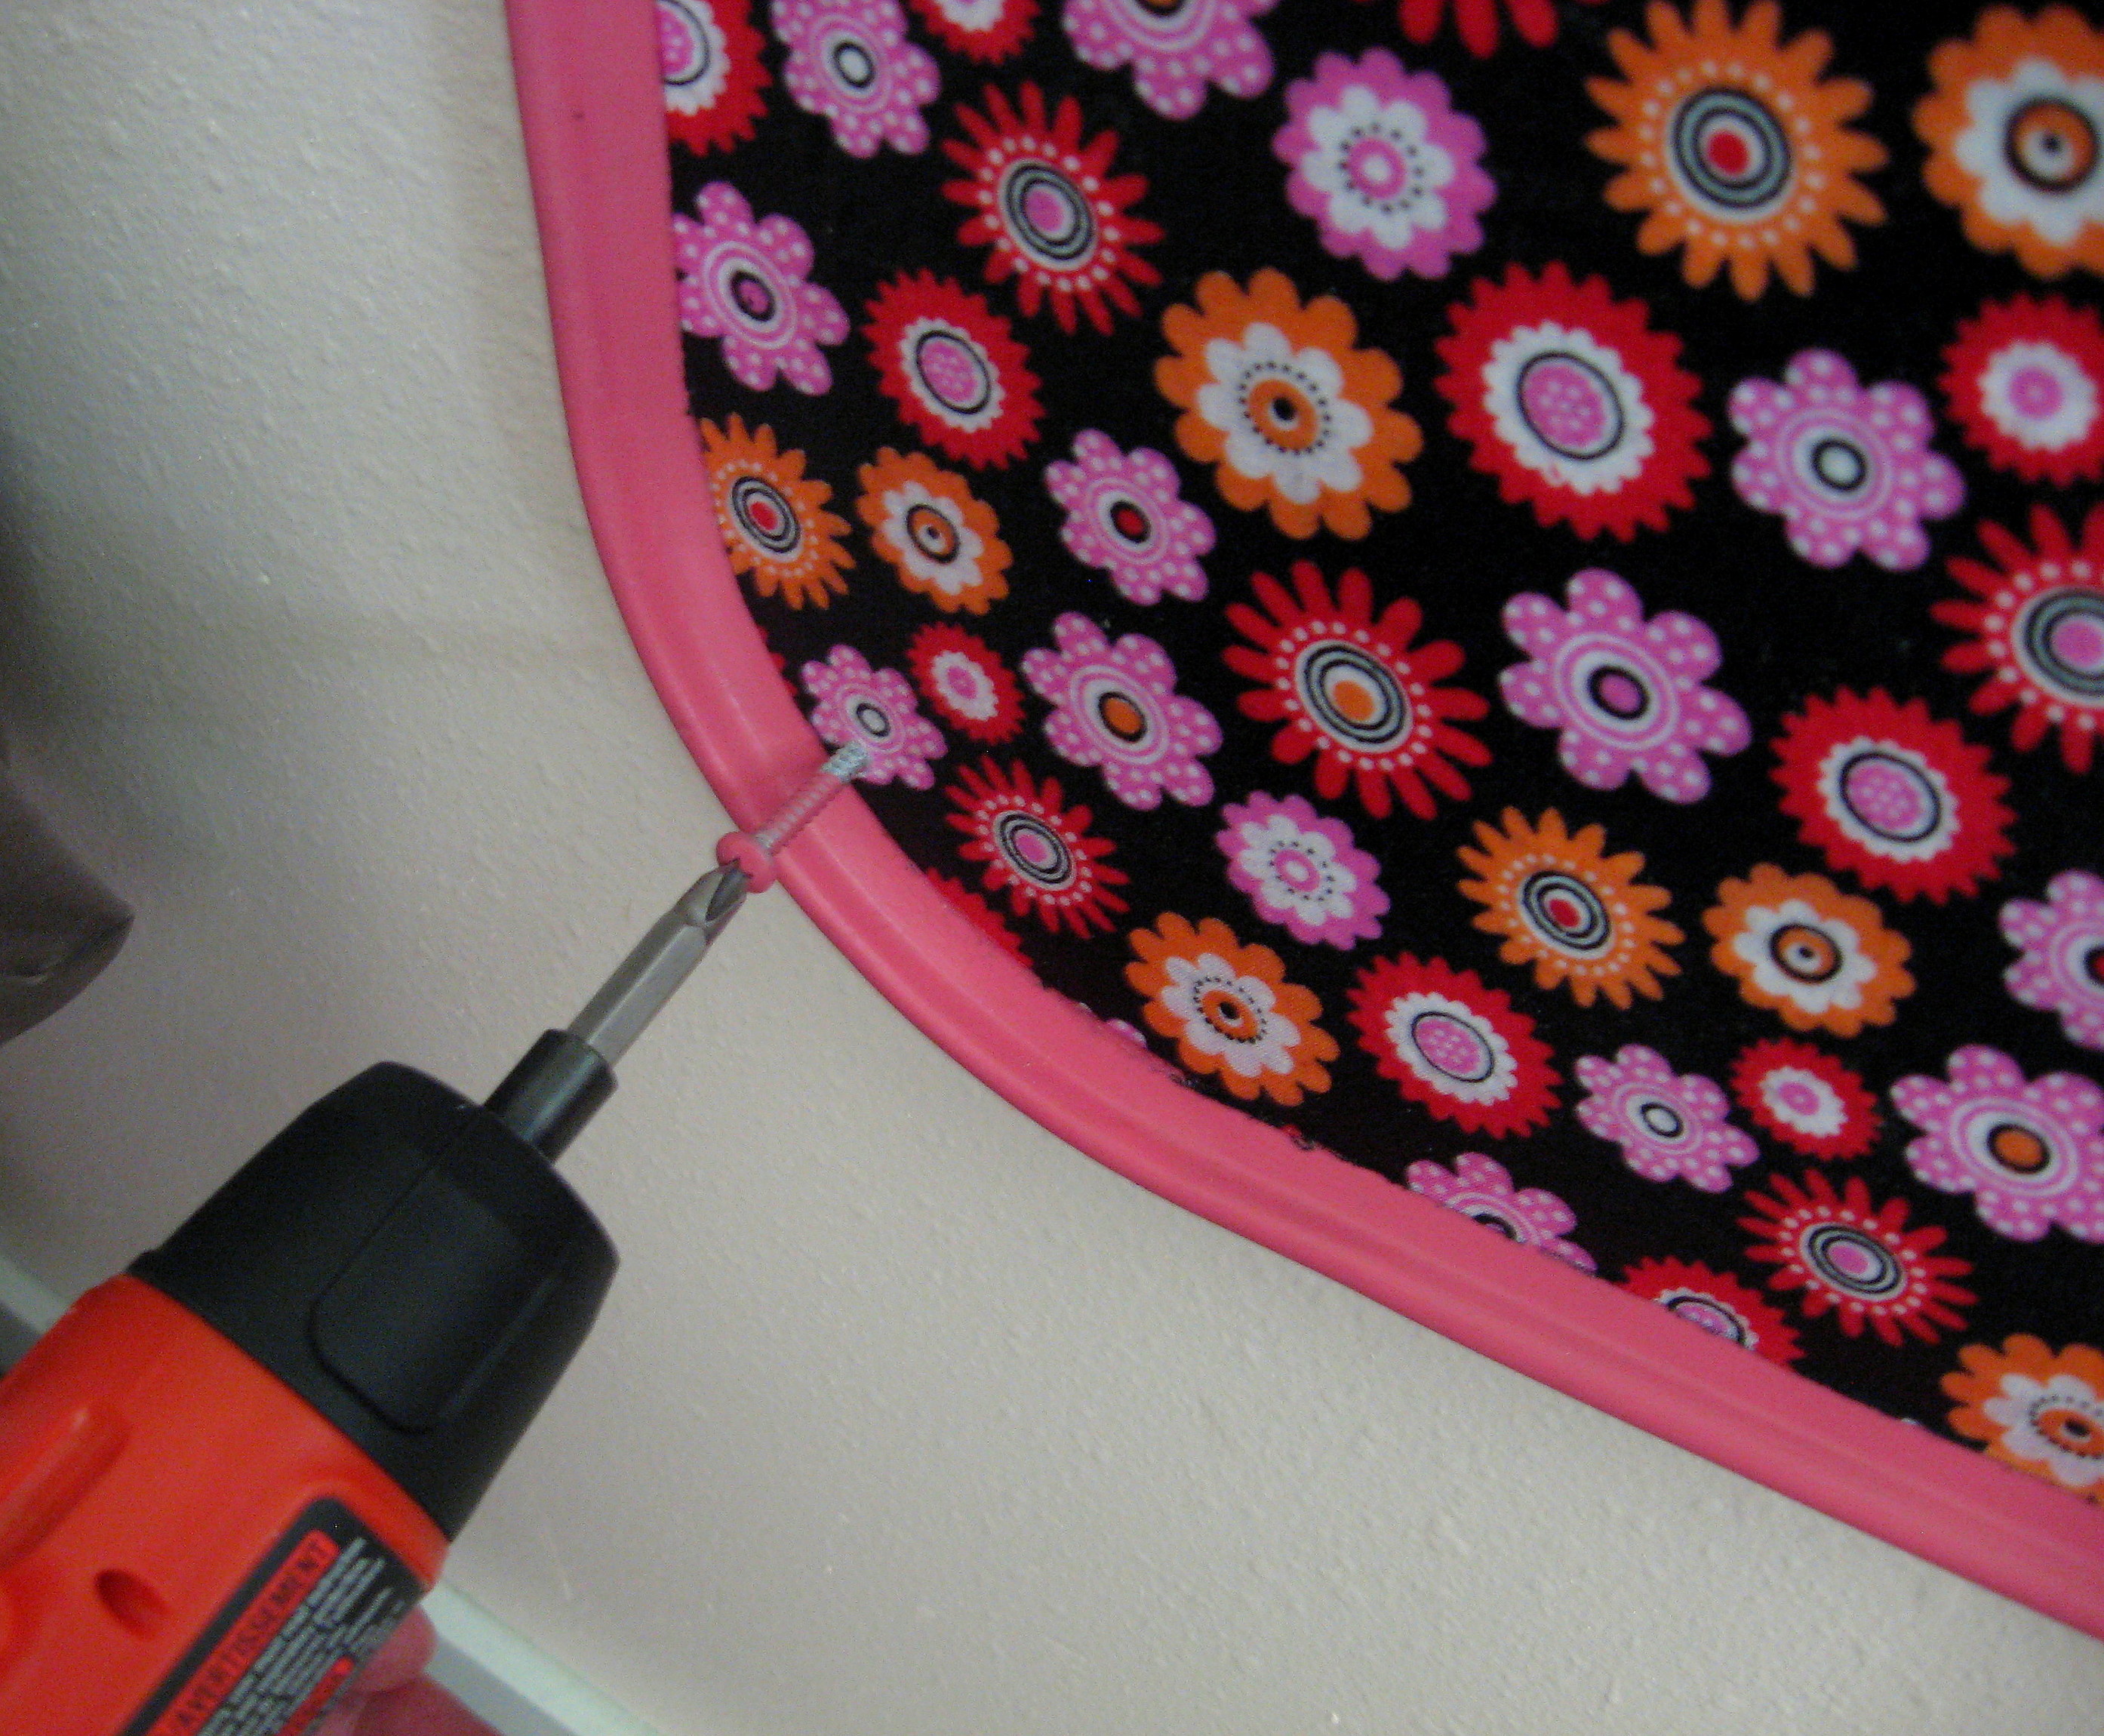
I started with a frame from the thrift store that was the right size to fit my freezer door. It needs to have glass or plastic in it to act as a dry erase board. I waited to find one that had plastic in it so it wouldn’t be so heavy. Just make sure it isn’t scratched up.
Take the back and the glass out (I will continue to say “glass” here even though mine is plastic. You know what I mean!) If the artwork in it is in good shape, be sure to donate it back to the store; someone obviously worked hard on this one! Paint the frame if you like; I spray painted mine orange. If yours is a plastic frame like mine was, I recommend a high quality spray paint made for plastic, like Krylon Fusion.
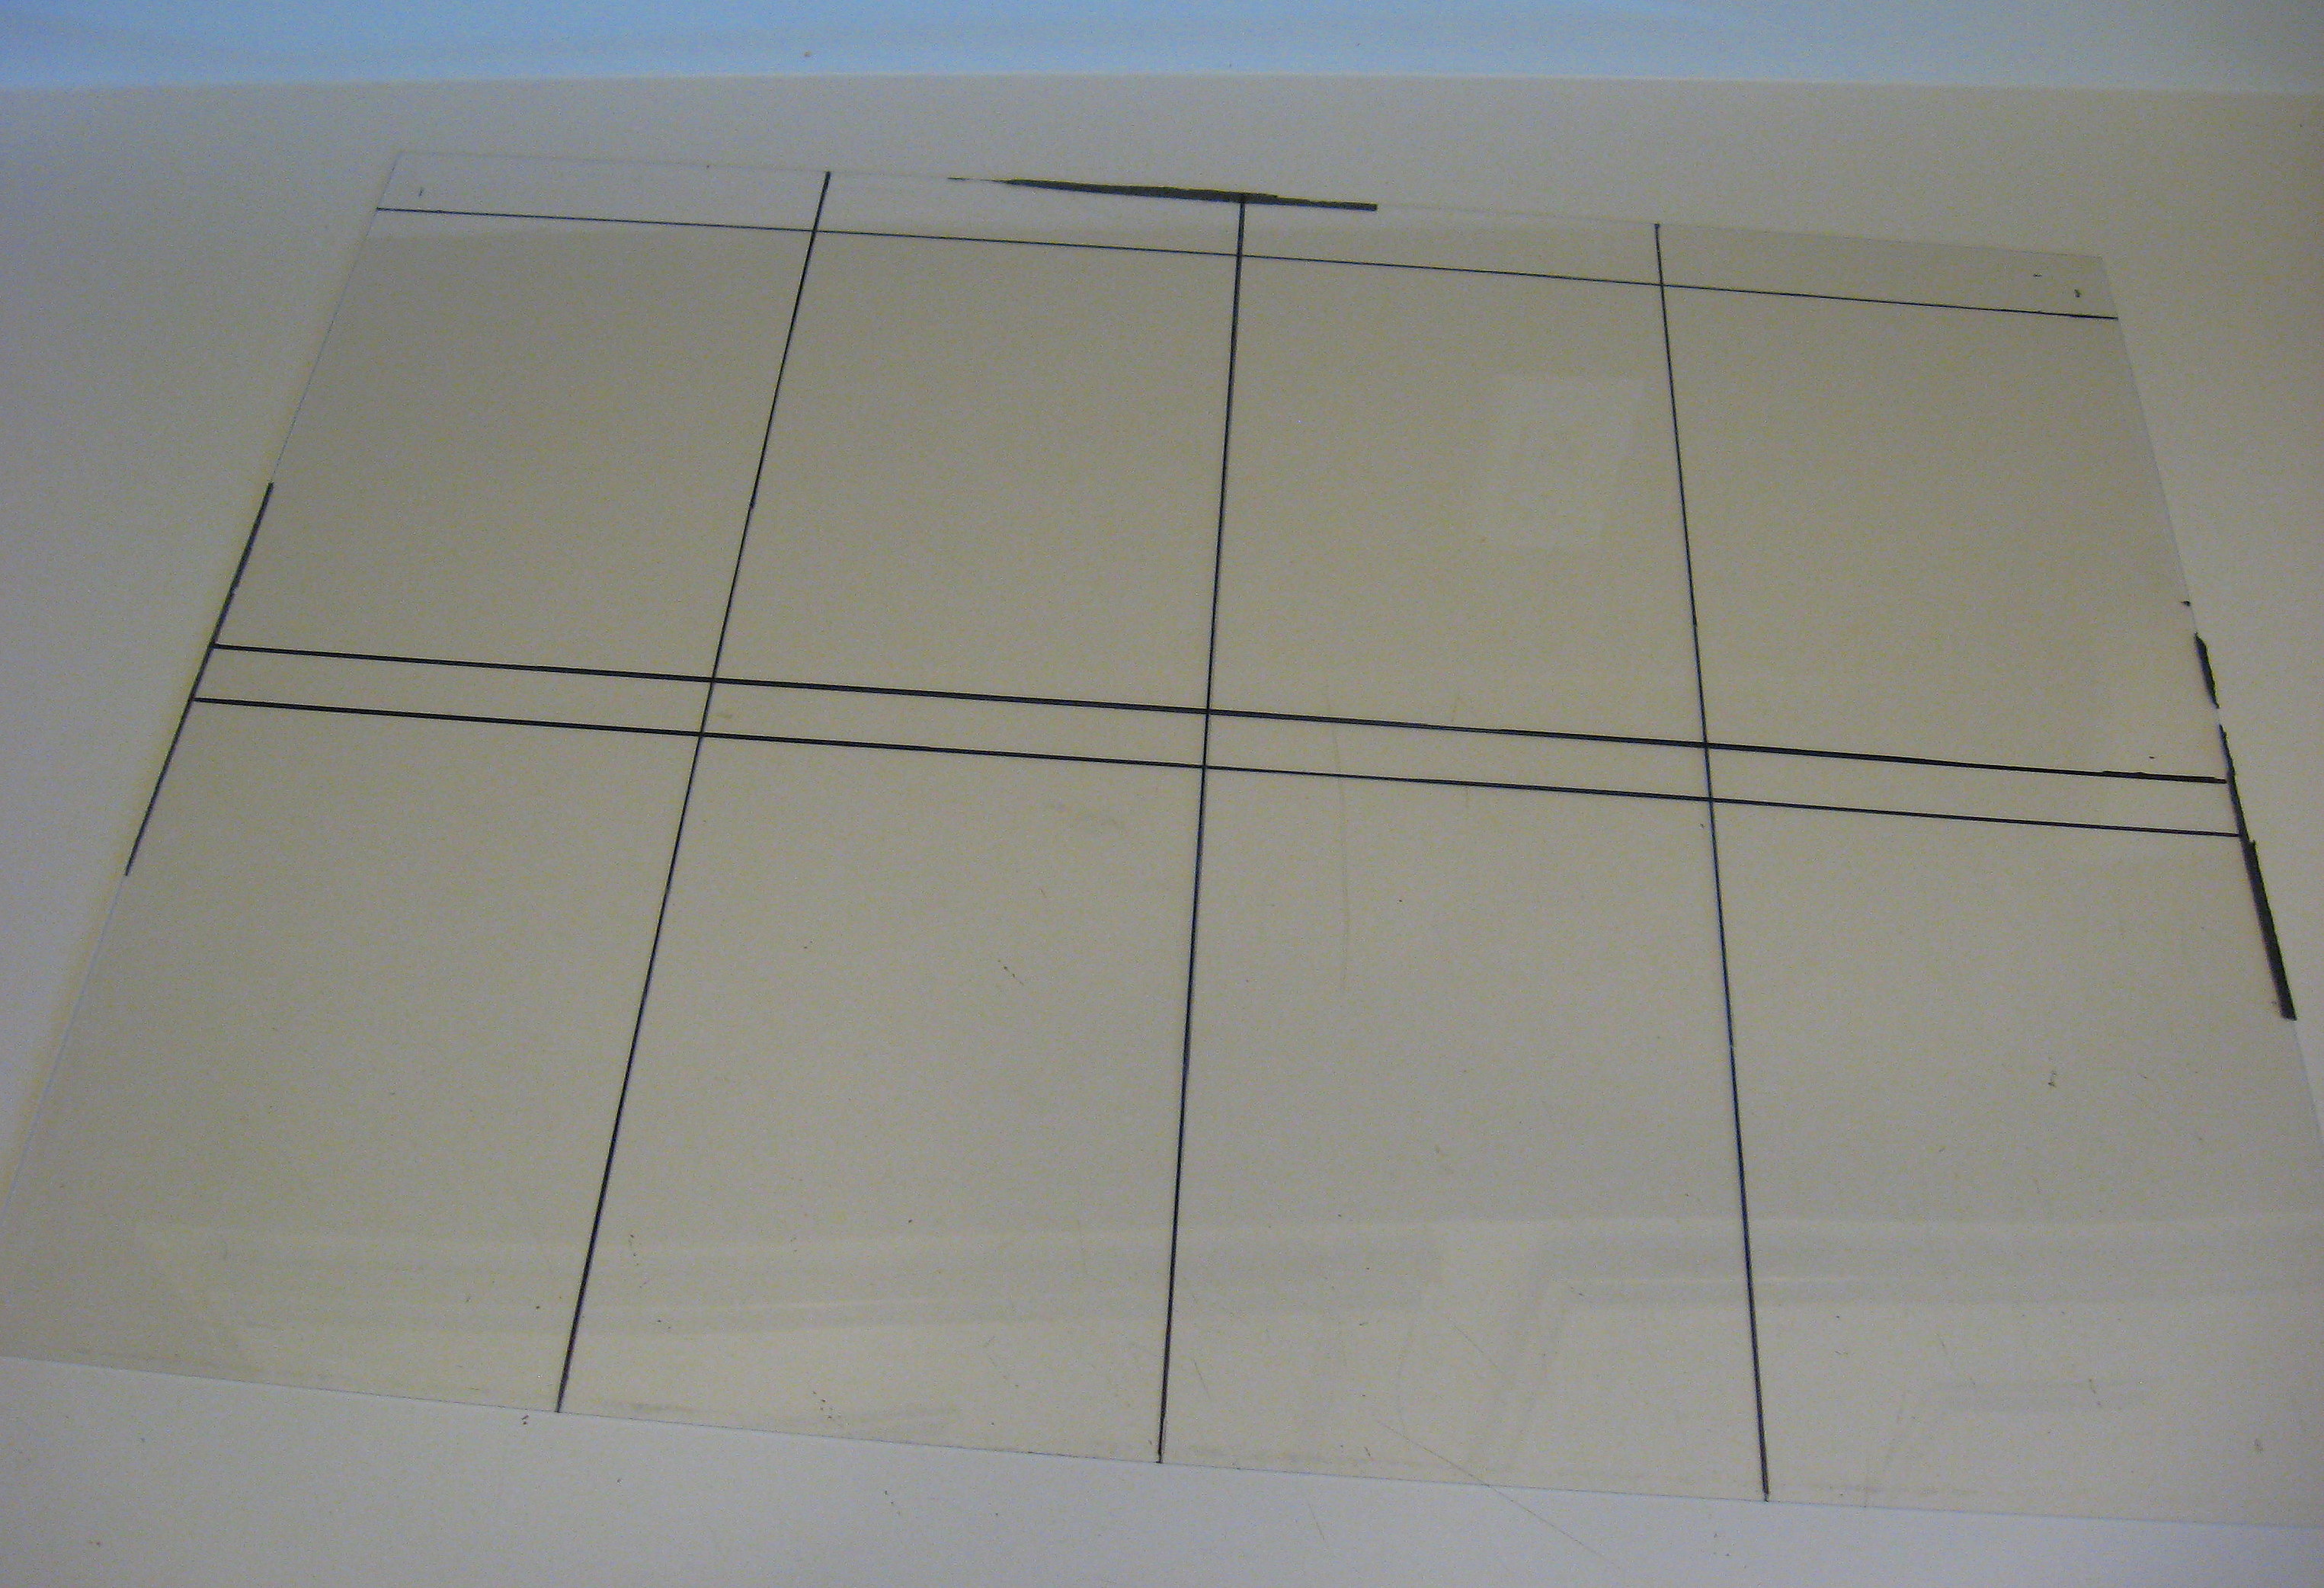
Decide how many different sections you want on your dry erase board, measure them out and use a straight edge and a Sharpie to draw the lines on the back side of the glass. I made 8 sections on my dry erase board, with an inch wide section at the top of each for the category title.
Like this:
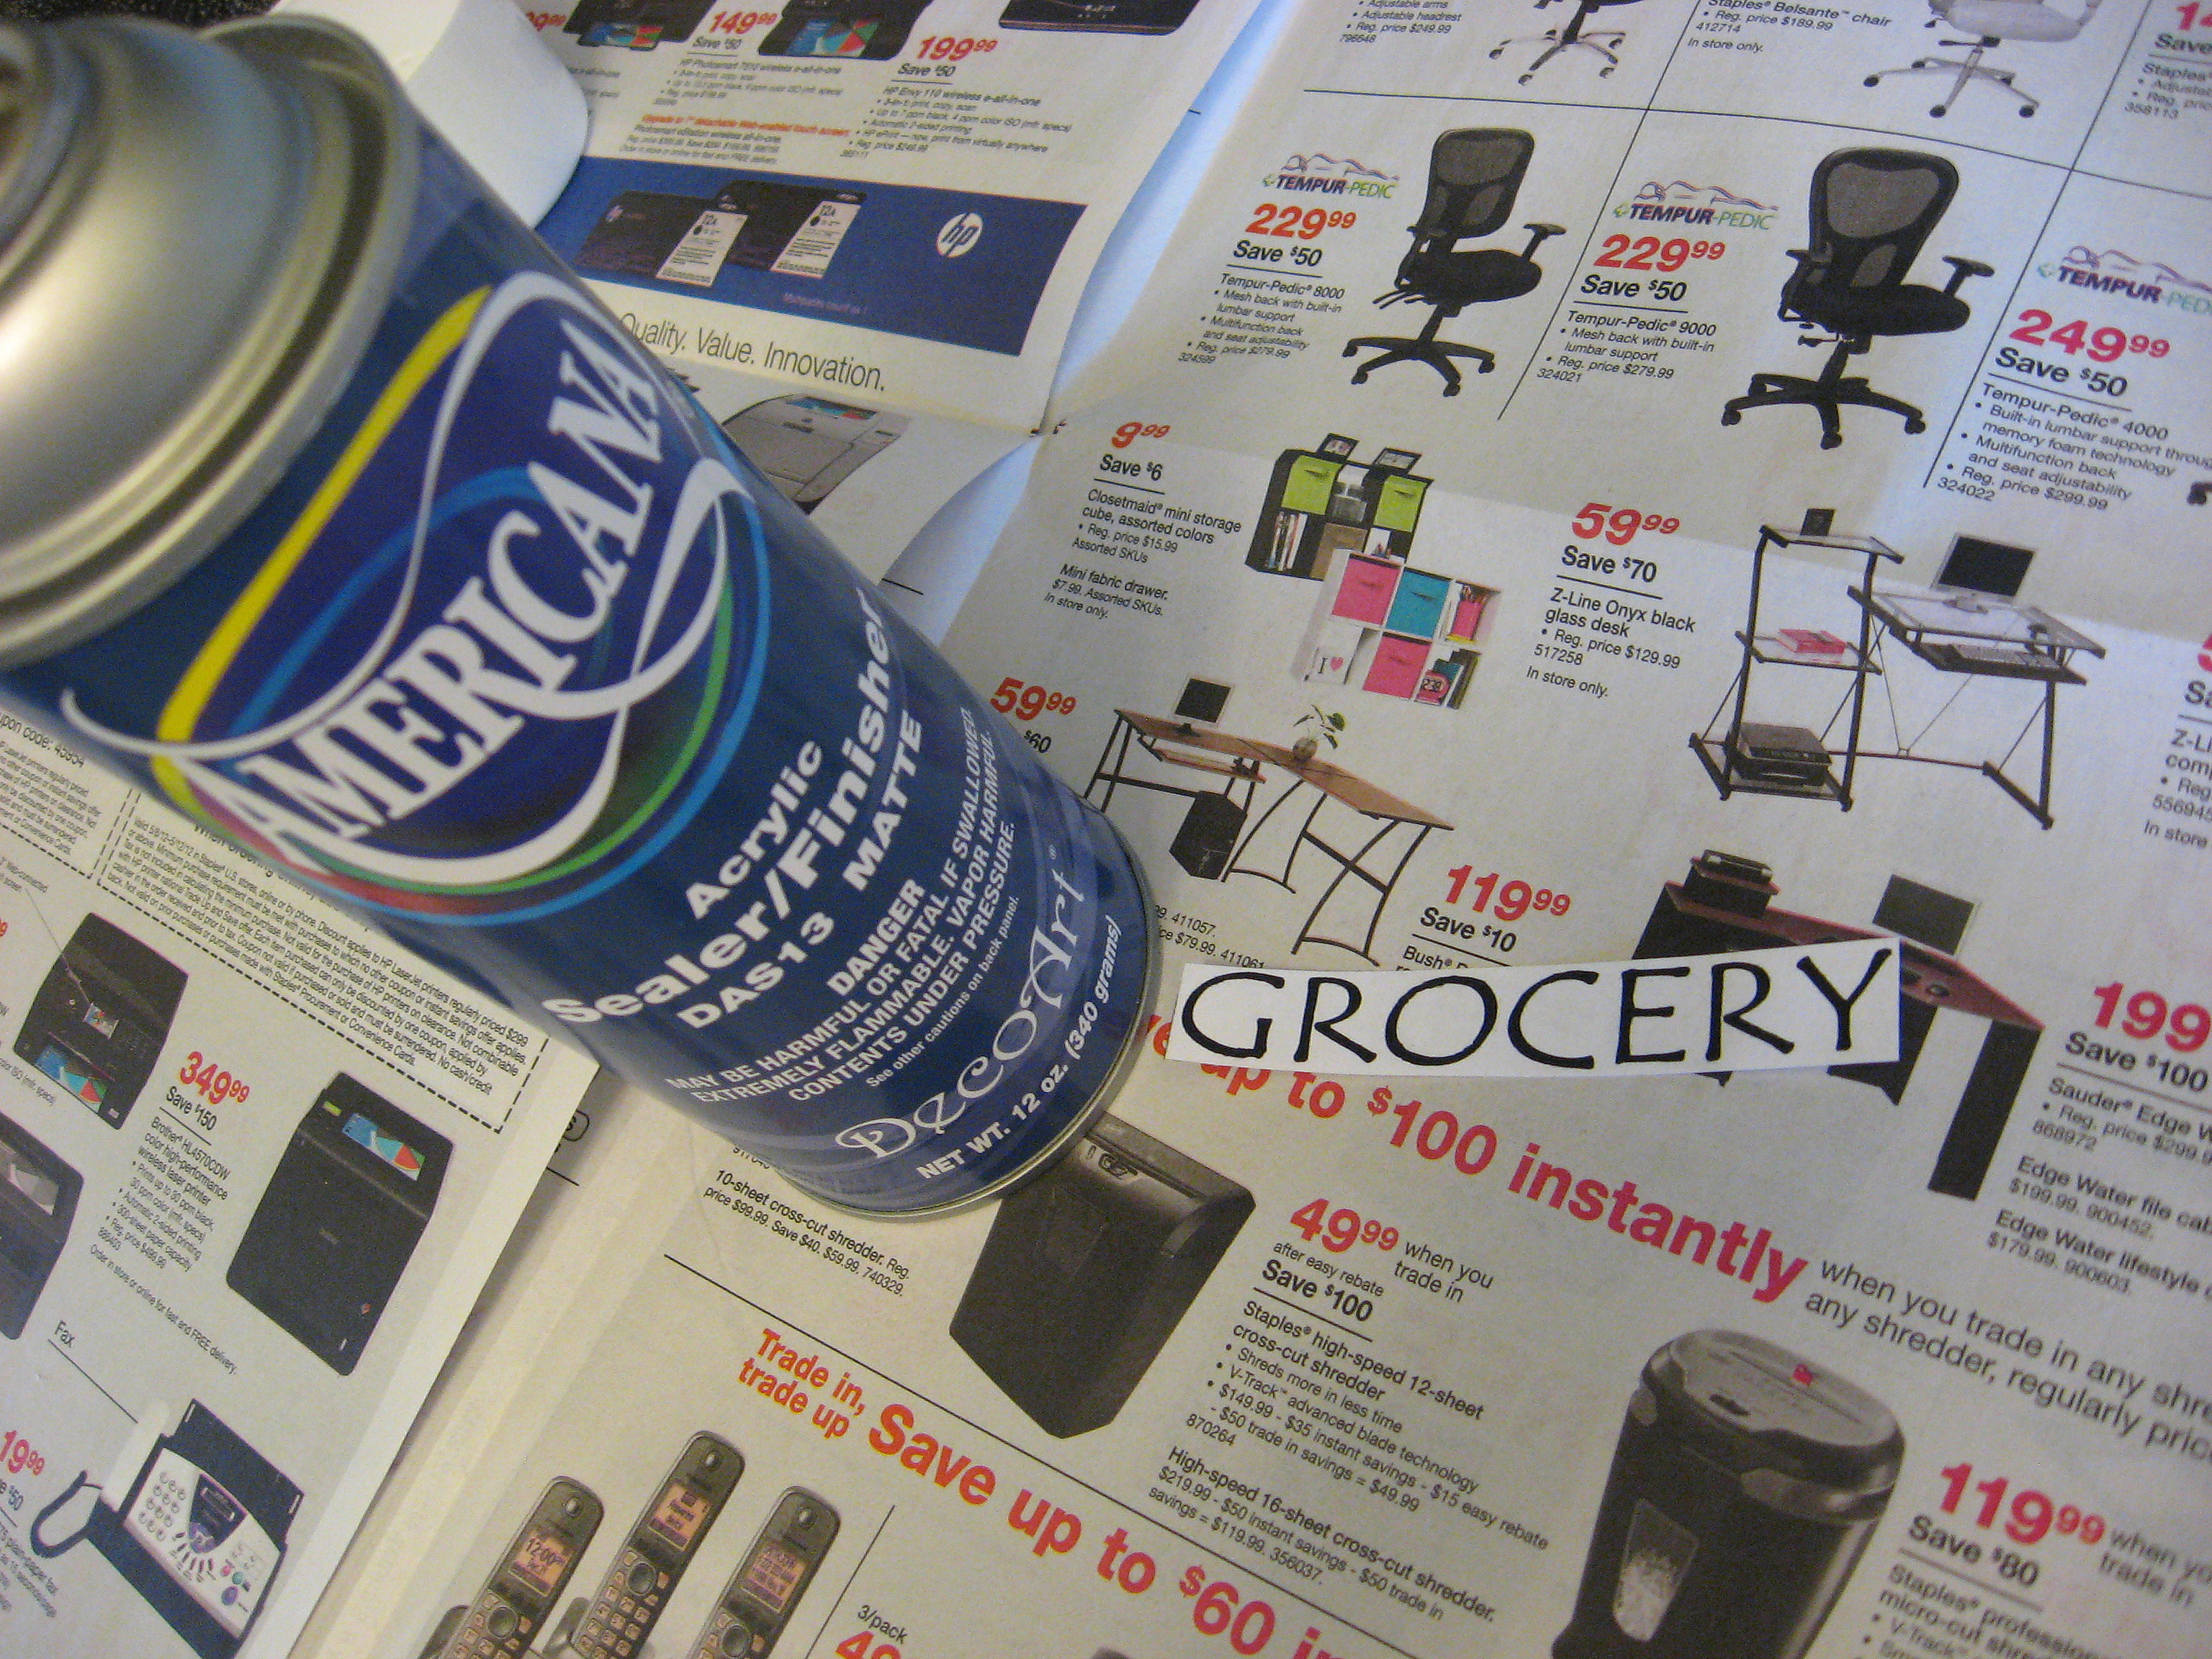
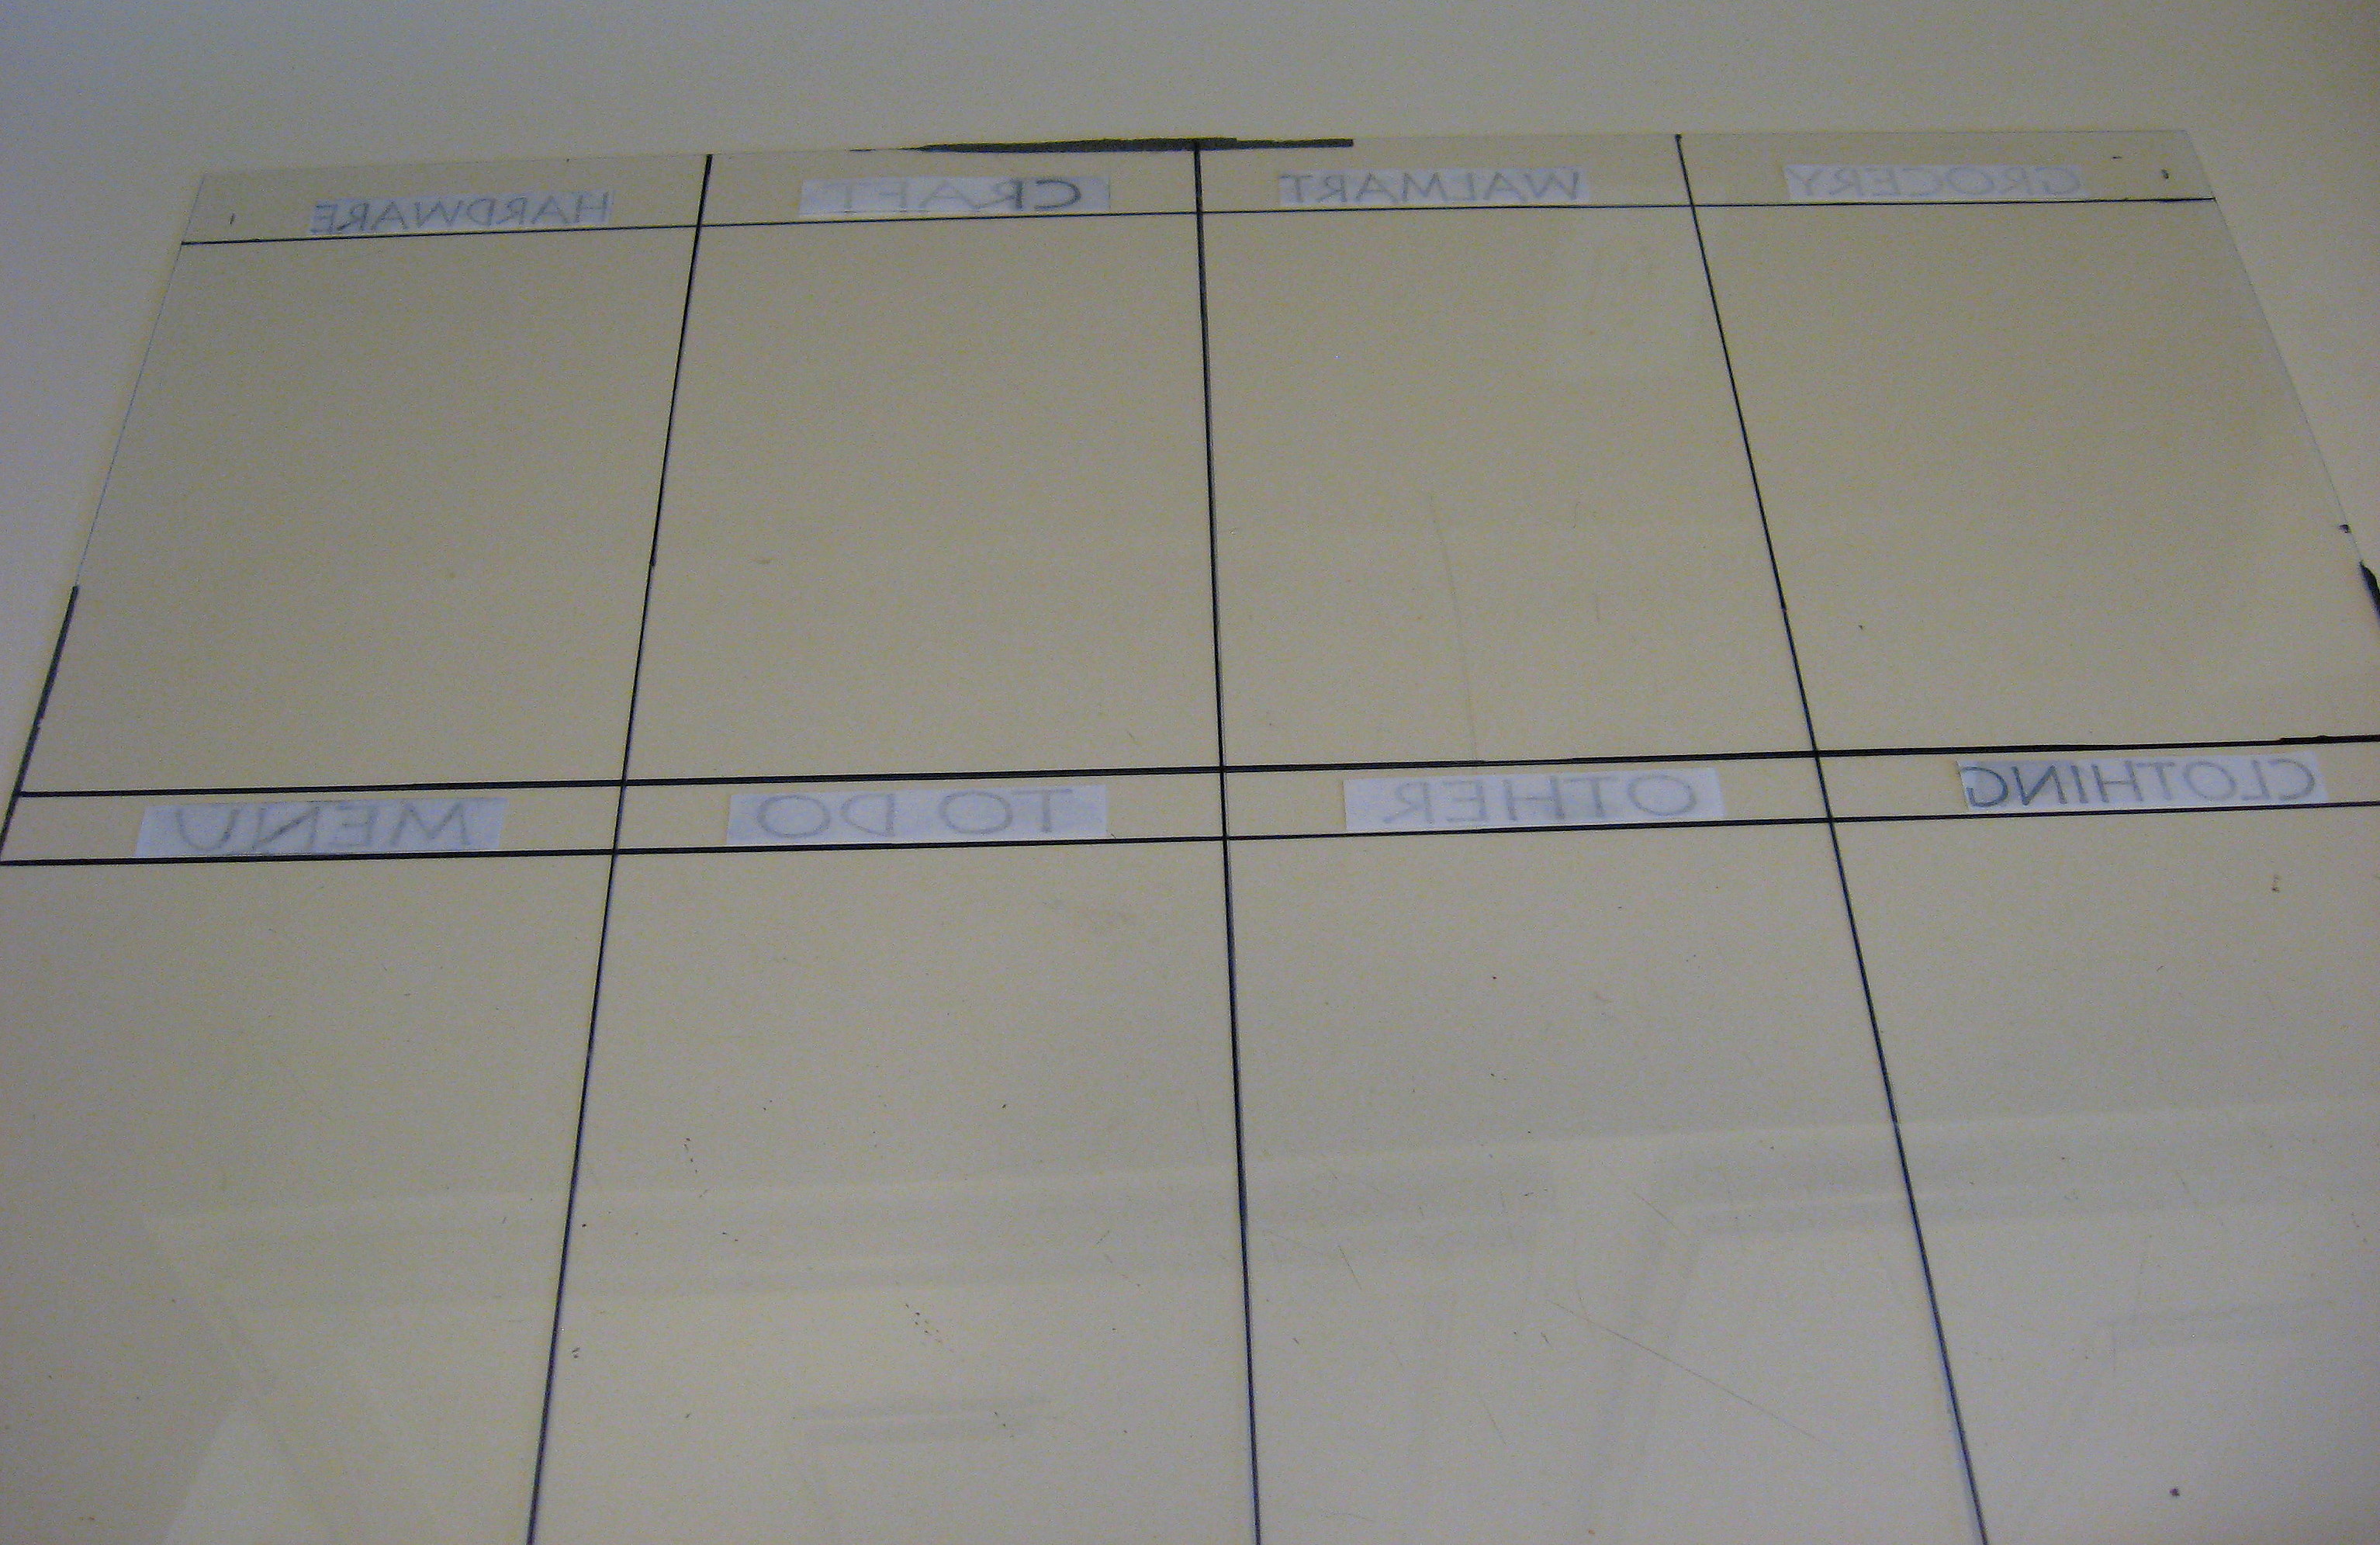
I printed out the categories I wanted onto pieces of paper, but you could also use vinyl, or even write them on the back of the glass with the marker (you’d have to write backwards, but you could print out the words, lay them under the glass and use them to trace.)
I cut out each title, and sprayed them with some craft fixative. I didn’t use an actual adhesive; I think it’s too messy. I just needed something that would dry clear and that would hold the paper in place well enough for the next step without interfering with the spray paint.
Here they are, attached face down to the back of the glass.
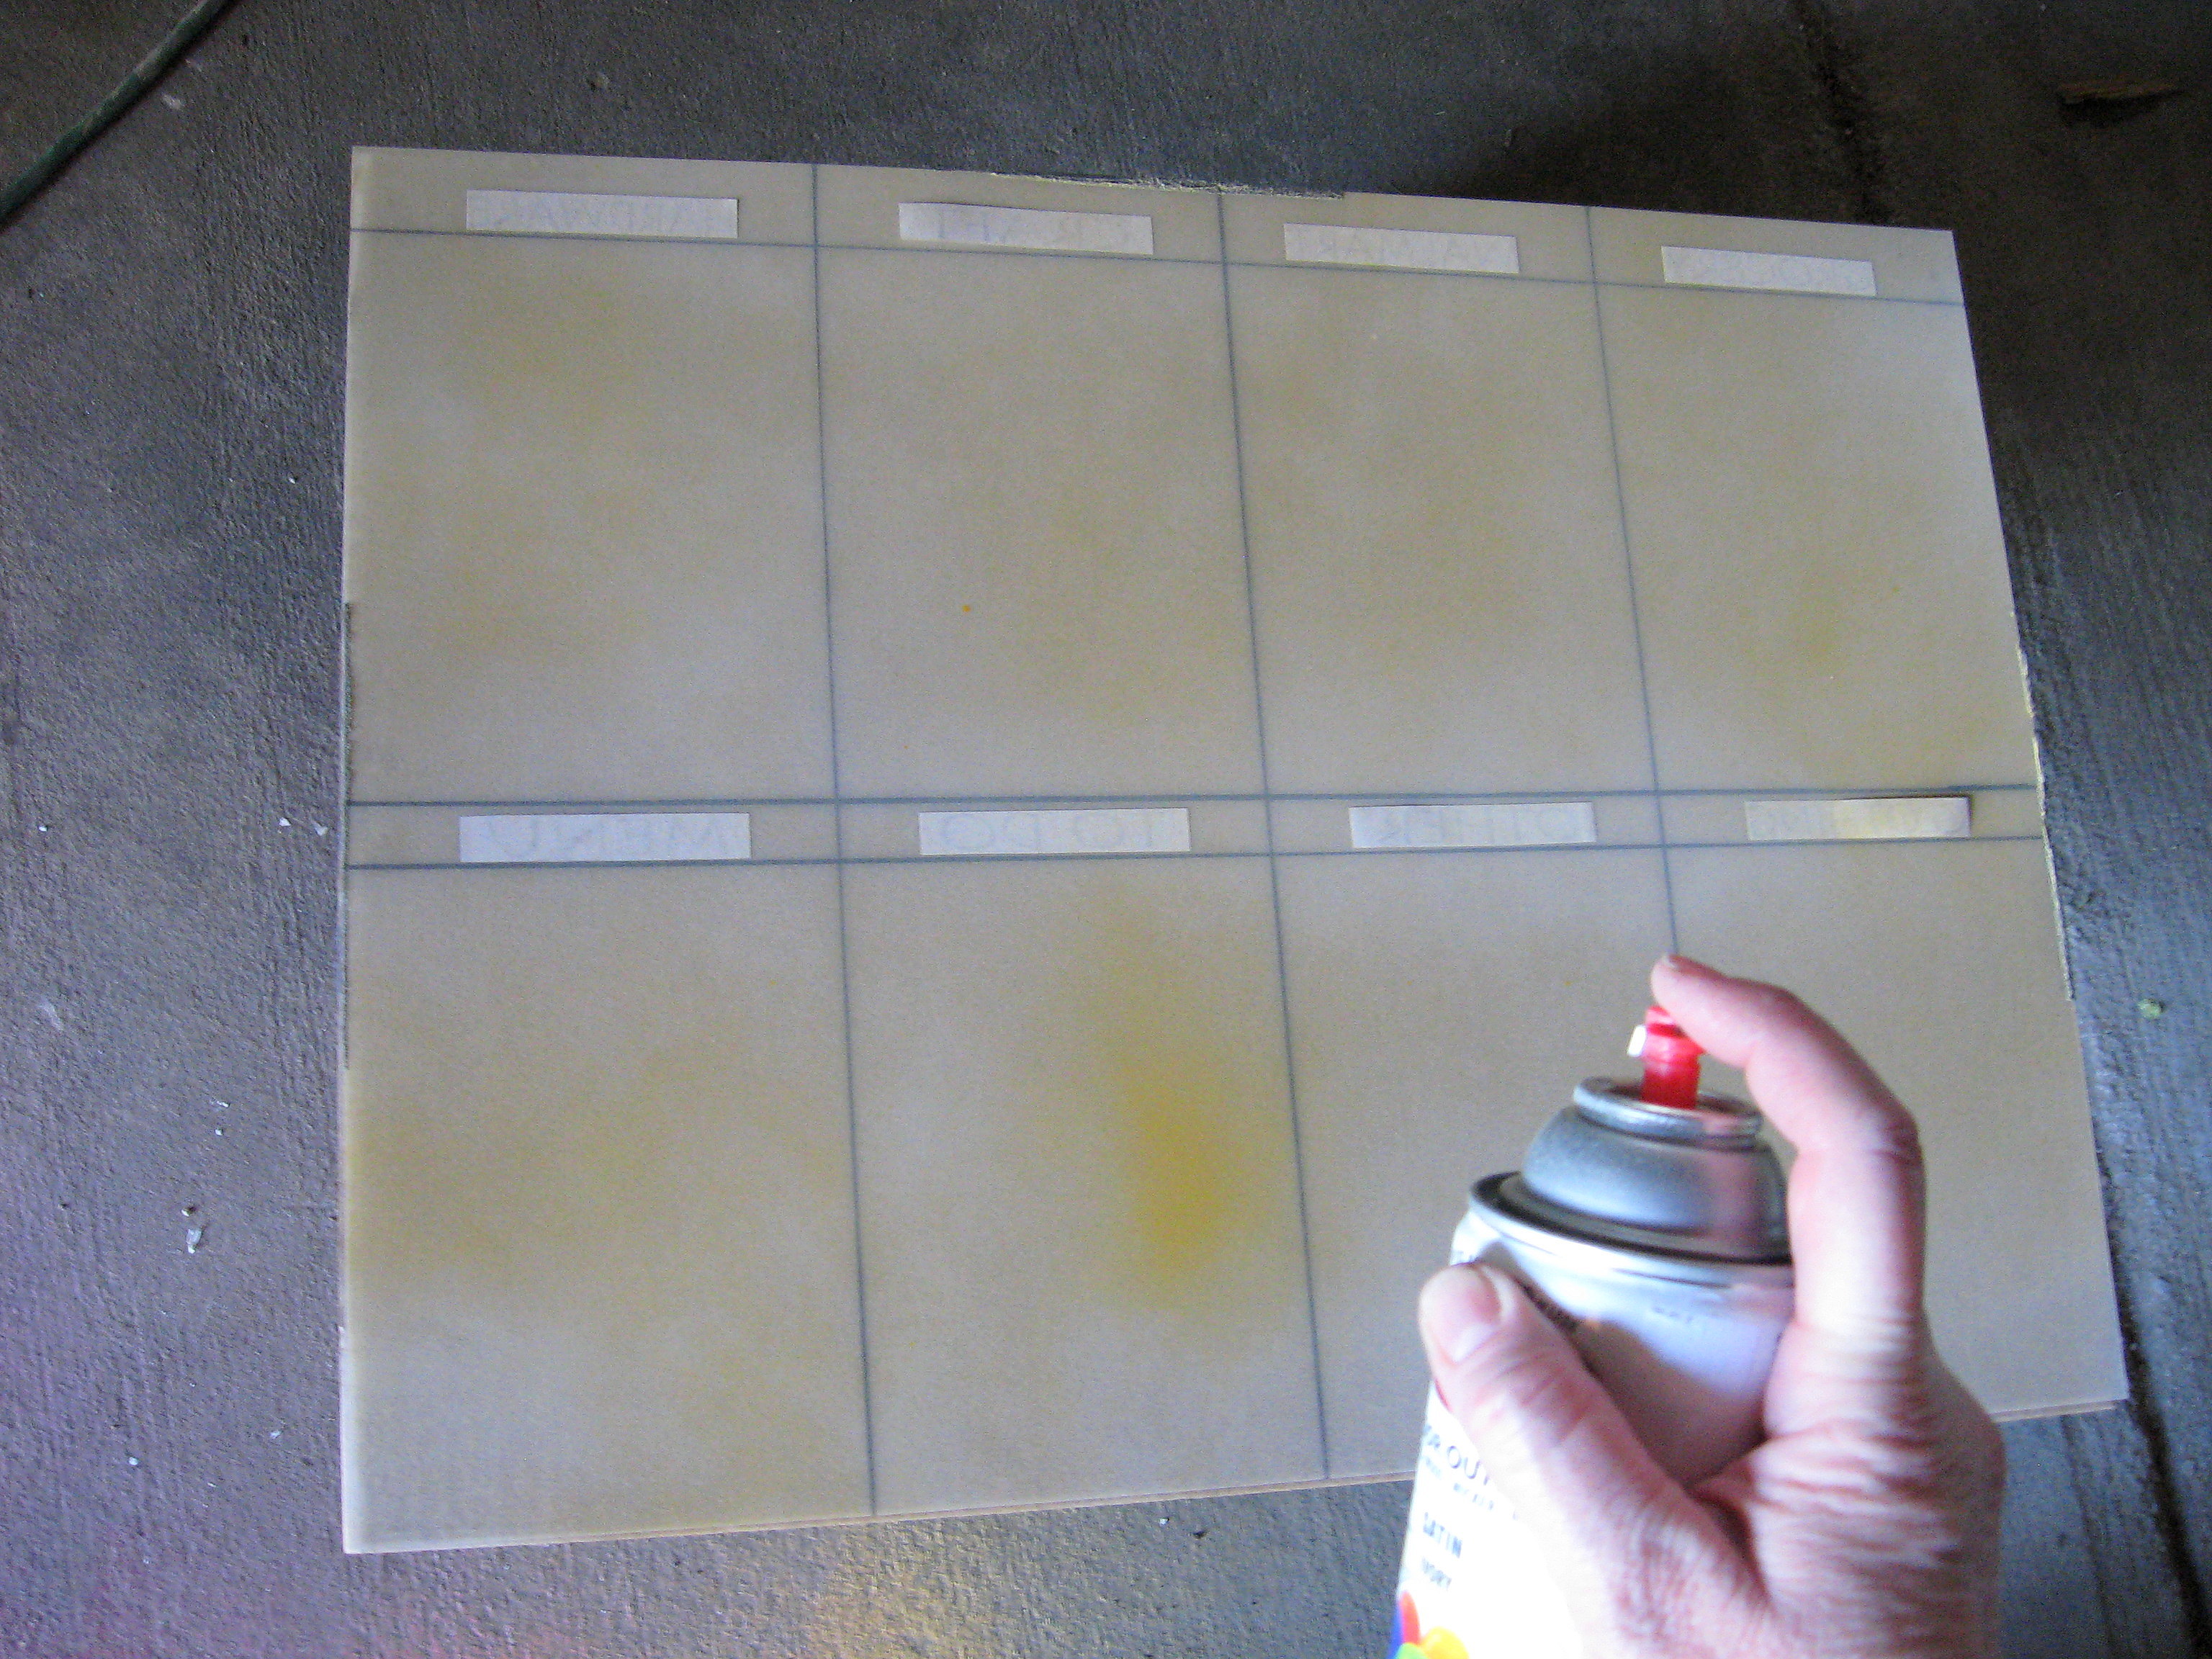
Now I spray painted over the whole back of the glass. I still wanted my dry erase board orange, but not as dark as the frame, so I sprayed on thin layers of white and orange until it was well covered. You could also just cover the cardboard that came with the frame with paper (think wrapping paper to get a big enough piece) or fabric.
Once that’s dry, put it all back in the frame, and use a good adhesive (I used E 6000) to glue very strong magnets onto the back of the frame.
Once the glue is completely dry, the dry erase board is ready to hang.
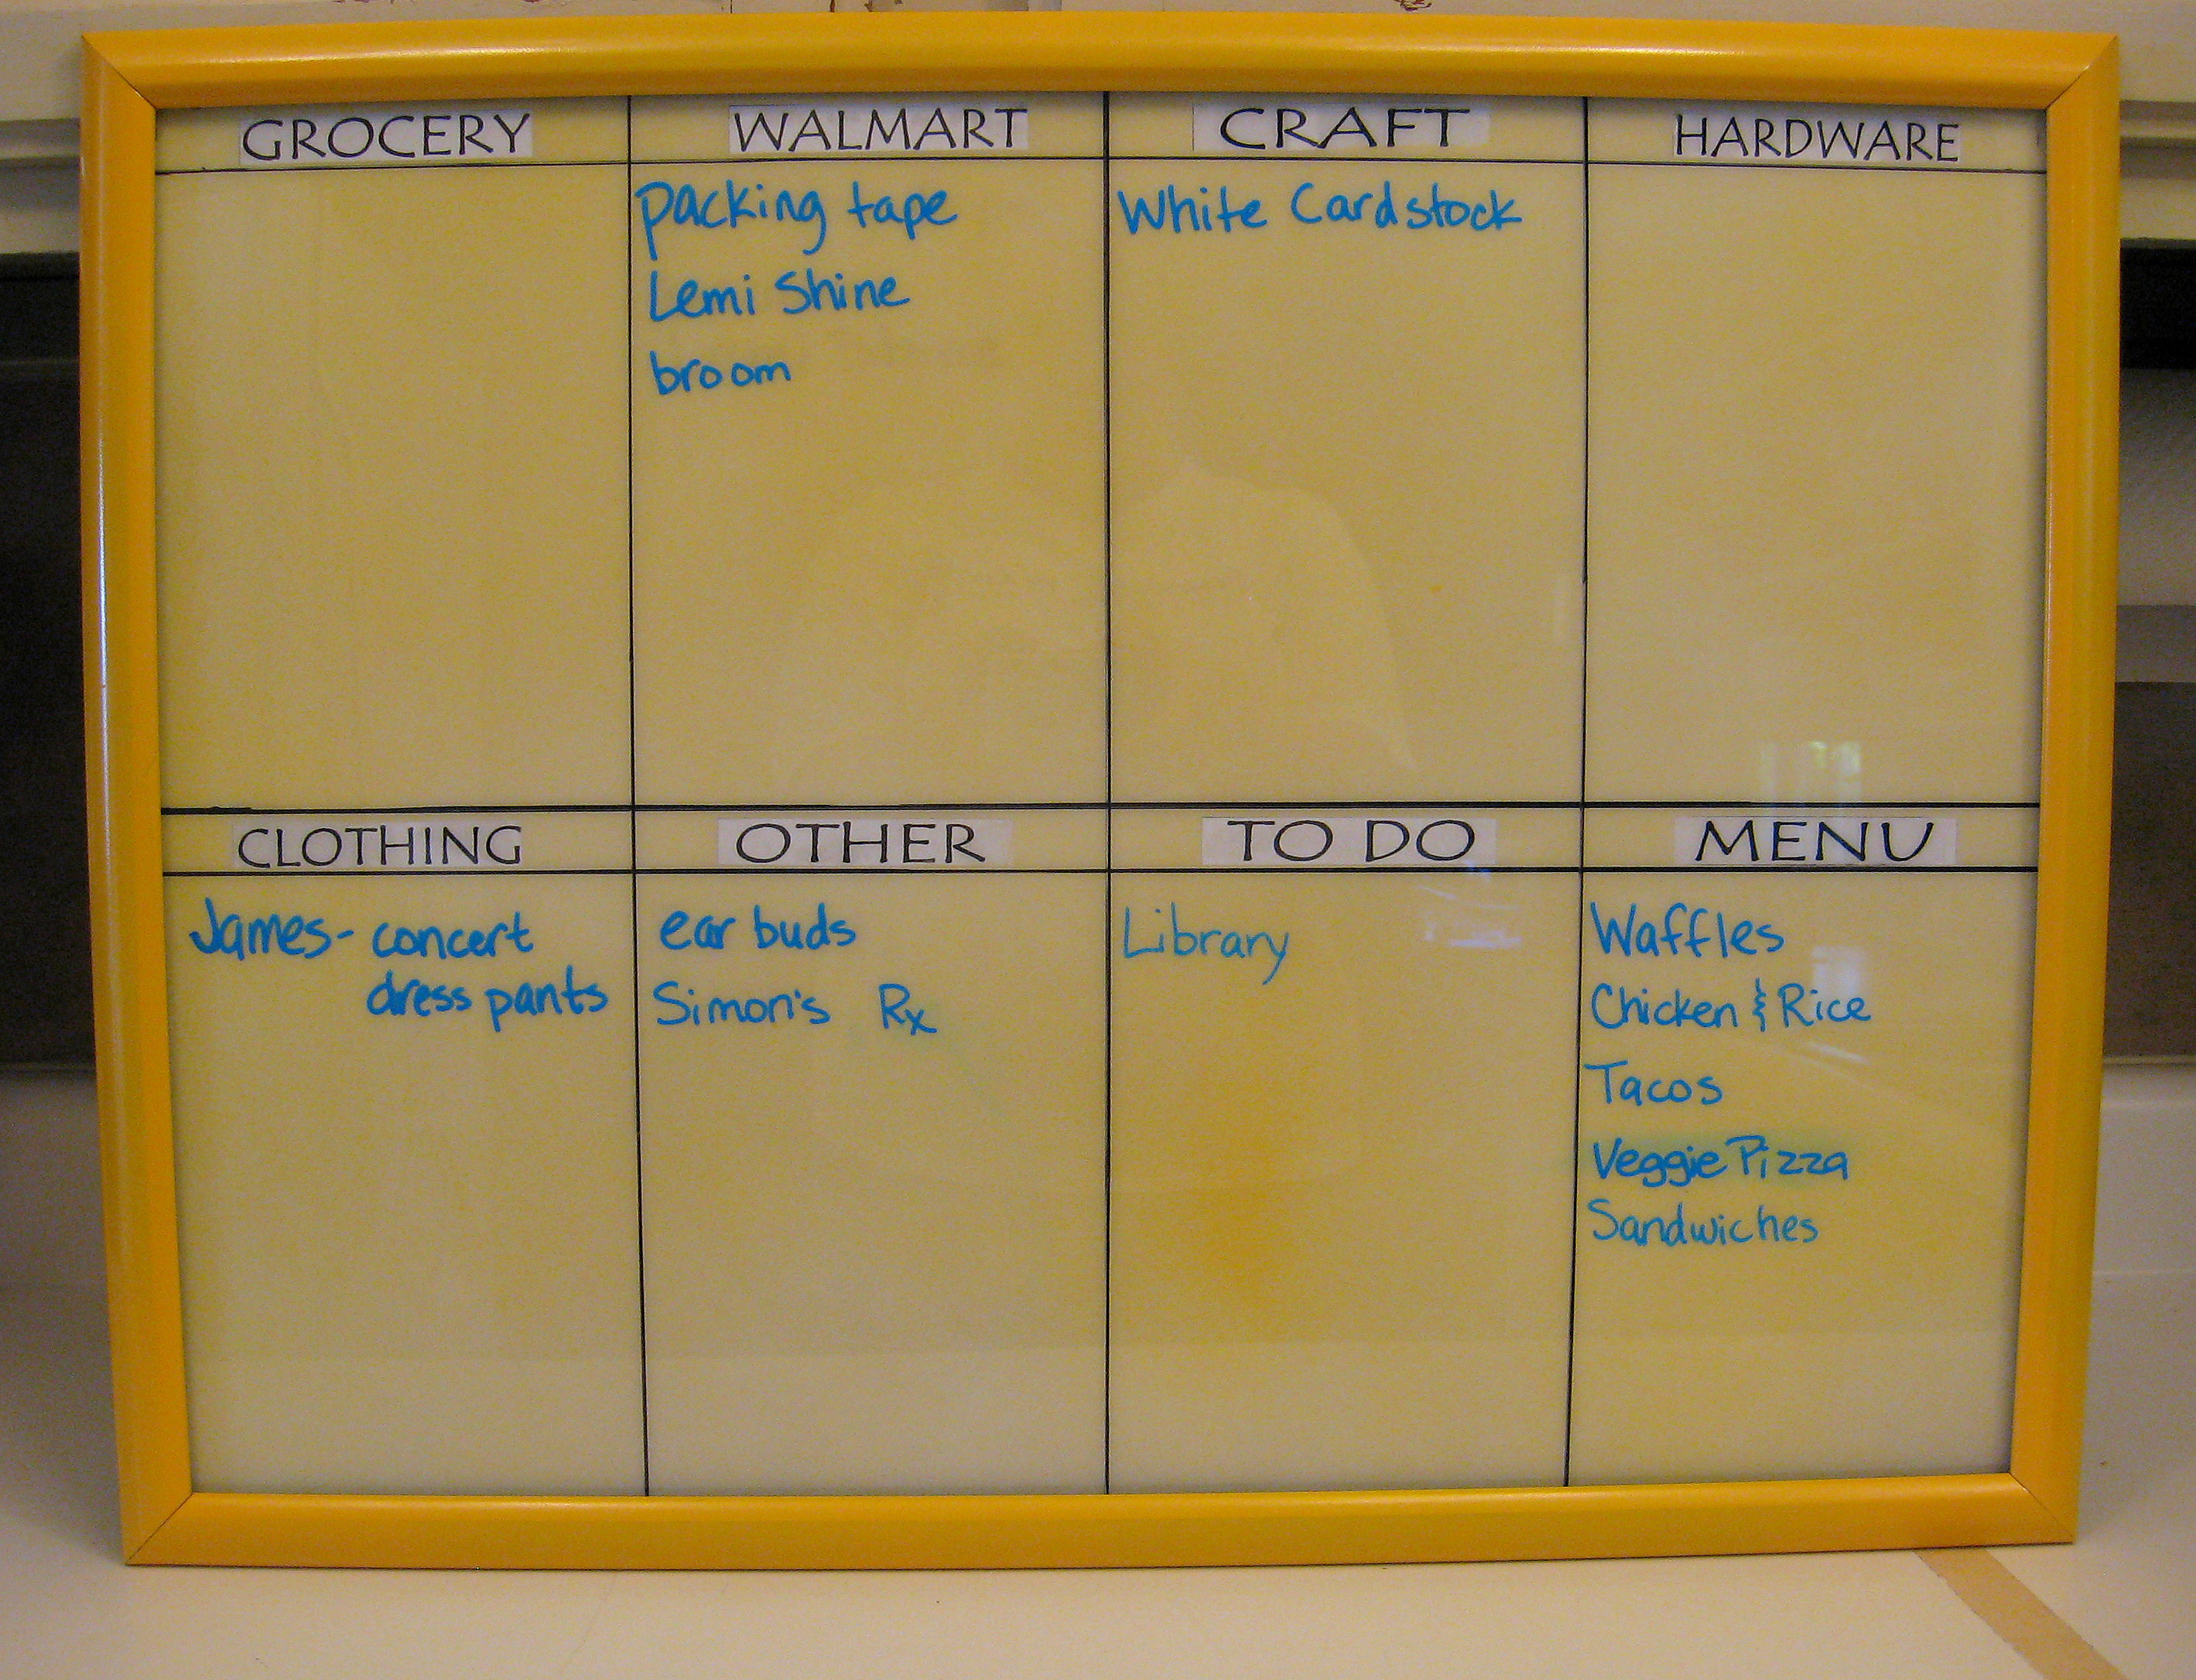
Since everything is on the back of the glass, you don’t have to worry about the lines and category titles on the dry erase board getting erased or messy. Remember the Bistro markers from the last project? They work great for this too, and erase easily with a standard chalkboard eraser.
Have you heard about Walmart’s new Savings Catcher program? Save time and money!
Have you heard about Walmart’s new Savings Catcher program? It’s now available nationwide!
Savings Catcher compares your receipt to advertised prices from top stores in your area, and if it finds a lower advertised price, you get the difference on an eGift Card. All you have to do is enter your receipt and Walmart does the work for you.
Find more information on the program here:
A PYP Best Blog! DIY Magnet Board!
Just in case you missed this article on making a magnet board the first time we shared it a couple of years ago, we are republishing it. After Sharon wrote this blog originally, we got an awesome response. This is one of the PYP Best Blogs!
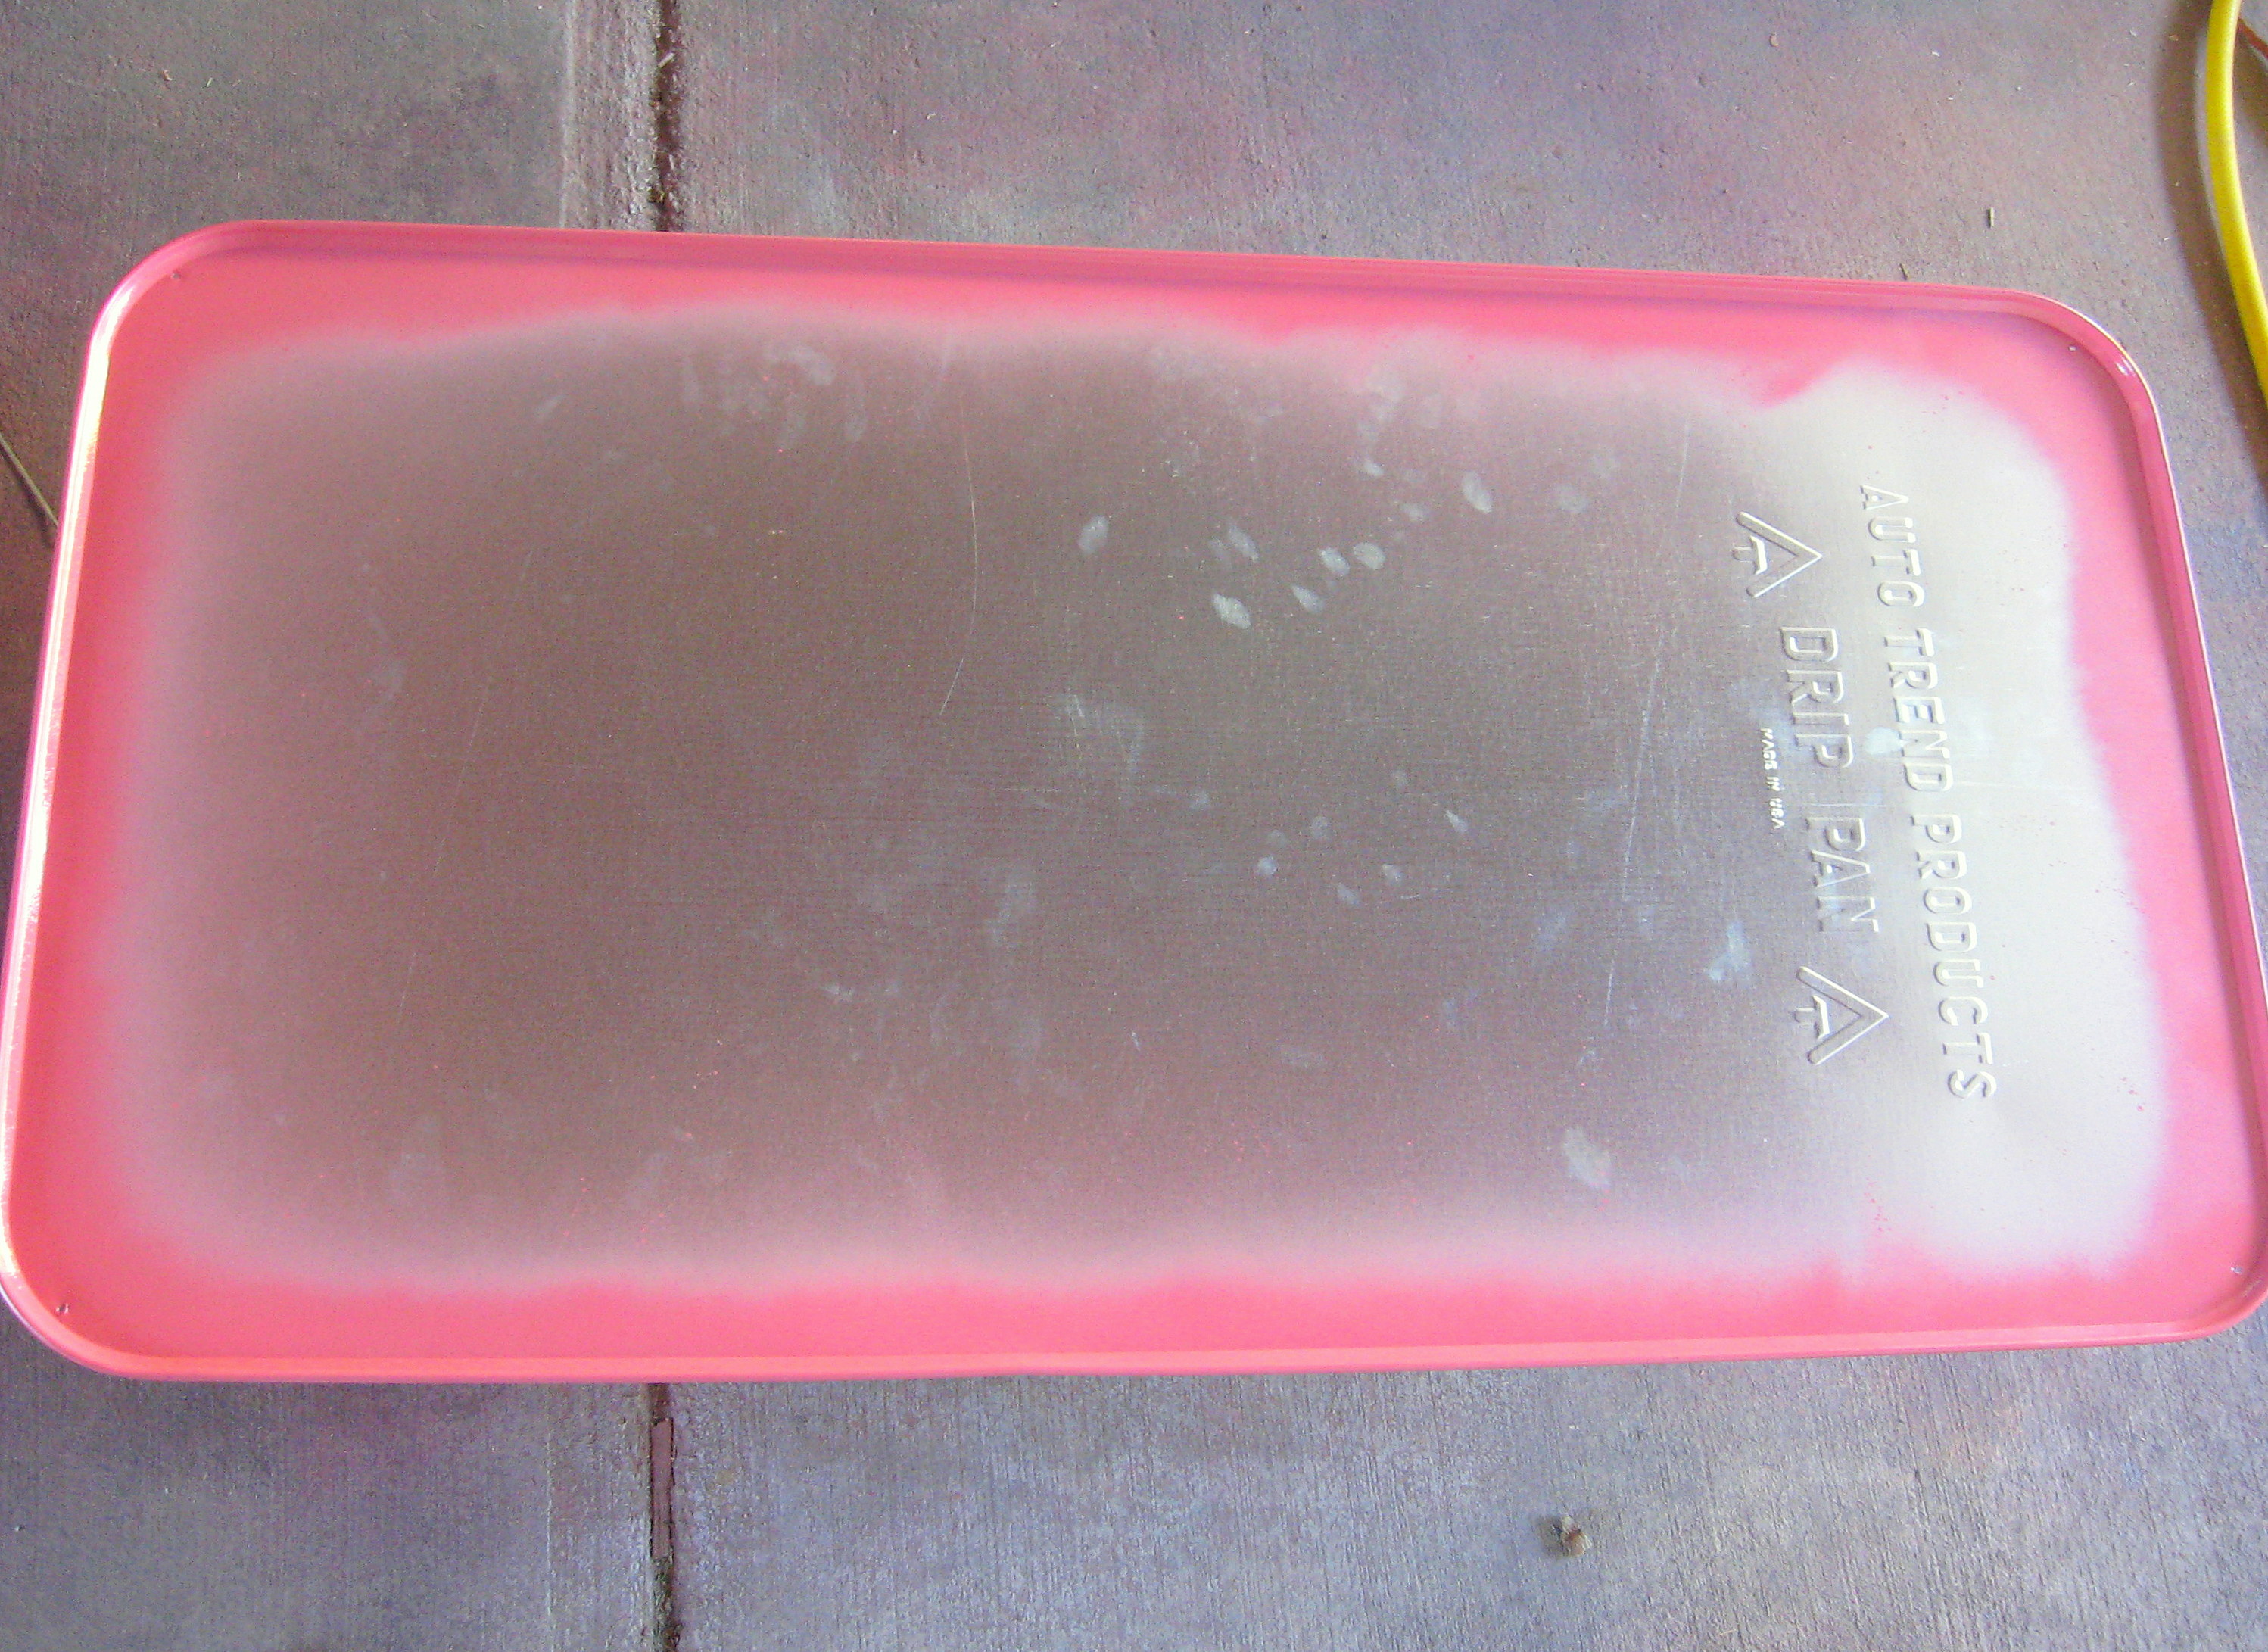
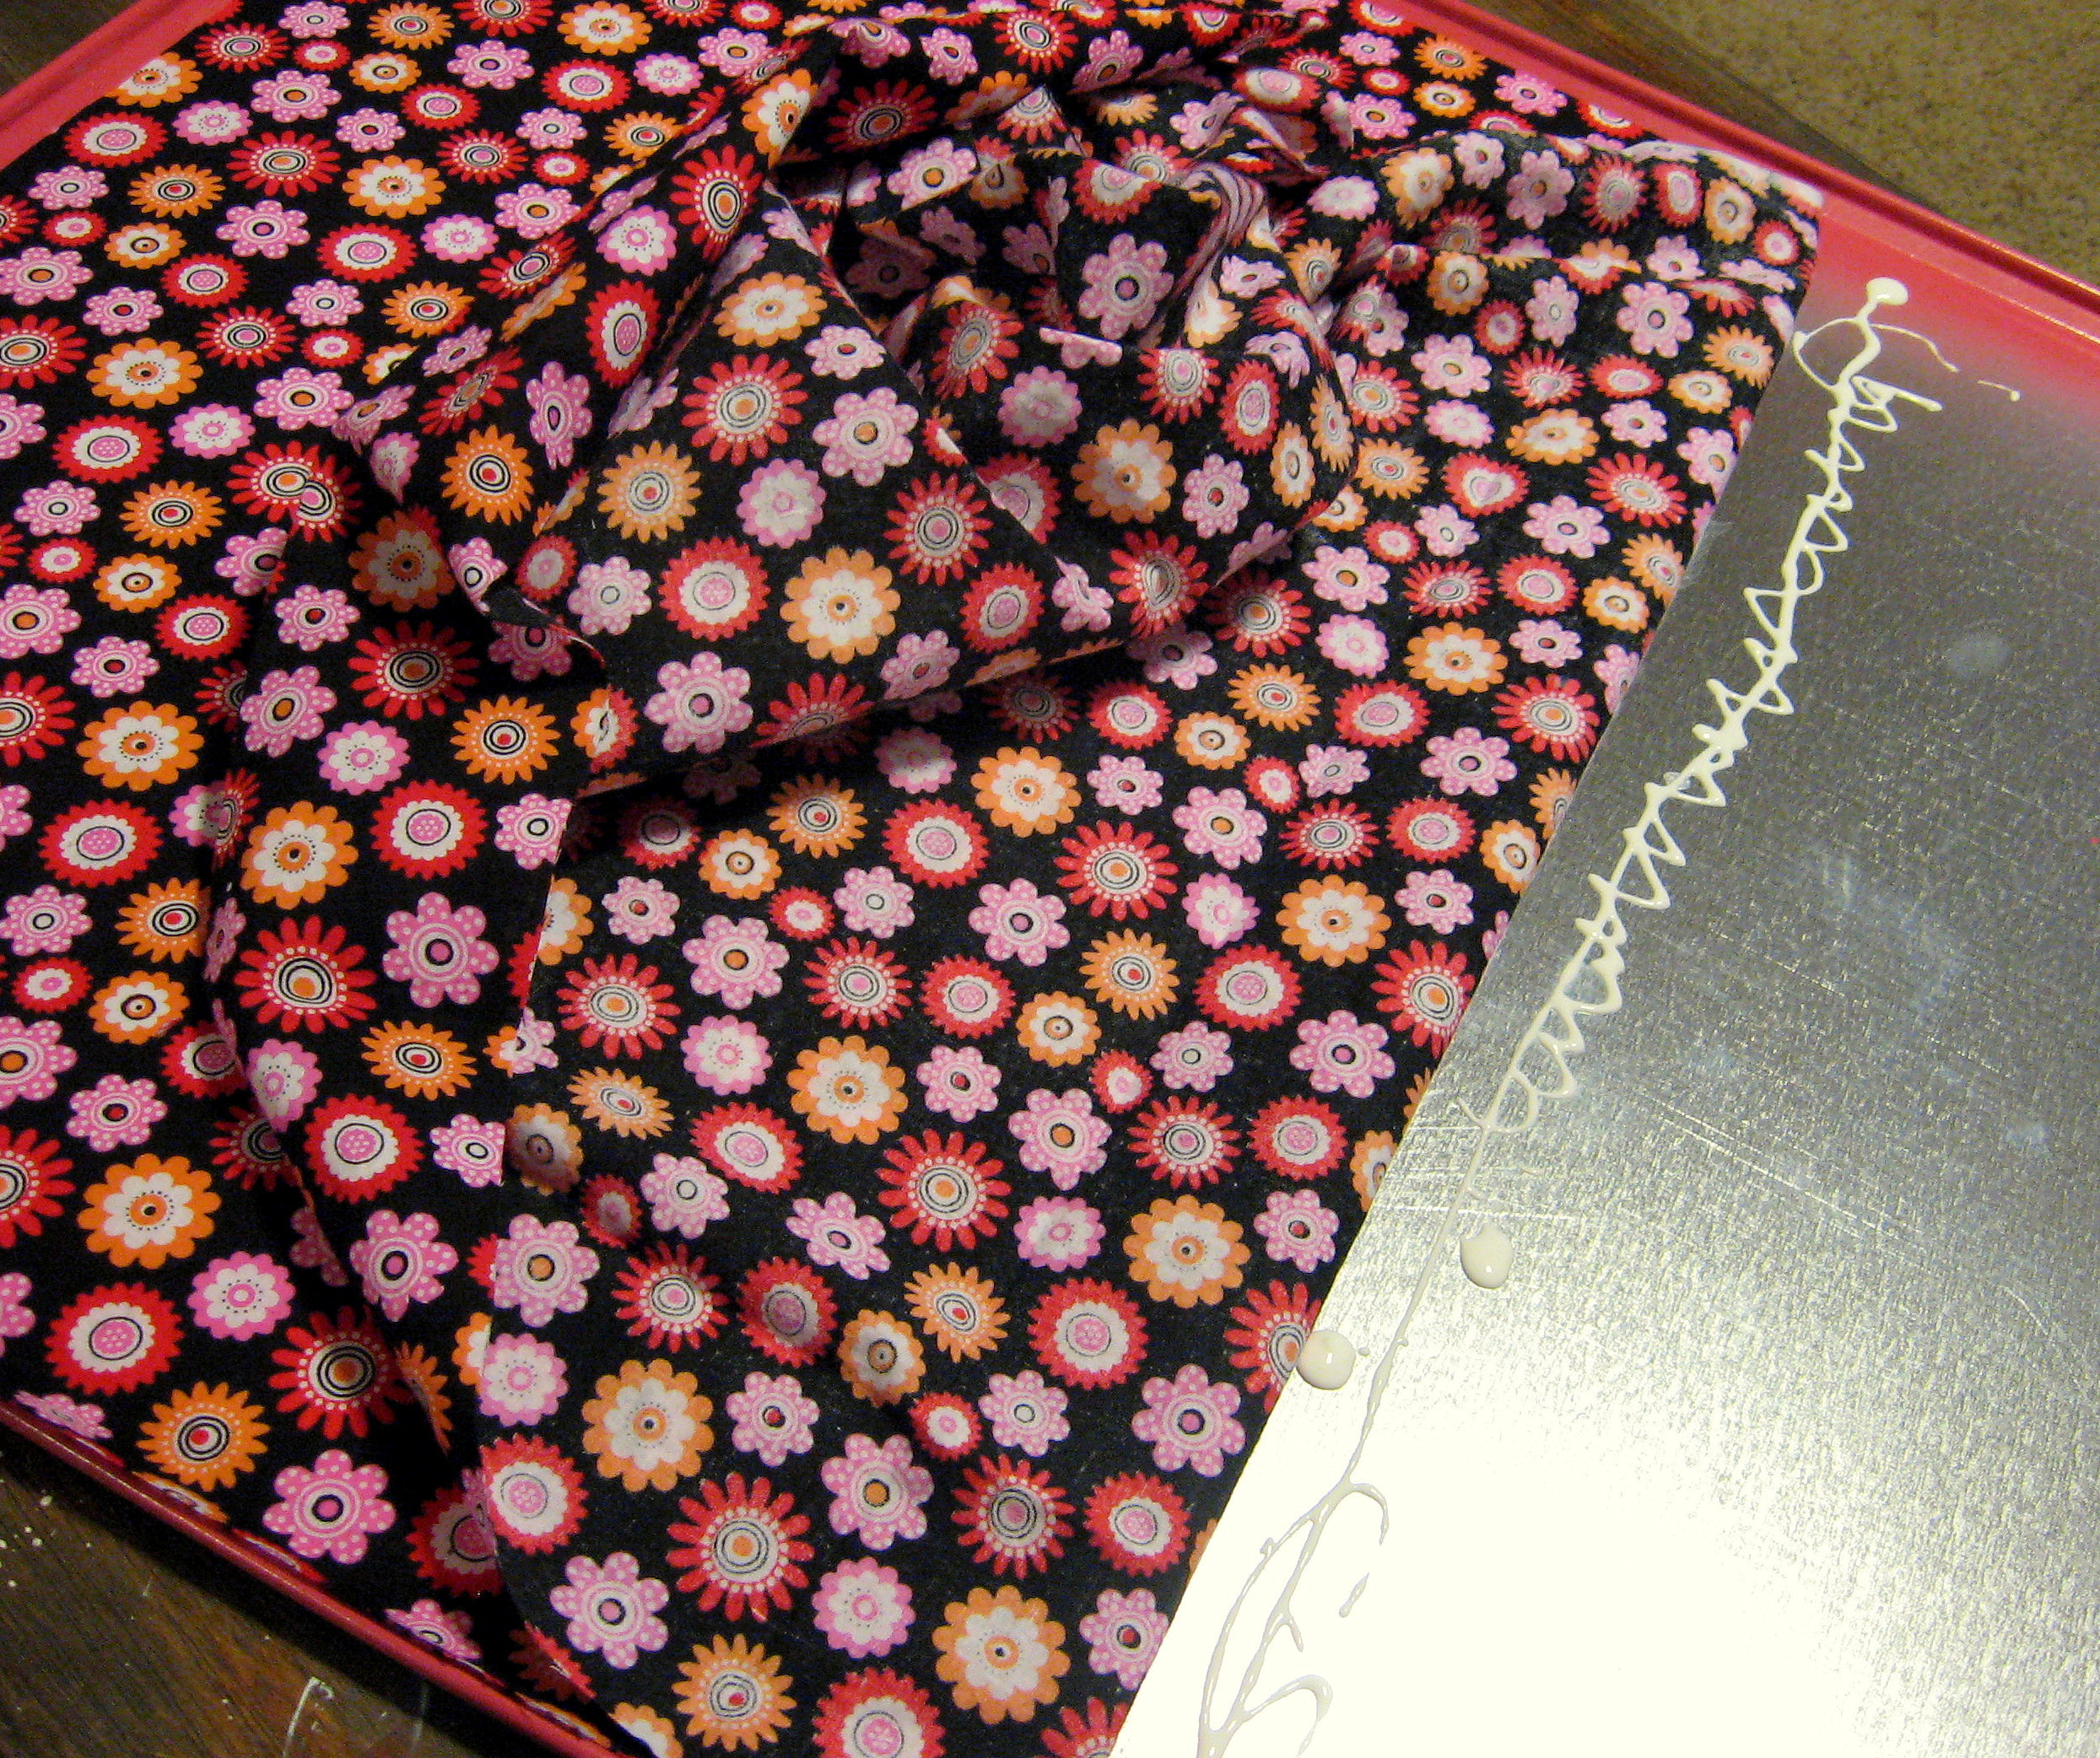
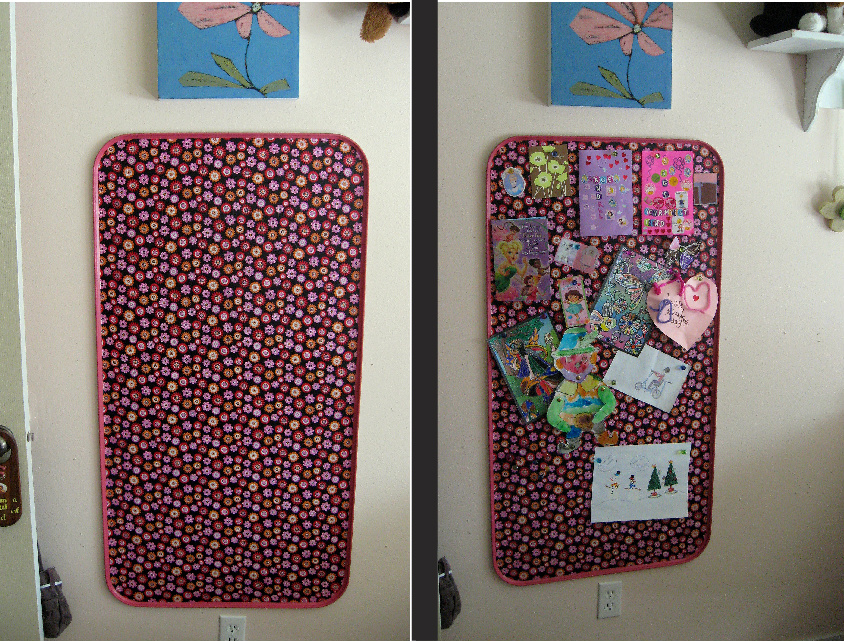
Have you seen these?
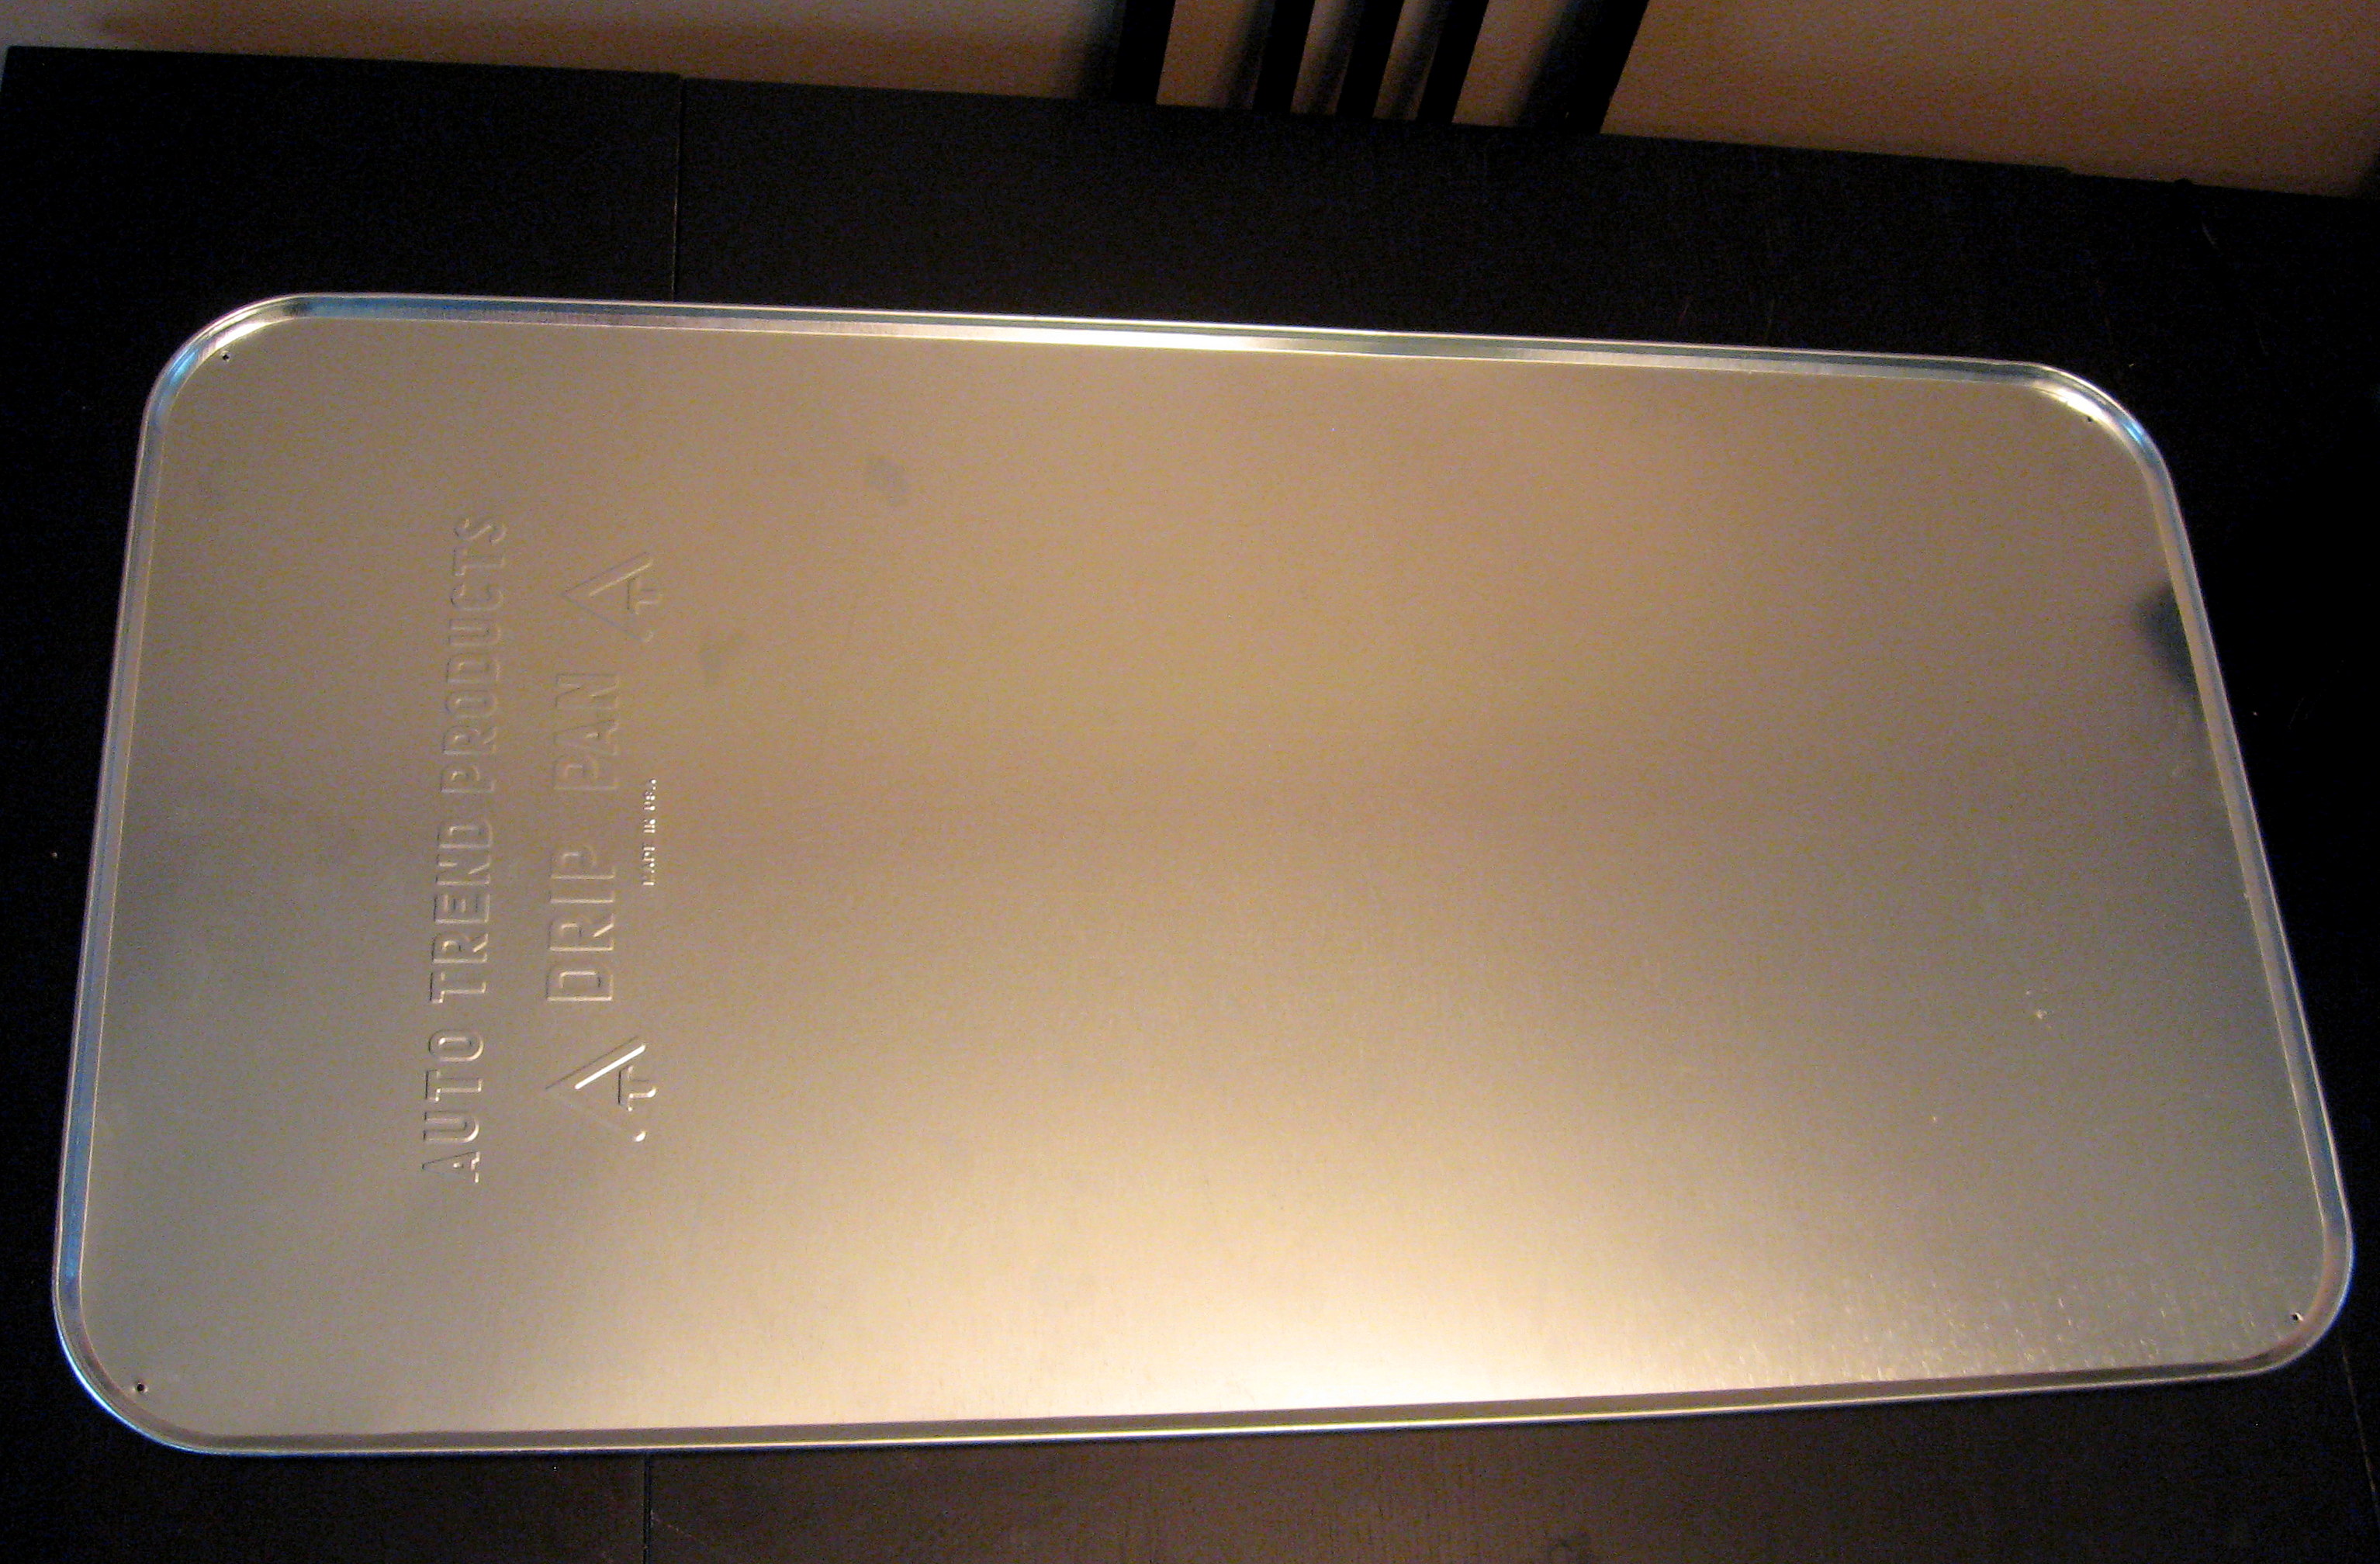
They look like an enormous cookie sheet, but they are drip pans to put under your car. They are big – about 2′ X 4′ – and you can get them at Walmart for about $11. I have had one in my craft area for awhile that I use as a magnet board. I needed one for my daughter’s room, and loved the size of these, but I knew the silver wouldn’t work in her pink room, so I pulled out my trusty Mod Podge and went for it!
You’ll need:
Drip Pan
Spray Paint
Fabric
Mod Podge
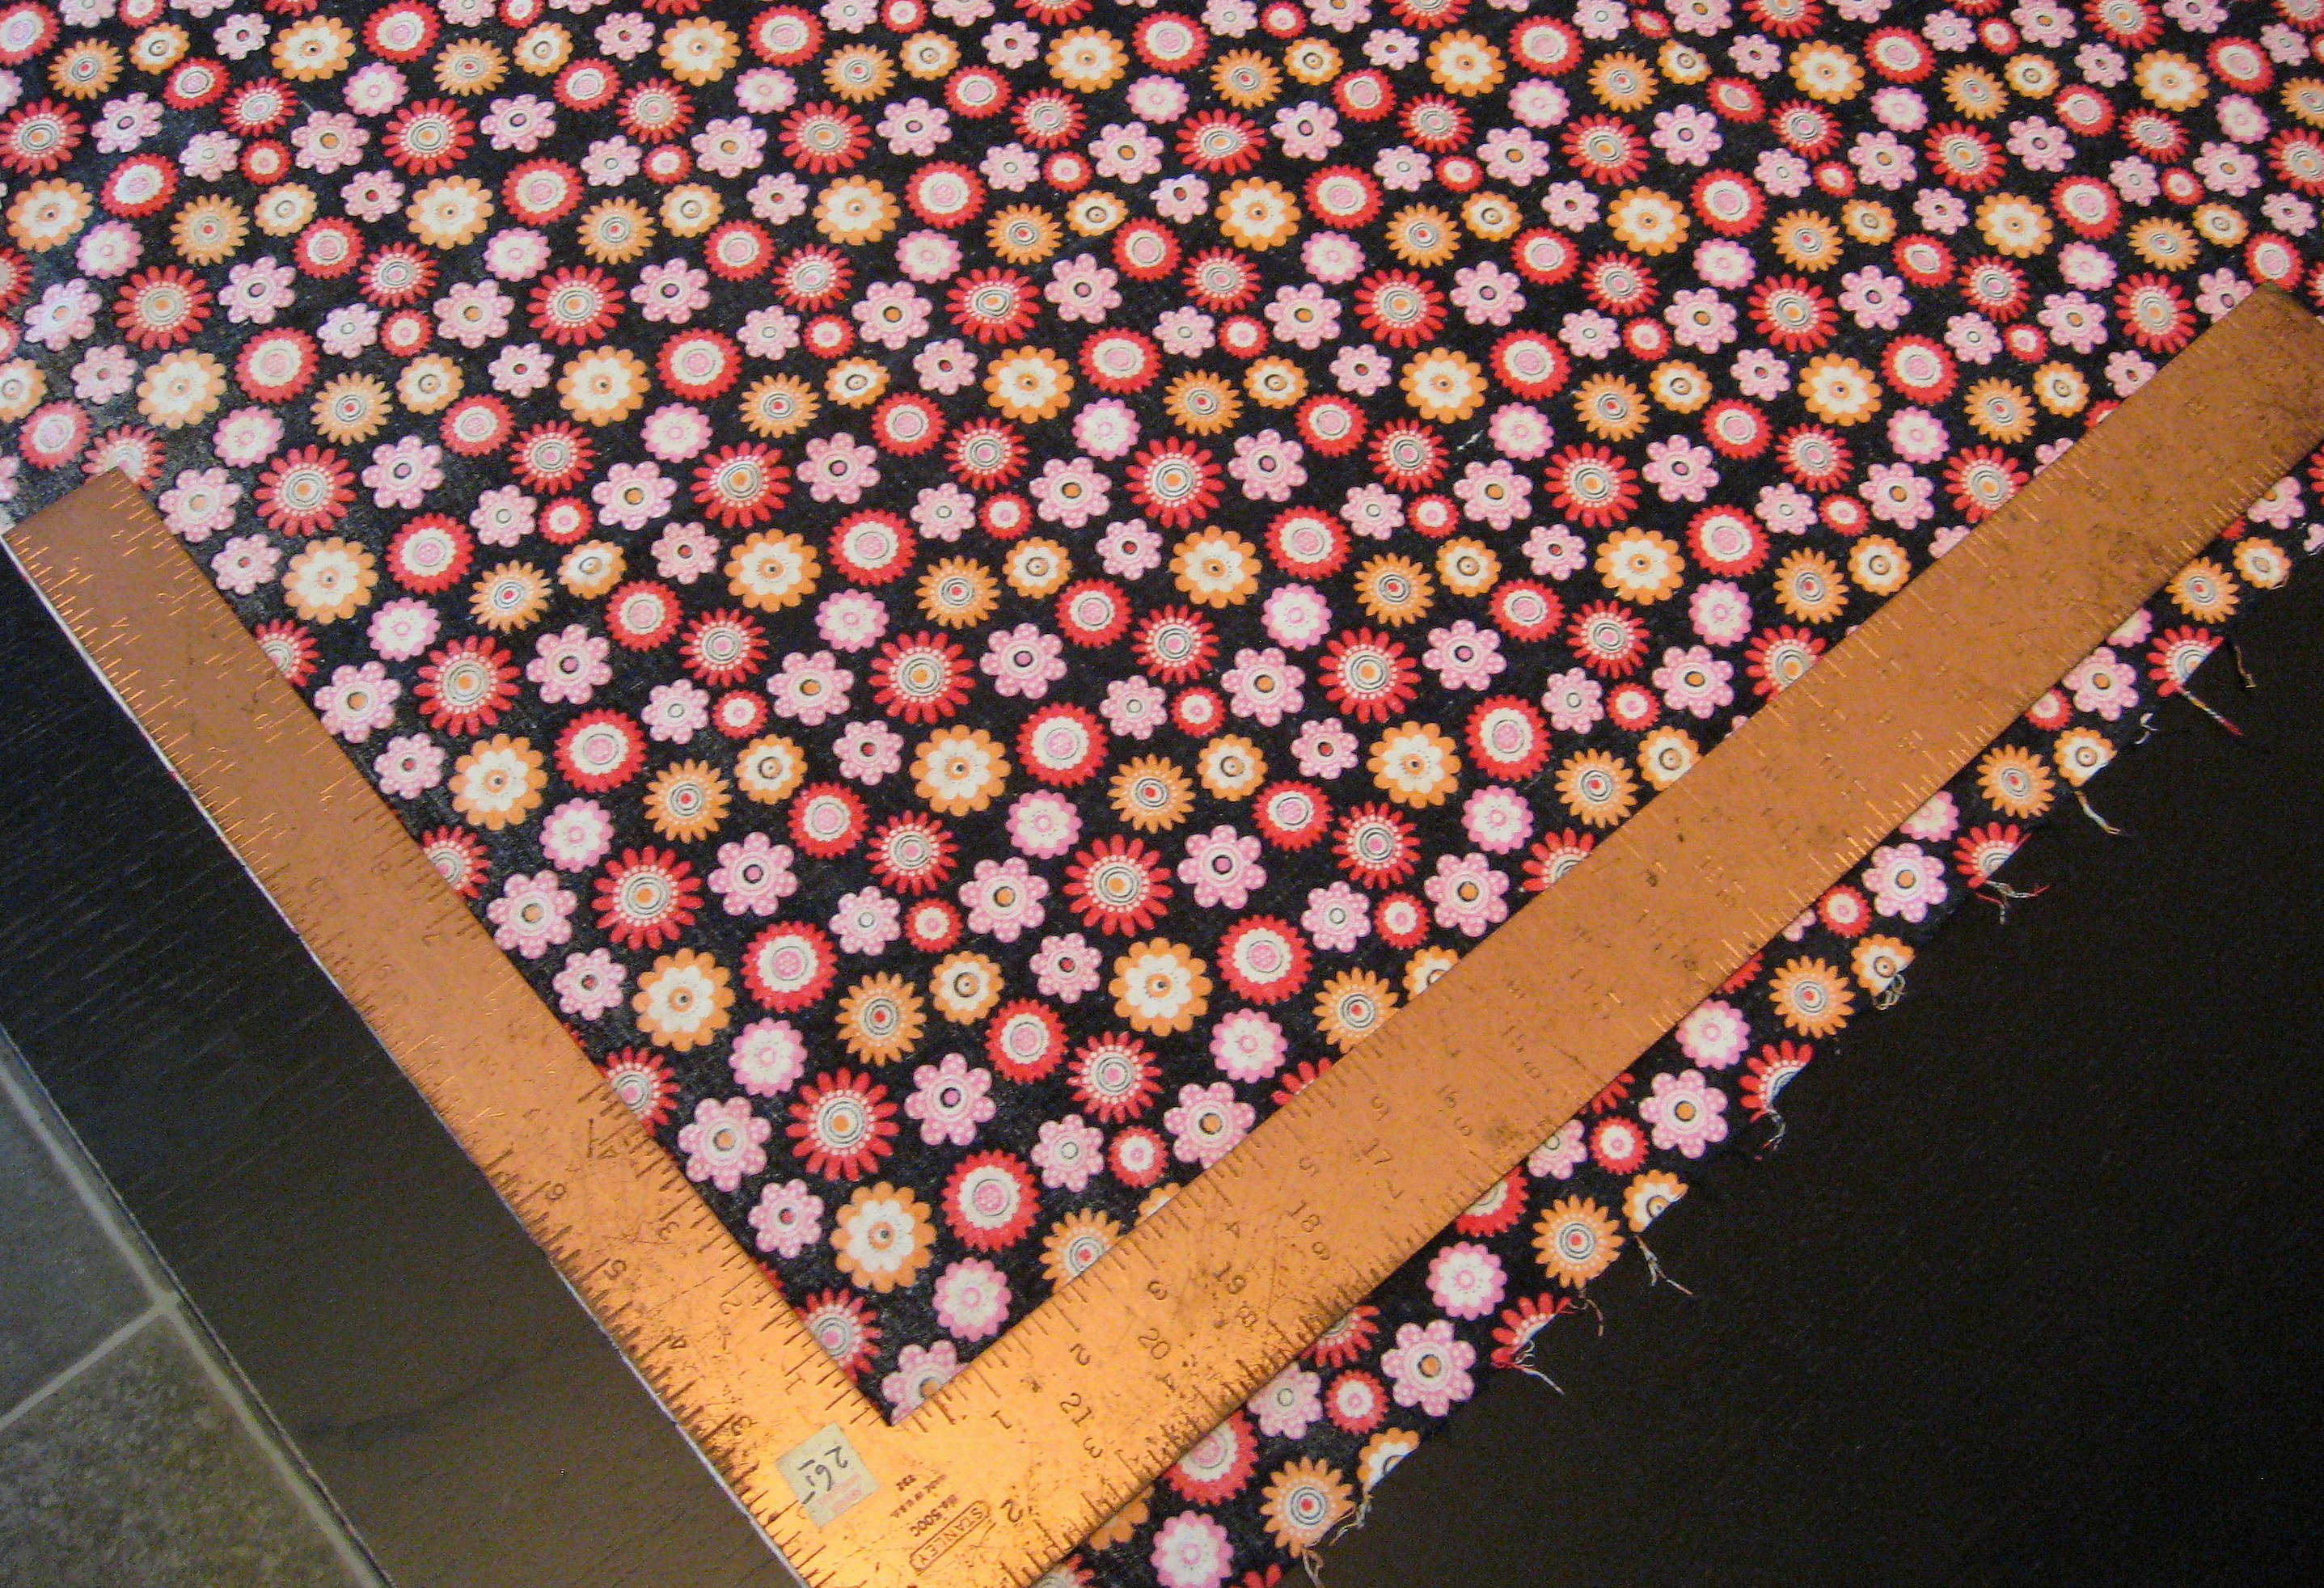
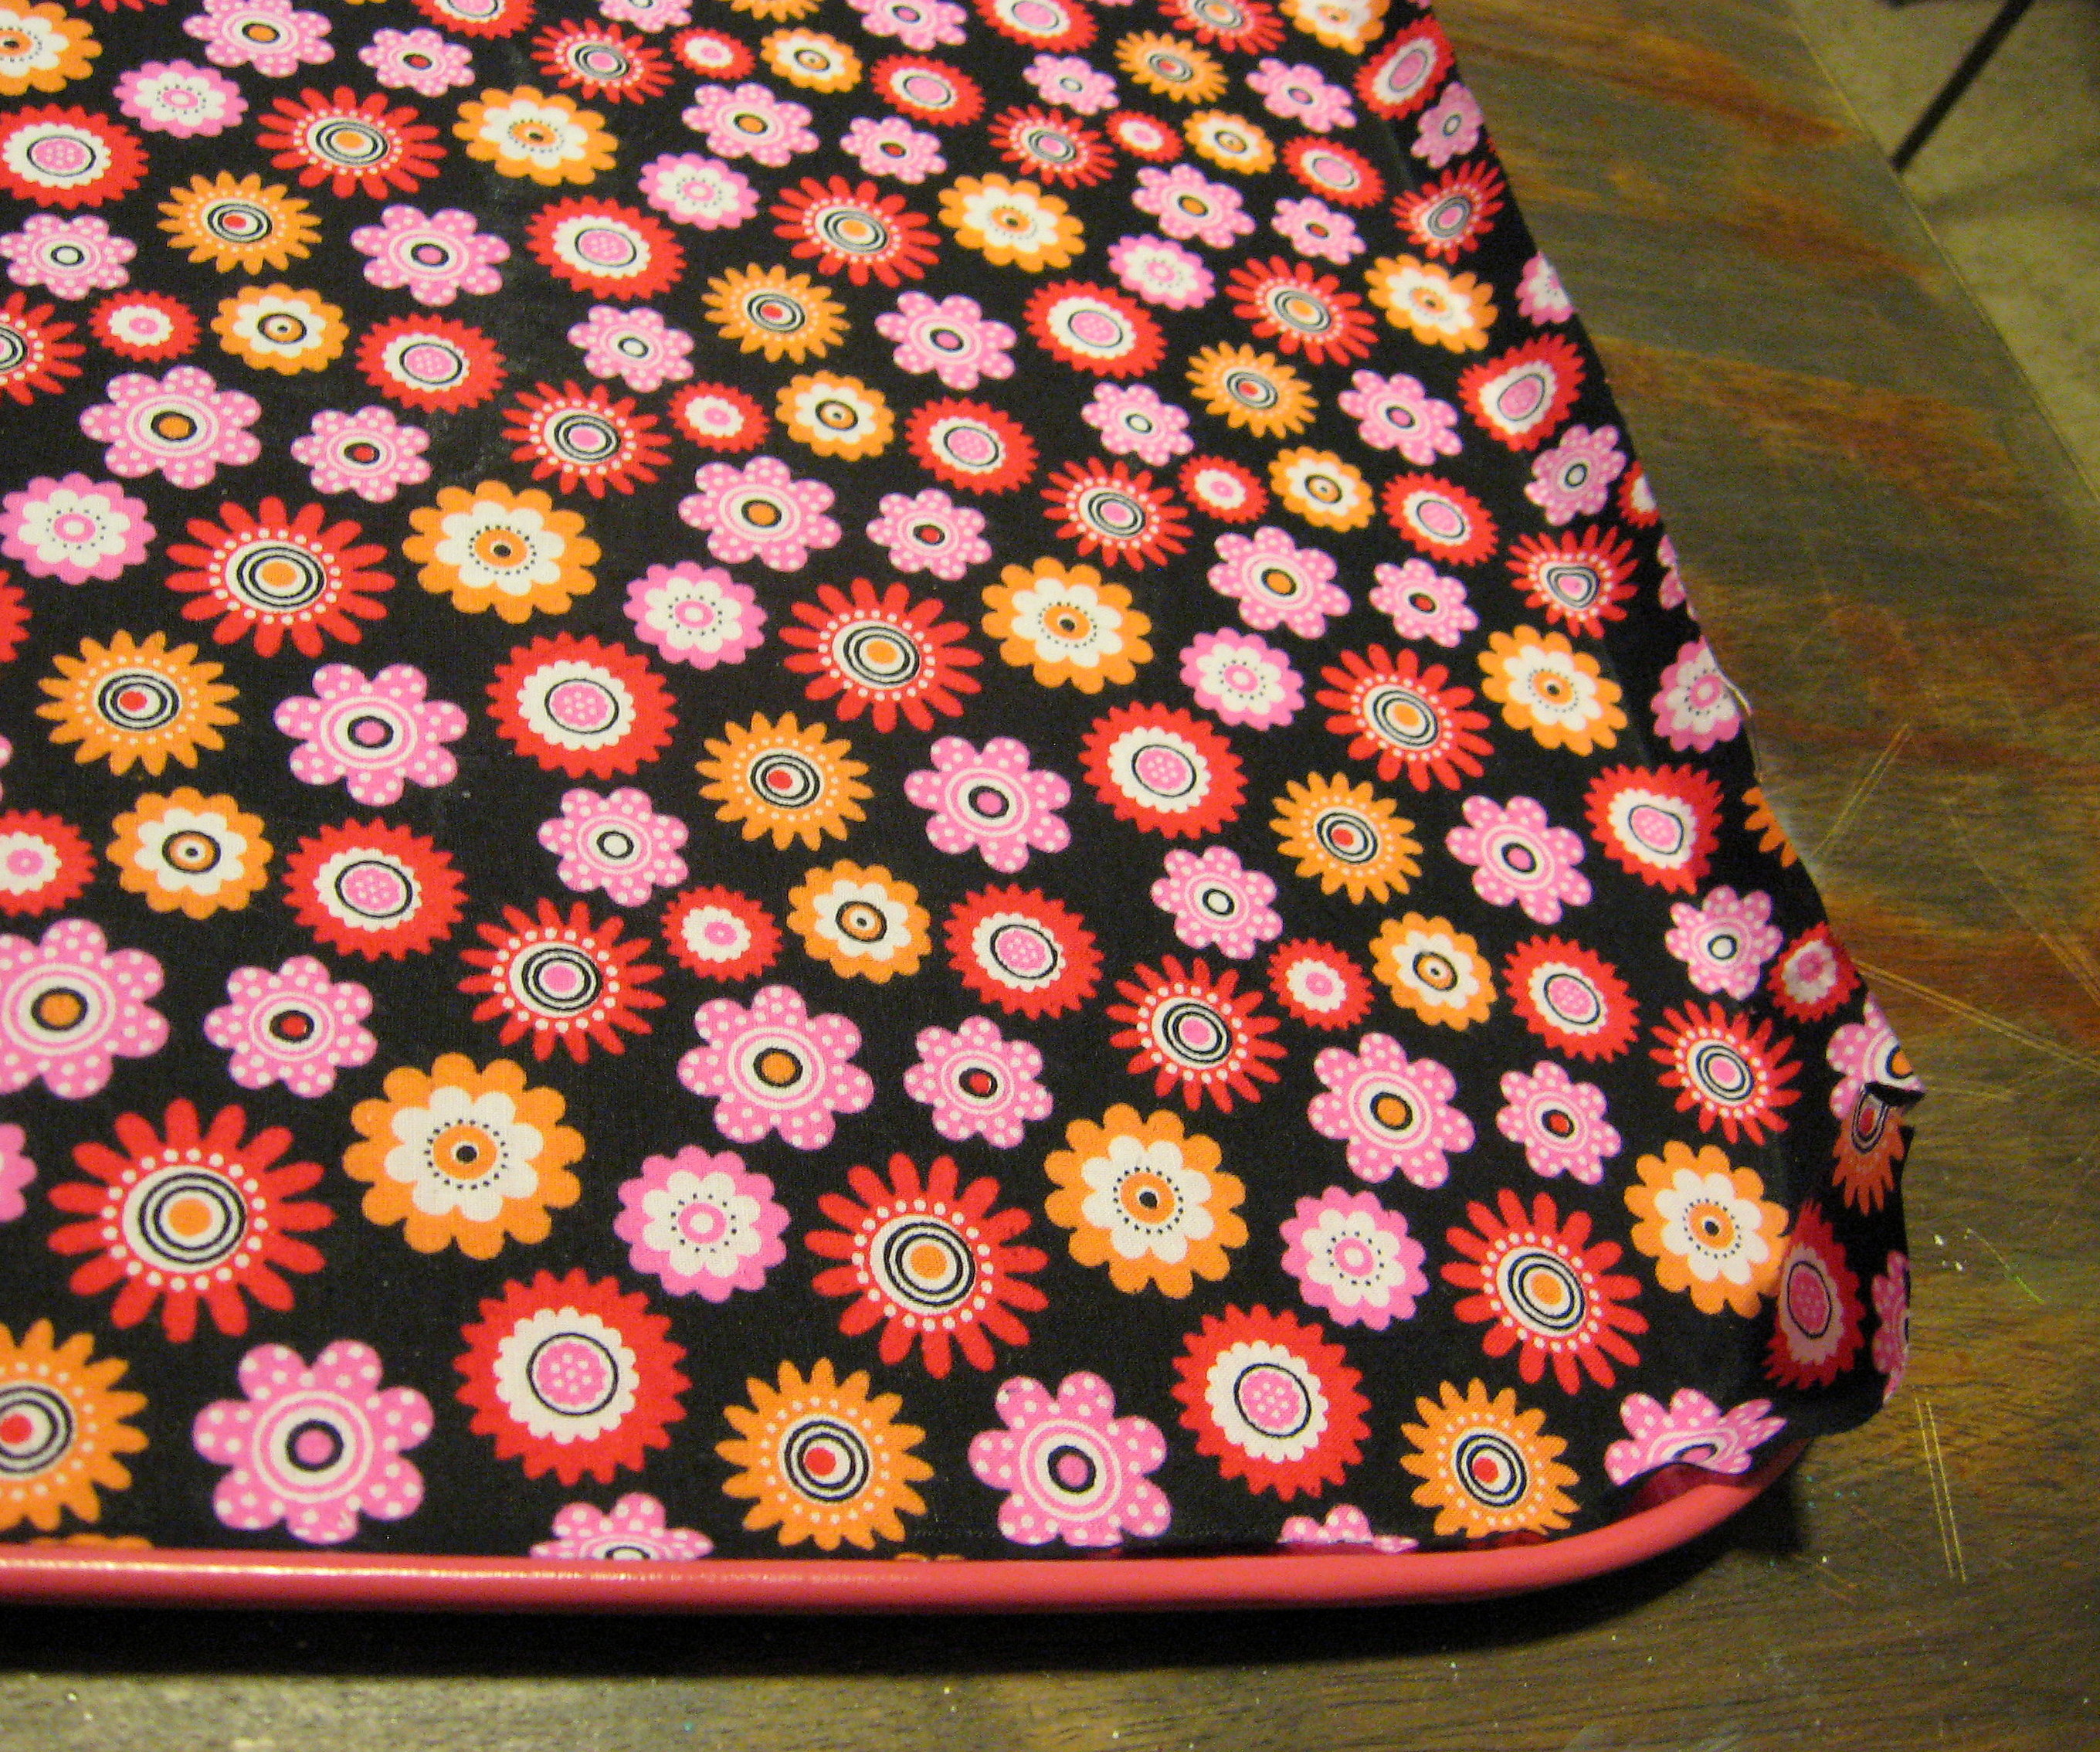
I started by cutting my fabric into a rectangle just a little bit larger than the dimensions of the drip pan – maybe an inch or so. The fabric will stretch a little as you Mod Podge it on, and you will cut off the extra when you’re finished, so you really only need to make sure that two adjacent sides are square and straight. If you have a rotary cutter and mat, you’ll want to use that. I don’t, so I used a carpenter’s square to mark it, then cut with scissors.
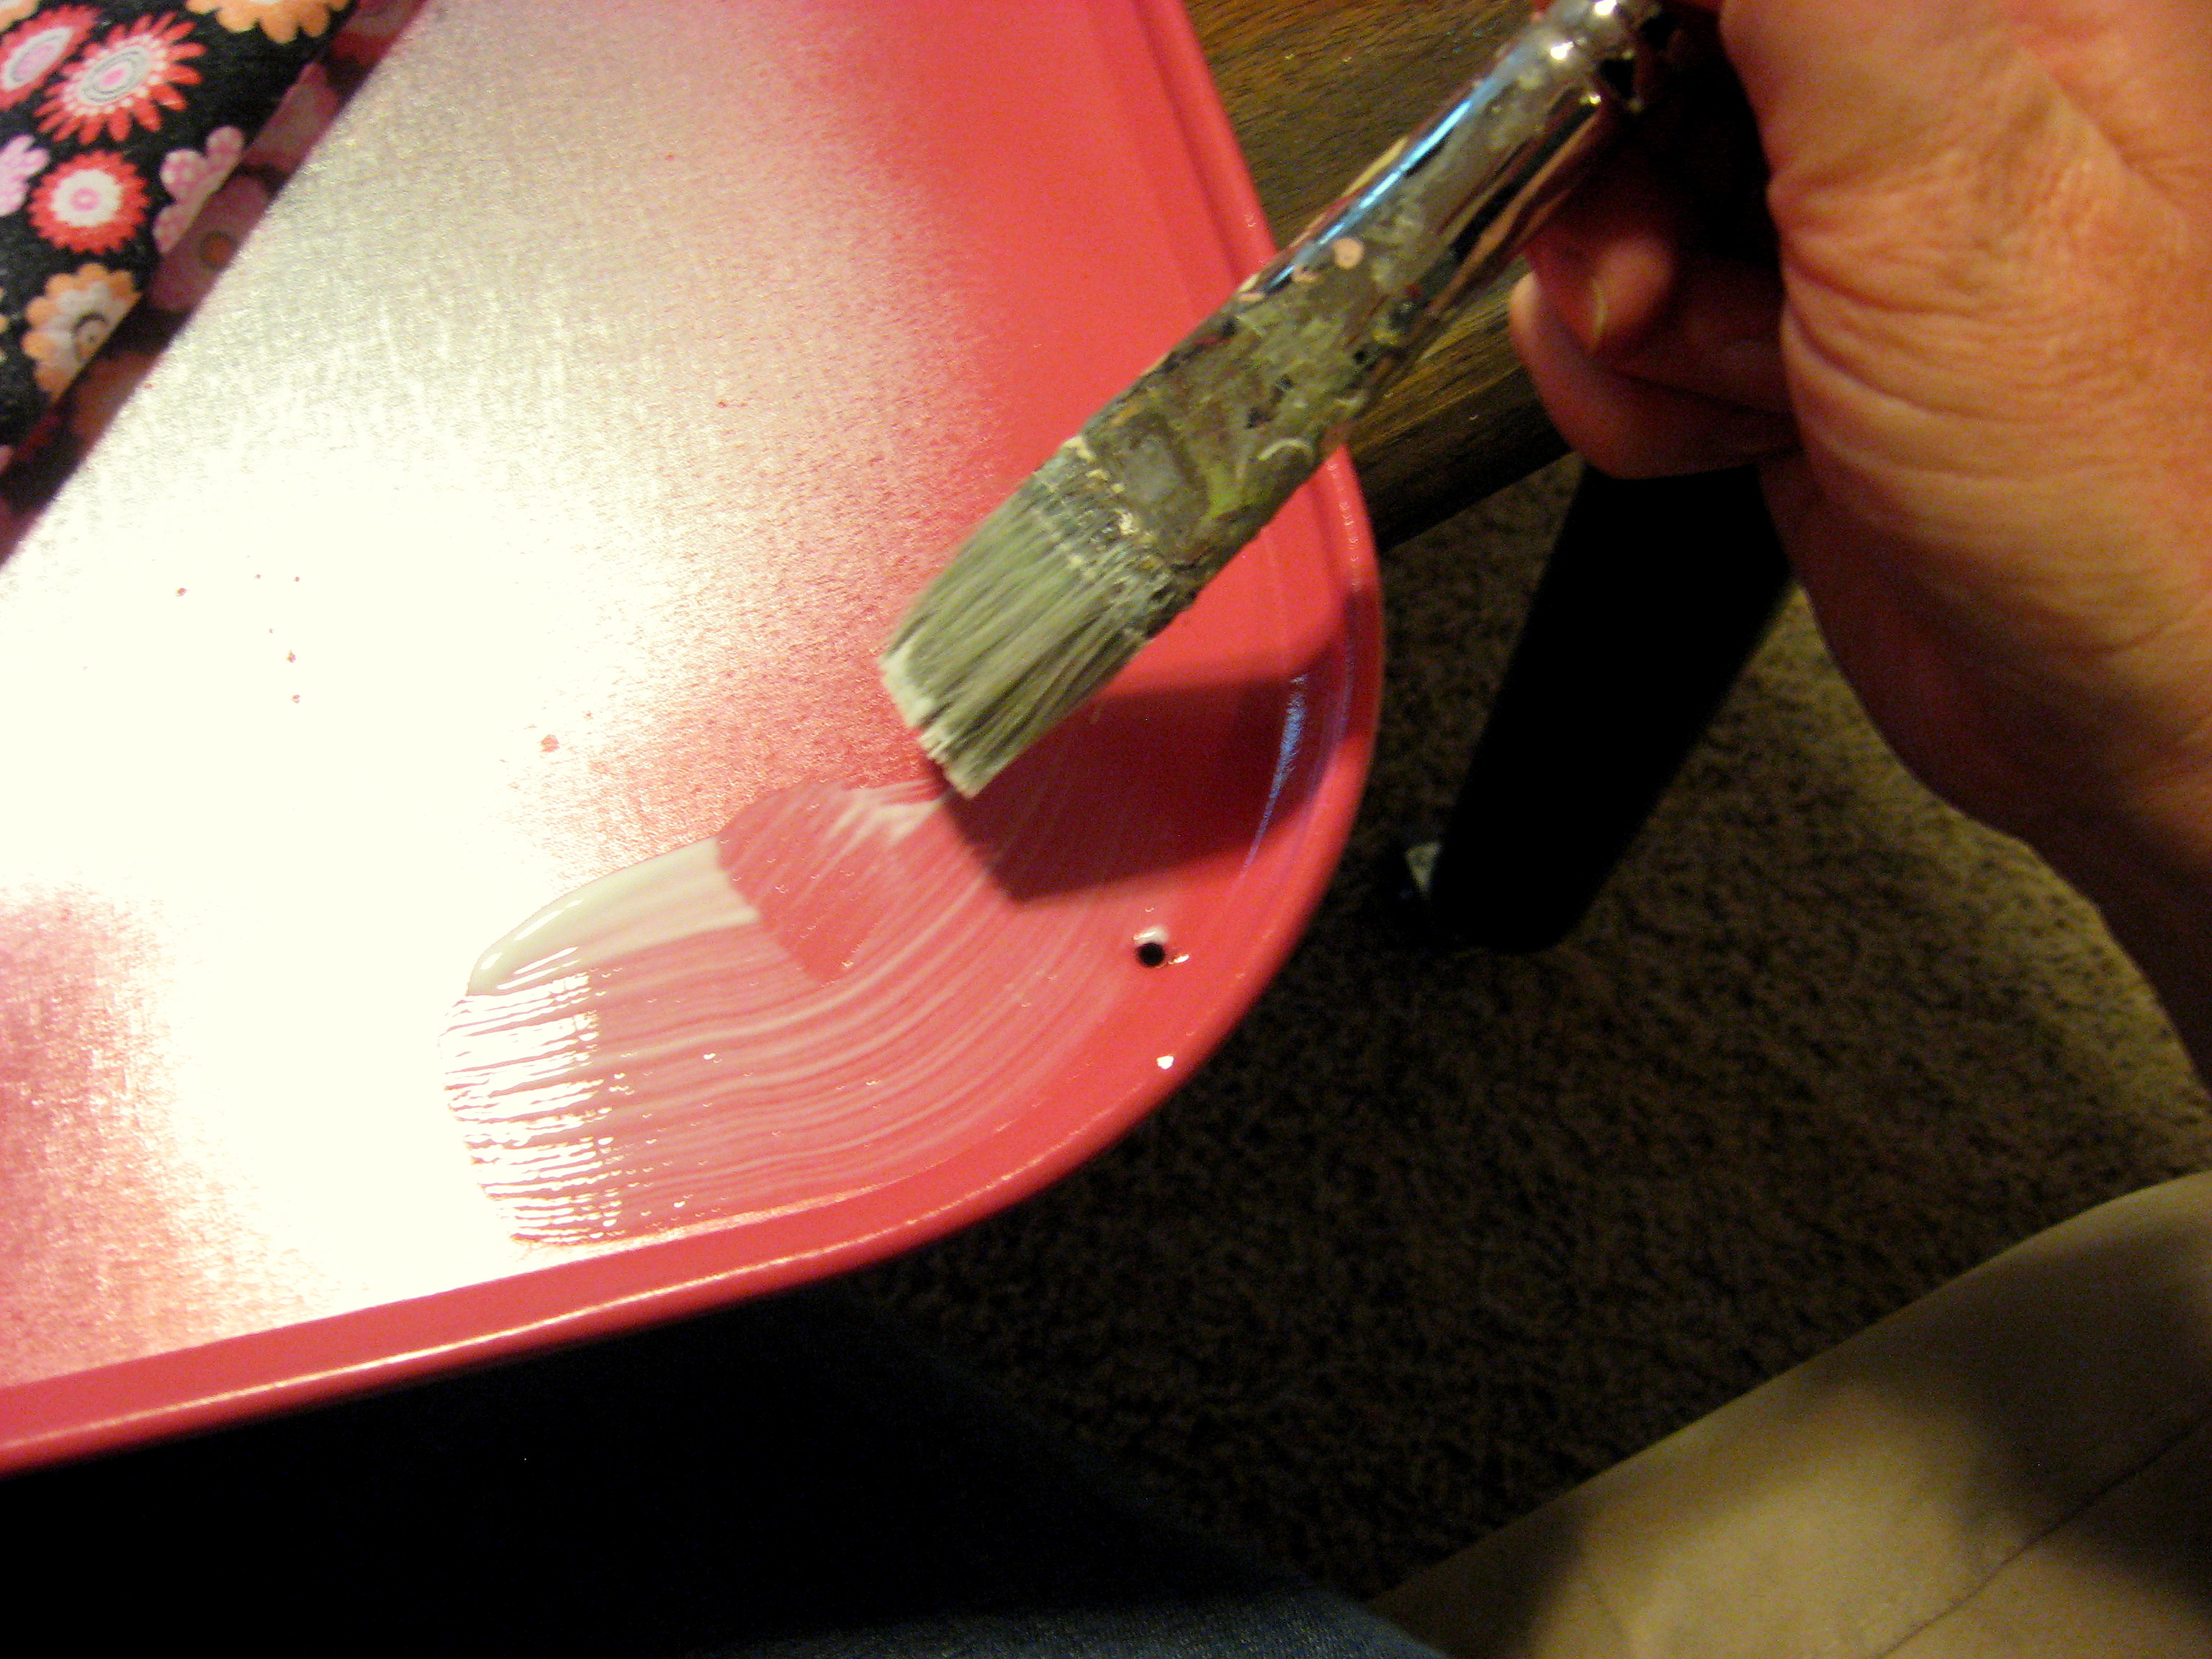
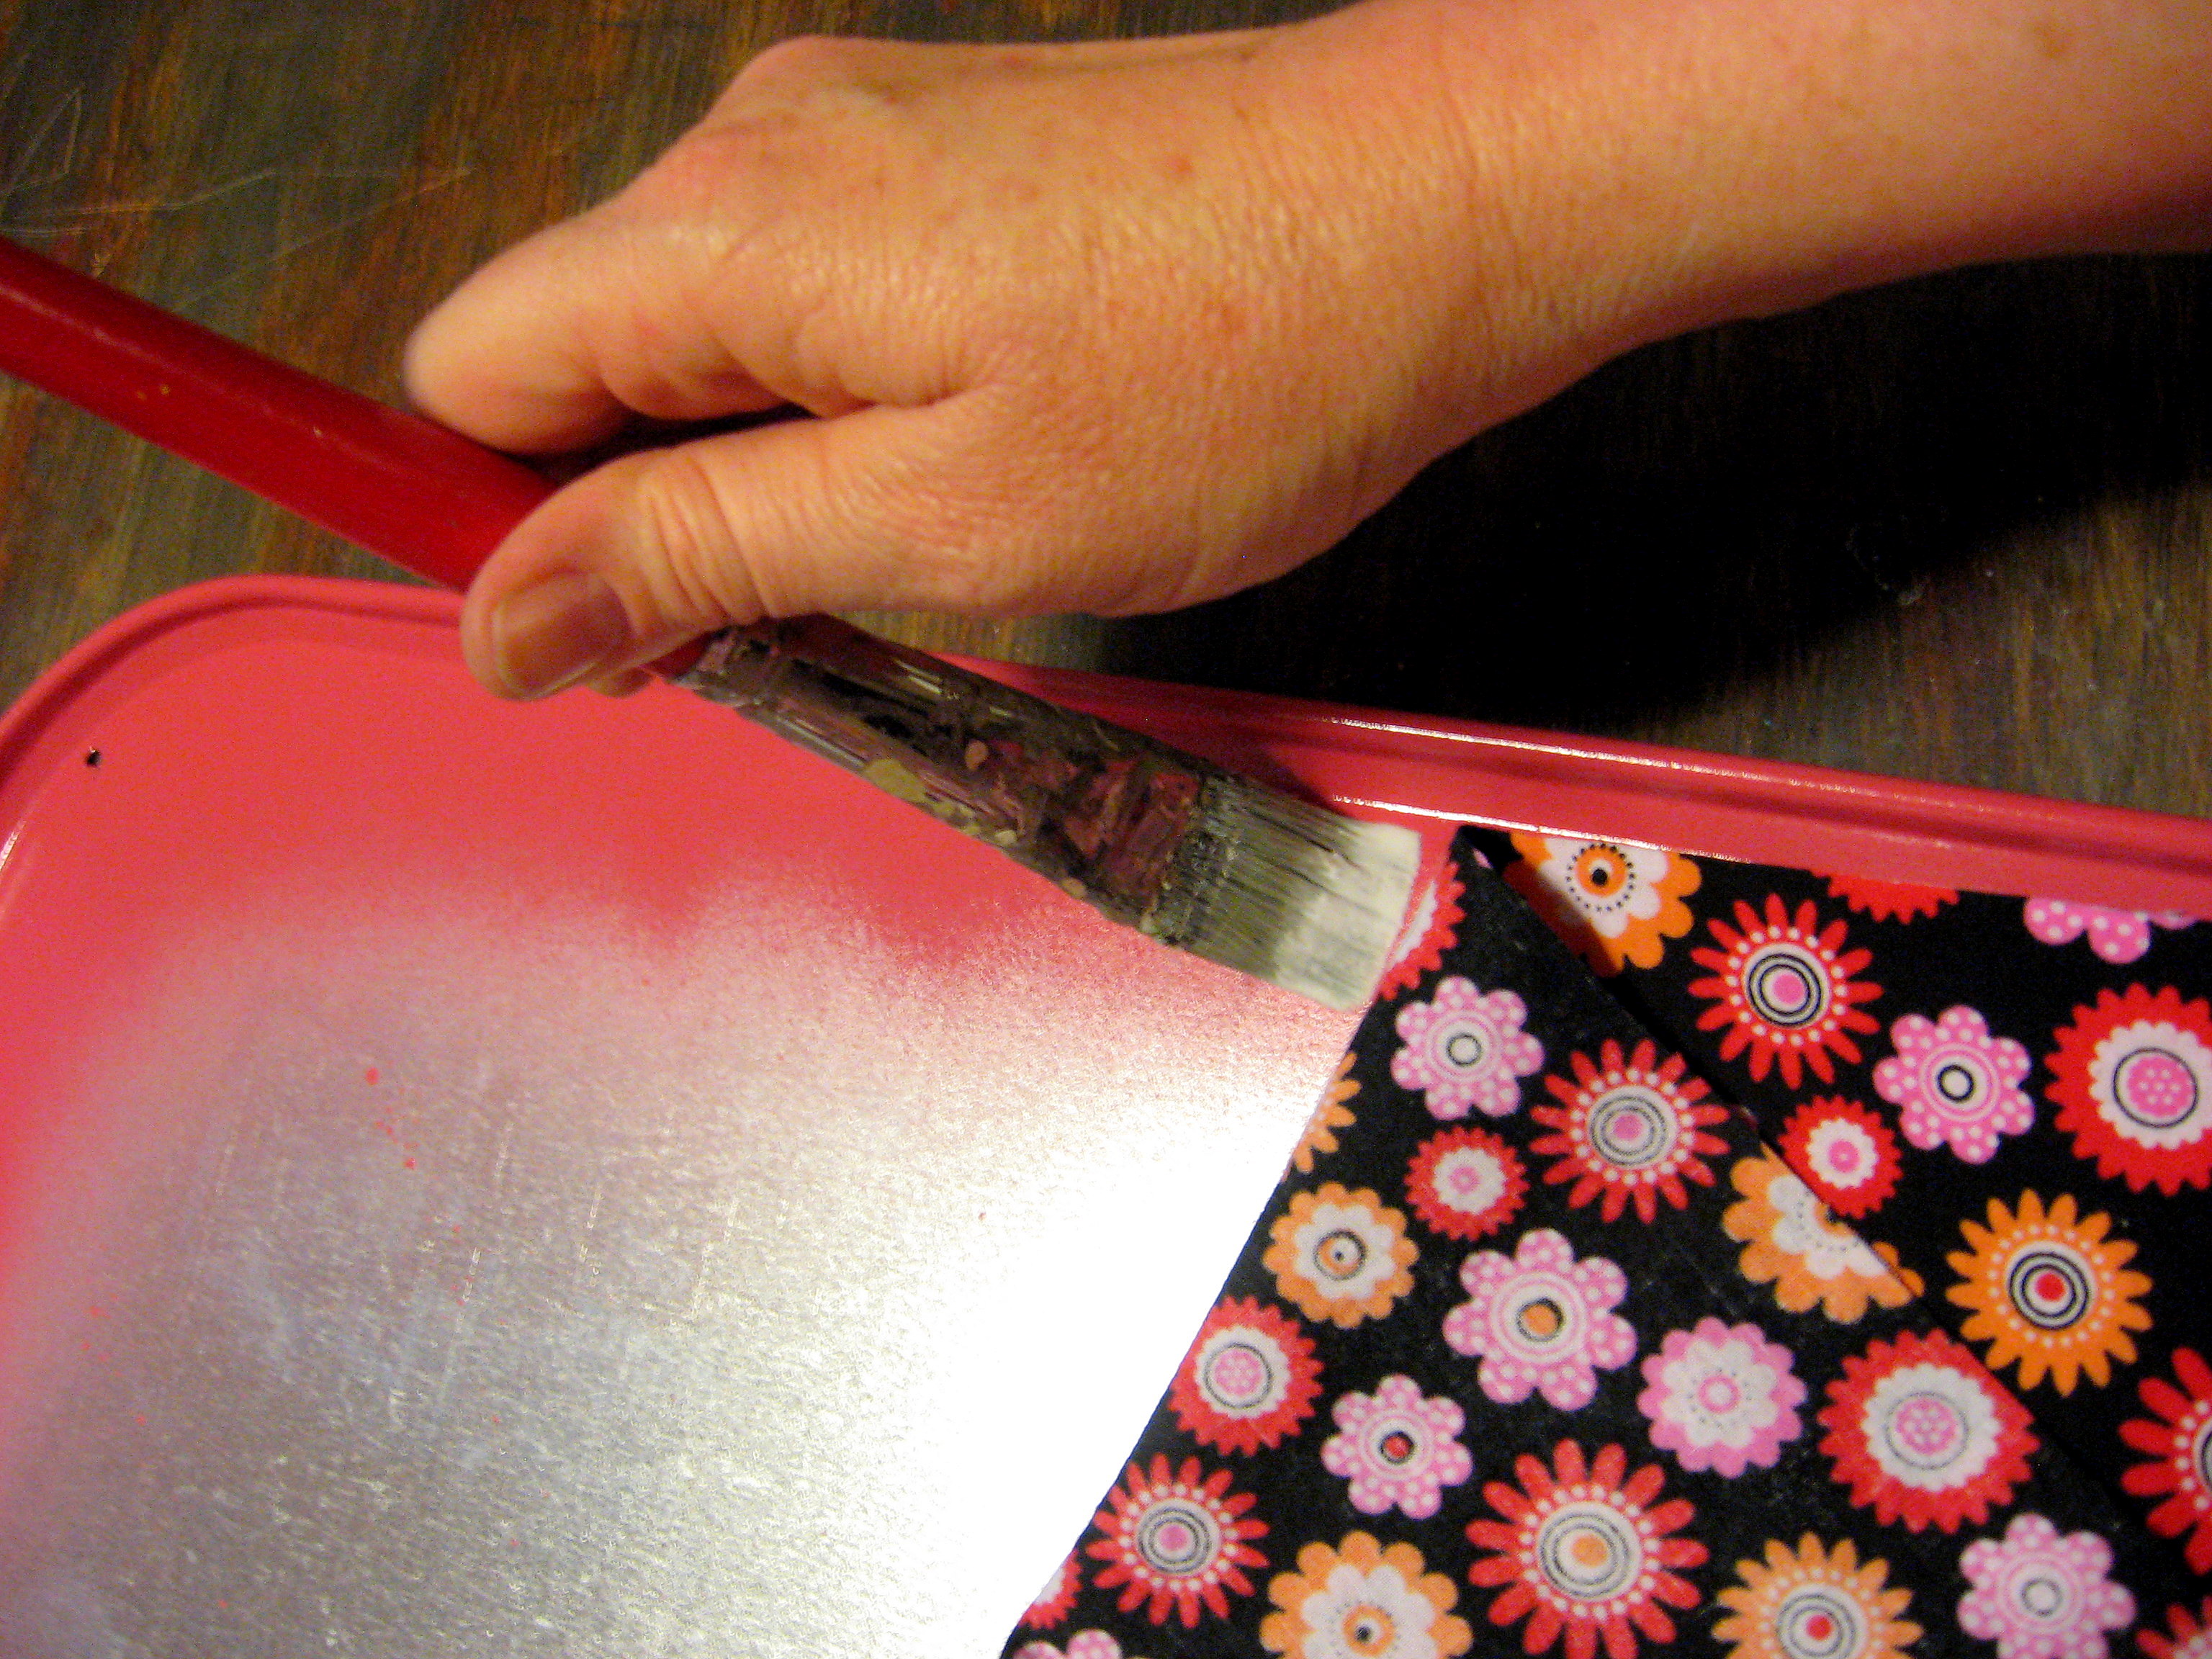
Put the fabric aside and paint the edges of the pan (you could save yourself this step by wrapping the fabric all the way around the edges to the back of the pan if you wanted to.)
You only need to do the edges, since the middle will be covered with fabric. I recommend using a high quality paint to lessen the chance of it scratching off of the metal. I like Krylon.
Once the paint is dry, find a big work space, make sure your kids are occupied and pop in a movie. Mod Podging fabric is a little trickier than paper and will take a little time and patience to get it all straight.
Start by lining up the two edges of your fabric that you cut straight with two adjacent sides of the pan. The corner will extend over; don’t worry about that yet.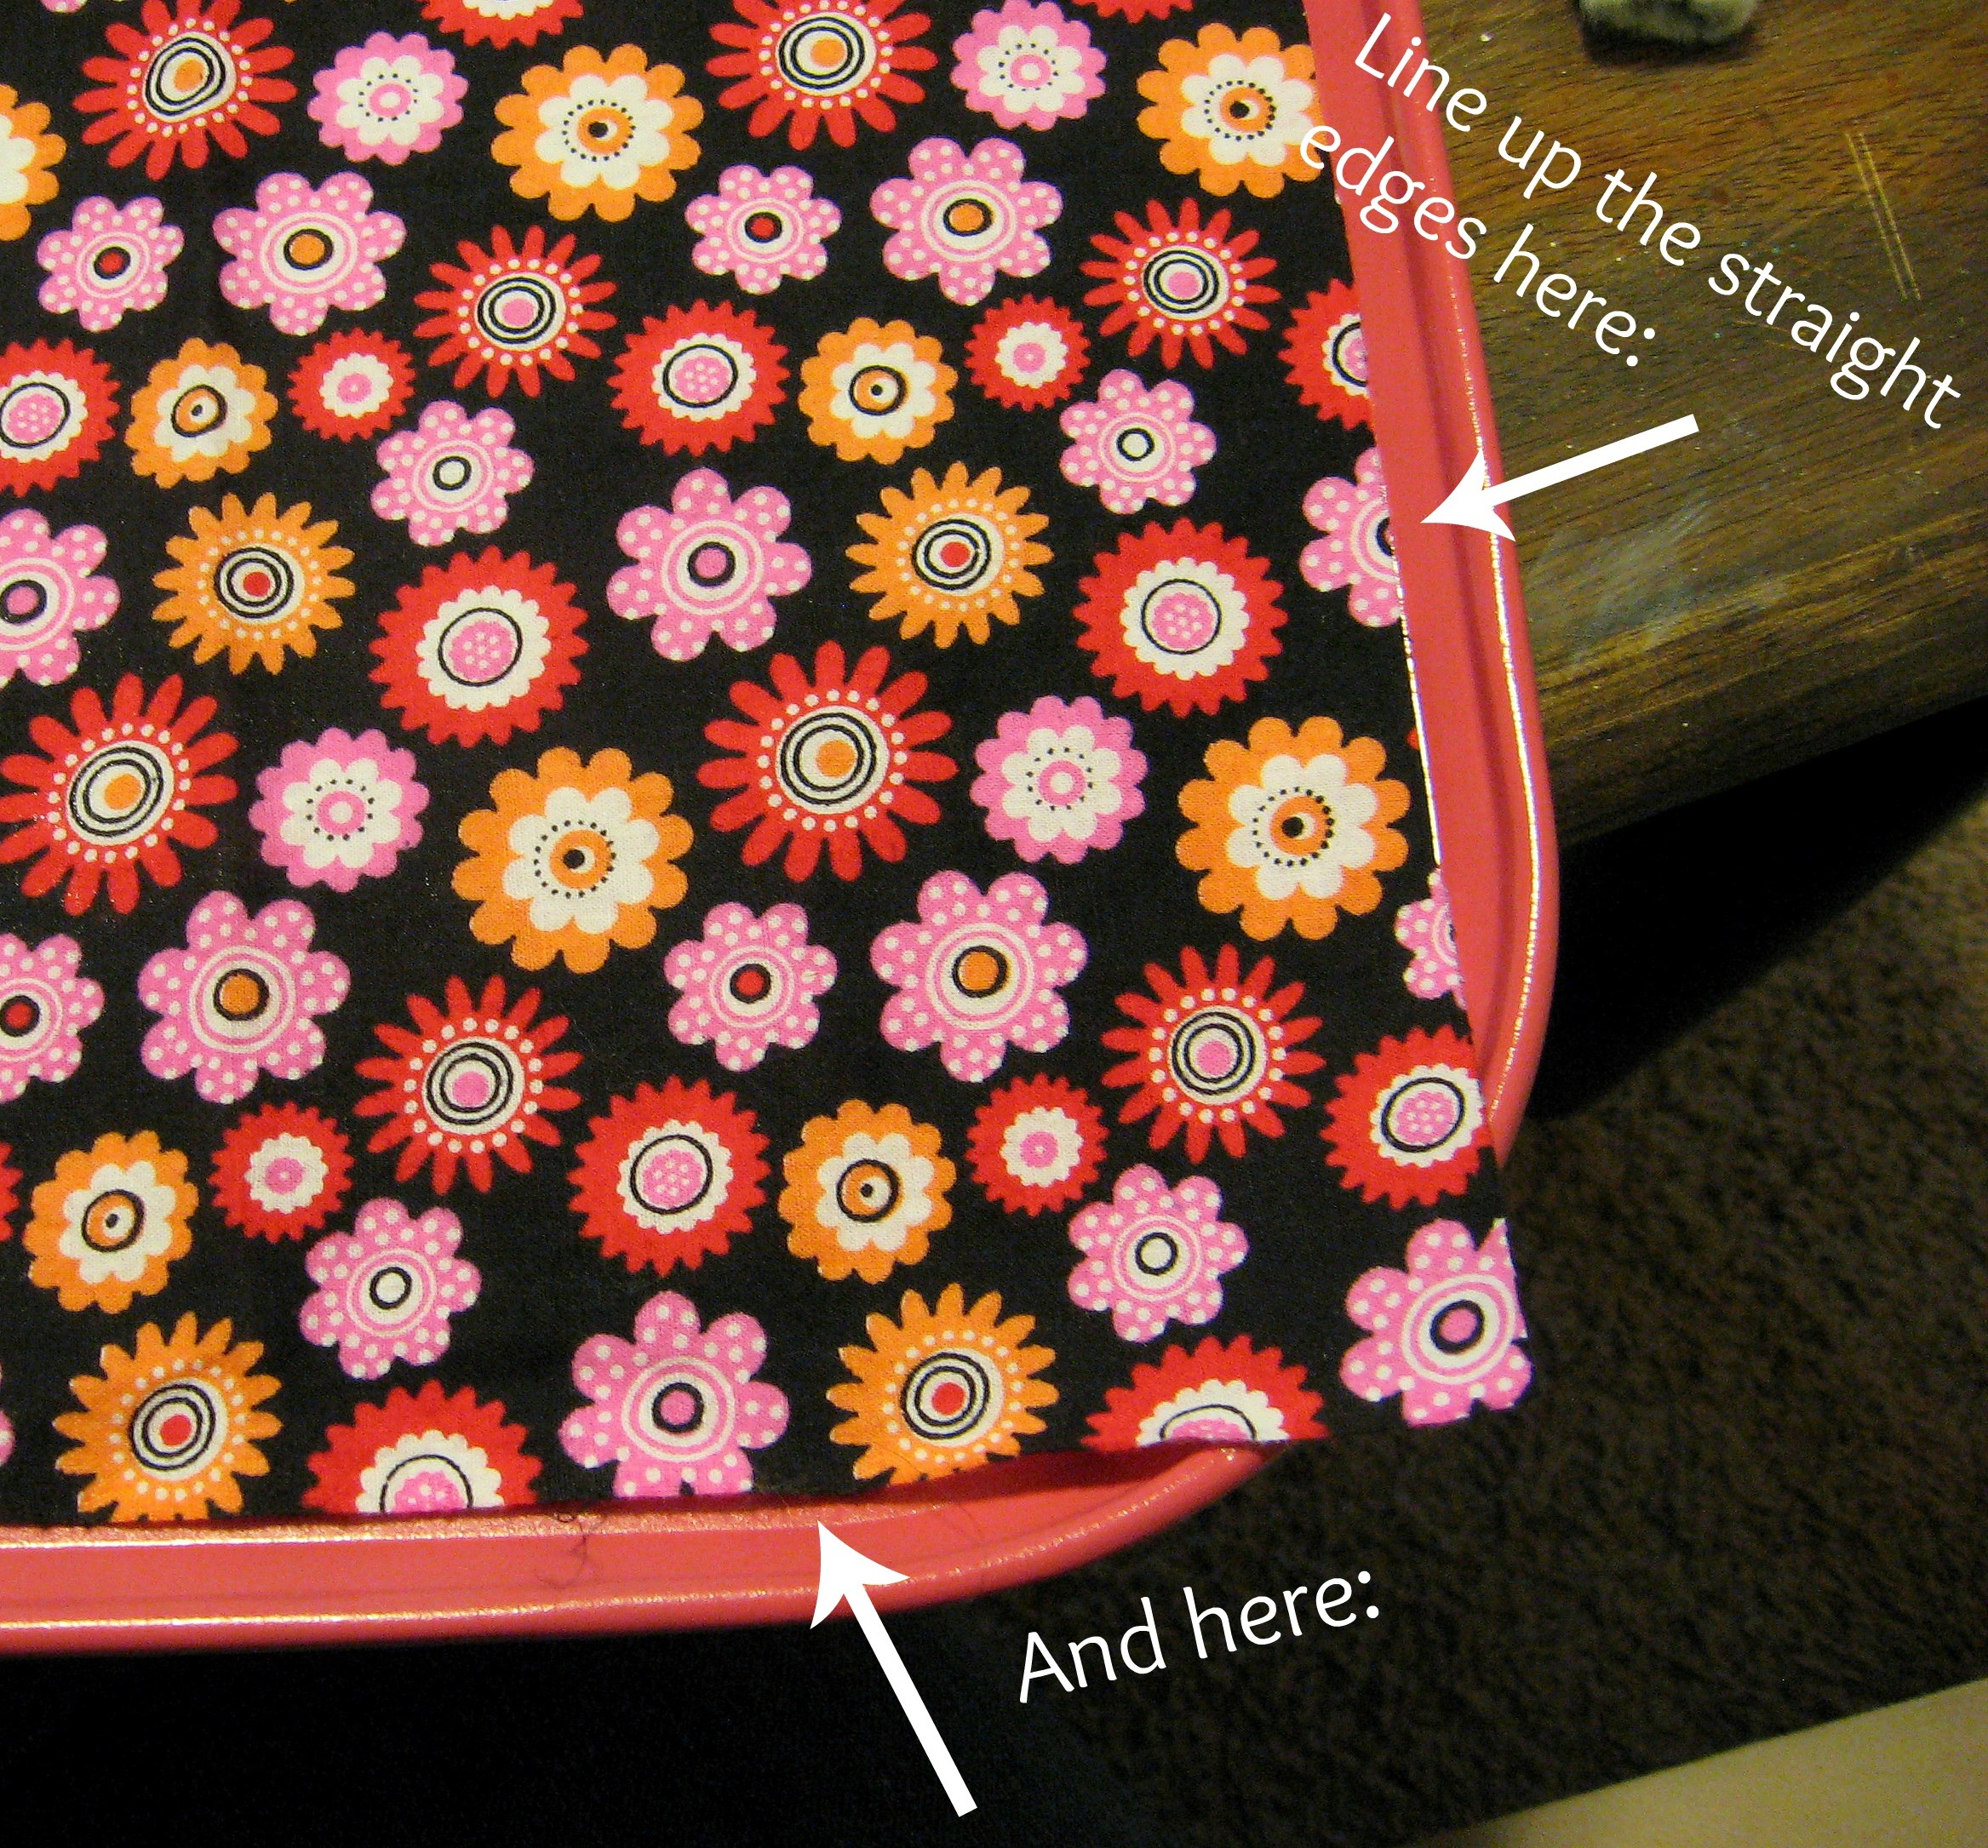
Once the fabric is all laid out and lined up with the edges, gently fold back the end and start applying the Mod Podge to the tray.
Start with the corner that you just lined up, then work your way across the short end of the tray until you get the fabric on that whole end adhered. Apply a few inches of the Mod Podge, then rub it down with your fingers until it is stuck.
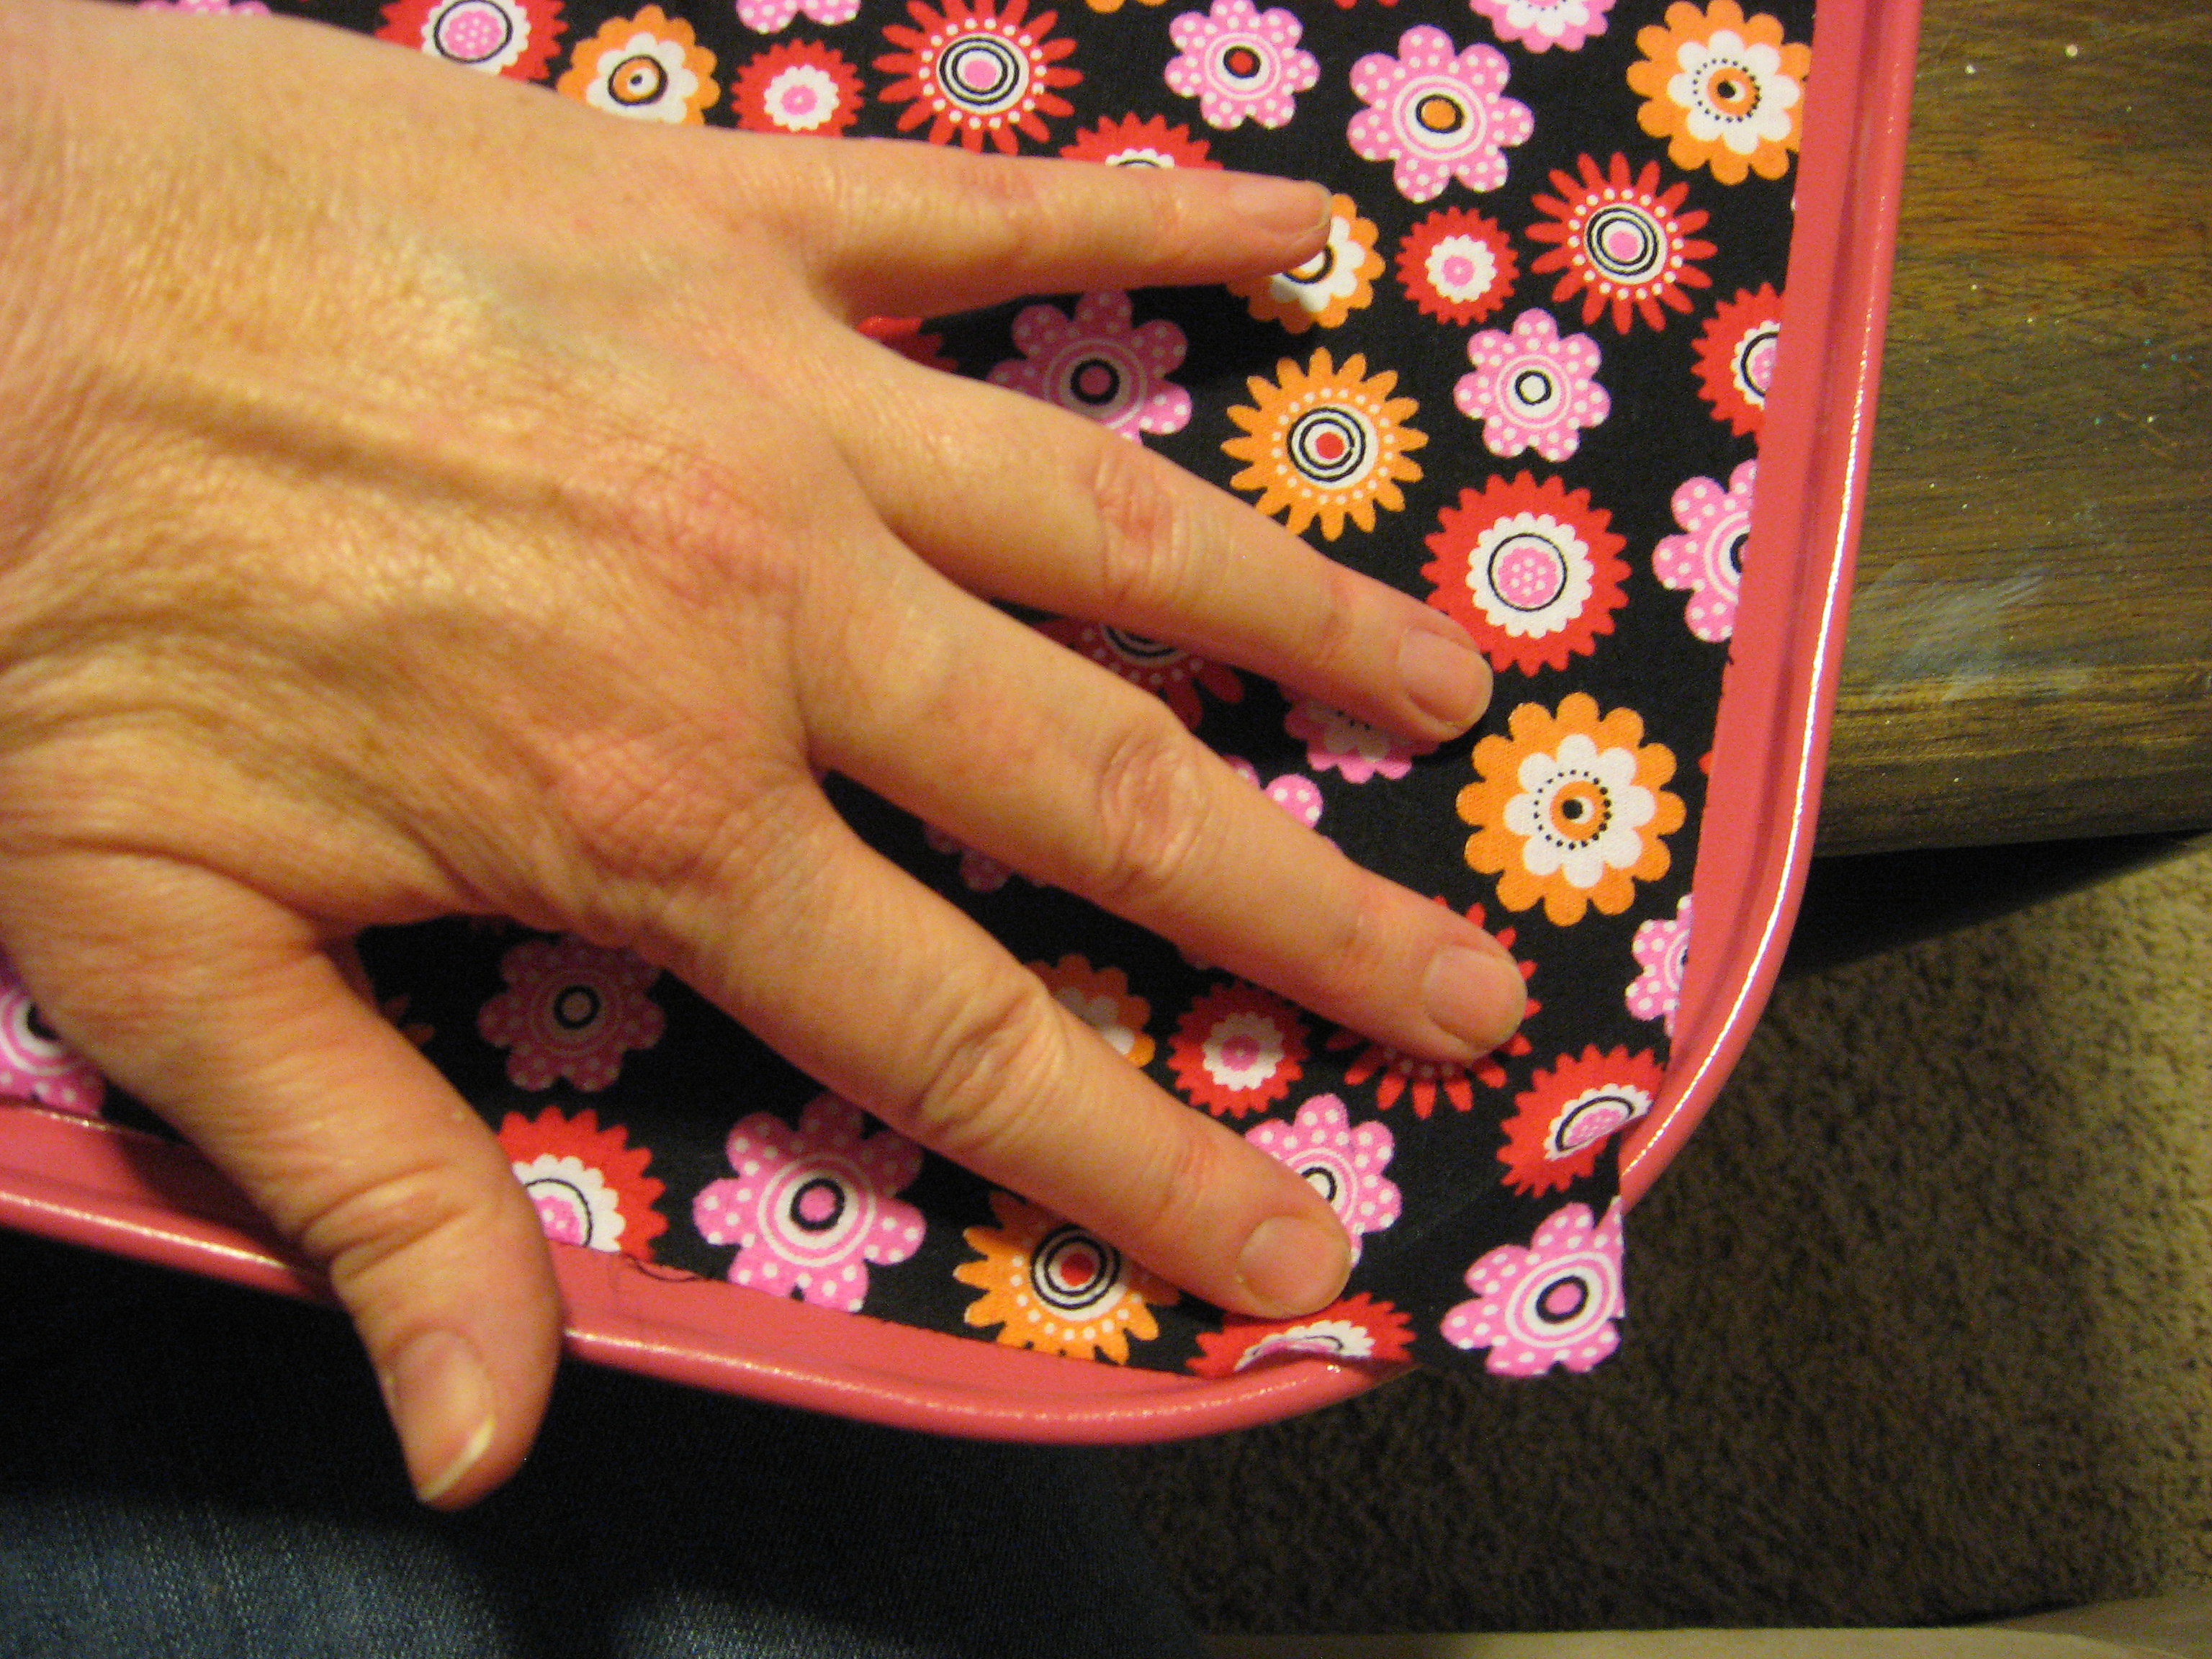
Then gently fold back more fabric, apply more Mod Podge, rub and repeat. Make sure you are not leaving any spots under the fabric without Mod Podge. Once you get a strip across the whole short end adhered, leave it for 15 minutes to dry before you continue. If that first strip is lined up and attached well, the rest of it will be easier. Continue rubbing it with your hands (or a brayer) as it dries to make sure it dries flat and smooth.
Once that first strip is dry, you can work the rest of the way down the pan in strips. Fold the fabric back, apply enough Mod Podge to cover 4 or 5 inches. I just poured it on
and then spread it with a paint brush.
again, making sure not to miss any spots. Fold the fabric over the Mod Podge – carefully lining up the straight edge (remember the other edge will extend over at this point) and rub until it starts to dry.
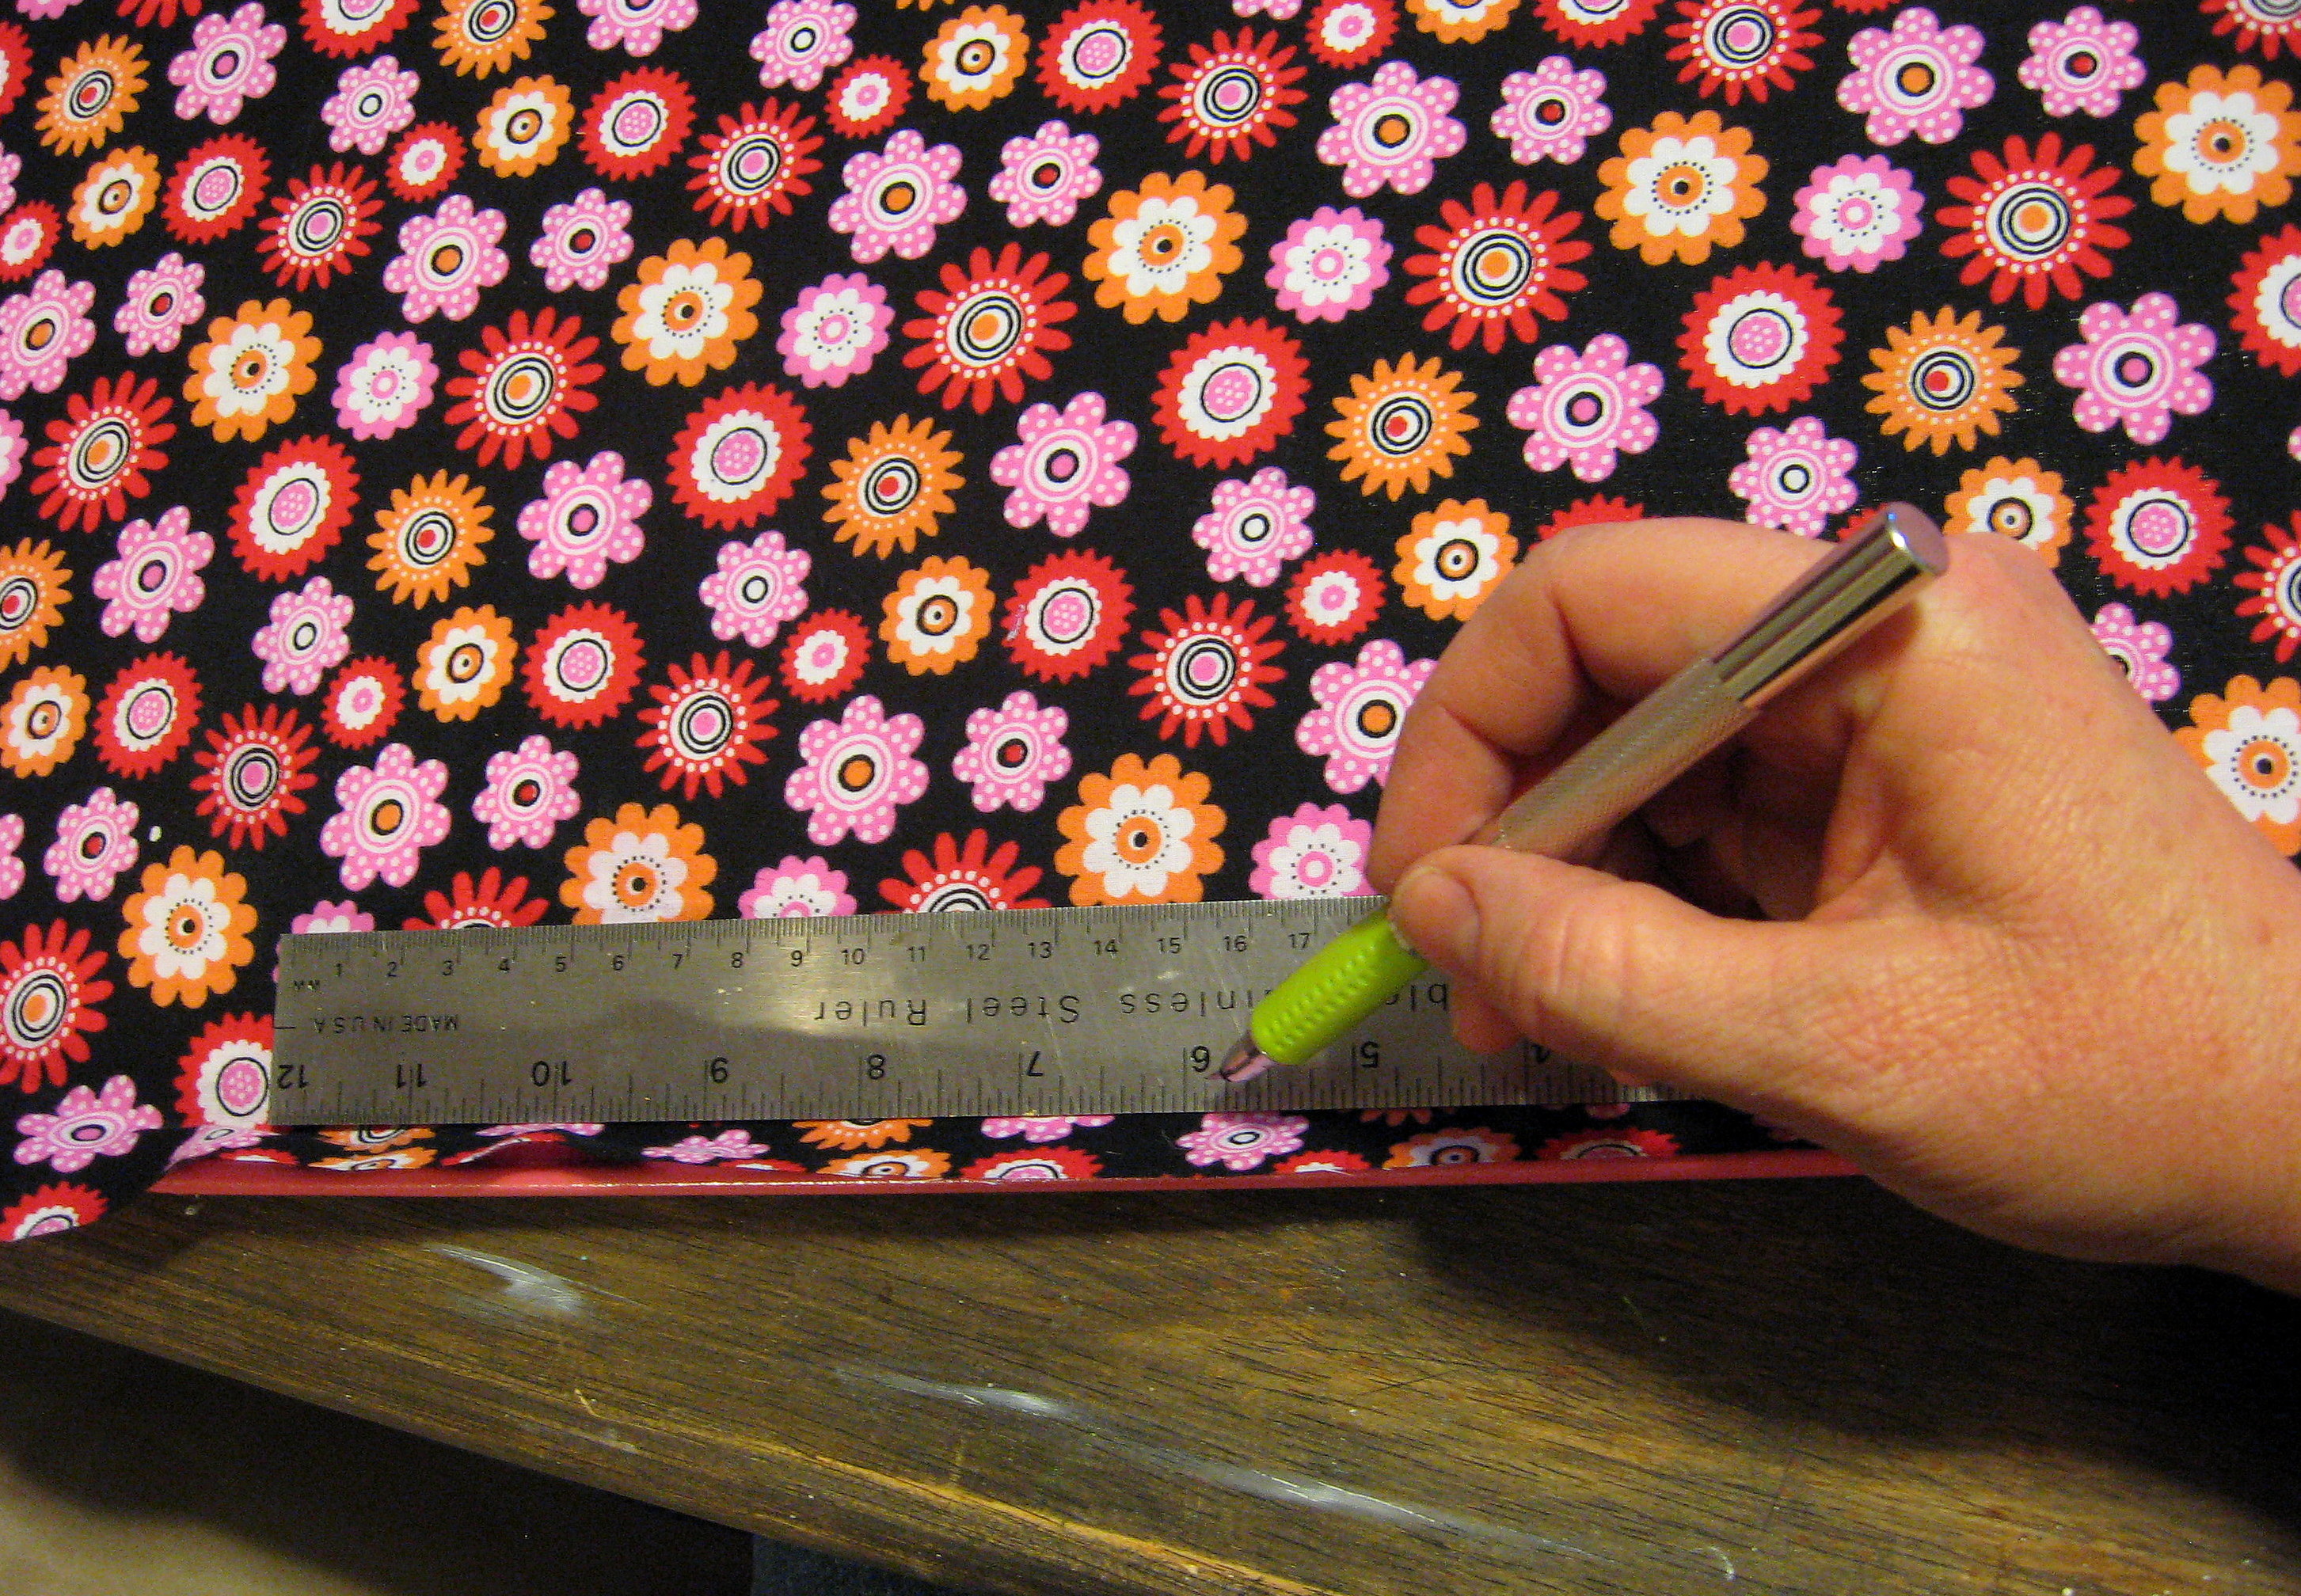
Let that dry thoroughly, then you are ready to cut off the excess fabric. I used an exacto knife and a metal straight edge on the straight parts, but I just free handed it around the curved corners.
Once I pulled the excess fabric off, I discovered this:
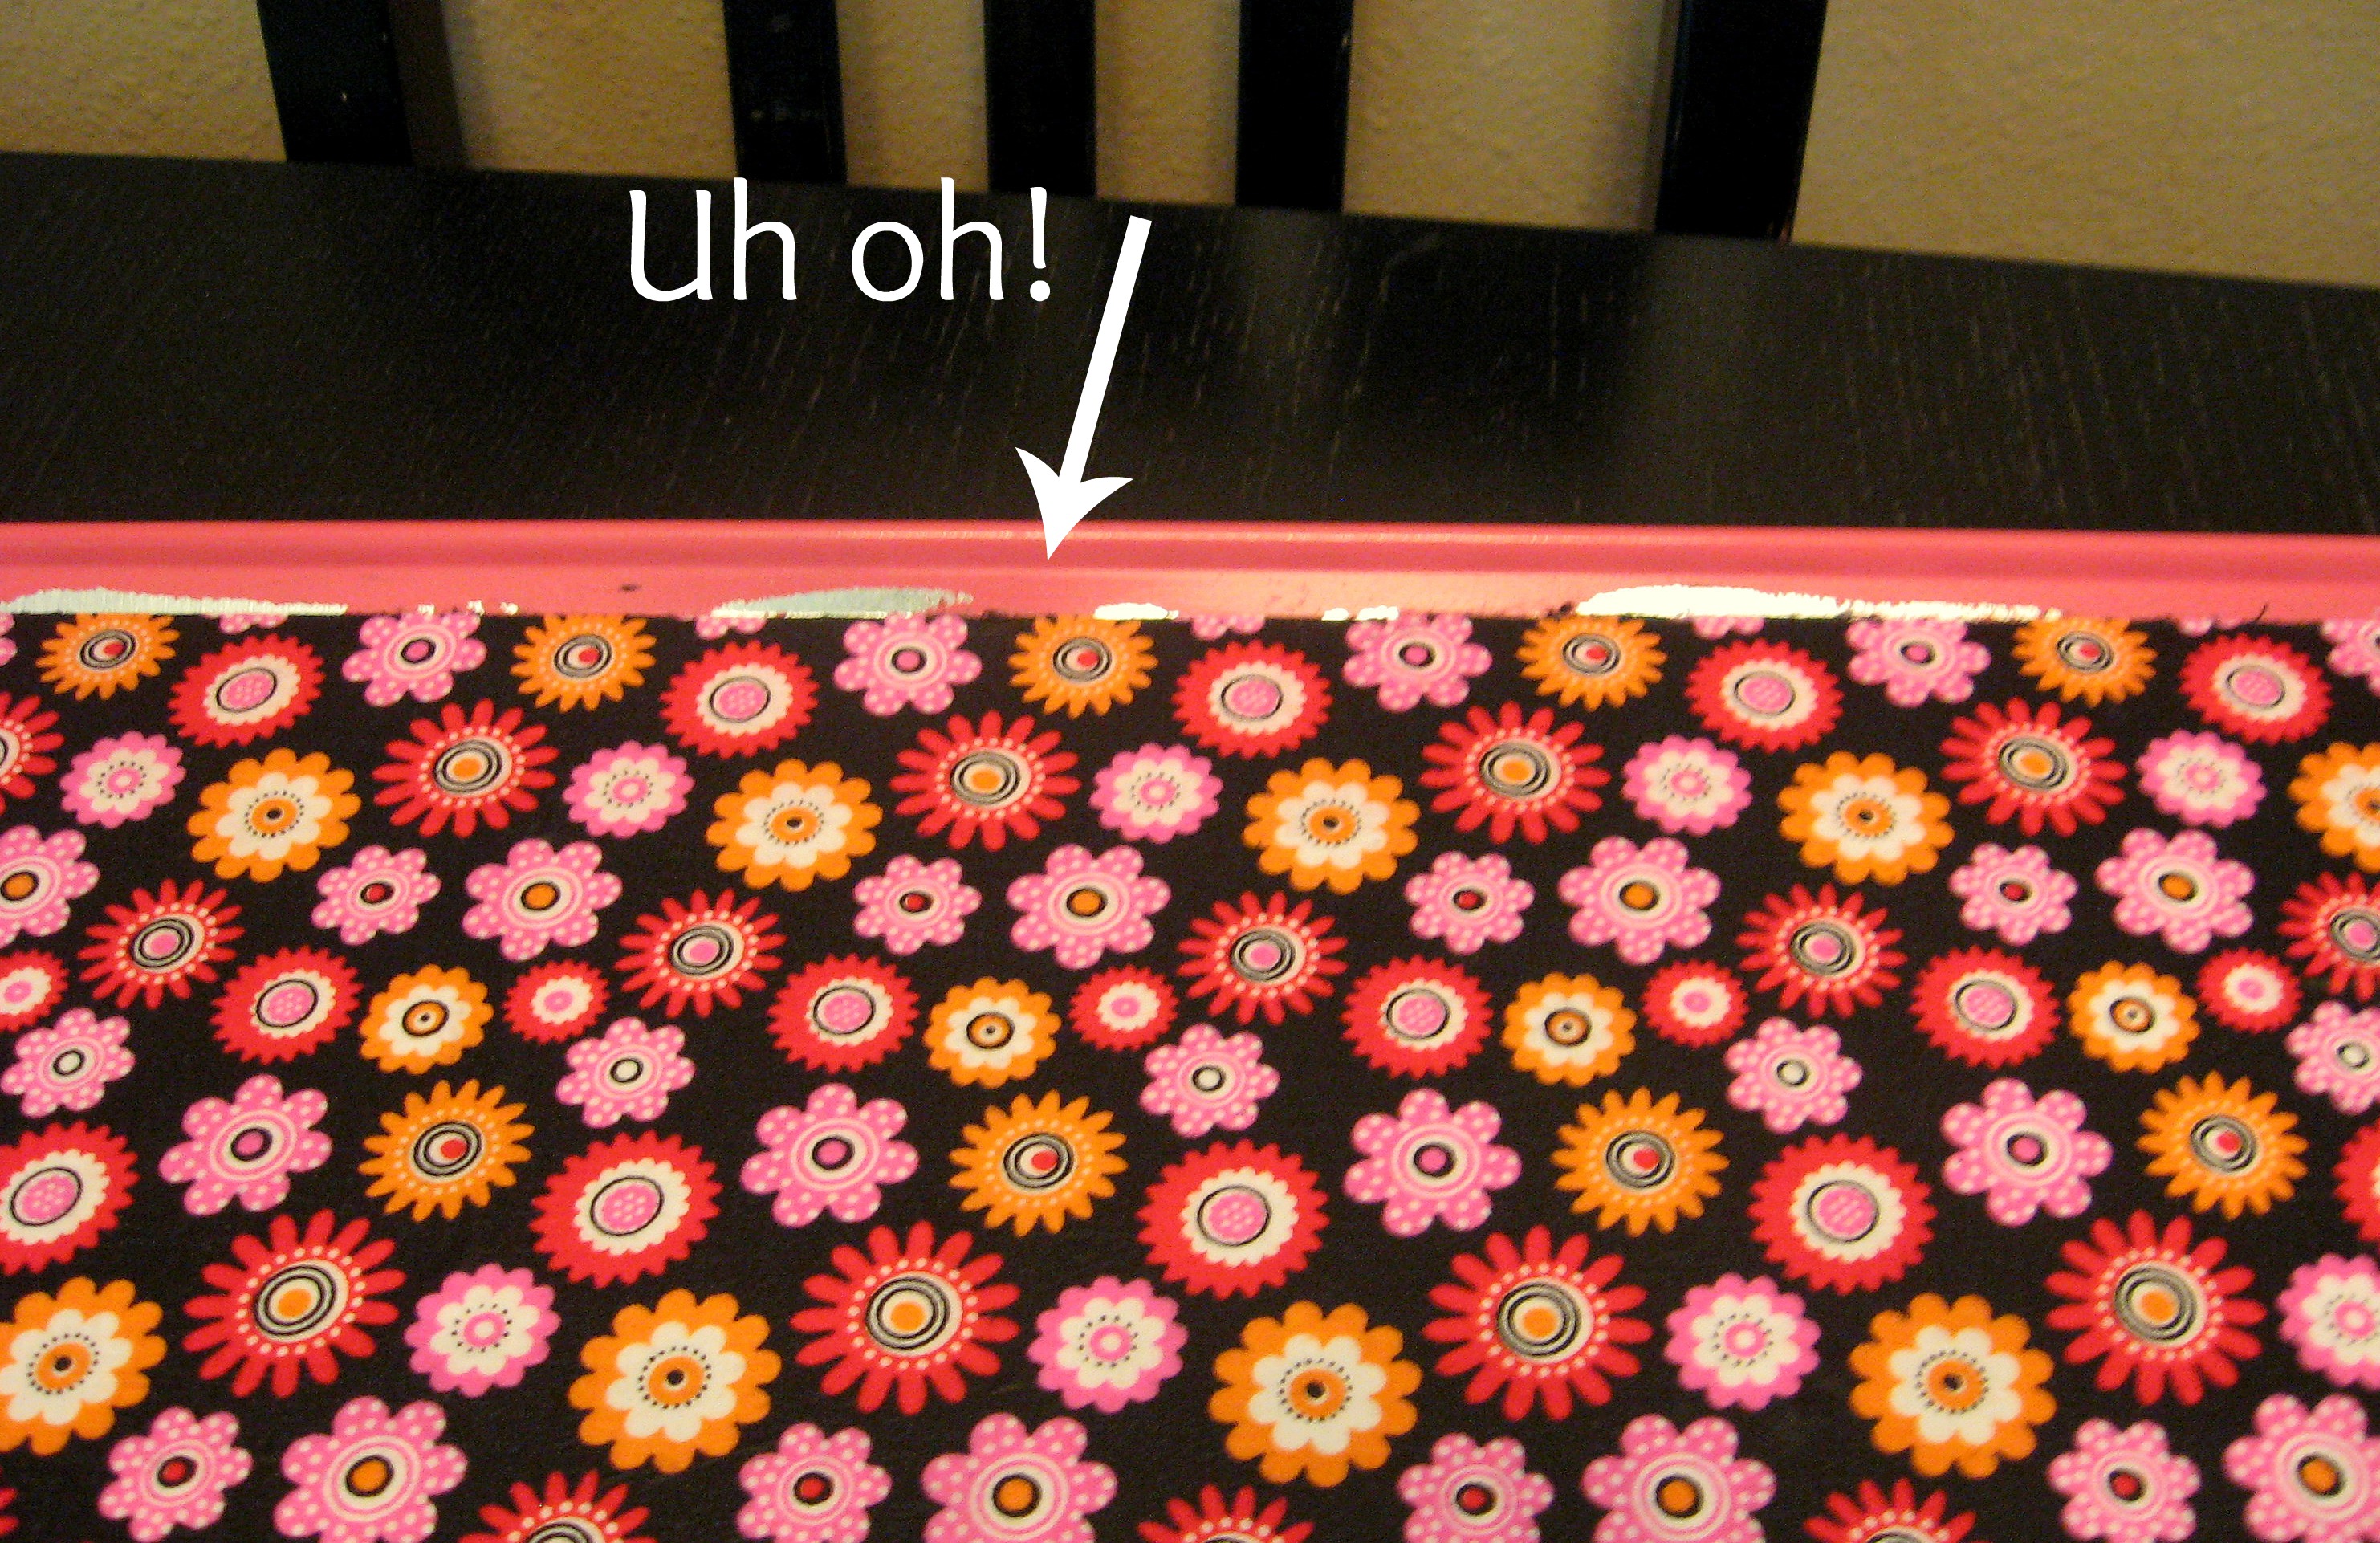
Oops. Fabric pulled the spray paint off with it in some spots.
SO – learn from me when you make yours and either 1) Mod Podge the fabric on first, then tape it off well and spray paint second. or 2) Be very careful as you are brushing the Mod Podge on and don’t let it go up the sides of the pan.
But, in case you find yourself in a similar place and need to fix it, this is what I did. I sprayed some spray paint into the bottom of an empty butter tub- hold it close to the bottom and spray for a minute so that you get a really concentrated stream and end up with some liquid paint. Then I just used it like regular paint with a small paintbrush to paint over the mistakes.
Once that’s dry, give the entire pan a top coat of Mod Podge. Be sure you go up on the sides of the pan too to protect the paint from scratching off.
I spray painted the heads of the screws so they would match
then just screwed it into the wall (a drill bit in an electric drill will go right through the soft metal of the drip pan).
Done! I was worried that the layer of fabric would compromise how strong of a bond I would get with the magnets, but it didn’t; even the heavy birthday card from Grandma that plays that annoying charming and delightful song stayed put.

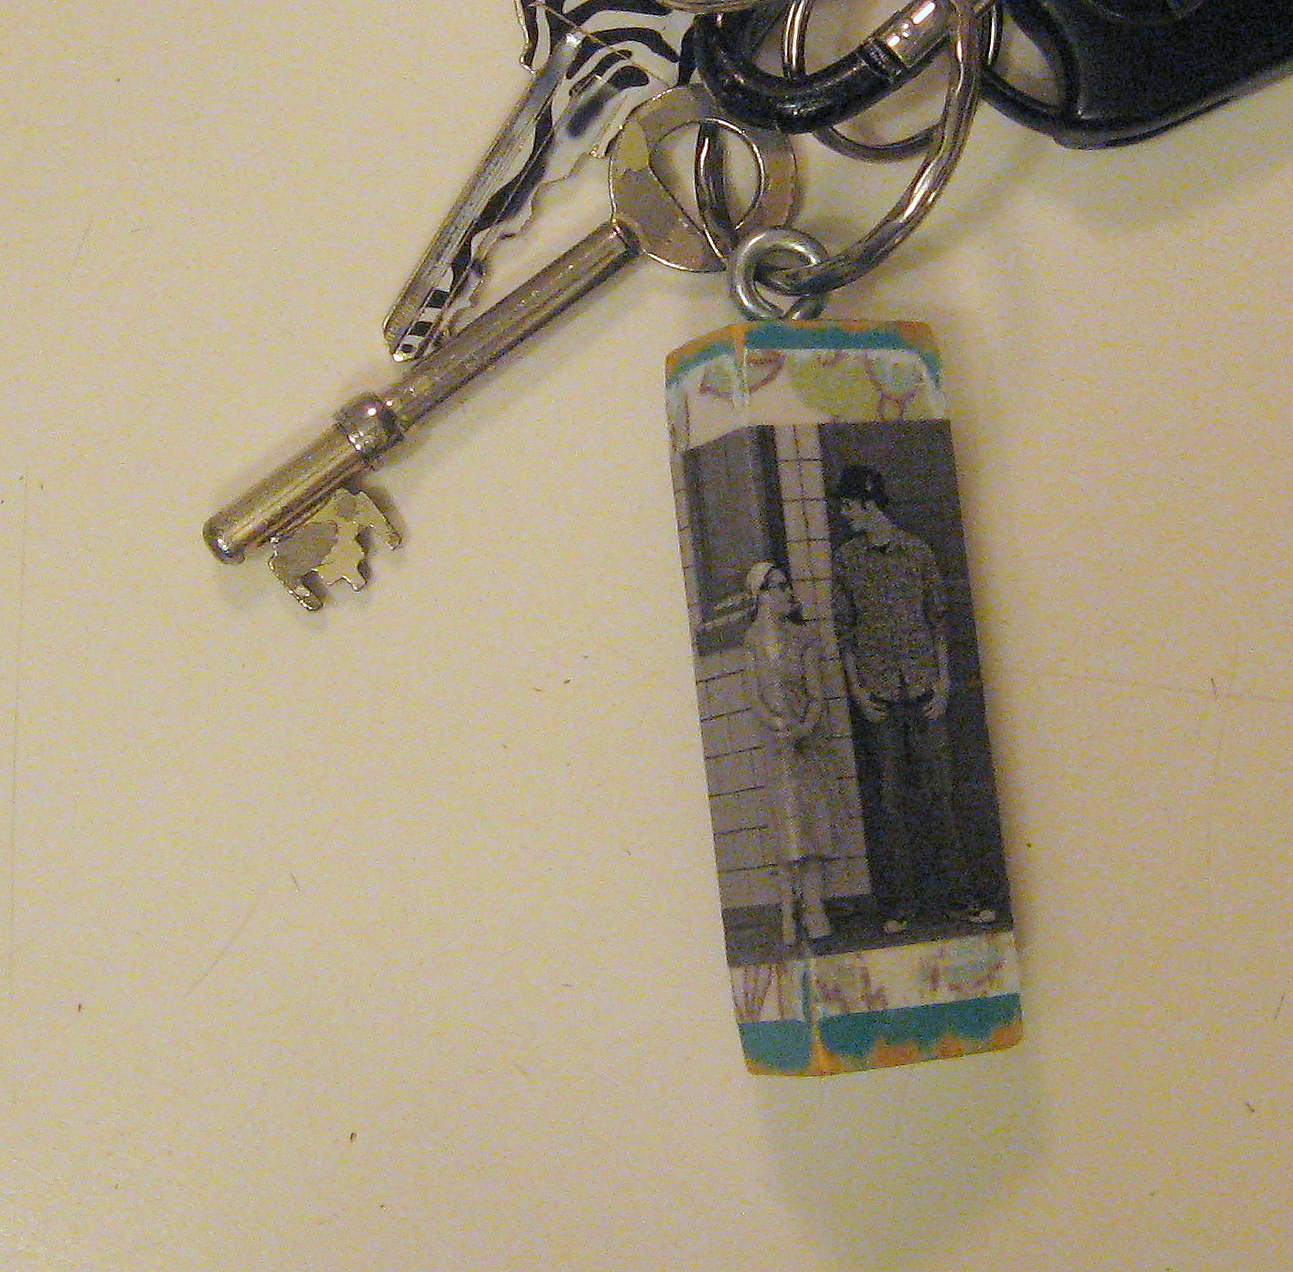
A PYP Best Blog! Make a Jenga Block Photo Keychain!
Just in case you missed this article on making a Jenga photo block keychain the first time we shared it a couple of years ago, we are republishing it. After Sharon wrote this blog originally, we got an awesome response. This is one of the PYP Best Blogs!
I was helping someone move recently and we found a handful of homeless Jenga blocks in the bottom of a closet. I rescued them back out from the garbage; I knew I could find something fun to do with them! This project was basically free, as I had all of the supplies on hand already, but if you need to purchase anything, it shouldn’t be much at all.
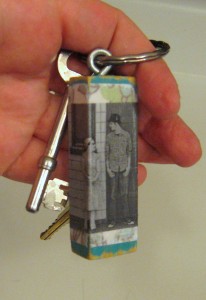
You’ll need a Jenga block or similar sized piece of wood, some scrapbook paper (paper will work better than cardstock), a little paint, a small eye screw, a drill and some Mod Podge.
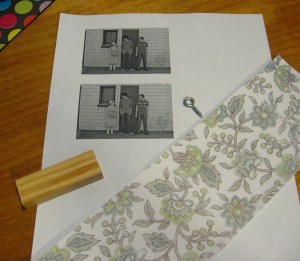
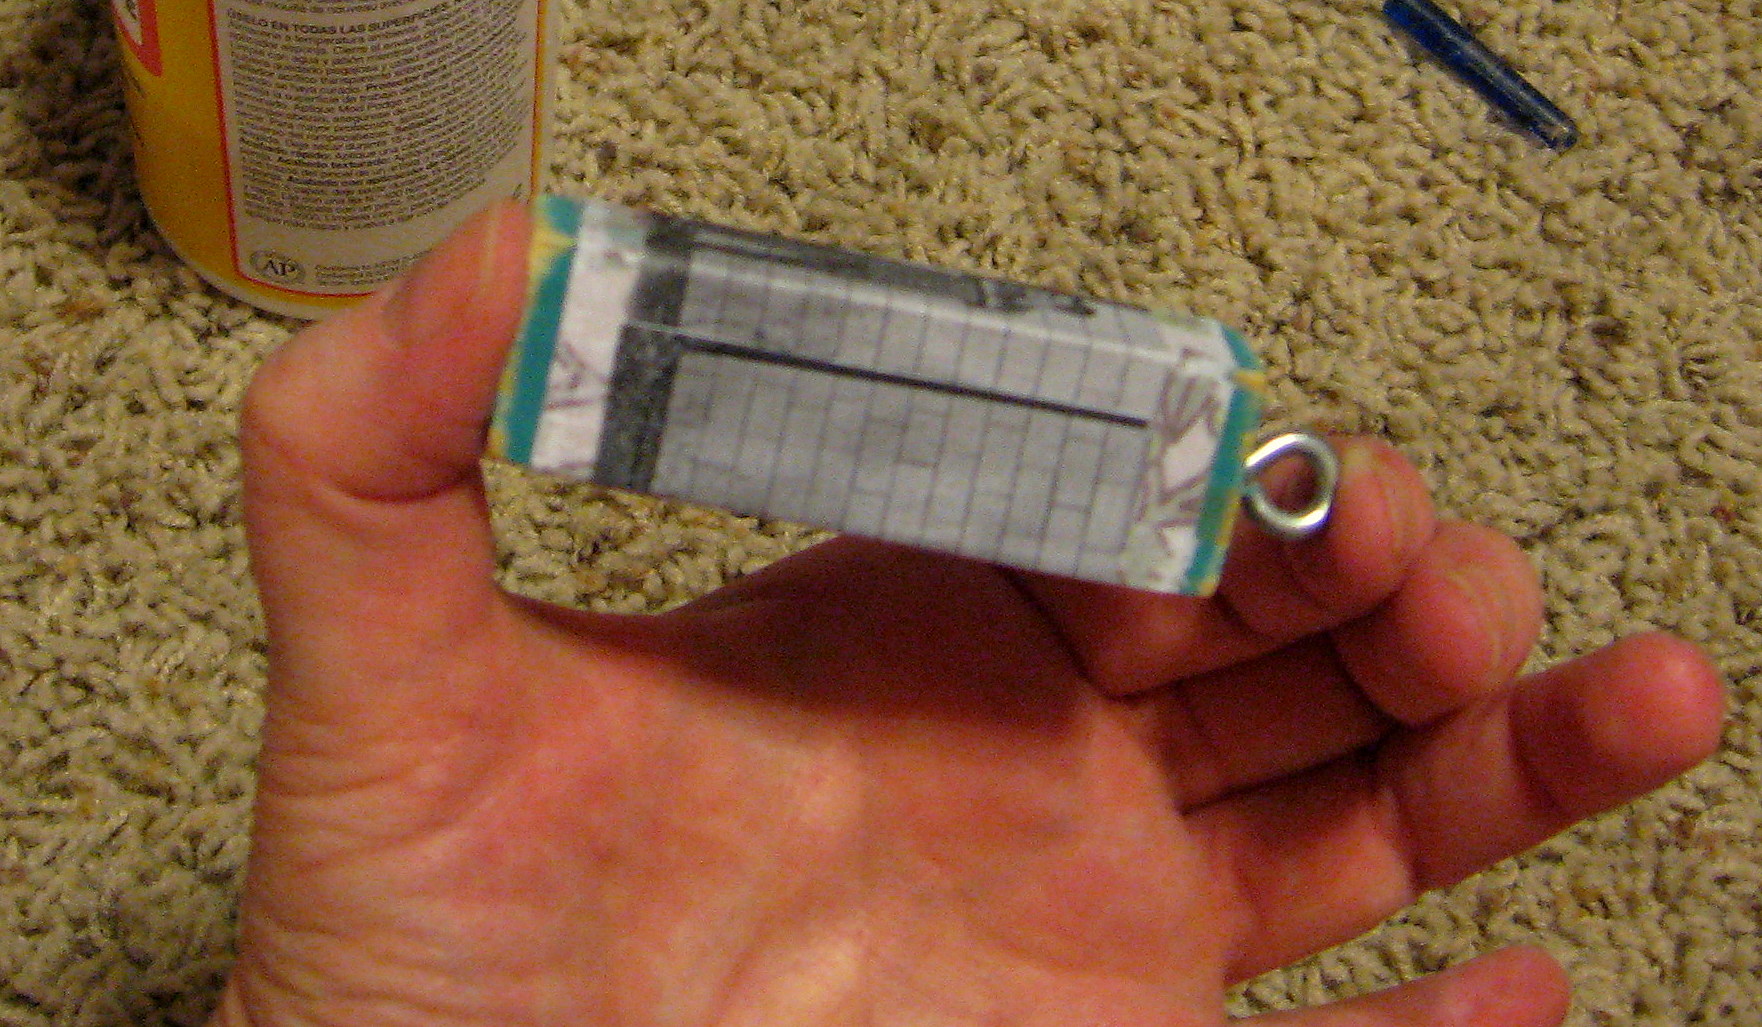
You’ll also need a photo of your choice printed with a laser printer. If you print it on an inkjet printer, the Mod Podge will likely smear the ink in the photo, although if that is your only option, I have had luck with spraying the photo with a clear craft sealer and letting it dry well, then use the Mod Podge on top. Use the Jenga piece to decide about how big you want your photo to be and just print it on plain white paper.
*You only need one photo. I printed 2 in case I made a mistake!
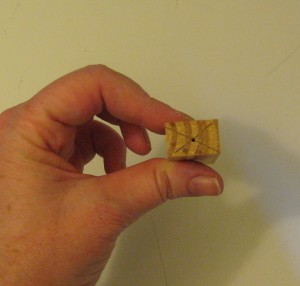
Draw an X on one end of the Jenga block and drill a small hole where the lines meet. This is where you will screw in the eye screw later.
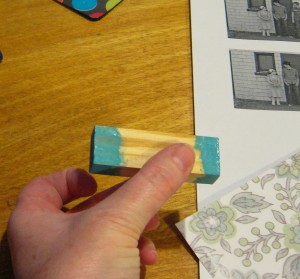
Now paint the ends of the Jenga block in the color of your choice. You only have to paint the ends because the middle will be covered with paper.
Once the paint is dry, it is time to Mod Podge on the scrapbook paper.
Cut a small piece of paper to the right height (just eyeball what looks good to you – it is up to you how much of the painted wood shows underneath!) and long enough to wrap around the Jenga block and just slightly overlap in the back.
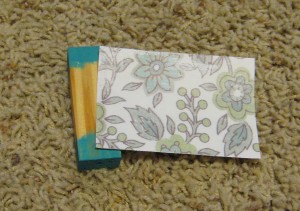
I found that it was easiest to Mod Podge the paper down one side at a time; it was pretty easy and gave me a nice crisp finish. Apply Mod Podge to one side of the Jenga block with a paintbrush and line the paper up so it is even with the edge of the Jenga block. Rub the paper with your fingers until it adheres and starts to dry, then move on to the next side, folding the paper tightly around the corners.

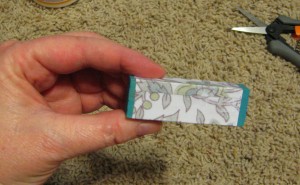
Once that’s dry, you can scuff up the paint and paper a little with some sandpaper if you like that look – or just leave it if you don’t! Now is a good time to put in the eye screw, as it gives you something to hold on to in the remaining steps.

A PYP Best Blog! DIY Stuffed Animal Storage!
Just in case you missed this article on creating DIY stuffed animal storage the first time we shared it a couple of years ago, we are republishing it. After Sharon wrote this blog originally, we got an awesome response. This is one of the PYP Best Blogs!
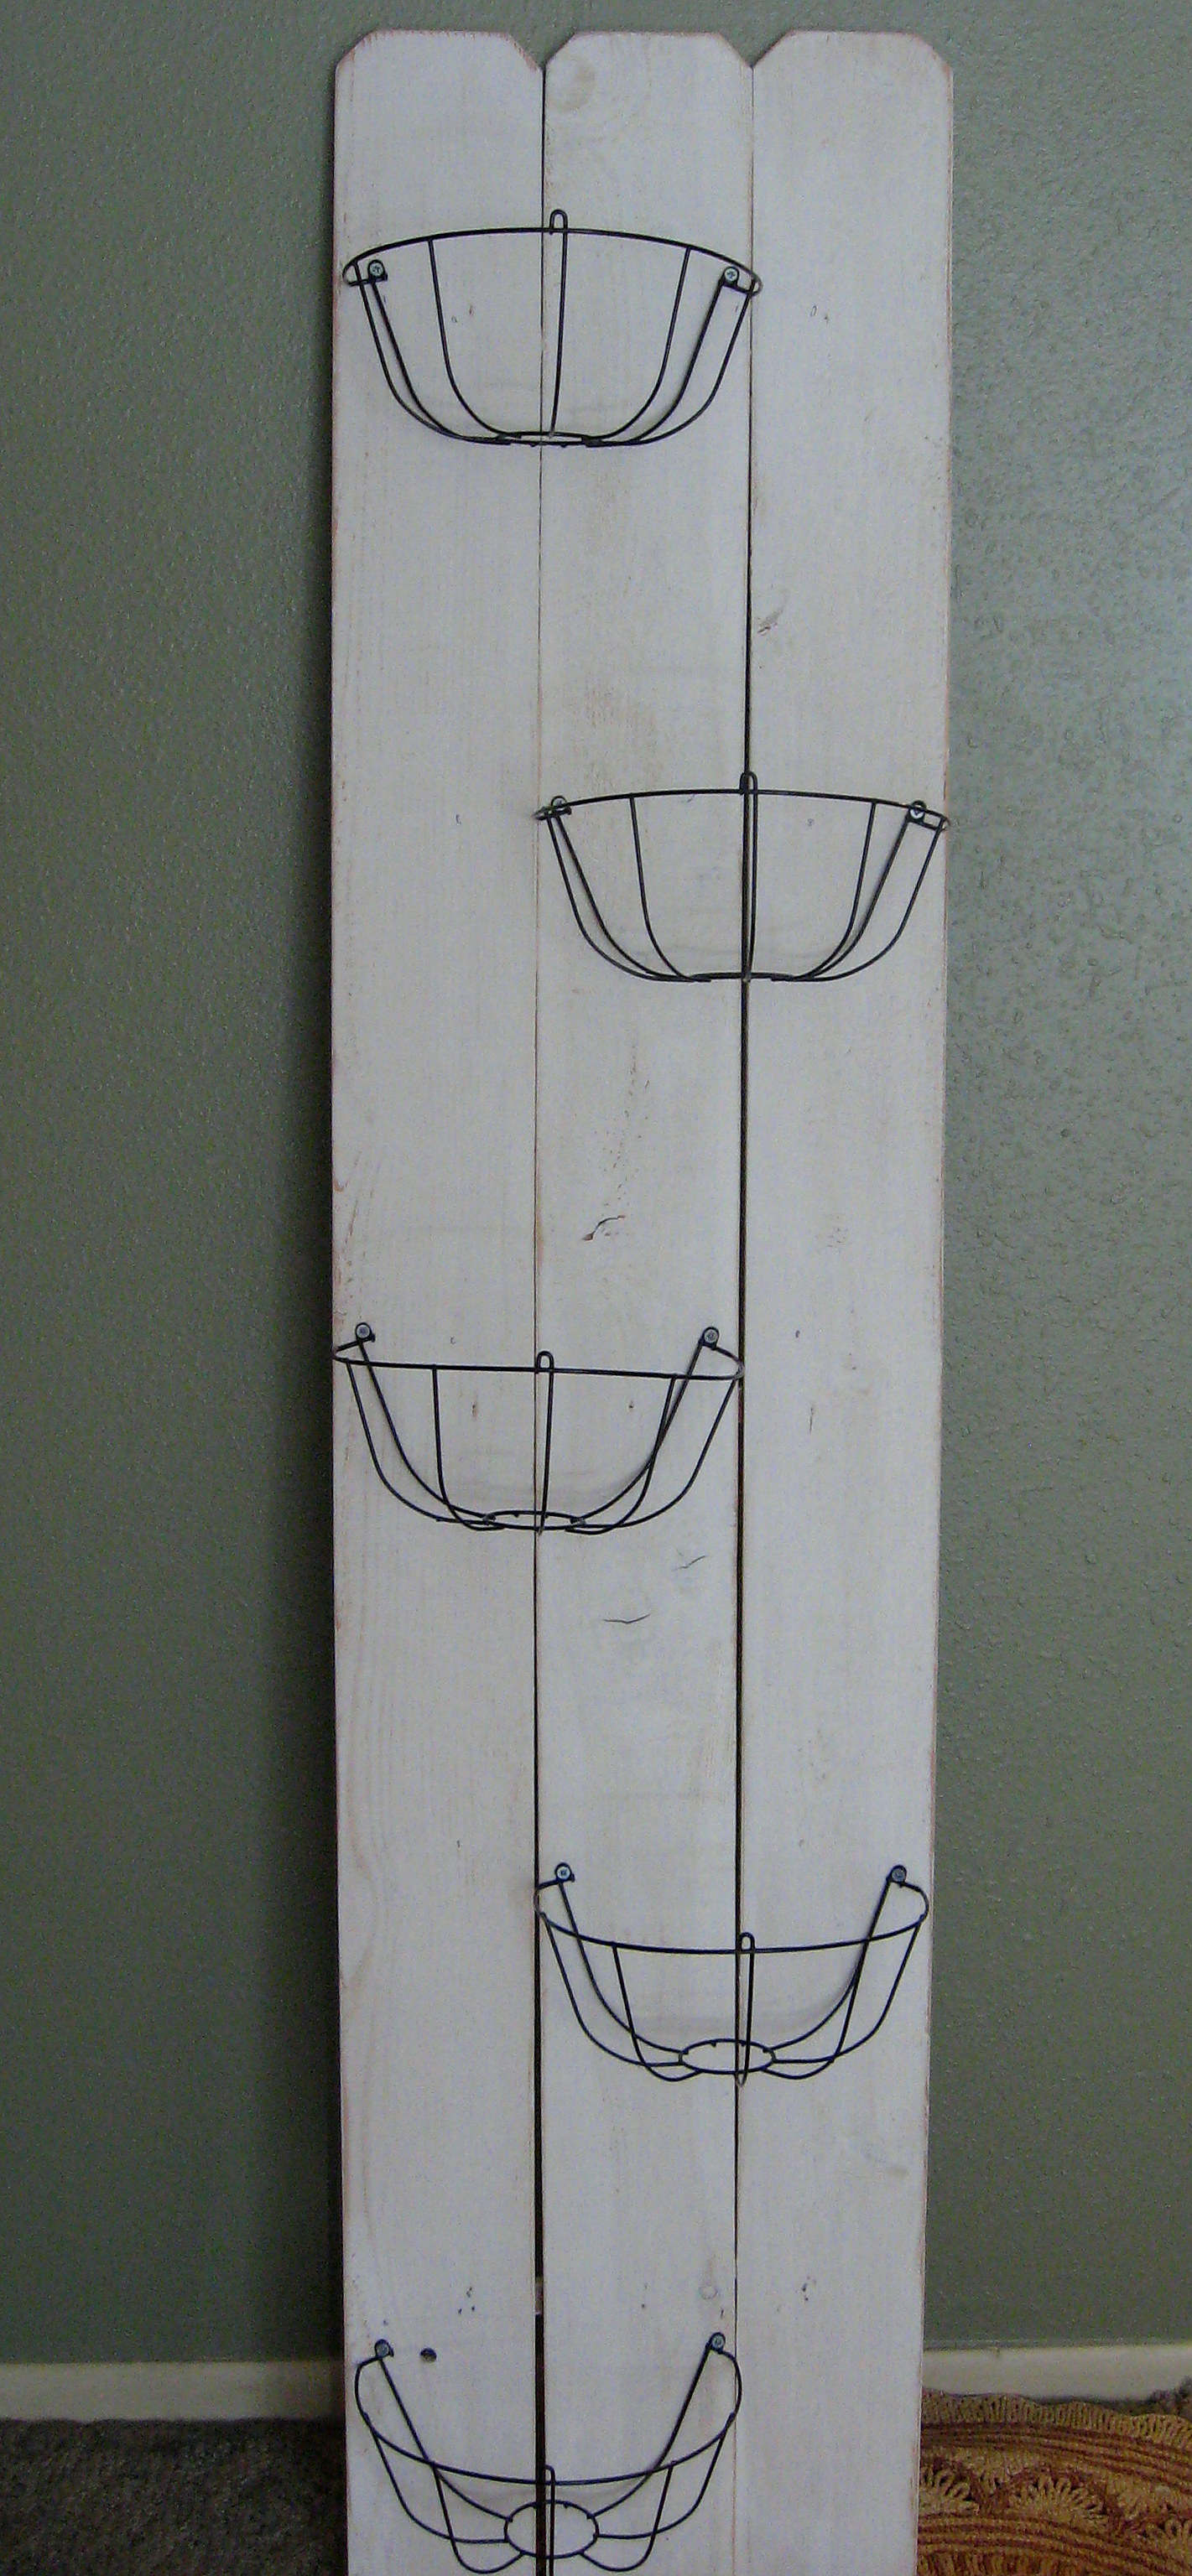
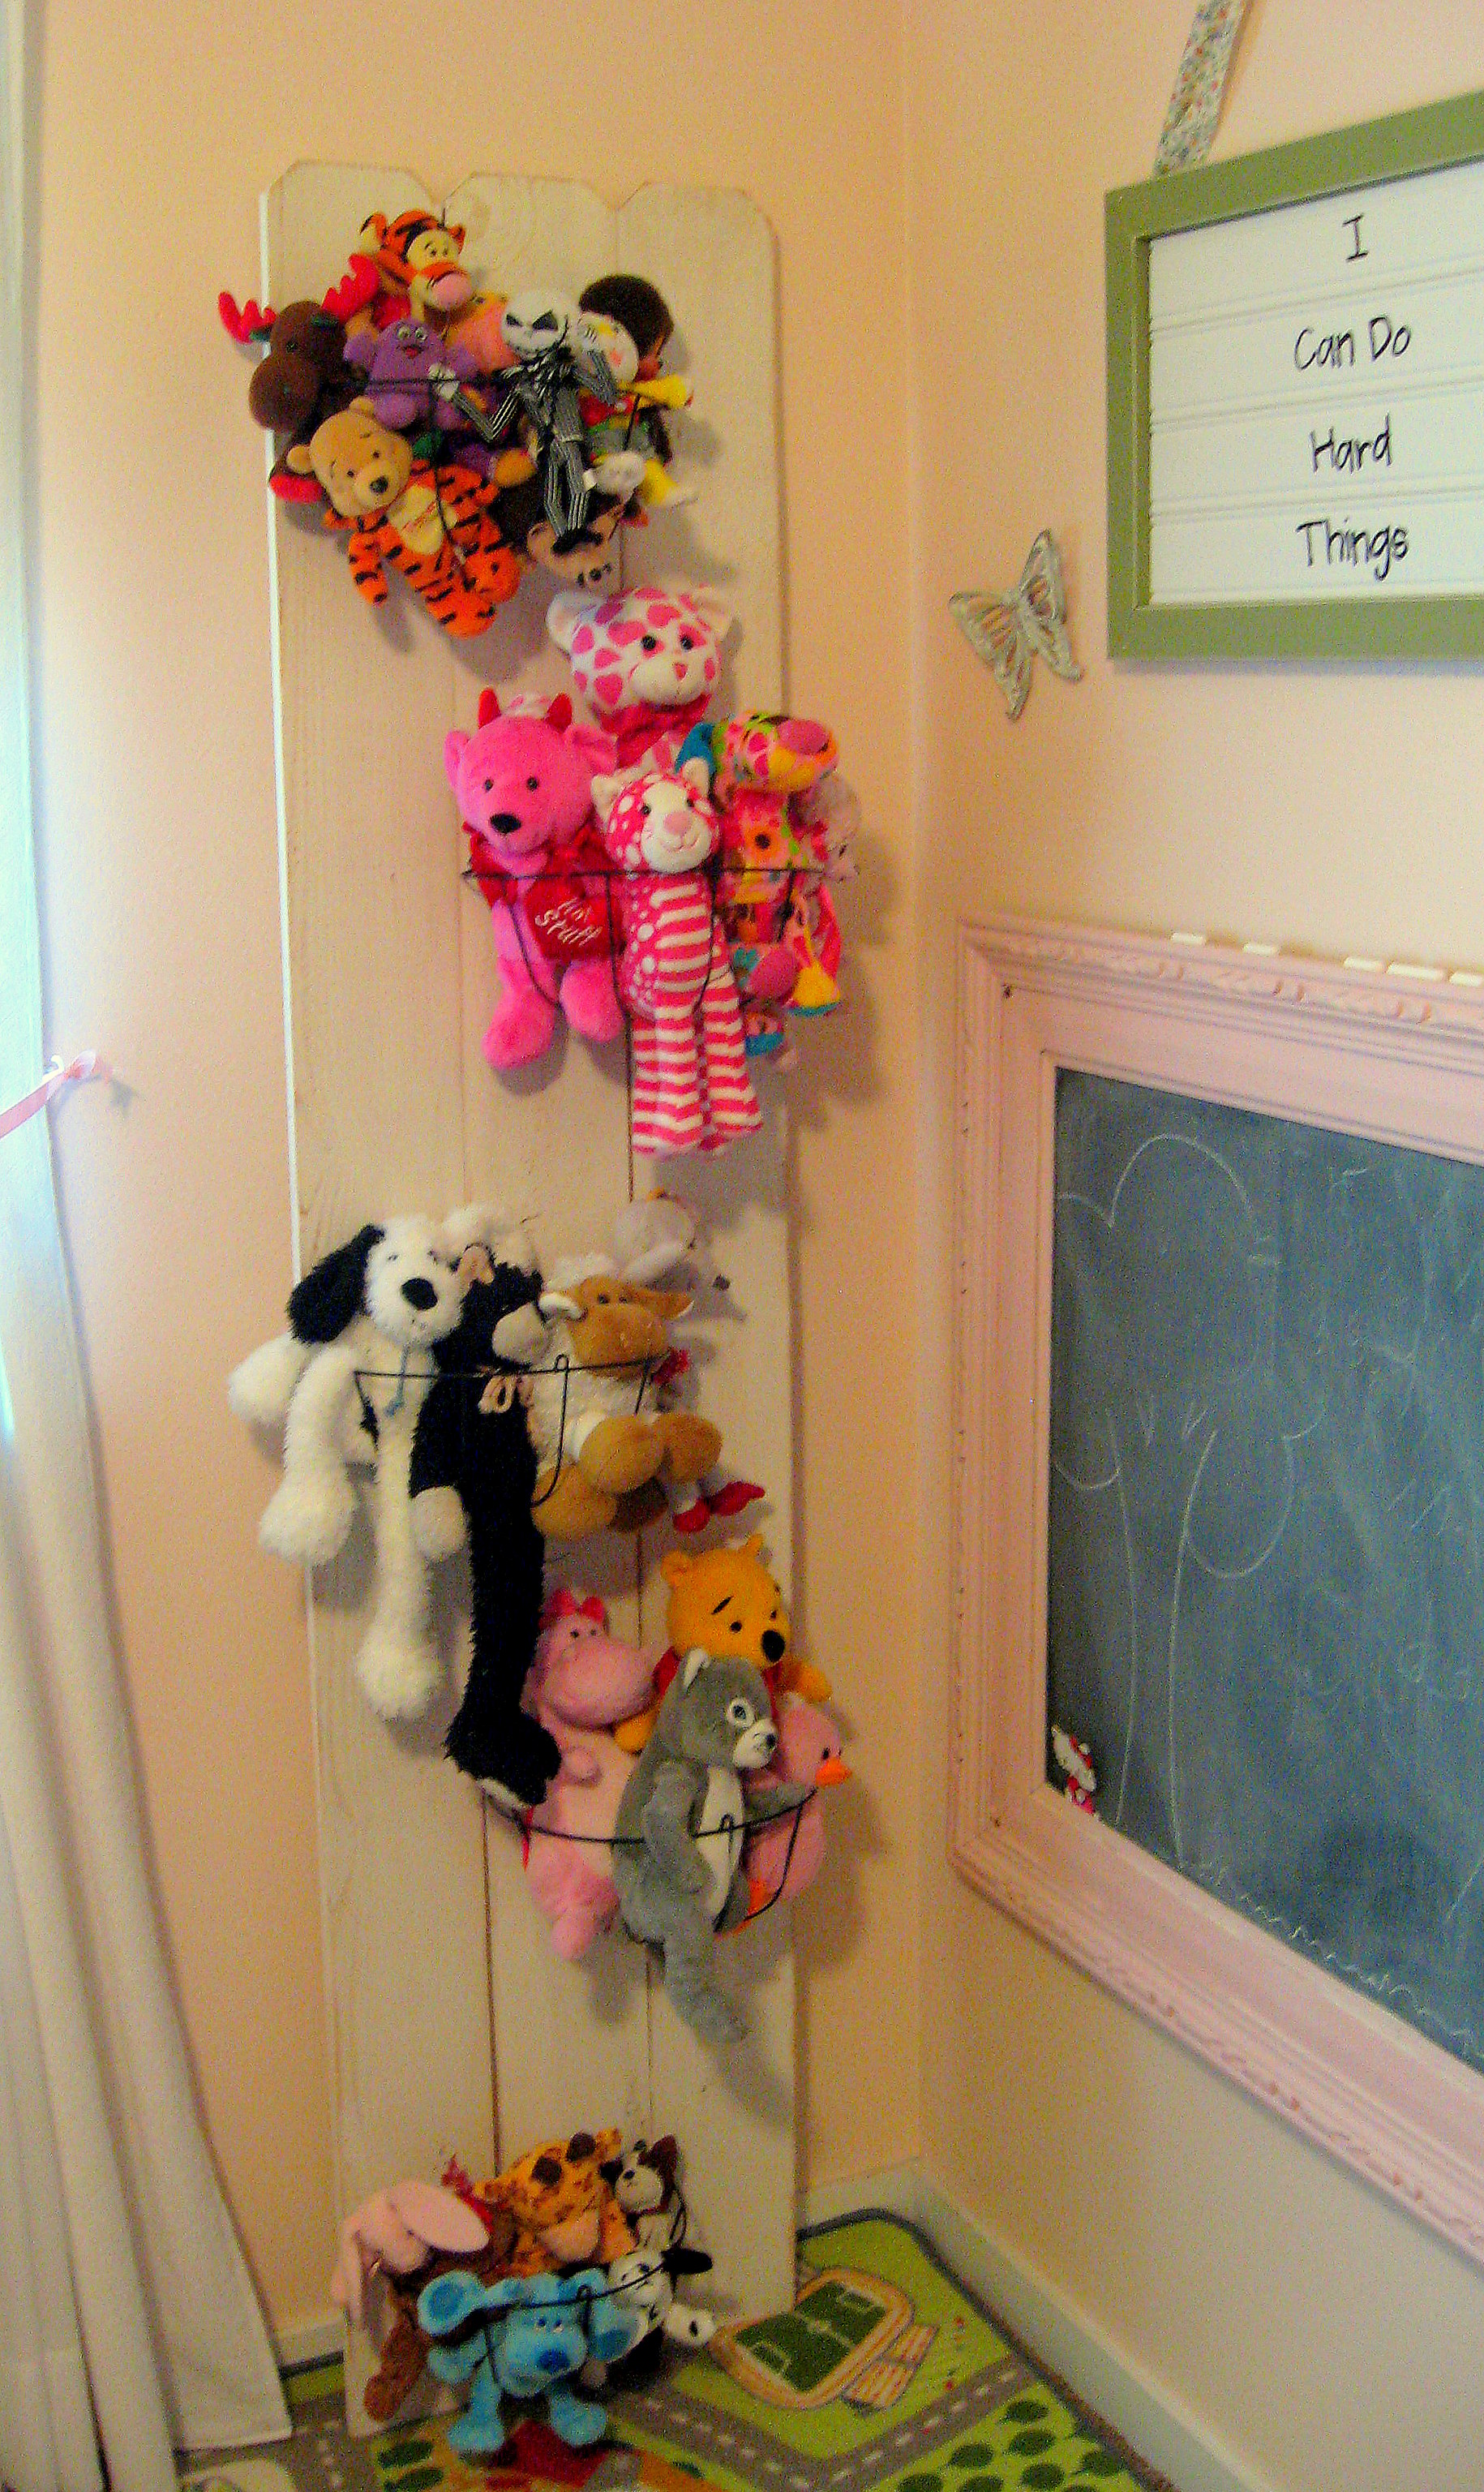
My daughter has an addiction – a stuffed animal addiction! Although I don’t mind enabling her, I don’t like how they end up piled in an ugly heap on the shelf, and I don’t like how she can never find the specific critter she’s looking for – especially the little ones. Here is how we solved the problem.
If you are DIY’ers with a well stocked garage you can do this project very inexpensively. Even if you have to buy everything, it should only cost about $15.
What you’ll need
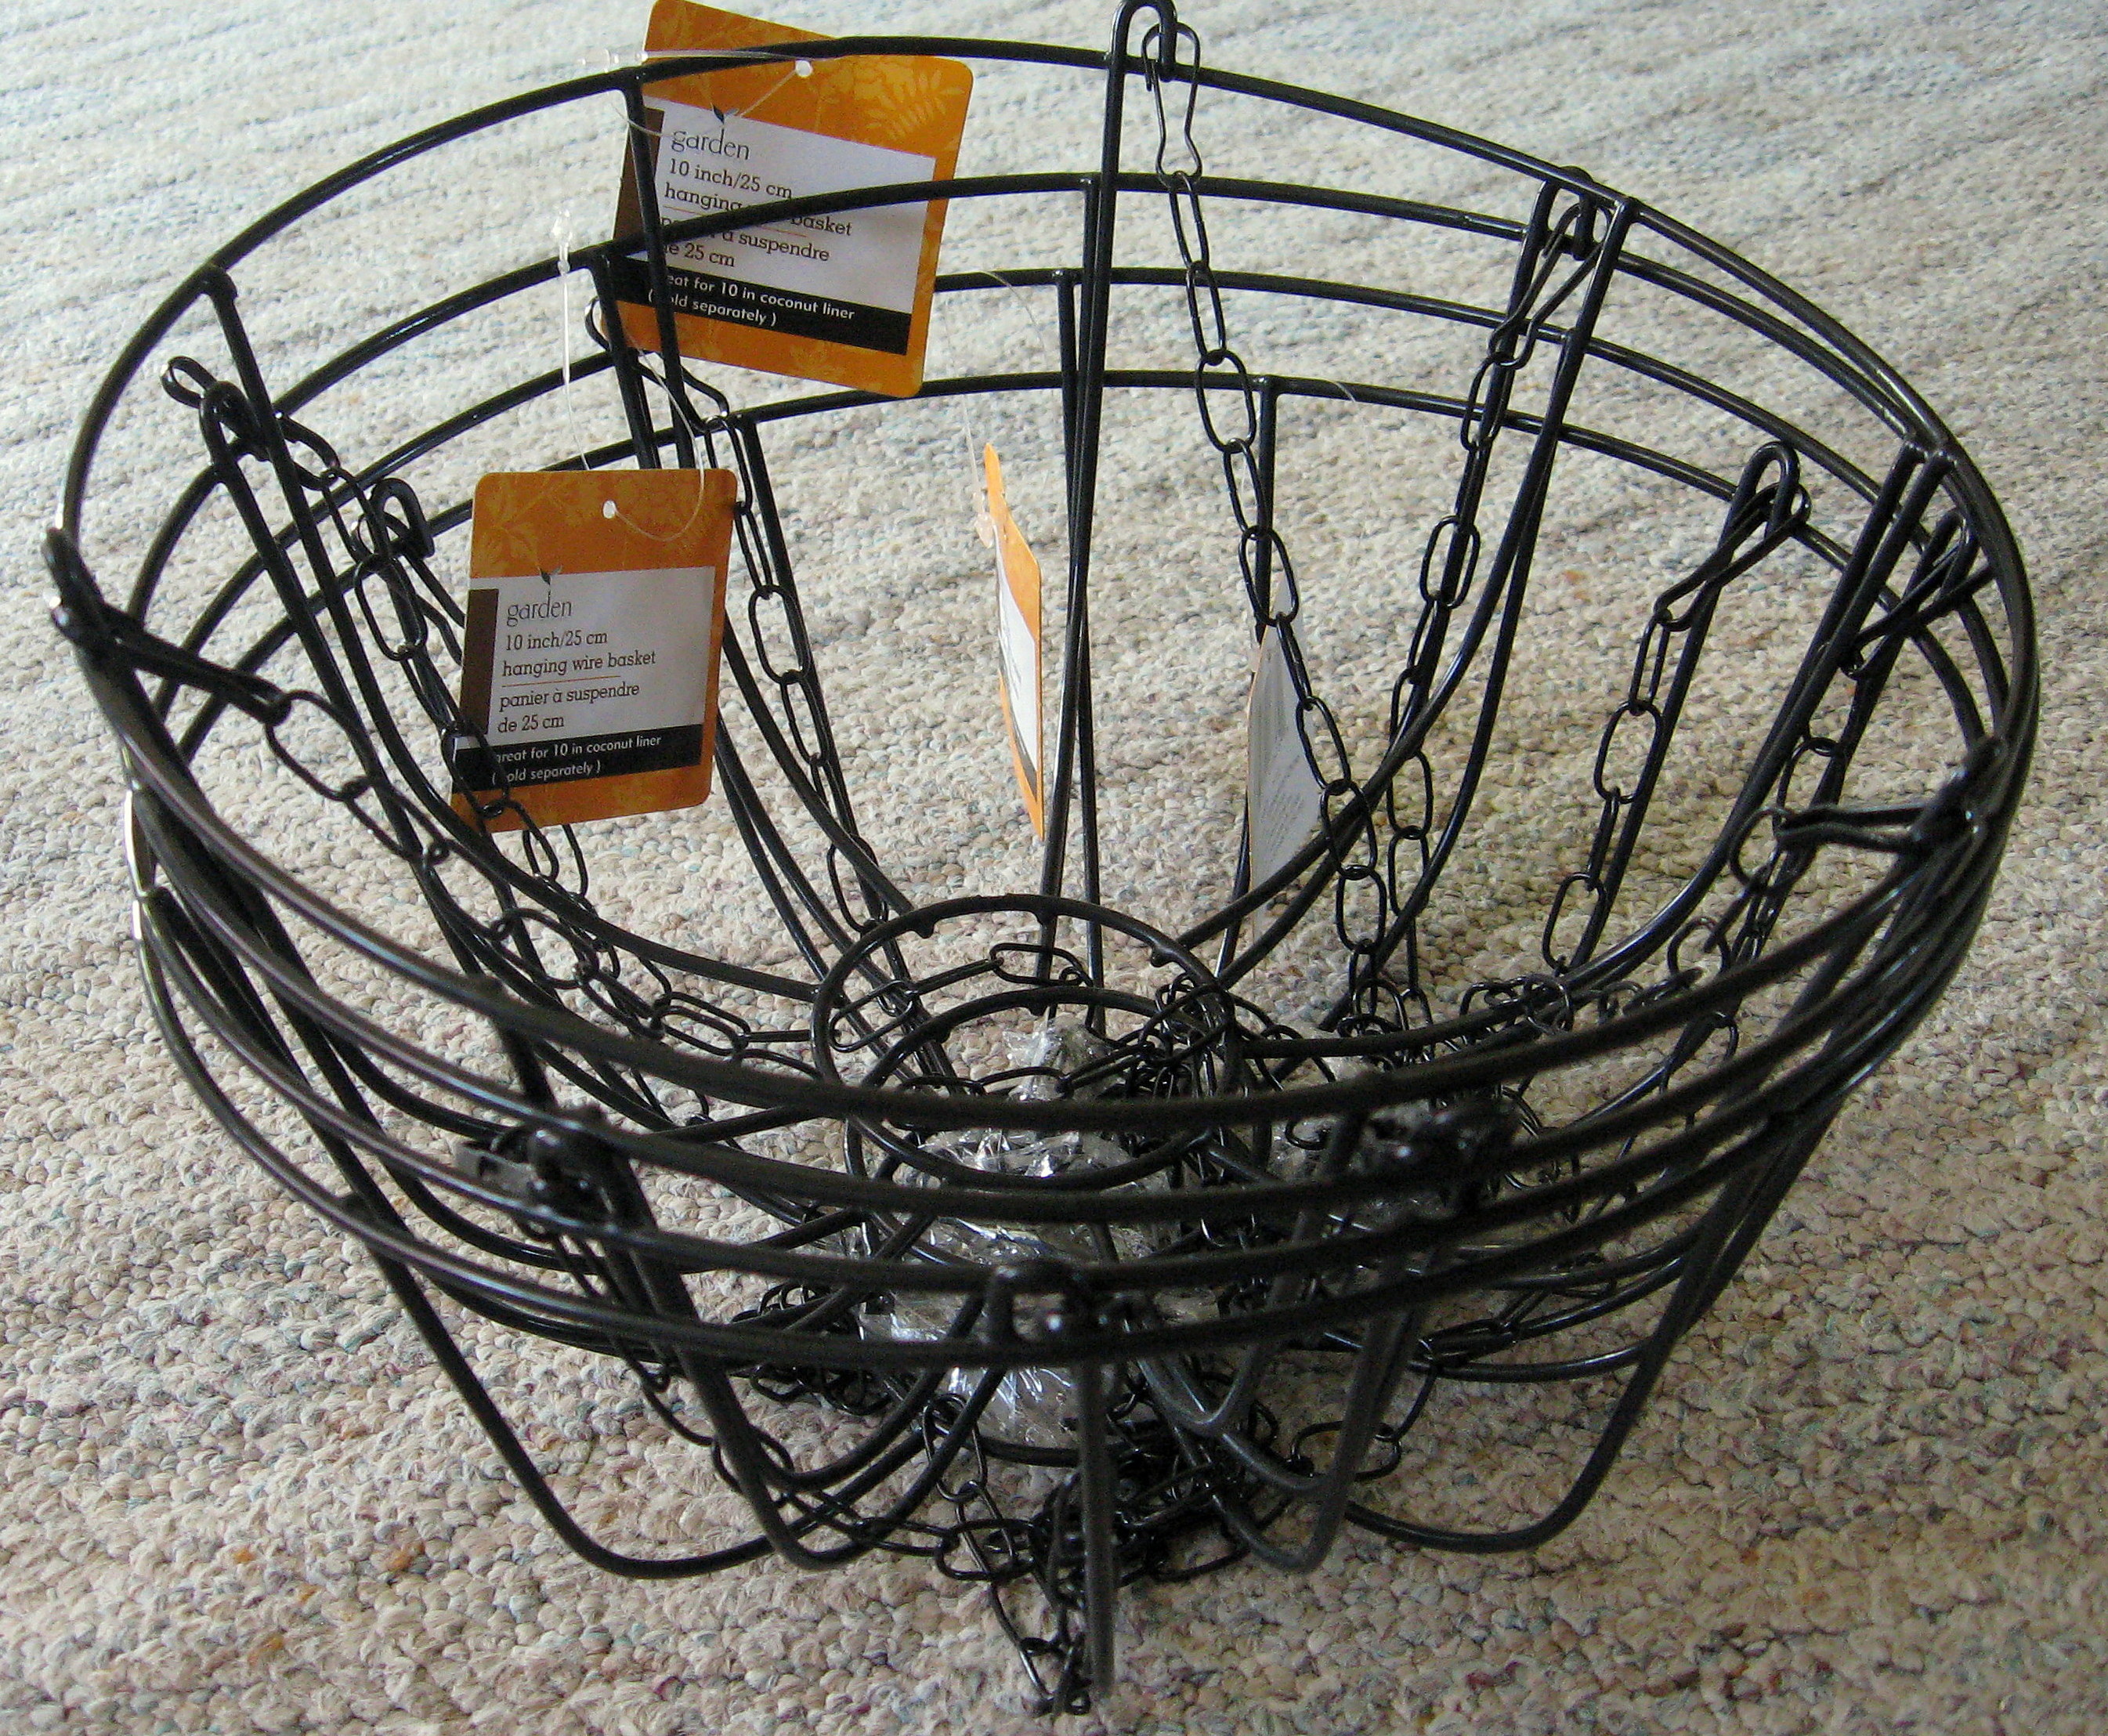
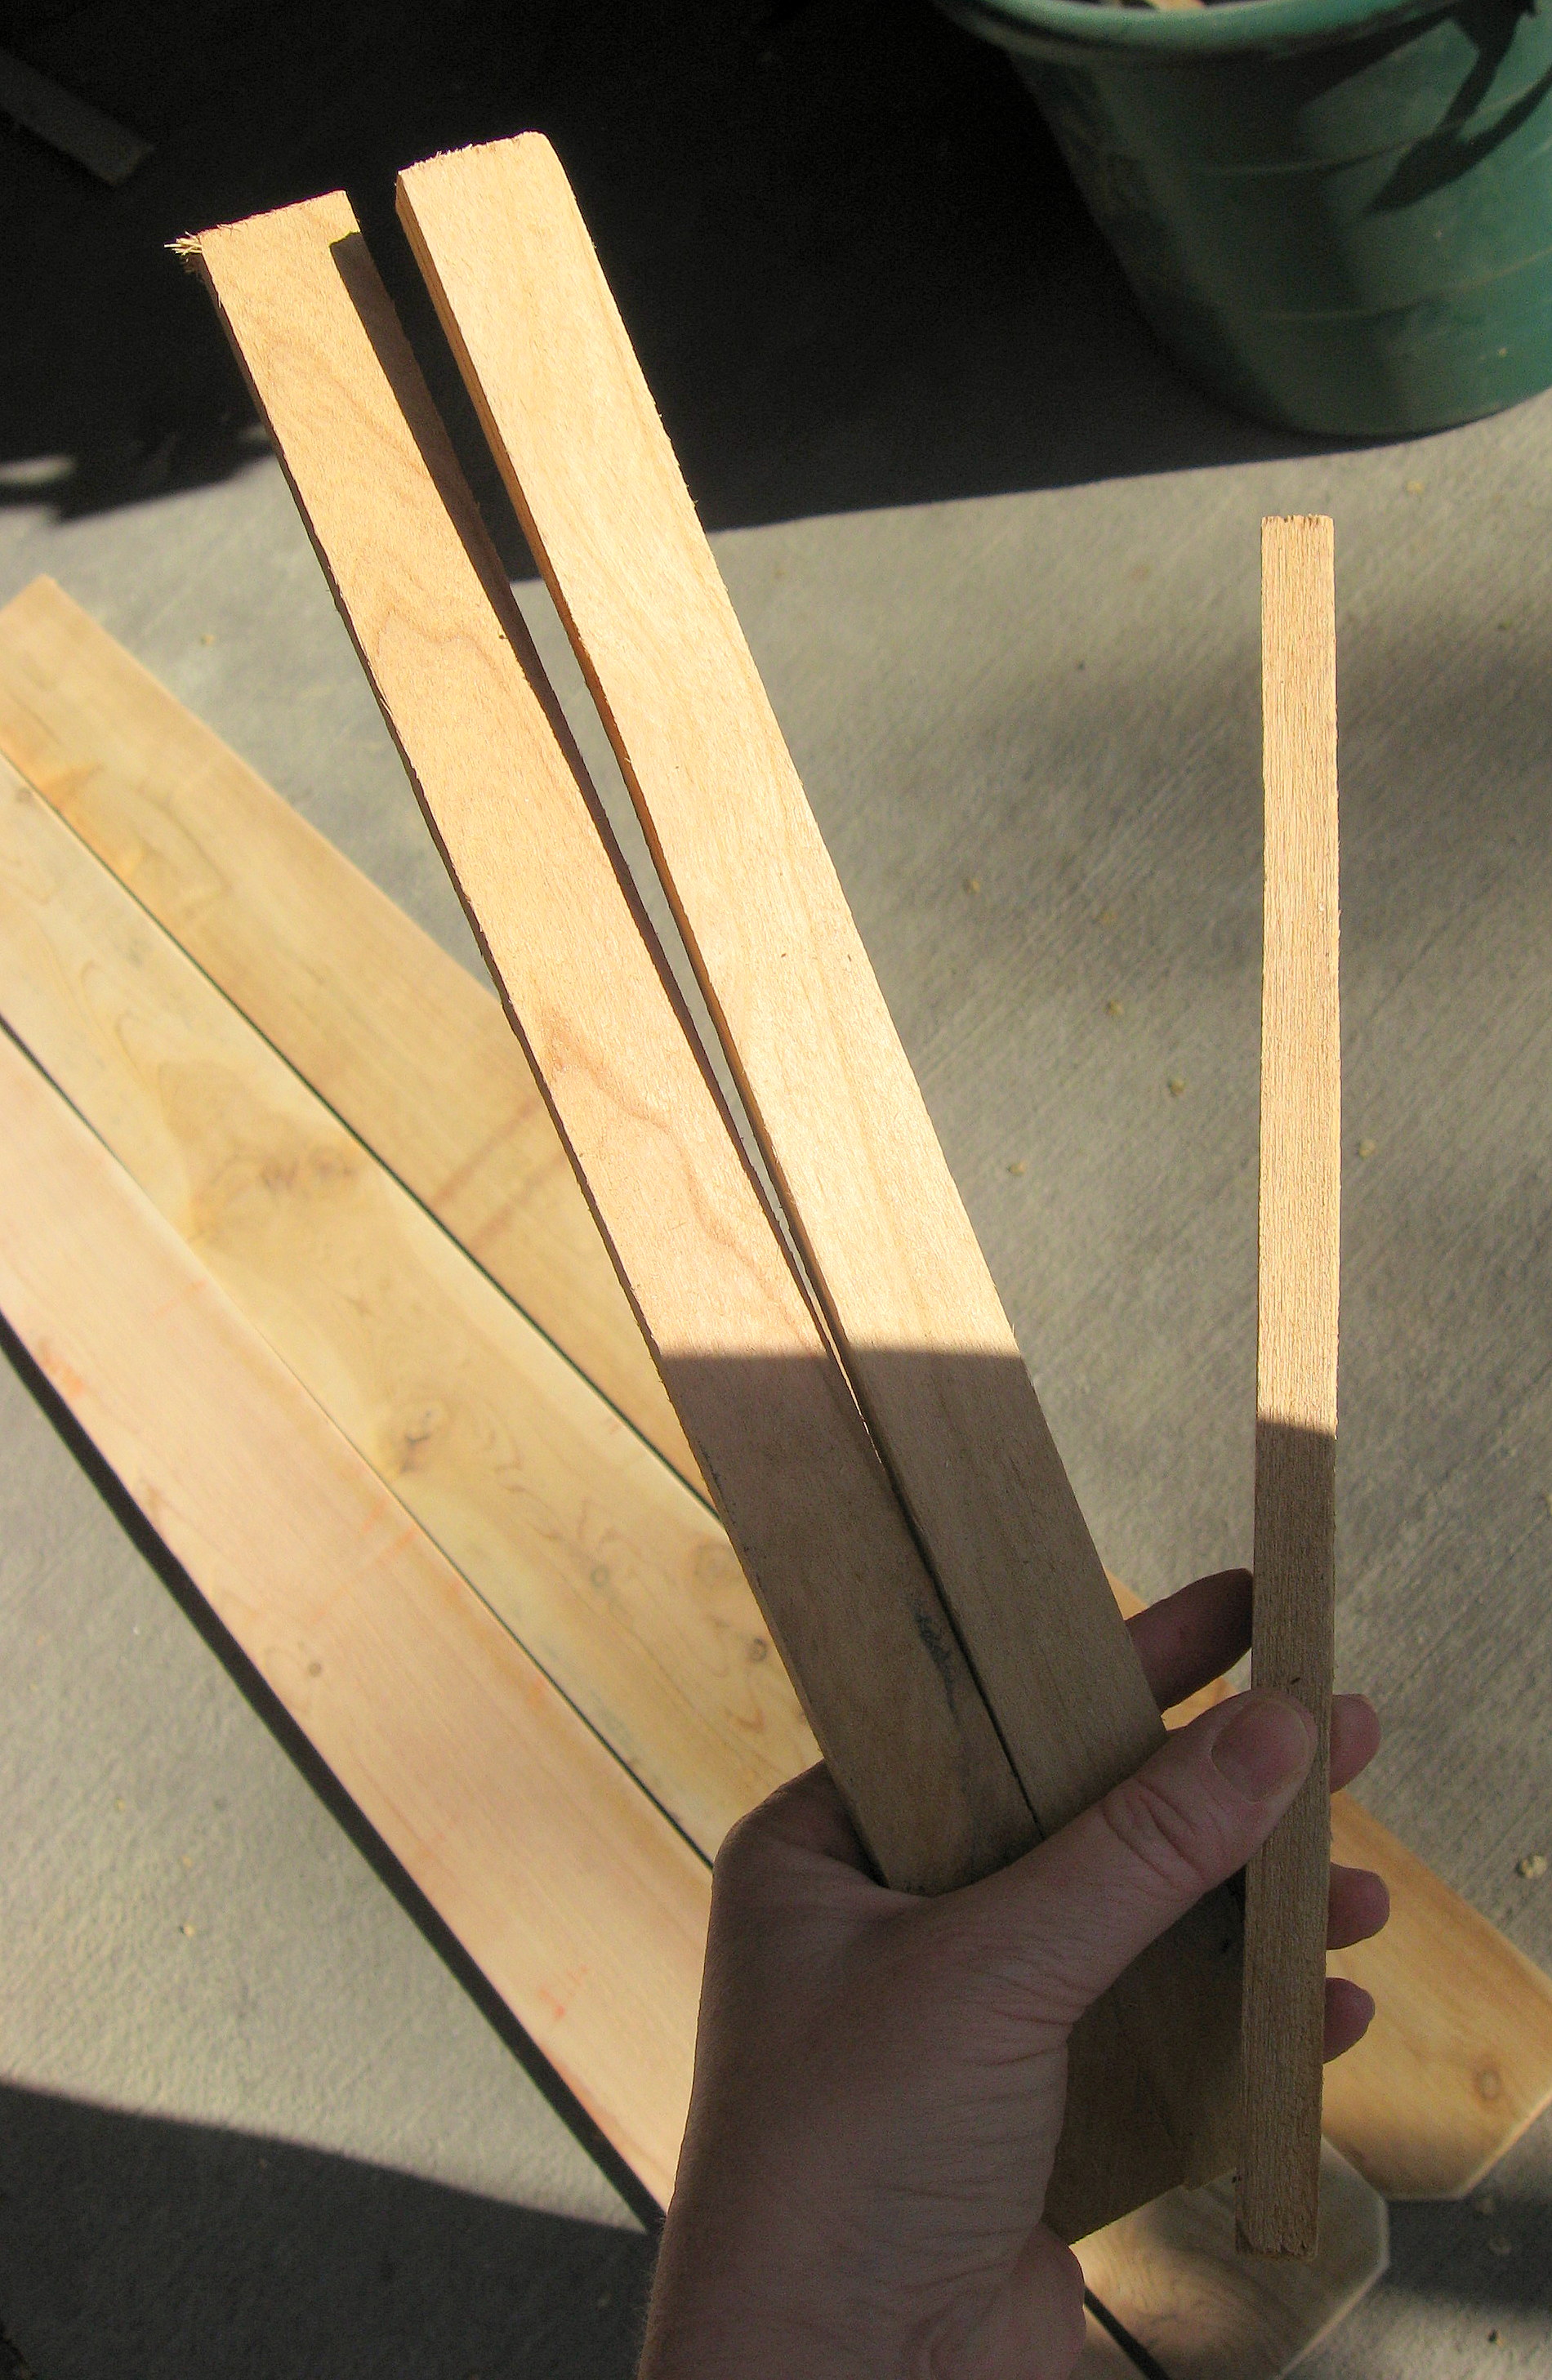
- Wire hanging planter baskets. I used 5 and I got them at Dollar Tree.
- Board(s); as tall as you would like, and wide enough to accommodate the baskets; I used 3 6-ft. tall cedar fence boards. These are about $1.90 at Home Depot but they regularly go on sale this time of year for less than $1. (I use these for crafts all the time, so I buy a stack whenever they are on sale.)
- Thin boards to connect the fence boards together; I used scraps from my garage, but if you have to buy something, ask for lathing strips. You should be able to get one long board for about $1.
- Nuts and bolts a bit longer than the board is wide – look for these hanging in little bags in the same aisle as screws and nails. Should be less than $1 per bag and if you follow my design you will need 10.
- Screws
- Drill
- Saw
- Sander or Sandpaper
- Strong Wire cutters
- Paint
Let’s get started!
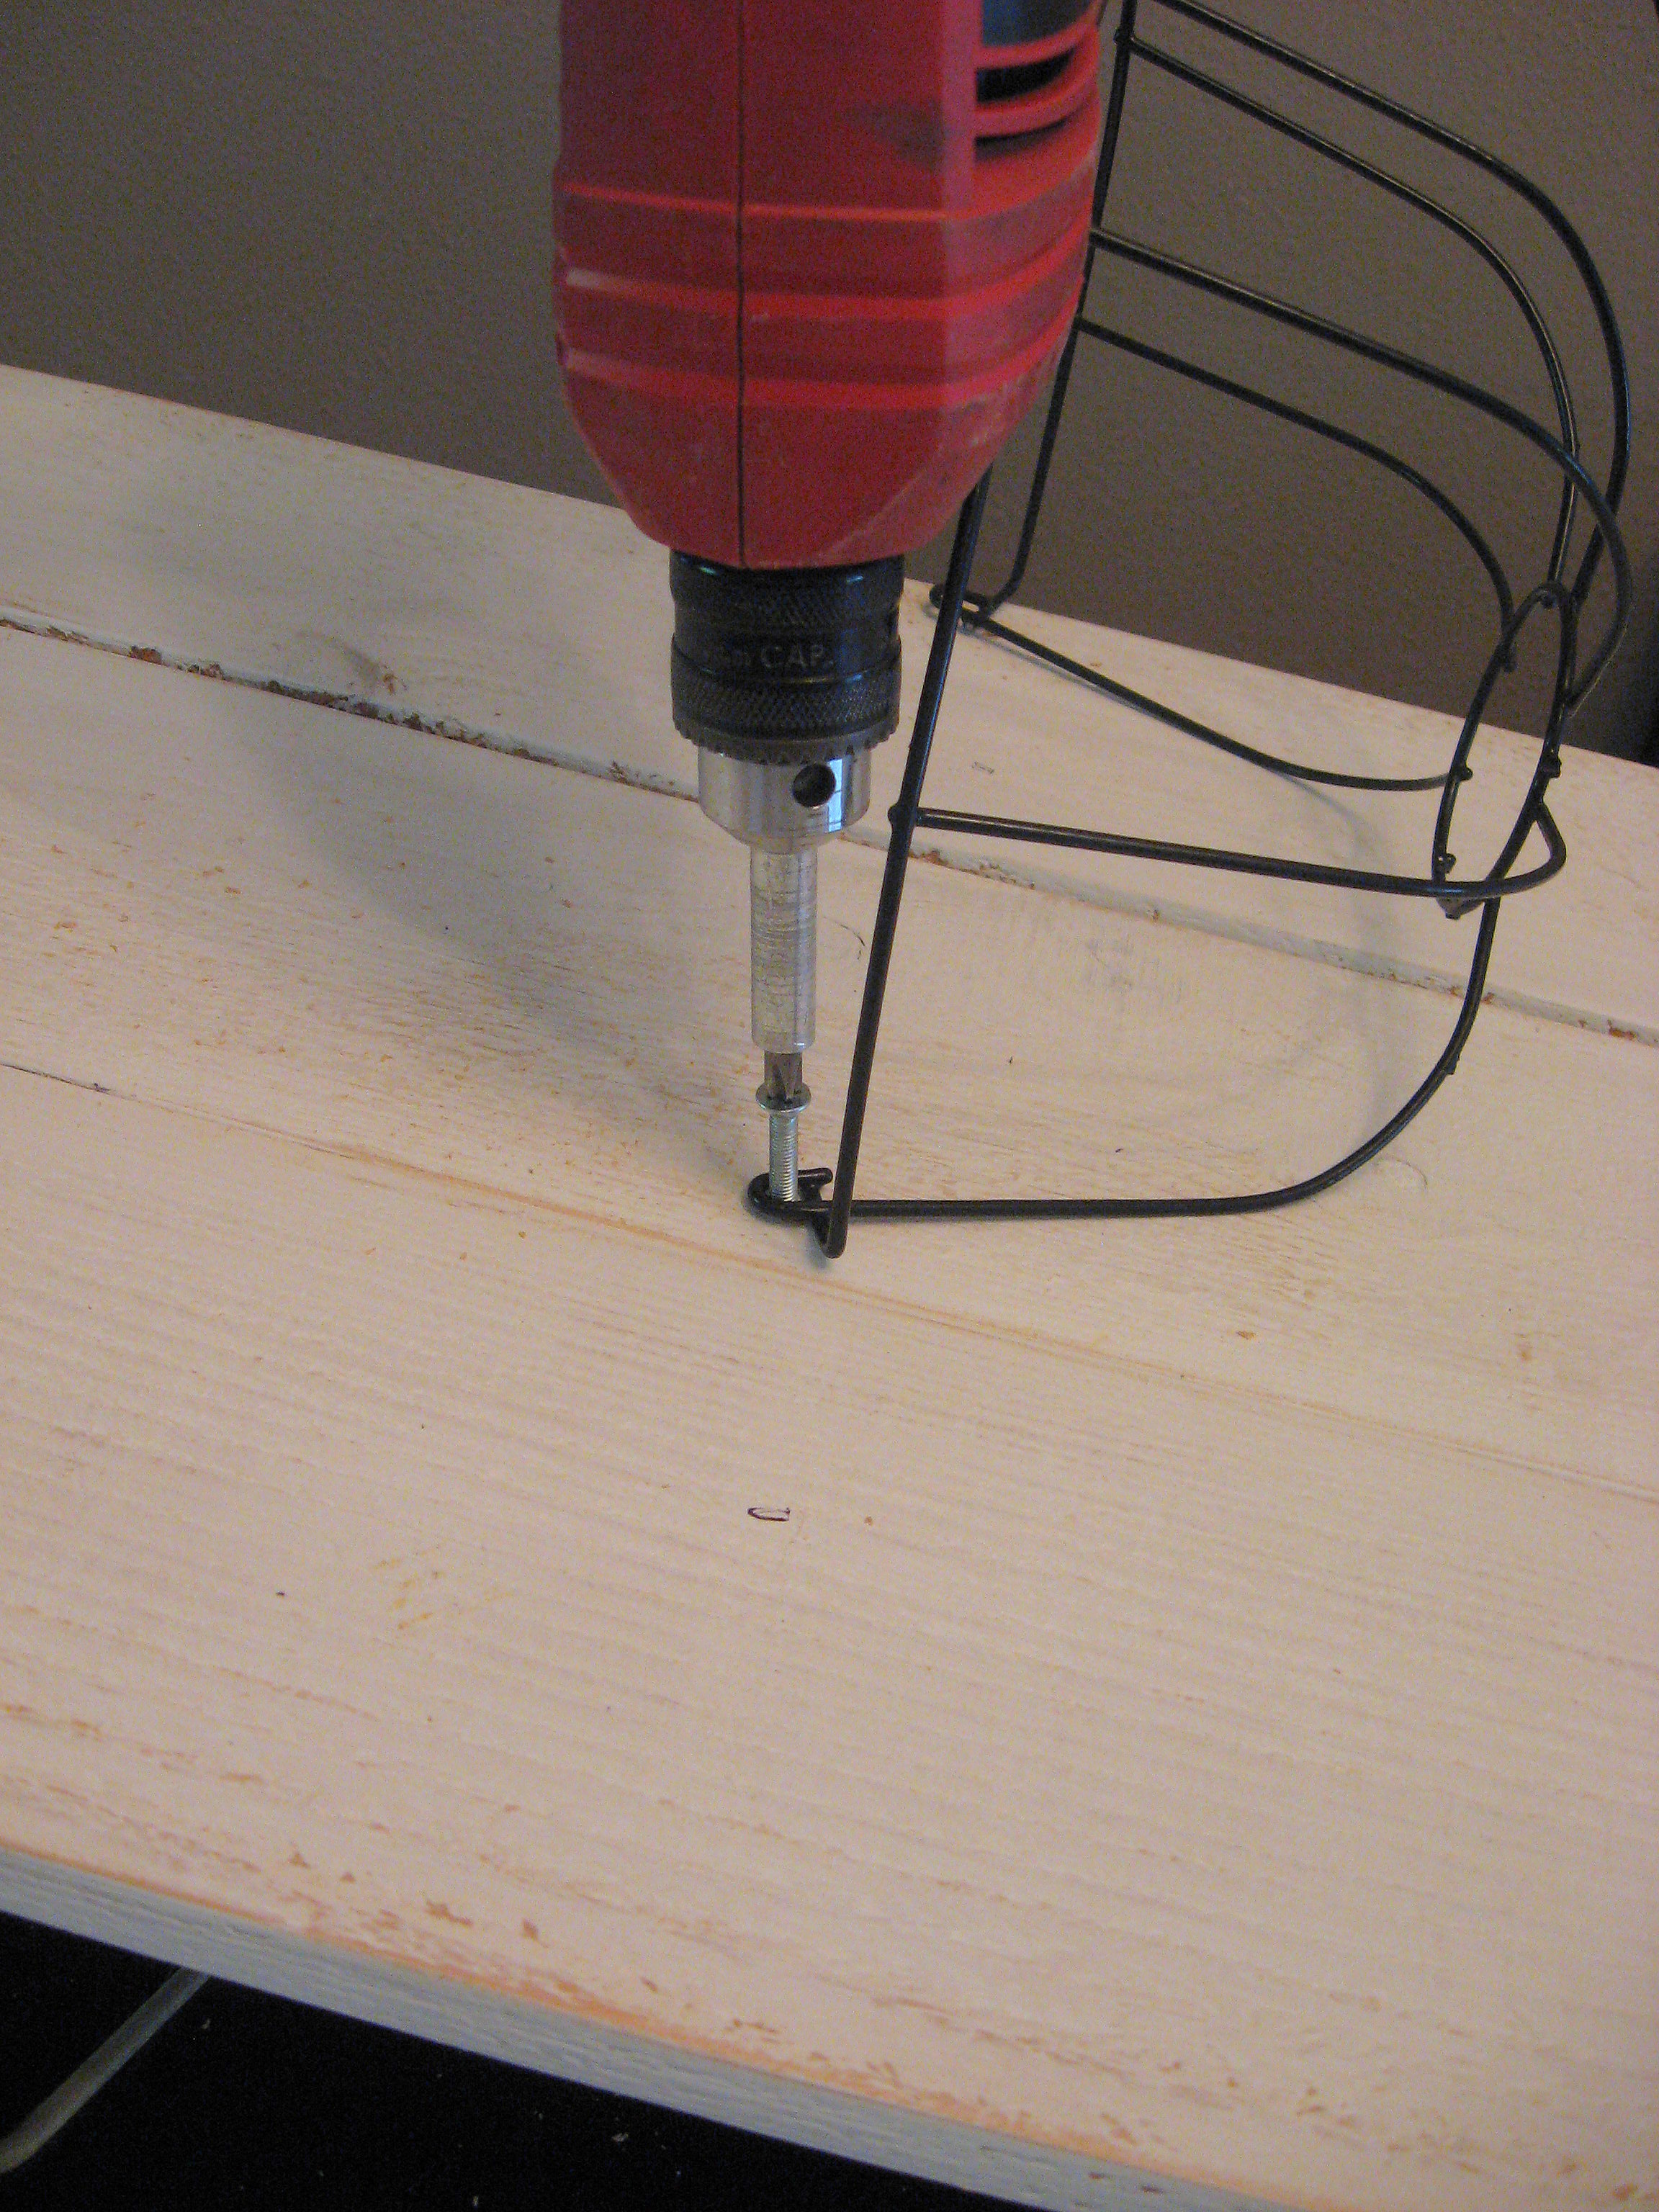
Start with the wire baskets; take off the hanging chain and either throw them out or save them for another project; you won’t be using them for this project.
Here is a close up of what my basket looks like. You will cut out a section of the basket so that it sits flat against the board. Make sure you keep the little loops that held the chain; that is where you will screw the basket into the board.
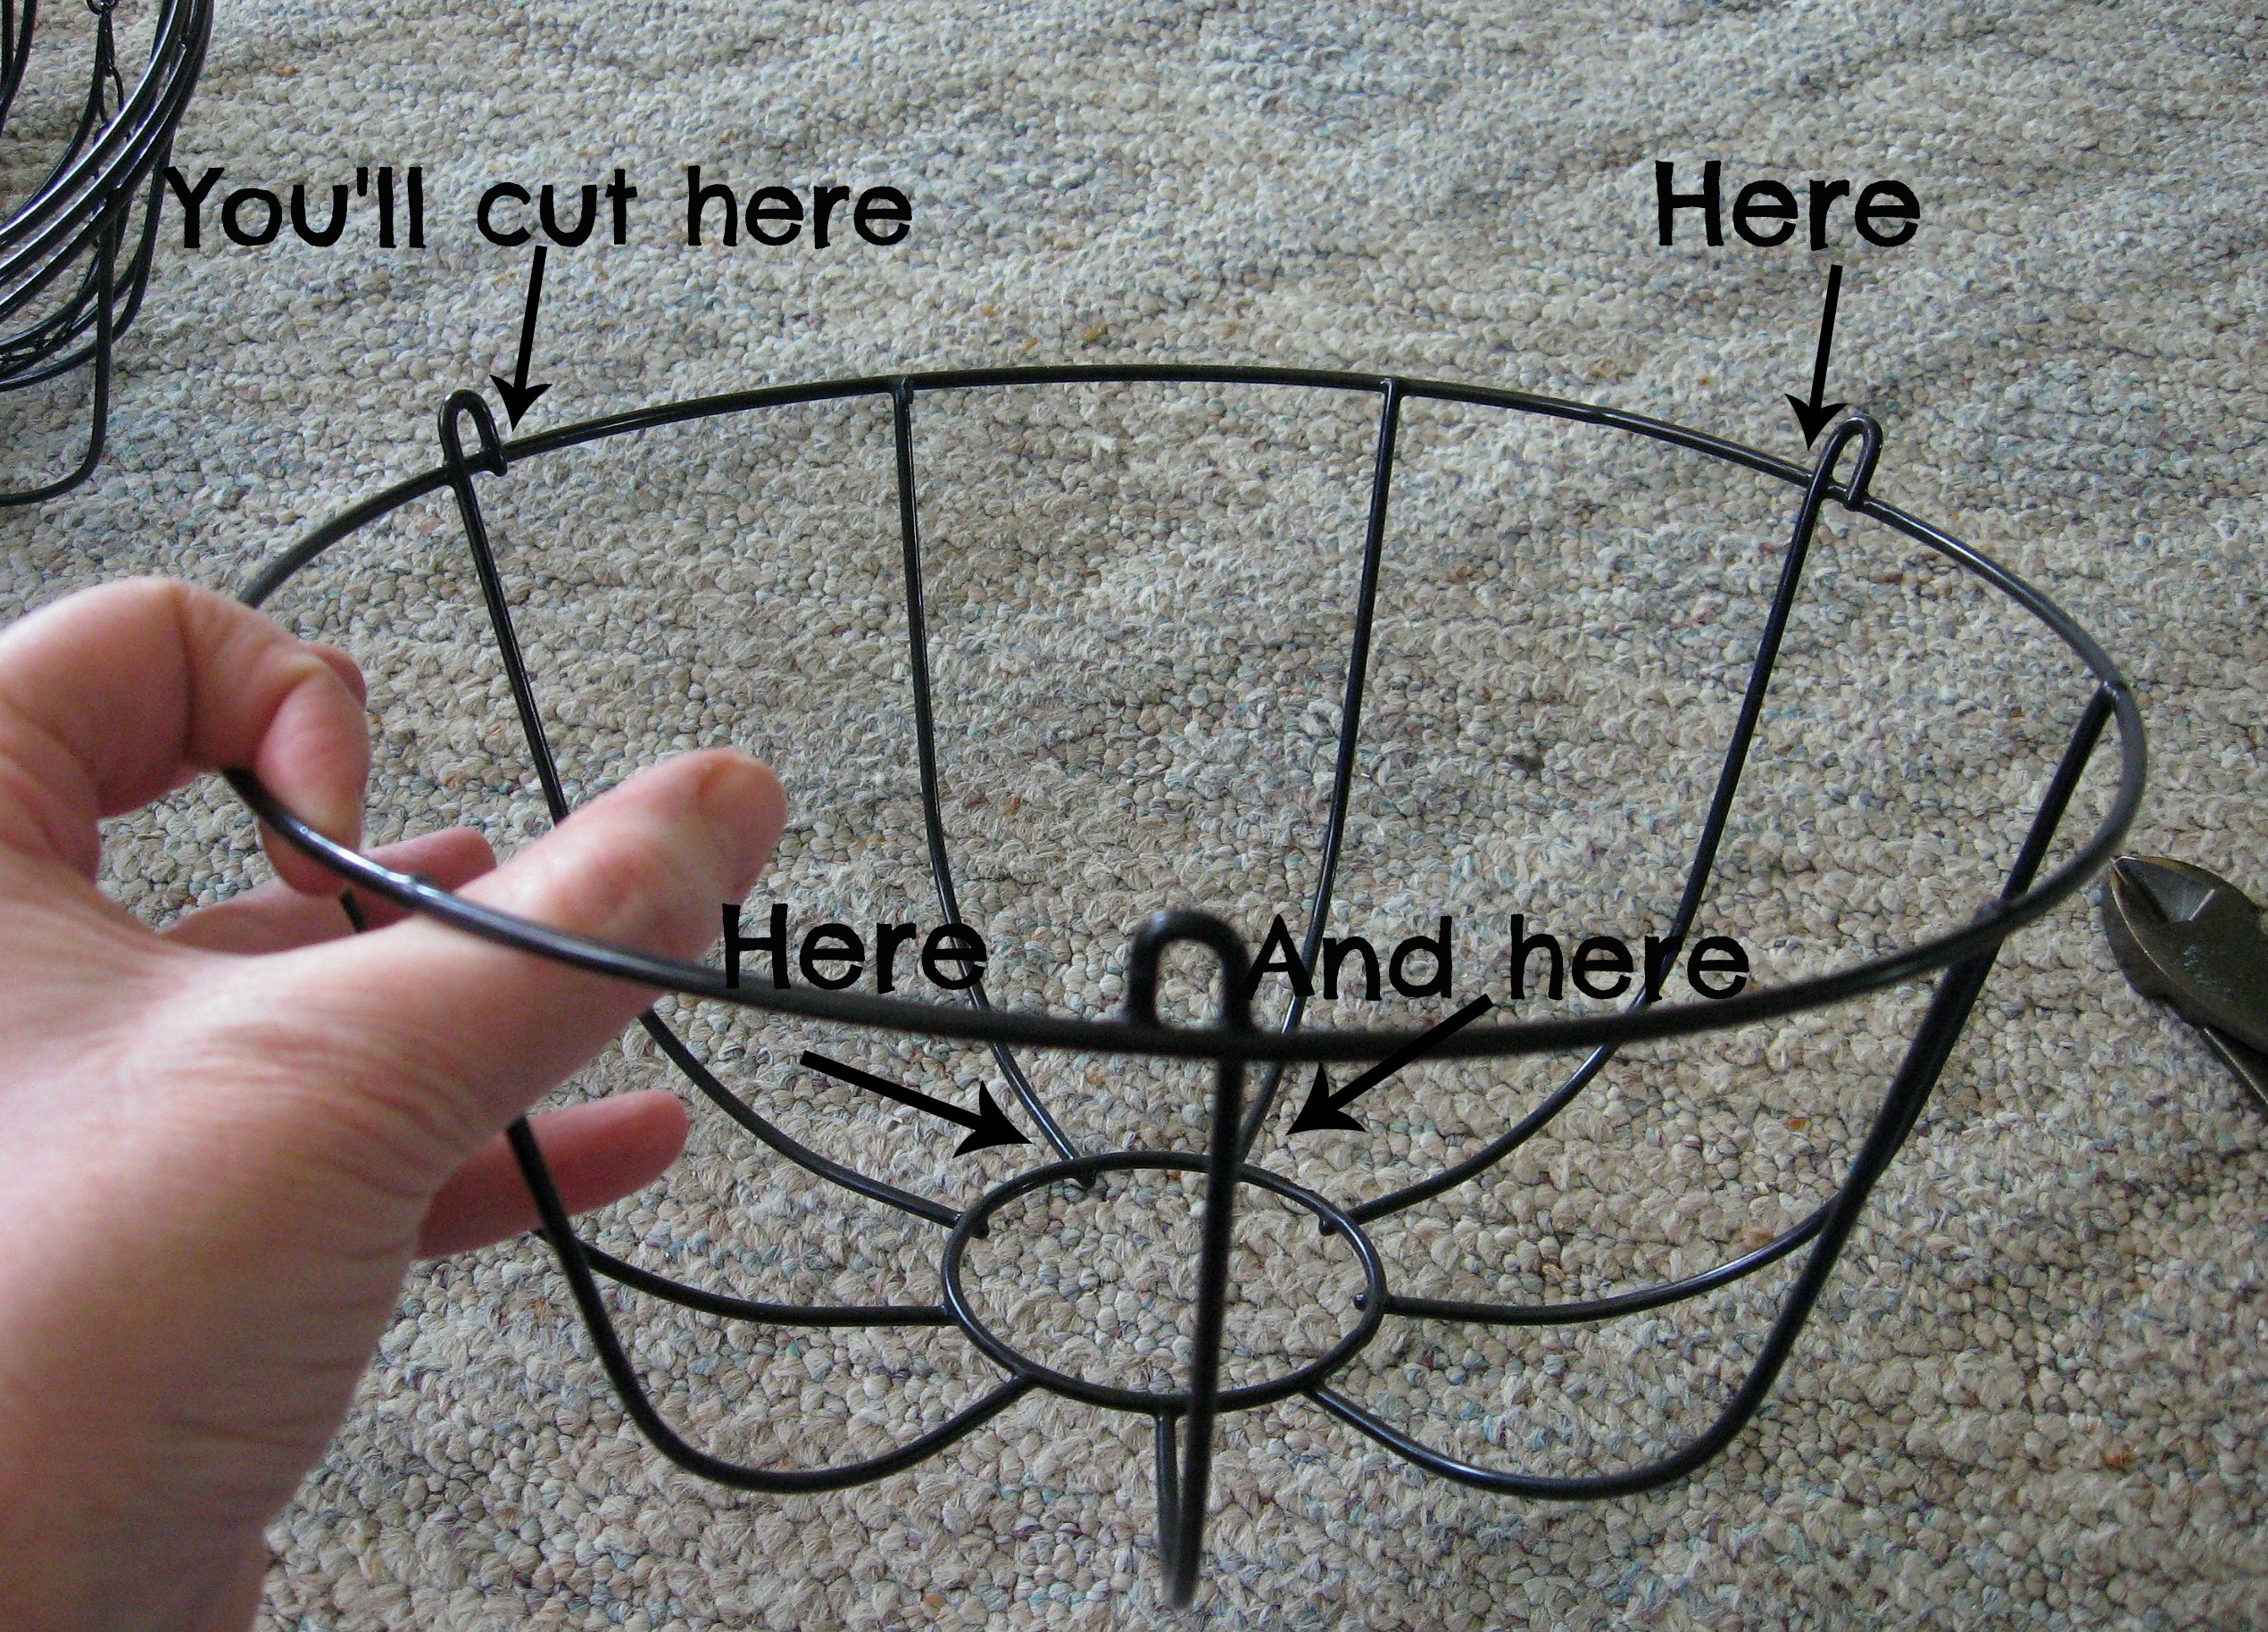
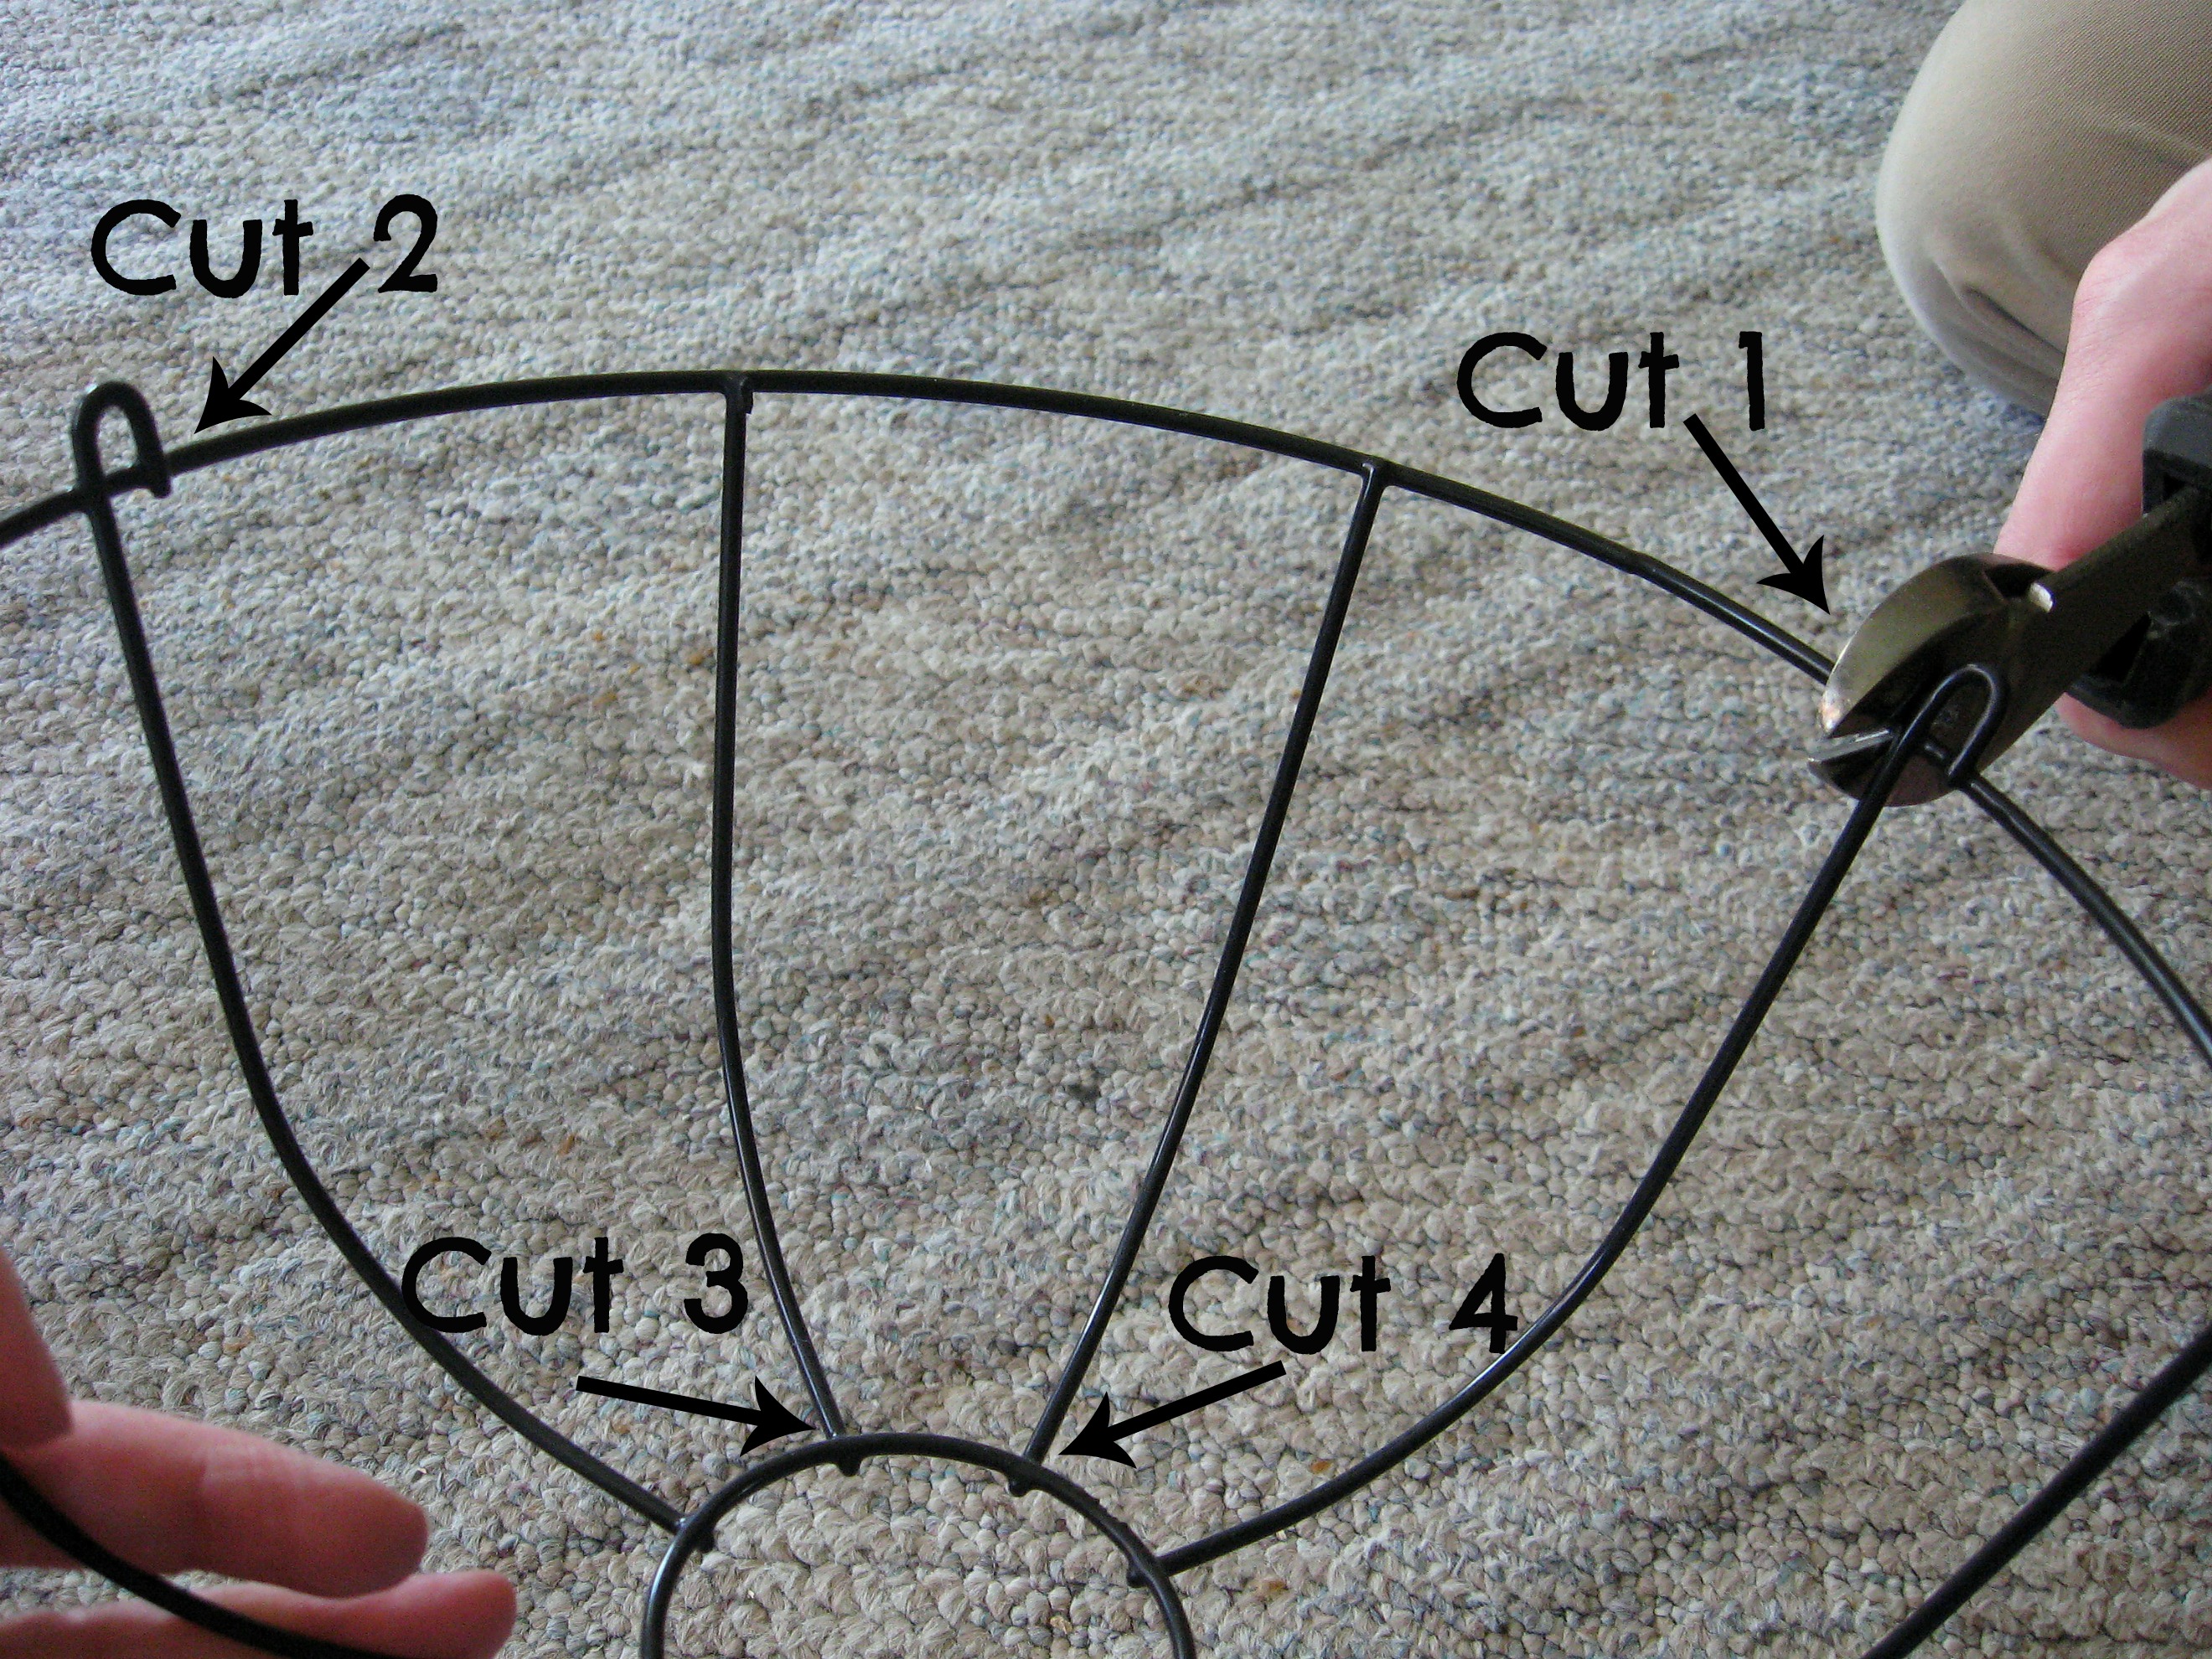
Use heavy duty wire cutters and cut as close to the intersections as you can, so you don’t leave a sharp end.
Now you’ll have a basket that has one whole “side” cut away. Next, with pliers, bend the little wire loops in at a 90* angle like this:
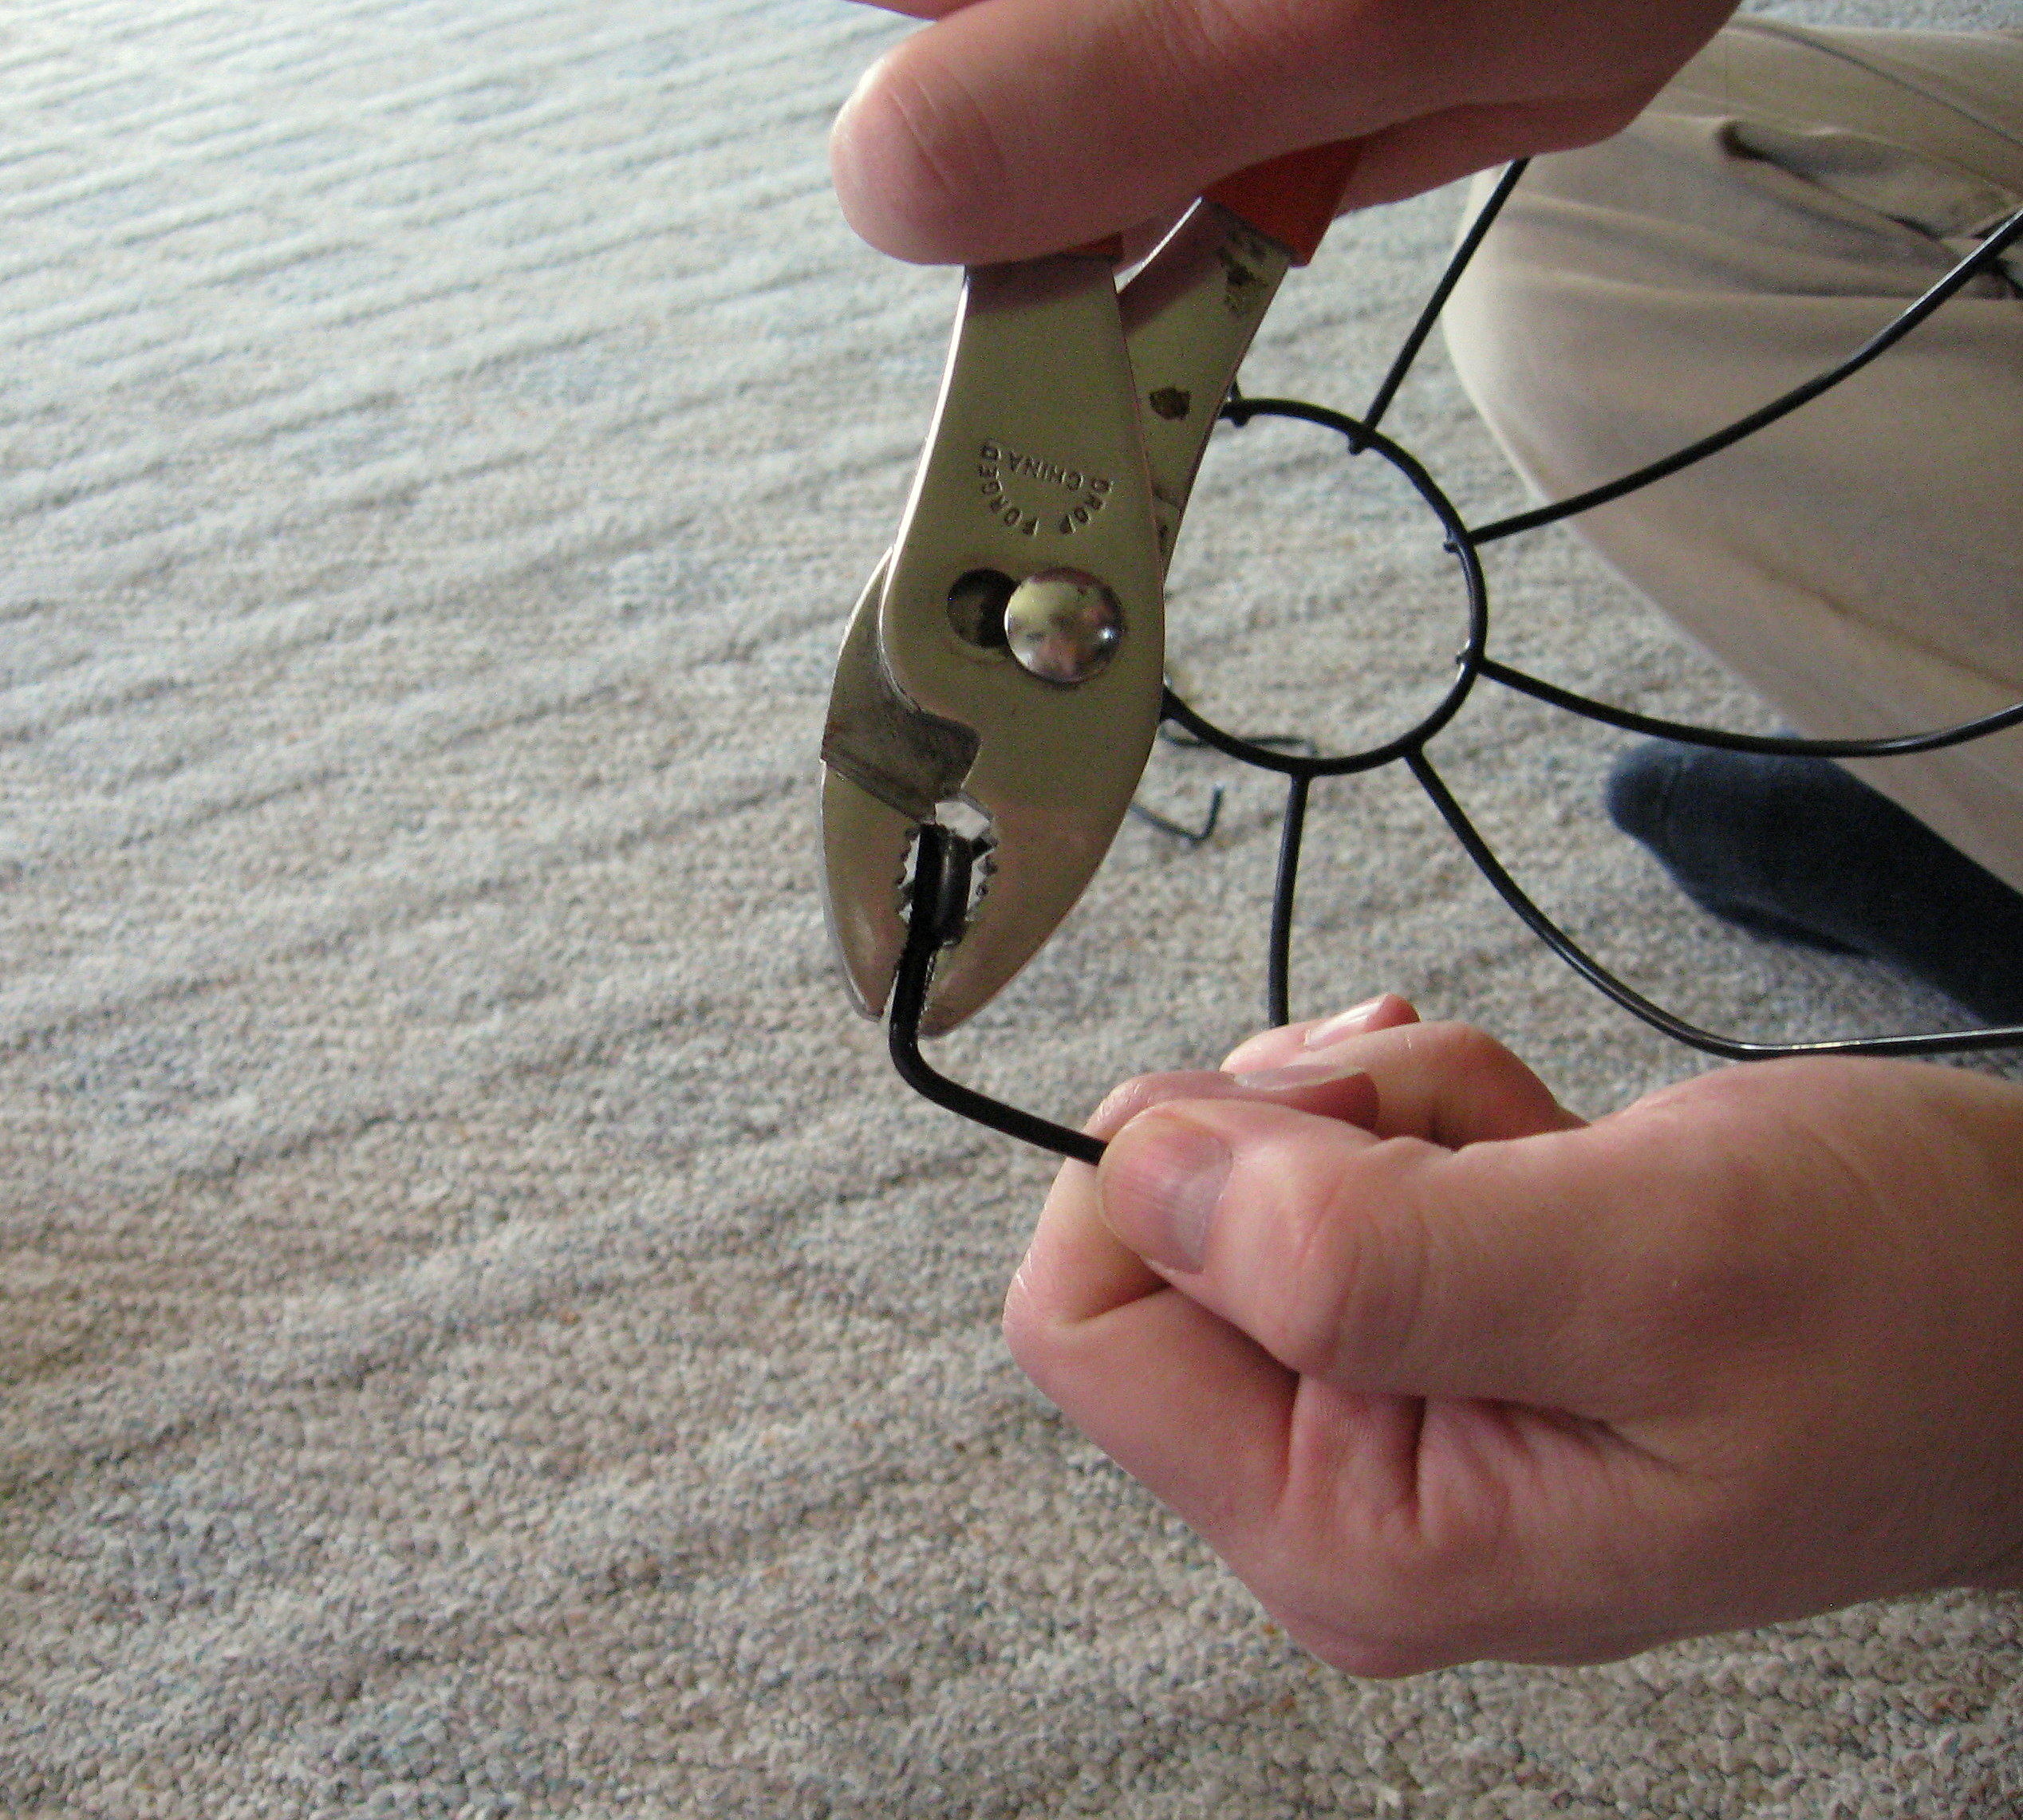
Bend the loops on each side, in towards each other.
Now it should look like this:
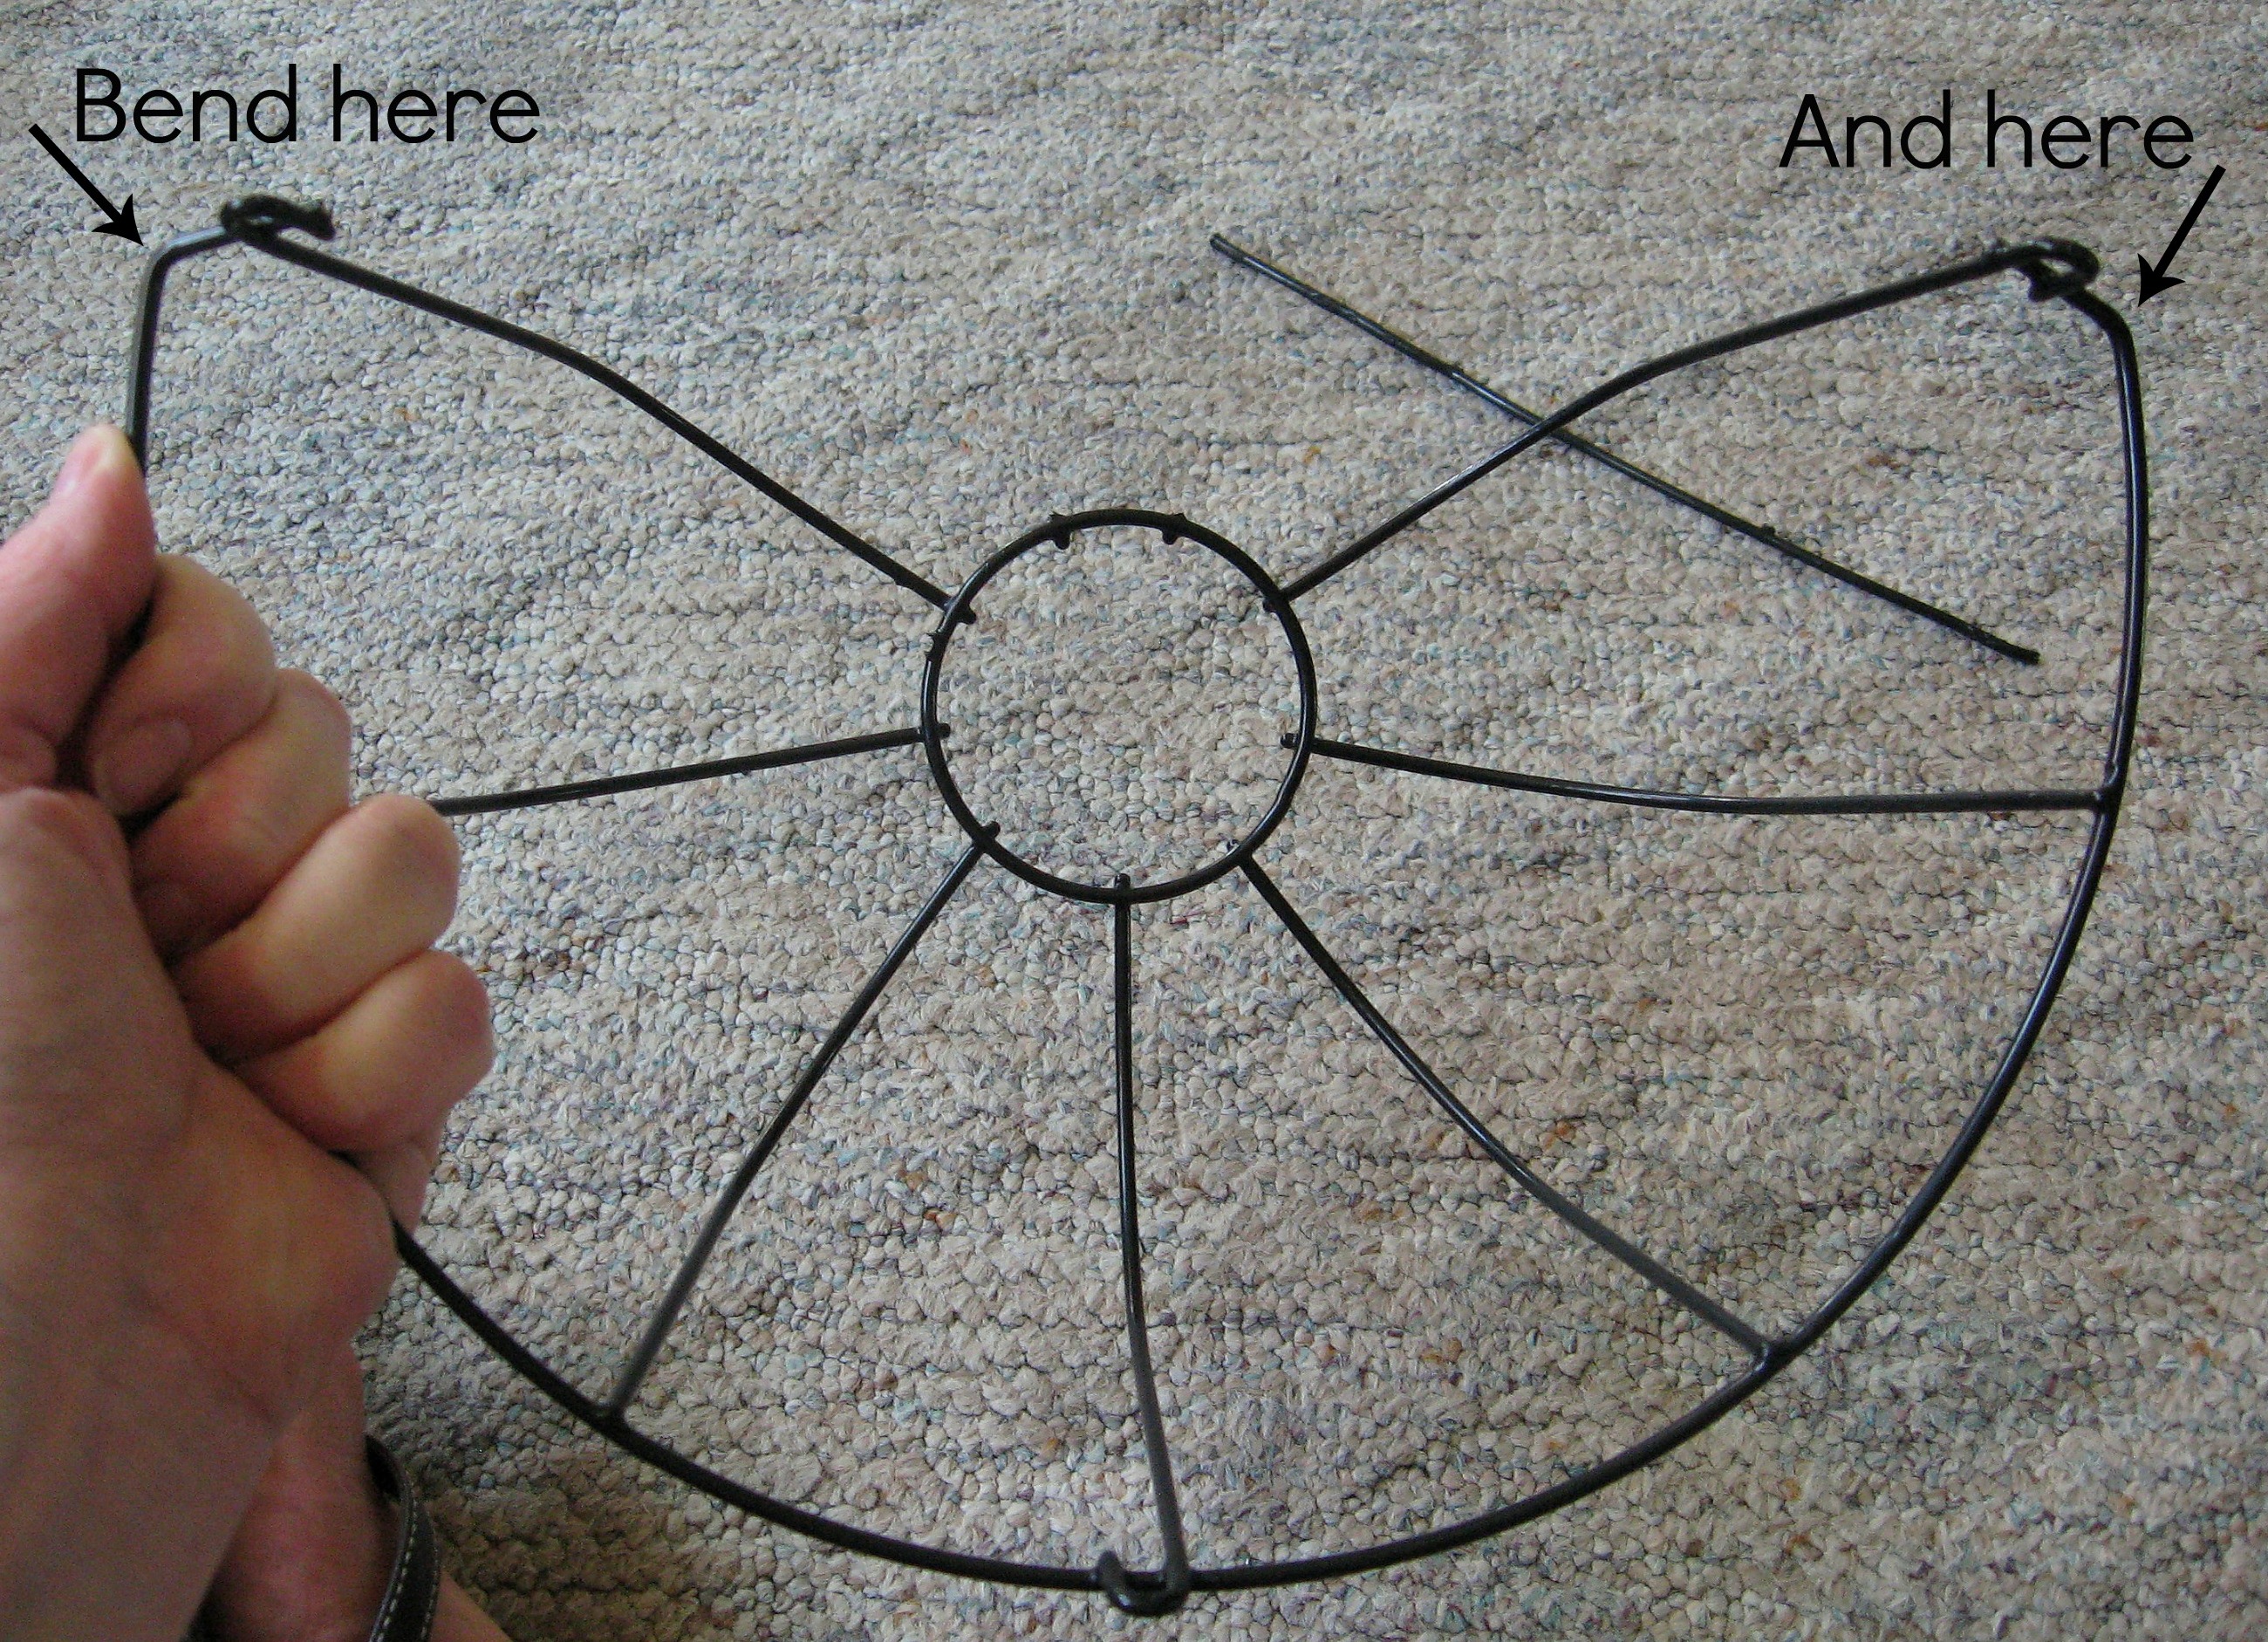
Cut and bend all of your baskets. Now take a minute to make sure you don’t have any sharp points, and if you find one, either cut it closer or file it down with a metal file.
Now we will put the boards together. A couple of notes about the boards that I used; I chose the dog eared cedar fence boards because that is what matches the style of my daughters room. You could easily change the style of this project by using one board that is wide enough for the baskets. You could even skip this part and attach the baskets straight to the wall. I considered attaching the baskets to the boards the other way. I decided that it fits better in her room vertically, but horizontally would be super cute too!
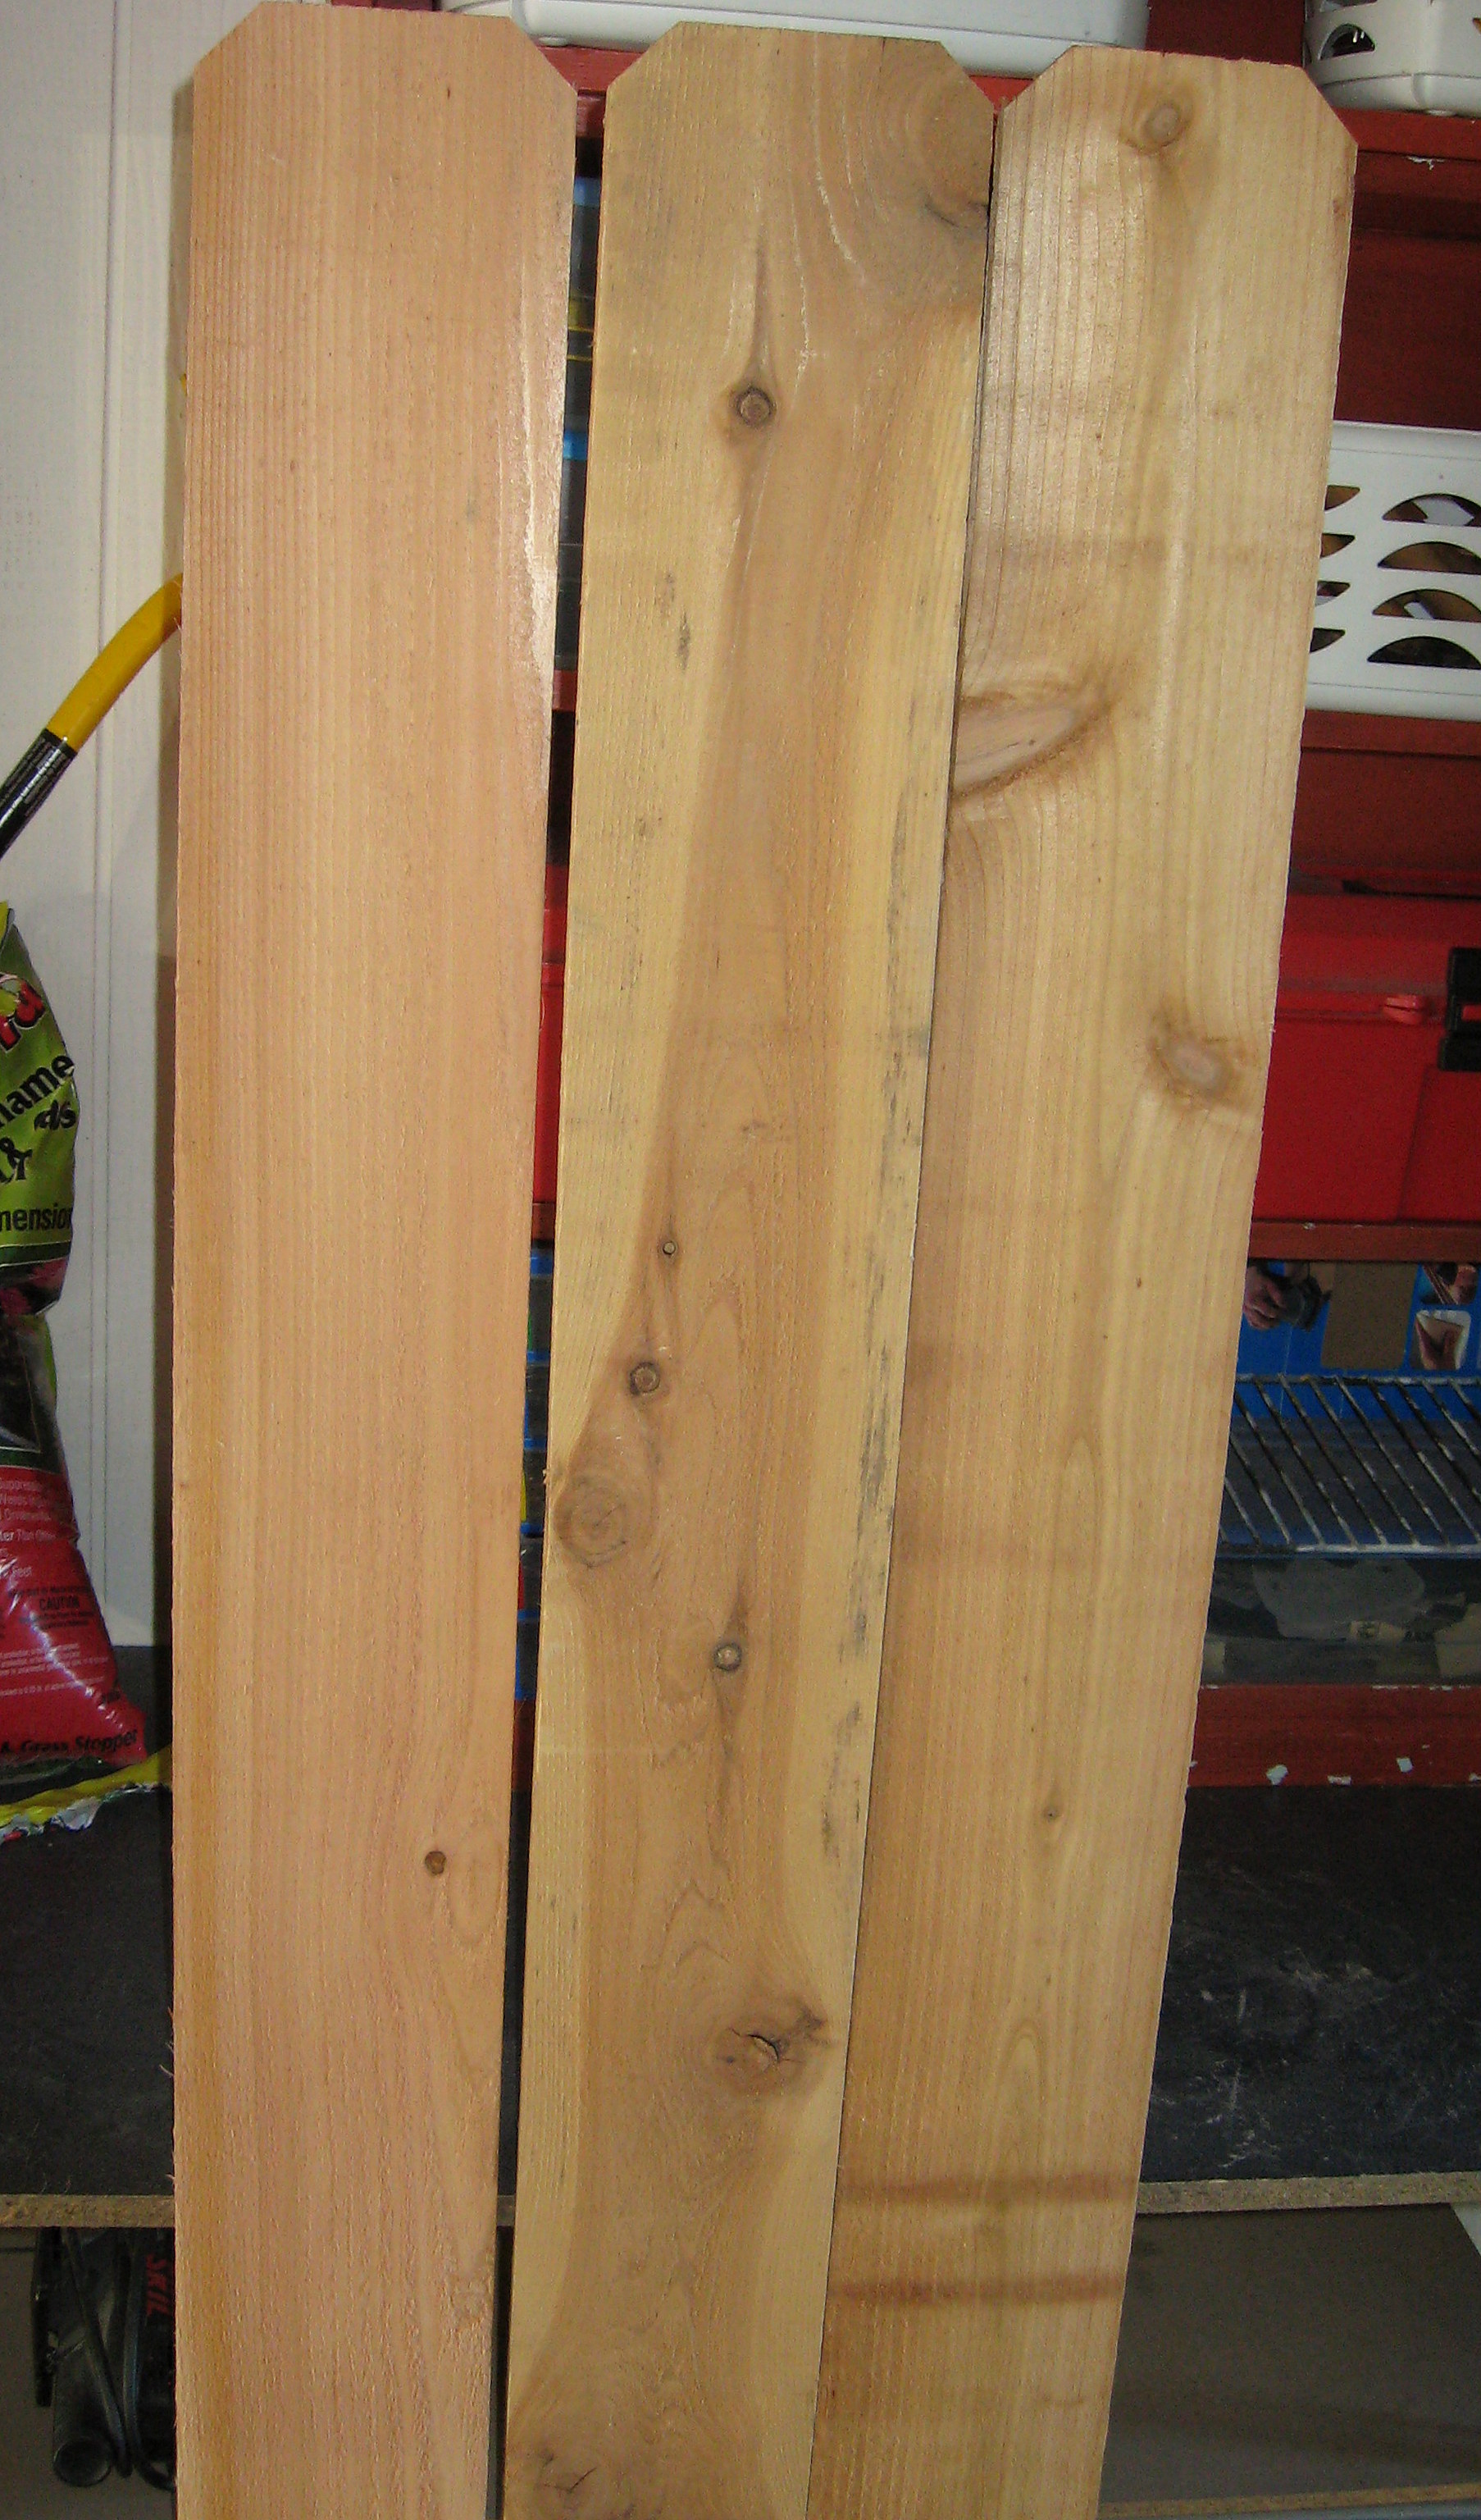
Here we go… cedar fence boards are notoriously warped and wonky. Again, for the style I was going for I didn’t mind if they didn’t fit together really tight, but if that matters to you make sure to take the time in the store to sort through the pile and find the straightest, flattest ones you can find.
The wood is very rough so start by giving them a quick sanding on all sides. Lay them out on the ground face down. Push them together and line up the bottoms so they are straight and perfectly lined up. See how mine are warped? That is fine; they’ll still go together. Just make sure the bottoms are even.
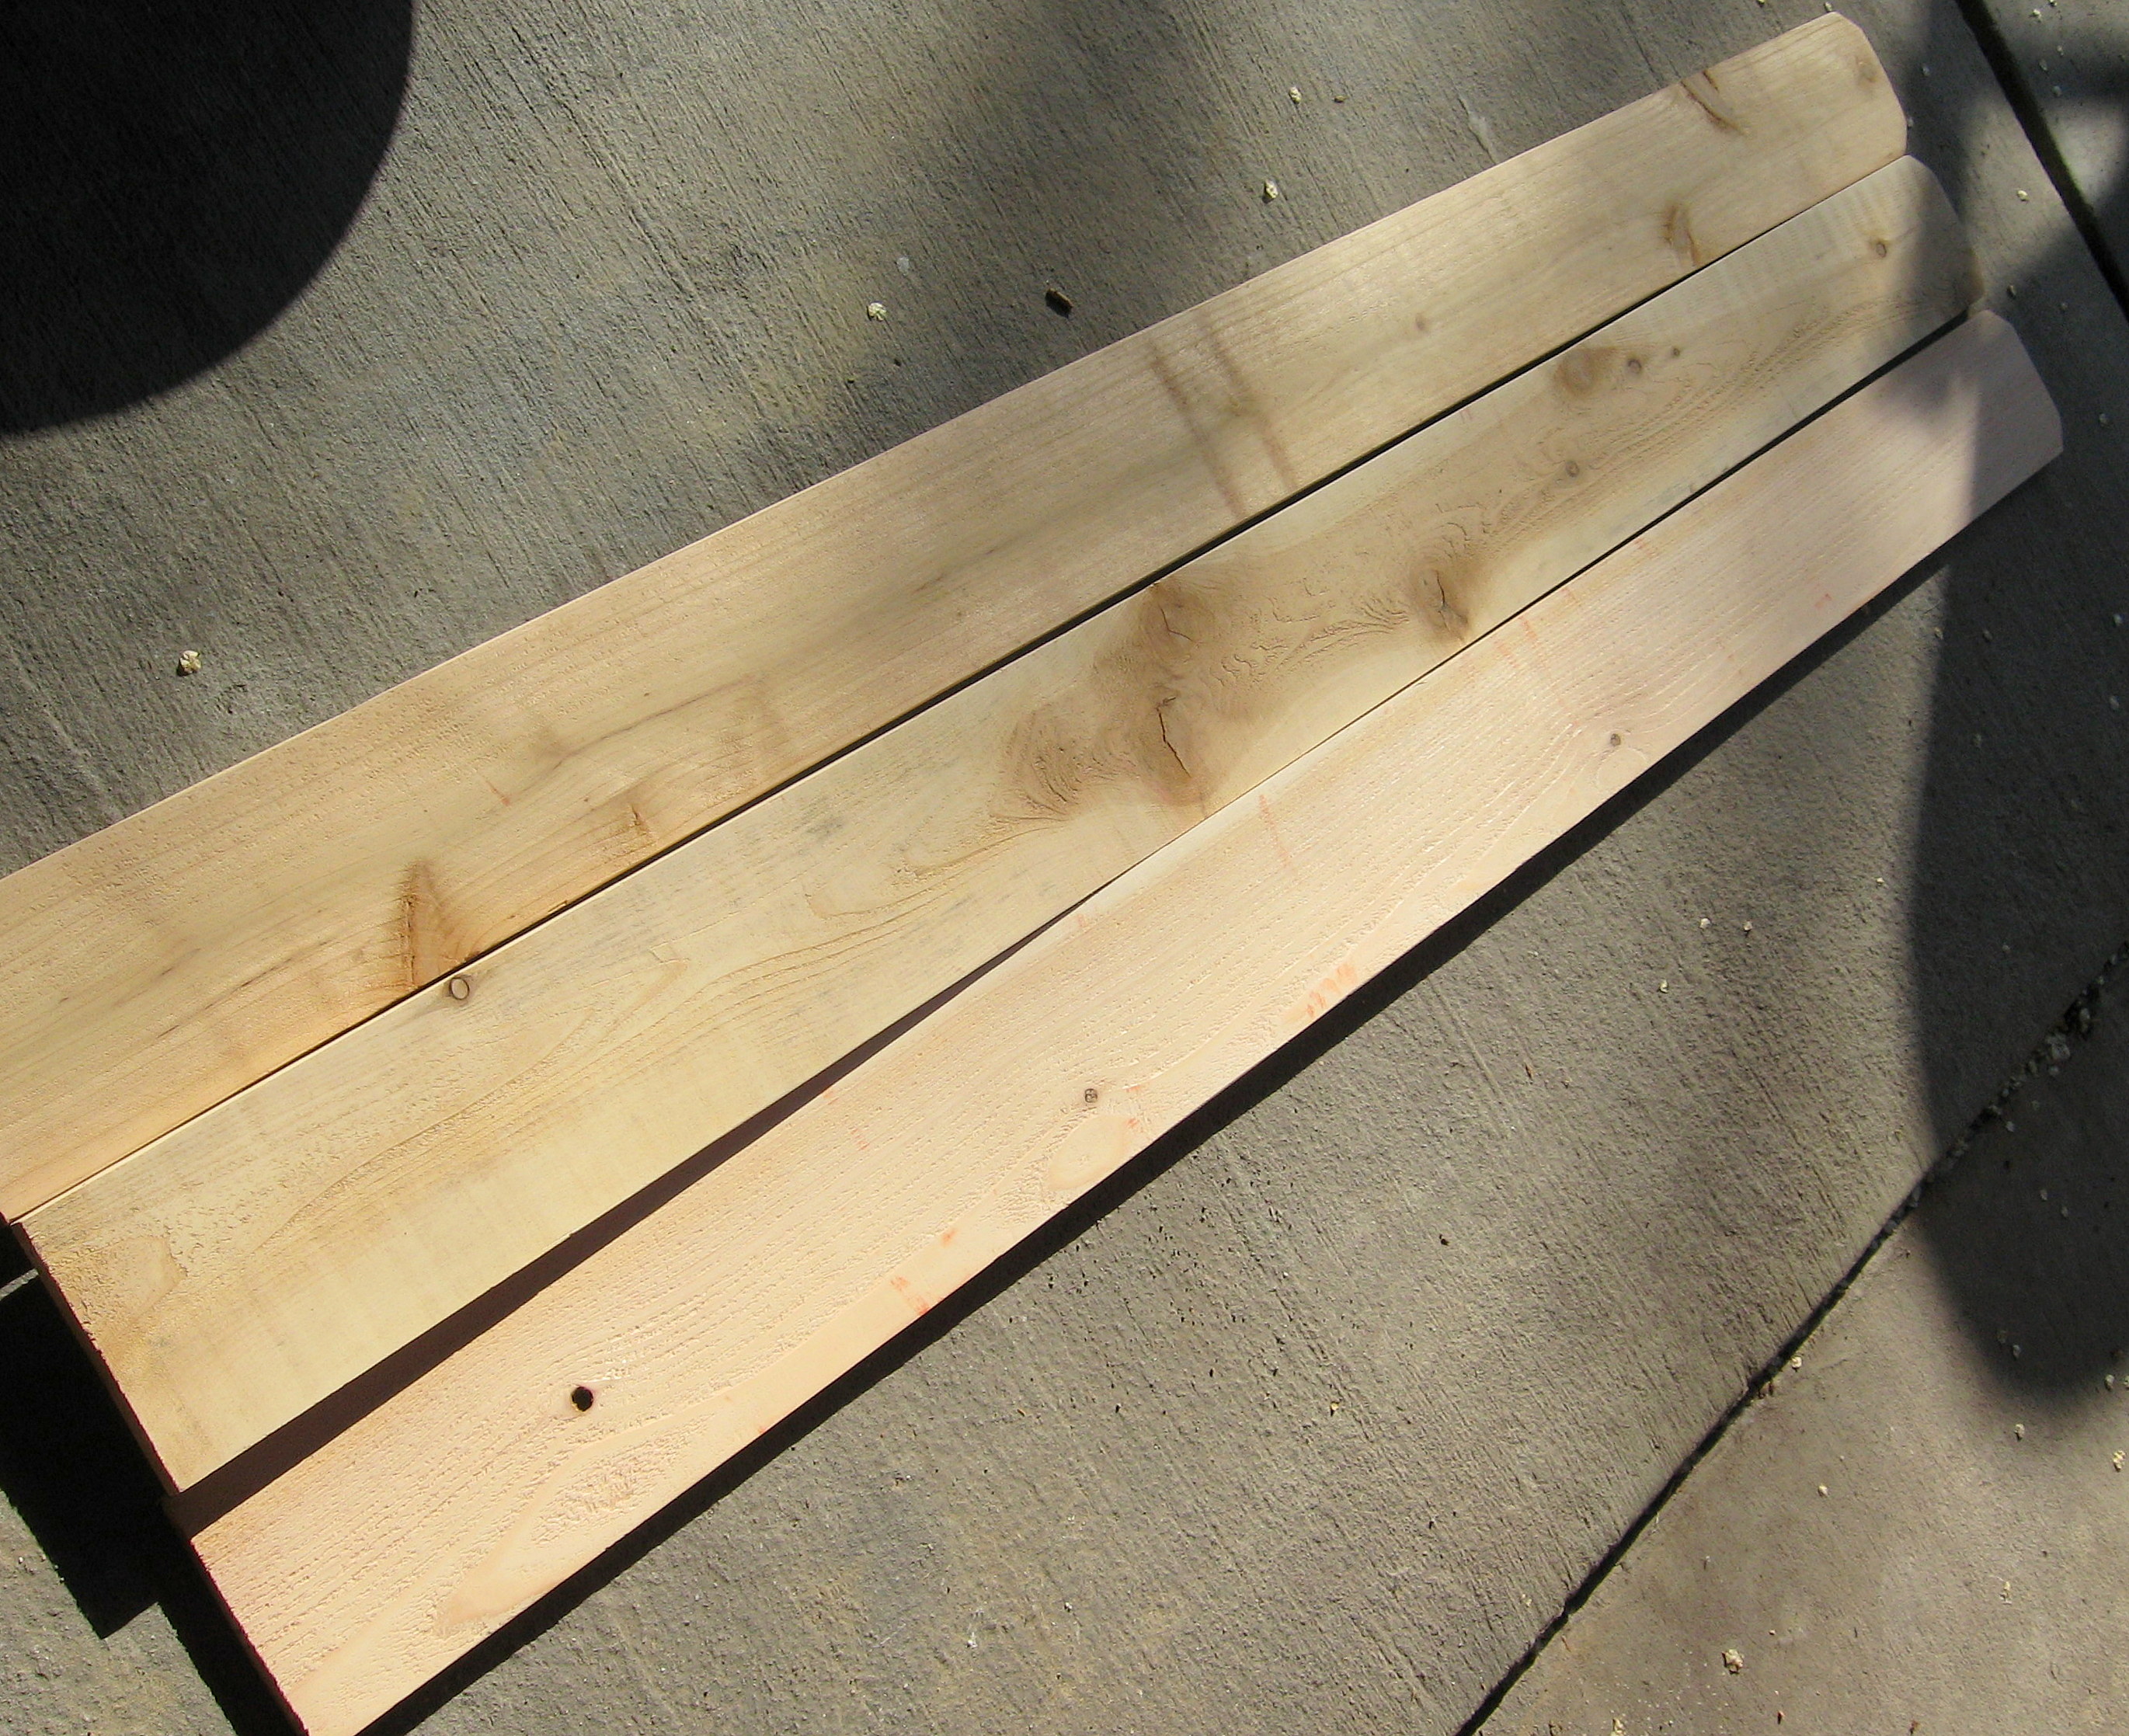
Now you will attach them together by screwing three strips of wood across them through the back. This is the wood I used – sorry for the shadows!
Hold the fence boards together tightly as you screw the cross boards in – use an extra set of hands, a large clamp or even some heavy cinder blocks on either side of the boards. Make sure you pre-drill all the holes so you don’t split the wood.
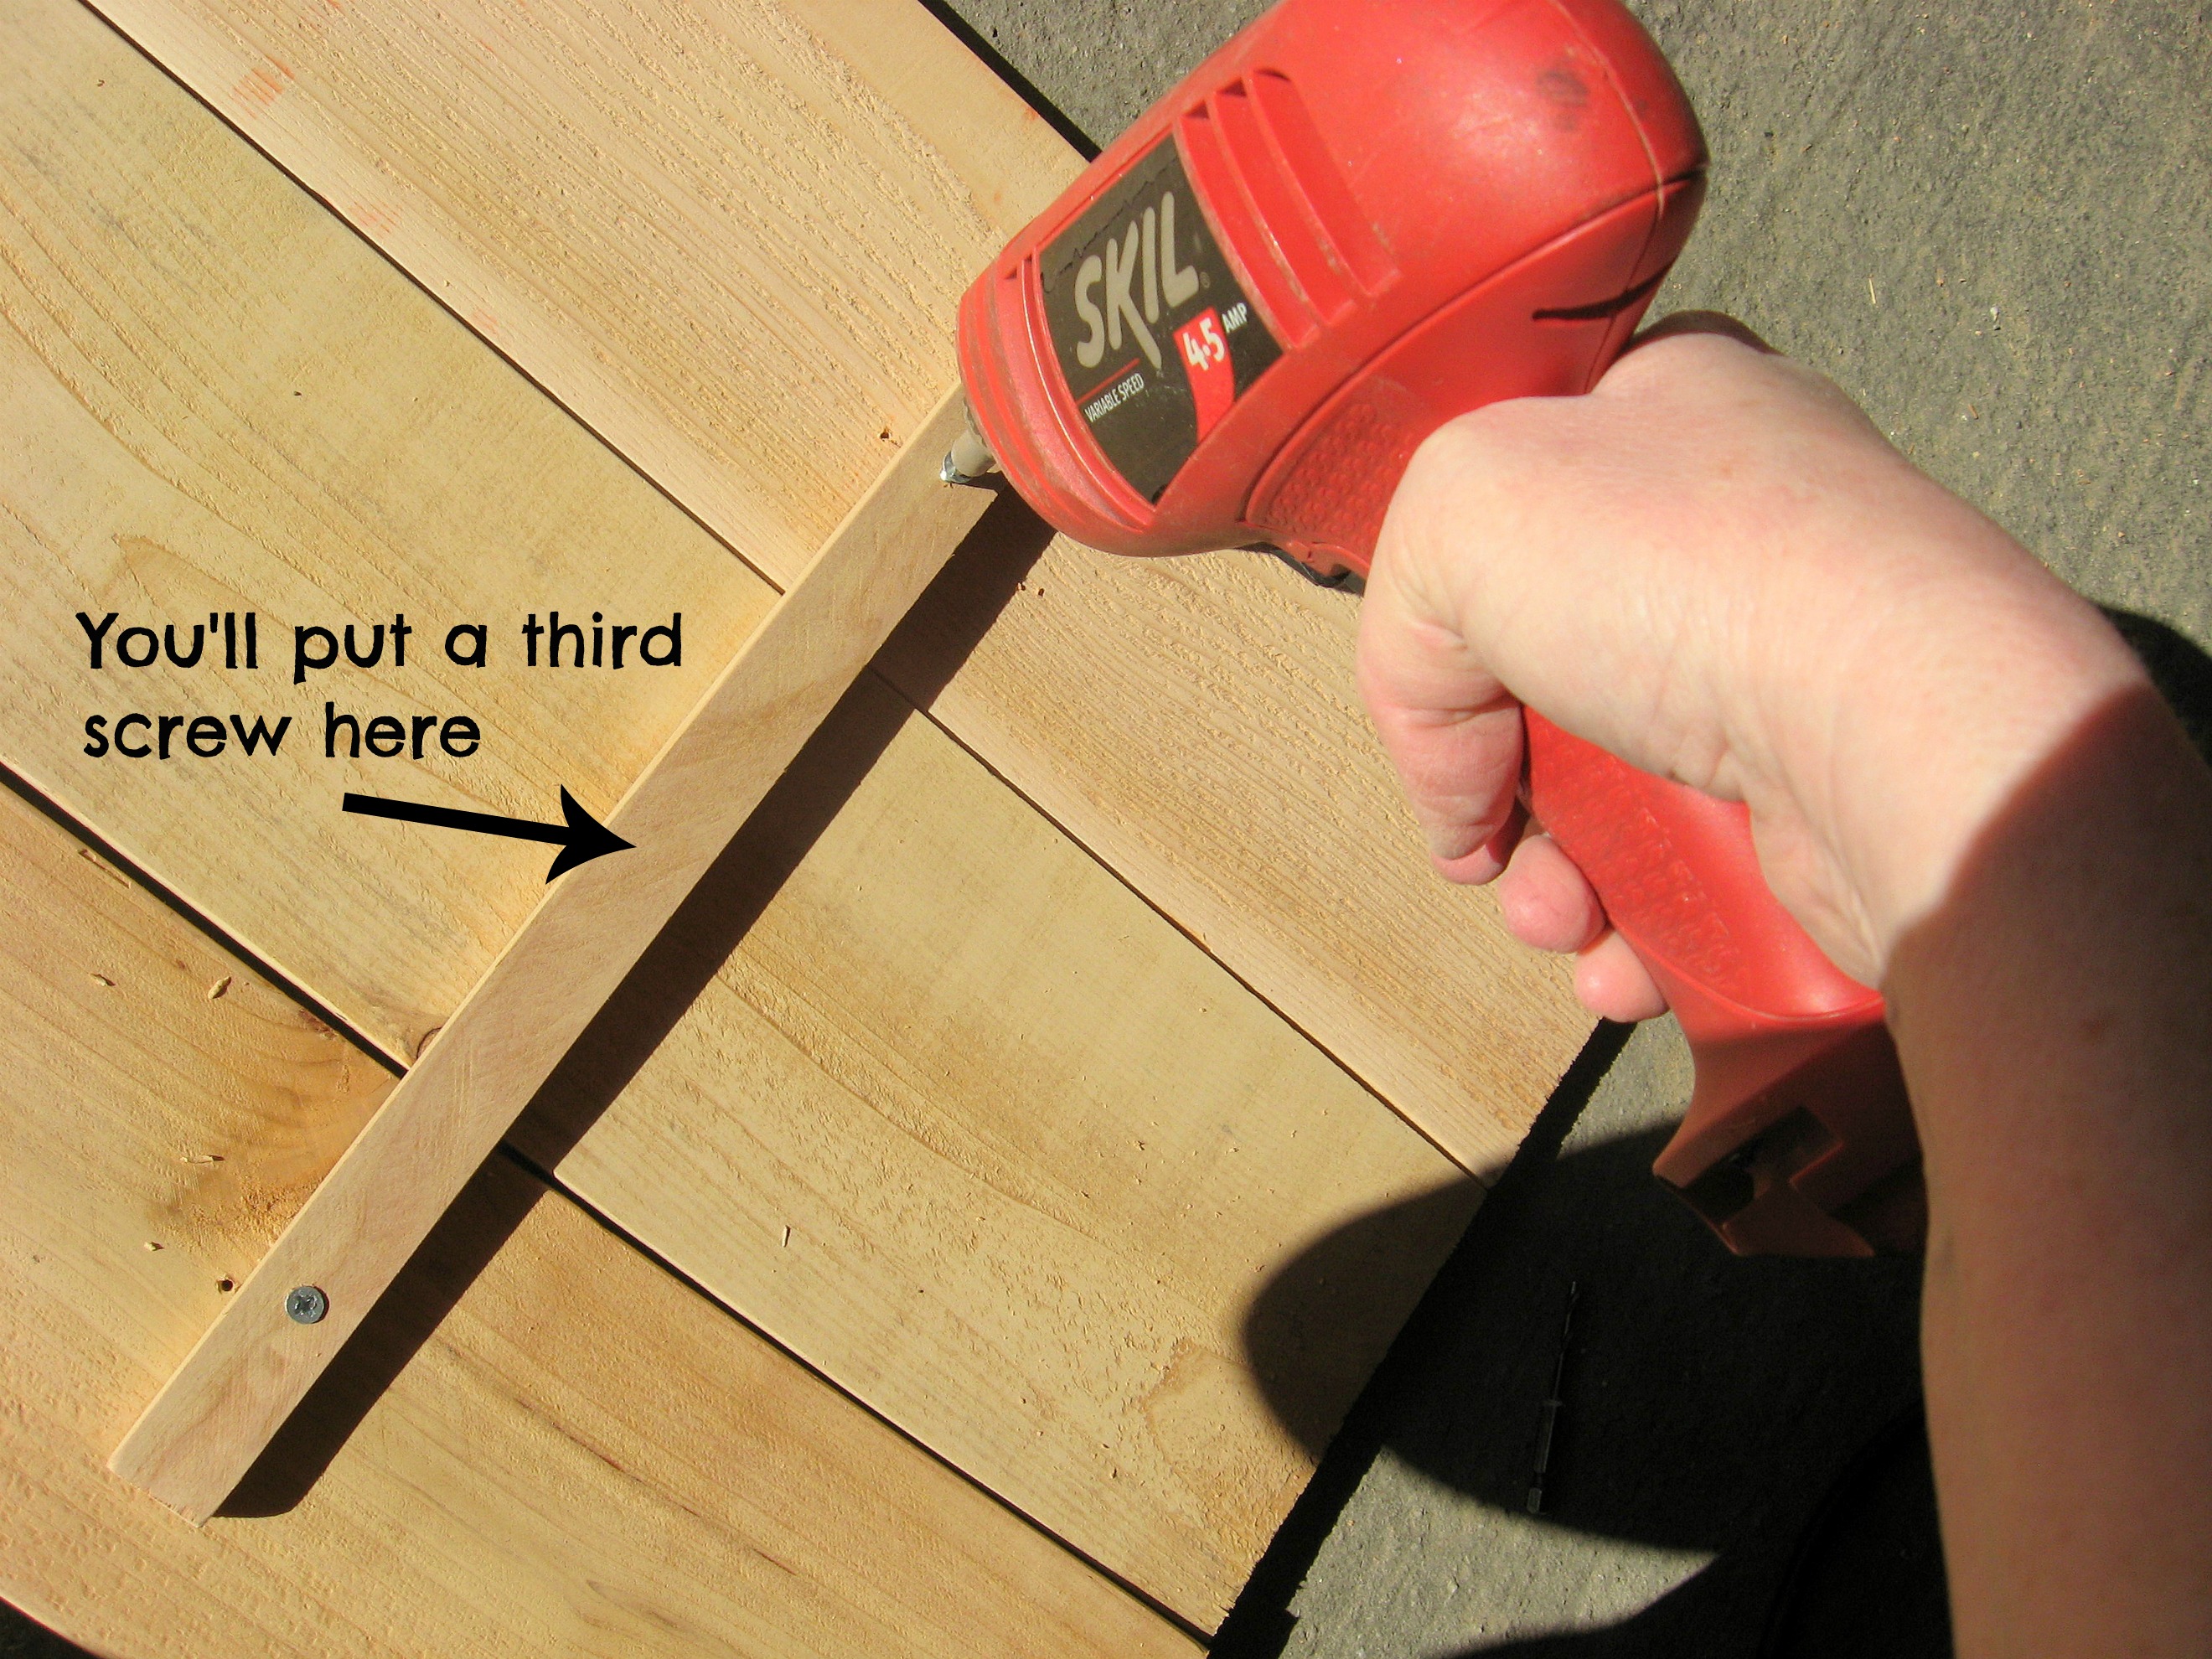
Here is what the back will look like when you’re all done:
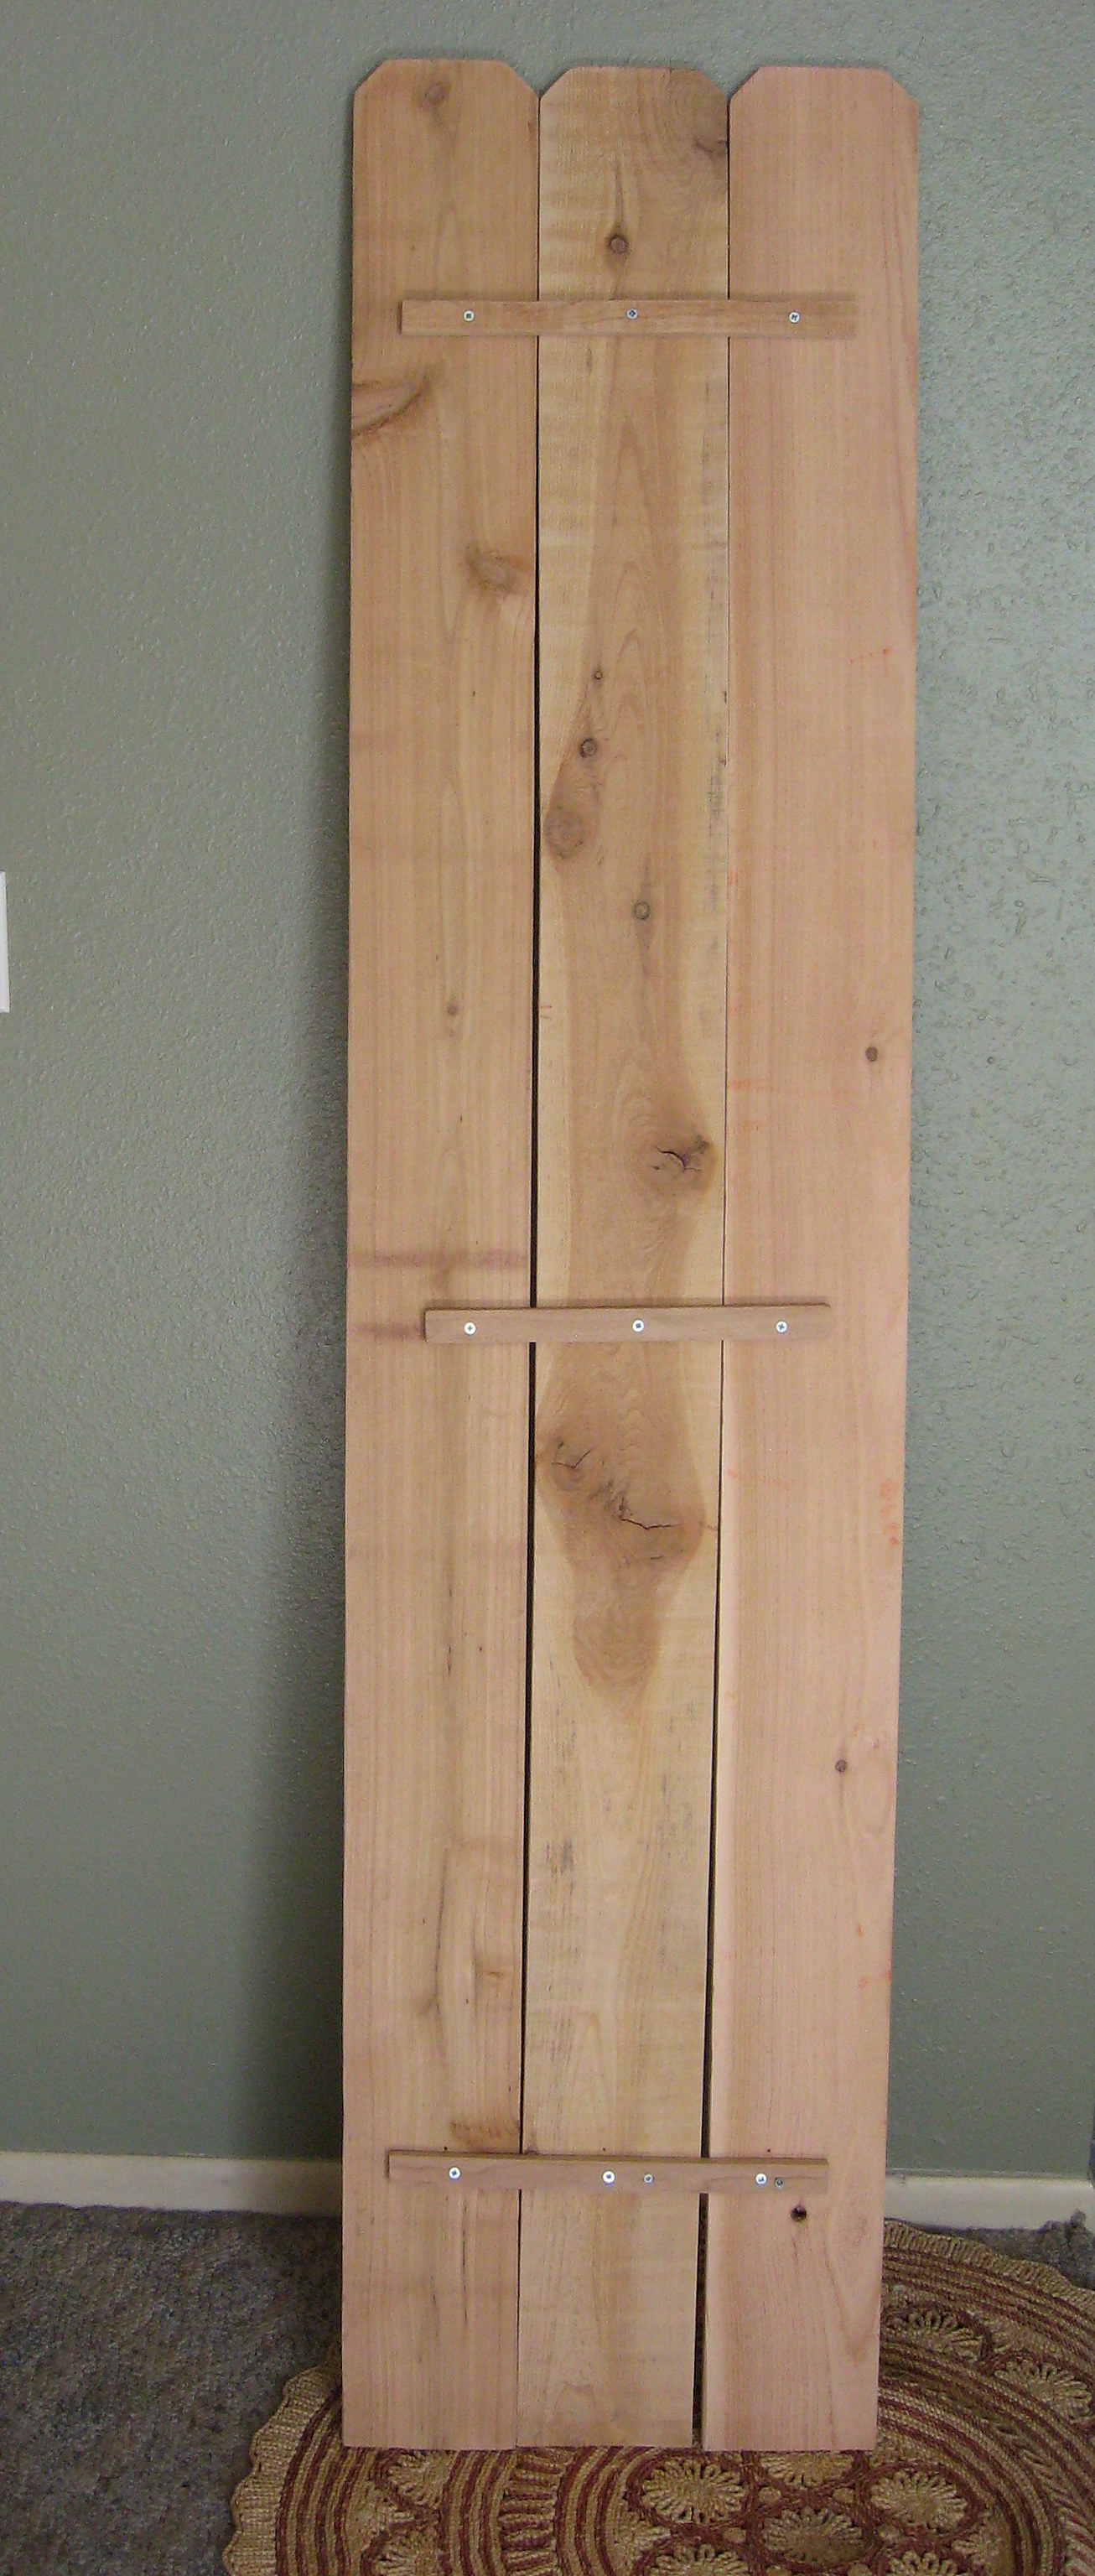
Paint the boards in the color of your choice; I went with white and gave them a good sanding to distress them once it was dry.
Now we will attach the baskets to the boards. Lay the boards out on the floor and decide where you want the baskets. I worked on this for a long time, getting them perfectly lined up and spaced evenly.
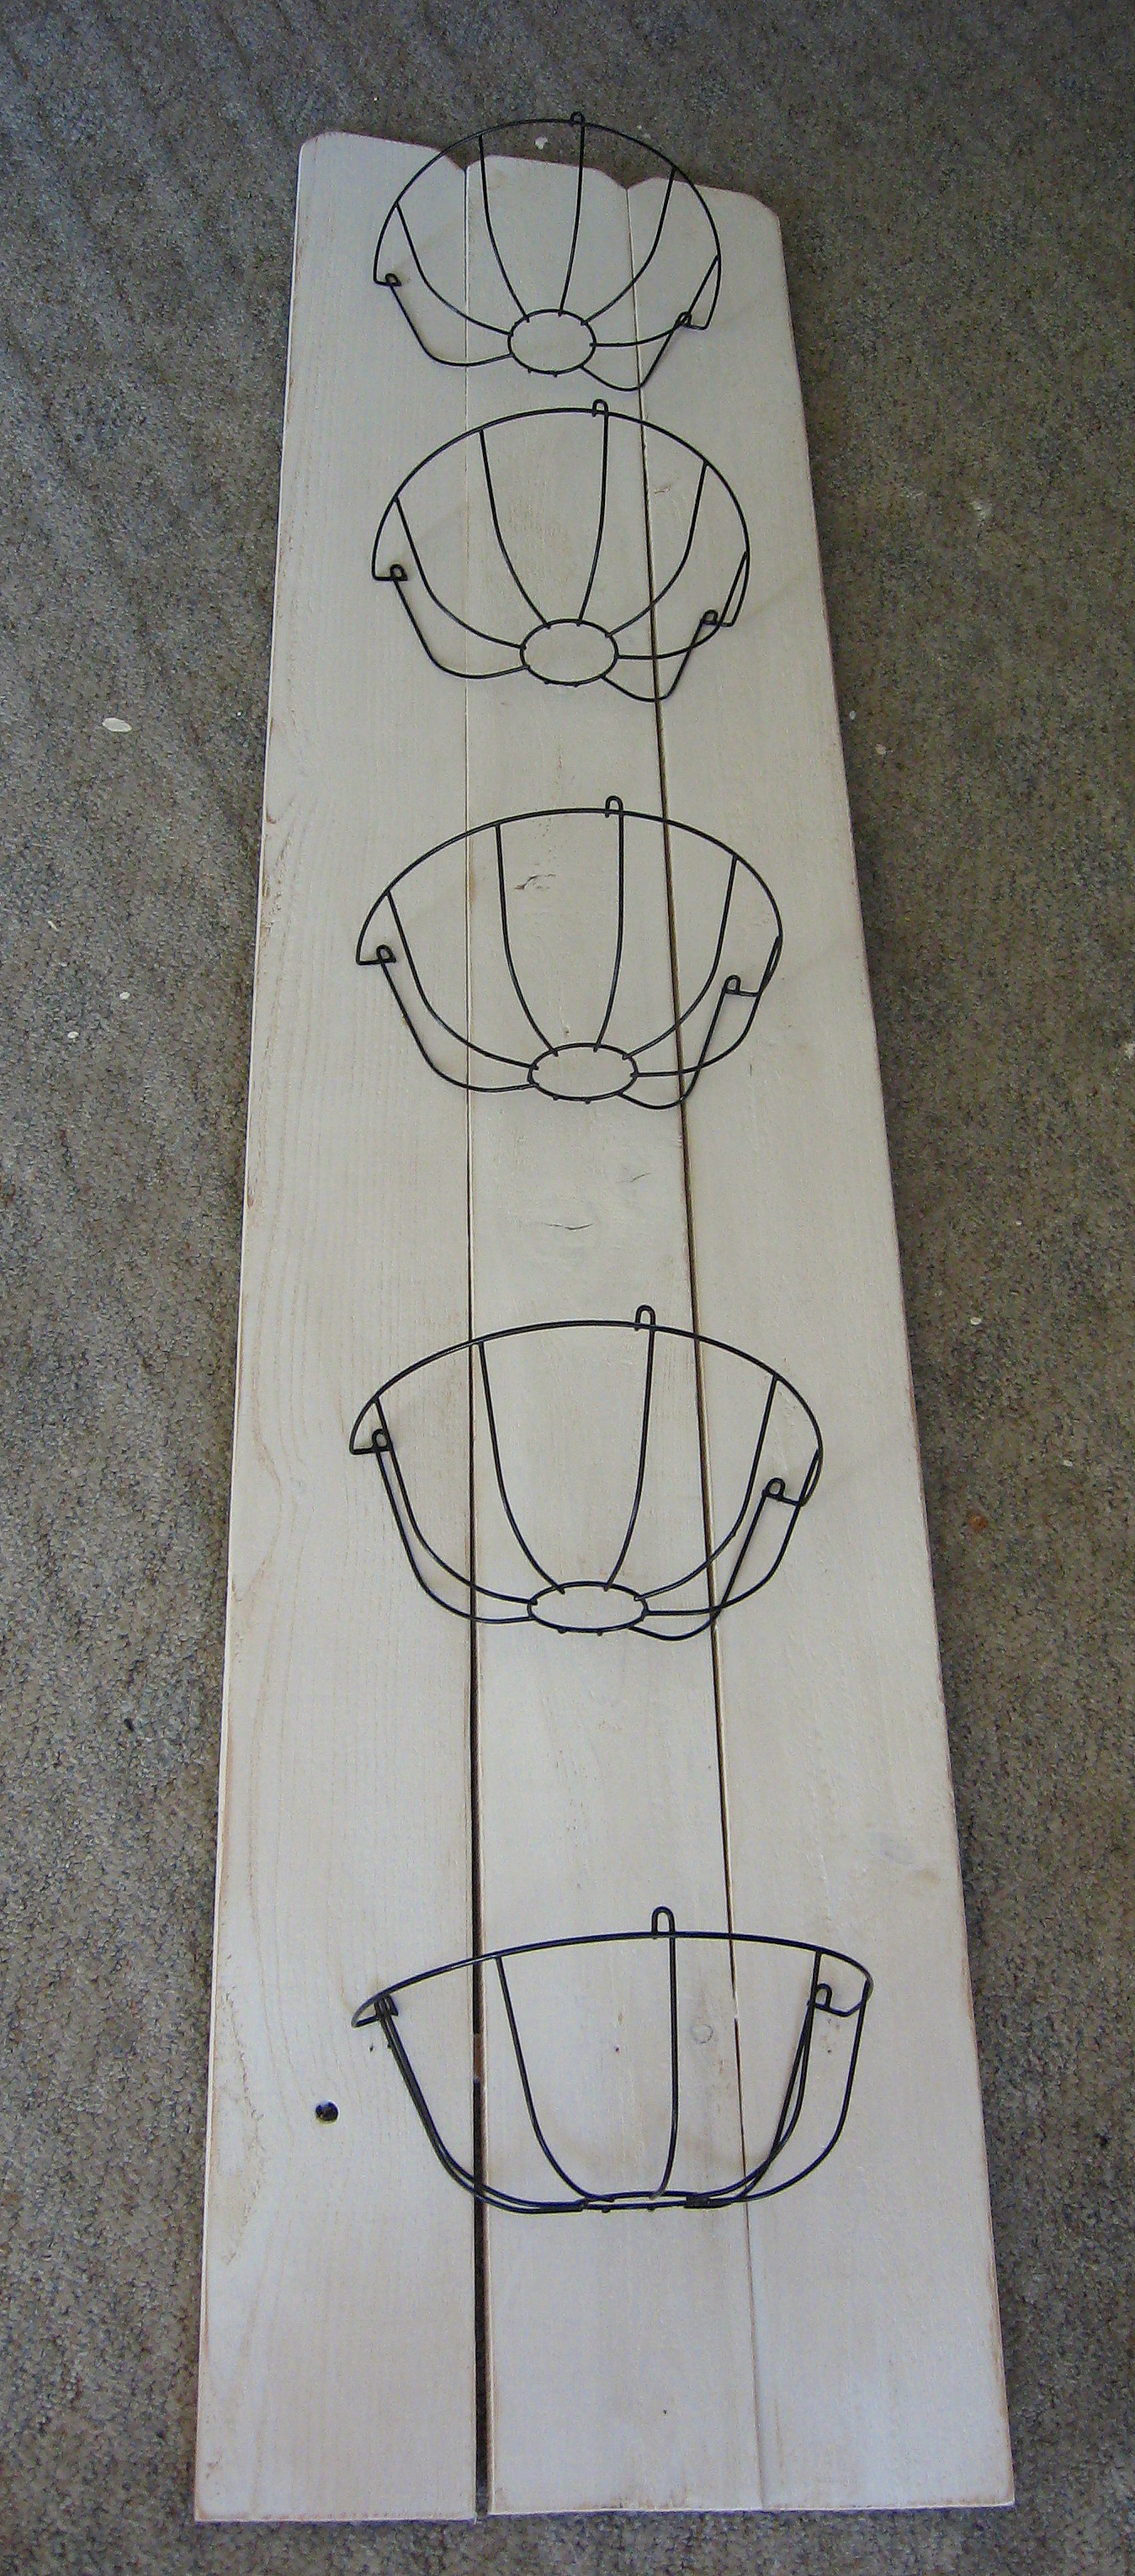
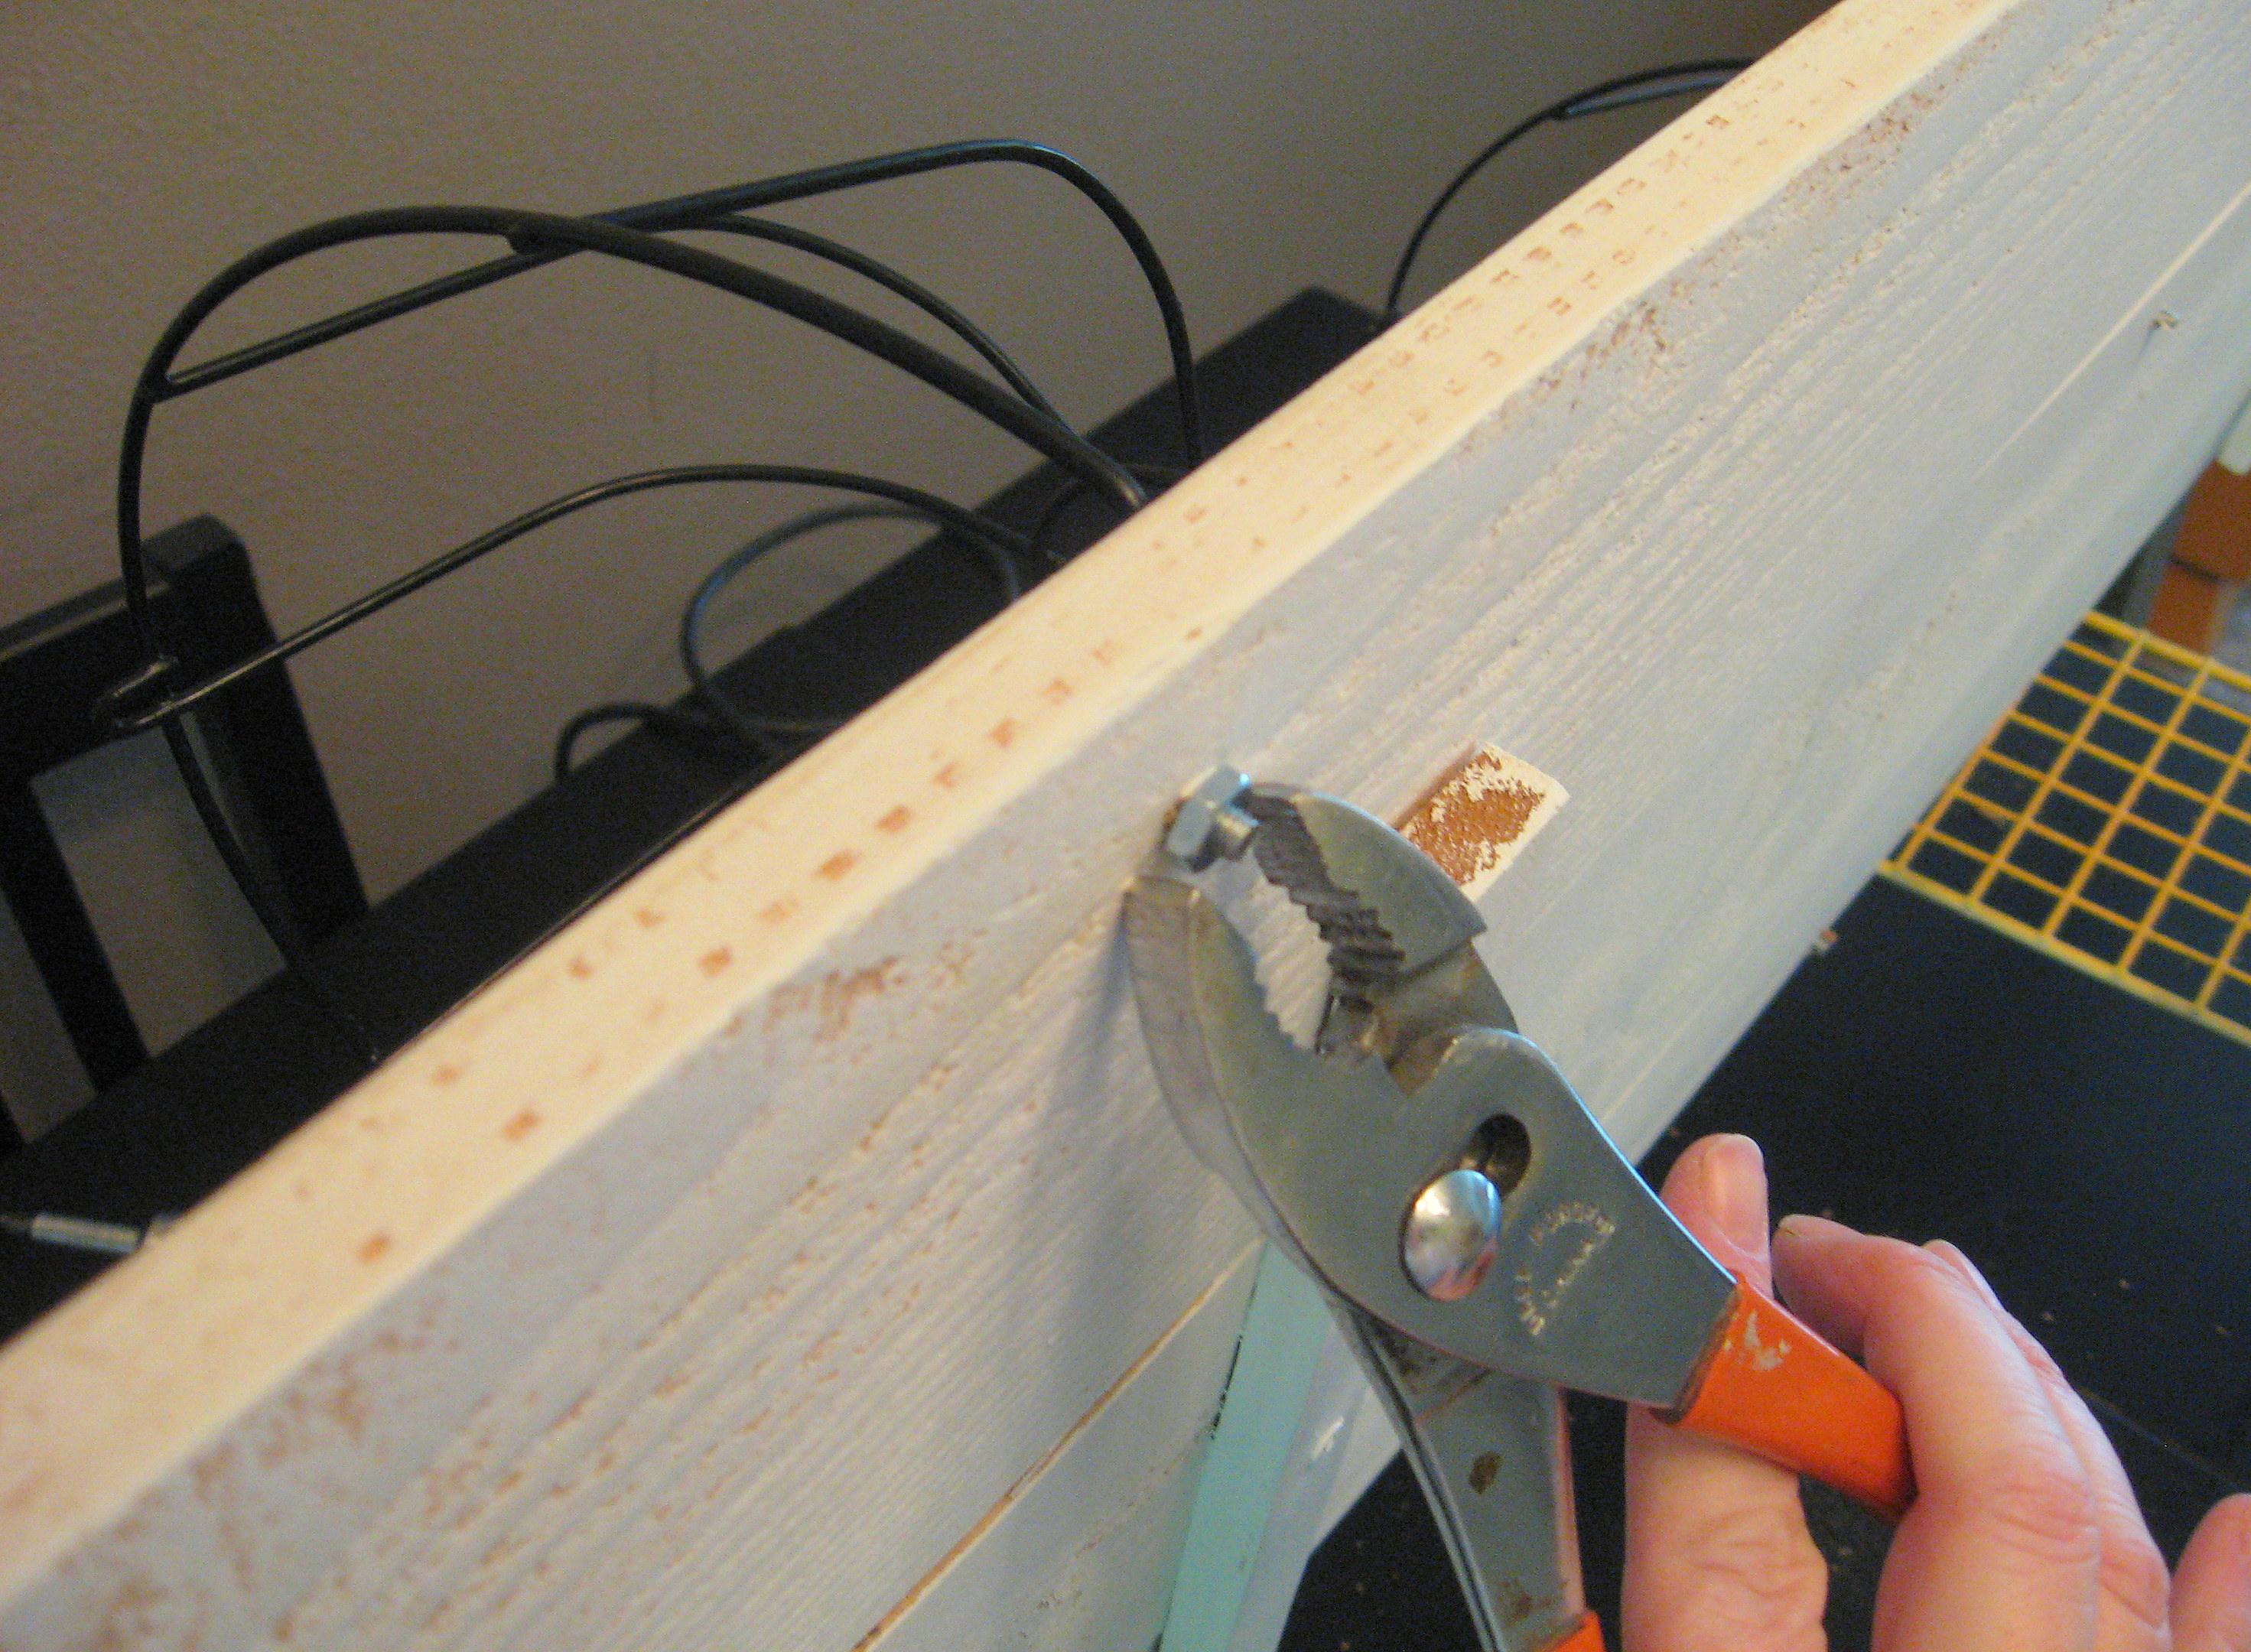
Then my son came home and moved them so that they were offset. After I freaked out, I looked at them again and realized I liked it better this way. Just make sure that once you know for sure where you want them, use a pen to mark the placement of each basket through the wire loop before they get moved again 😉 This marks where you will drill.
You could just use a screw into the wood, but since the baskets will get a lot of action, I decided I wanted them to be really secure, so I used a nut and bolt. Drill a hole just big enough for the bolt to go through on each of your markings. Then, hold each basket in place and screw the bolt through the wire loop on the basket and through the board.
When all the baskets are screwed into place, flip the board onto its side and screw all the nuts into place using pliers or a…. ummm…. nut-tightening-tool (shoot!! What is that called?)
When you tighten all the nuts and bolts, it will make the baskets pop up away from the surface of the board.
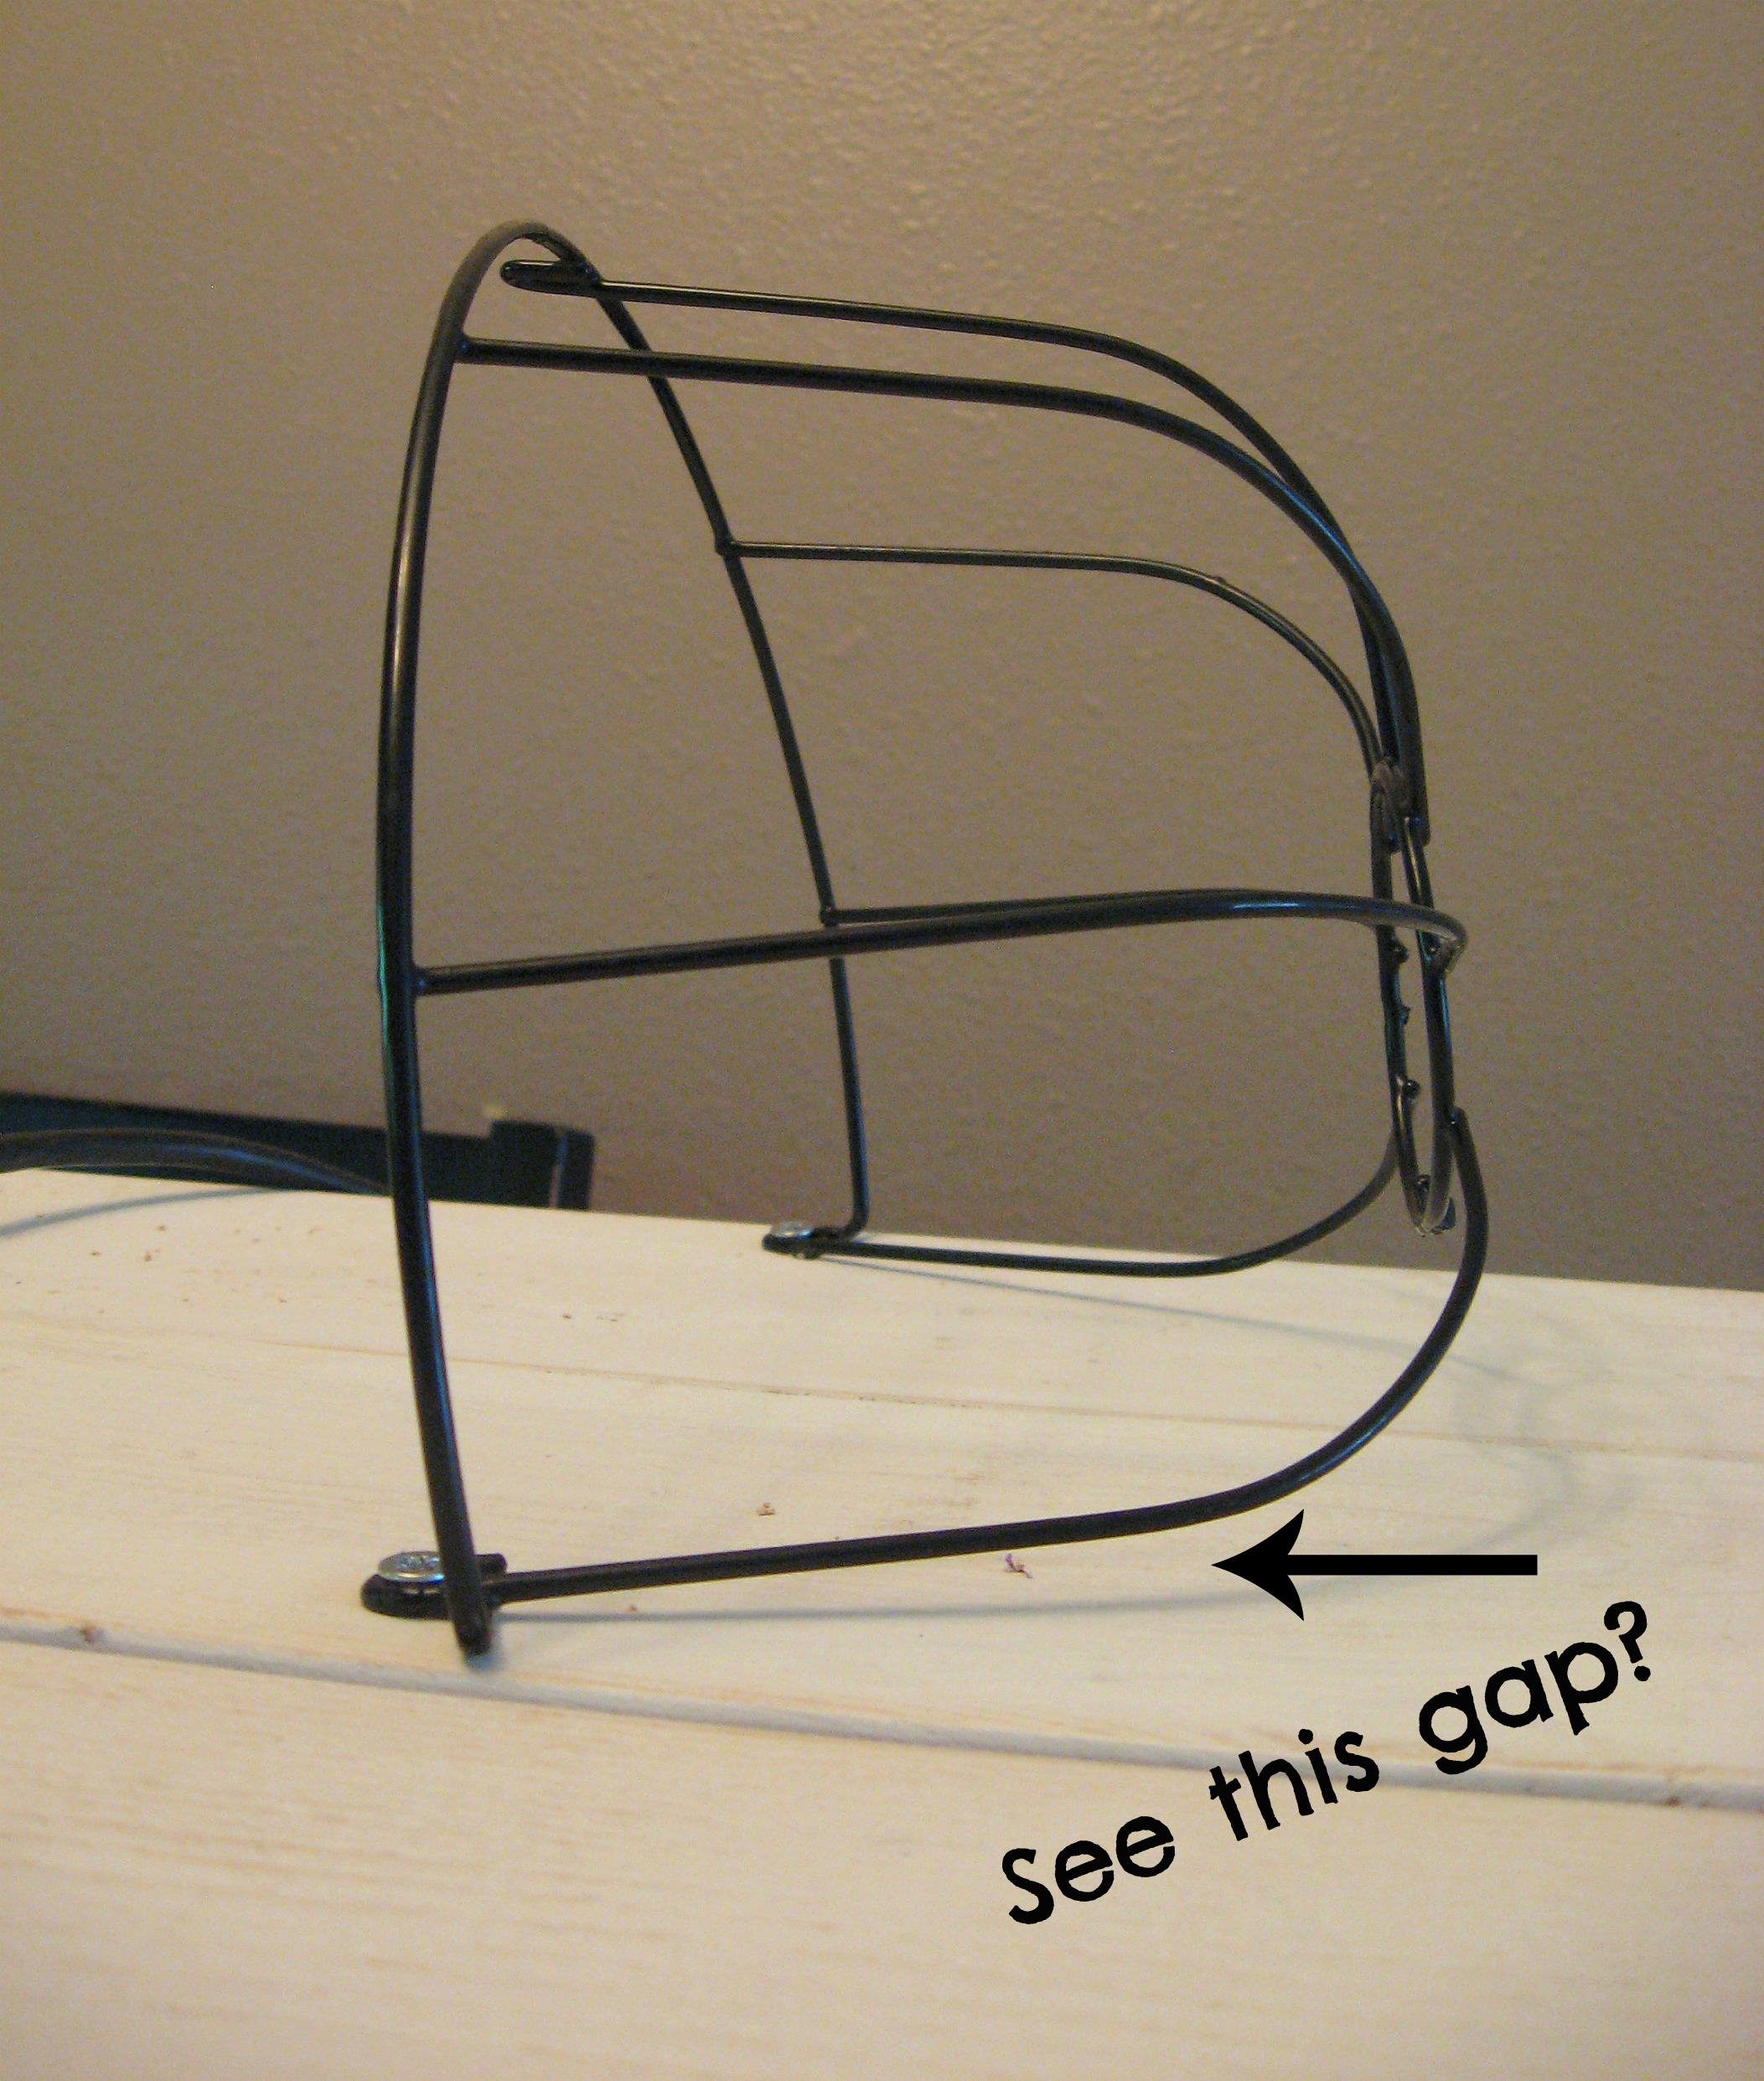
I’m sure it isn’t a big enough gap for the critters to fall through, but I didn’t like the way it looked. I found that if I just pushed it down against the board,
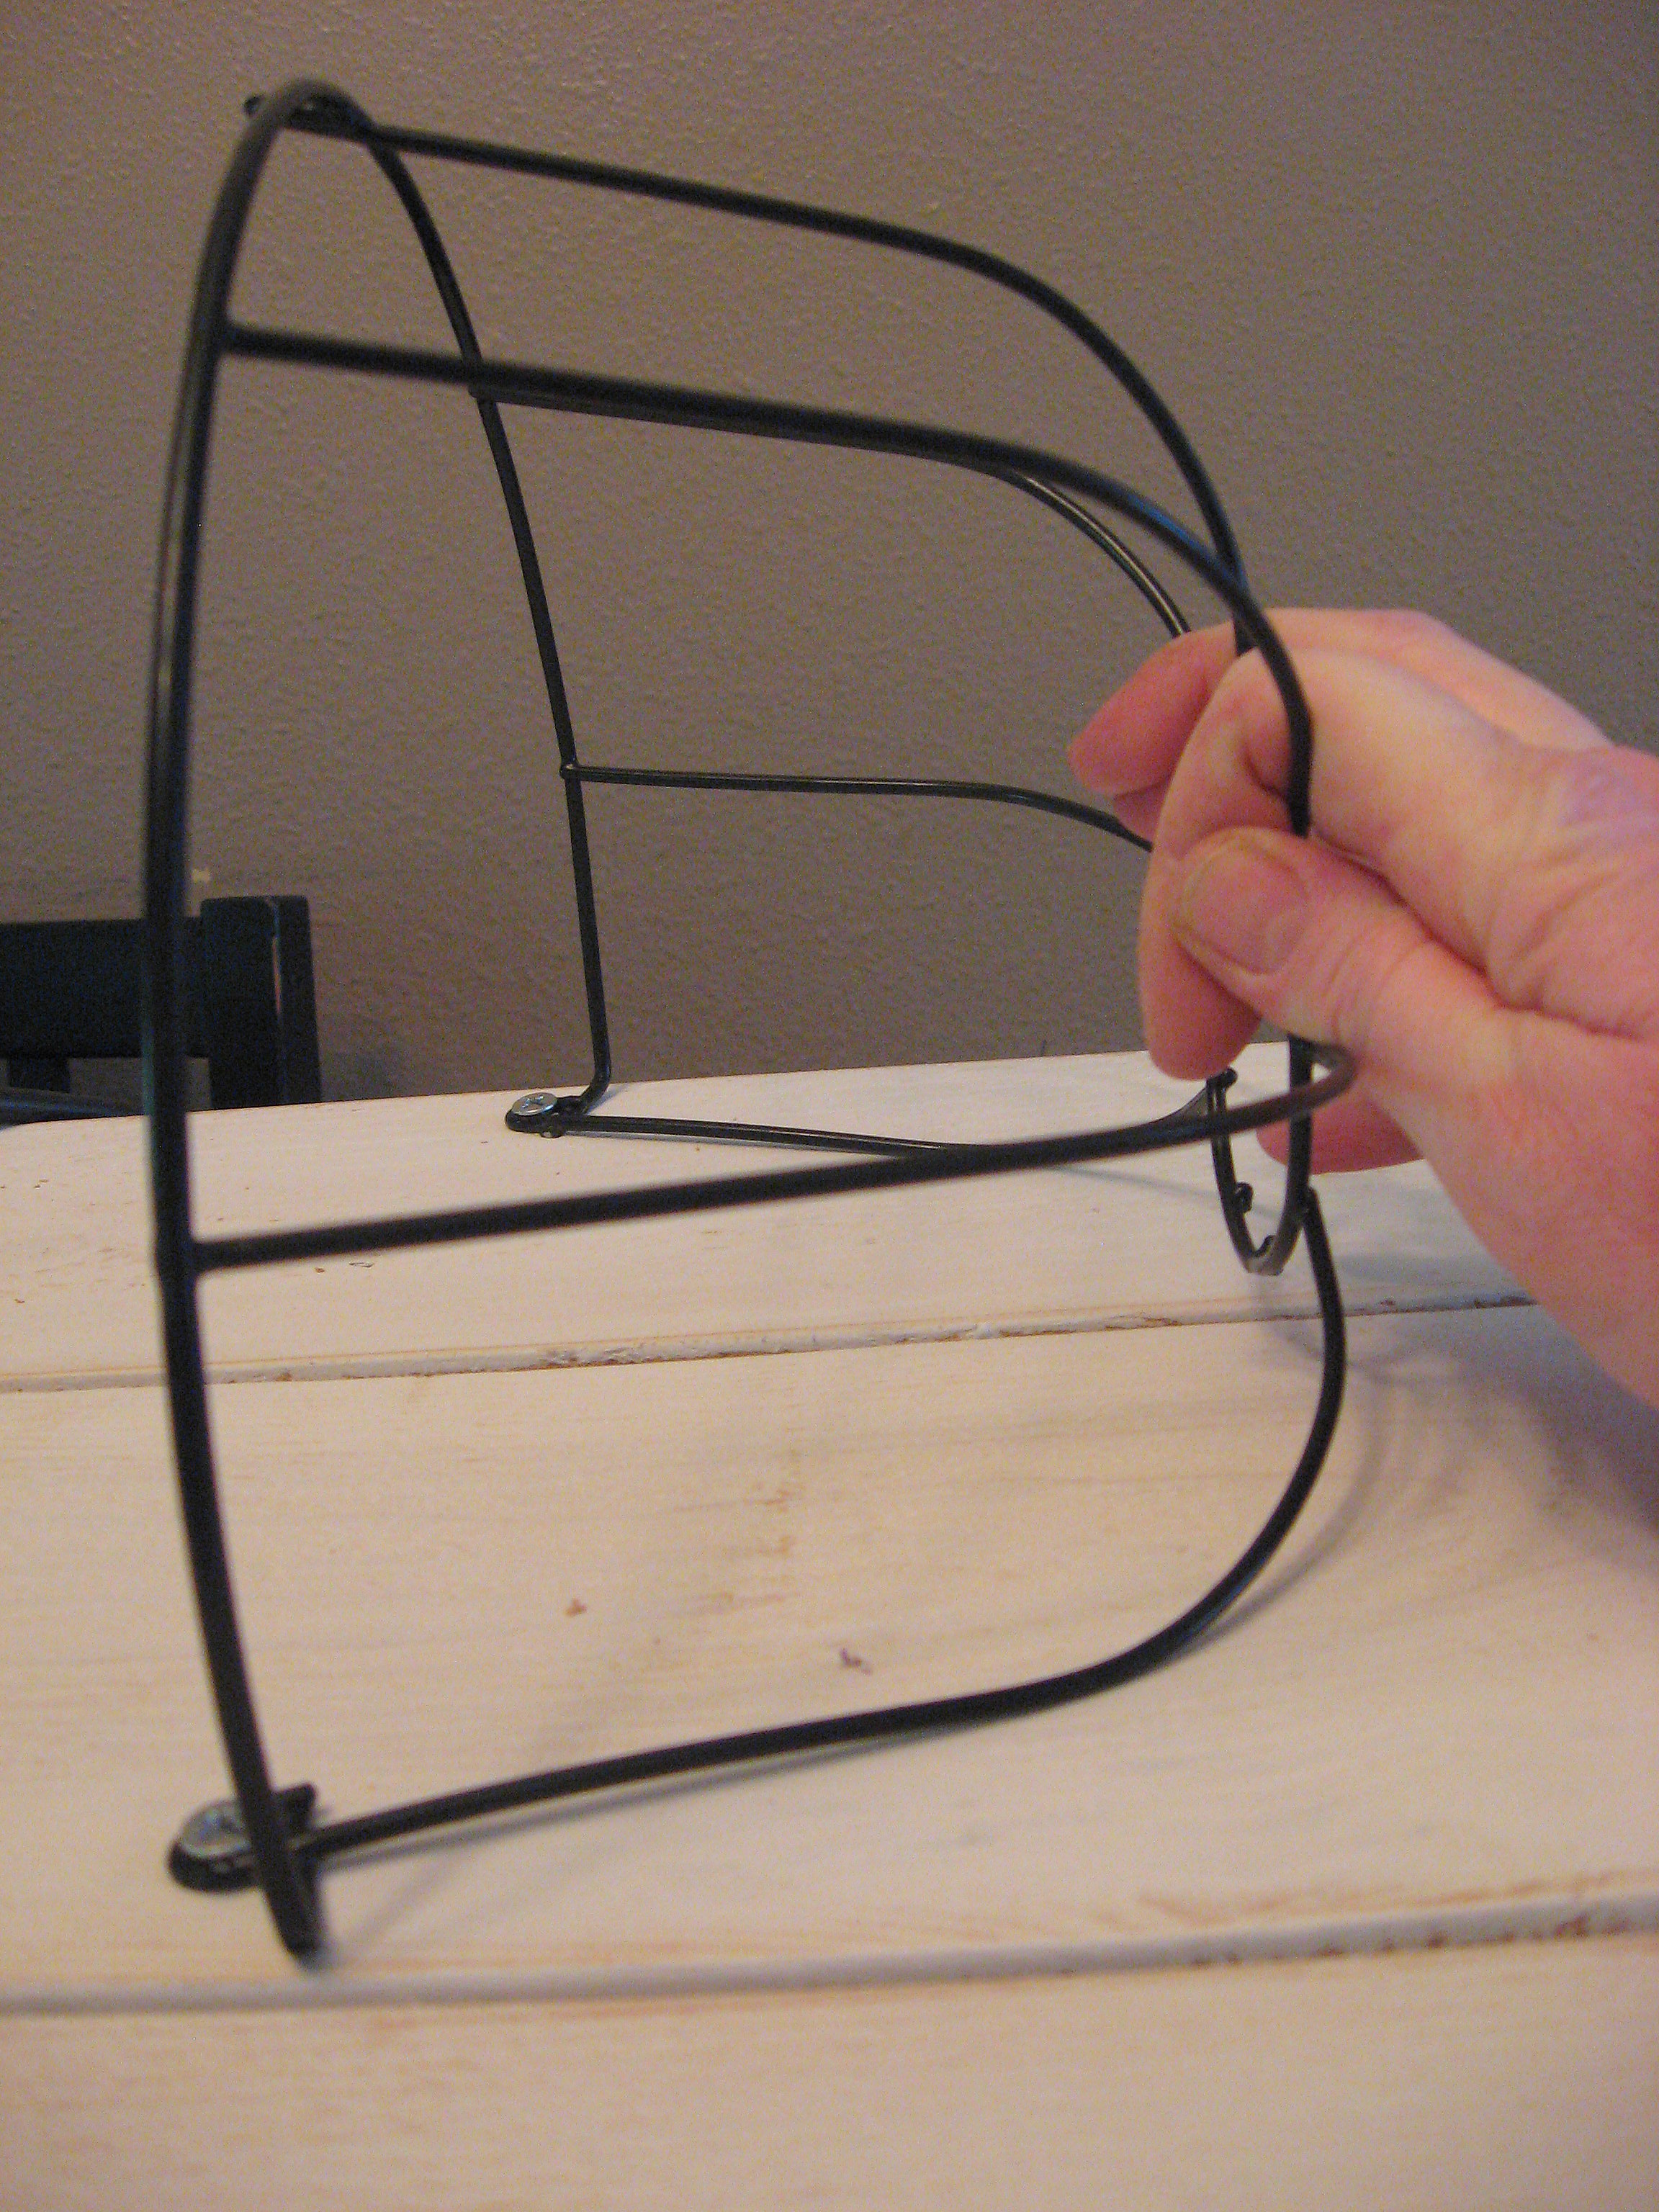
the wires of the basket would bend enough that the basket would sit flat against the board again.
Here it is with all of the baskets attached:
**NOTE – Once this is full of critters, it is very front heavy. My intention is to hang this on the wall as part of my daughters room redo this summer. In the pictures here it is just leaned against the wall. My daughter is old enough that I feel safe leaving it this way until her room is finished, but if your kids are small and you think they might pull this over on themselves, PLEASE attach it to the wall before you fill it!
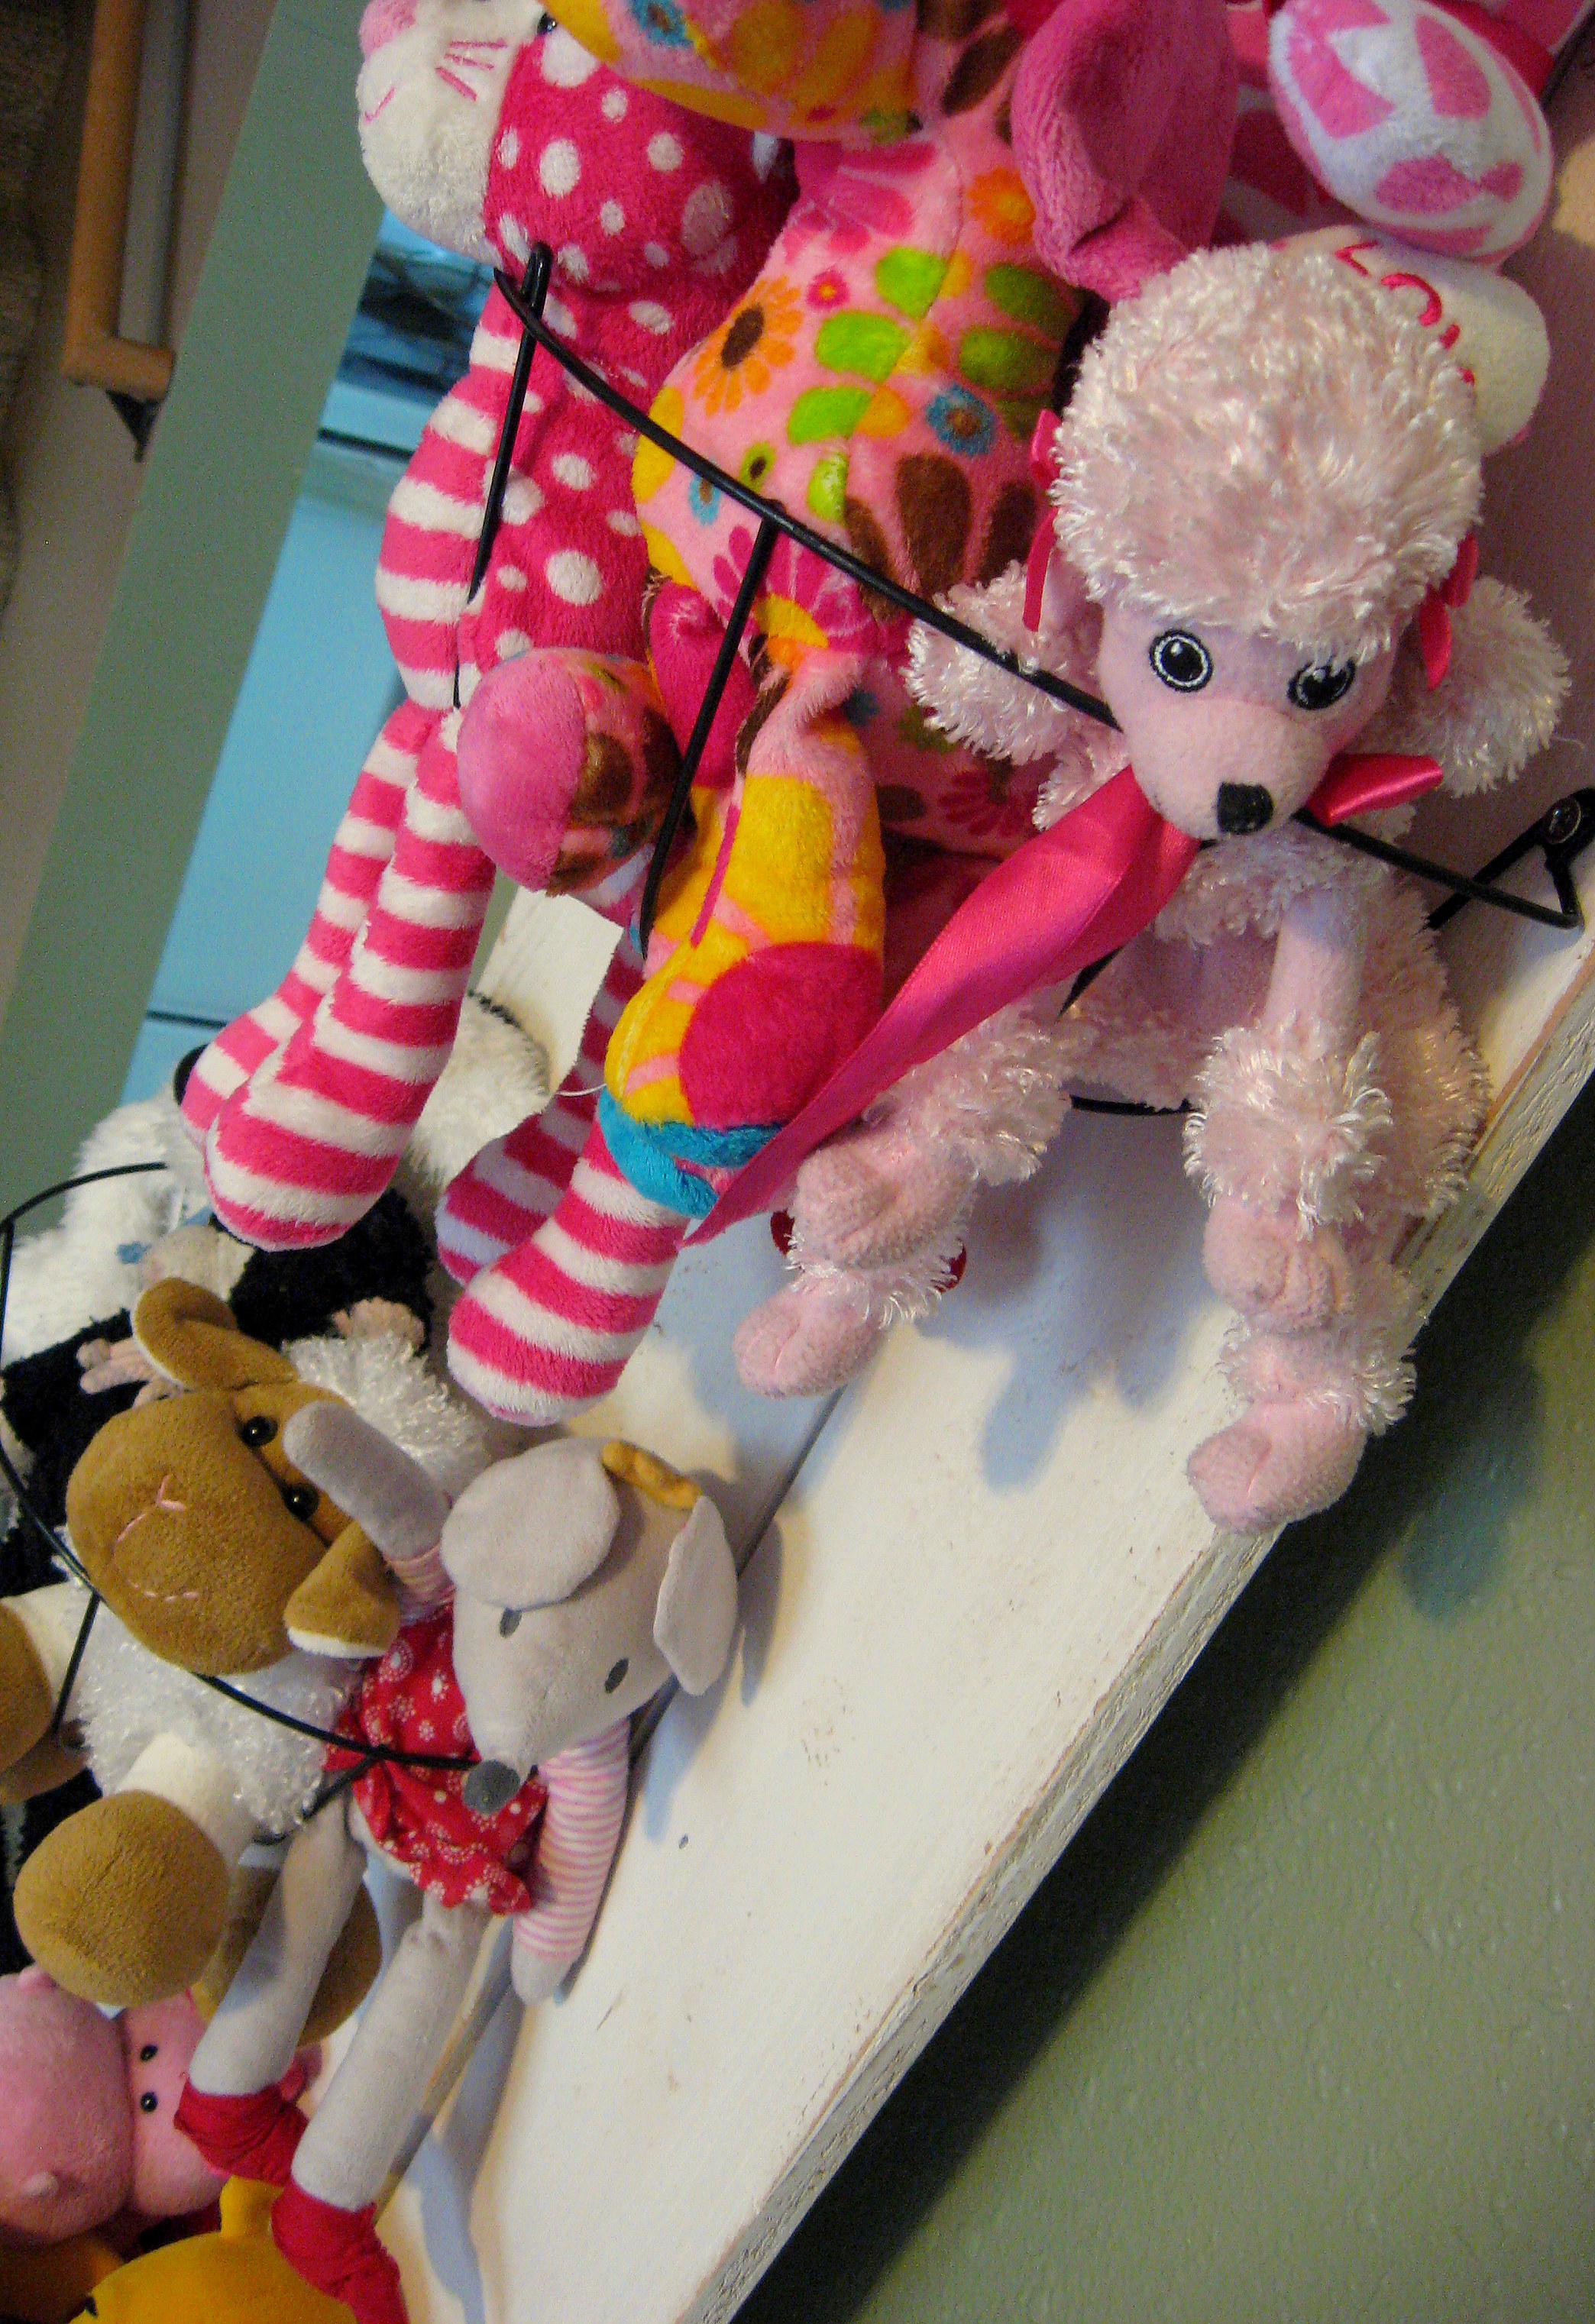
And here it is all filled with critters.
A PYP Best Blog! DIY Roman Shade!
Just in case you missed this article on making a DIY roman shade the first time we shared it a couple of years ago, we are republishing it. After Sharon wrote this blog originally, we got an awesome response. This is one of the PYP Best Blogs!
Summer wreaks havoc on my daughter’s sleep schedule; it is light when I put her to bed and the light in the morning gets her up much earlier than I want to join her! I purchased a black out shade a few summers ago from Ikea for my own bedroom and it works great – totally where I recommend buying them if you don’t want to go the DIY route – but since our Ikea is quite a drive, I just bought a $20 shade from Kmart for my daughter’s room. And it broke in a week. She does have blinds, but they just don’t block out enough light. I decided to use the broken black out shade and some decorative fabric to make my own Roman Shade.
I used these blinds because that is what I had already, but you can follow these same instructions if you have the cheap mini-blinds. OR, if you are starting from scratch, mini blinds are super cheap at Walmart.
Take the blind, open them all the way and lay them out on the floor.
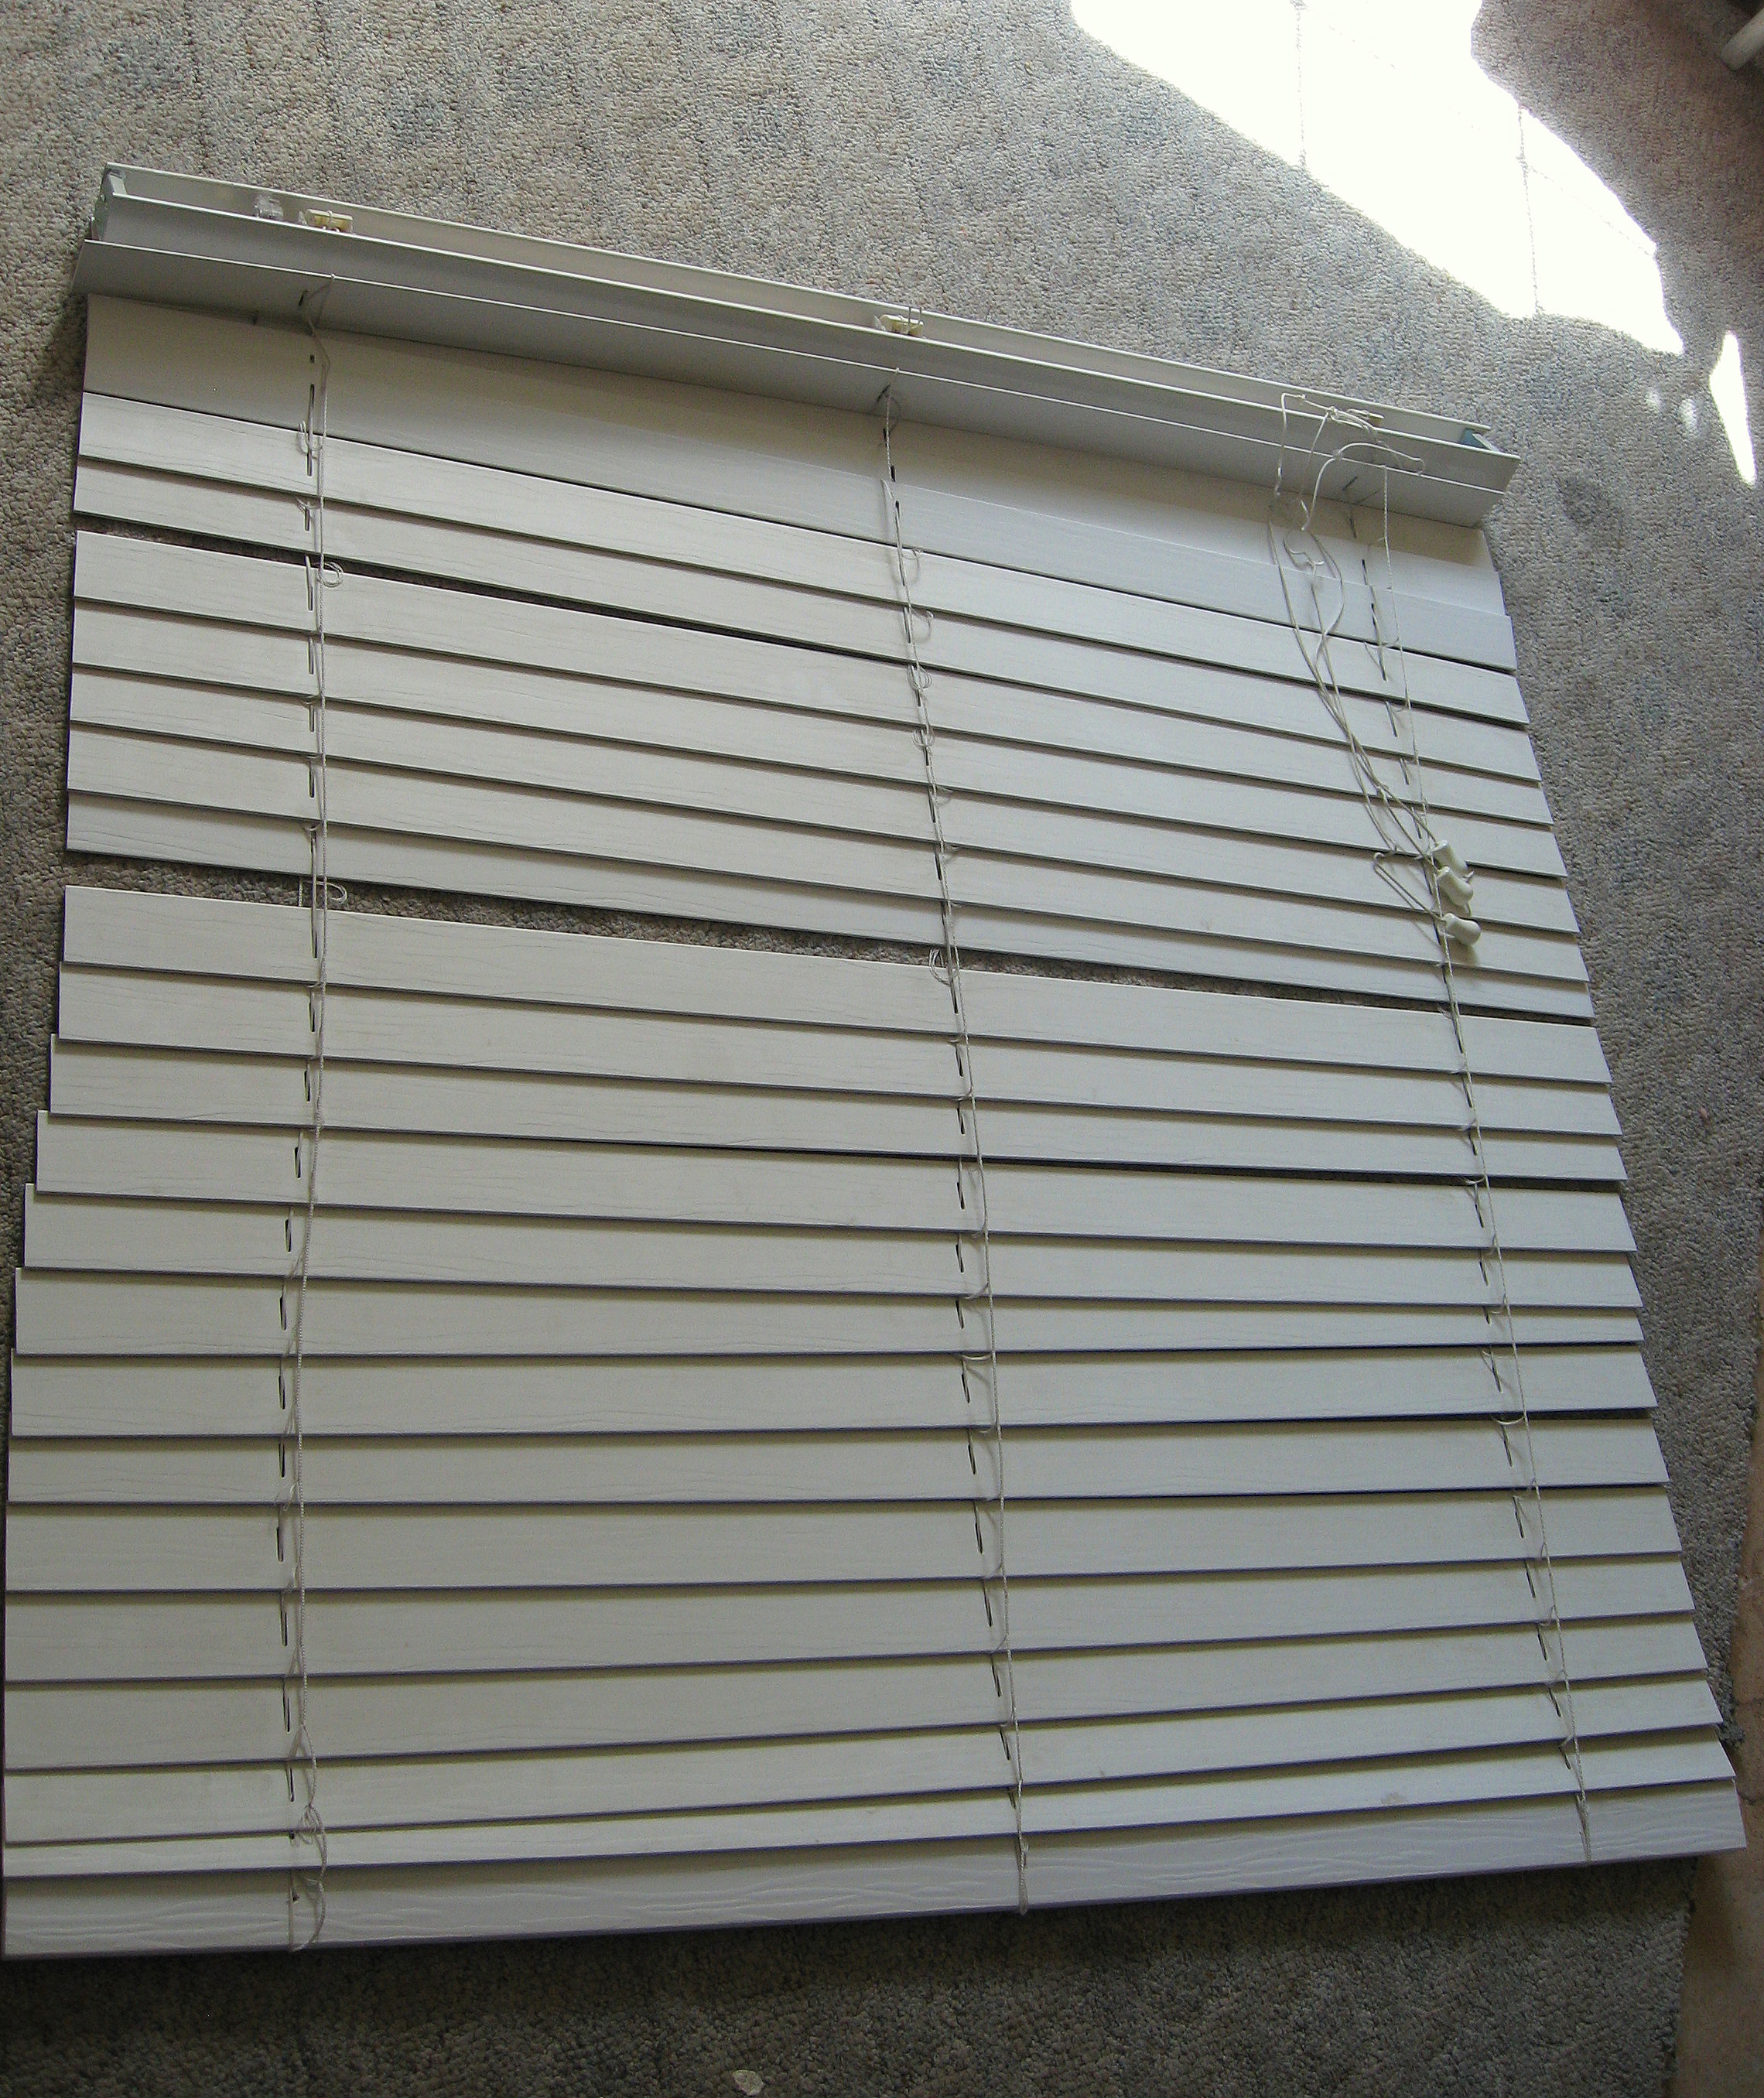
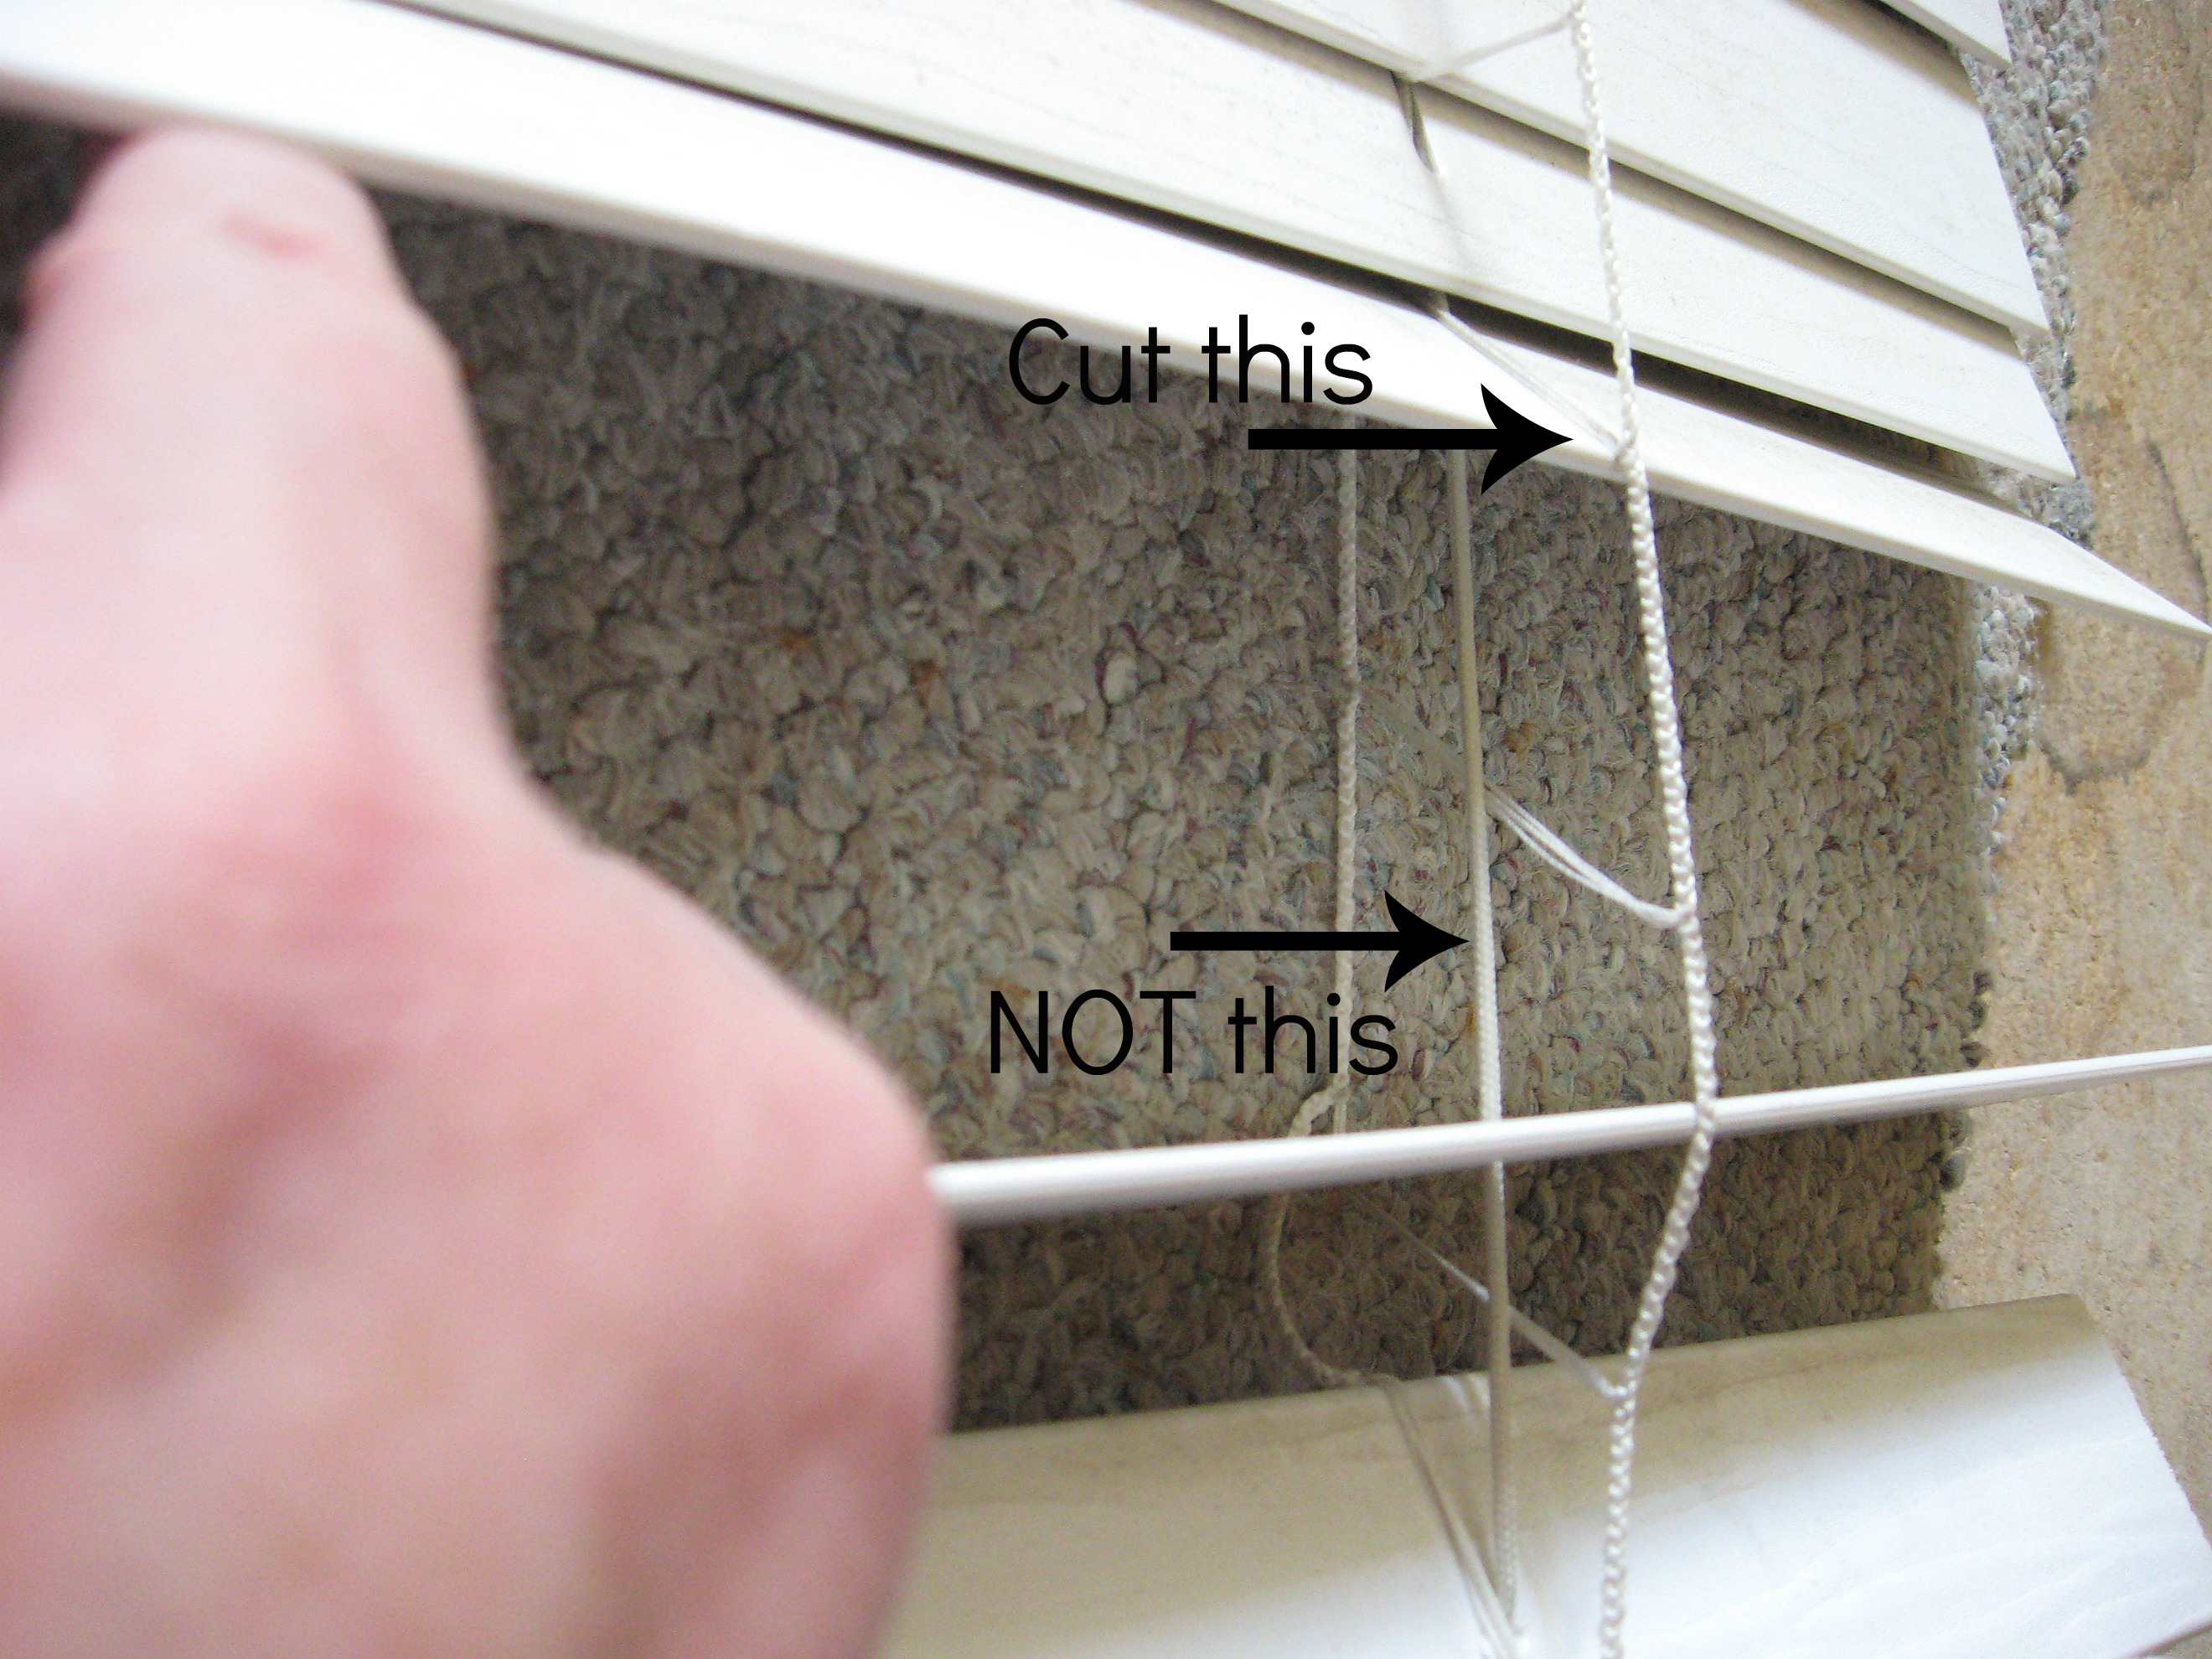
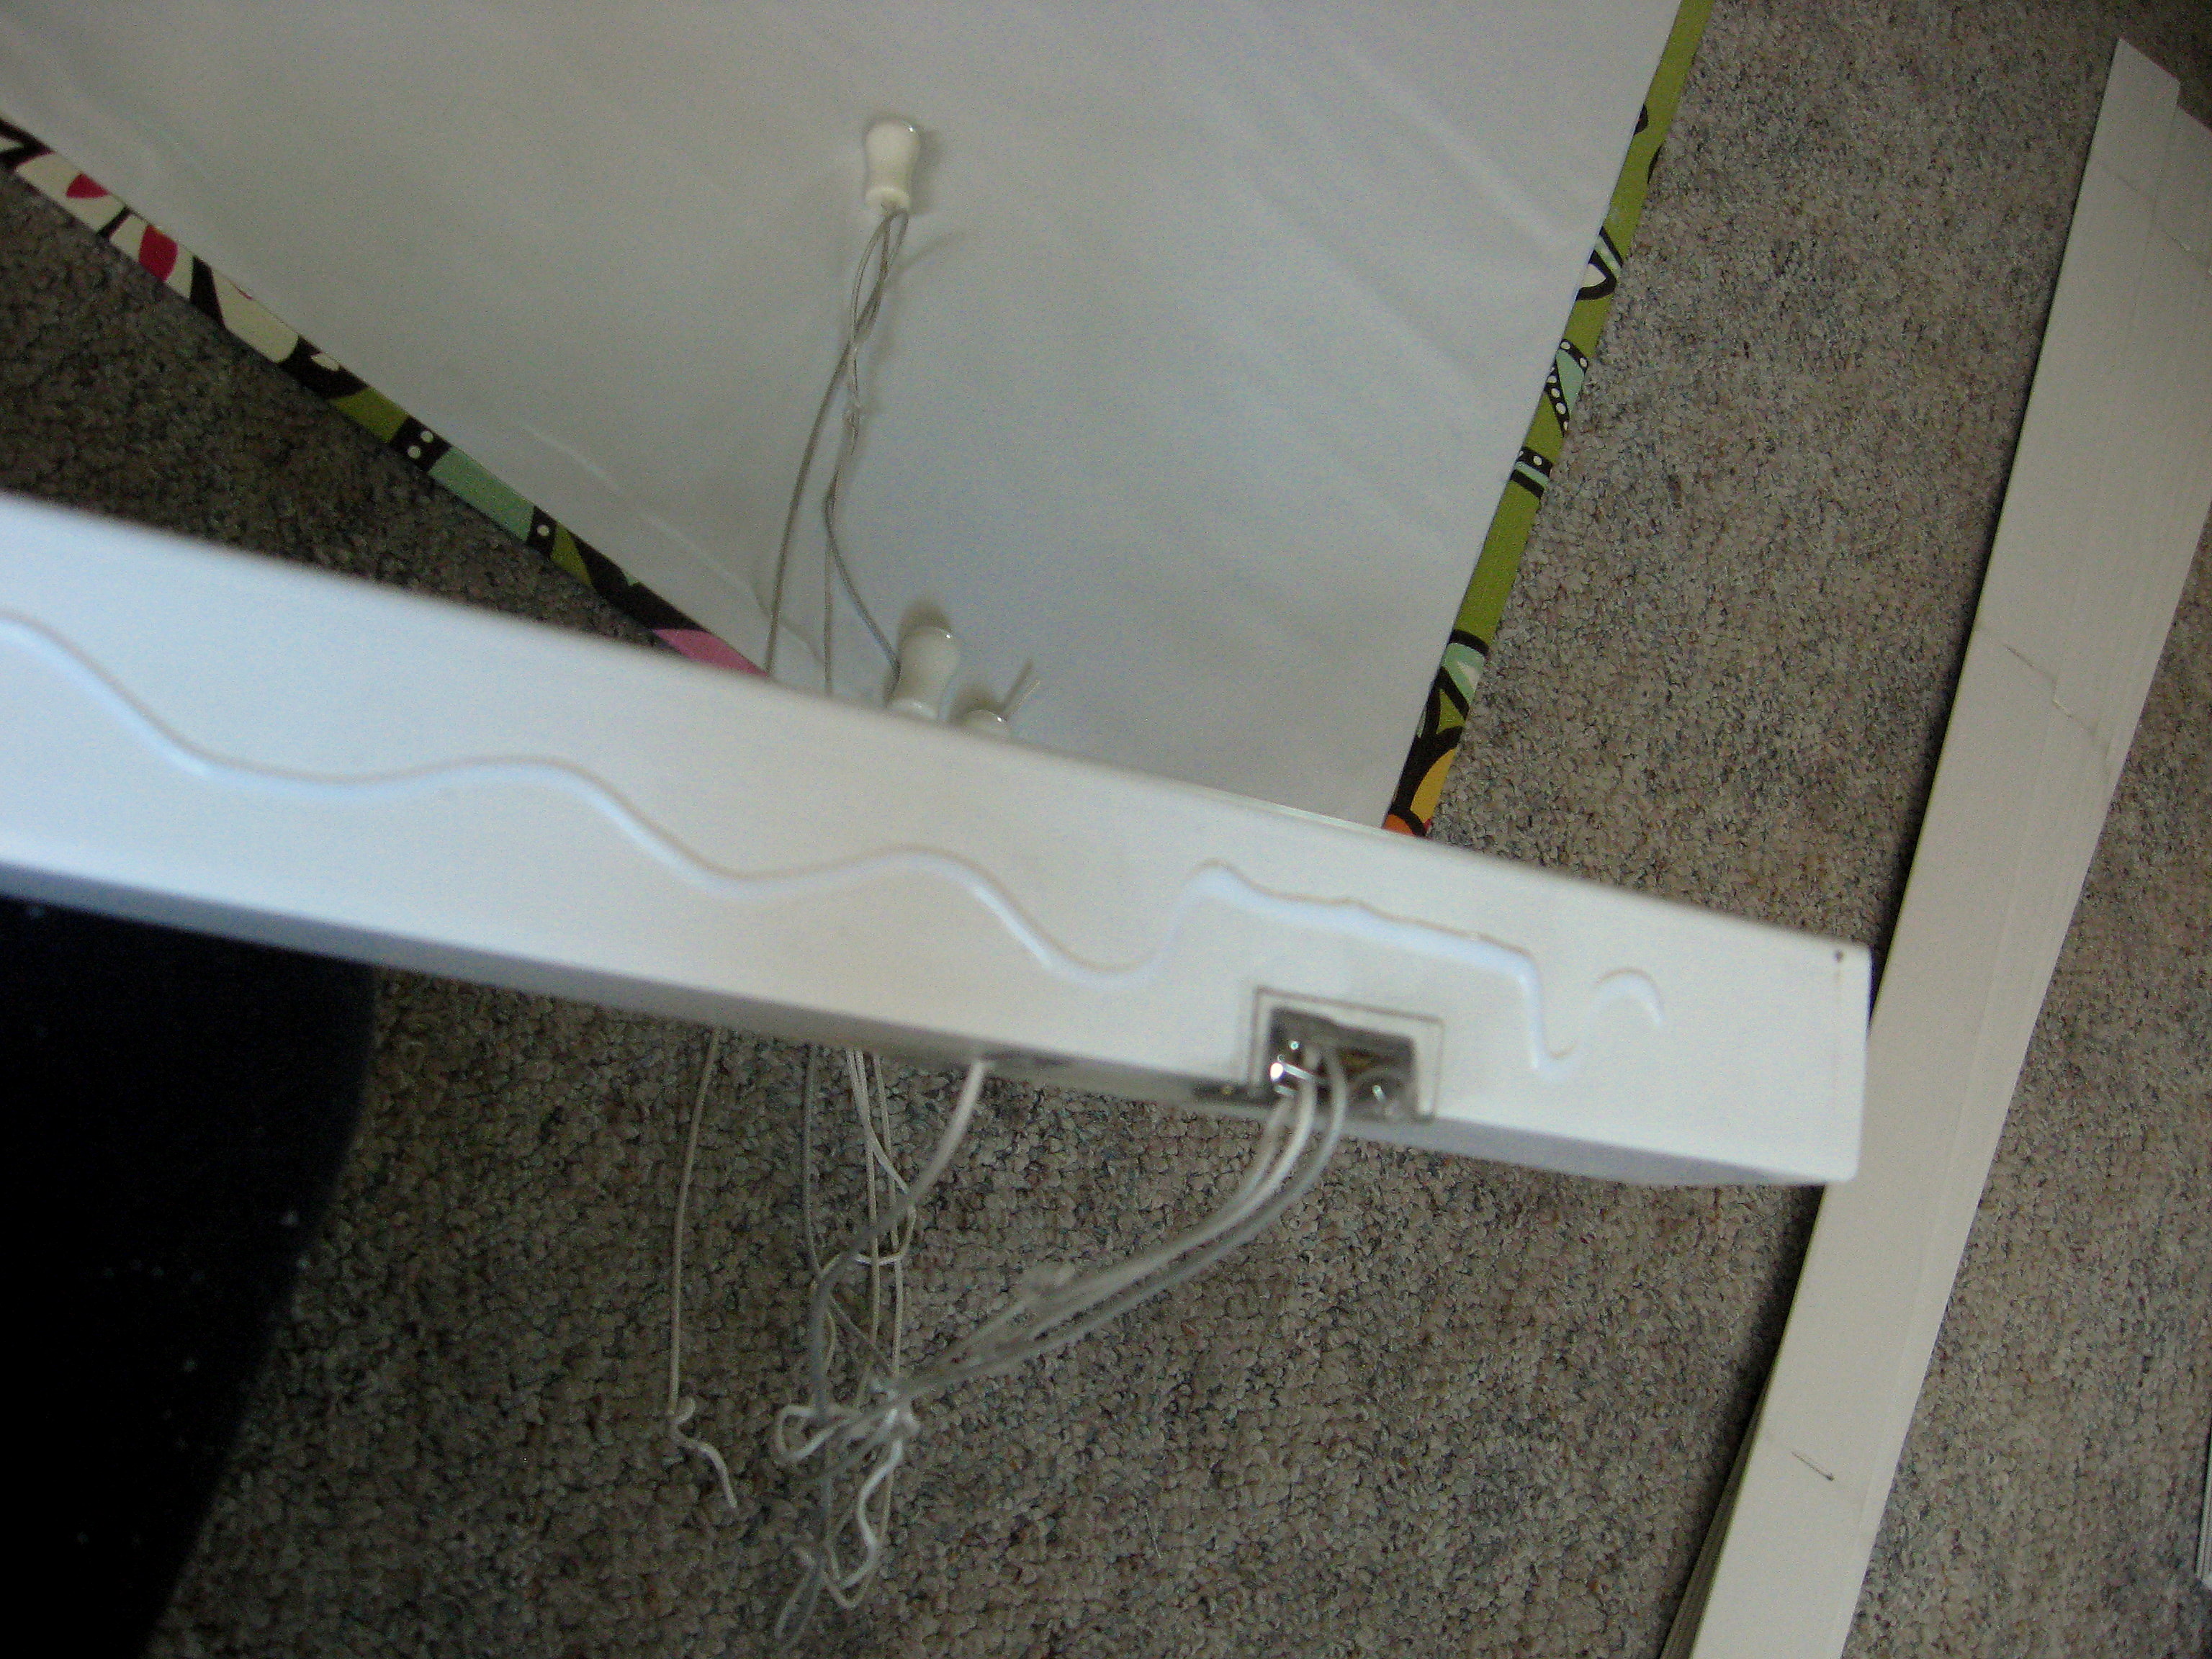
You will cut the thin strings that hold the slats in place – the ones that look like a ladder. DO NOT cut the heavier string that runs up through the holes in the slats – that’s the string that makes the shade go up and down.
Cut them all the way, top to bottom.
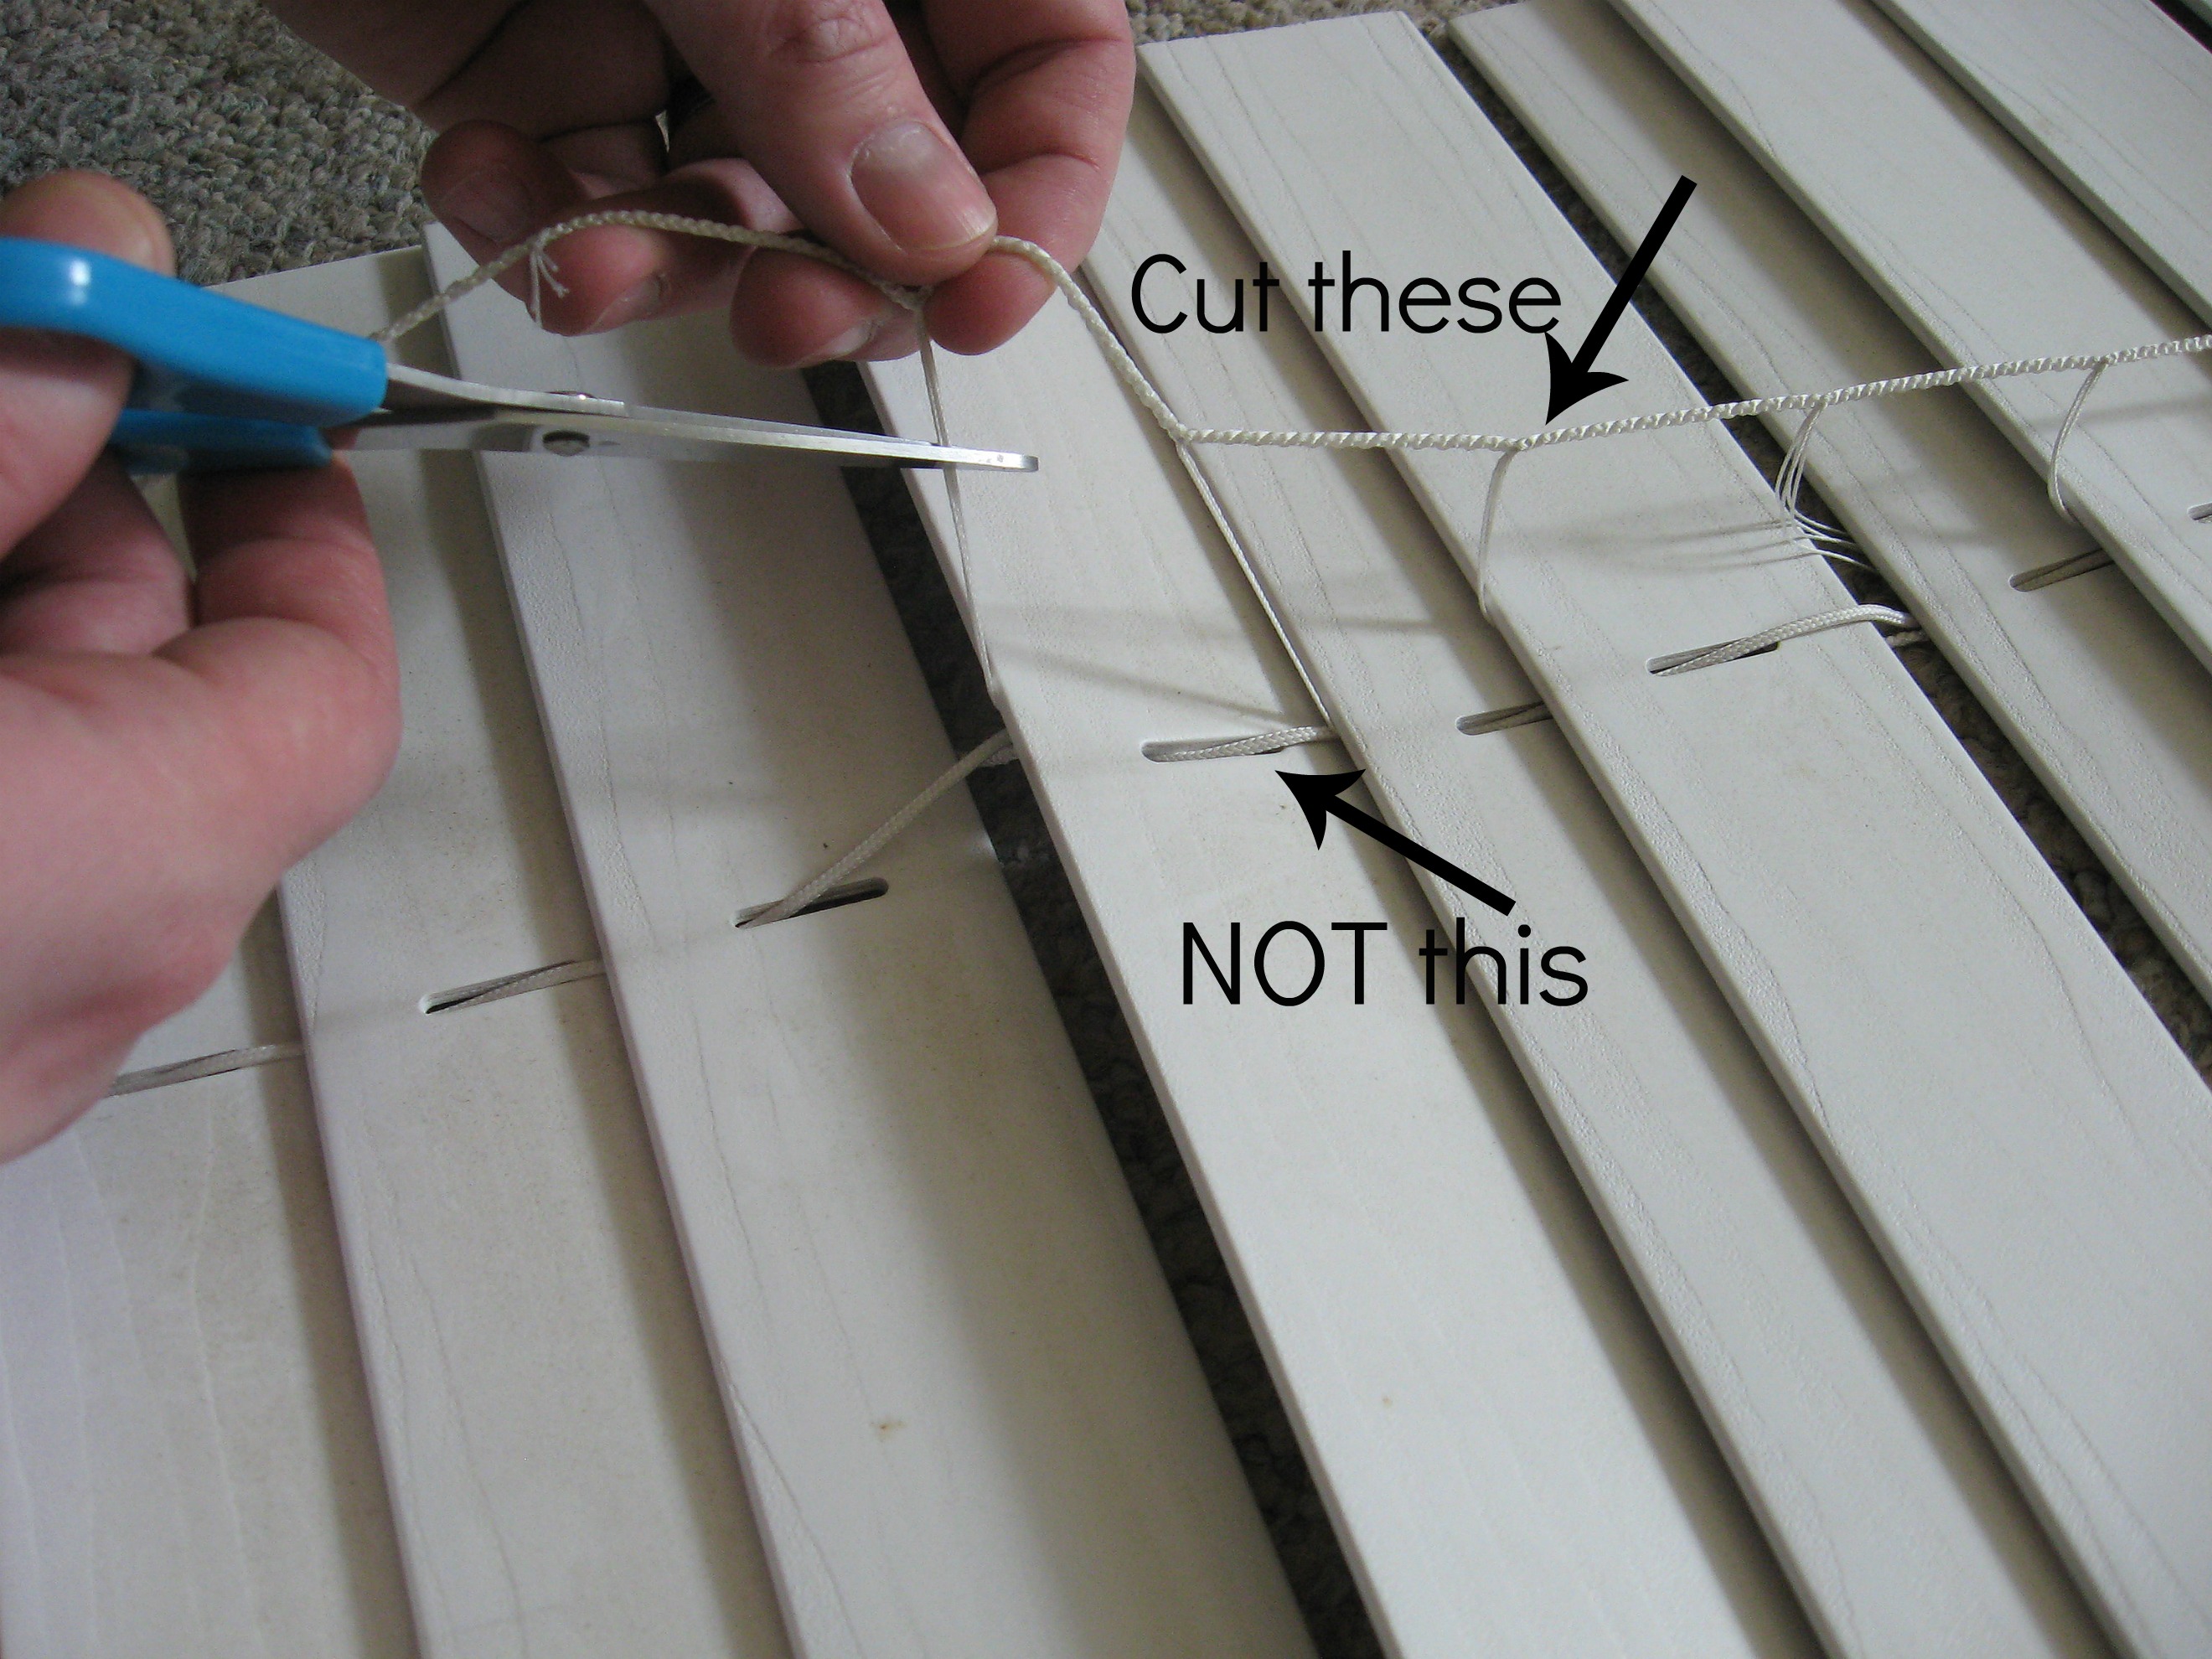
Now remove the little plastic plug at the bottom to reveal the knotty mess of strings there. Pull all the strings out – the knots in the thin strings that you just cut can just be cut away. Carefully untie the other string – the thicker one.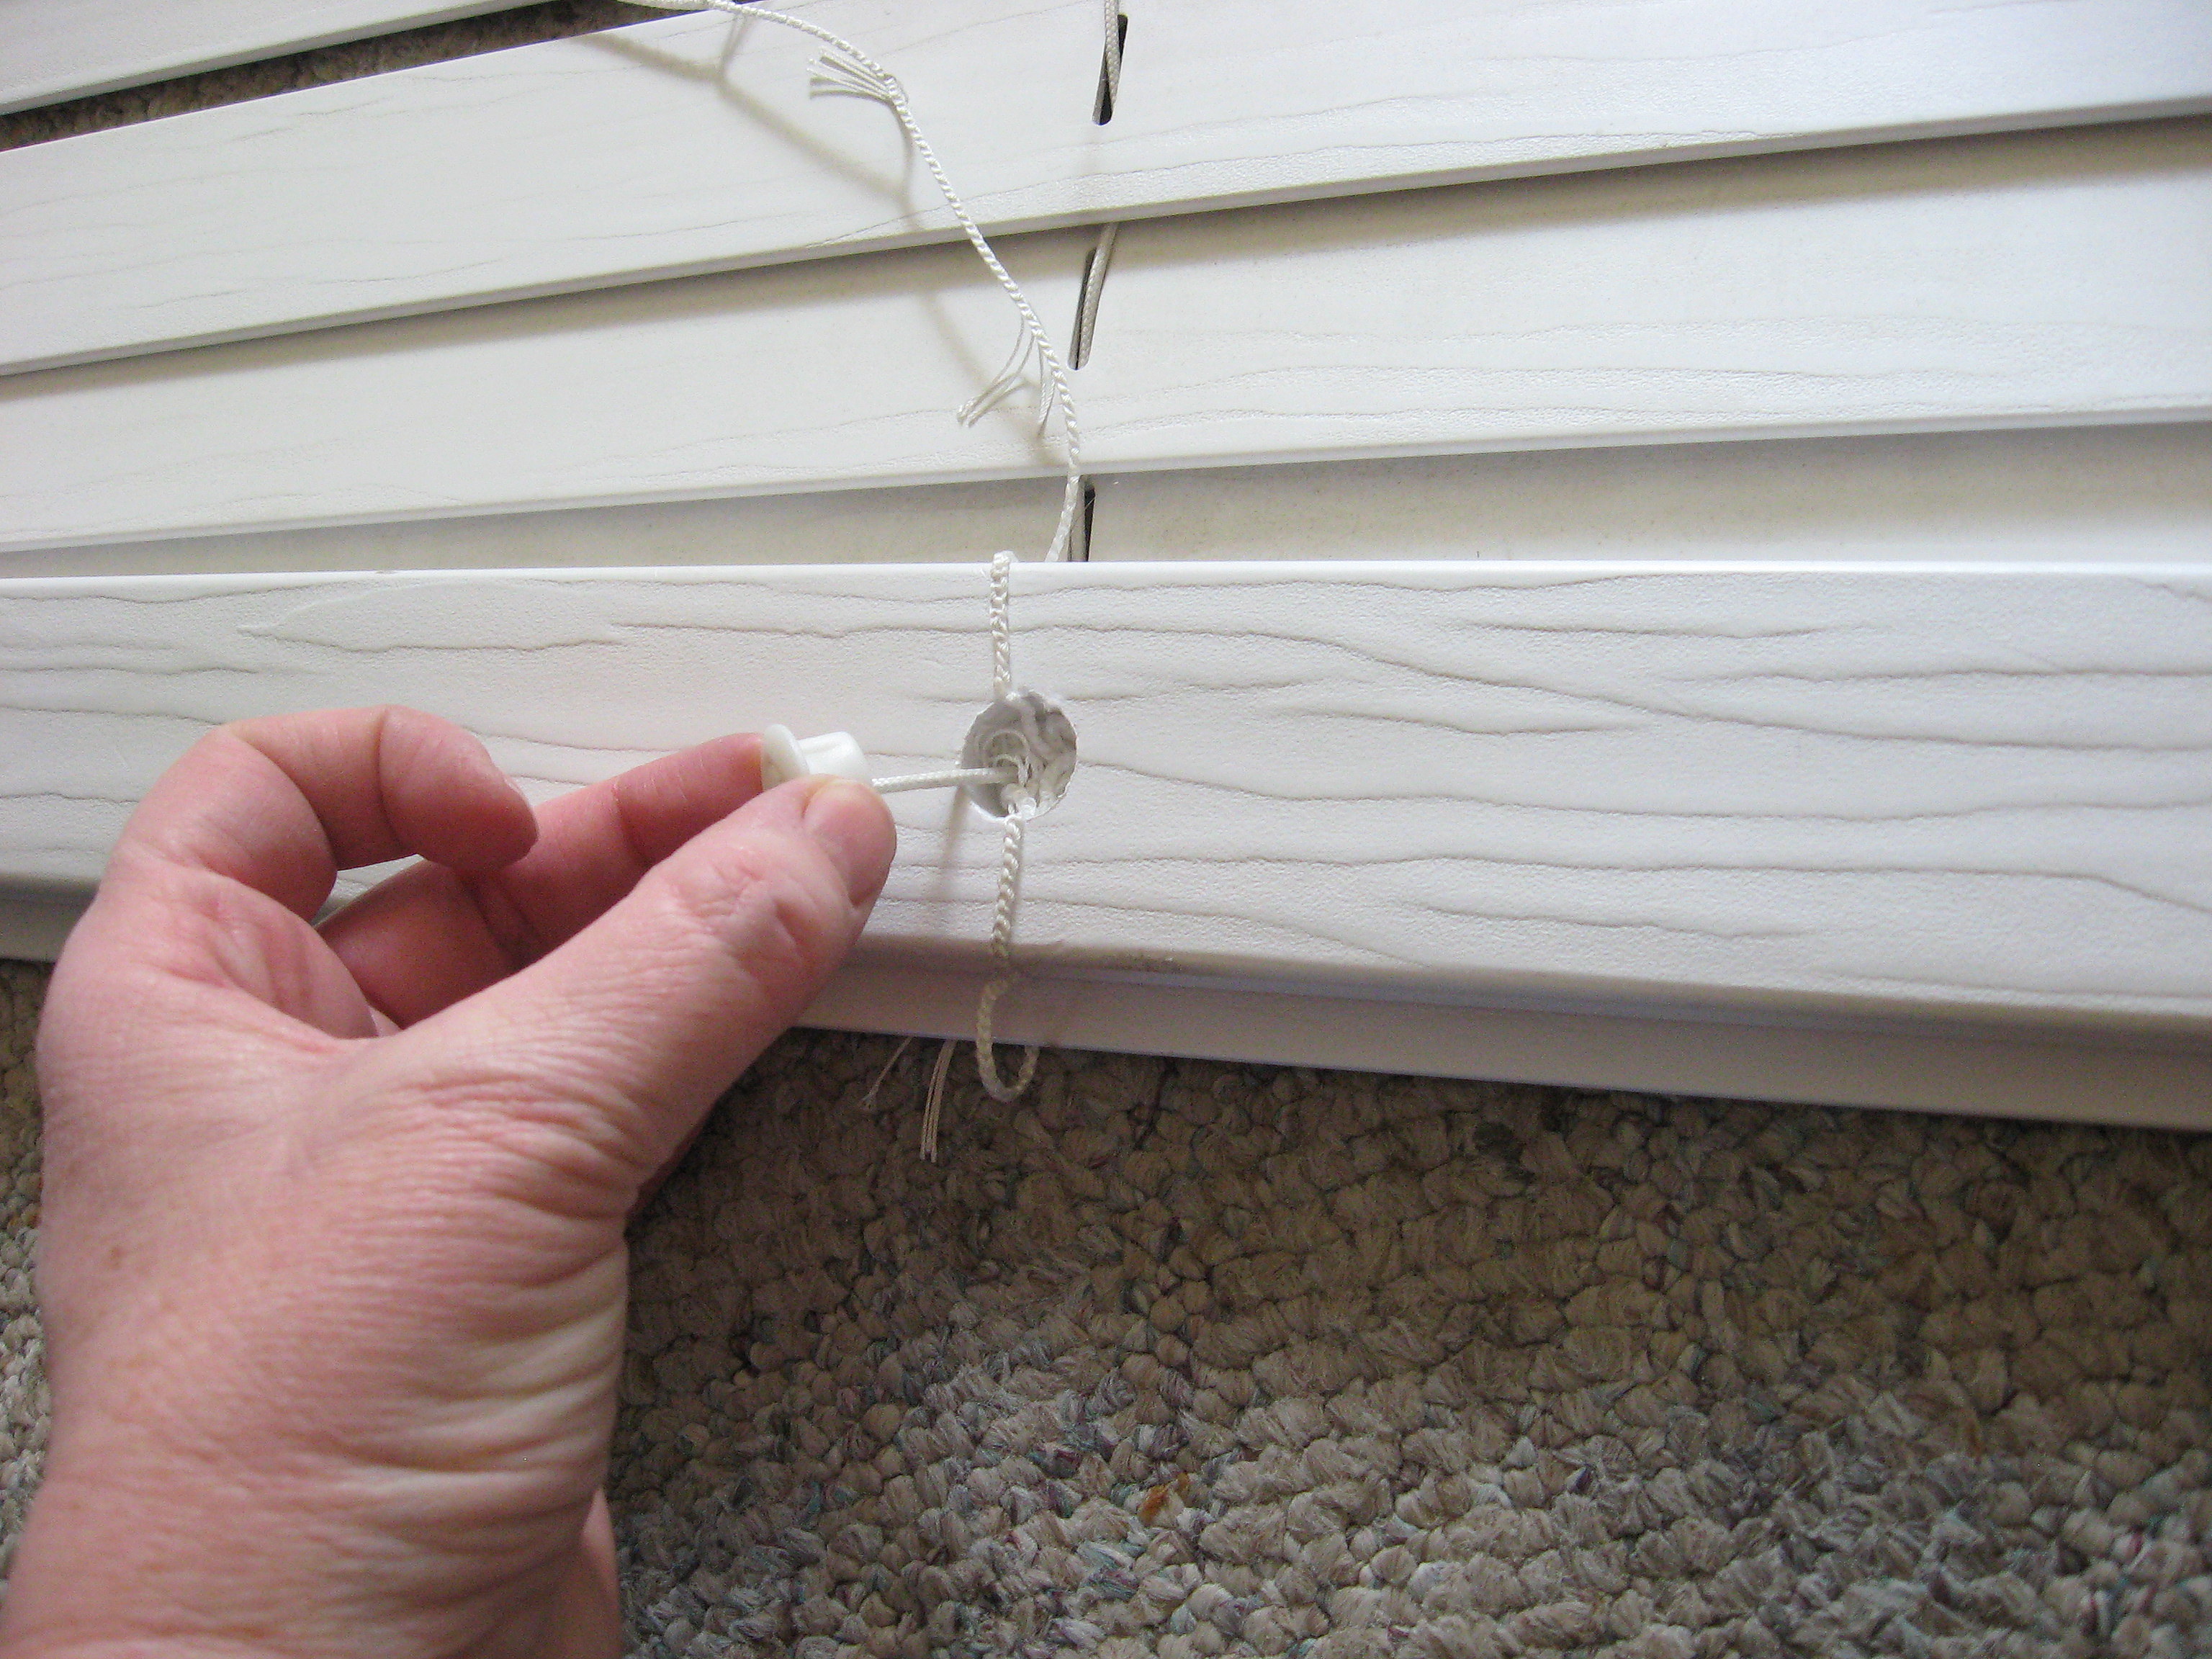
Now take that bottom board off and you will be left with the slats on the thicker string.
Remove all the slats and it will leave you with this:
Set this aside and prep the fabric.
I am using a piece of fabric and the plastic from the broken shade. You can buy black out fabric, or you can use just the decorative fabric if your shade is more decorative than for light control.
First, you will cut the black out fabric -if you’re using it- to size for your window. Then cut the decorative fabric to size plus one inch on all sides.
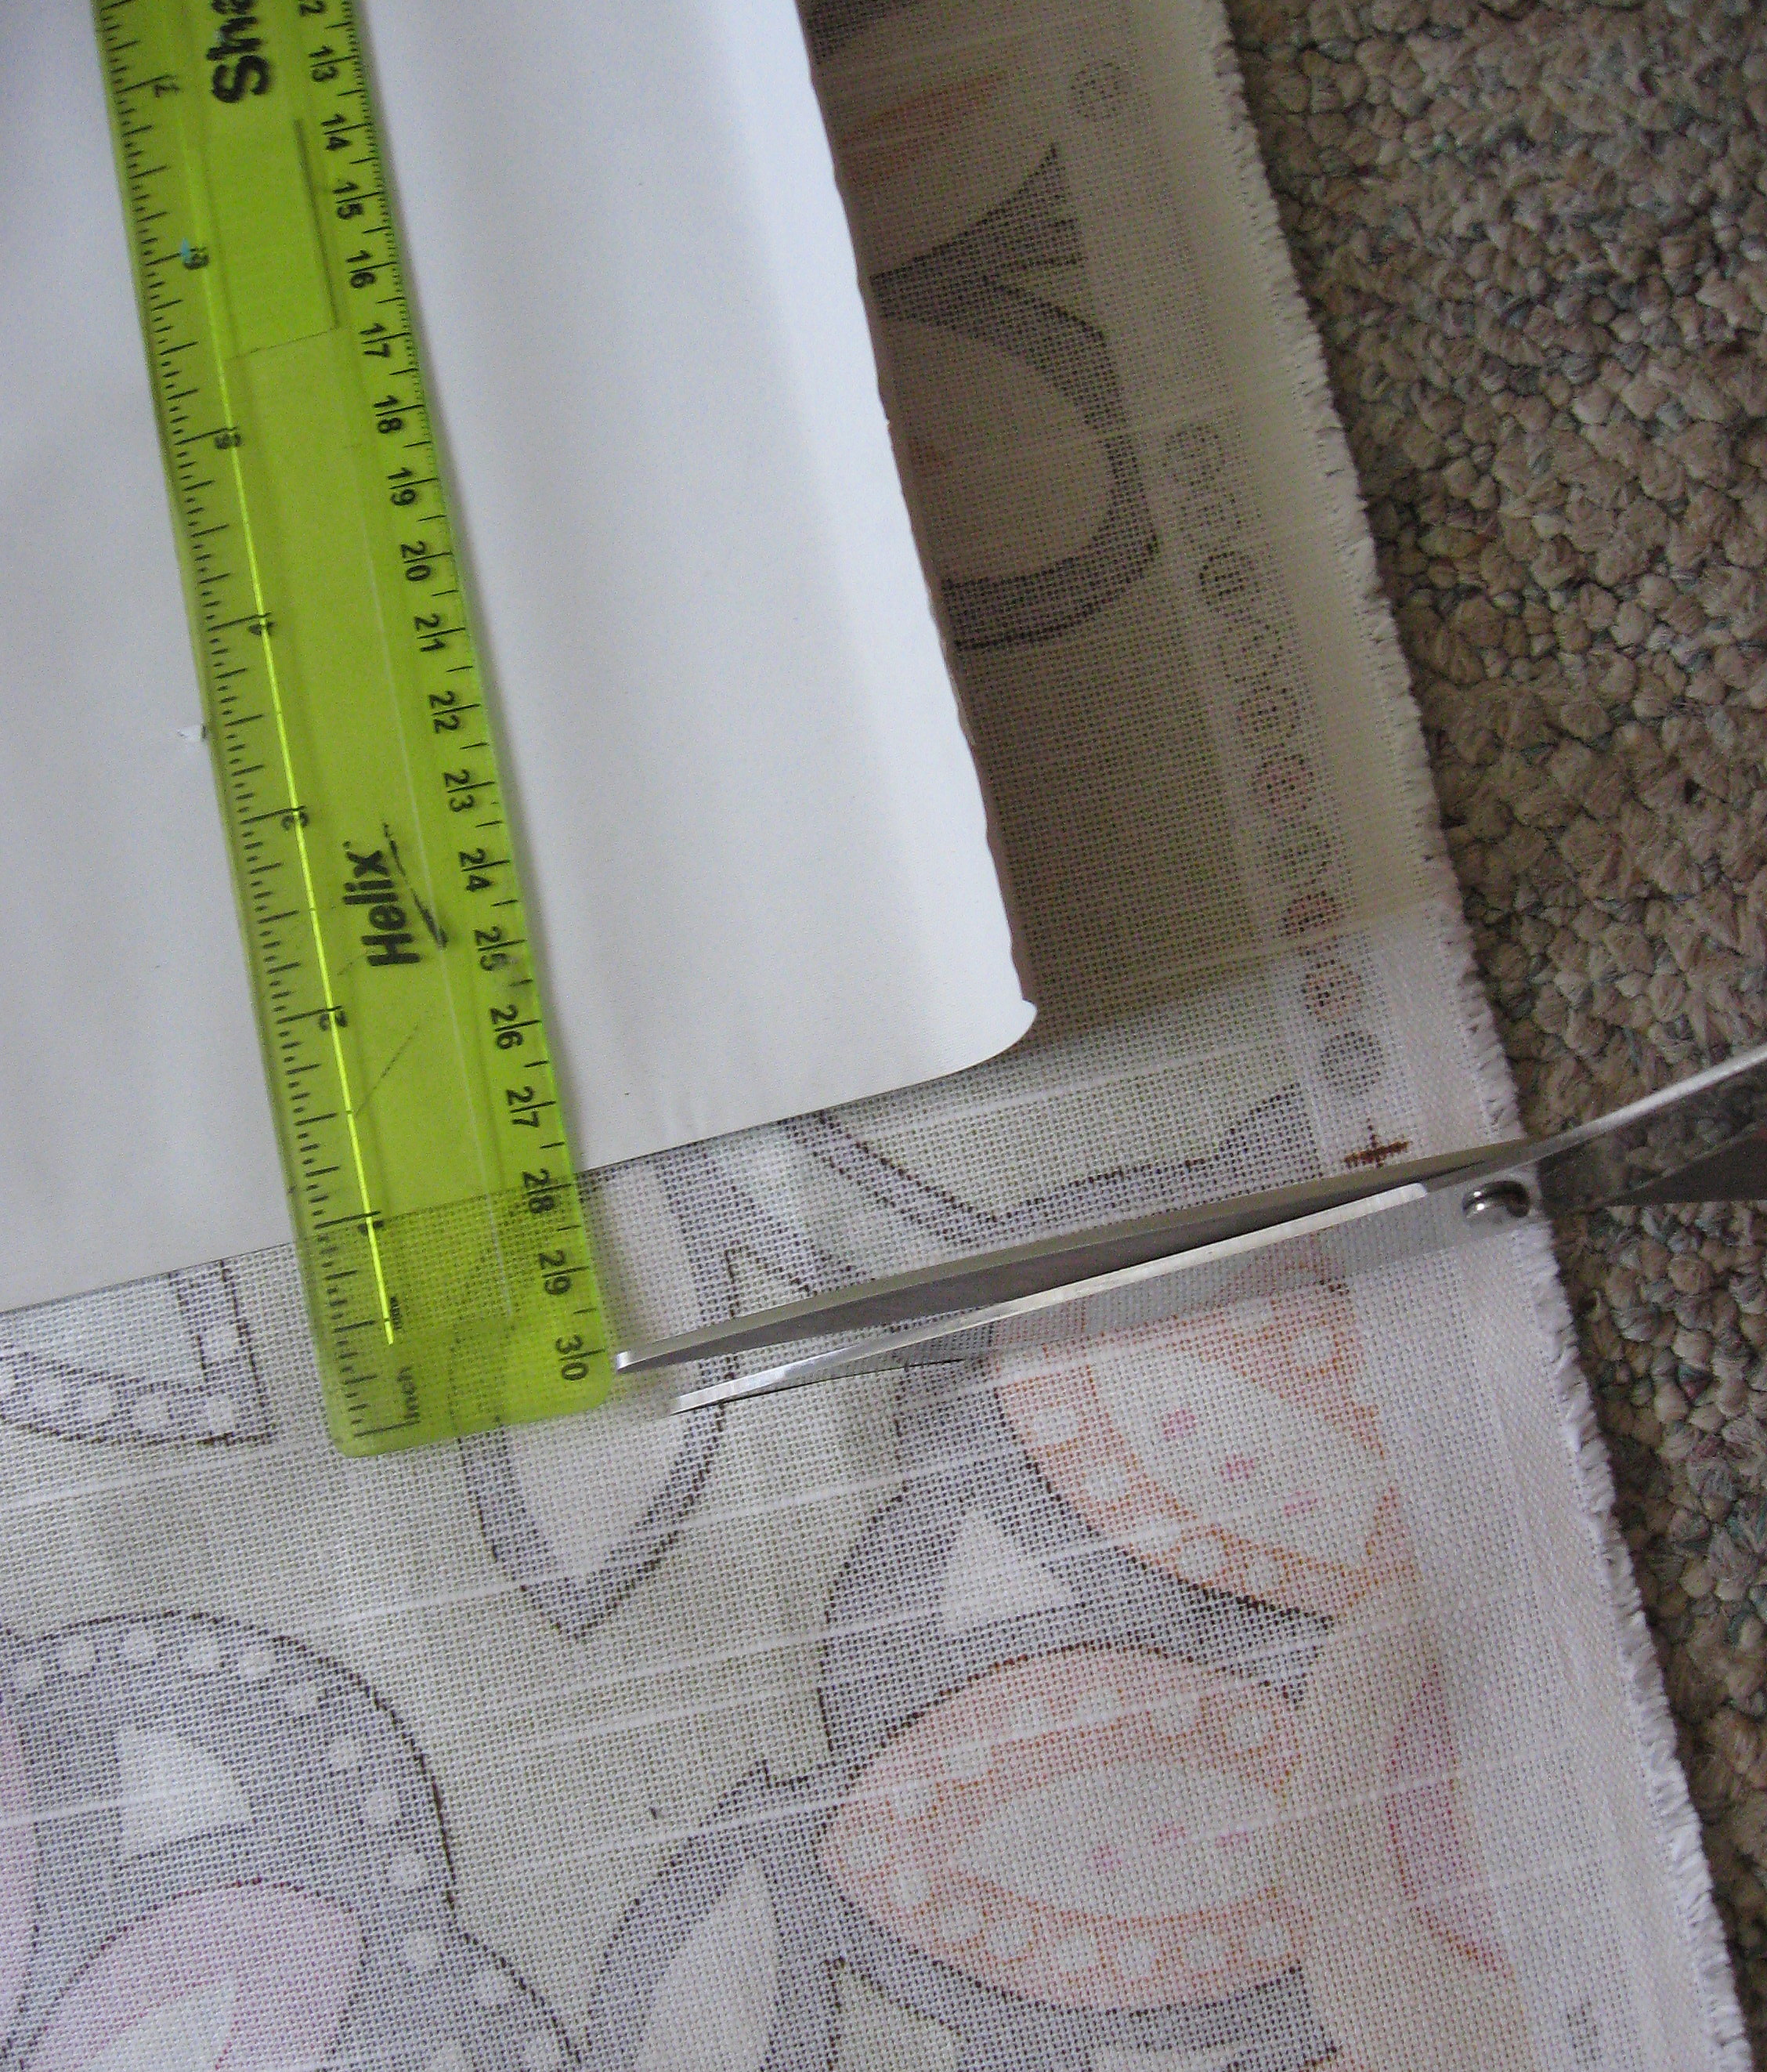
Fold the decorative fabric over 1/2 inch on all sides and iron.
Then fold over 1/2 inch again and iron.
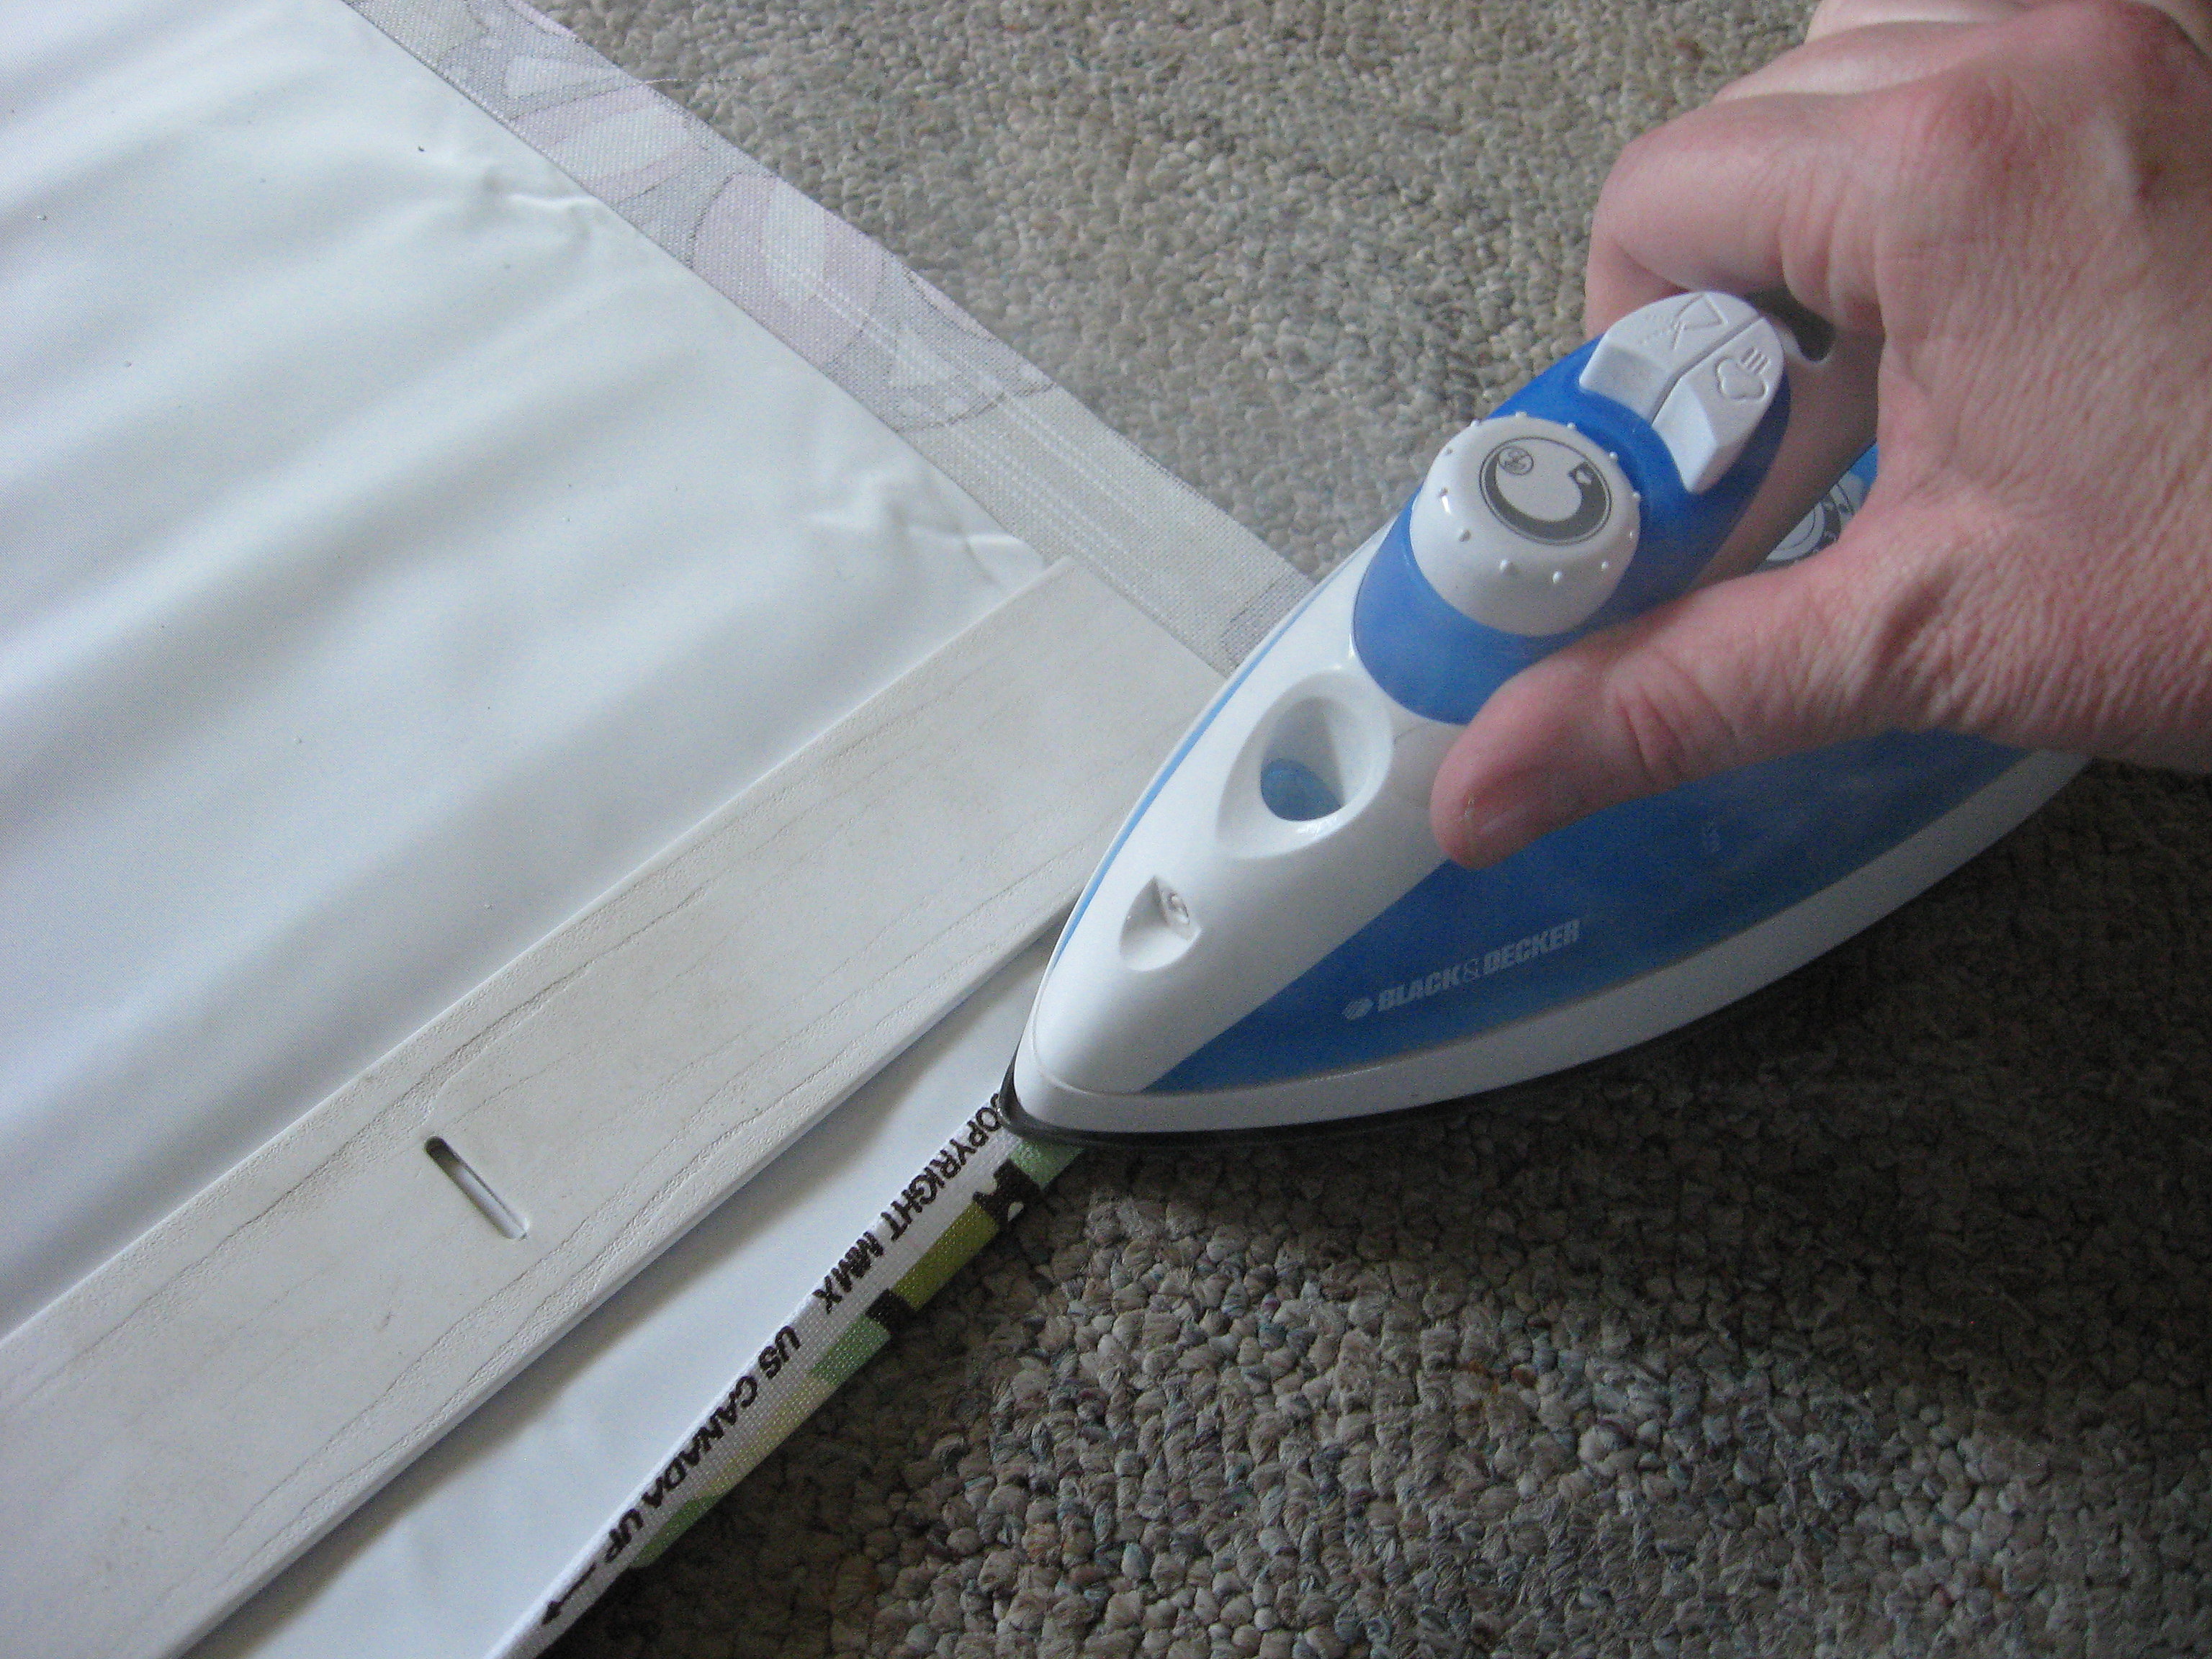
BE CAREFUL if you are using plastic that you don’t melt it!
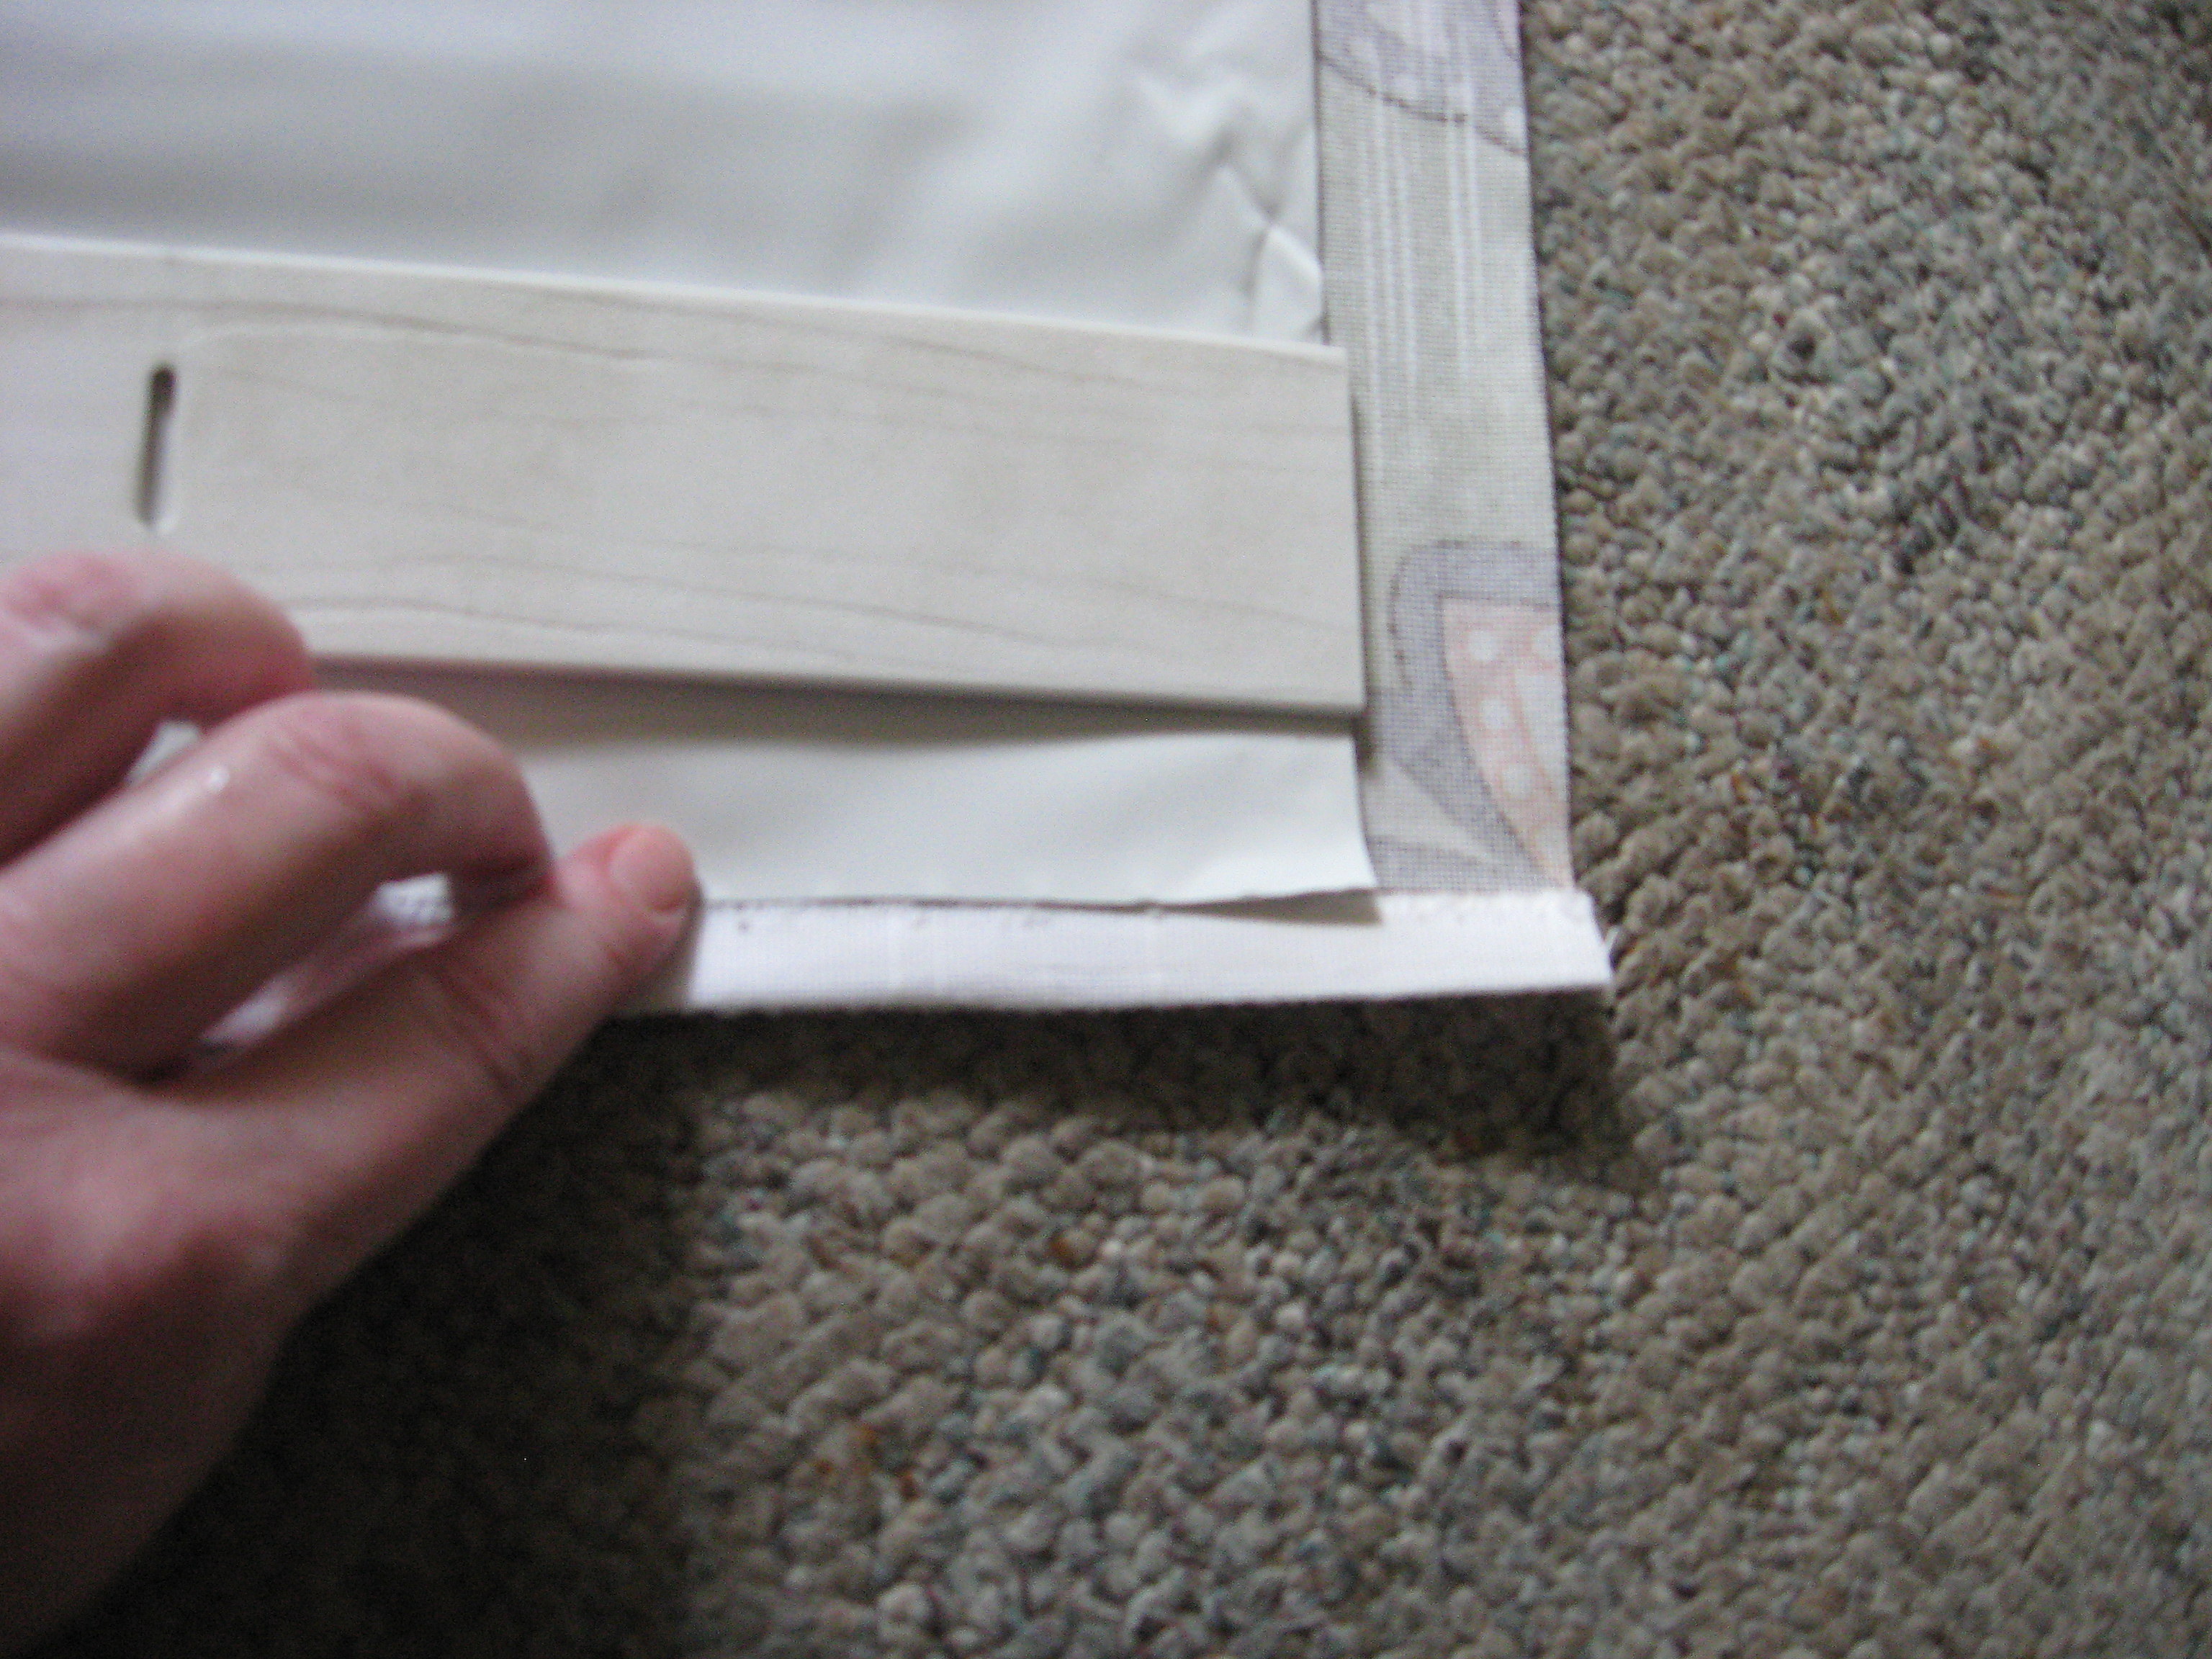
Now use fabric glue to glue this hem down on all four sides – gluing it to the black out fabric if you are using it.
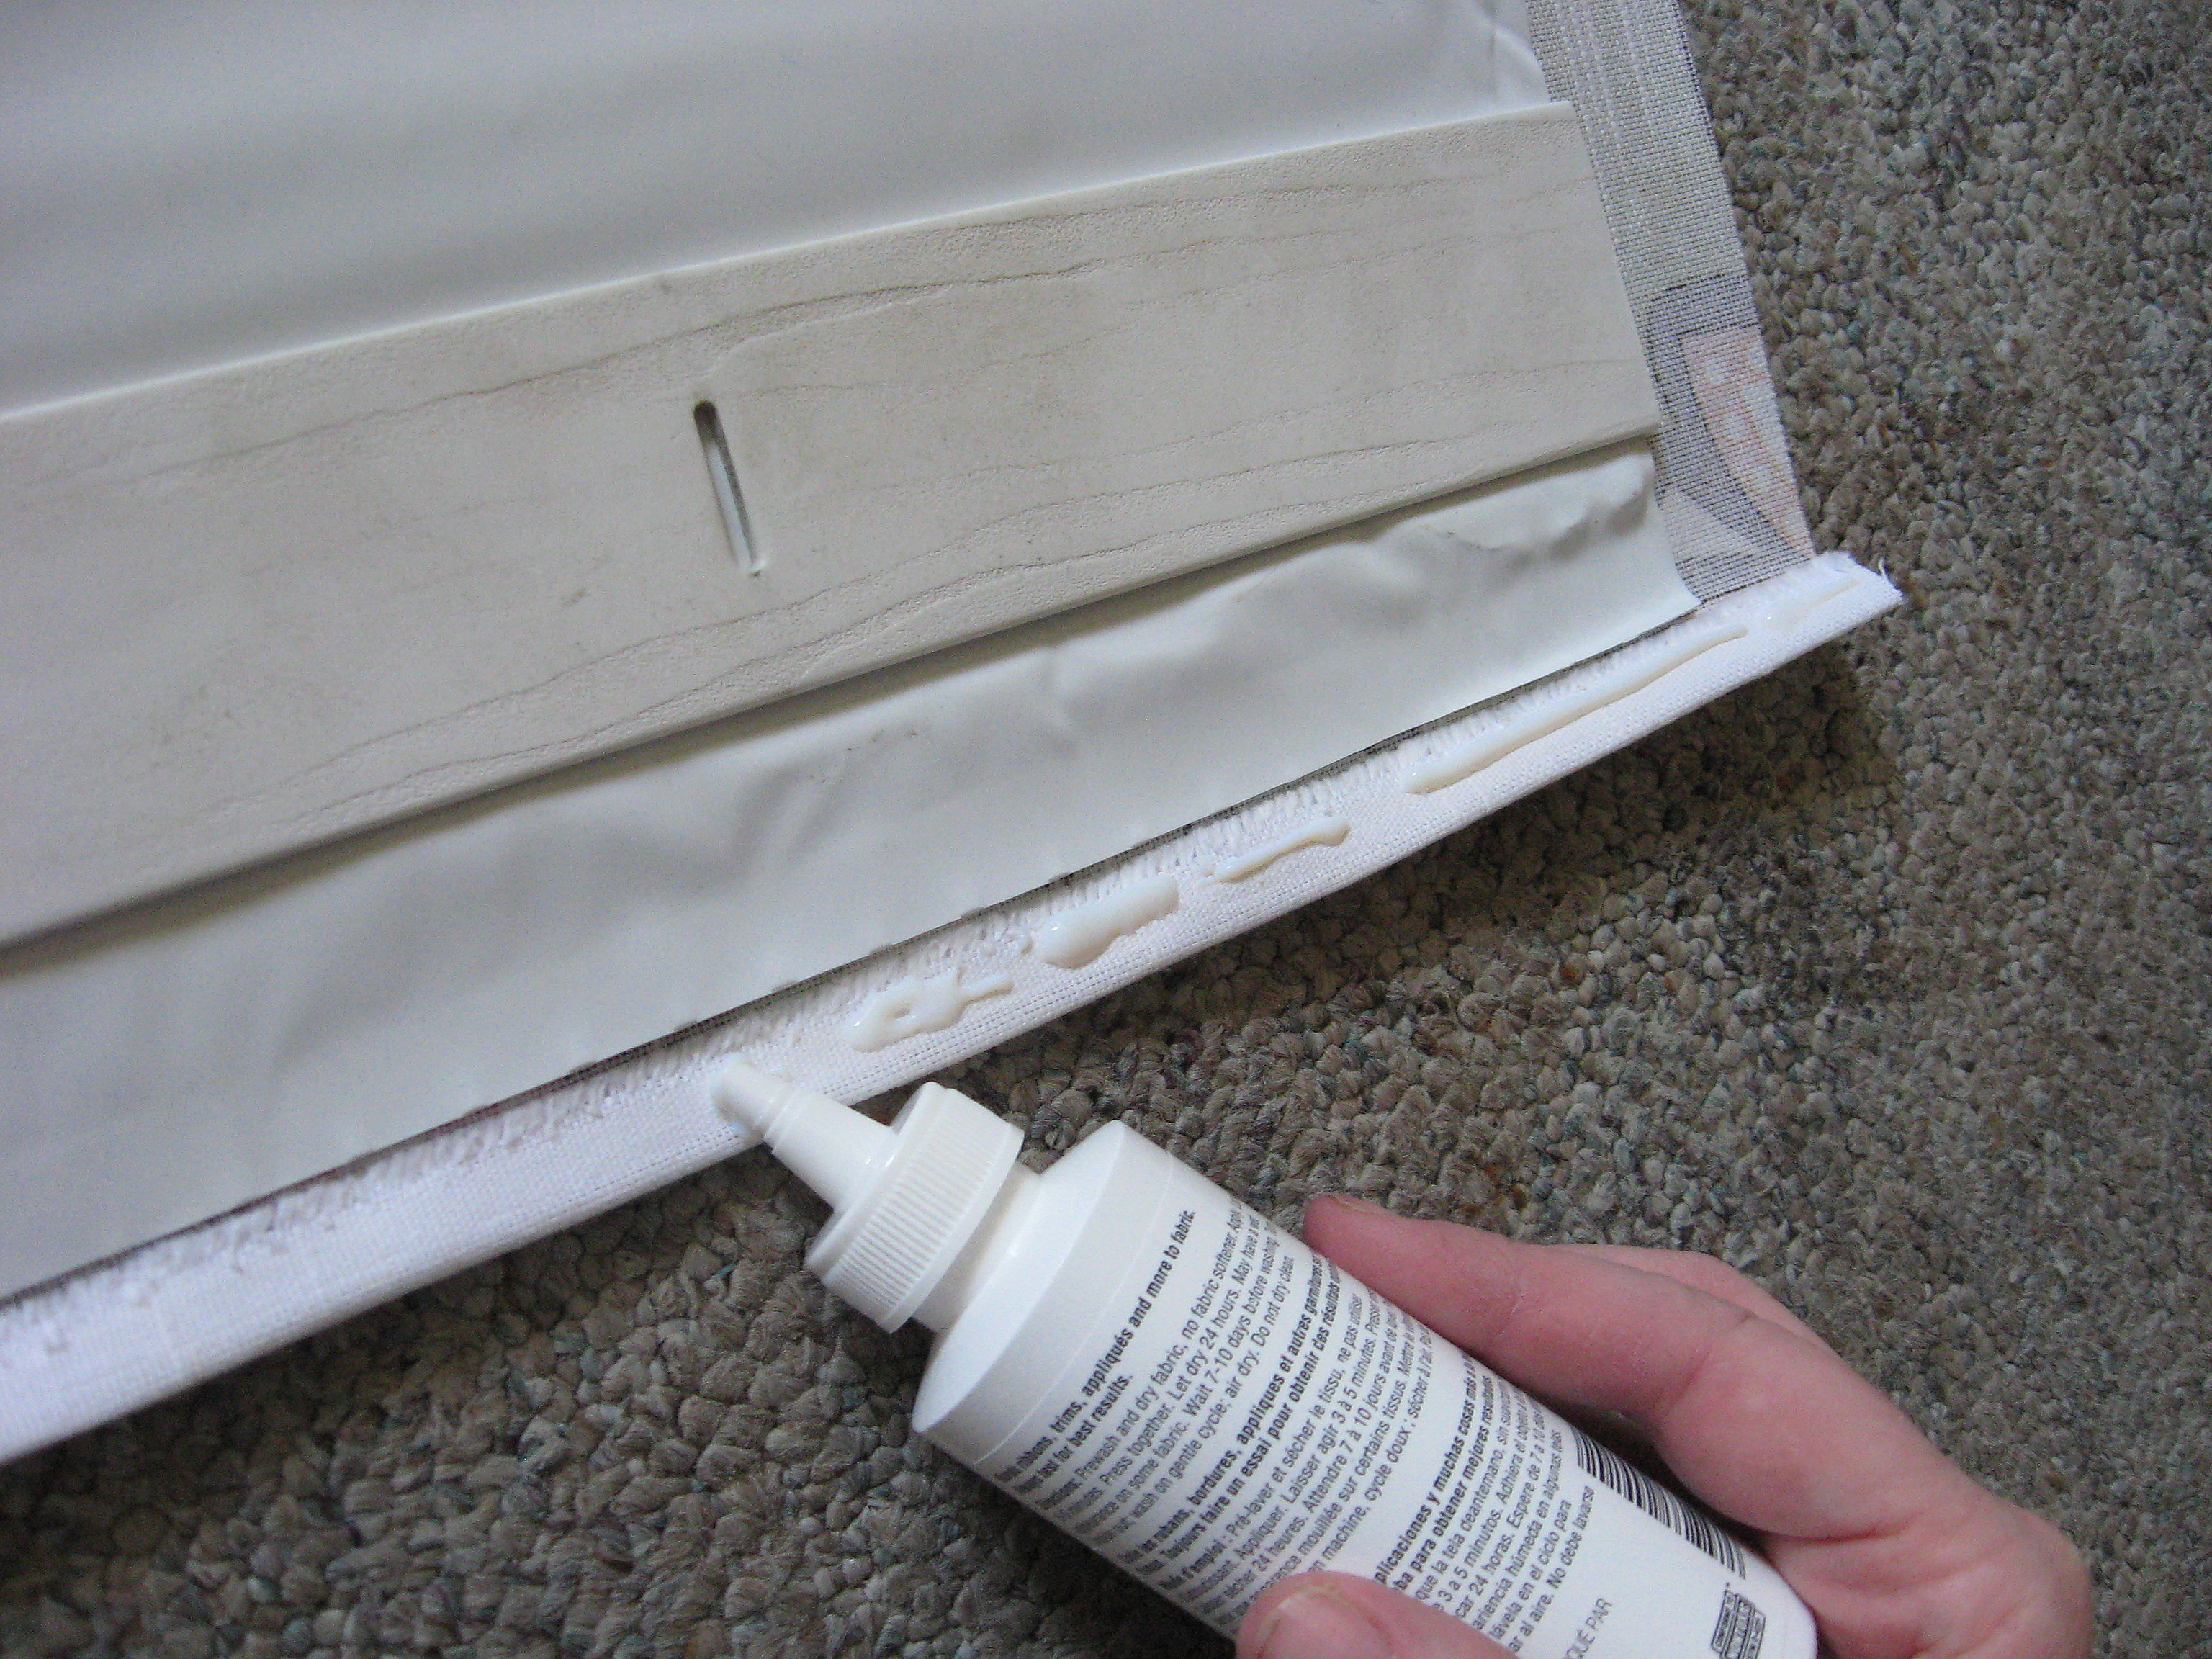
Glue it down on all four sides and weight it down while it dries (I used the slats from the blinds).

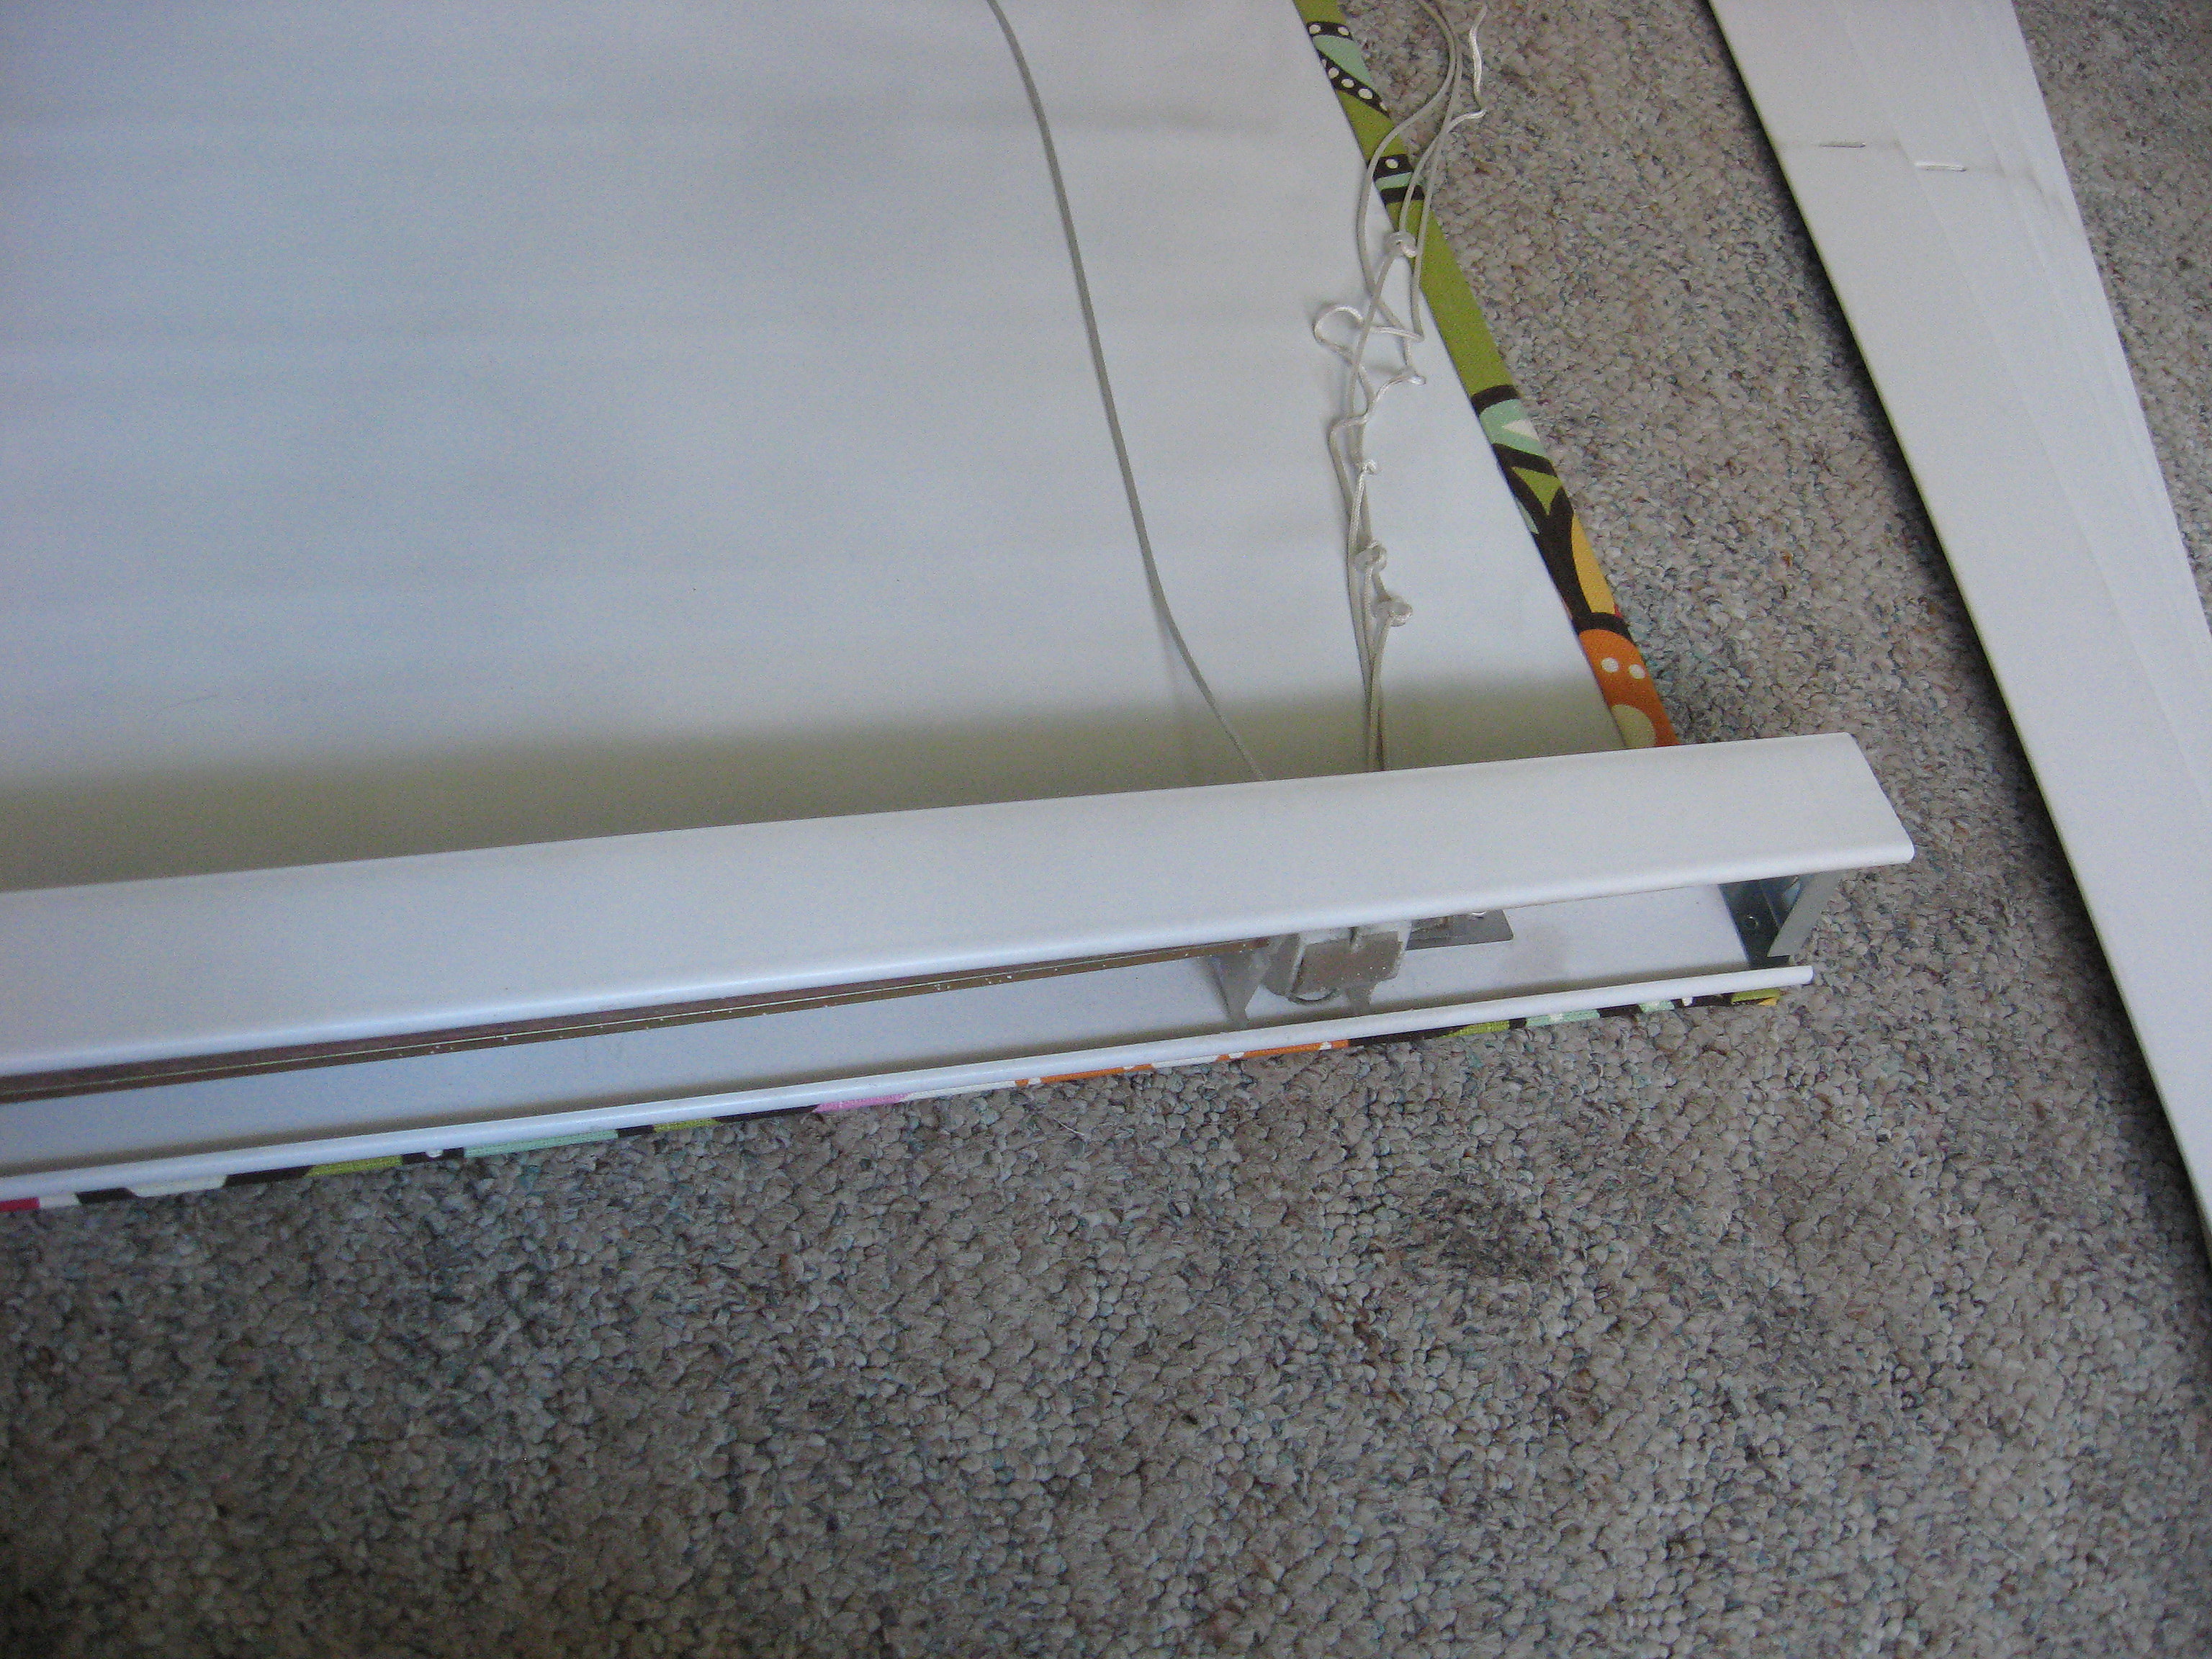
Once that’s dry, you will glue the top of the blinds to the top of the fabric. Stop the glue a couple of inches from the ends so that you can hang it back in the brackets when you’re done.
Line it up carefully, weight it down and let it dry. Make sure you don’t get glue on any of the strings.
Once that’s dry, you will start to reassemble the shade. First, you need to decide how many folds you want in the shade when it opens. It’s totally up to you; I just measured the length of my shade and came up with a number that made sense to me; mine are about 9 inches apart.
Start at the bottom of the shade and measure up, making a mark on each side of the shade.
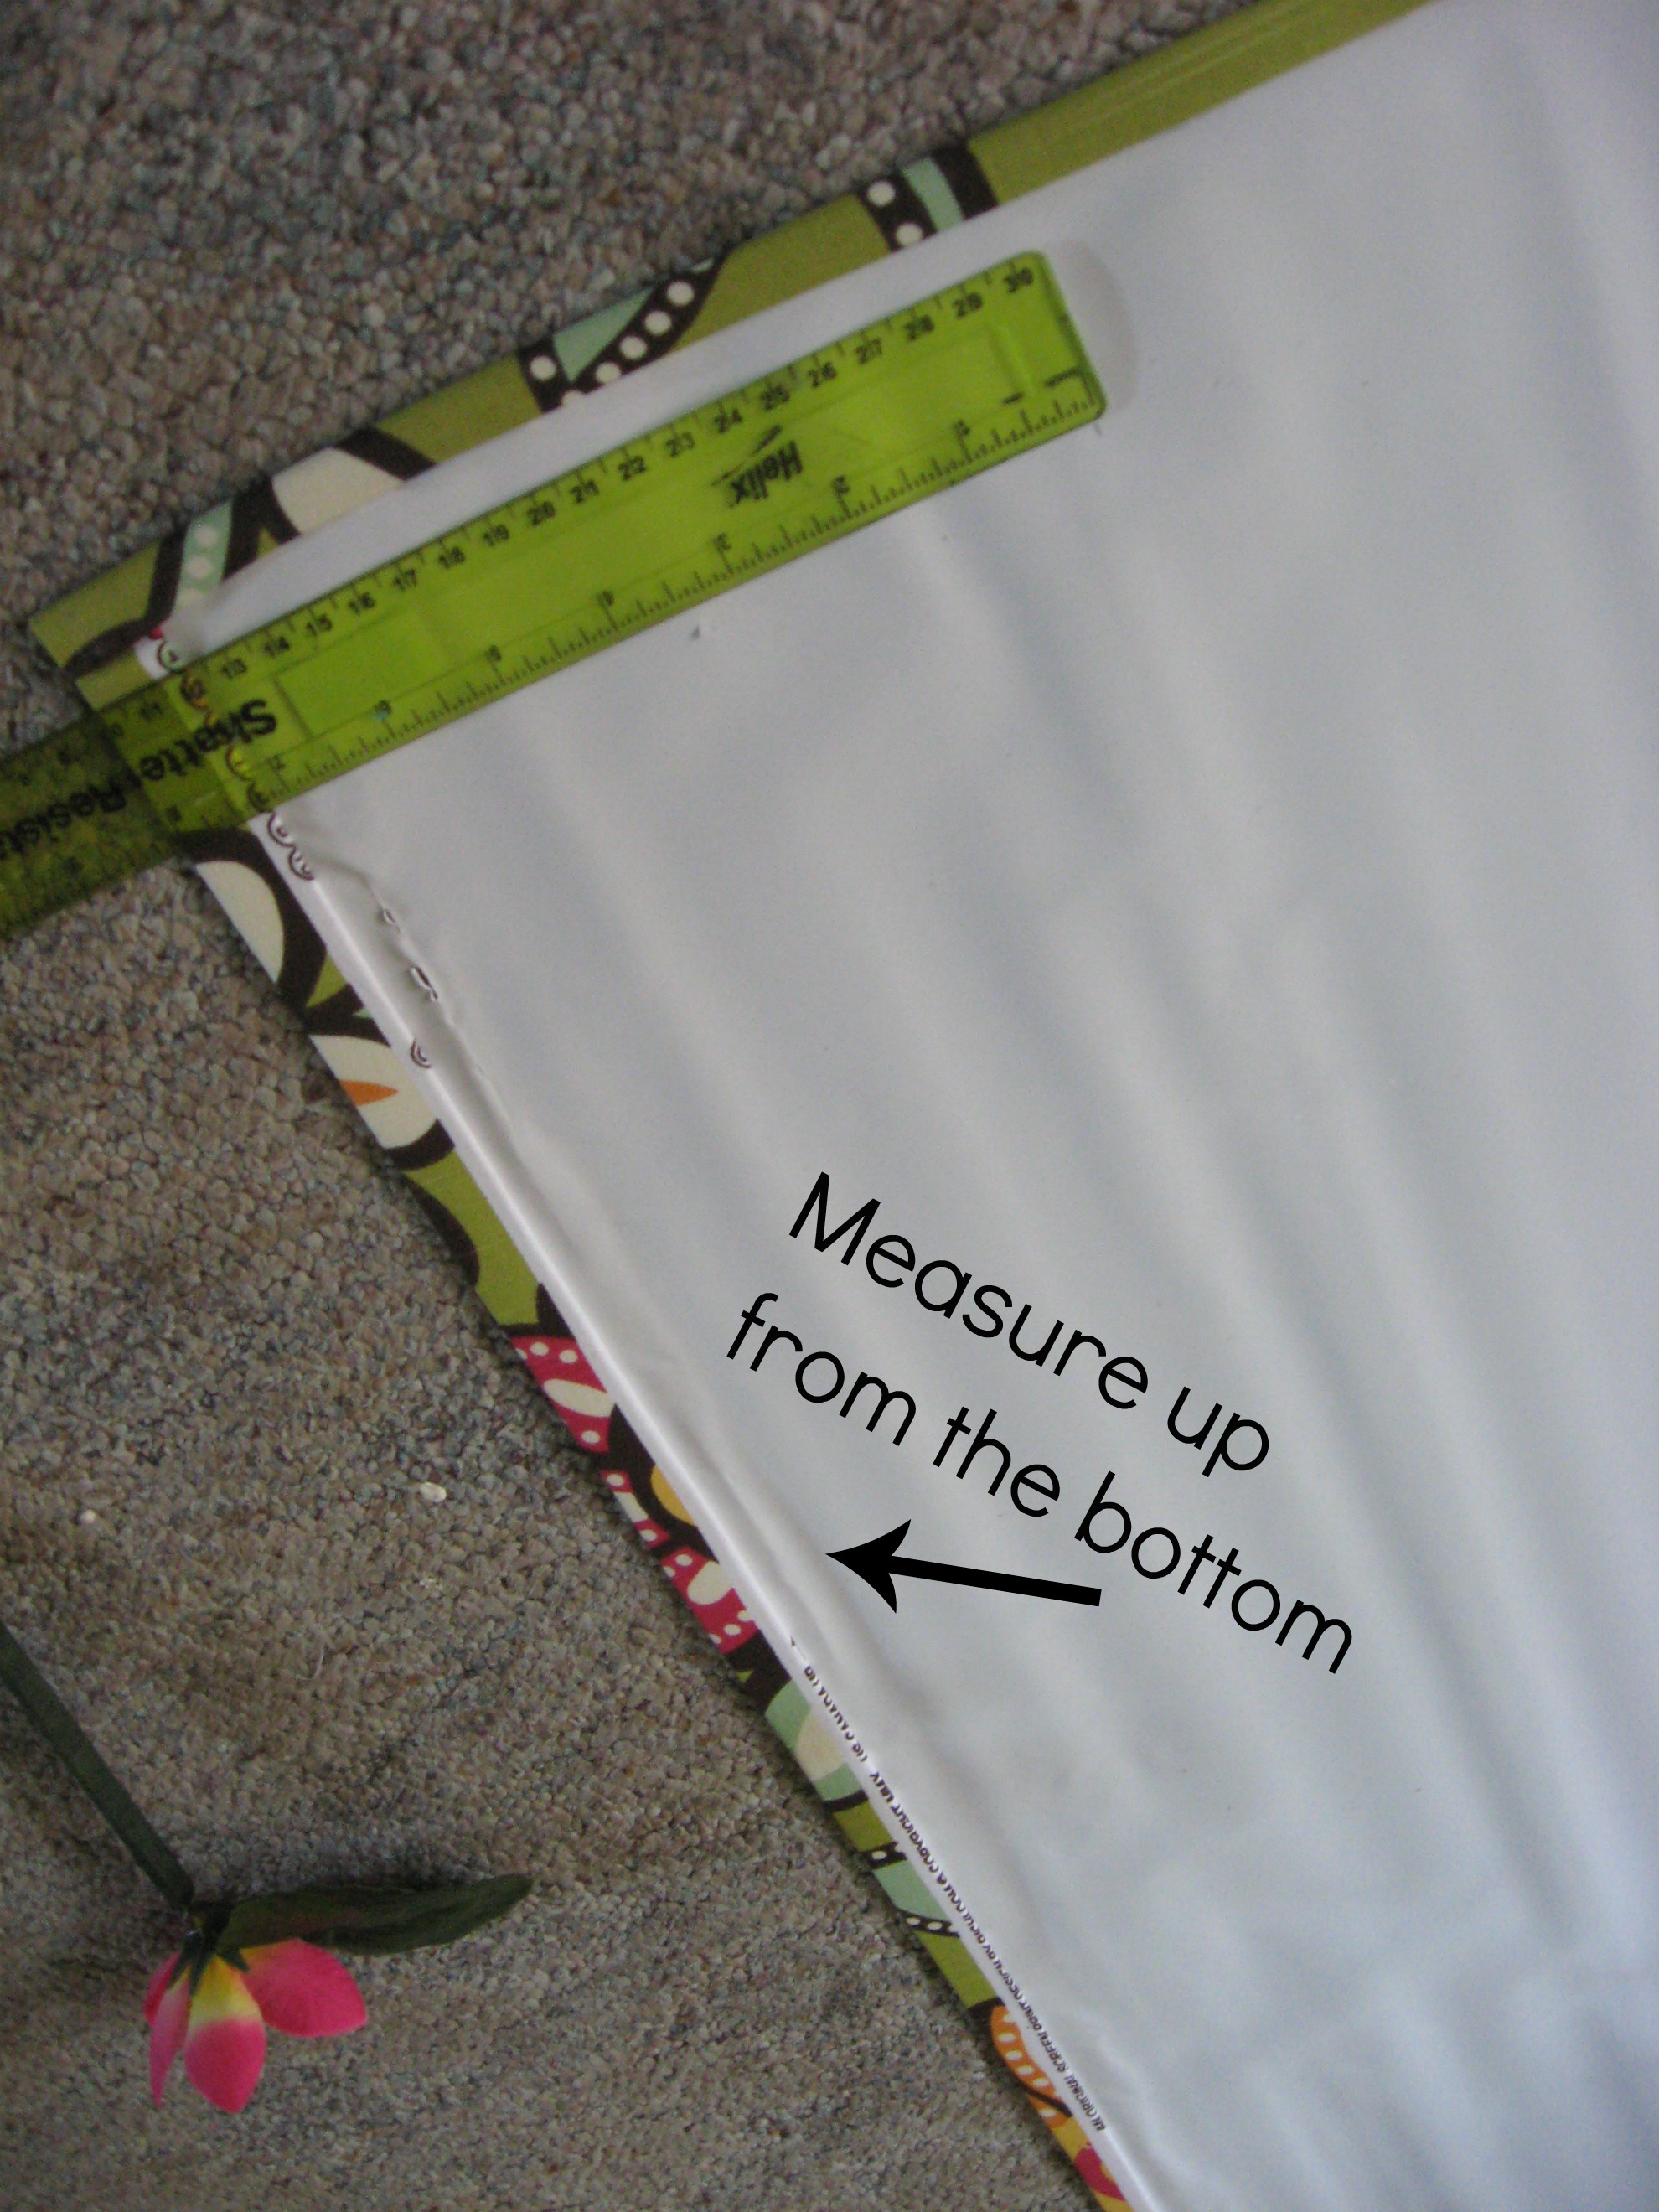
However many folds you want (however many marks you made) – that’s how many slats you will use. Slide them back onto the strings.

Put glue on the back of the slat – being careful to avoid the strings – and line it up with the marks you made.
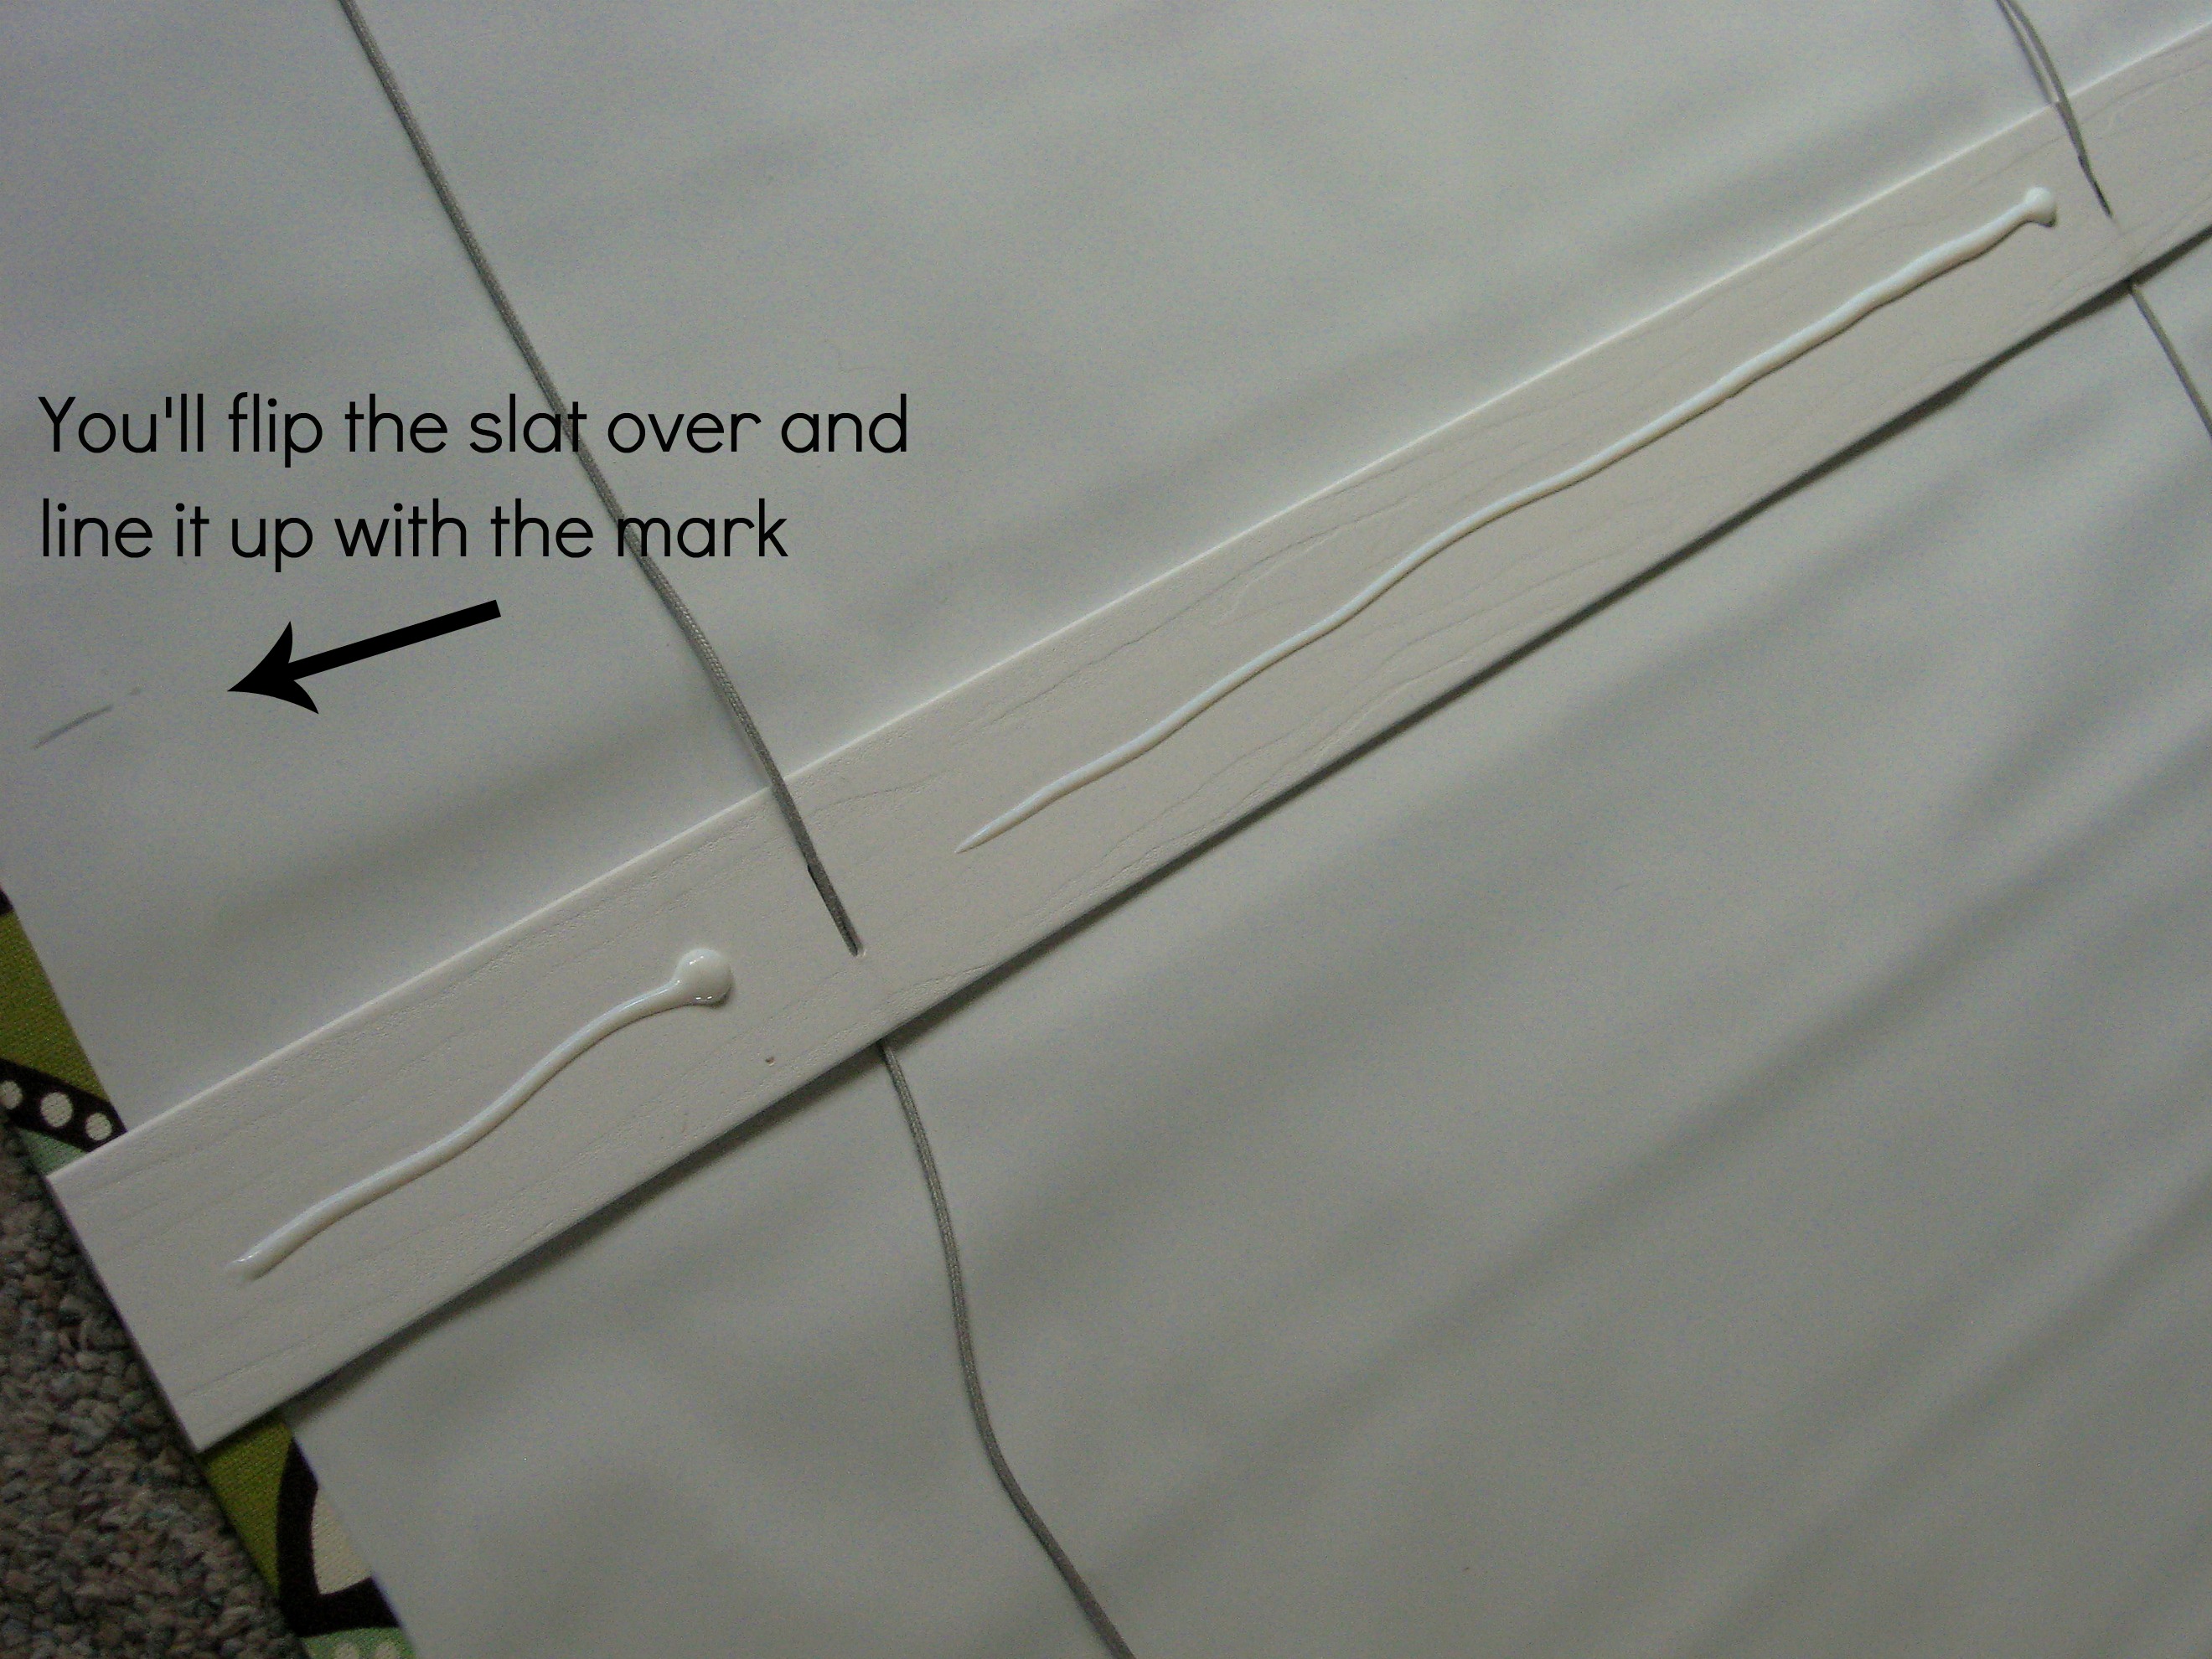
Repeat for all of the marks, weight them down and let them dry.
Now restring the bottom board back on, glue it to the bottom of the shade, and weight it down while it dries.

When everything is dry, retie the strings at the bottom and replace the little plastic plugs.
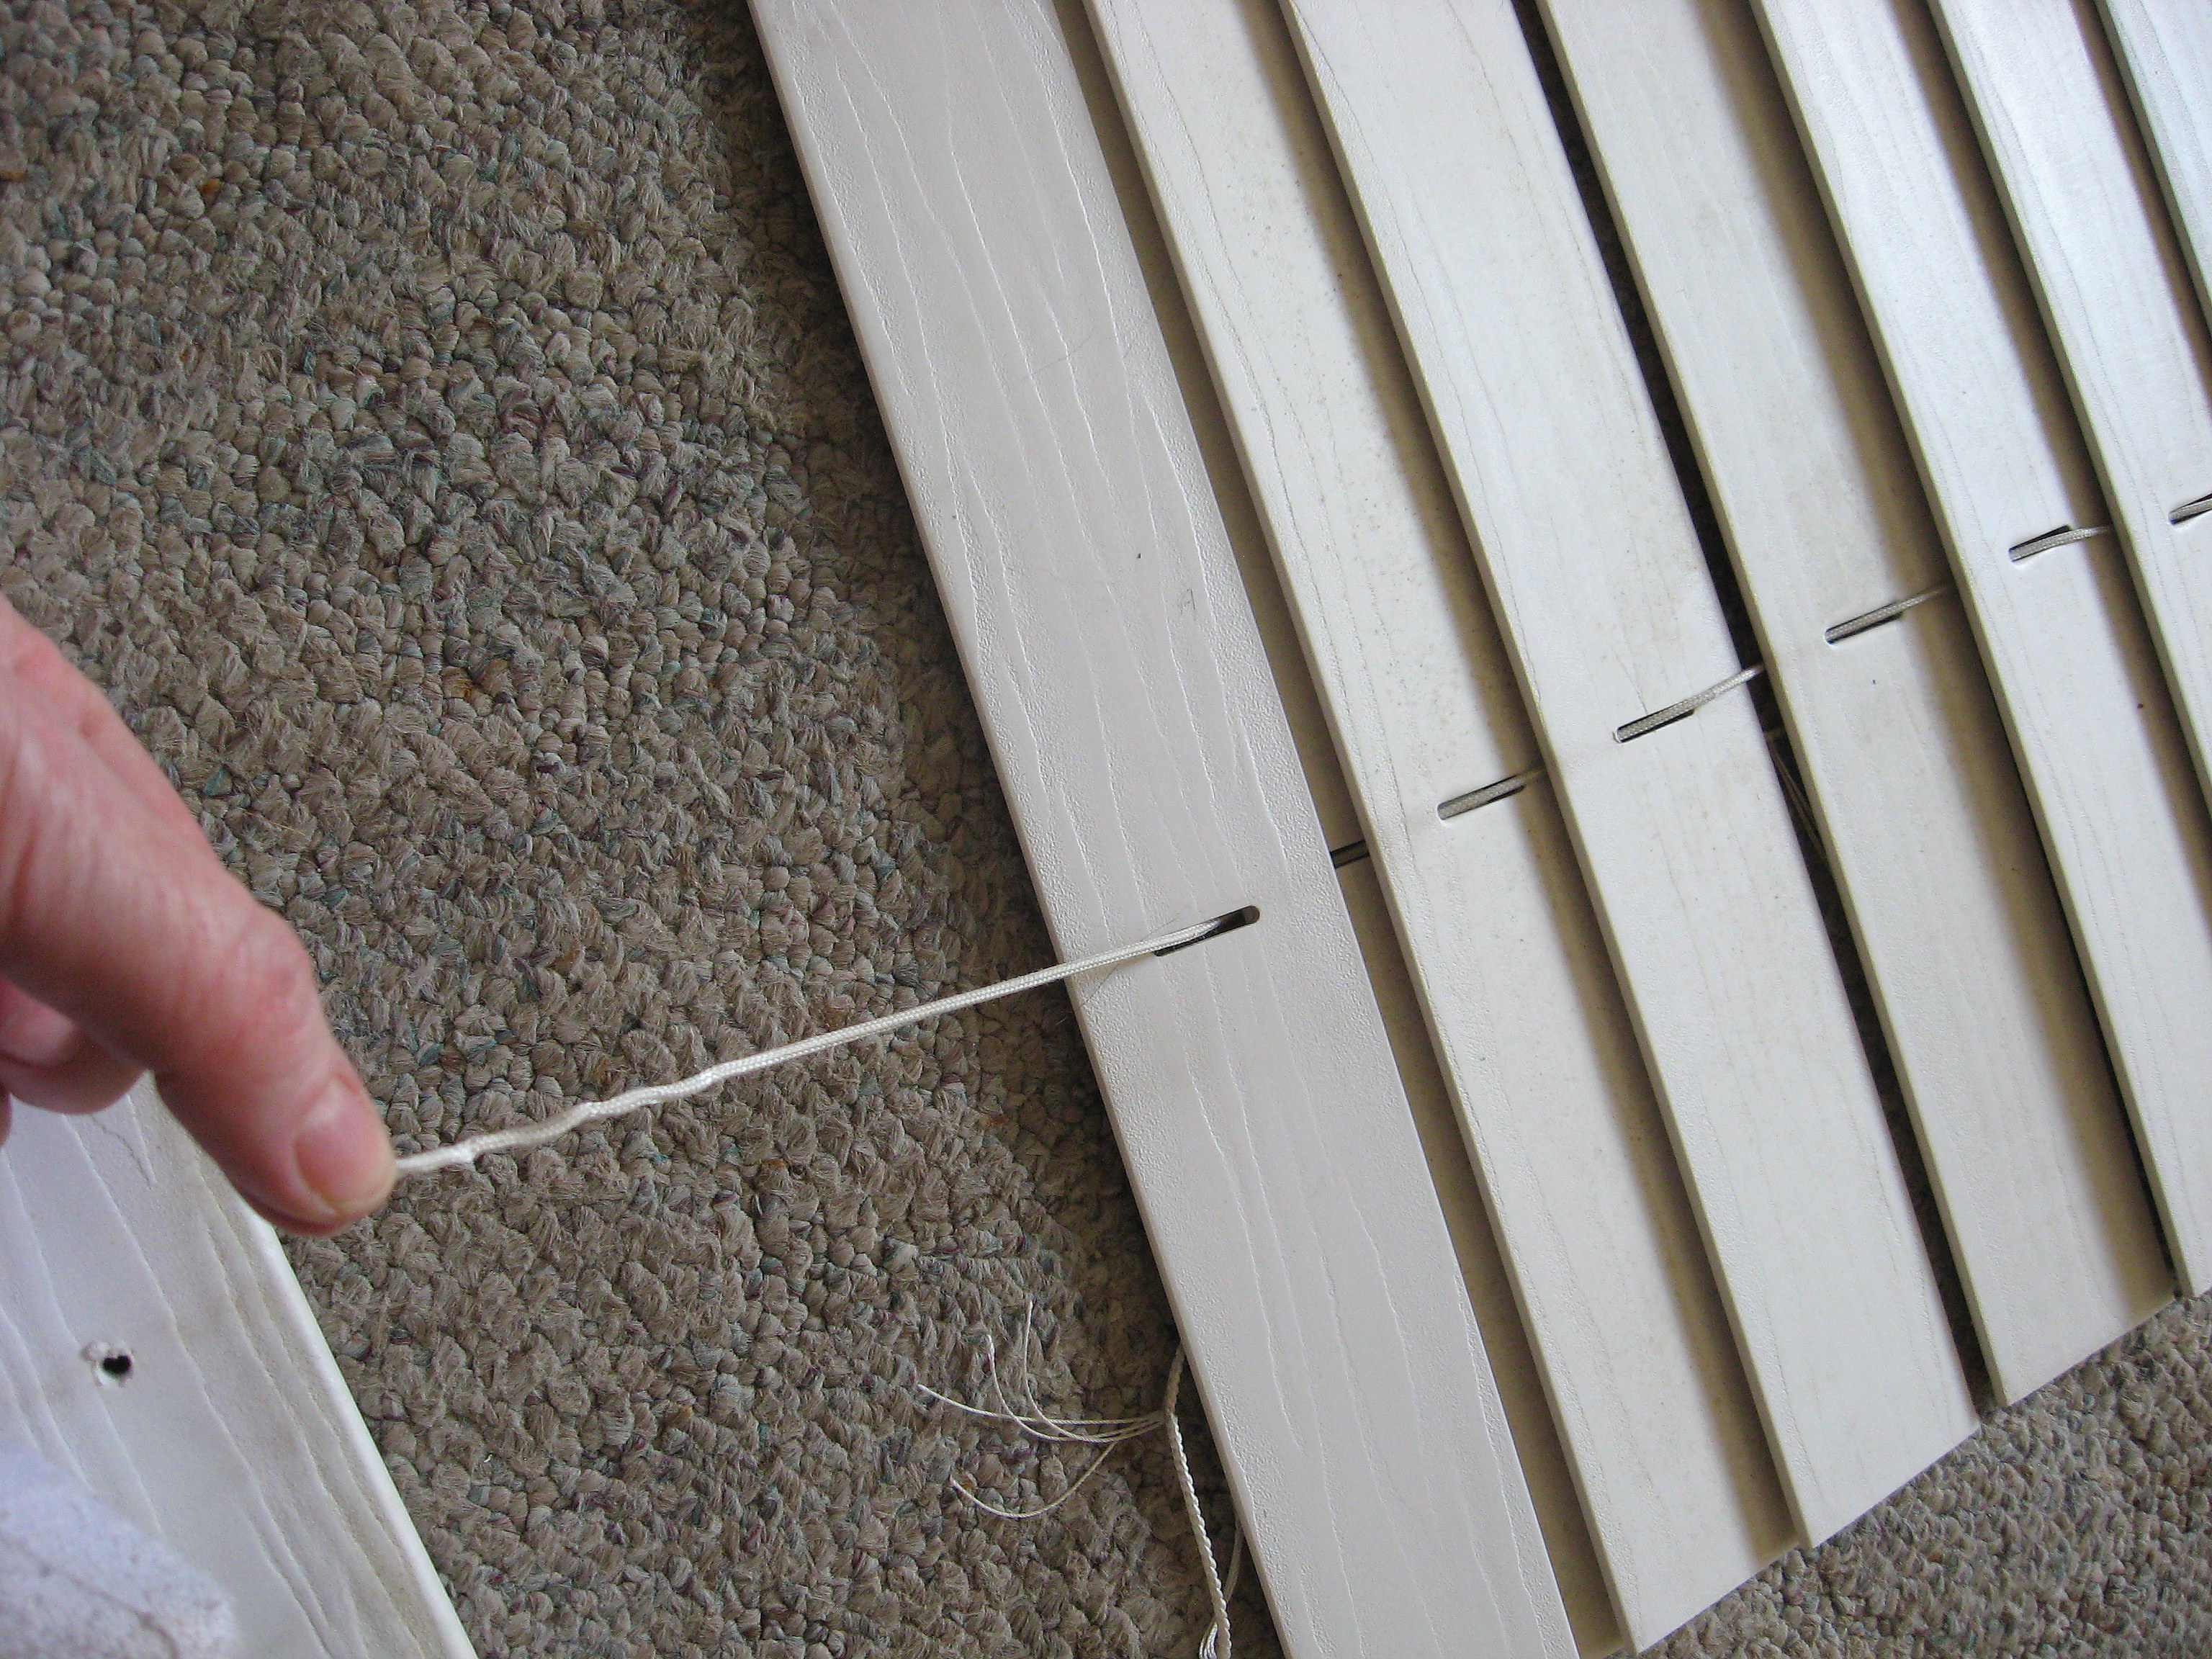
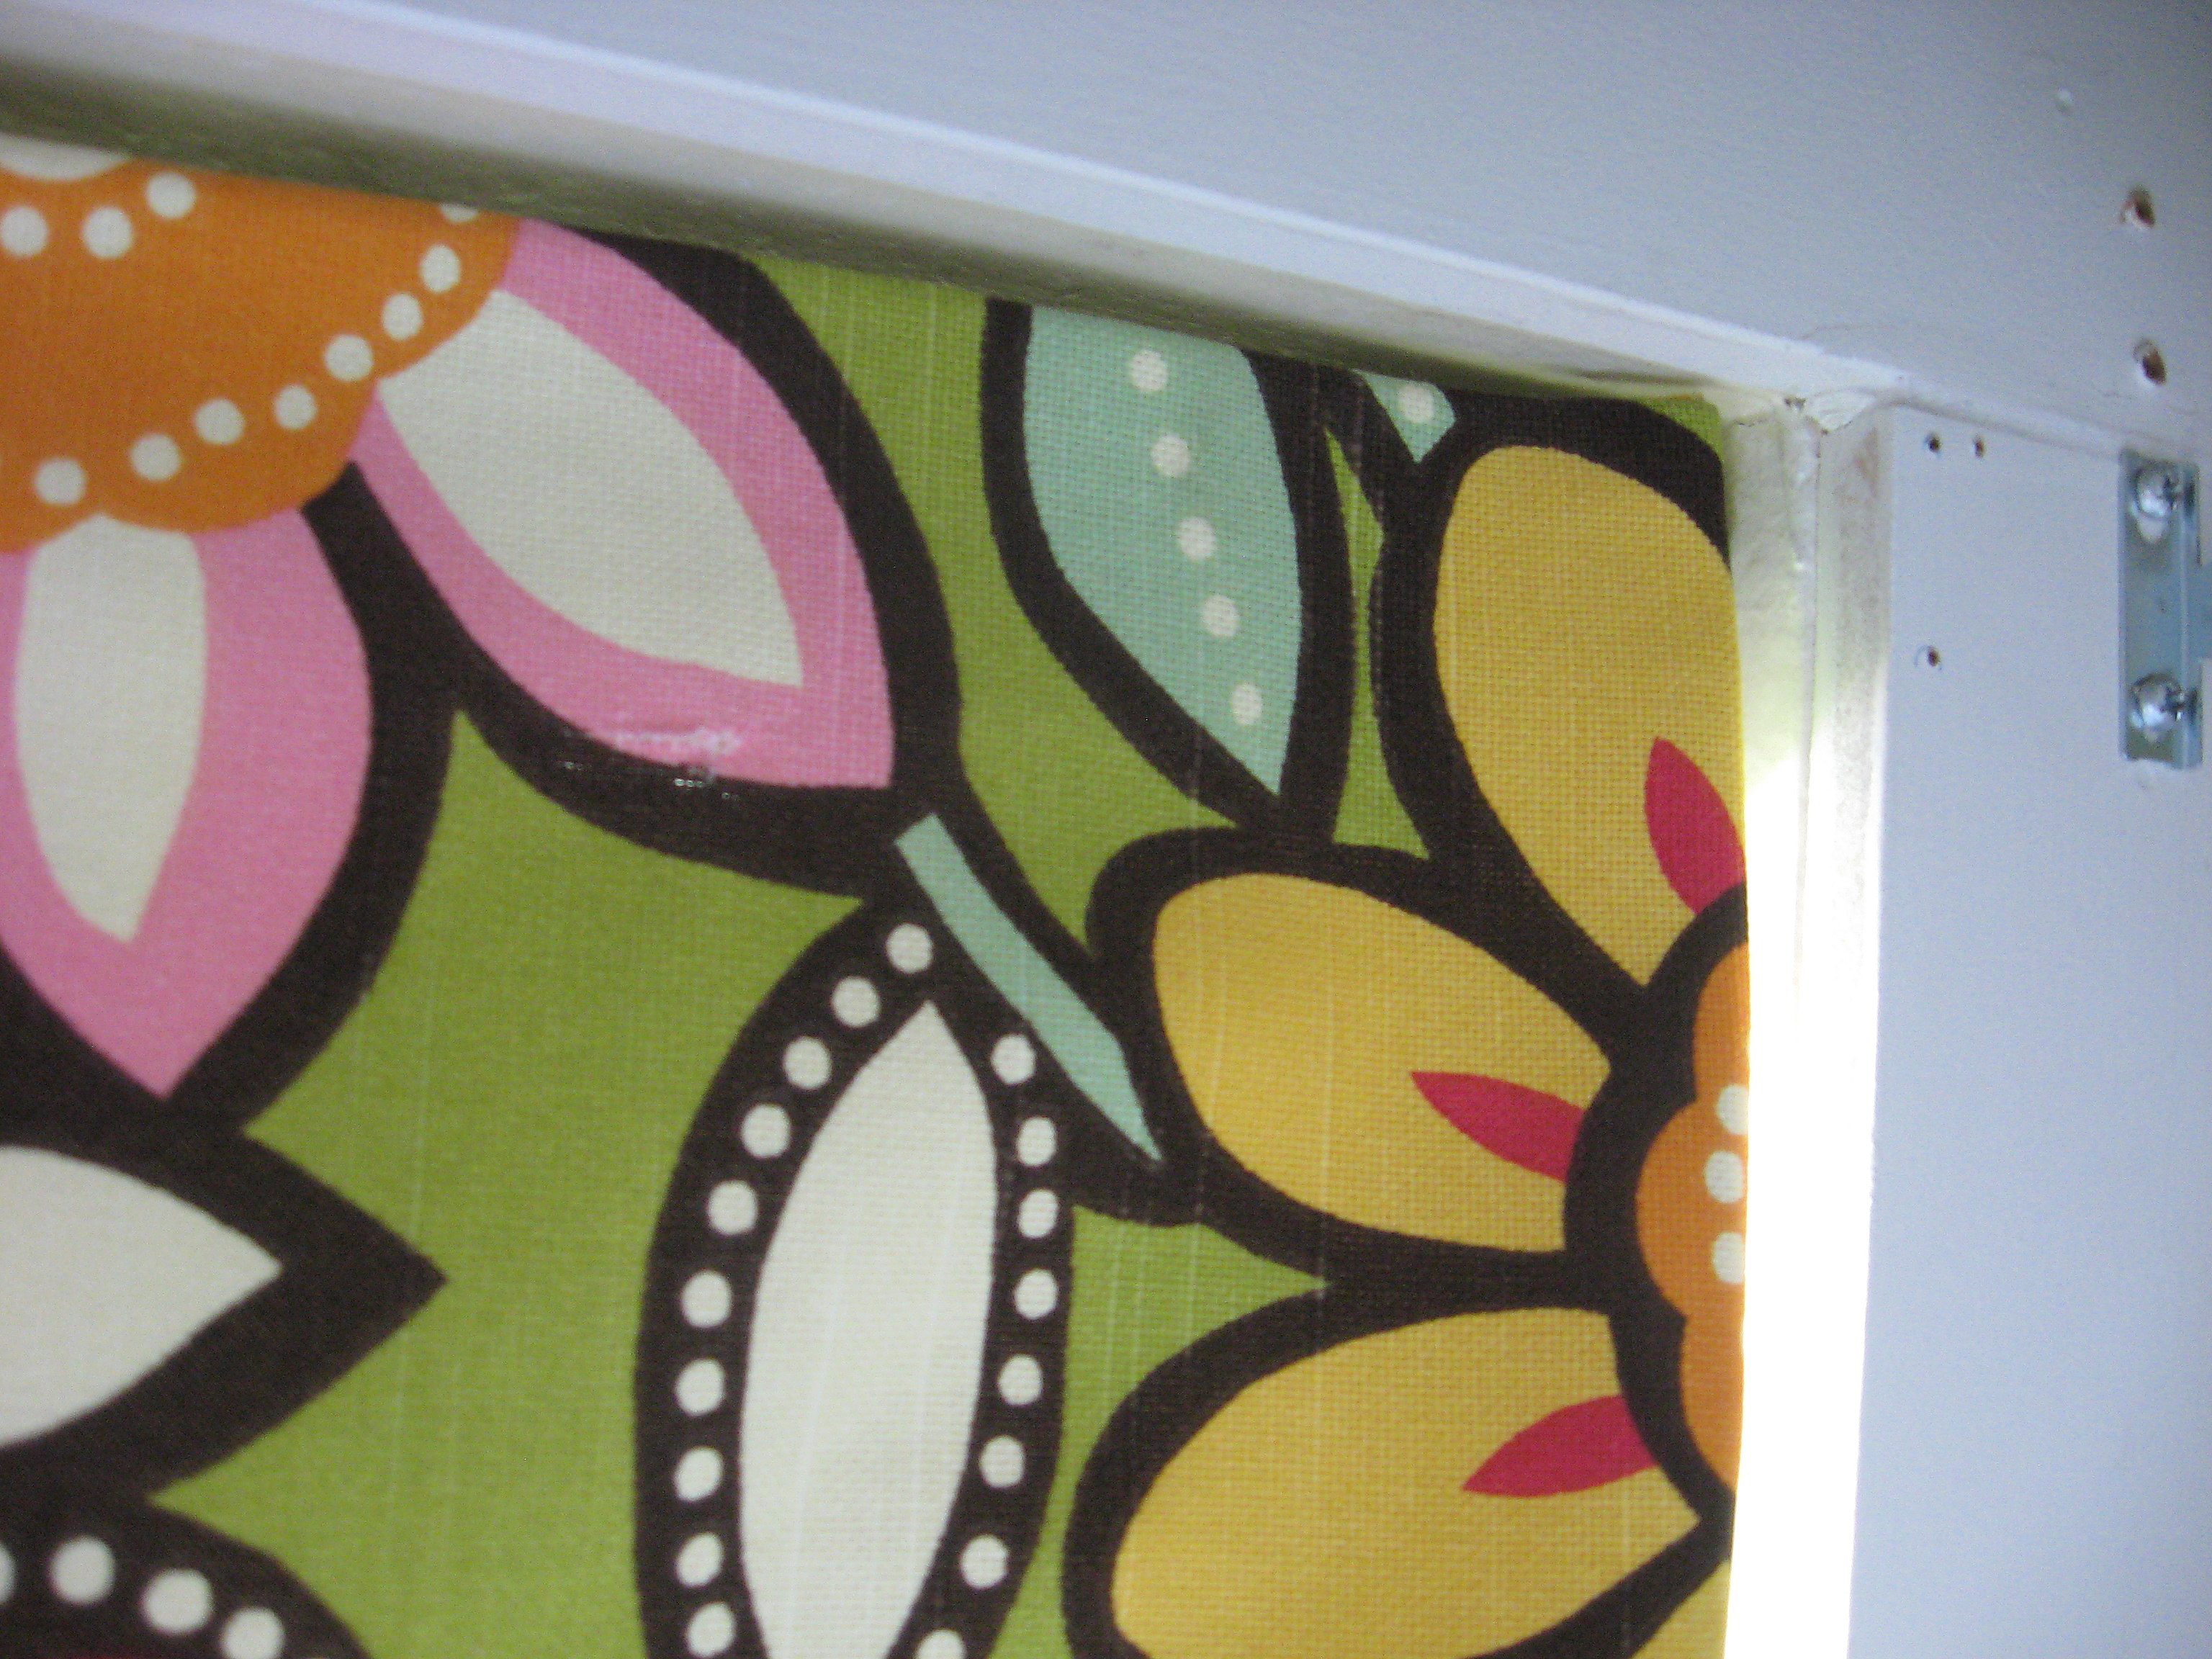
Now rehang the blinds in the brackets. You can see here how I left the fabric loose at the ends, so that I could lock the blinds back in the bracket properly.

But it lies nice and flat:
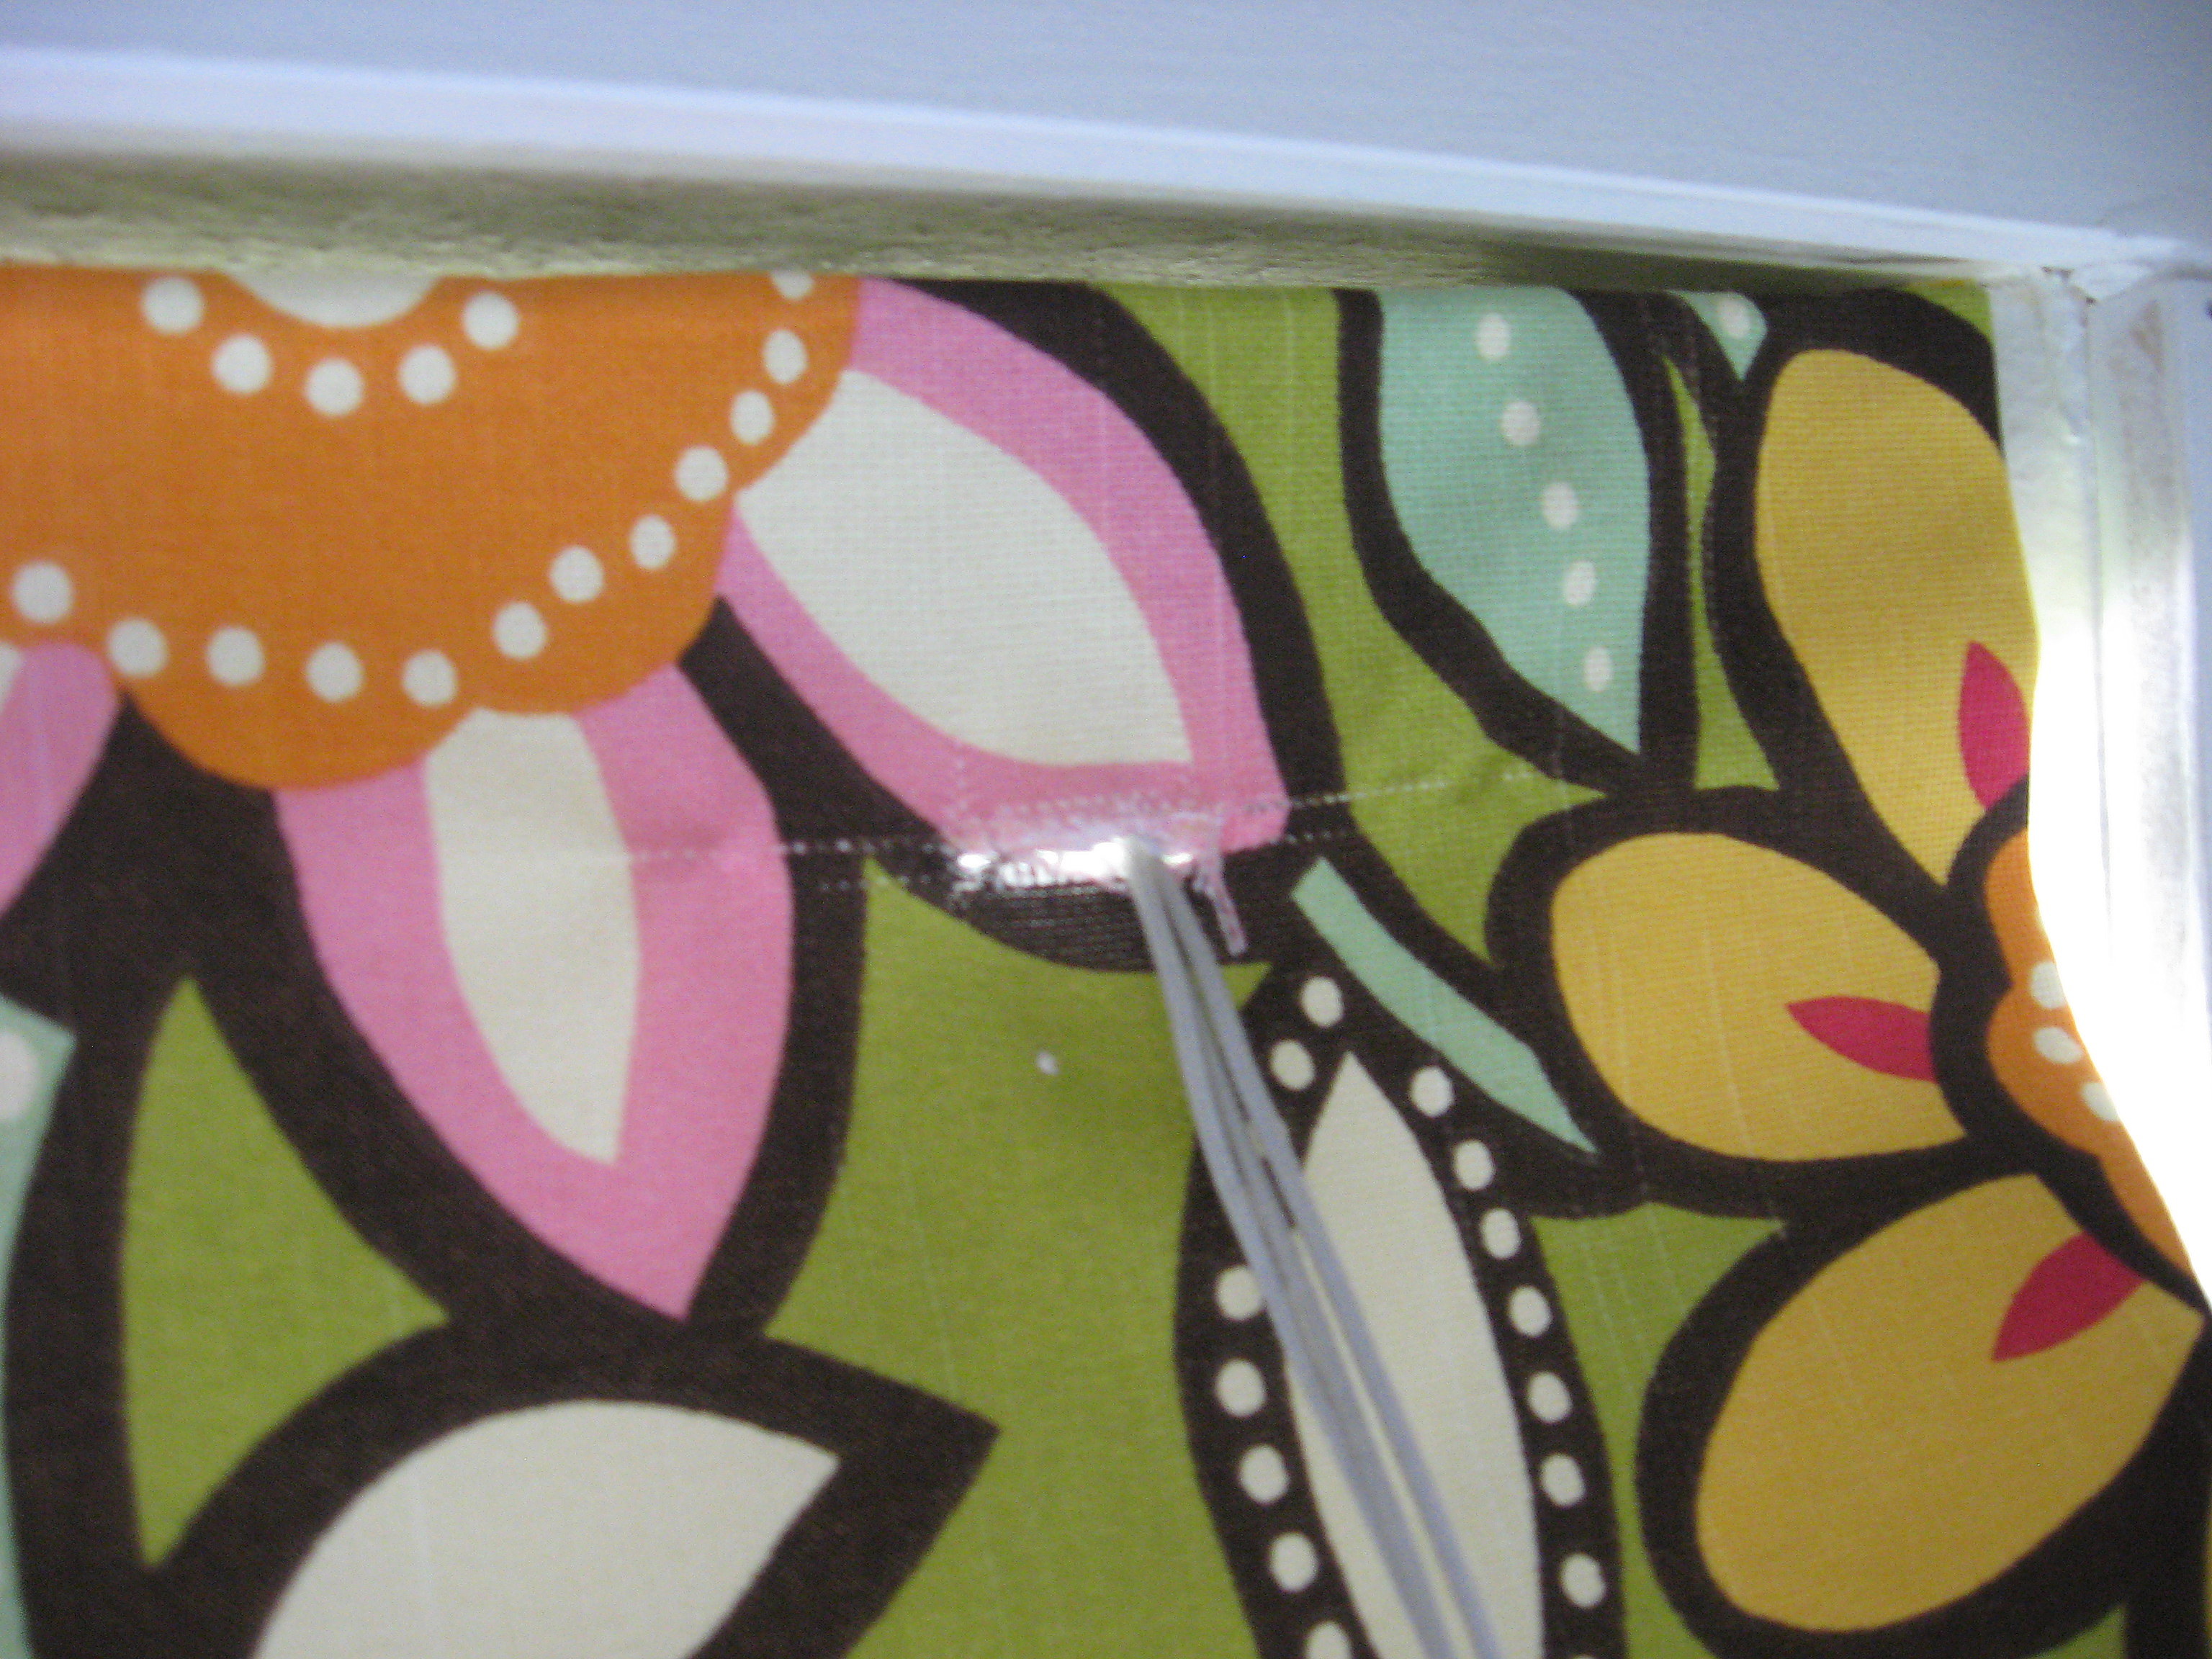
At this point the strings are behind the blind. I’ve seen people deal with this a couple of ways; I’ve seen a few people glue the fabric to the BACK of the top bar on the blinds, but I don’t like the way that looks. Most people seem to leave it behind – you can open and close the shade, but I think it’s inconvenient, and since this is in my little girl’s room I needed her to be able to do it on her own.
I opted to cut a slit in the shade right where the pull strings come out of the top bar. I threaded the pull strings through the slit to the front of the shade. Put a little fabric glue on the fabric around the slit so that it doesn’t fray or tear.
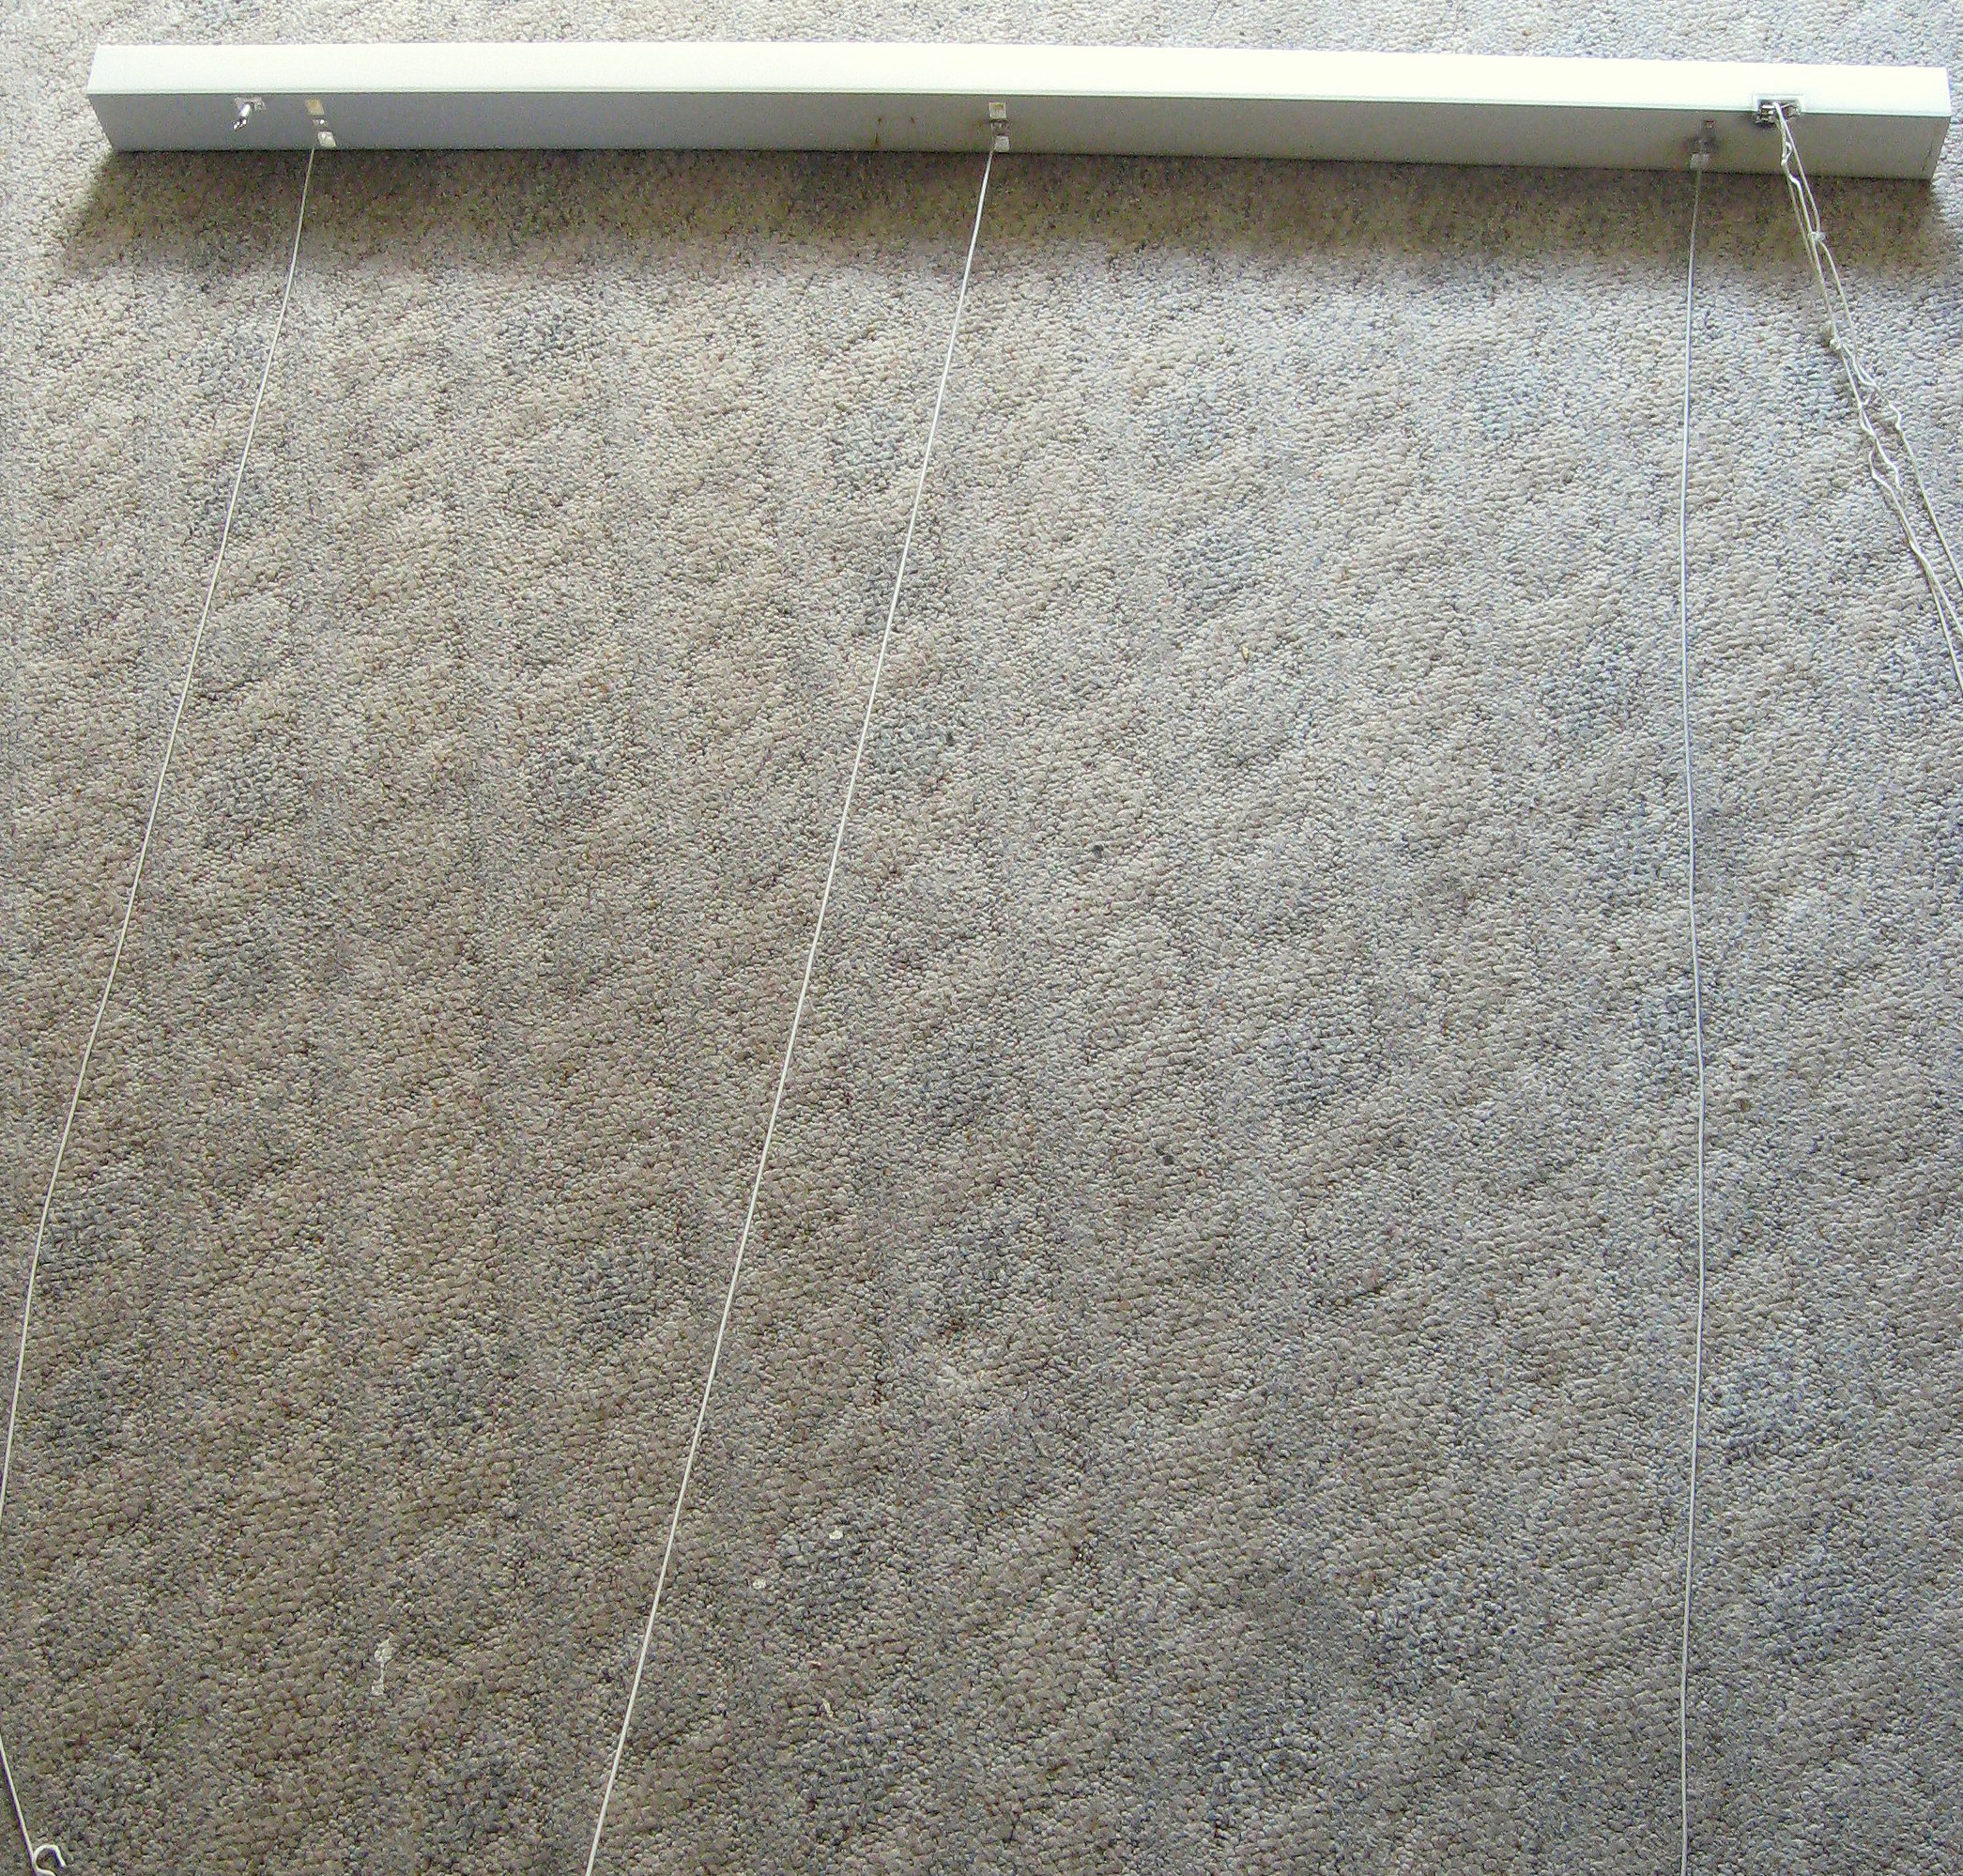
Here they are open:

And closed:
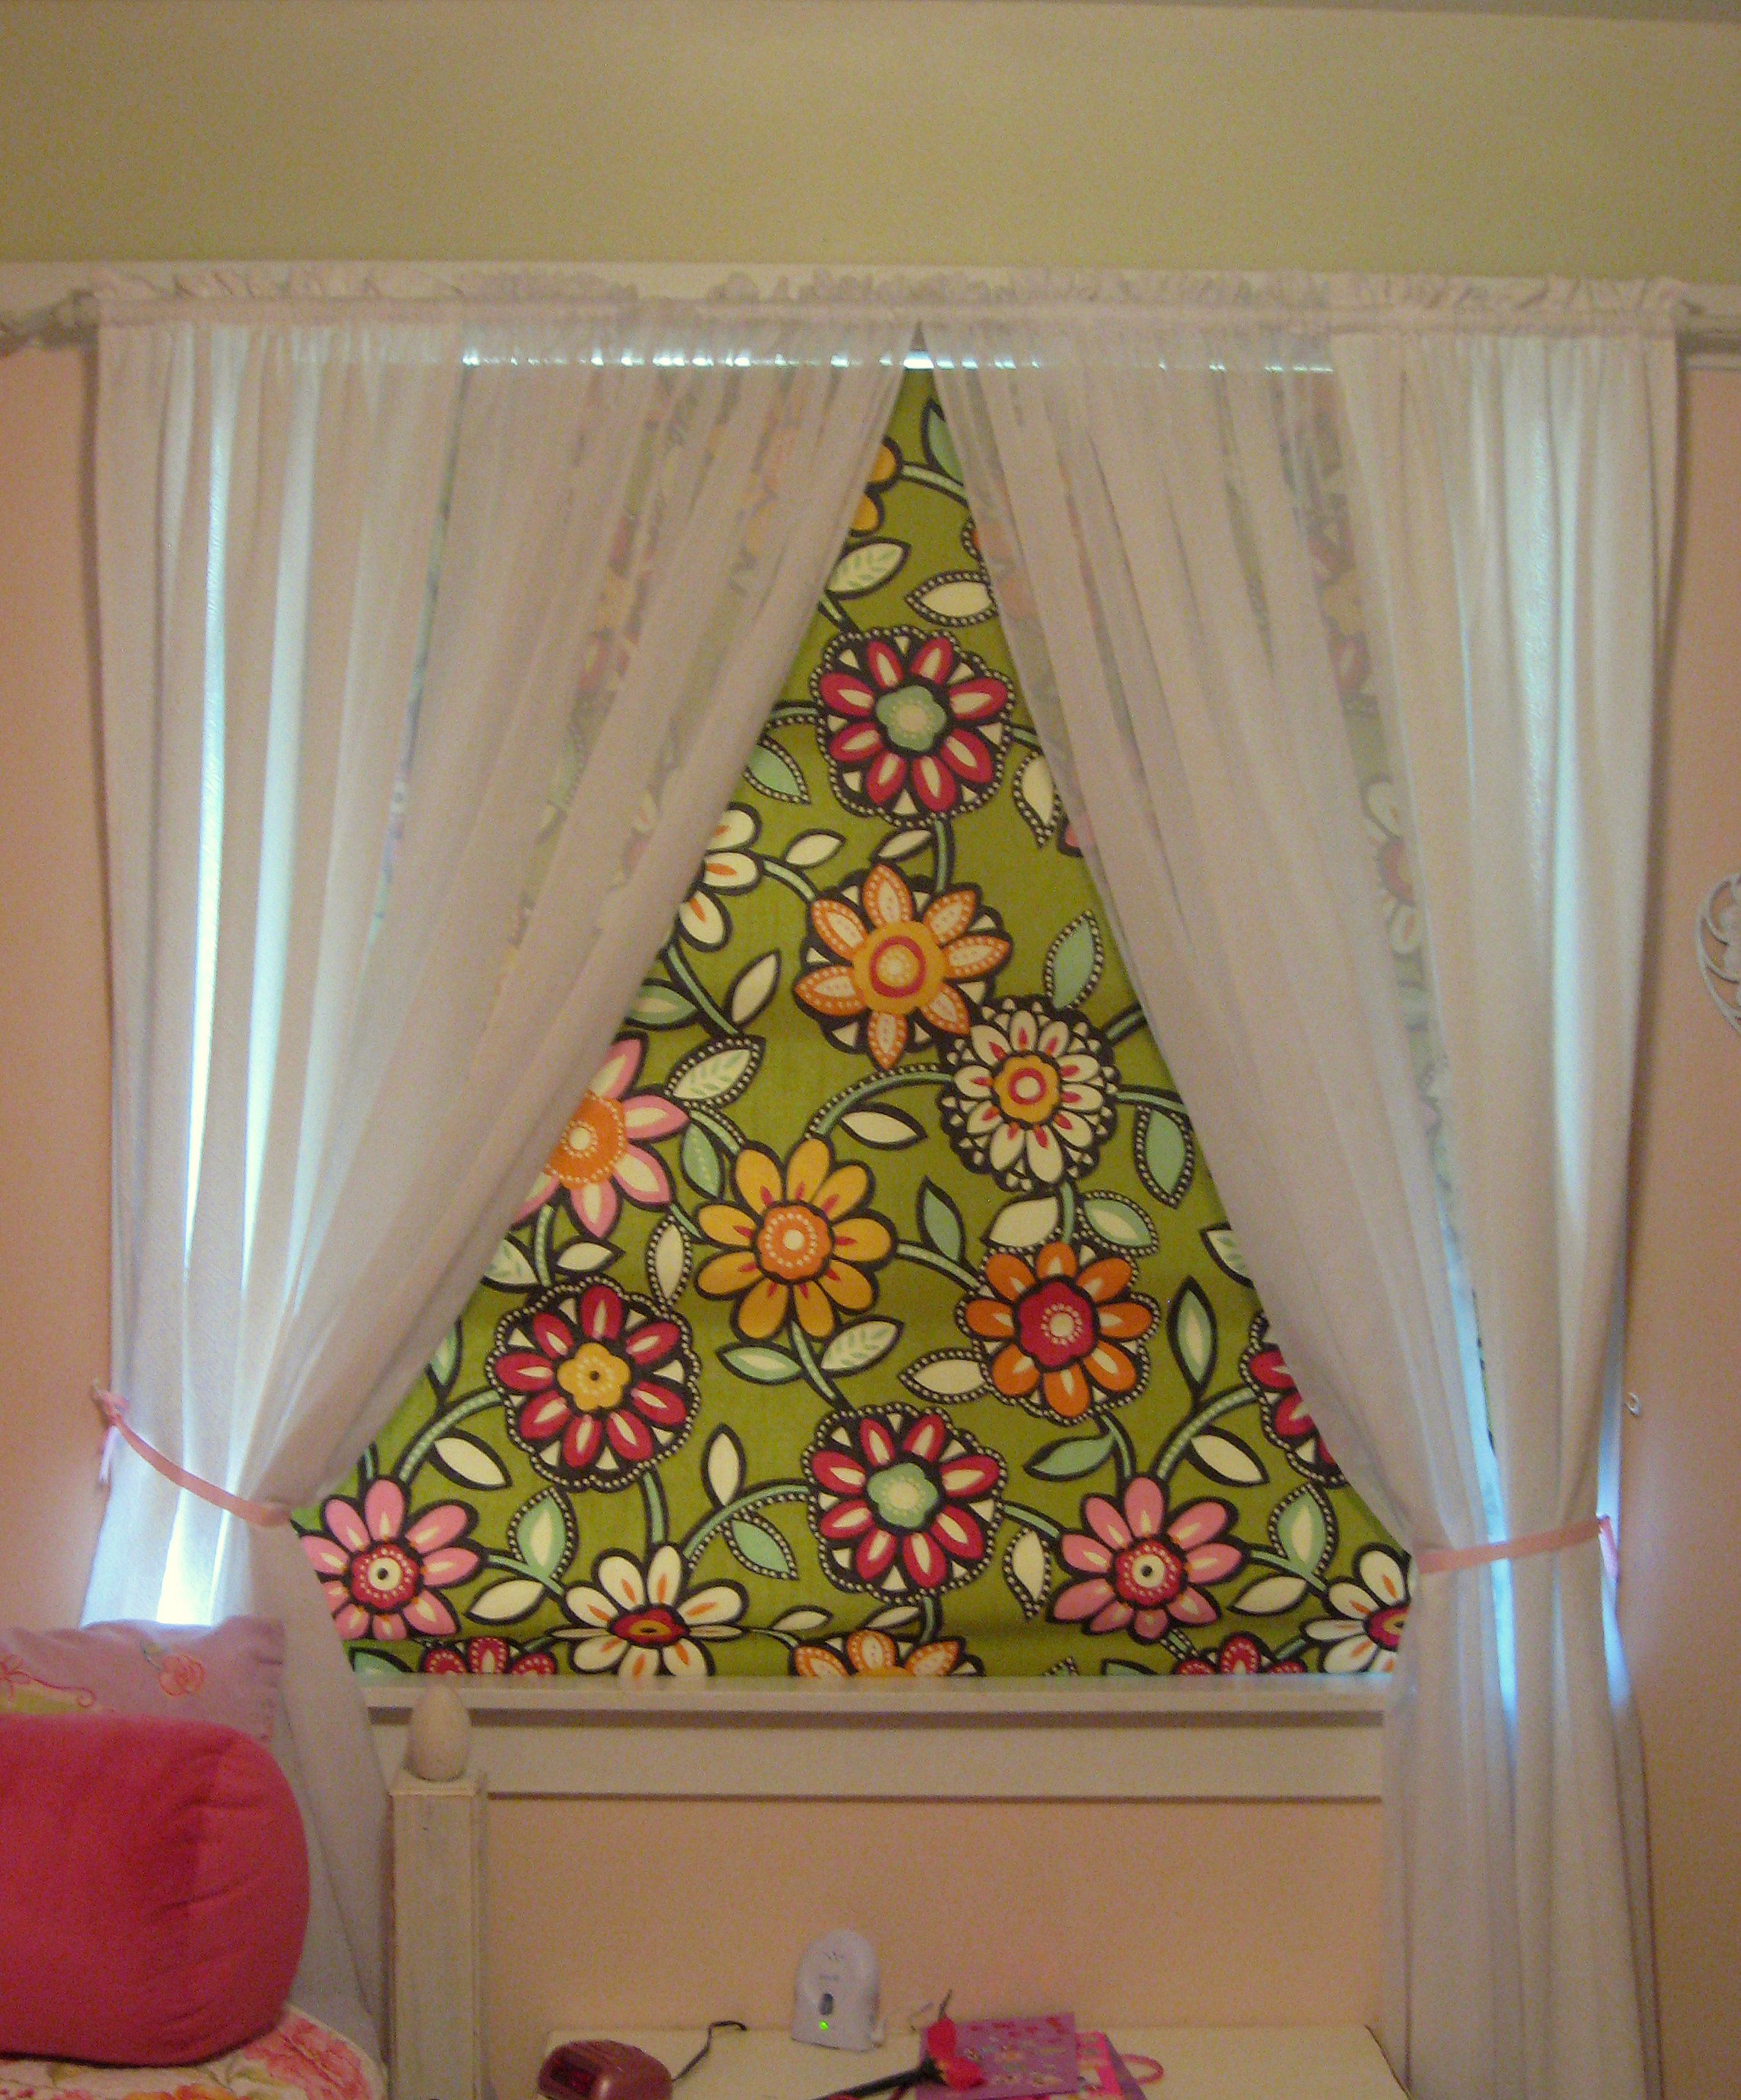
Much better!
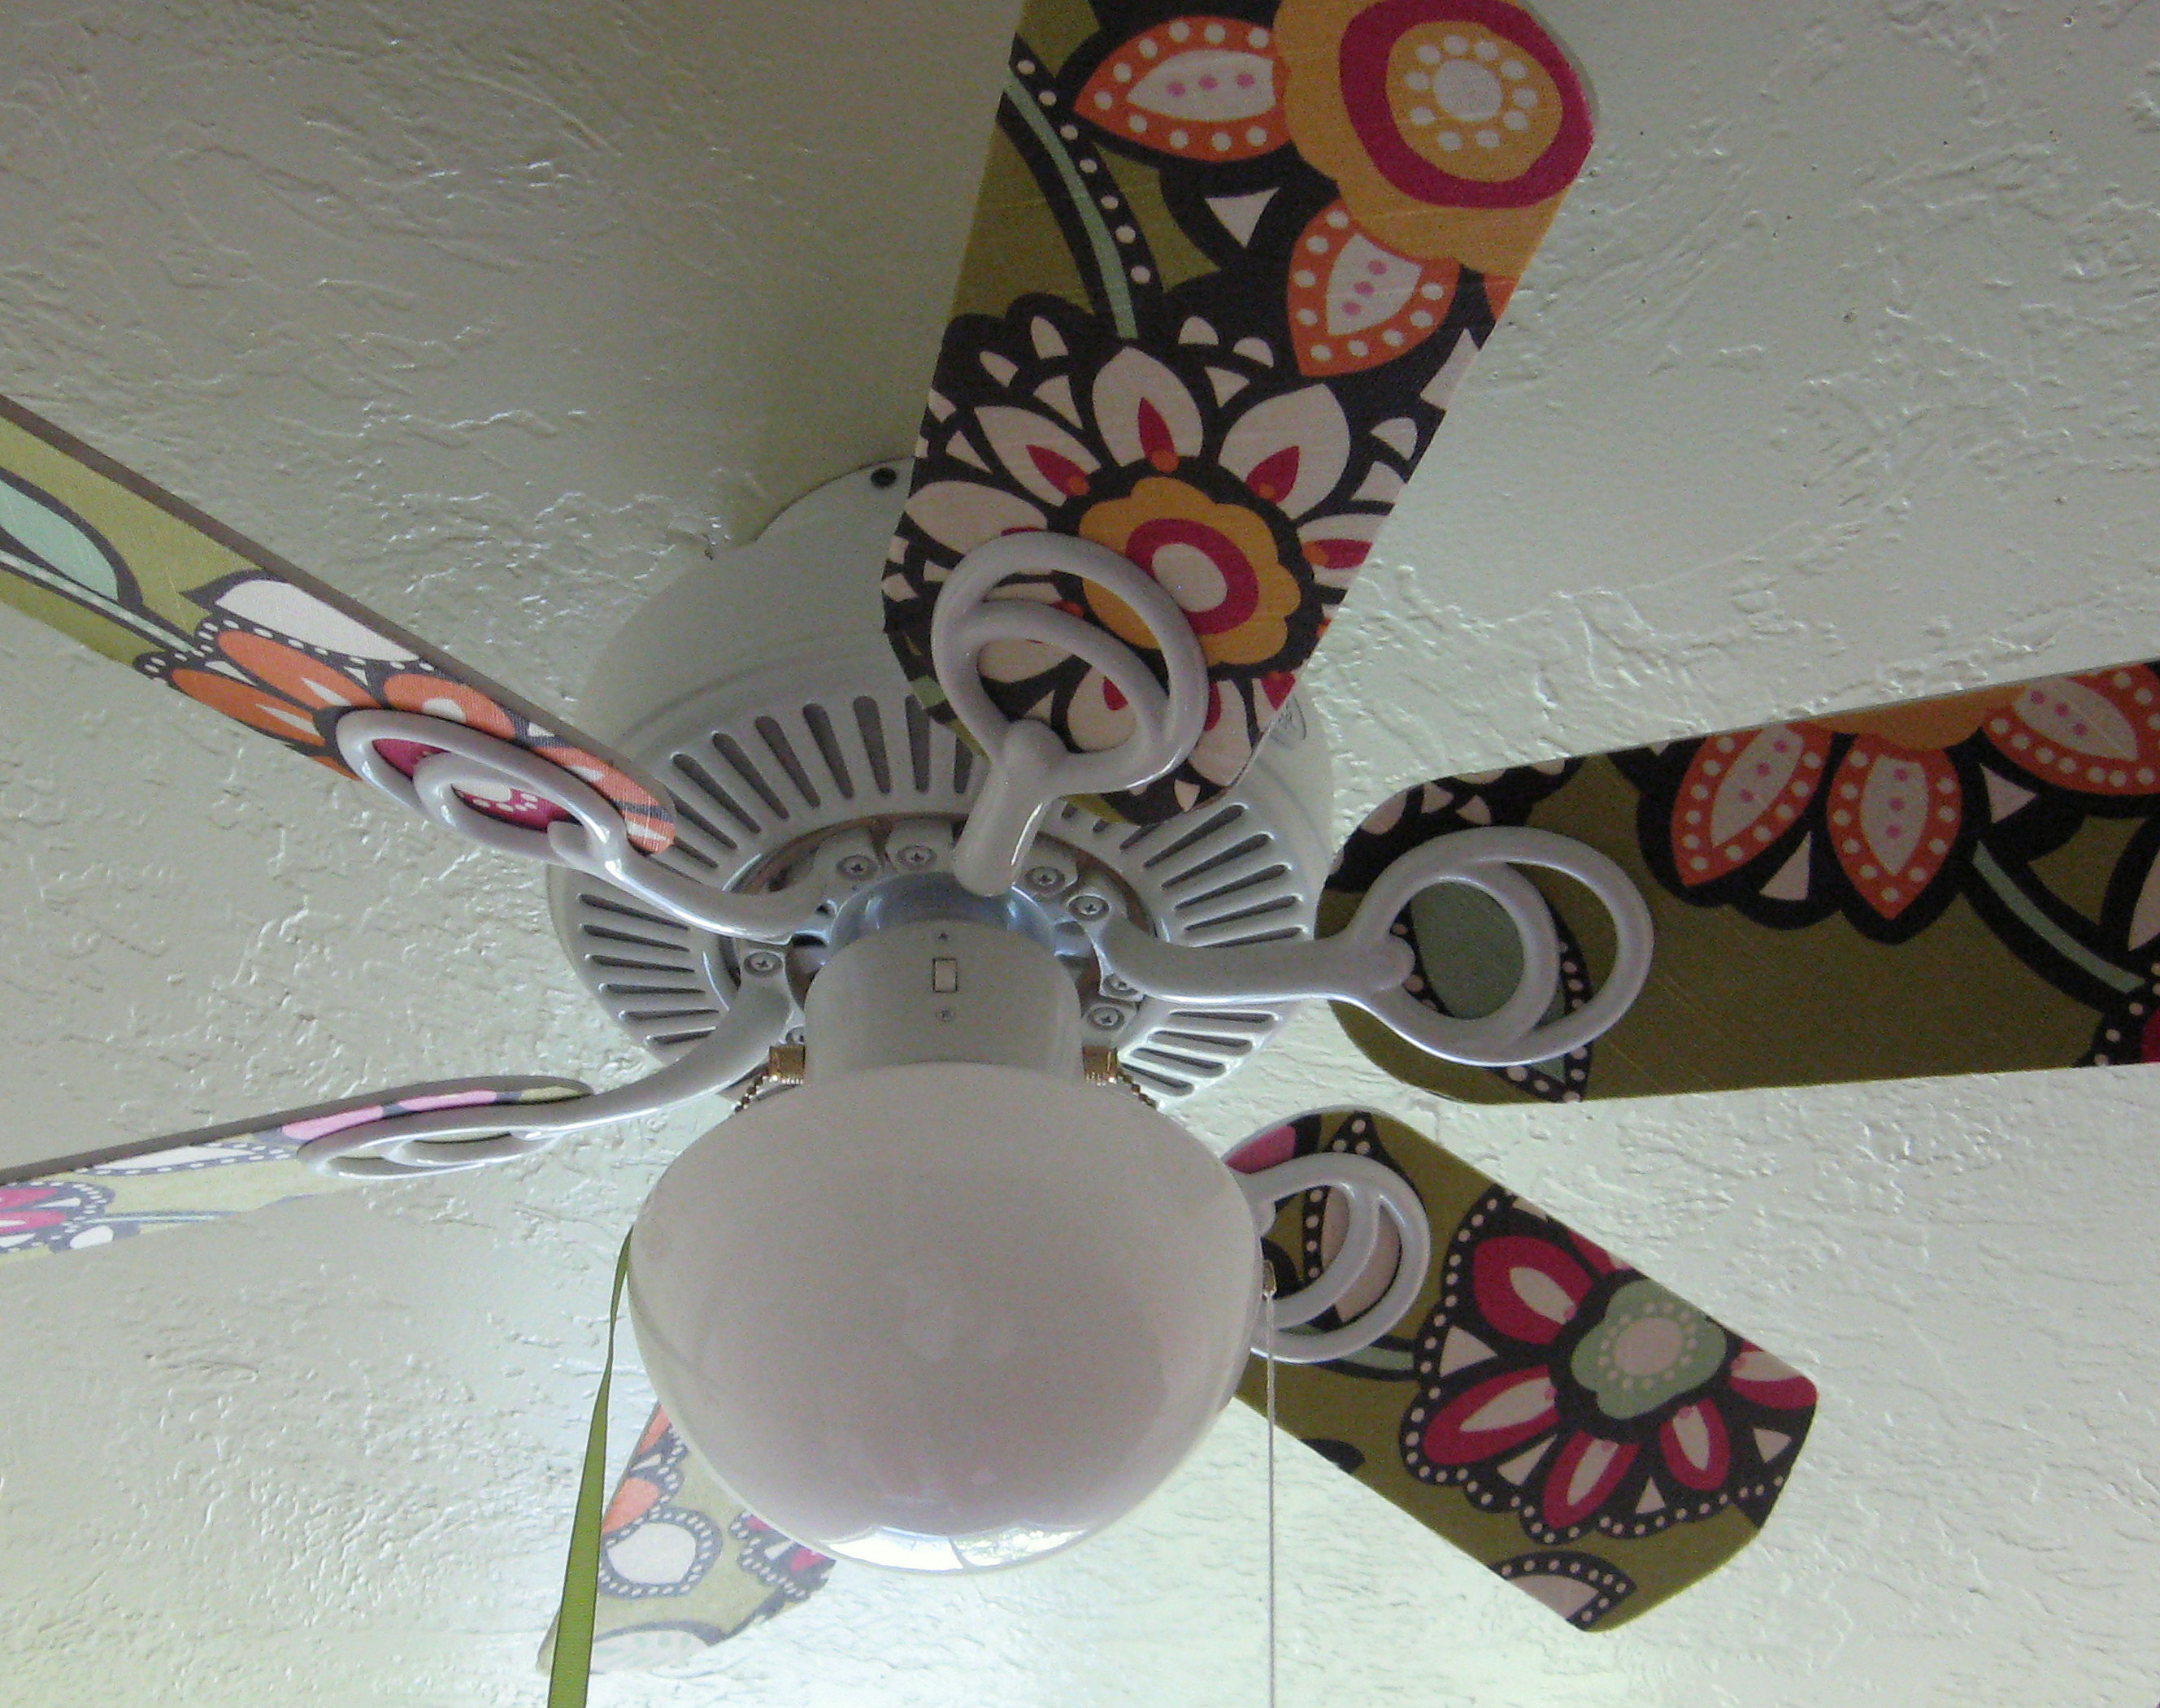
A PYP Best Blog! Update a Boring Ceiling Fan!
Just in case you missed this article on updating a boring ceiling fan the first time we shared it a couple of years ago, we are republishing it. After Sharon wrote this blog originally, we got an awesome response. This is one of the PYP Best Blogs!
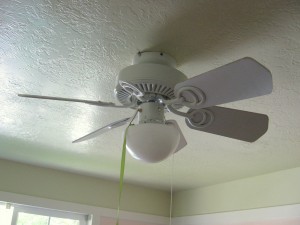
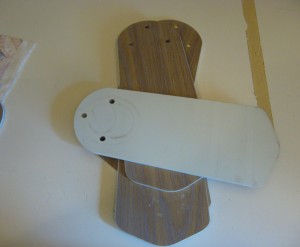
This is the ceiling fan that was in my daughter’s room when we bought our house:
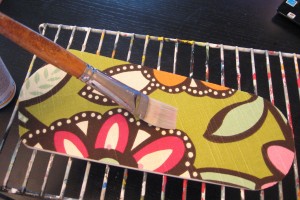
I used the leftover fabric from the roman shade that I made for her room and a bottle of Mod Podge and the whole project took about an hour.
Start by removing the fan blades. They come off easily with a screwdriver. Use this opportunity to give both fan and blades a good scrubbing!
Most fan blades will be reversible with a different color on each side so that you can change them out if you want to. This fan had brown wood grain on the other side, and since I can’t see myself EVER using it that way, that is the side I decided to cover.
Lay a fan blade out on the backside of the fabric and trace around it once for each fan blade, then cut them out.
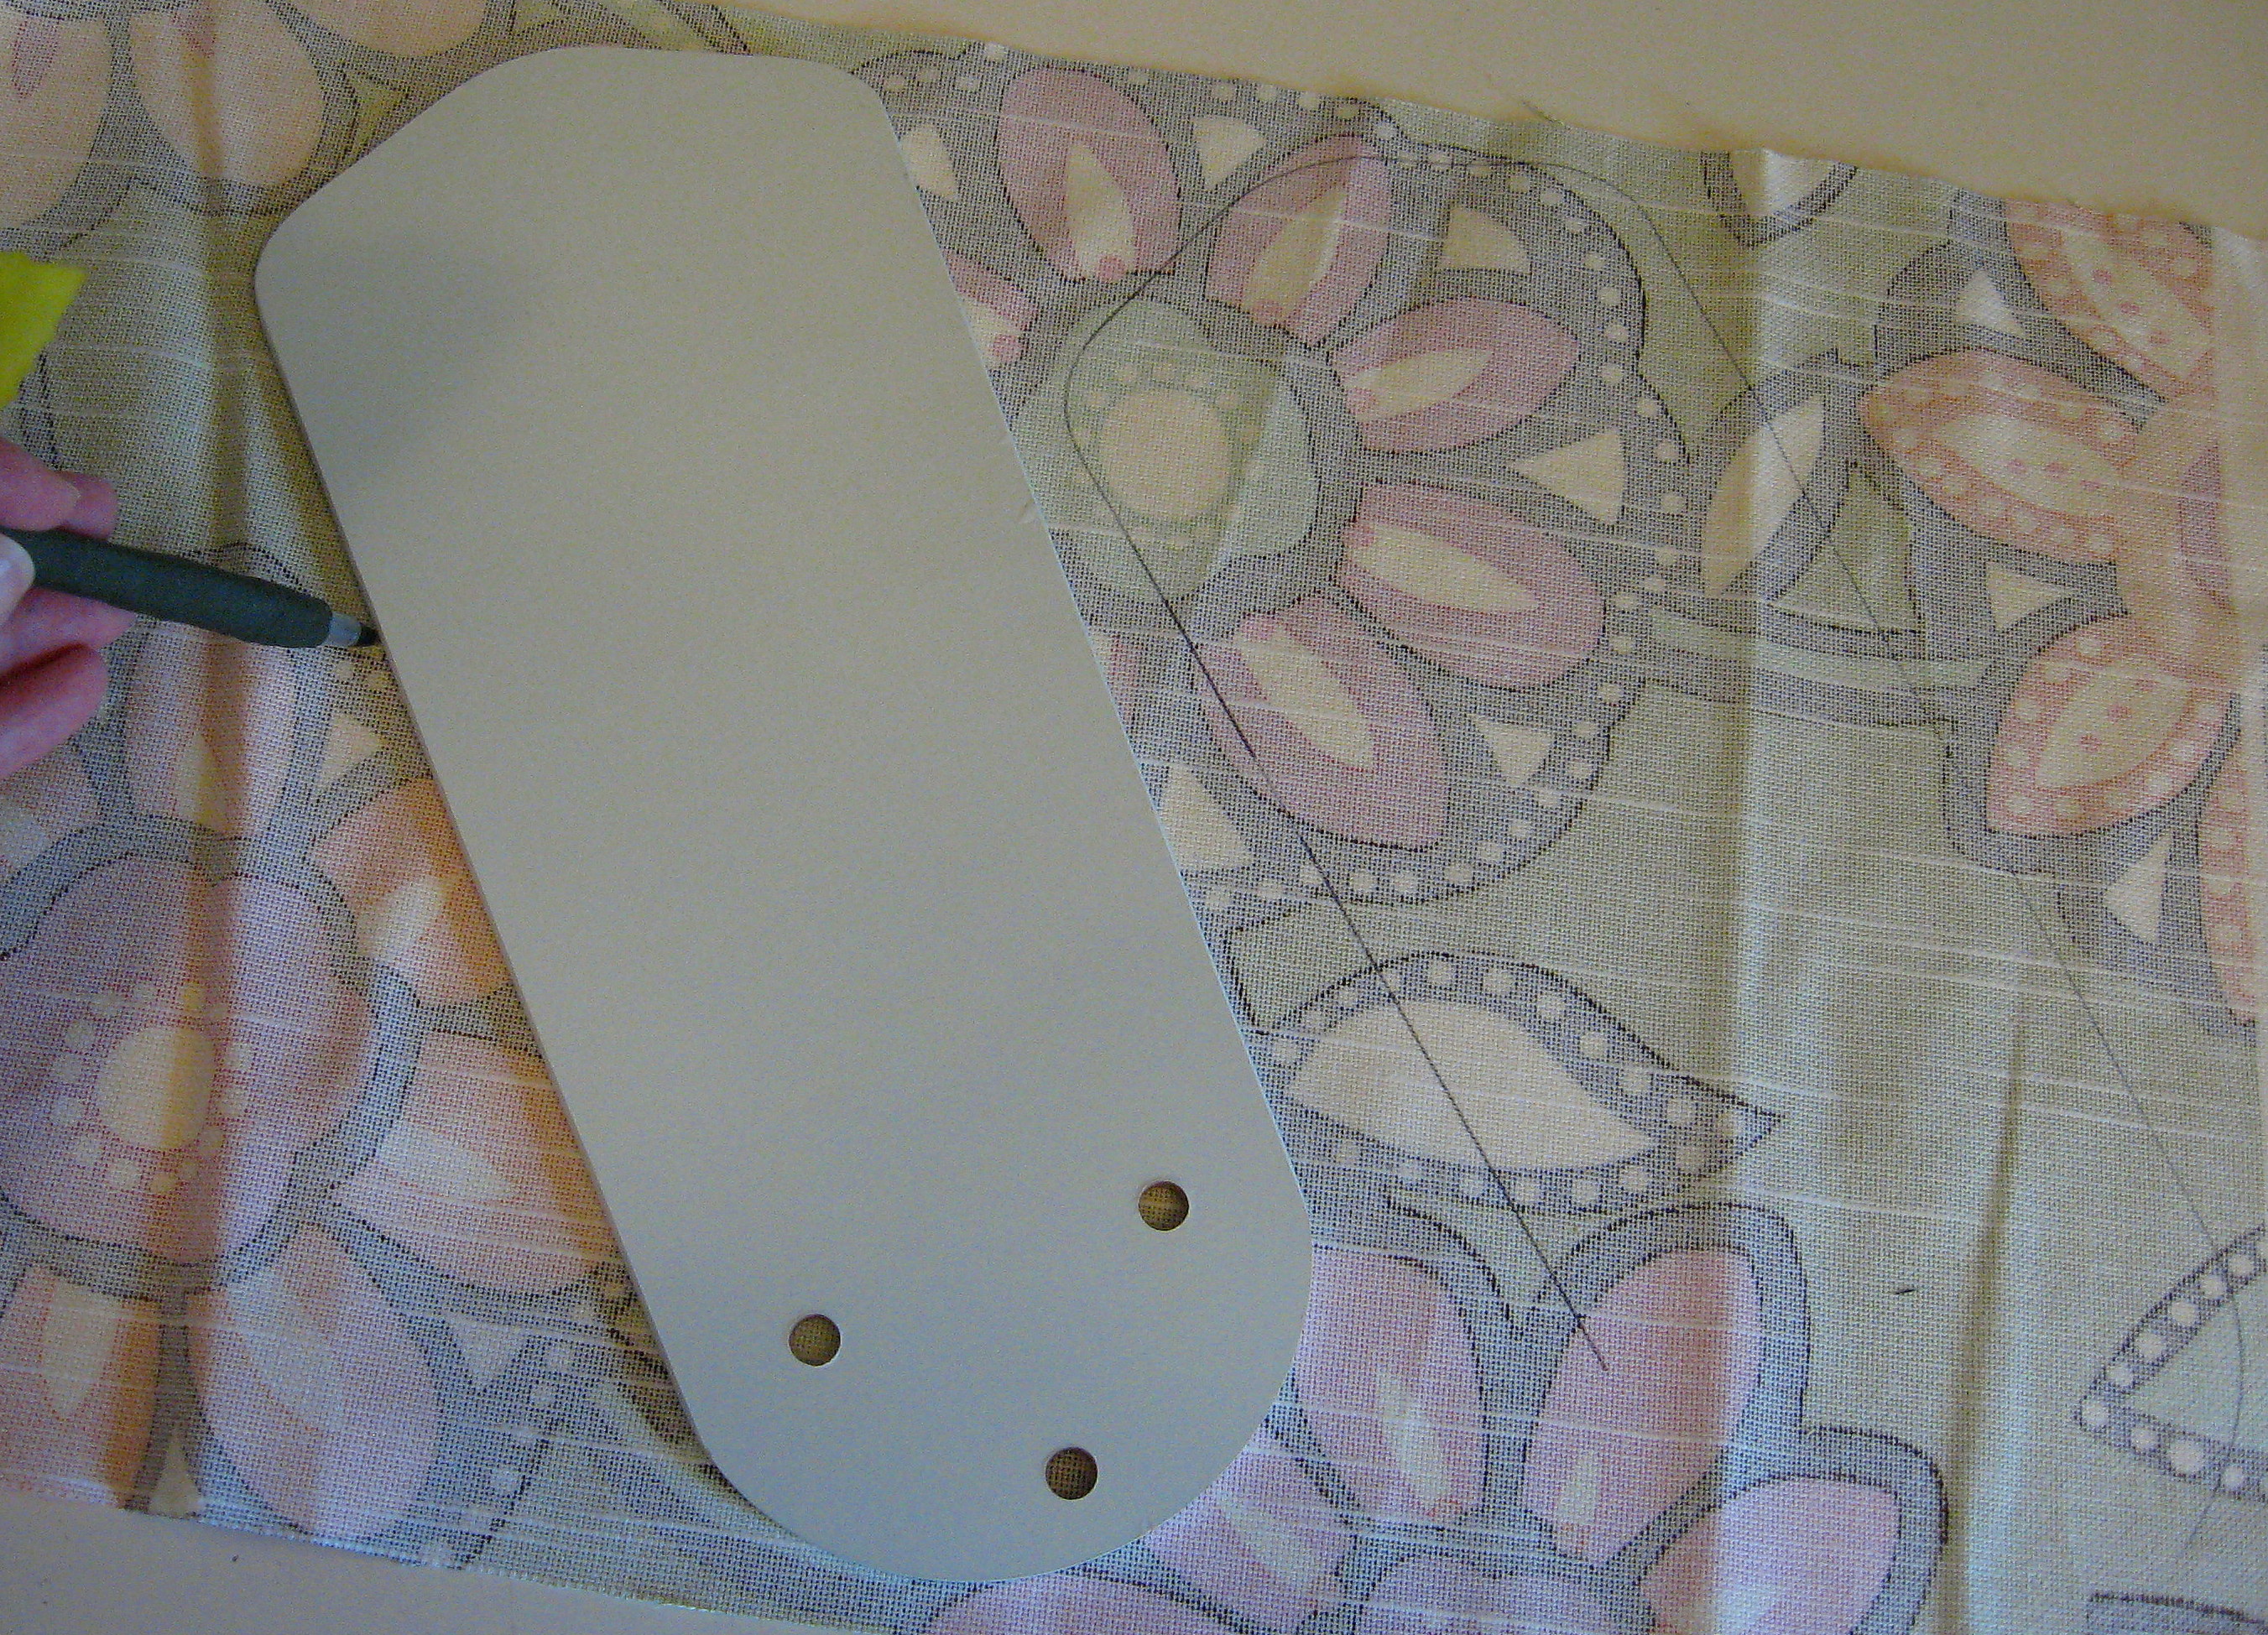
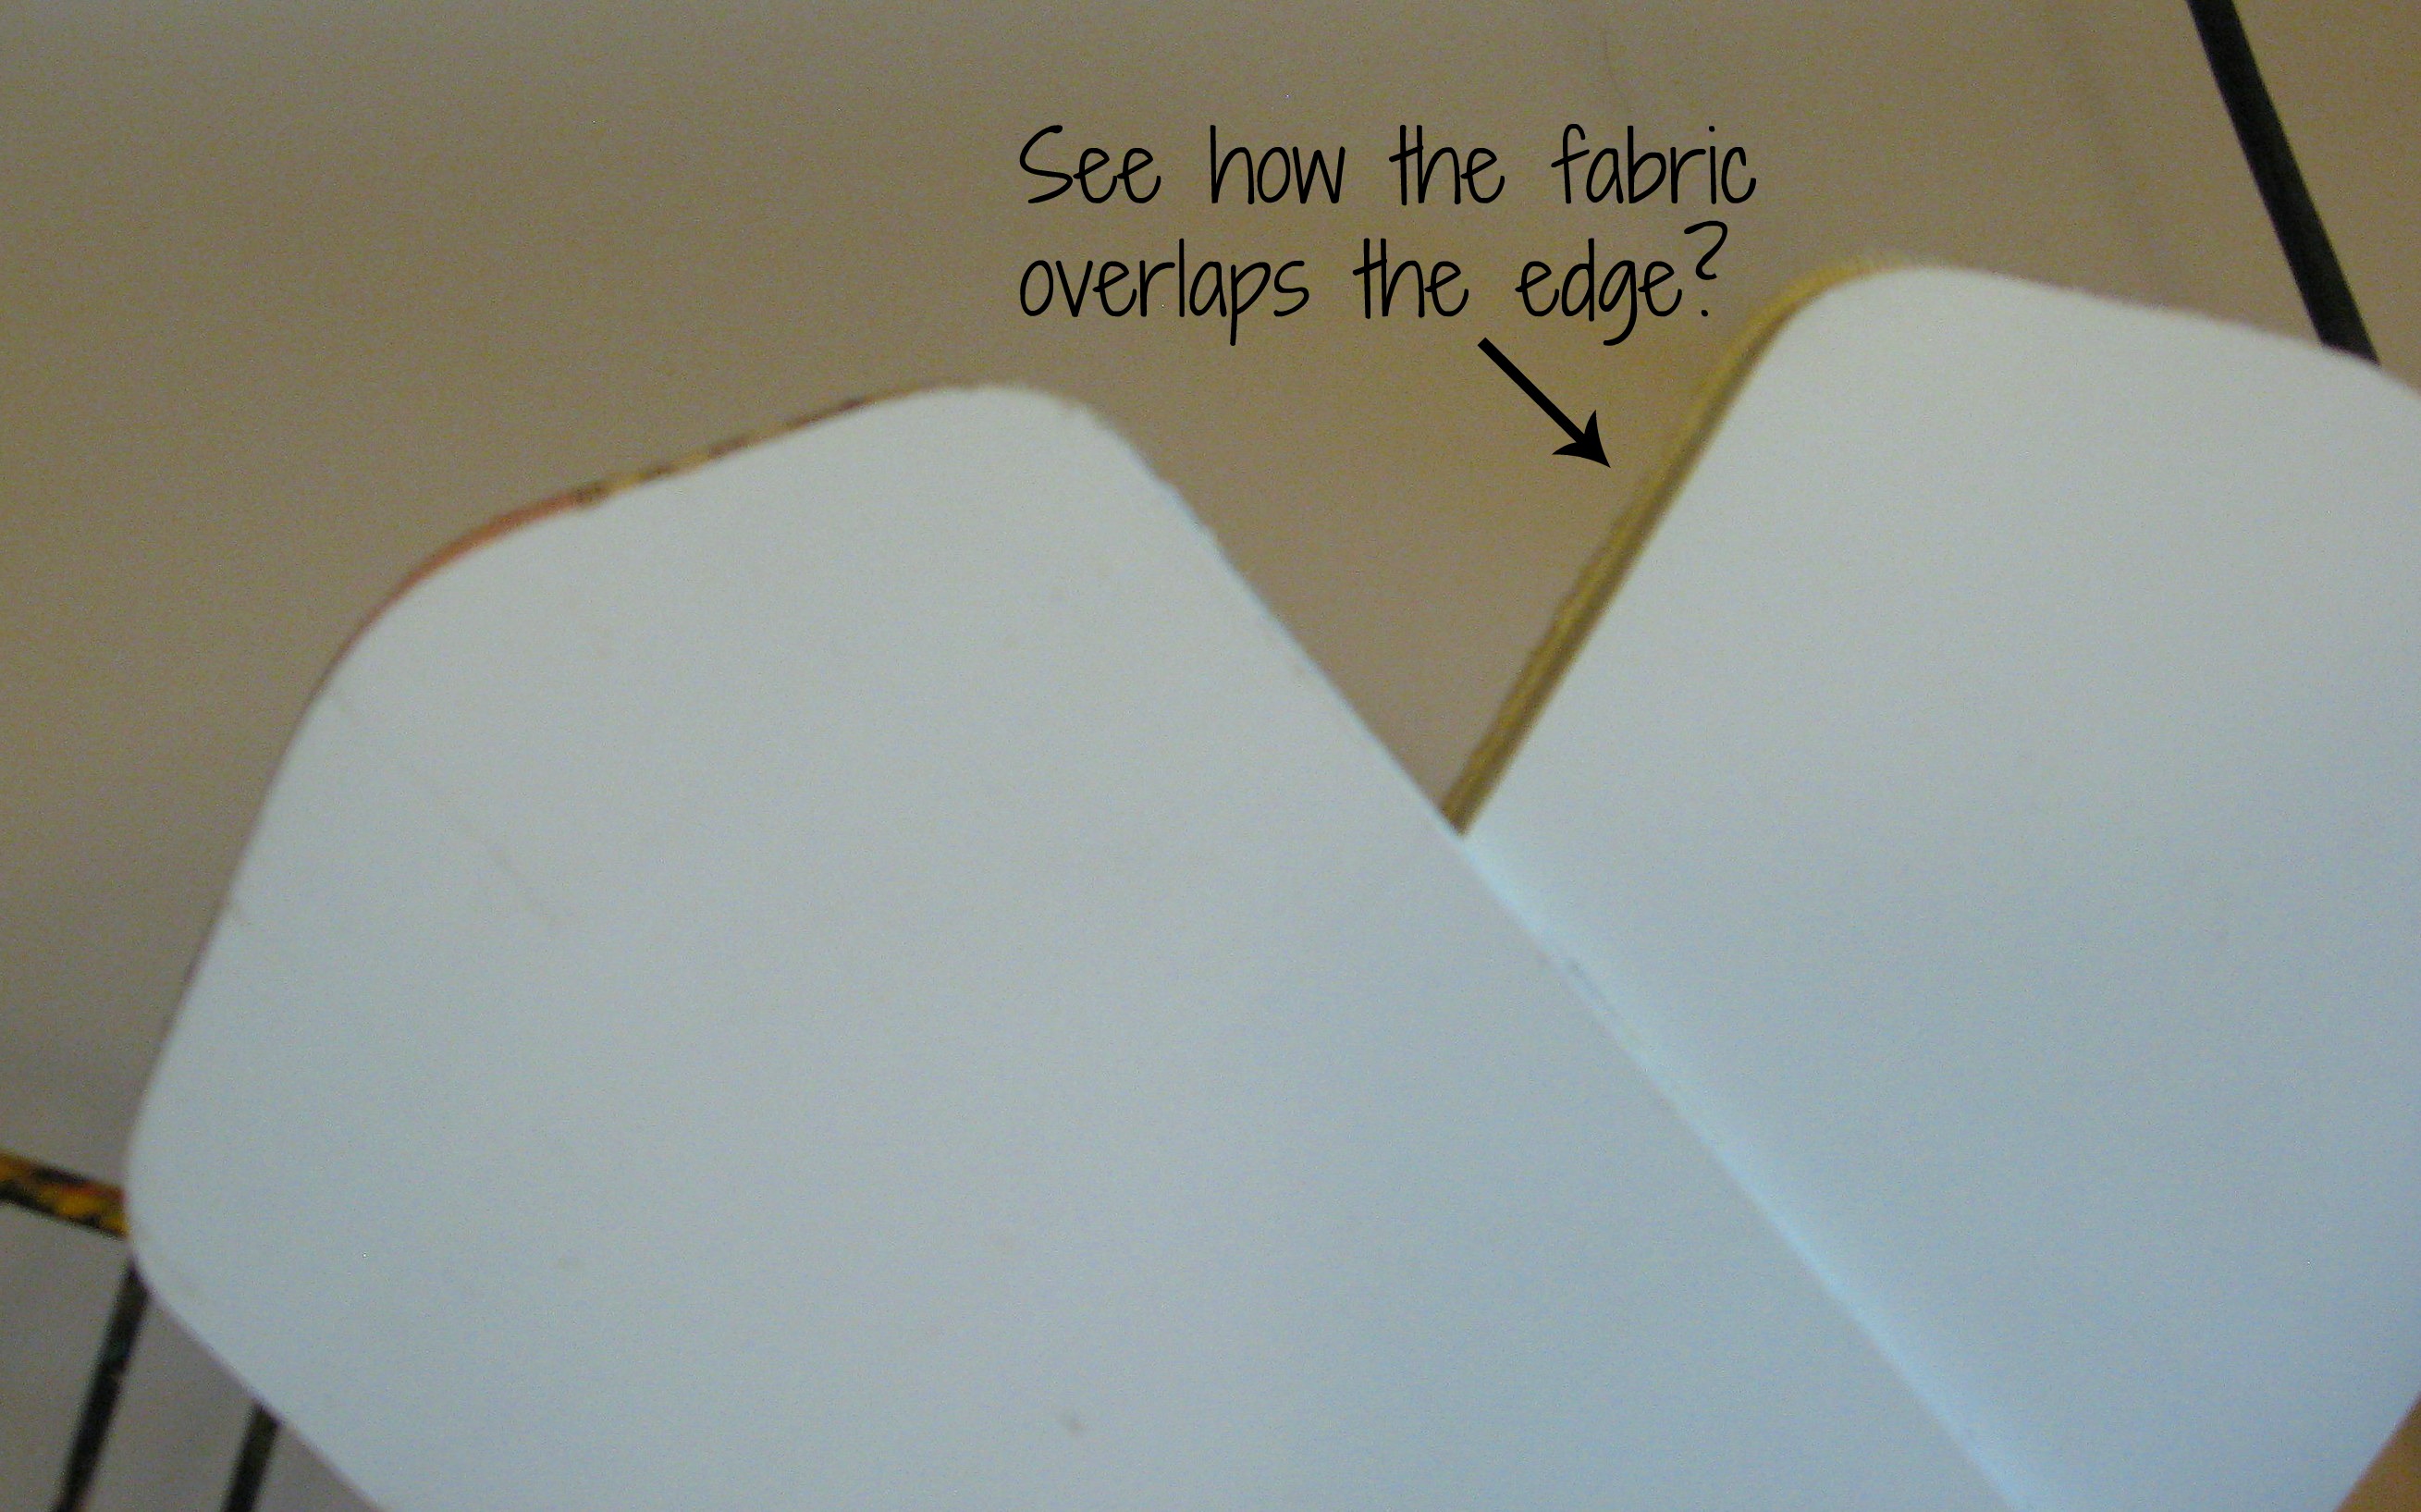
Err on the side of cutting too big and not too small. You don’t have to be too careful about the fabric fitting on exactly – if it hangs over just a touch it will be fine because no one will ever see the tops!
Now put a generous coat of Mod Podge on the fan blade
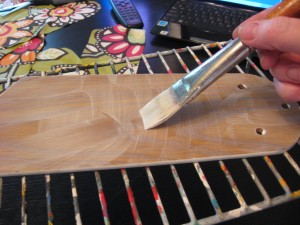 and then put the fabric on it. Smooth it down with your hand as it begins to dry; I didn’t even iron the fabric first. Between the Mod Podge and the smoothing, it will get the wrinkles out!
Let that dry about 15 minutes, then put a coat of Mod Podge on top of the fabric to seal it. Let that sit until it is completely dry,
 then use a drill bit to drill a hole through the fabric where the screw holes are in the fan blade. Make sure the Mod Podge is totally dry or the fabric will come twisting off when you start to drill through it (uh…you know. I’m IMAGINING that is what would happen anyway…..)
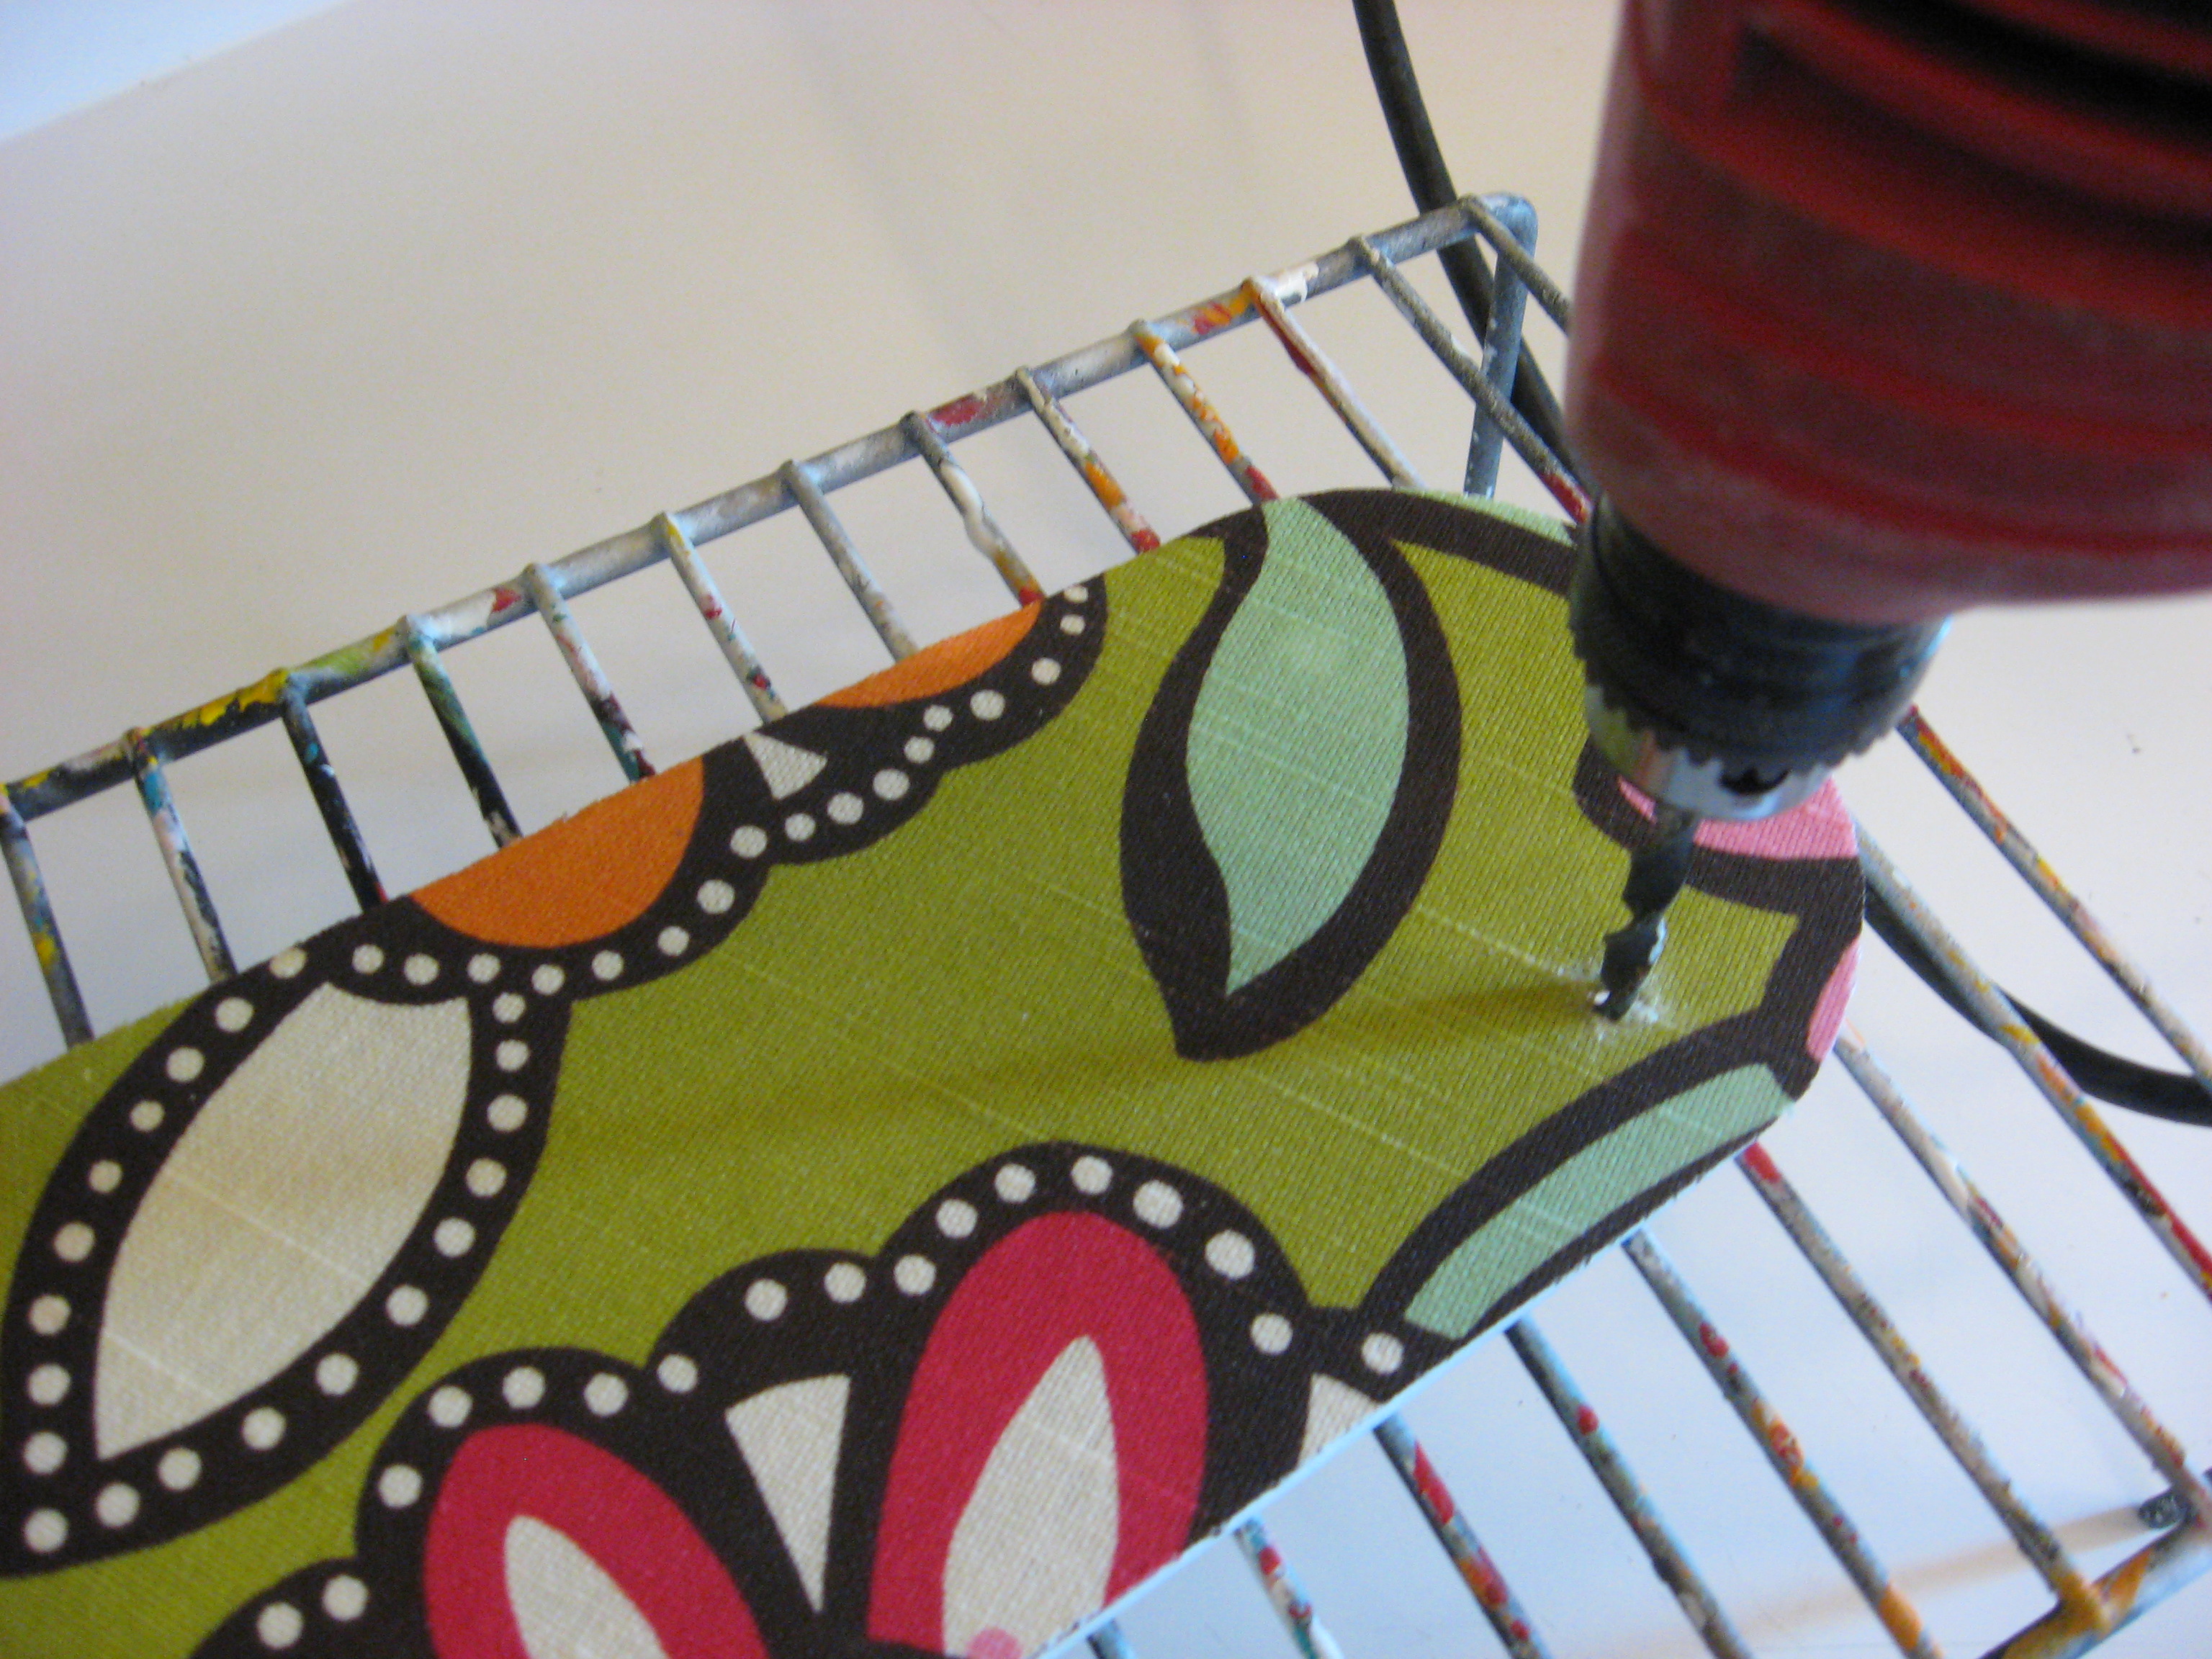
Screw the finished fan blades back into place and enjoy!
*LAST DAY!* Sam’s Club – $45 for a One-Year Membership Package plus $20 GC and $26.23 of free food coupons!

Sam’s Club – $45 for a One-Year Membership Package
A PYP Best Blog! Painting Laminate Furniture!
Just in case you missed this article on painting laminate furniture the first time we shared it a couple of years ago, we are republishing it. After Sharon wrote this blog originally, we got an awesome response. This is one of the PYP Best Blogs!
If you google “How to paint laminate furniture” you will get dozens of different results. Being able to paint cheap laminate furniture and give it new life is the hallmark of the DIY blogger. I will admit that until recently I usually ignored these posts. I’ve been painting laminate furniture since before most of these bloggers were out of diapers – back in the day when everyone said it was impossible to do! I got great results – I have a cheap WalMart shelf in my kitchen that I first painted 19 years ago and it still looks great – but it was labor intensive with days of sanding, priming, painting and more sanding to get the desired results.
Well, I am glad that this old dog finally paid attention to some of those DIY bloggers and learned a new trick; I’m converted! I have always used Kilz brand primer, and I’m sure I still will, but what I have learned is that some primers are gripping primers and some are not. If you want to paint a surface like laminate that the paint won’t adhere to, you’ve got to give it something to stick to. Enter this wonder:
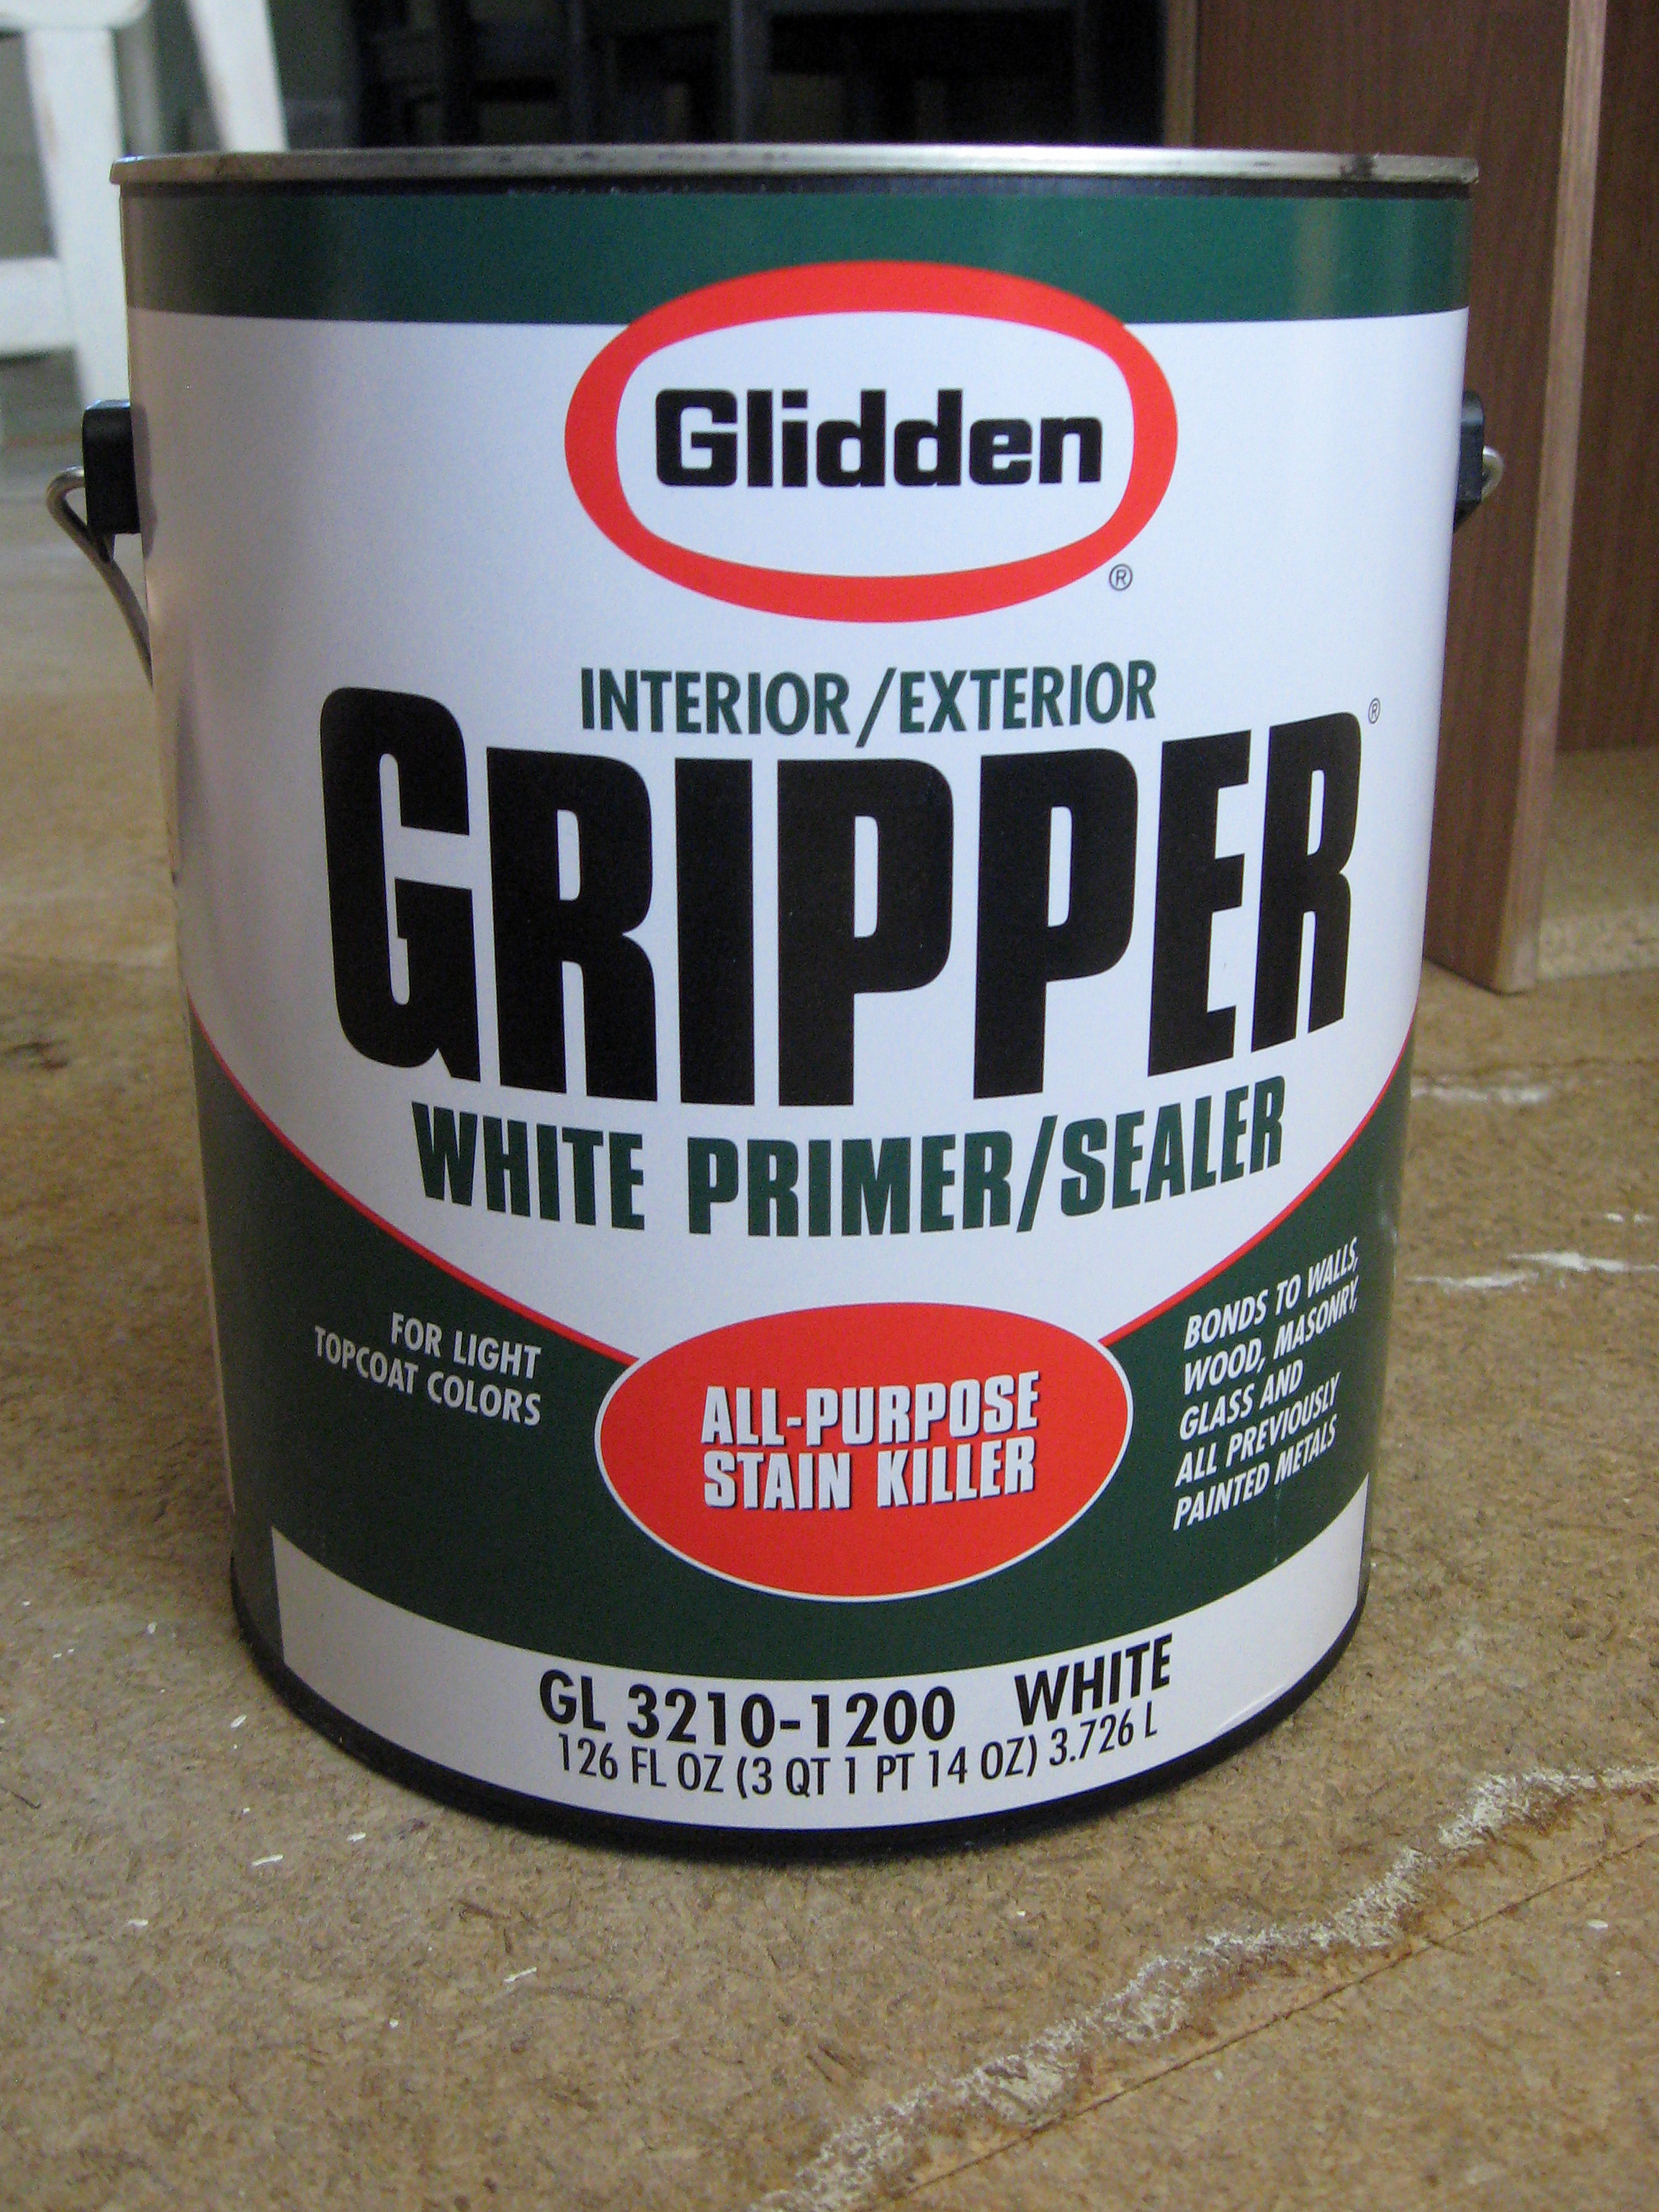
It grips to the surface to be painted with NO SANDING. I bought this straight off the shelf at Home Depot (have them shake it up for you while you’re there!). It is pretty pricey stuff, but it seems to go a long way. It comes in both white and grey; get white if your paint is light and use grey if it is dark.
I had a laminate Ikea wardrobe that I have been wanting to paint forever, but I knew all that sanding was going to be a pain so I kept putting it off. I thought this was the perfect project to try out the Gripper on.
I forgot to take a picture of it before I took the doors off, but you get the idea…
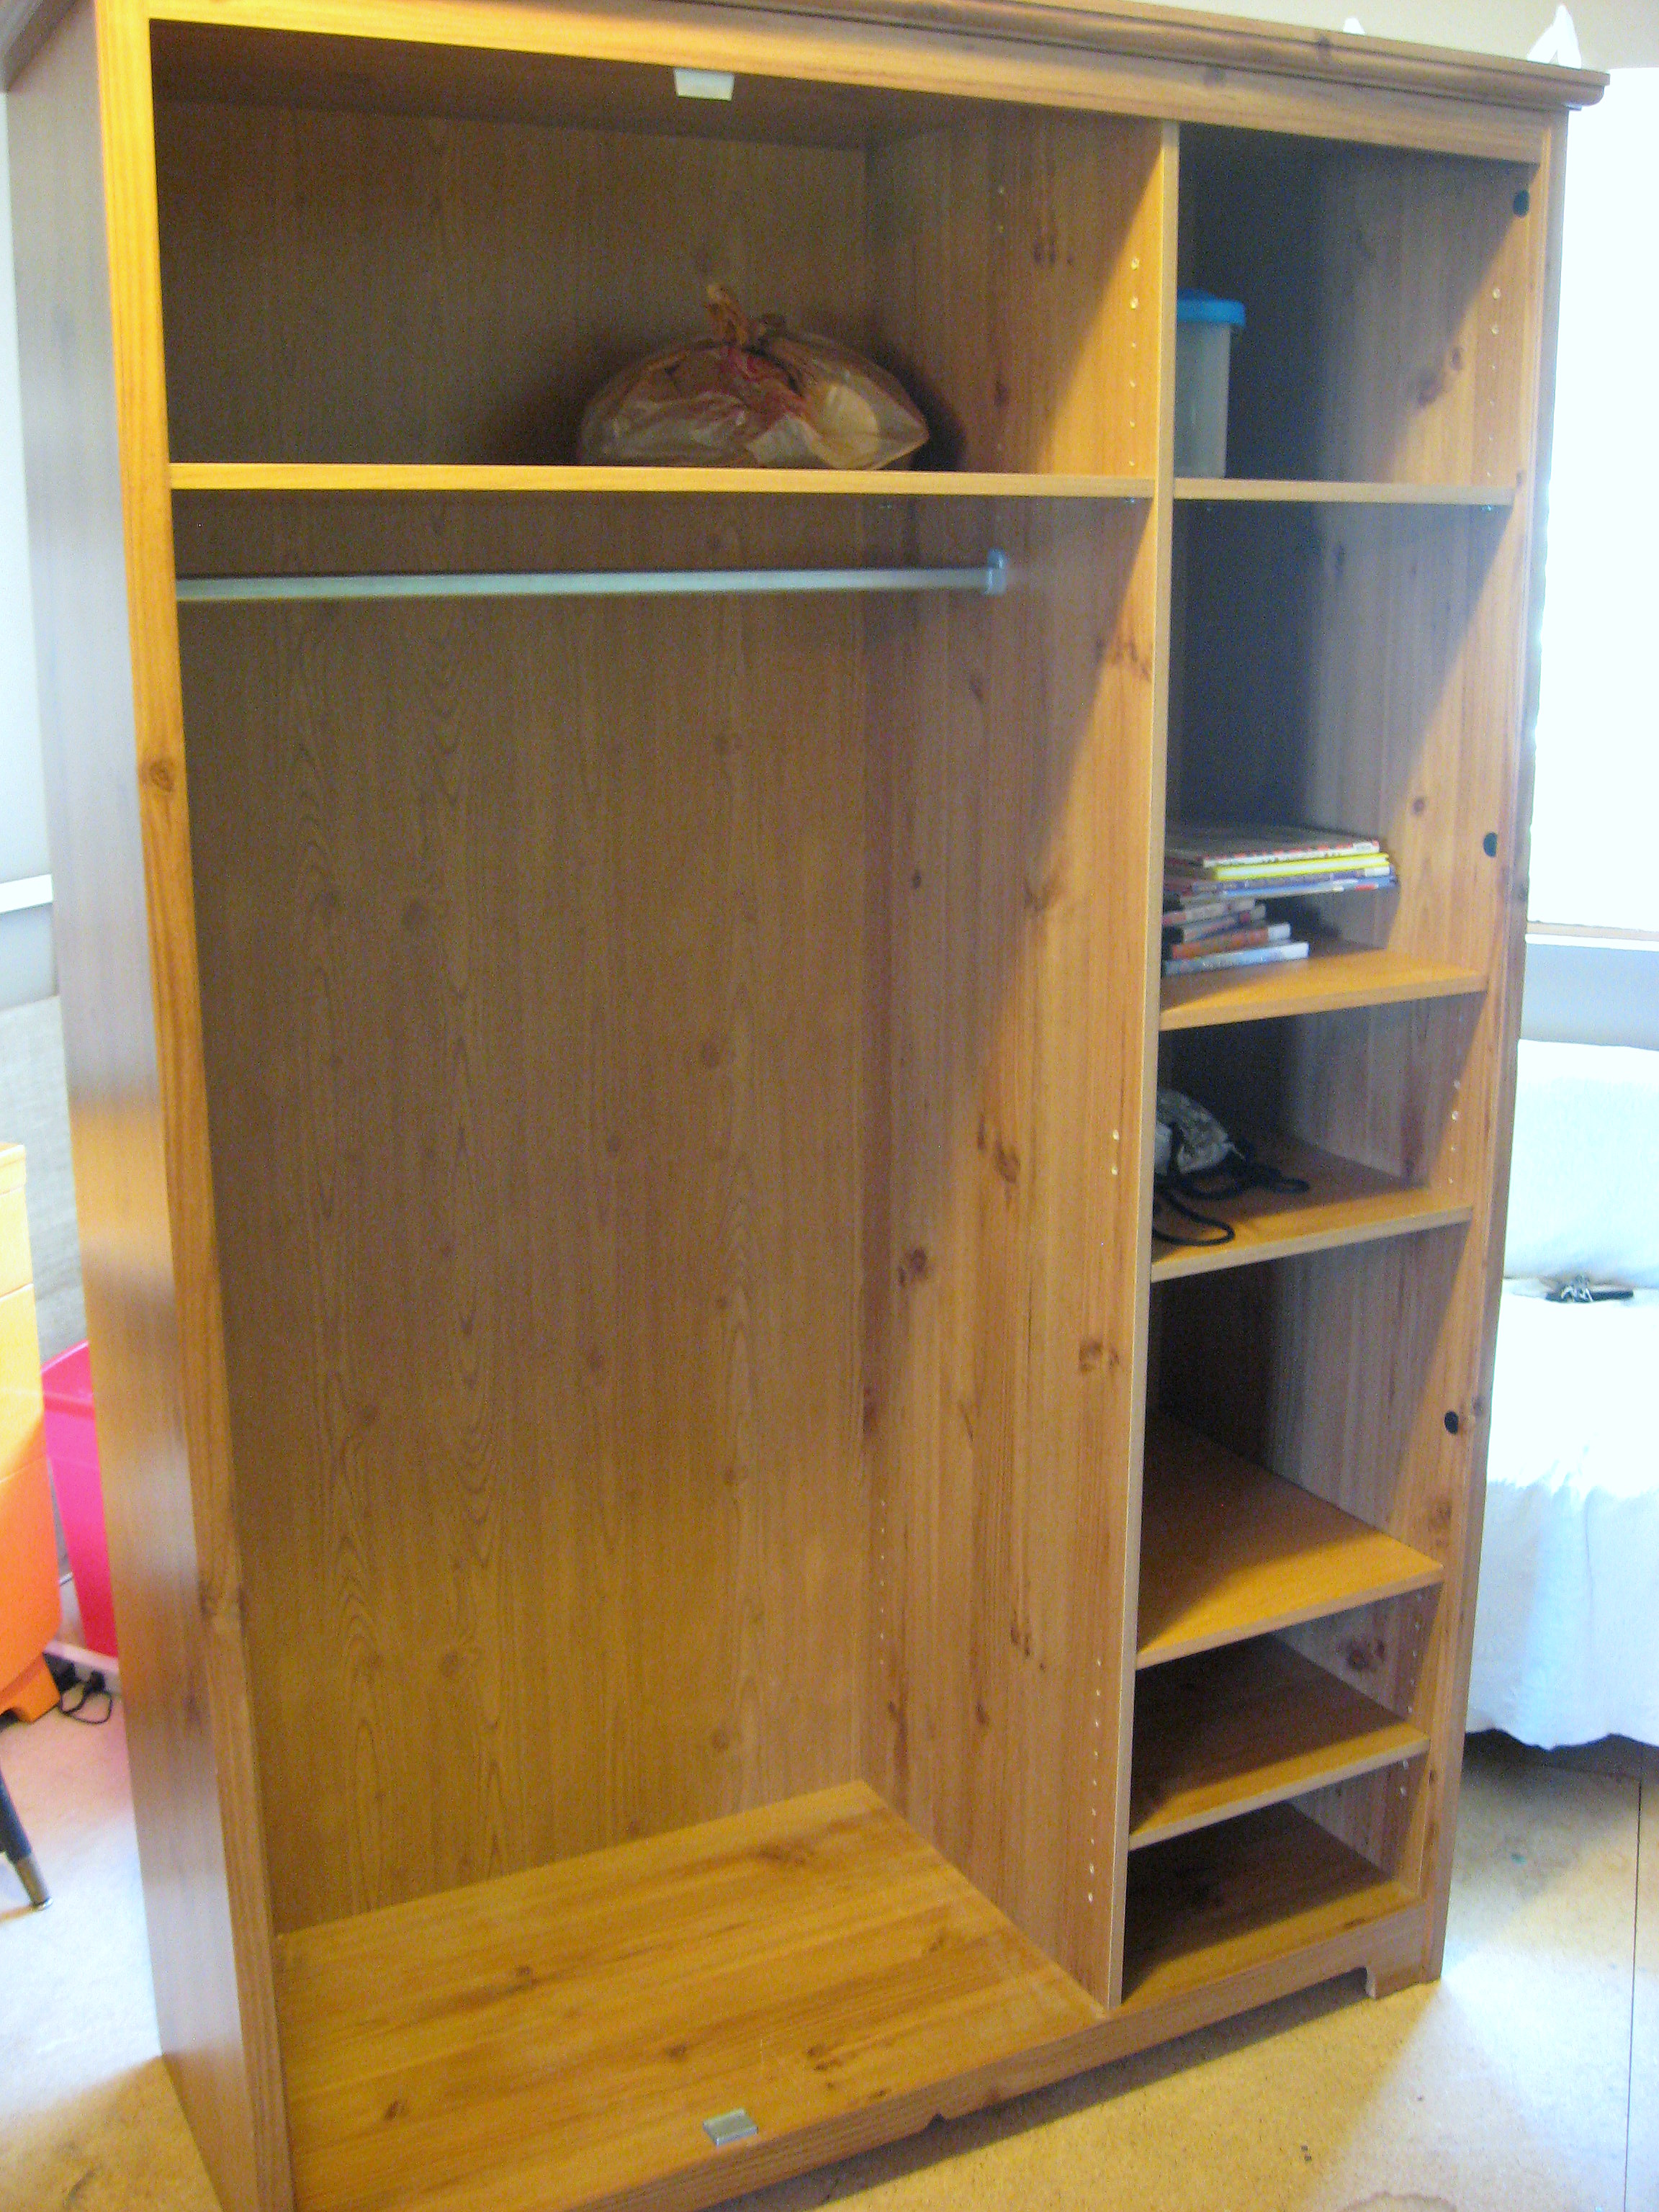
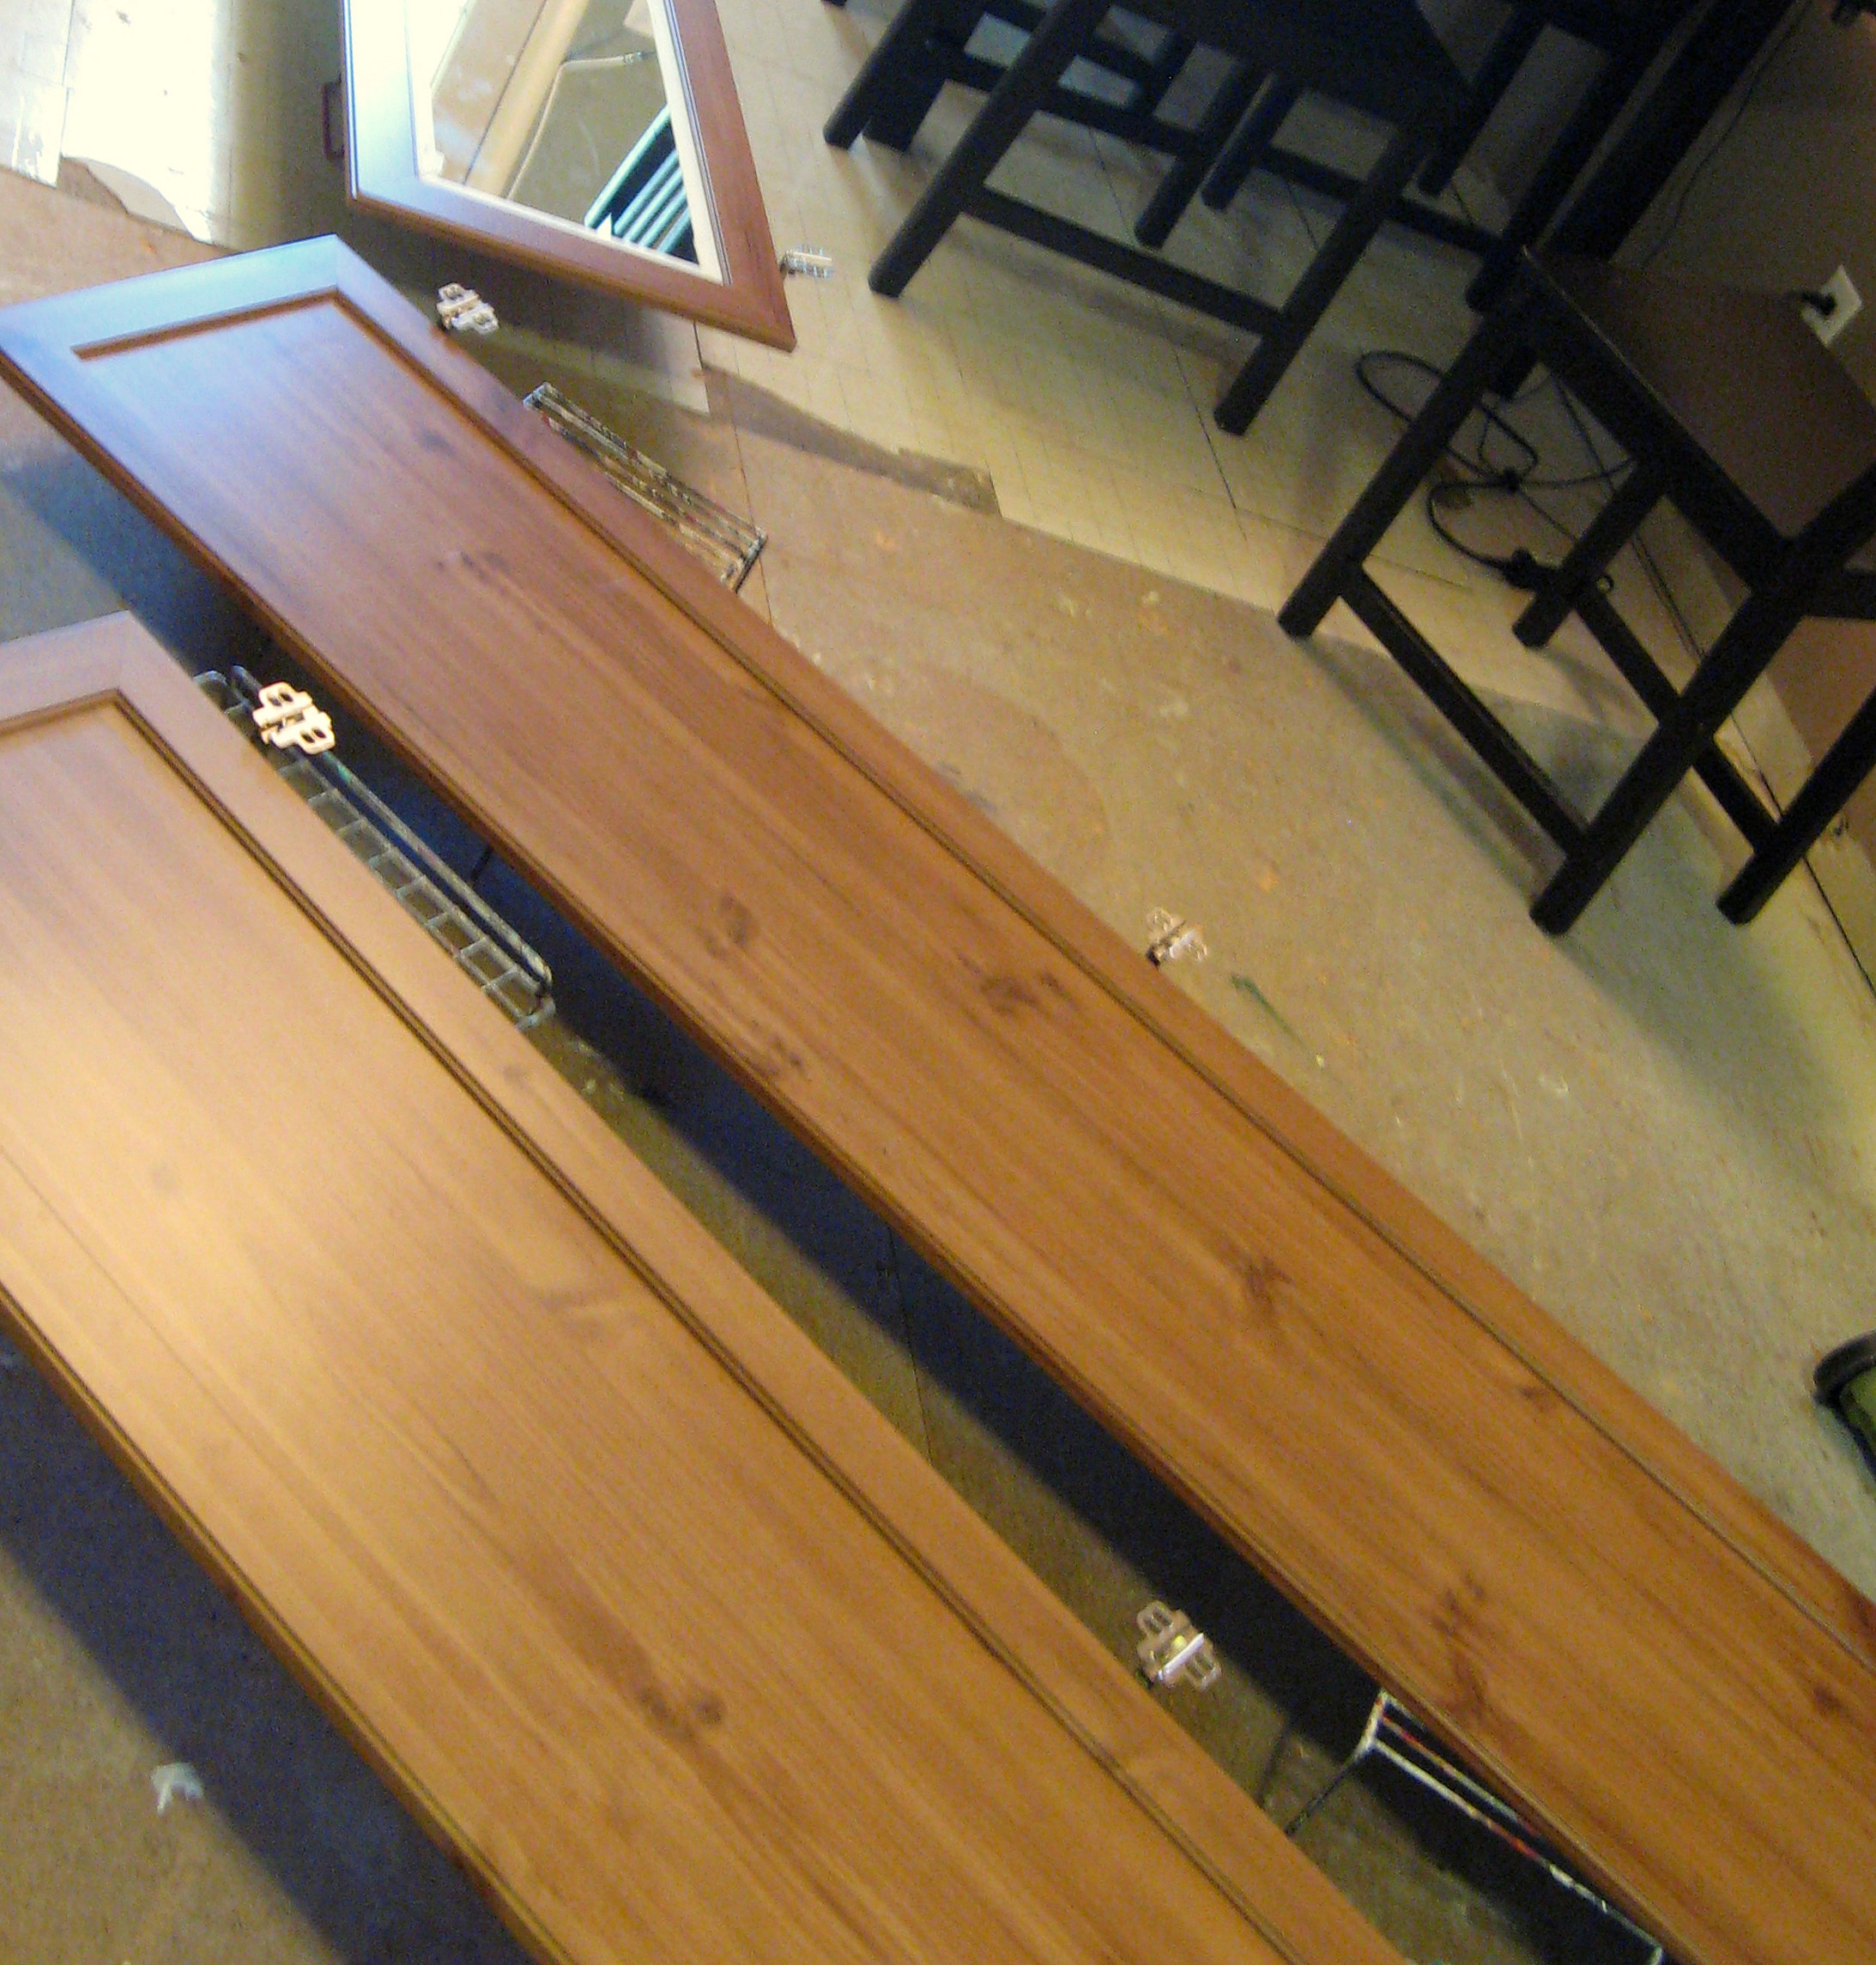
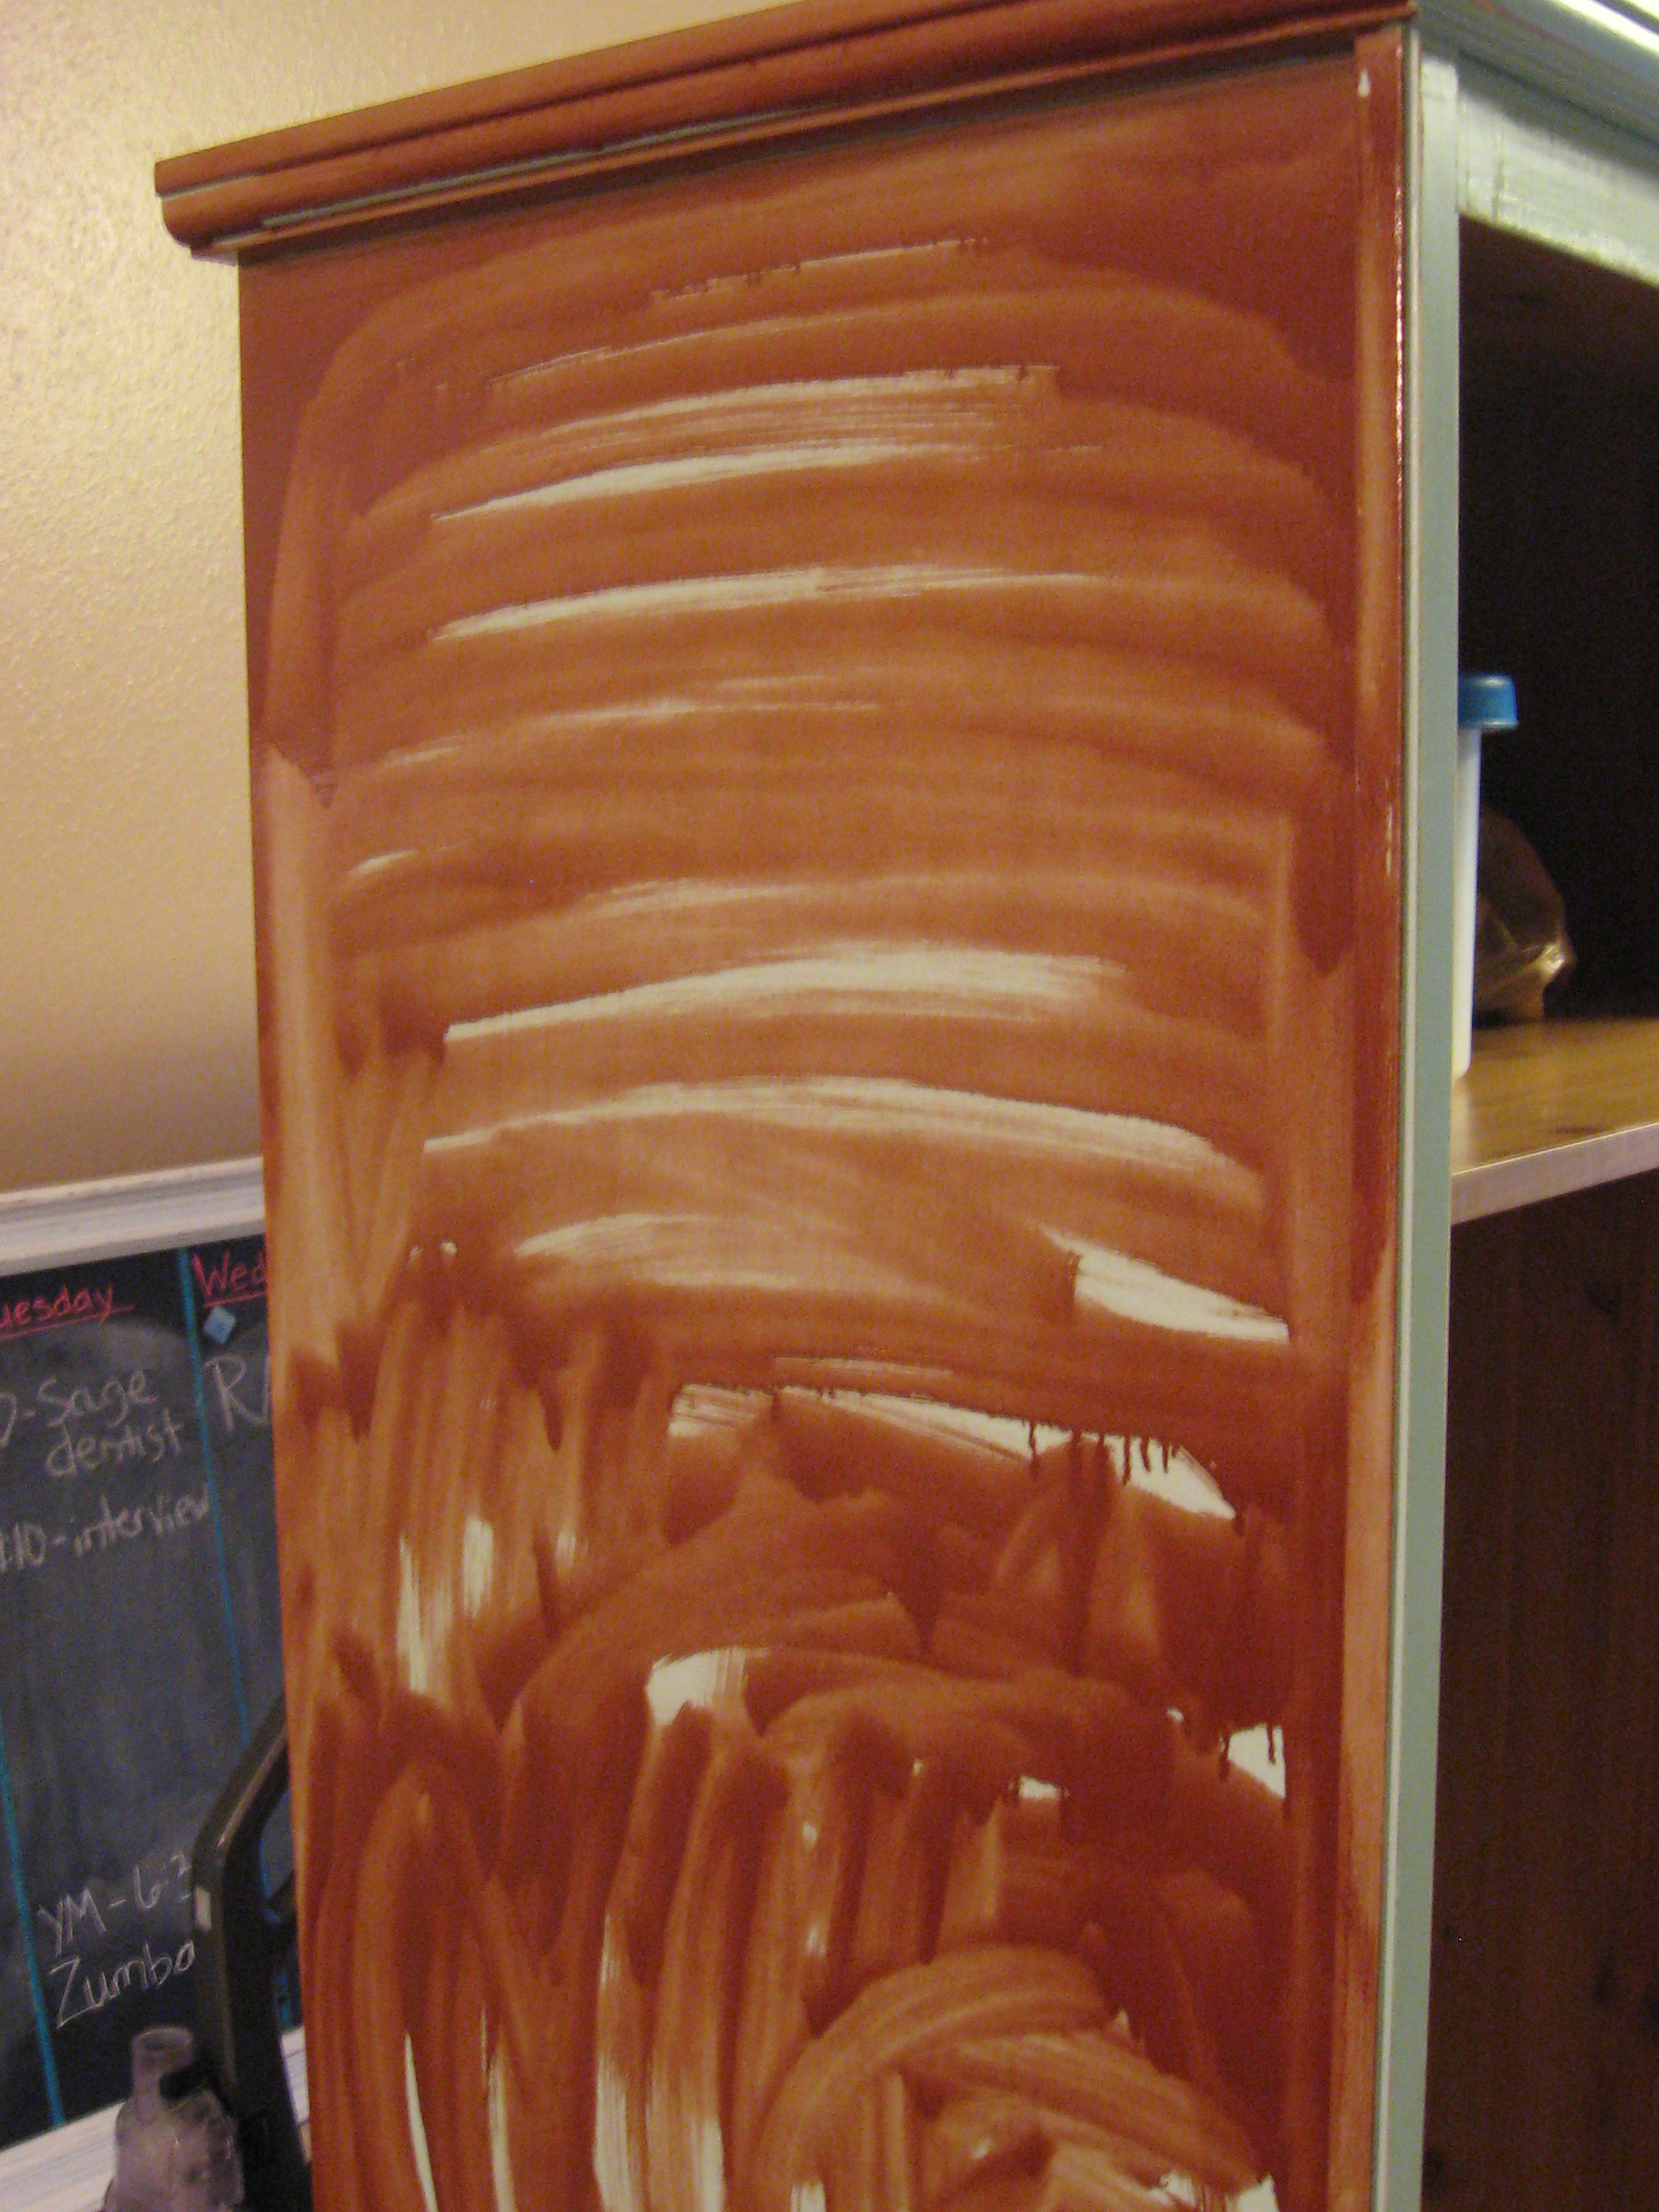
Take the doors off, tape around the mirror and remove or tape all the hardware. I chose not to paint the inside, so I taped around there too. Give everything a good coat of the Gripper with a regular brush or roller.
You can see here that I wasn’t even too careful about getting the coat even. Here are my thoughts on this – I wanted this finished project to be something I could sand back into and expose some of the “wood” underneath. Usually when you try that on laminate furniture, the paint will just lift right off. I was curious how it would work here, so I only did one coat of Gripper. I have a dresser that I used it on that I wanted to be solid and smooth so I used 2 coats of Gripper and I was more careful to brush it on smoothly.
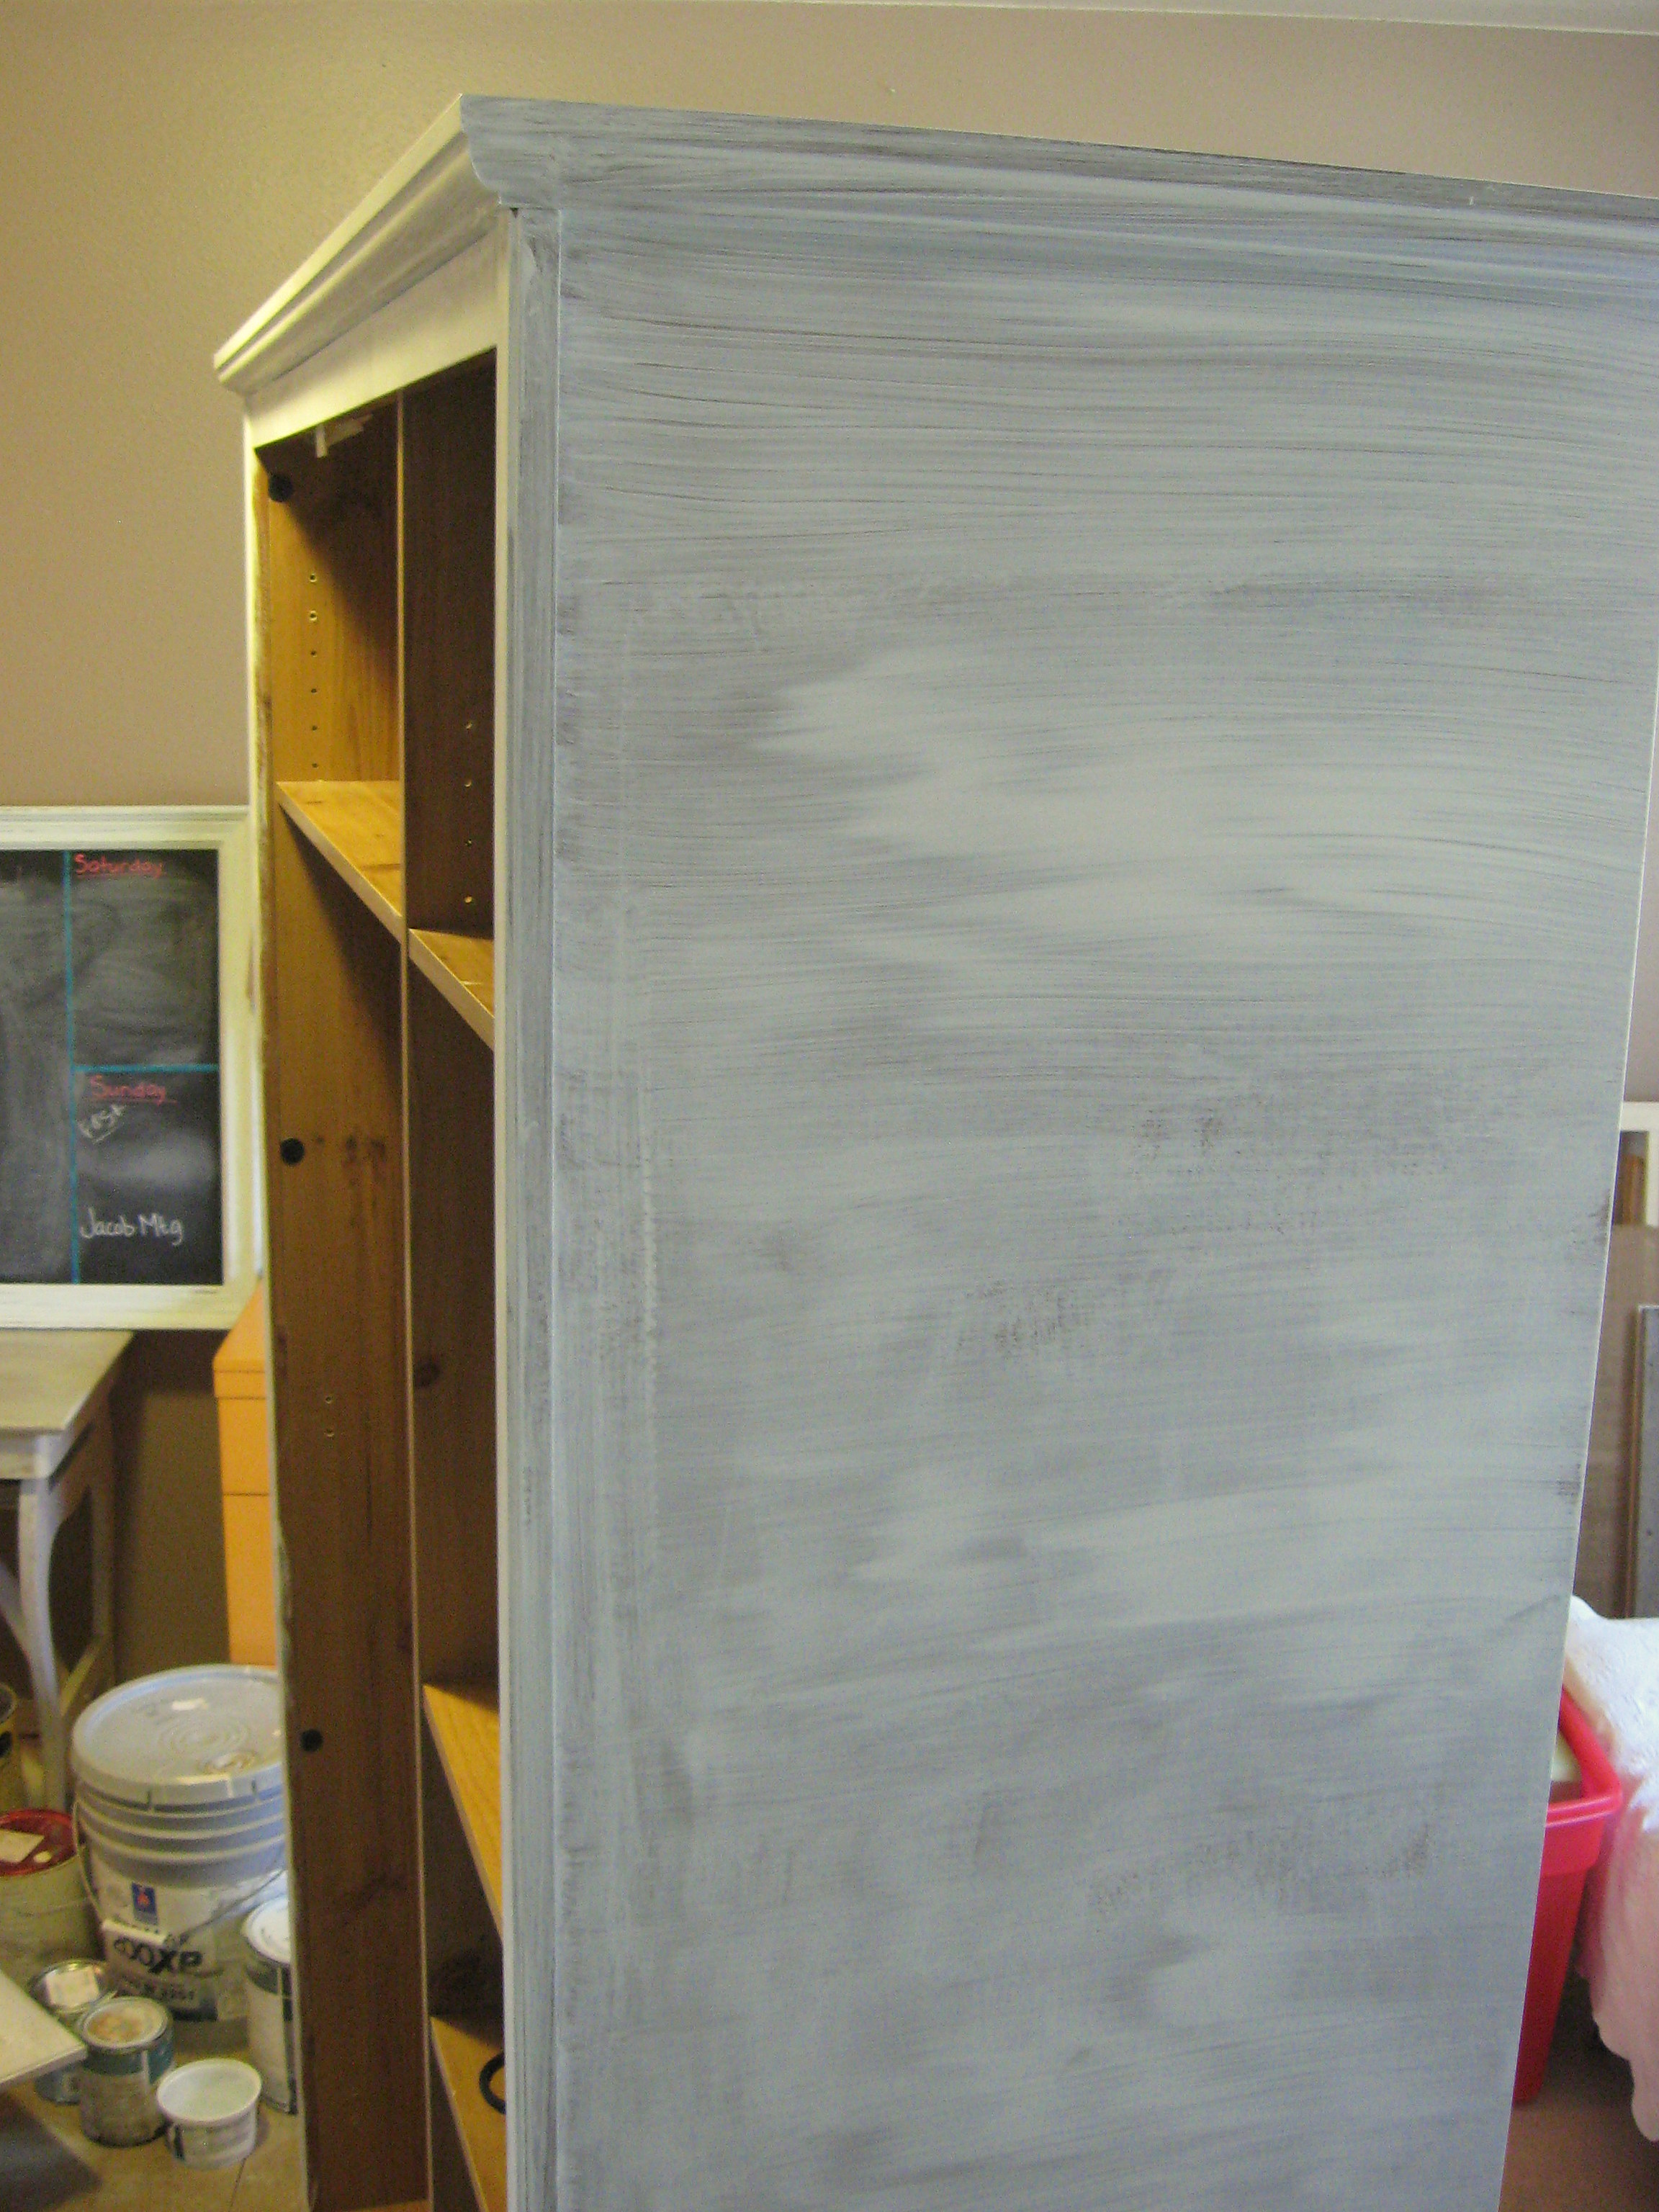
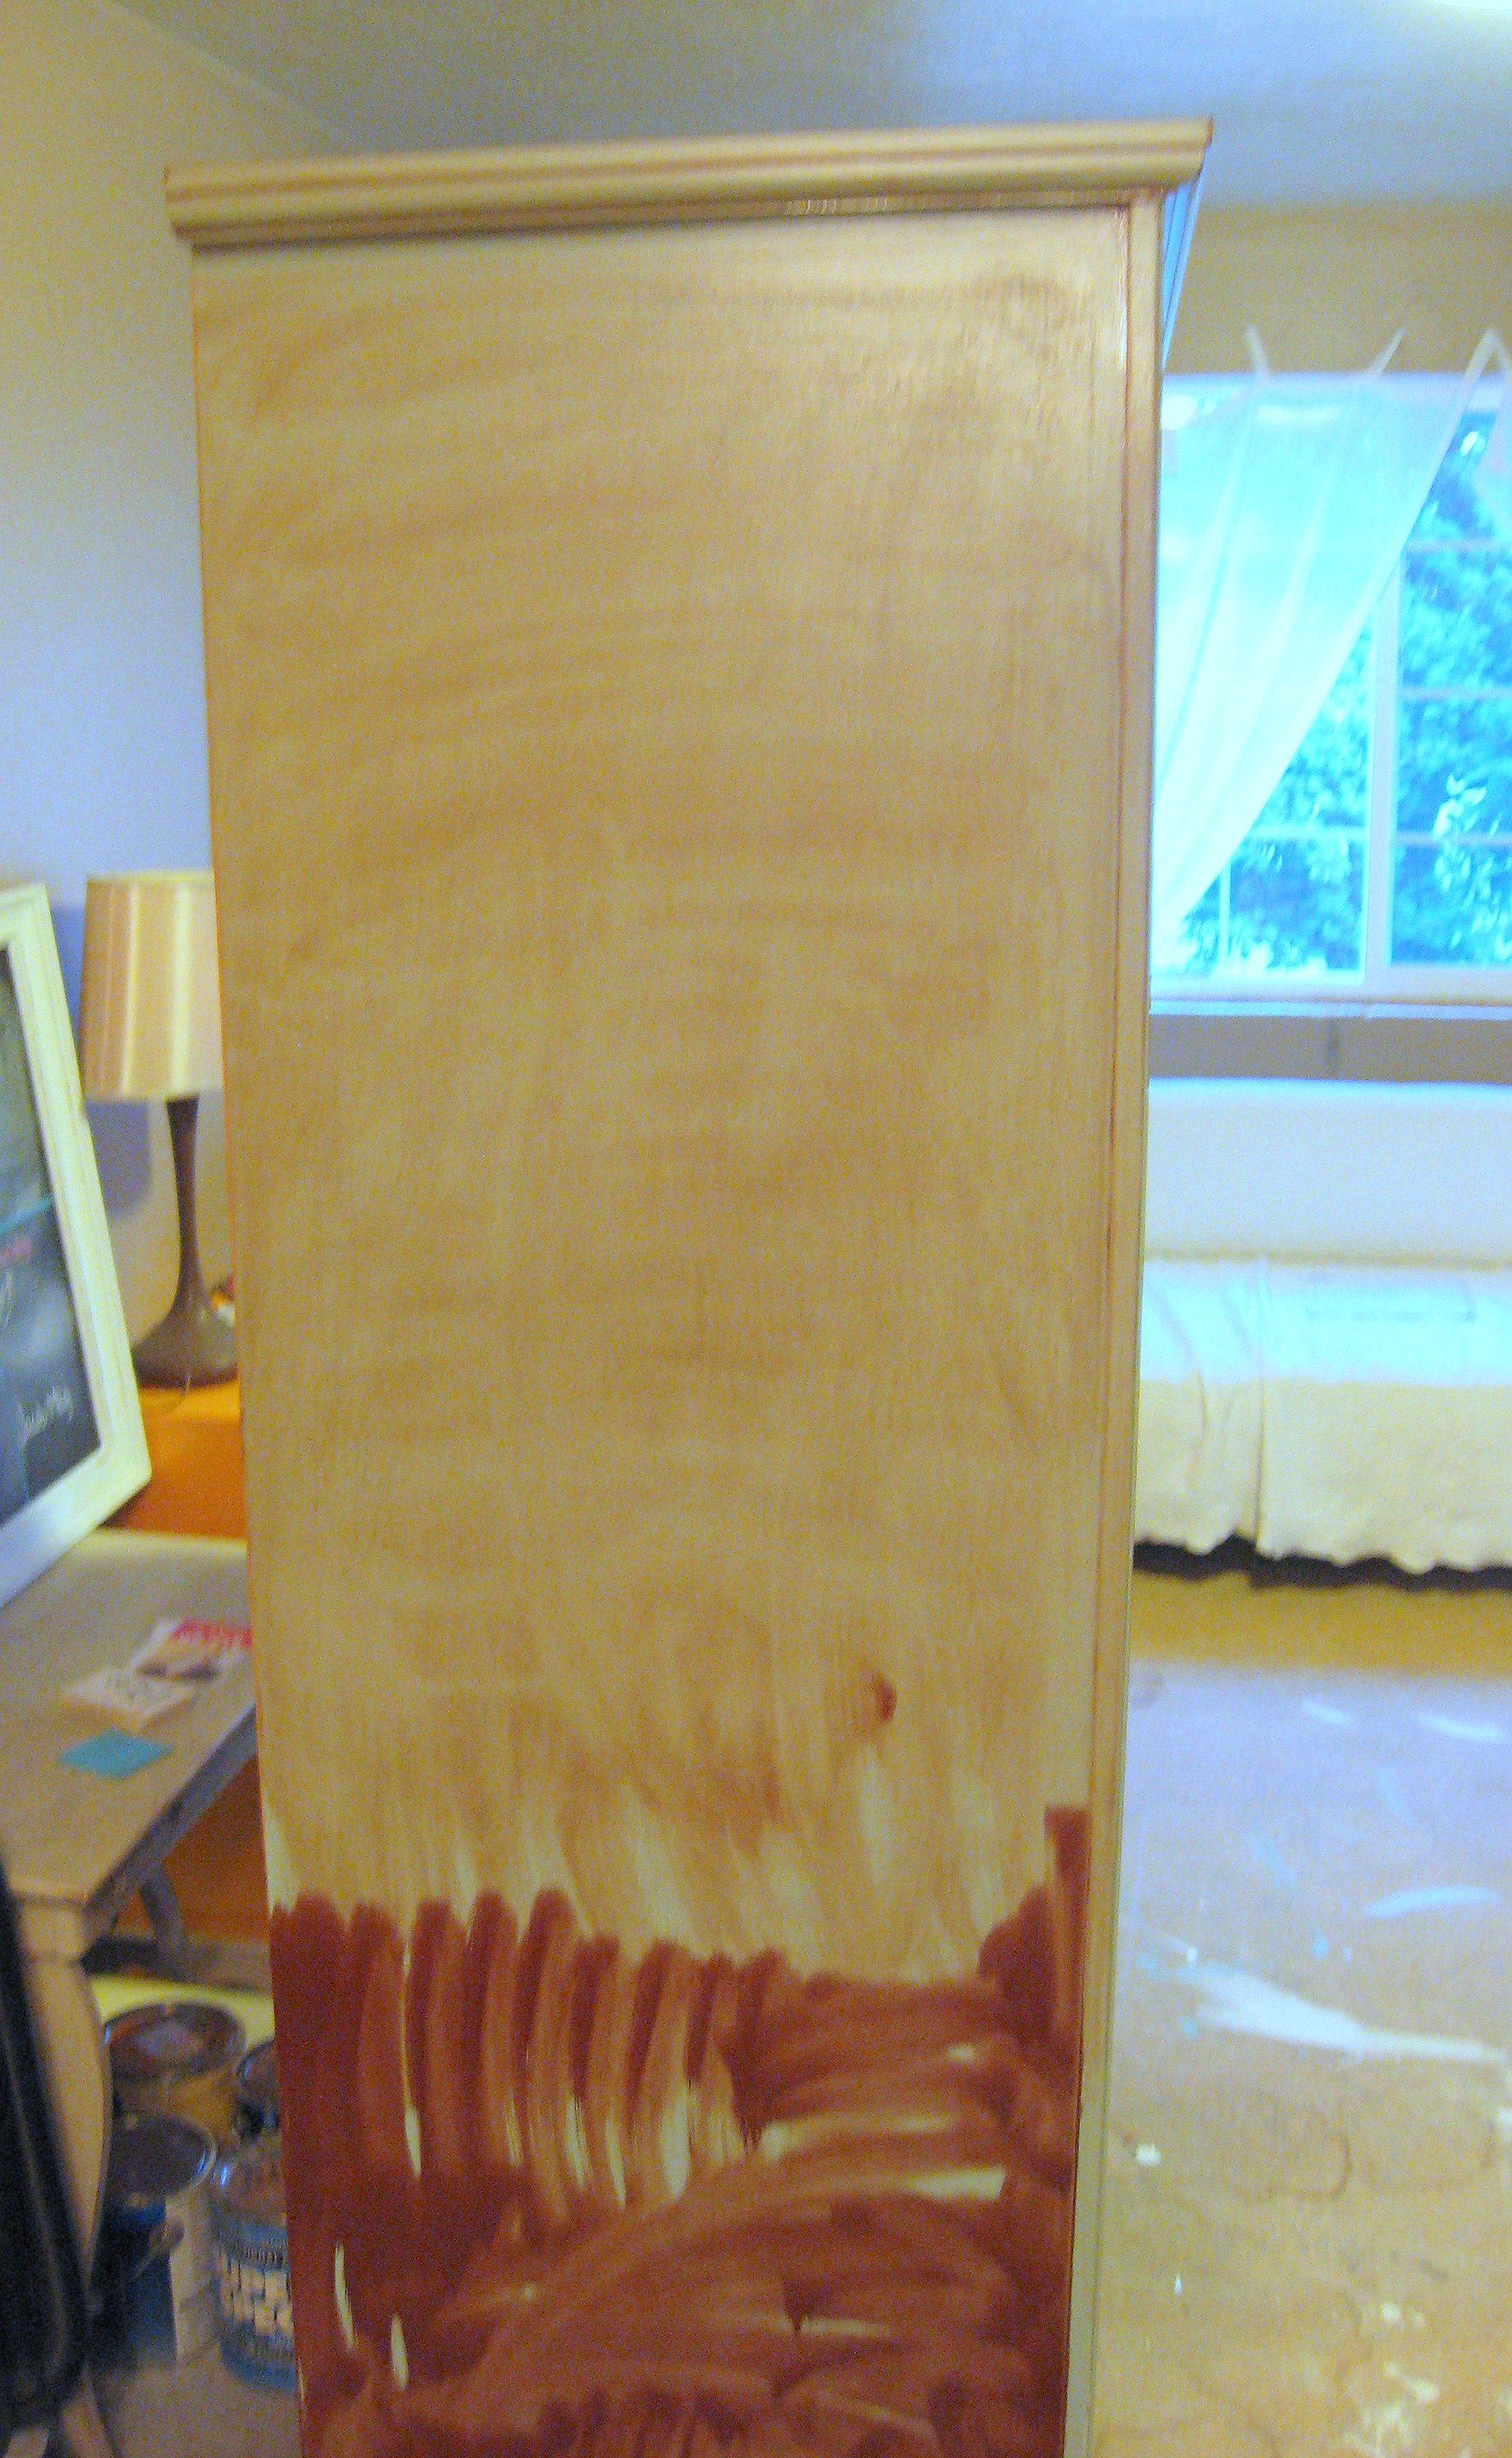
Let that dry according to the directions on the can, then cover with the paint of your choice. I didn’t get a picture of this step, but I used 2 coats of pale blue Satin interior house paint
Once that is dry, I went over the whole piece with a fine grit sandpaper on a small detail electric sander, roughing up the whole surface and concentrating (holding my breath!) in a few spots along the edges to wear the paint down to the wood. The paint came off very worn and natural-looking just as if it had been on raw wood! Wonderful!
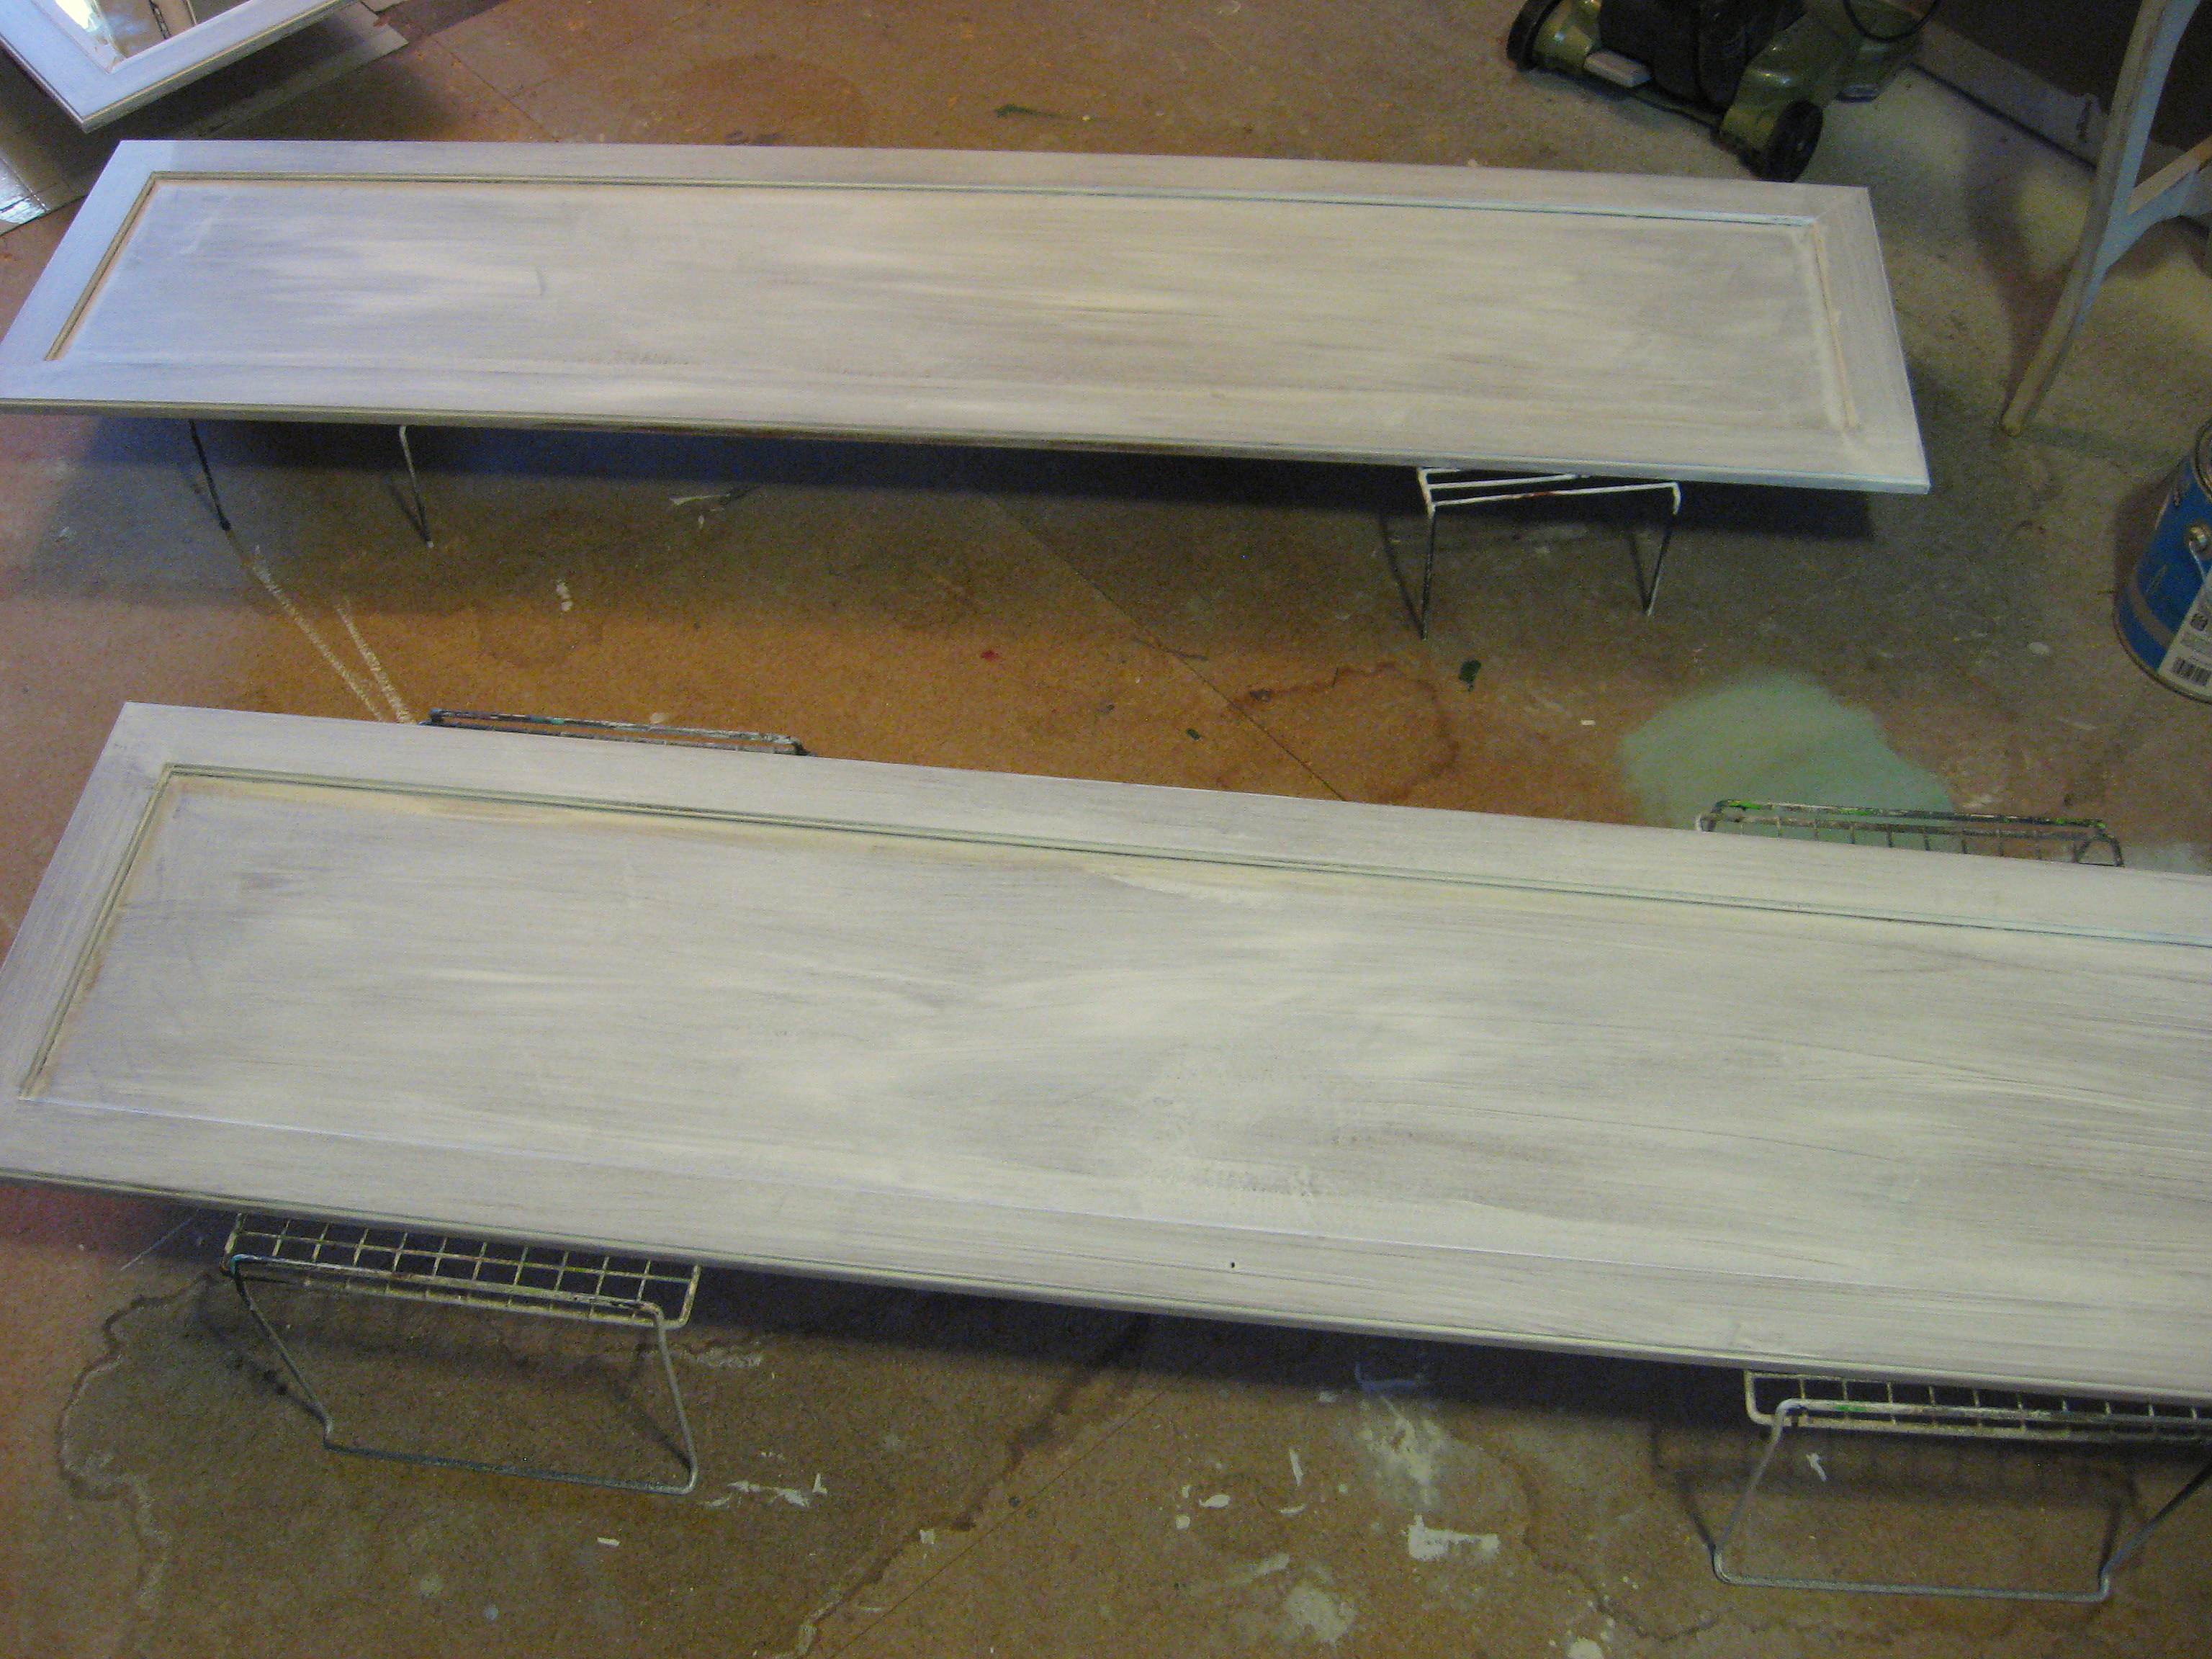
Next I put on a wood stain. Just brush it all over with a paintbrush – working in small sections –
and then rub it back off with a rag. If you want it darker, then leave the stain on longer. If you want it lighter, continue to rub and buff it off with a rag until you get the desired results. Be sure to leave more stain in the crevices and cracks, where age build up would naturally occur.
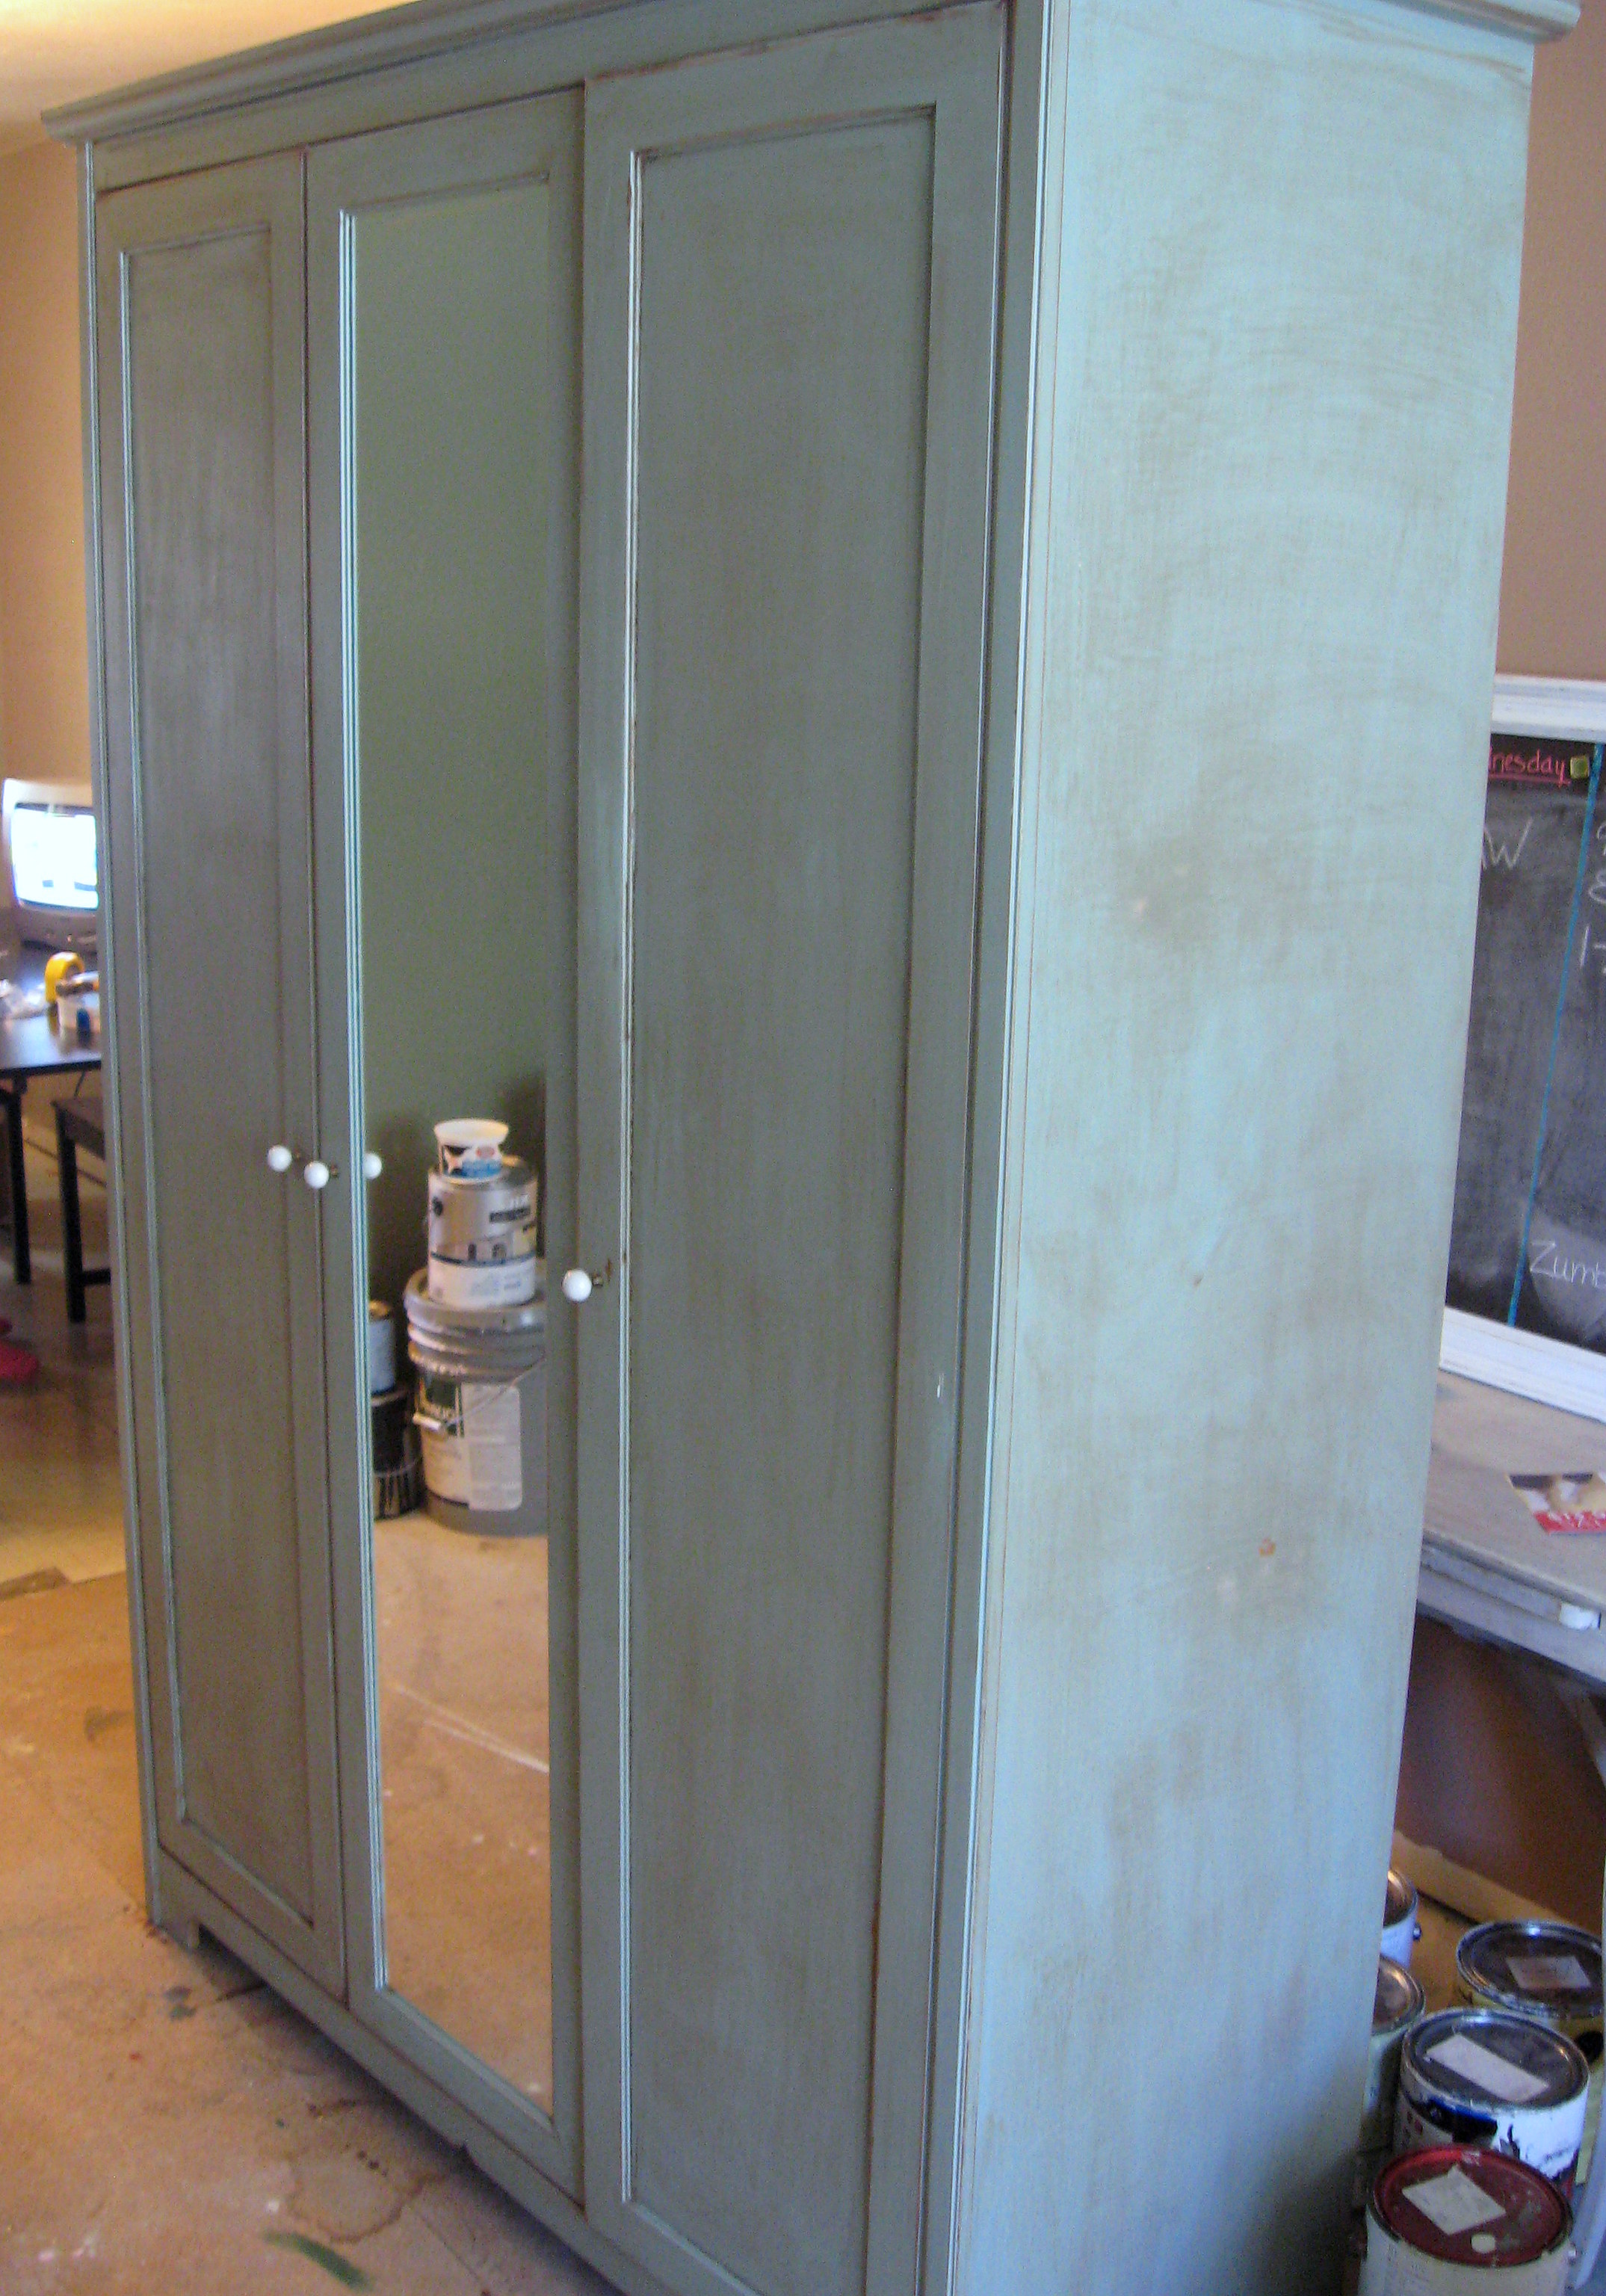
Replace the doors and hardware – I got these cute little white ceramic knobs on a 50% off sale at Hobby Lobby for $2/knob. I saw the exact same knobs at Anthropologie for $7!
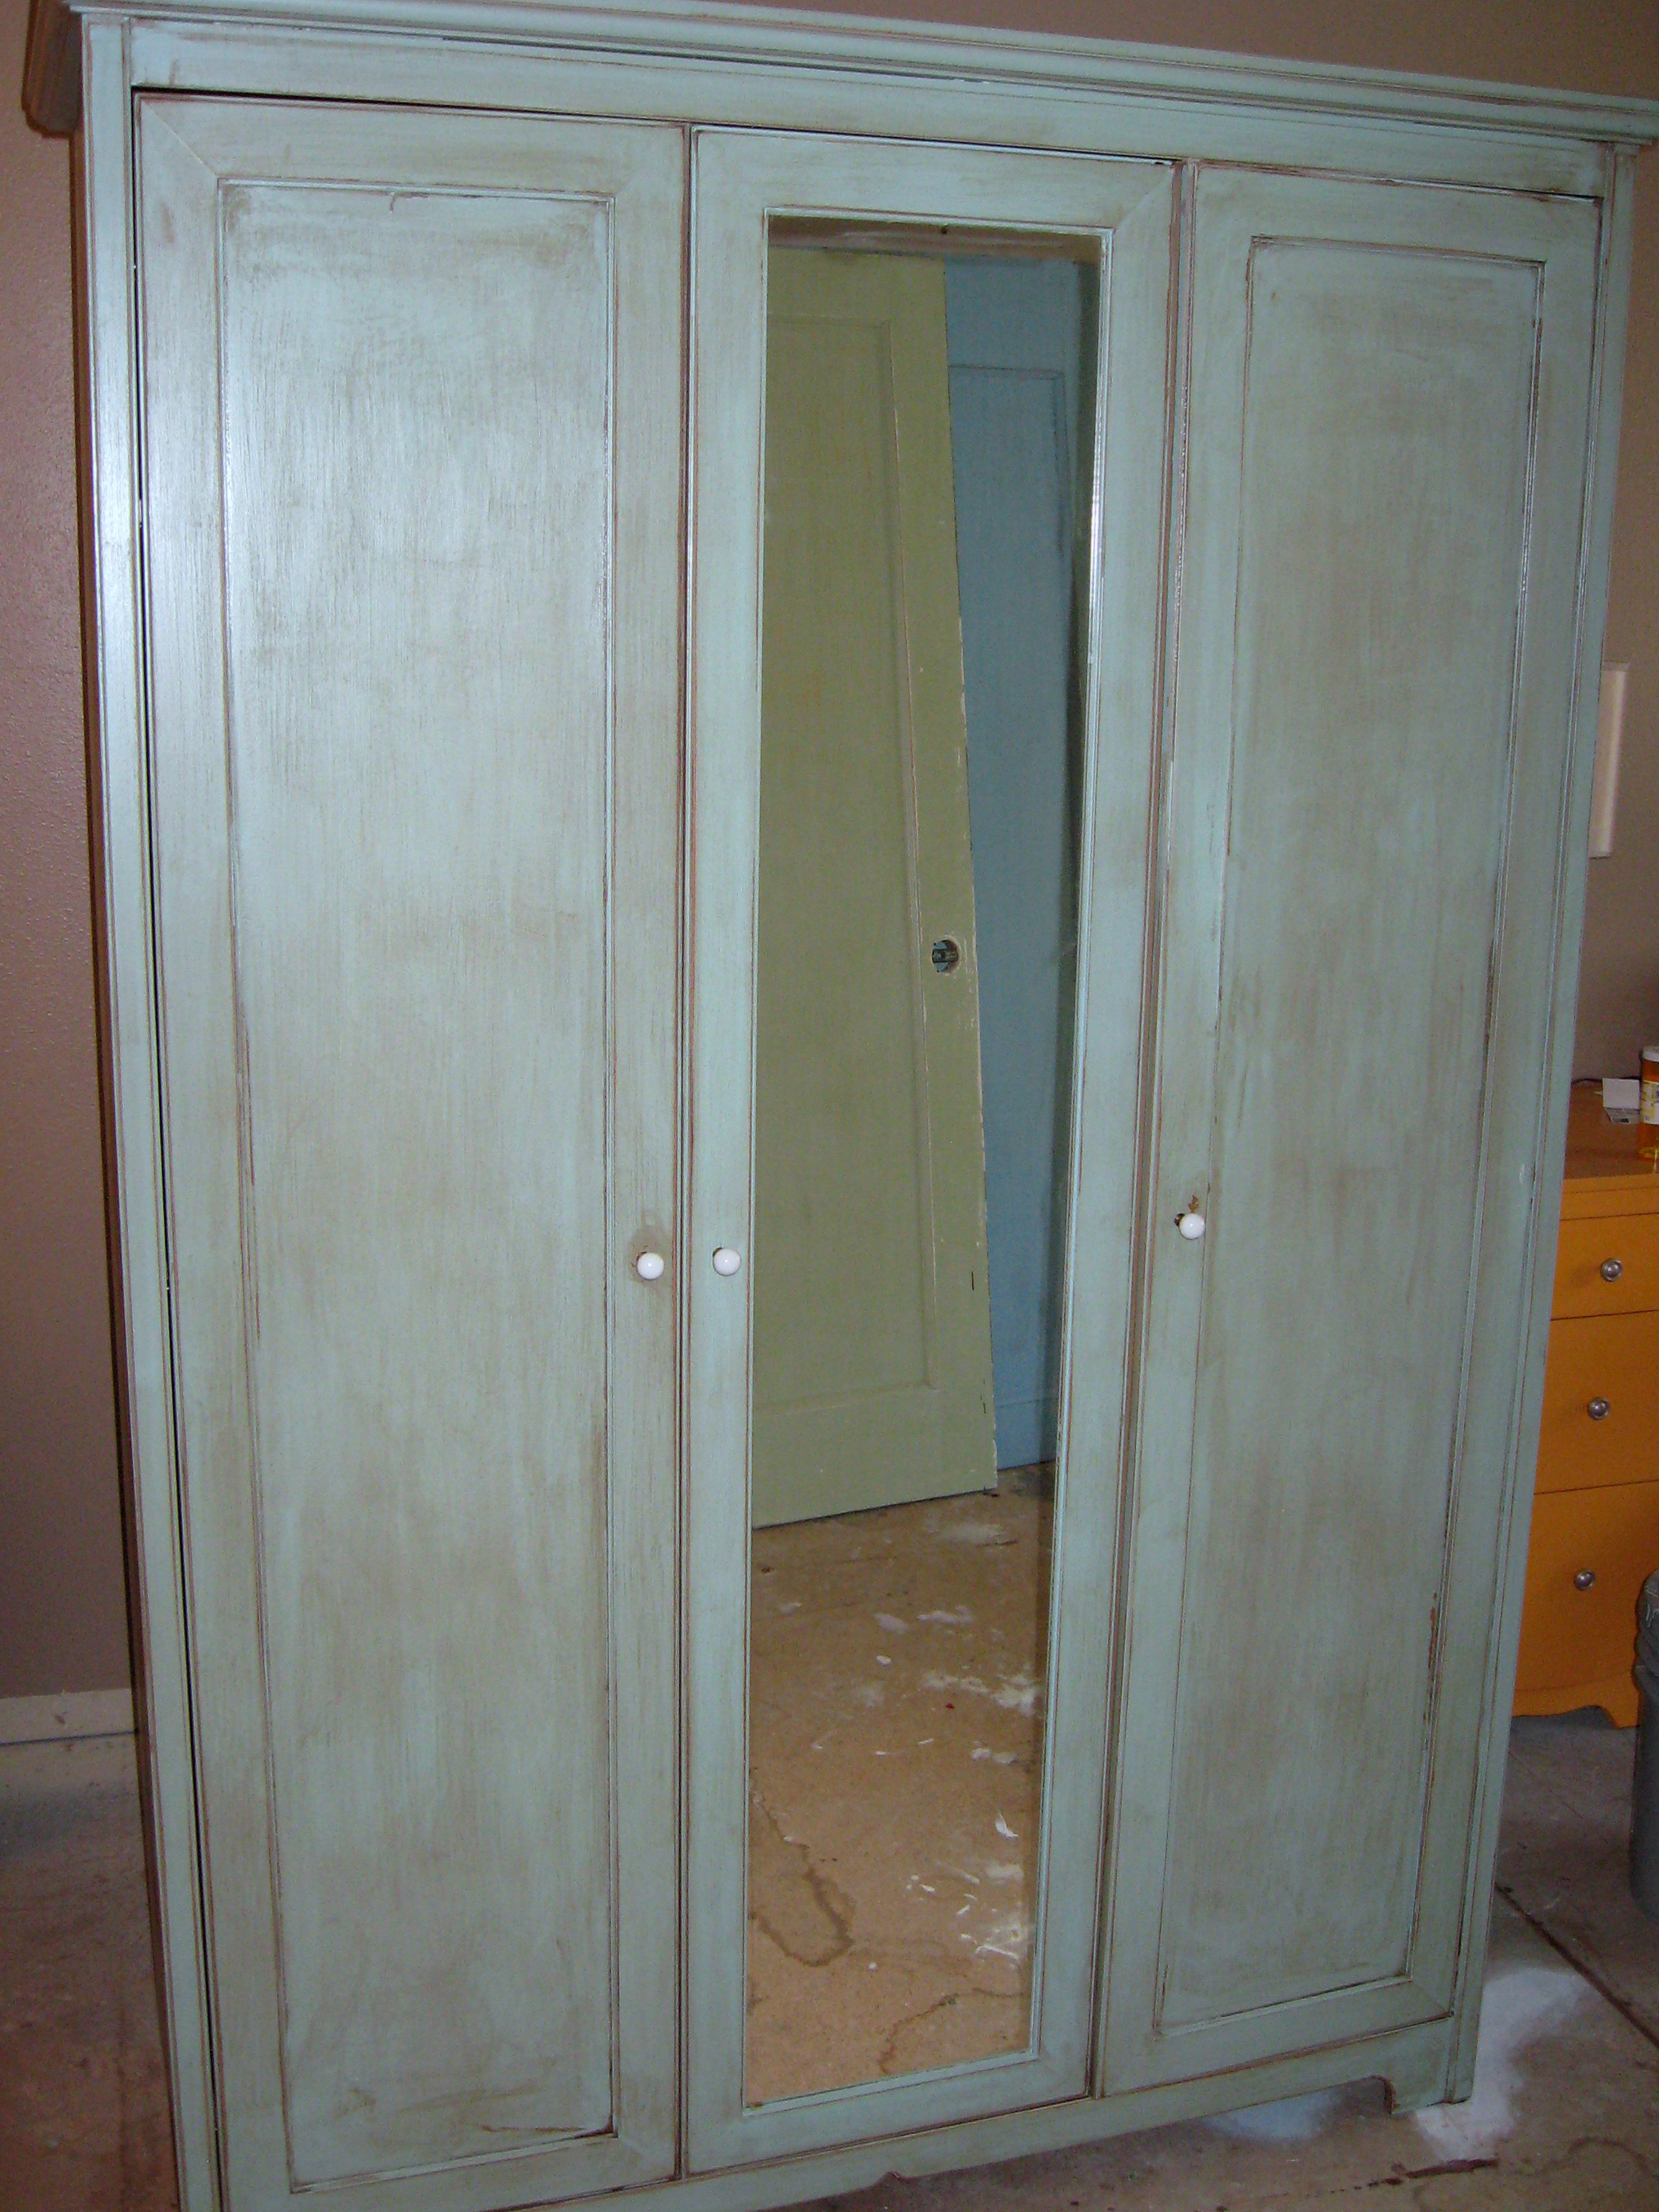
This has been sitting in the middle of our massive-messy remodel now for 3 weeks waiting patiently for us to finish the floor in it’s eventual home. It has been bumped, scraped, brushed up against and generally abused and it still looks great and COULD NOT have been easier to do.
A PYP Best Blog! DIY Dulce de Leche!
Just in case you missed this article on making your own dulce de leche the first time we shared it a couple of years ago, we are republishing it. After Sharon wrote this blog originally, we got an awesome response. This is one of the PYP Best Blogs!
I made a discovery of epic proportions this weekend! Dramatic? Maybe a bit, but if you – like I – didn’t know this before, I think you’ll be happy I shared!
My boys found a recipe they were dying to try, but it called for Dulce de Leche. Whether that is available in my store or not, I don’t know, I never looked. Since I had cans and cans of sweetened condensed milk in my pantry and knew you could use it to make dulce de leche, I wasn’t going to spend the extra money. The internet is full of “recipes” about how you can boil a closed can of sweetened condensed milk either in a pan or in your crock pot for hours until it turns into thick, gooey, carmely goodness.
The internet is also full of stories about said cans exploding as they heat and making a thick, gooey carmely mess in your kitchen and potentially harming anyone nearby.
I will admit that I tried it once; it works, but I was nervous the whole time, so even though I knew I could do it again, I kept putting it off. Finally, I searched the internet to see if there was another option. I found one blogger who said that you can pour the milk into the top of a double boiler and stir it over heat for 2 1/2 hours as it cooks. No thanks; keep searching…
BINGO!
You can cook it in the oven!!!
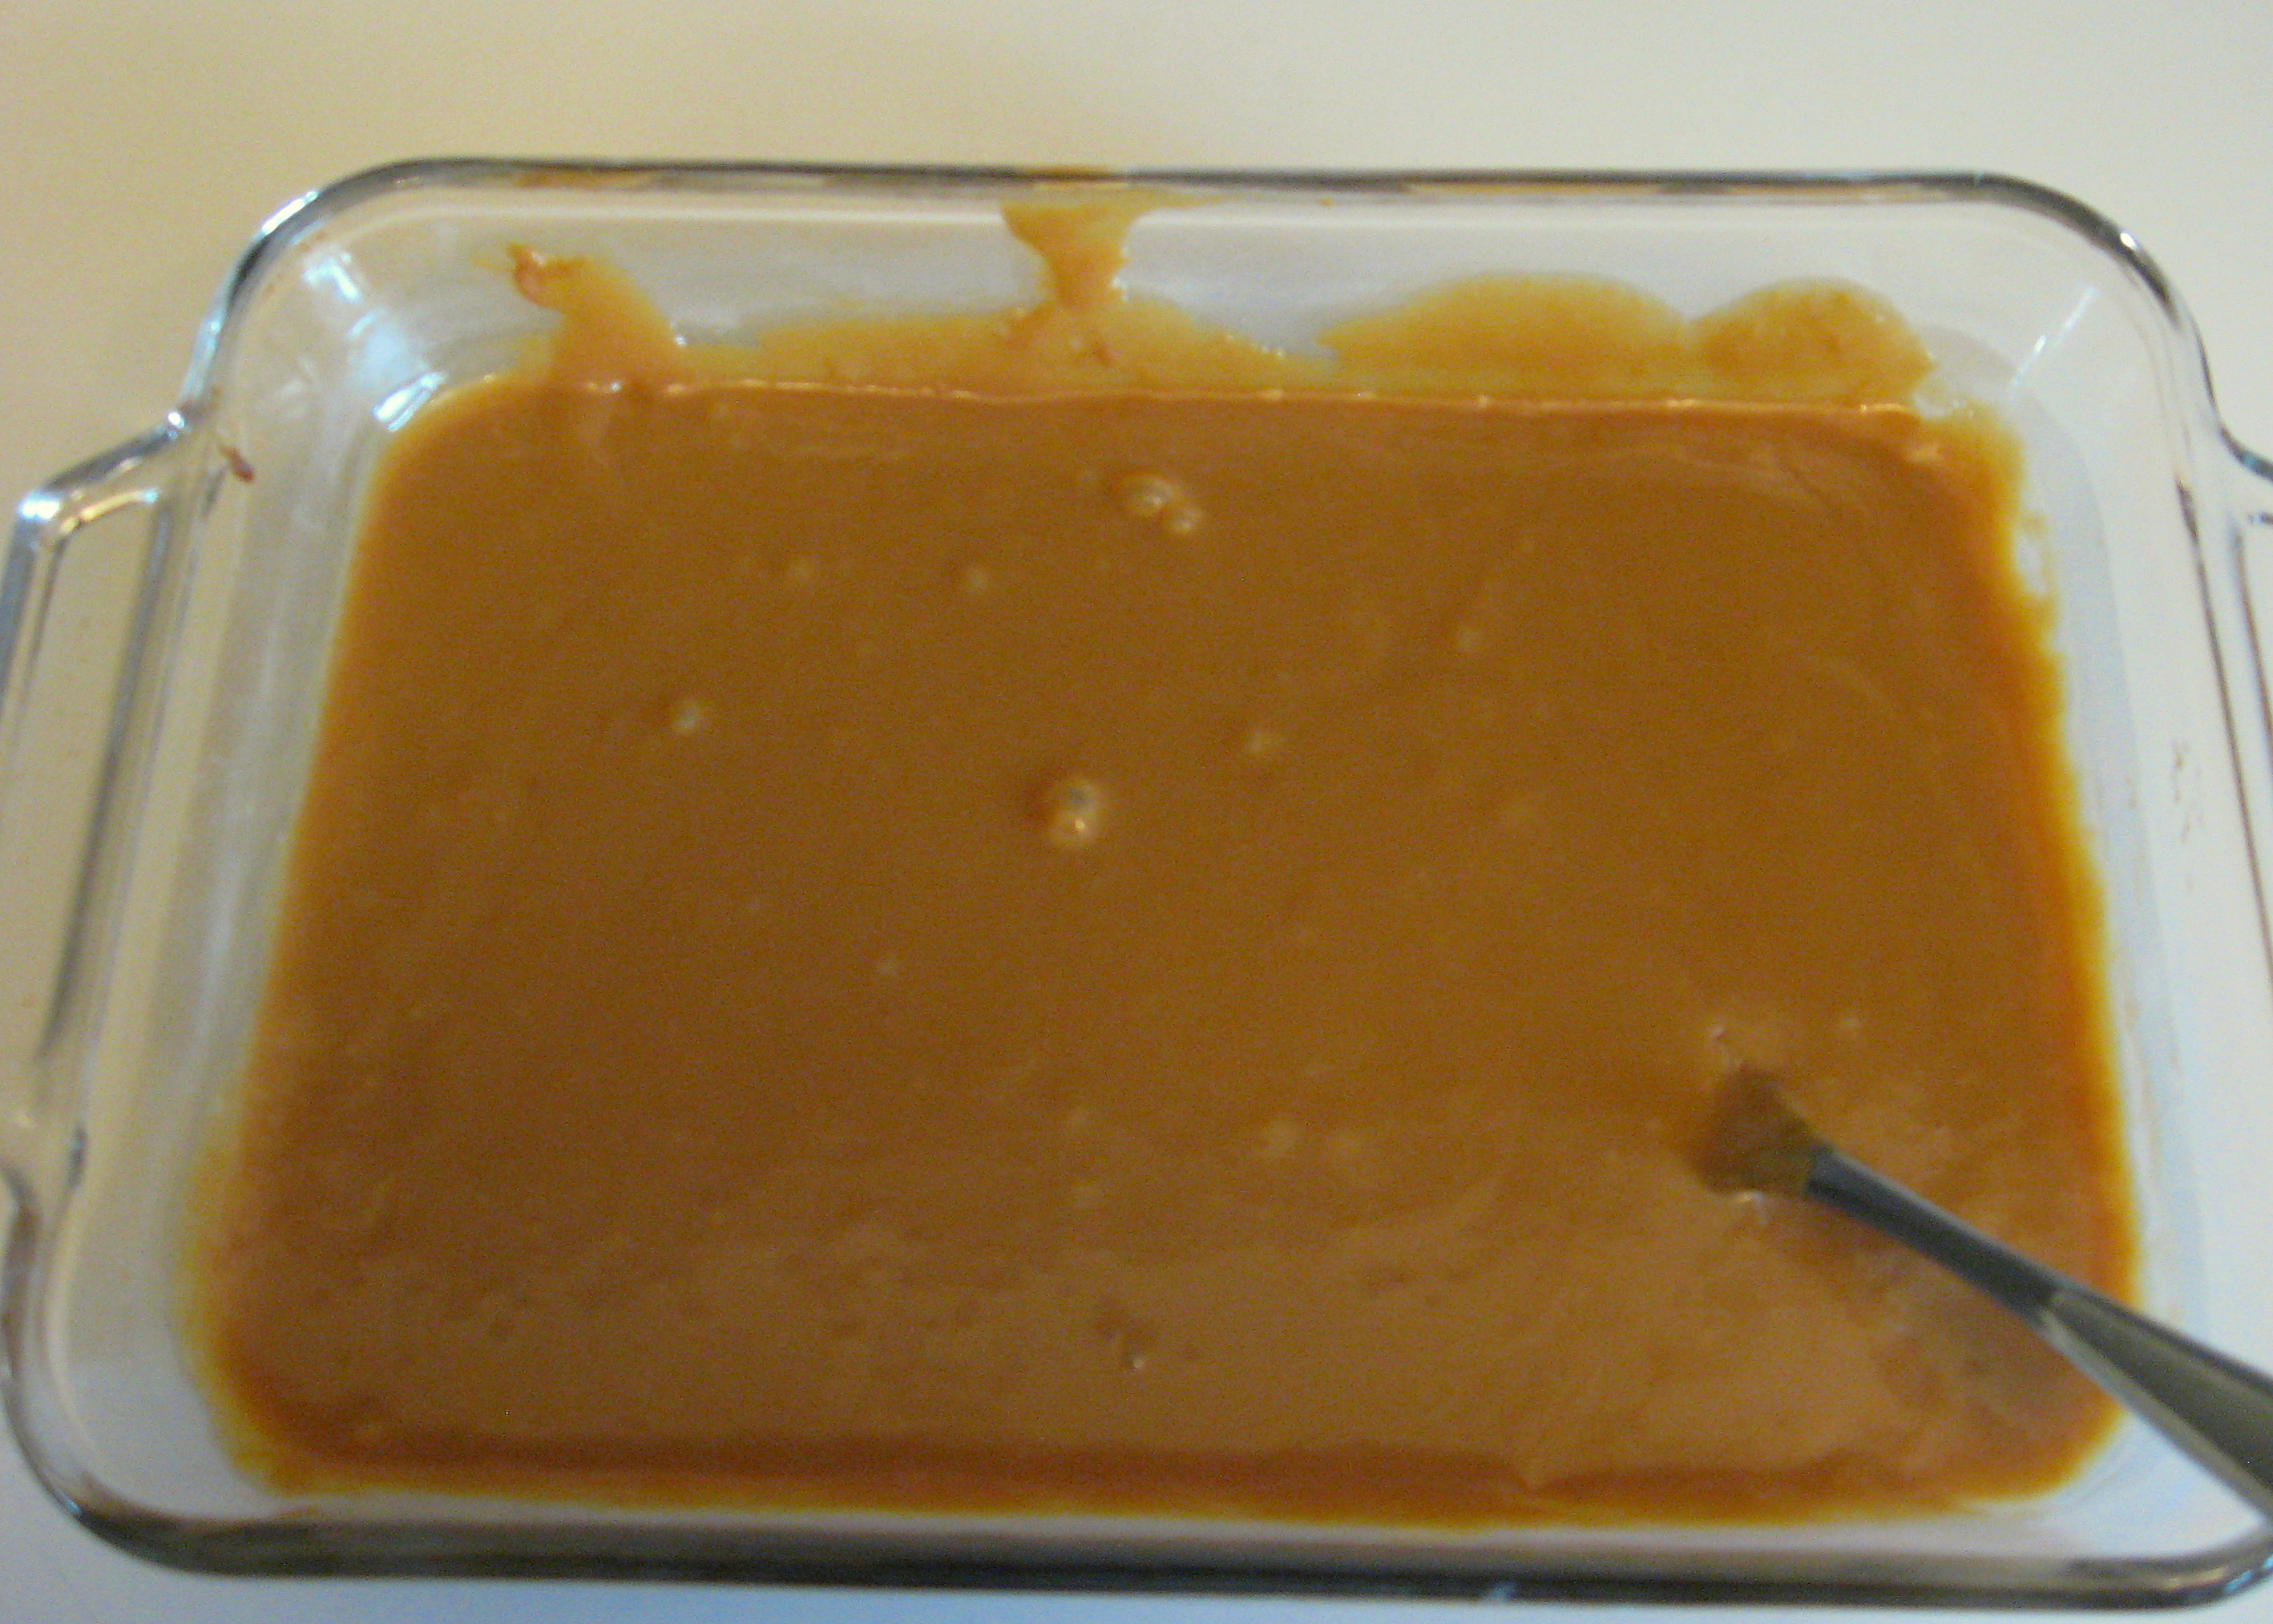
Turn your oven on to 425*. Open the sweetened condensed milk and pour it into an oven safe glass pan…a pie plate is perfect for one can. I used a bigger pyrex pan here because the recipe I’m making required 2 cans worth of the finished product. 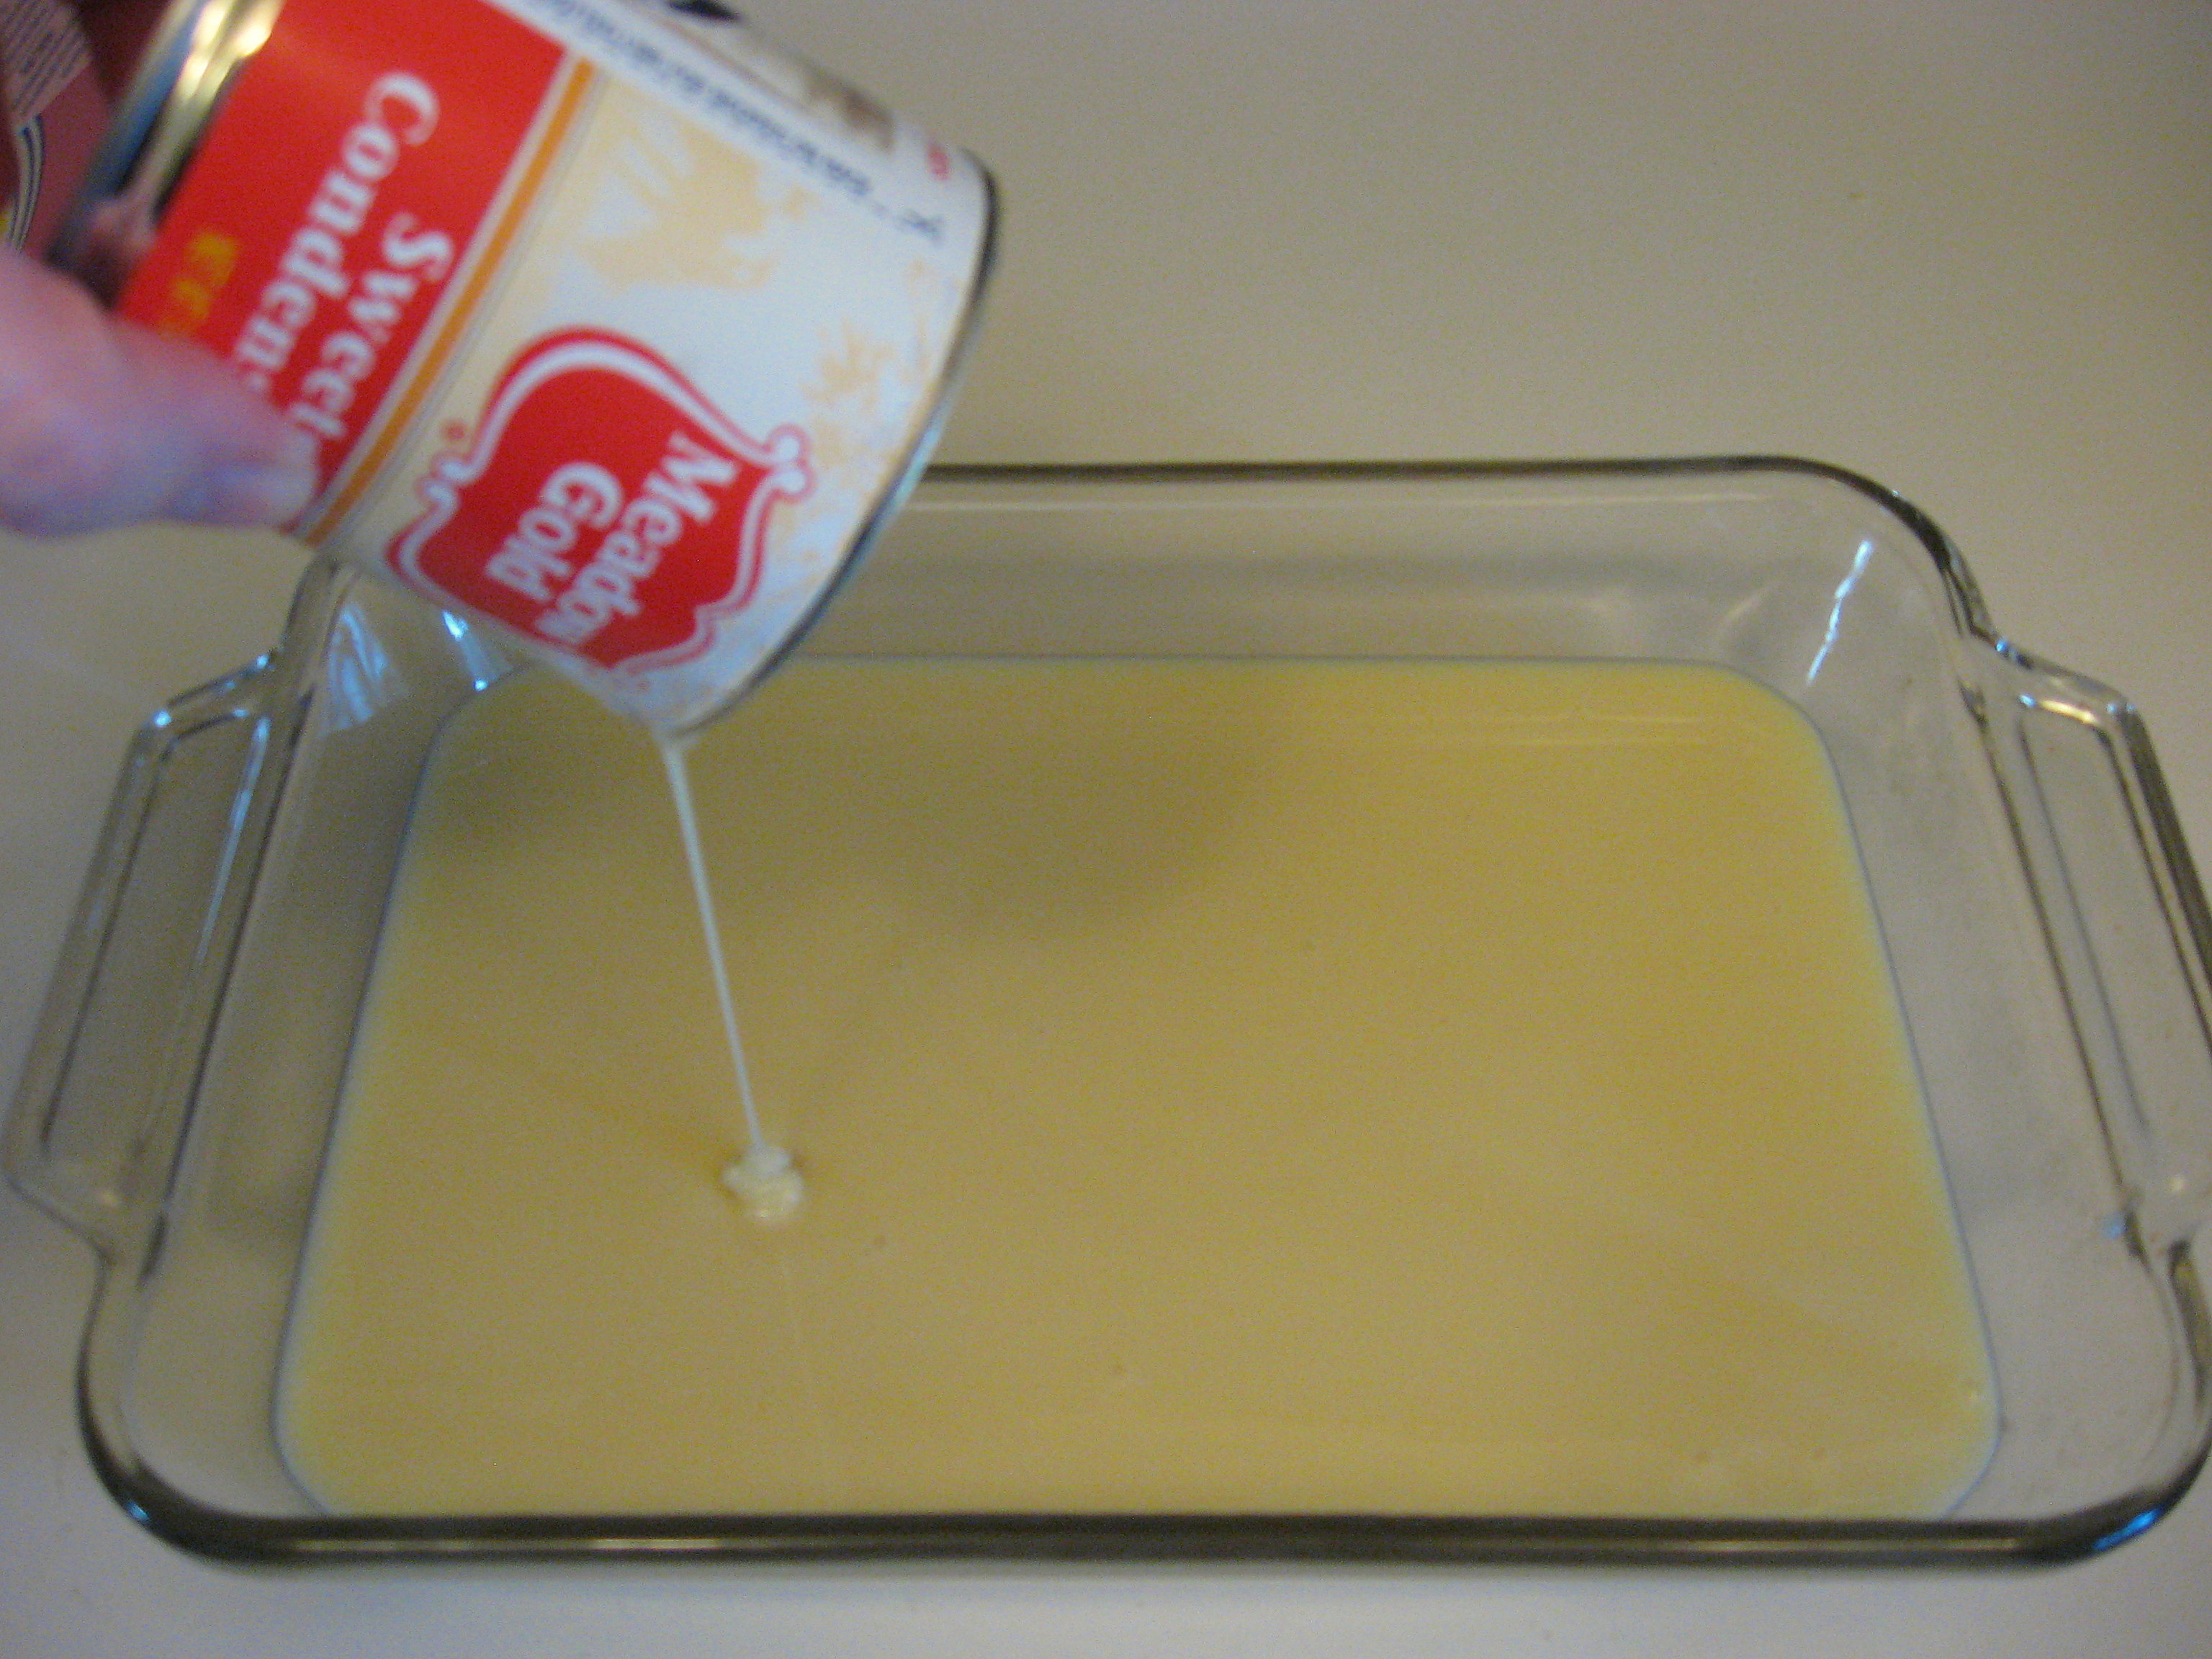
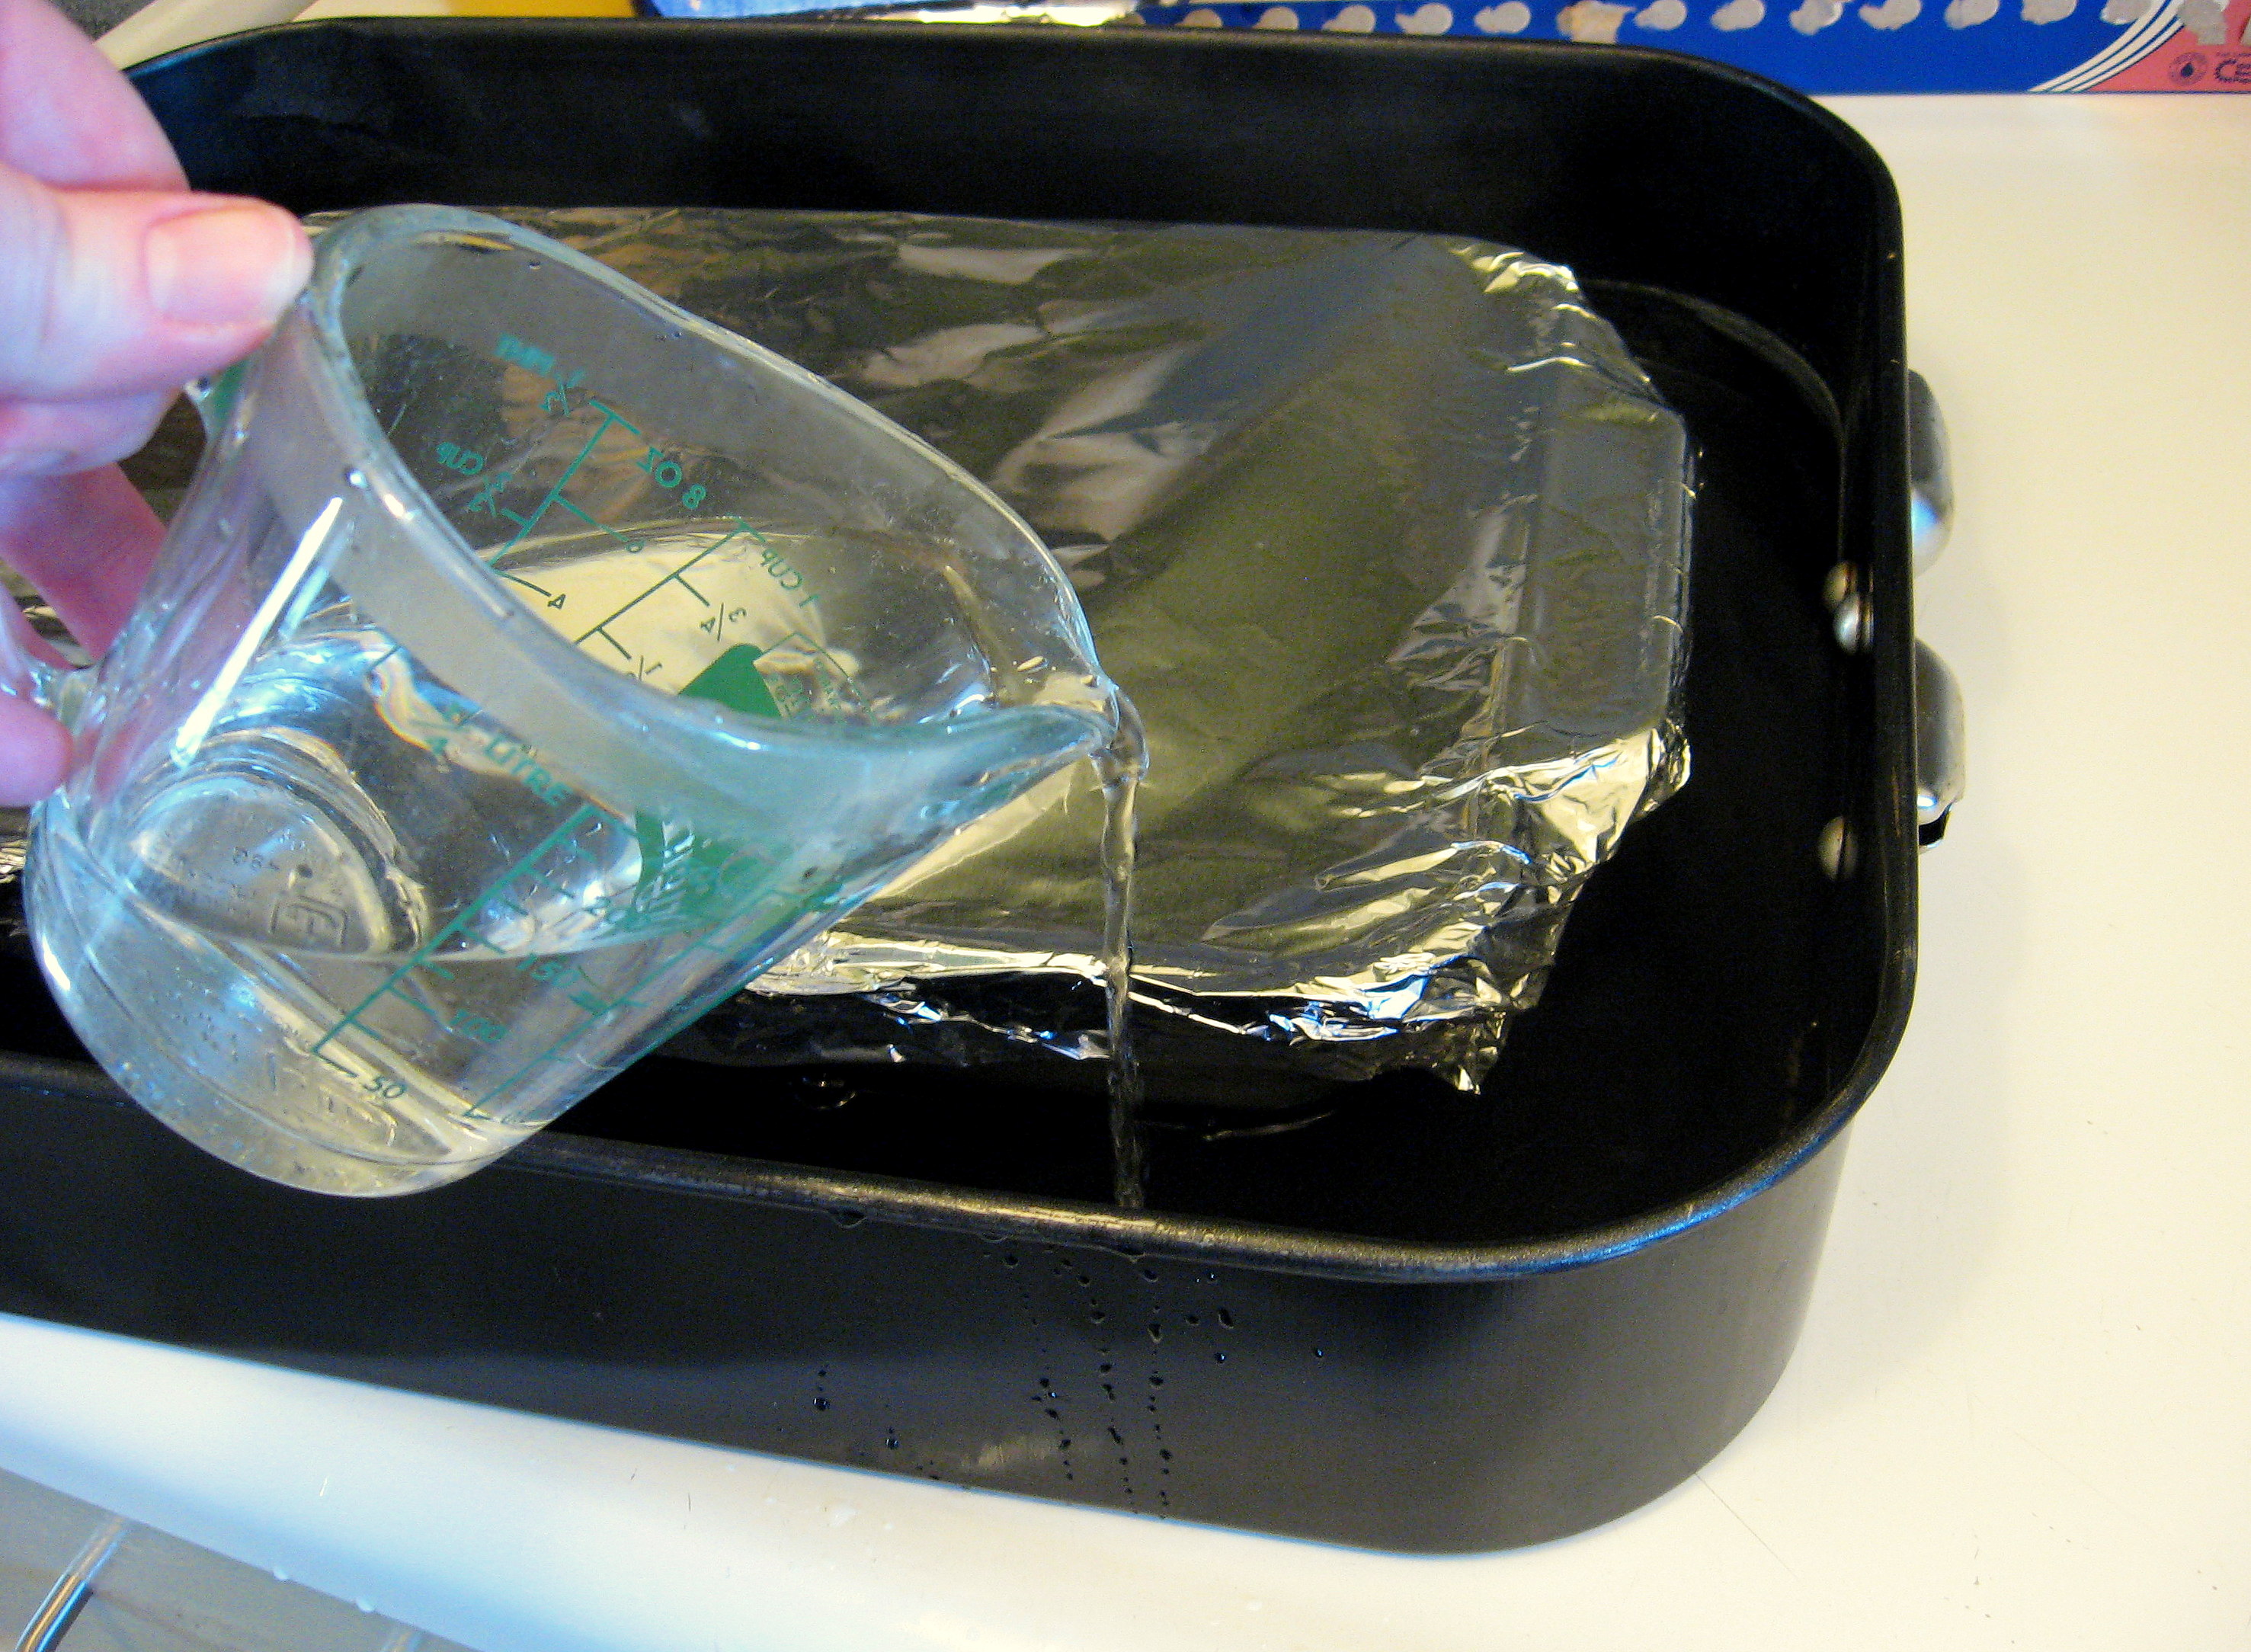
Cover this tightly with aluminum foil.
Put the glass pan into a bigger pan – like a roaster pan – and fill with hot water up to about halfway up the sides of the glass pan.
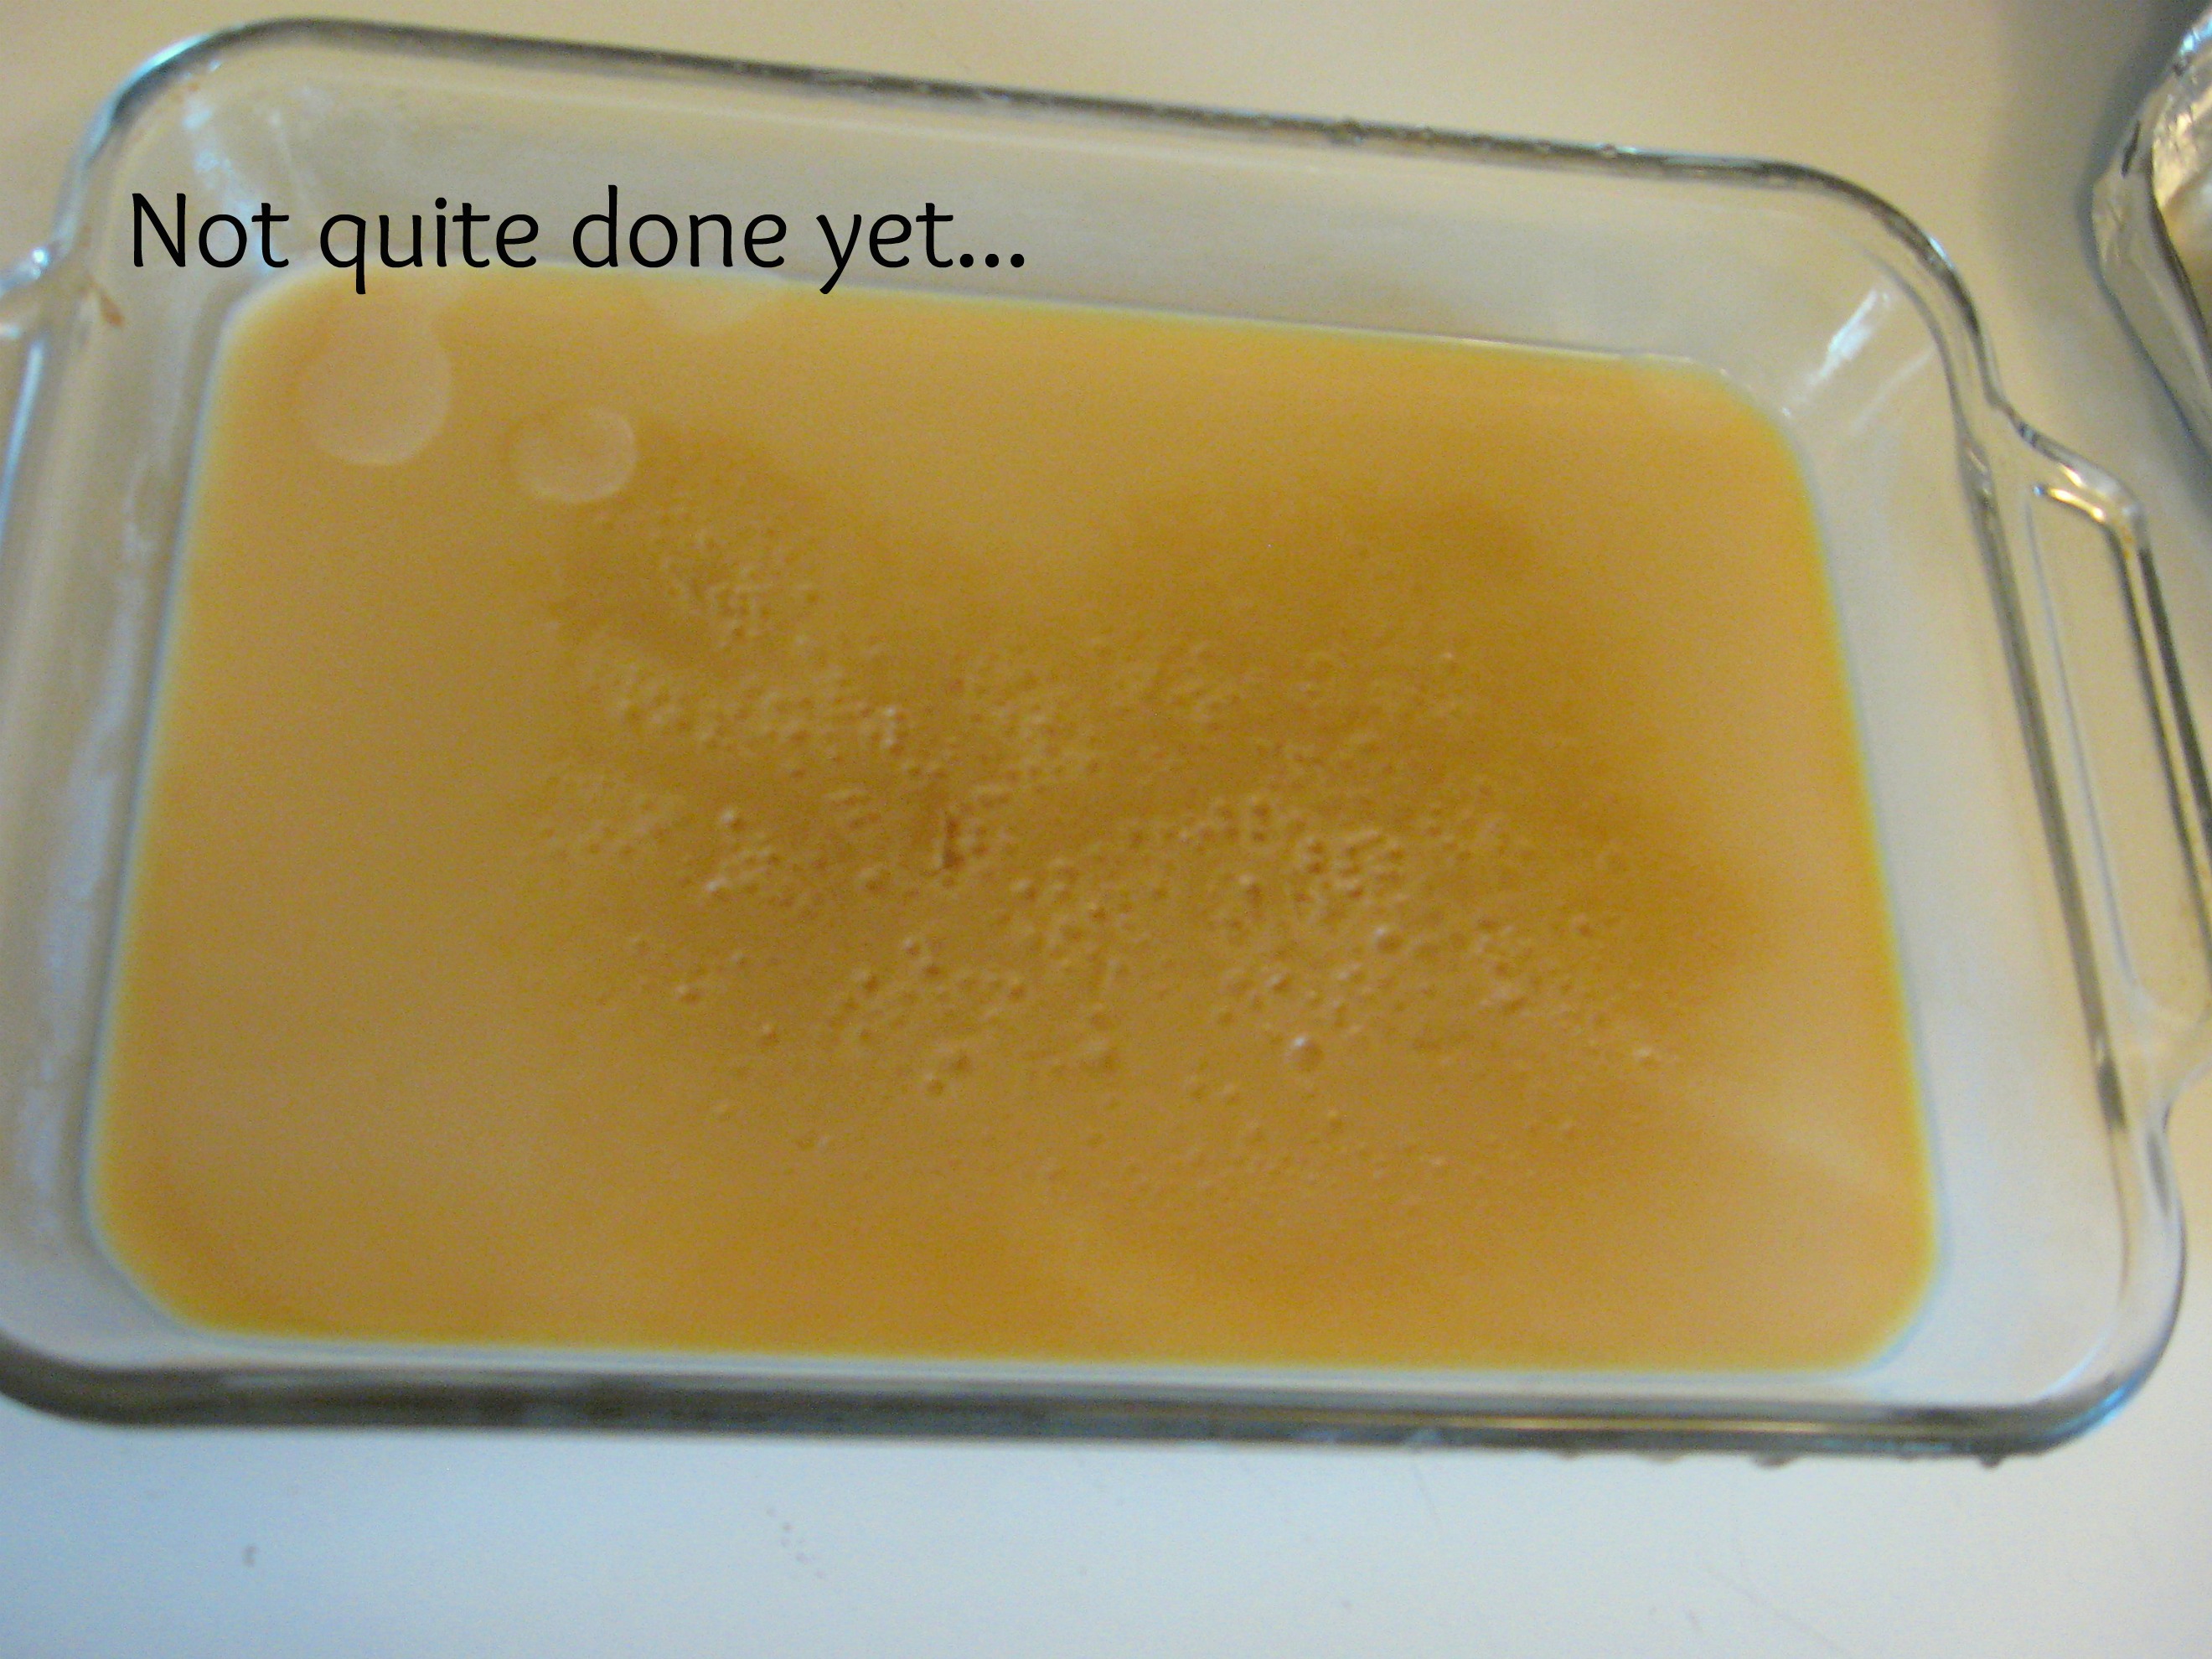
Pop the whole thing in the oven and leave it to cook for 1 to 1 1/2 hours. Check it once in awhile to make sure that there is plenty of water and replenish when necessary.
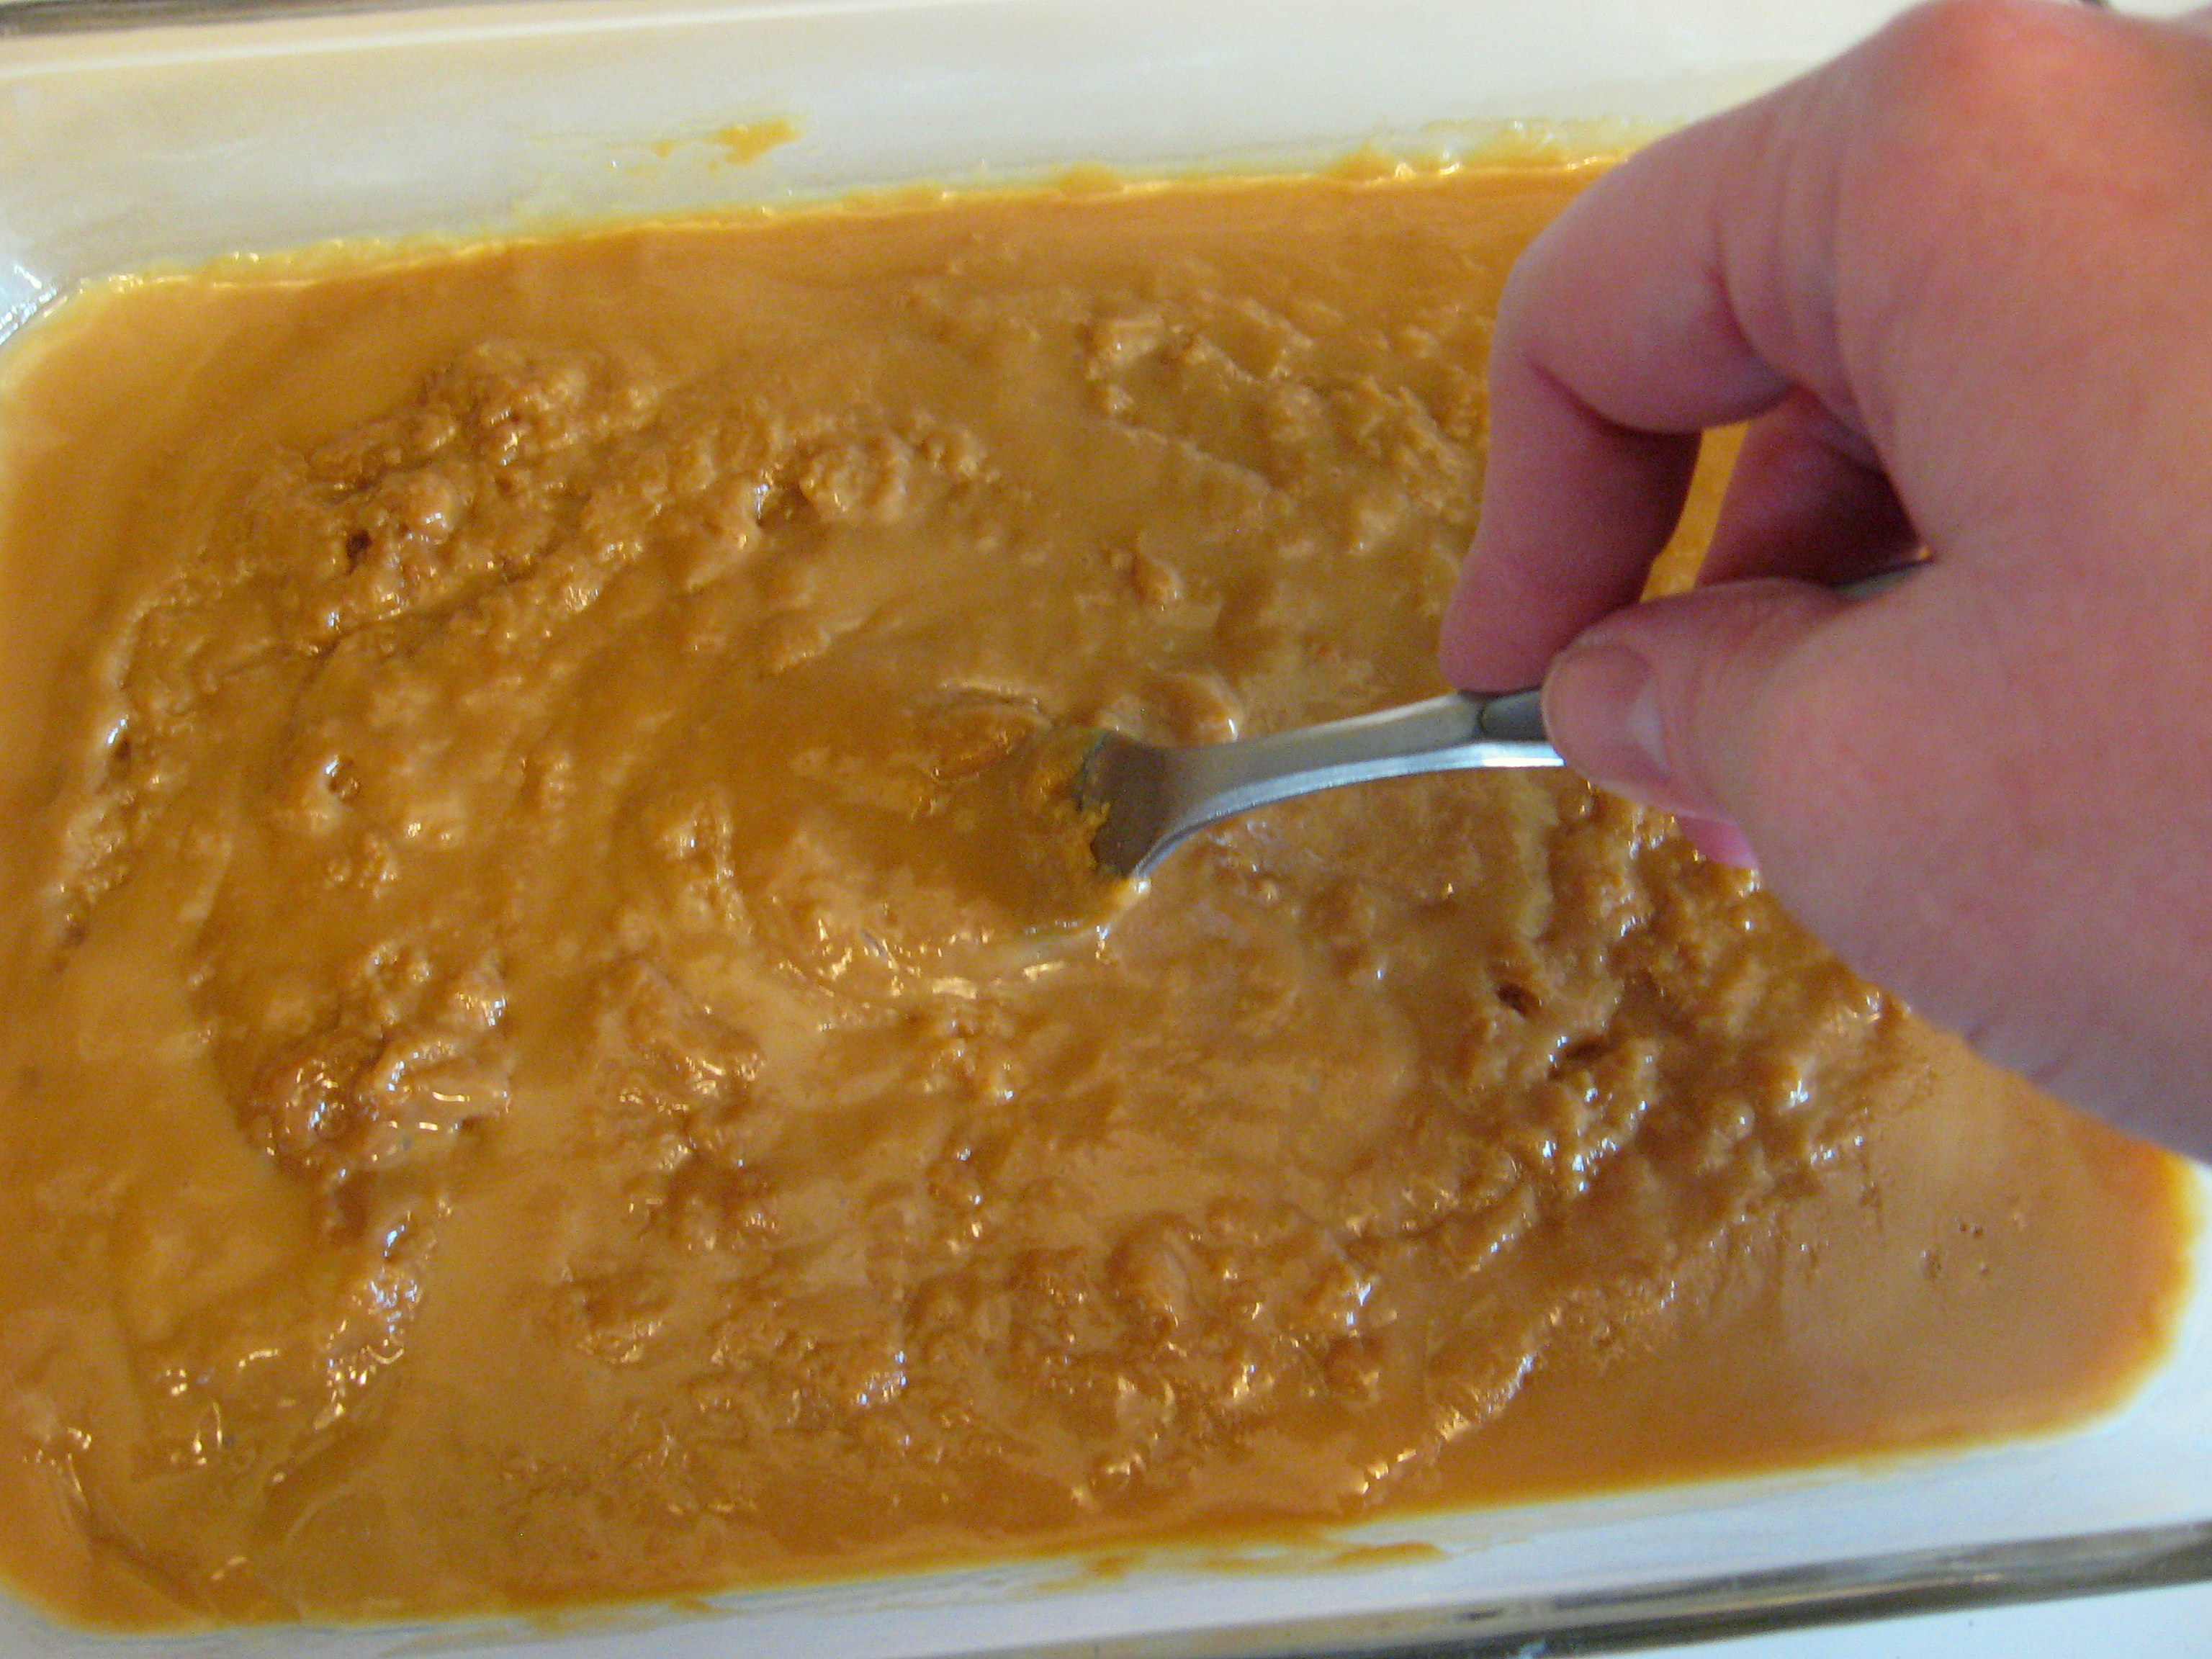
After about an hour, pull back the corner of the foil and have a look. When it’s done it should be thick and brown. (With the 2 cans that I did, it took more like 2-and-a-bit hours, but the one can was perfect after about an hour and 15 minutes).
**BE VERY CAREFUL when you open the oven door. Open it and stand back or you will get hit in the face with very hot steam!!
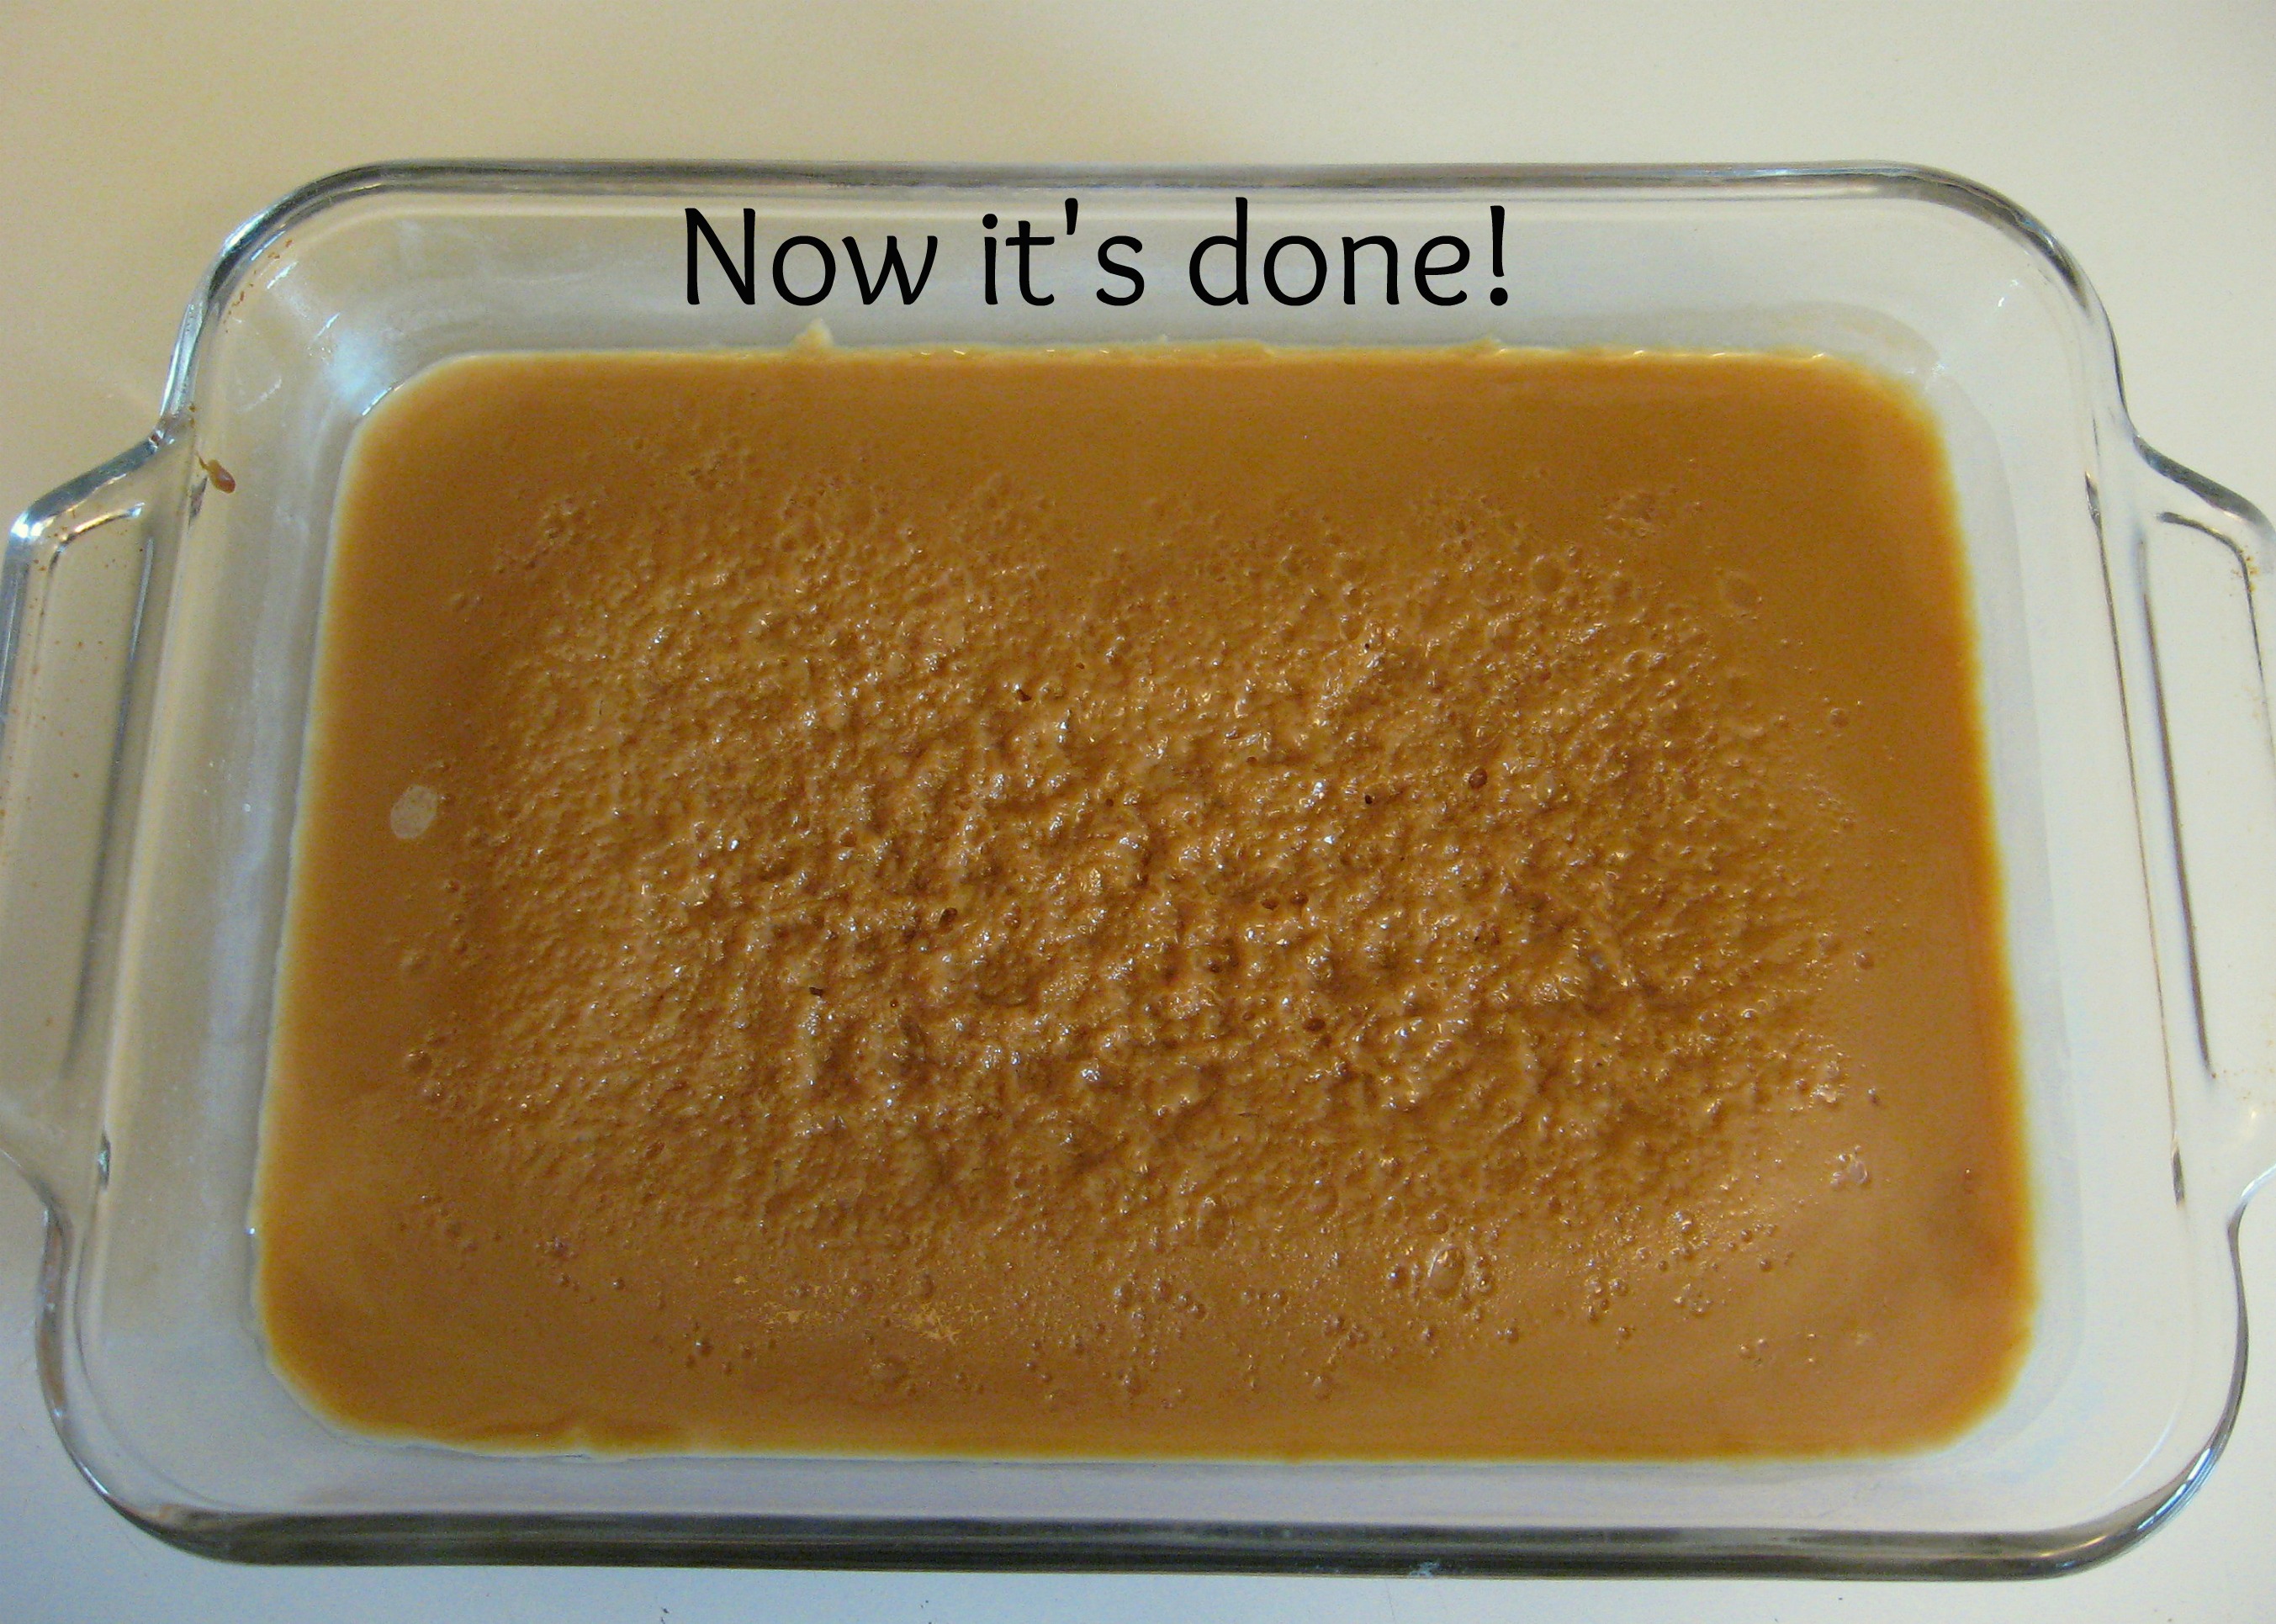
Once it is dark and carmely looking, remove the pan from the water and whip it with a whisk or a fork until it is smooth.
Now just try not to eat it all with a spoon…
Shop Smart Magazine Just $12.31 for 1 Year!

Deal of the Day – Shop Smart Magazine Just $14.49 for 1 Year
July 21st Only – Use Coupon Code 15CJ0615 and Save an Additional 15%!