
Easy But Cheap Hamburger Recipe

Alright, so we’re about to whip out a delicious hamburger recipe that not only is cheap but as we just mentioned, it’s delicious. Your family will beg you to cook these more often and you probably won’t decline just because of how easy and affordable these hamburgers are. Now, what are you waiting for? Let’s take a look at the cheap hamburger recipe below and see what cool and innovative ways you can think of to make this recipe even more better.
Ingredients
2lbs Lean Ground Beef
1 Pack of Buns (We like Bunny brand)
1 Onion
1 Pack of Cheese
1 Bottle of Mustard
Old Bay Crab Seasoning
Pepper
How To Cook It
1. Prepare onion and set to the side.
2. Mash ground beef into 5-6 patties and add seasoning + pepper.
3. Cook until done (no pink on the inside).
4. Add cheese to patties and let melt towards the end.
5. Add patties to buns and top with mustard and onion.
6. Serve hot and enjoy!
So, there you have it. That’s all that you have to do to prepare this cheap hamburger recipe. The secret ingredient here is the Old Bay Crab Seasoning. It’s actually pretty darn delicious and tastes great on hamburgers. We also use it on french fries as well. Not a fan of the seasoning? Well, simply remove it and just use pepper. As for your french fries, try using Lawry’s Seasoning Salt. It’s pretty much the standard for seasoning salts. No, really.
It’s the best but that’s besides the point. We invite you to go try this recipe now, share it with your friends, and see if they aren’t some of the most simple but delicious burgers that you’ve ever had. Notice how we didn’t mention using any oil? That’s because we don’t! Cook these in a pan, serve them, and you can come on back over here later to thank us!
Easy Baked Spaghetti Recipe

If you love spaghetti as well as baked spaghetti or have always wanted to try it, we’re going to blow you away with an amazing dish. This is an extremely easy baked spaghetti recipe that anyone can make and while it may seem a little on the pricey said, it feeds 6-8 people pretty comfortably. This is also one of those recipes that you can tweak to your liking (adding or removing toppings). Pumped up yet? Well, if you’re not, you should be. We know that we’re excited to share this easy baked spaghetti recipe with you so…
Scroll down and take a look!
Ingredients
2lbs Ground Beef
1 Bag of Cheddar Cheese
1 Bag of Mozzarella Cheese
1 Bag of Pepperonis
1 Package of Fresh Mushrooms
1.5lbs of Spaghetti Noodles
2 Cans of Favorite Spaghetti Sauce
1 Bottle of Texas Pete Hot Sauce
1 Large Foil Pan
Instructions
1. Cook spaghetti in pot until tender (or done to liking). Add salt if desired.
2. Brown ground beef in a skillet.
3. Drain spaghetti, meat, and add both to foil baking pan.
4. Mix in sauce, half bottle of Texas Pete.
5. Coat with both cheese, pepperoni, and mushrooms.
6. Cook on 350 degrees in oven for 30 to 40 minutes.
So, there you have it. That’s all it takes to make this easy baked spaghetti recipe. All in all, you’ll spend about an hour or so getting this dish ready and your family is sure to love it. Again, you can modify this recipe as needed. Some people don’t like mushrooms and some people hate pepperoni. That’s fine. Simply take them off and add something else.
Heck, you could even just eat it without anything on it at all but the cheese. Oh, and about that hot sauce! If you want it even hotter, use an entire bottle. Or you could just use a different brand of hot sauce but Texas Pete is what we prefer. It’s mellow, has just the right amount of kick, and unlike other hot sauces, it pours extremely easy. How cool, right?
Anyways, enough of our rambling. We’ll let you go now so you can get started with this amazingly easy baked spaghetti recipe and see how you like it. Be sure to let us know what you think and check back often for more fun, easy recipes just like this one. Enjoy!
On A Budget Chili Recipe

Who doesn’t love chili? It’s hot, delicious, and extremely filling. Okay, so just about everyone loves chili. What we don’t tend to love though is the price tag that usually comes with making a large pot of chili. This is all about to change though as we’re going to share an easy, delicious chili recipe with you that will cost you under $20 to prepare.
Ready to take a look and get started? Take a look at the ingredients below!
- 2lbs Ground Beef
- 1 Can of Kidney Beans
- 1 Can of Chili Beans (with or without sauce)
- 4 Cans of Stewed Tomatoes
- 1 Onion
- 1 Garlic Clove
- 1 Packet of Chili Powder
Got that? Good! These are the only ingredients that will need unless you like to top your chili with crackers, sour cream, cheese, Fritos, or whatever. Now, how to cook it.
- Pour all 4 cans of Stewed Tomatoes into large pot over Med Heat
- Dice Onion (like you would for a hot dog) and Garlic Clove
- Brown the Ground Beef over Med to Med High Heat mixing in Onion and Garlic
- Once Ground Beef/Onion/Garlic is ready, mix in with Stewed Tomatoes
- Add both cans of Beans to mix as well as the packet of Chili Powder
- Cook (Med Heat) for about 30 to 40 minutes covered or uncovered.
- Serve and enjoy! (Typically serves around 4-6 people)
Sounds pretty easy, right? Well, that’s because it is. This is a very simple chili recipe that you can prepare in less than an hour without spending more than $20. These numbers were calculated based on what we paid. You can buy ground beef by the pound for around $3 a pound. An onion is less than a dollar as is a garlic clove and packet of chili powder. Then all you need is the beans and stewed tomatoes which should run you around .80 to $1.20 a can depending on what brand you buy. One more thing before you go though so check this out.
We put this recipe together assuming you were cool with ground beef. If you’re not and prefer something like turkey burger, go right ahead! We’ve actually had it with both (as well as different kinds of beans) and have to admit that it tastes great regardless. It could just be the simplicity of the recipe but that’s what this is all about. You get to save money, eat good, and be happy. All at the same time! Doesn’t get much better than that, huh?
We don’t think so either. Now, what are you waiting for? Get to the grocery store or wherever it is that you shop so you can get your hands on everything needed to make this affordable chili recipe. Your entire family will thank you for this one and will wonder what chef or food guru that you stole this recipe from. They may not even believe that you made it in less than an hour in your own home! Anyways, we hope you like this recipe!
Freezing Zucchini
If you have an abundance of zucchini like I do and your friends aren’t so willing to take it you may want to try ding dong ditching it and leaving the green skinned squash on random front porches of unsuspecting neighbors. Or you can use it to your benefit and make it last a little longer by freezing it.
We are in the middle of what I call squash season and this forever giving vegetable (or weed as my husband likes to call it) seems to be waiting in the garden each and every morning. Although it is fun to watch something grow so prolific, it can be overwhelming when you look at the pile of squash on the counter and wonder just what you are going to do with it.
If you enjoy zucchini, freezing it is a great way to extend the life of your garden produce. Freezing the squash gives you the ability to use it later in year. These frozen veggie packs make it easy to add to soups, casseroles, side dishes, pasta sauces, breads, cakes and muffins.
Freezing zucchini is super simple just follow these quick and easy steps to regain your counter top and hide this summer squash away in your freezer.
Directions
Start by washing the zucchini well. Making sure to clean all the dirt off of the squash.
Next cut the ends and any undesirable sections off of the zucchini.
Then section the vegetable into smaller pieces that are easy to grate. Scoop any extra large seed out and discard them.
Grate the squash by hand or with a food processor.
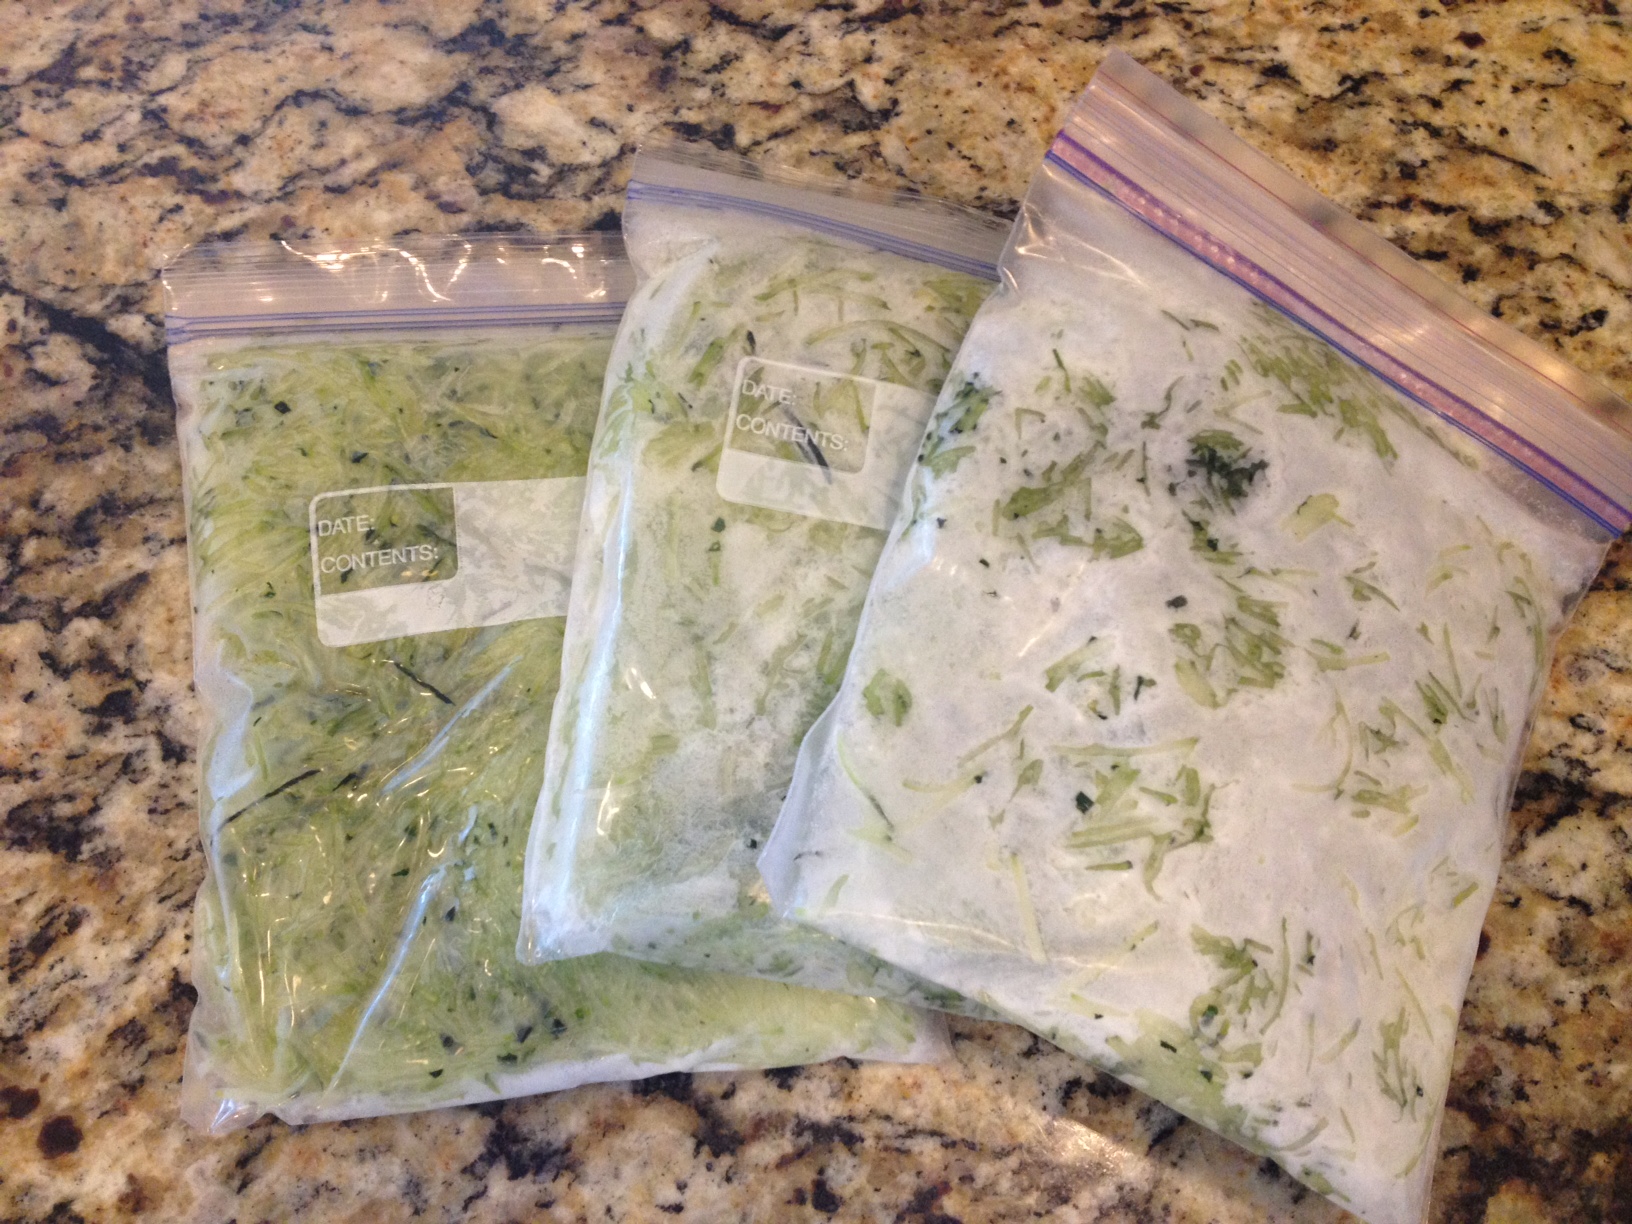
Measure zucchini into amounts that can easily be used in your recipes. I measured out 2 cups and placed into freezer bags.
Store in small containers like freezer bags or plastic containers. If you decided to use freezer bags, pat the zucchini flat and stack the bags in the freezer to save space.
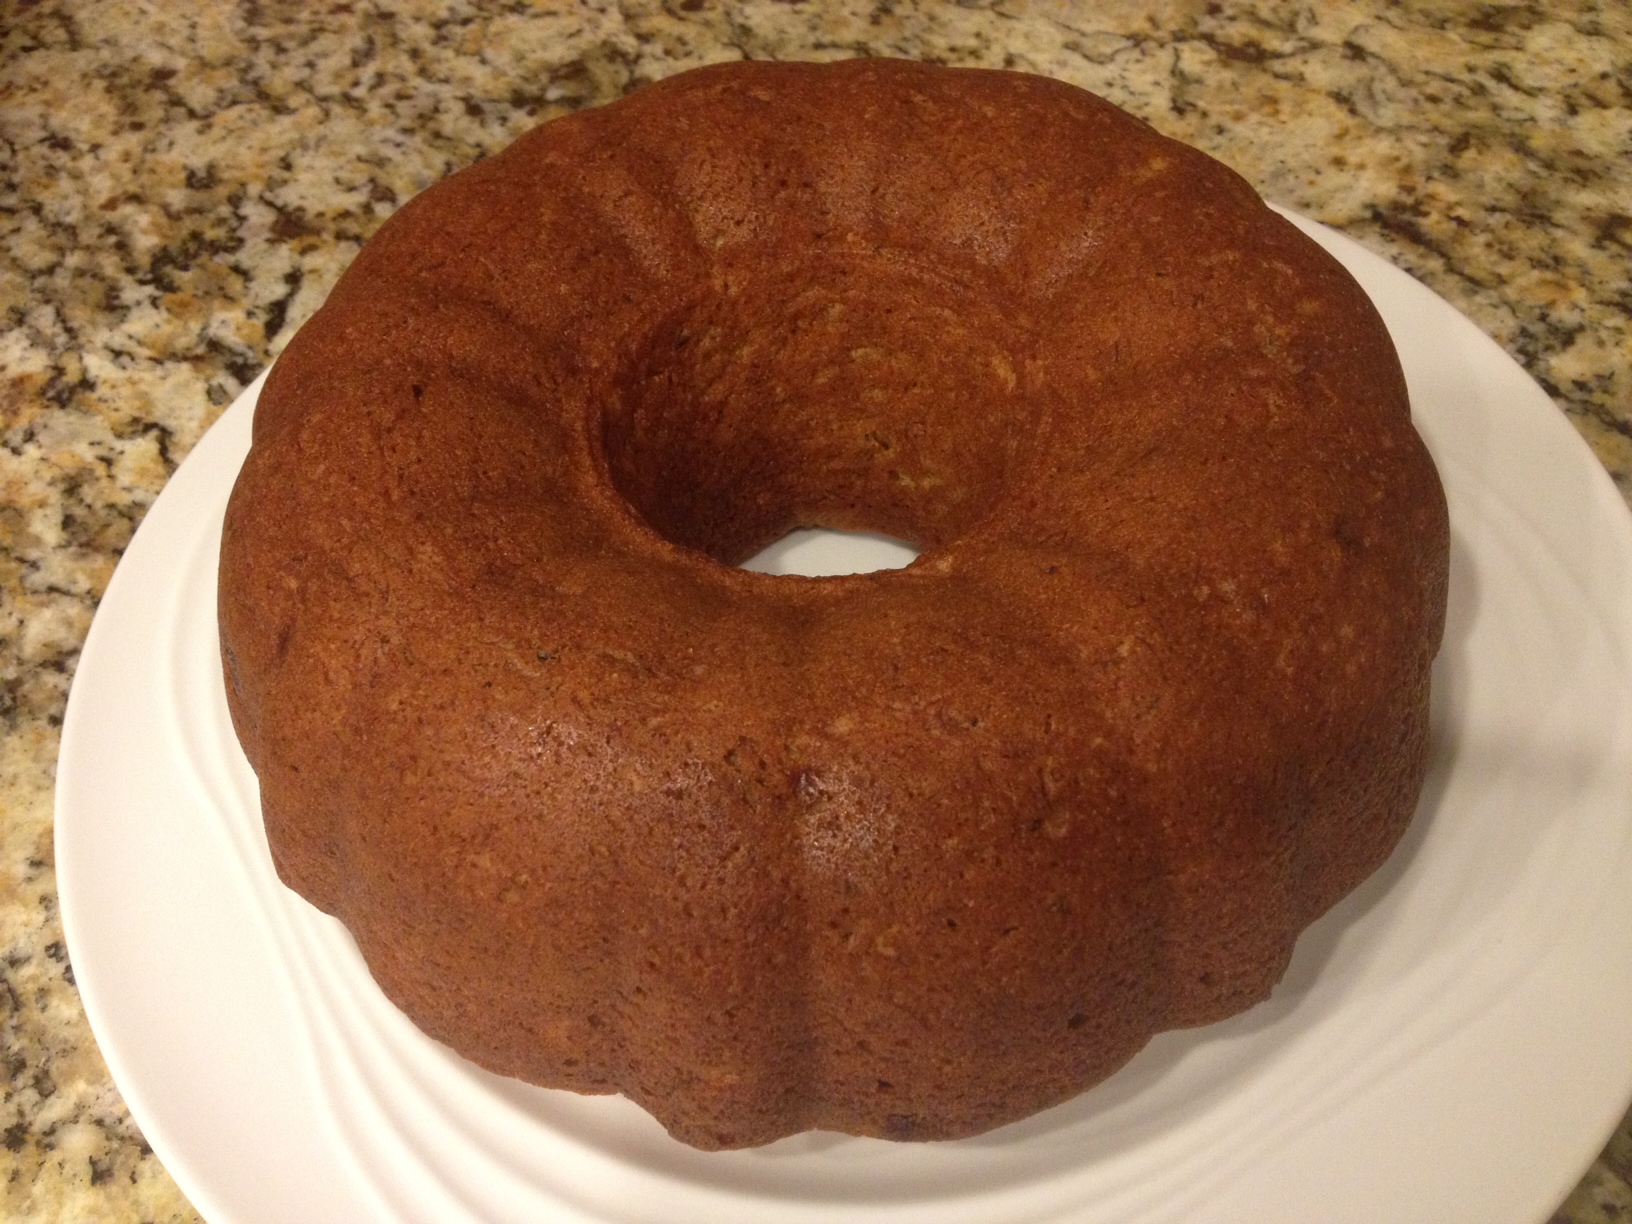
Zucchini Banana Bundt Cake Recipe
So as I said in one of my earlier post, I planted zucchini in my garden this year and it seems to be coming out of my ears. I am trying to make the most out of whatever comes out of my garden. These days that is looking grim since my digs have taken to eating peppers and pepper plants and anything else they have a fancy for trying out of the garden. But the zucchini grows like a weed and and keeps producing despite the other struggles in my garden.
This zucchini bundt cake is light and sweet with a hint of cinnamon. The colors are beautiful with the flecks of green peeking through the warm blonde cake. I love it when things you bake turn out so pretty. Theres something so satisfying, looking at it and thinking, “I made that.” It’s a perfect cake for a brunch. If you wanted to make it a little richer you could add a cup of chocolate chips. Serve it with vanilla ice cream for another good from the garden summer treat.
Ingredients:
3 large eggs
1 cup vegetable oil
1 1/2 cup sugar
2 cups all-purpose flour
1/4 tsp. baking powder
1 tsp. baking soda
2 tsp. ground cinnamon
2 tsp. vanilla extract
1 cup aw zucchini, shredded ( about 3 small )
1 cup mashed banana ( about 2 )
1/2 cup chopped pecans (optional)
Directions:
Preheat Oven to 350 degrees.
Shred zucchini and mash bananas and set aside.
In a large bowl, beat eggs, oil, and sugar.
Add vanilla extract and beat well.
Slowly add flour, baking powder, baking soda, cinnamon, and pecans. Mix well.
Next add the zucchini and bananas and fold in until well blended.
Pour into greased and flowered bundt pan, and bake for 45-55 minutes or until toothpick inserted into the center comes out clean.
Cool for 10 minutes in pans on wire rack.
Remove from pan and cool completely.
Top it off with a light dusting of powdered sugar.
Summer Key Lime Cookie Recipe

We love cookies at our house and summer is just enough reason for me to try a new recipe. This new key lime cookie recipe didn’t disappoint. If you love limes and even if you don’t you just might fall in love with this cookie recipe too. They are light and tangy and the best part is they are quick and easy to put together.
Key Lime Cookie Recipe
1 cup salted butter, softened
1 cup granulated sugar
1 egg yolk
2 Tablespoons key lime zest
1 teaspoon pure vanilla extract
2 Tablespoons key lime juice
1/2 teaspoon salt
2 cups + 2 Tablespoons all-purpose flour
Beat the butter and sugar together until it is fluffy. Next add the egg yolk and beat until incorporated. Then add the vanilla and key lime juice and mix well. Last of all add the key lime zest, salt and flour and mix until the dough is slightly sticky. Place the dough in the refrigerator for about 10 minutes. Drop by spoonfuls onto a greased cookie sheet or silpat mat. Bake for 8 to 10 minutes at 350 degrees.
Icing Recipe
2 1/4 cups powdered sugar
1/4 cup key lime juice
1/2 teaspoon pure vanilla extract
1/8 teaspoon salt
2 drops green food coloring (optional)
Mix powdered sugar, key lime juice, vanilla extract and salt. Add a couple drops of food coloring and mix well. Drizzle over cooled cookies.
Fresh Ideas For Summer Squash and Zucchini
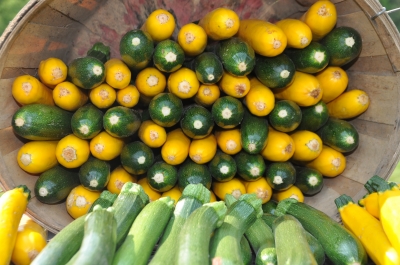
Summer gardens are in full bloom and starting to bare natures goodness. For those gardeners who have been lovingly attending to their gardens, they are now beginning to reap the bounty of their careful attention and patience. Some of my favorite summer plants are zucchini and yellow squash. (Probably because you really don’t have to posses a green thumb in order to help these thriving plants grow.) These plants are abundant producers and will keep giving all summer long. They also may produce more vegetables than you feel like your family could possibly eat. If this is the case at your house and you’re wondering what to do with all these extra veggies, here are a few ideas to dress up these ordinary garden vegetables while serving them up in a kid friendly way.
Veggie Fries
Start by cutting the squash into veggie sticks a couple inches long. Toss into flour and then drop them into a couple of beaten eggs. Finish them off by rolling them in panko bread crumbs. Place on a greased cookie sheet and bake at 400 degrees for 10 – 15 minutes.
Veggie Waffles
Begin by grating the zucchini or squash. Thaw hash browns and mix equal parts squash and hash browns in a bowl. Grease a waffle iron well and spread the hash brown and squash mixture in the waffle iron, close the lid and let it cook for about 15 minutes.
Squash and Sauce
Take a vegetable peeler and cut the squash into ribbons by running the peeler length wise along the vegetable. In a sauté pan cook the ribbons lightly for about 5 minutes. Serve with your favorite pasta sauce and eat it like spaghetti.
="https://
Image courtesy of [Bill Longshaw] / FreeDigitalPhotos.net
“>
Recipe : Healthy Pumpkin Oatmeal Muffins
As a mom, I’m constantly trying to sneak in those extra healthy foods we should be eating into my kids diets. If there is a way to eliminate white sugar from their meals and slide in an extra vegetable or two, I’m your Guinea pig. (and my kiddos are too)
As I try to improve our diet and shake out the white sugar, white flour, preservatives, dyes and anything else we shouldn’t be eating, I always end up turning to the internet to find more information.
There are plenty of clean eating options, great blogs with recipes and an endless source of opinions. If you search the internet you will find some clean eaters are more extreme than others. I would call myself “a middle of the road clean eater.” I want it to be healthy and I want it to taste good. Lucky for us most natural foods do taste good.
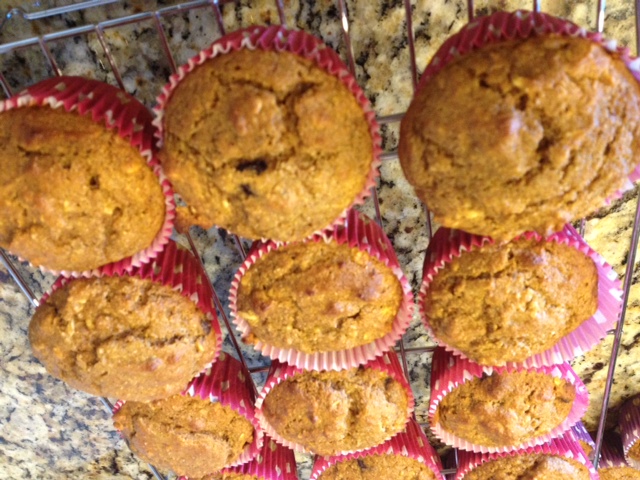
This recipe for Pumpkin Oatmeal Muffins received a thumbs up from my entire clan. I made it with homemade pumpkin puree that I preserved last fall. Pie pumpkins grow easily in the garden, so if your interested in giving this a try, plant you pumpkins now and follow my link.
I have to admit Pumpkin Chocolate Chip Bread from Great Harvest Bakery is a favorite in our home. These are a much healthier version in a muffin and were gobbled down by my boys this morning. We did add some chocolate chips to a batch because everyone needs a treat once in a while. Who can pass up chocolate? Not me.
PUMPKIN OATMEAL MUFFINS
Ingredients:
1 cup whole wheat flour
1/2 cup almond flour
1/2 old fashioned oats
1/2 cup chopped walnuts or almonds (optional)
2 teaspoons baking powder
2 teaspoons pumpkin pie spice
1/2 teaspoon baking soda
1/2 teaspoon natural sea salt
1 cup cooked pumpkin flesh, or winter squash or sweet potato
4 egg whites or 2 whole eggs
1/2 cup natural honey
1/2 cup sour milk (add 1 tsp lemon juice)
1/4 cup ground flax seed
Directions:
1. Preheat oven to 375 degrees F. Line muffin tins with paper muffin liners.
2. Combine all dry ingredients in one bowl. Set aside.
3. Combine all wet ingredients in another bowl.
4. Add dry ingredients to wet ingredients. Mix until just combined.
5. Drop spoonfuls of batter into muffin tin. Fill to top.
6. Bake for 25 minutes until just golden on top. Remove from heat and let cool on wire rack.
Yield: Makes 12
M&M Cookie Recipe….Yum

Cookies have always been one of my greatest weaknesses. If you look at my Pinterest boards you will see there is one devoted strictly to cookie recipes. My very own online cookie collection. I look through the recipes and salivate. Then I break out my baking gear and get to work. Sometimes the recipes are great and sometimes not so great.
This is the latest recipe I’ve tried and my boys gobbled them up. The recipe developed into 6 dozen, freshly baked, M&M laden cookies and still there weren’t enough to go around. Leaving the glasses of milk sitting alone on the kitchen table. They were a hit at our house, so I thought I would pass this recipe along. If you love M&M’s and cookies, give this one a try. It might just become your new favorite.
Ingredients:
1 cup packed brown sugar
1/2 cup white sugar
1 cup shortening
2 eggs
1 1/2 teaspoons vanilla extract
2 1/2 cups all-purpose flour
1 teaspoon baking soda
1 teaspoon salt
1 1/2 cups M&M’s
Directions:
1. In a large mixing bowl combine, sugar, eggs, shortening and vanilla. Until well creamed.
2. Add flour, salt, and baking soda. Mix until well incorporated.
3. Add M&M’s and stir in until evenly distributed in the dough.
4. Bake at 350 degrees F until edges are lightly browned. About 9-11 minutes.
Enjoy 🙂
Pretzel Hug Treats
This is an easy snack/treat for the holidays. You can customize it by using Christmas colored m&m’s too!

1 bag pretzel Snaps (the square kind)
2 bags Hershey Hugs
1 bag M&M’s
Preheat oven to 250 degrees. Place the pretzels on a large baking sheet flat and evenly spaced. Top with a Hershey hug, then place into the oven for about 5-6 minutes. WATCH CAREFULLY as each oven is different. You want to take them out as soon as they are soft, not totally melted. Then gently place the m&m’s on top. Wait until they harden to eat, about 2-3 hours. Faster if you place them in the freezer or fridge.
Halloween Treat : Edible Witches Brooms

Last minute holiday parties can be some of the best. As fun as they may be they can create a bit of stress as well. If you are more laid back or are one of those type A personalities who need a plan, you need not stress.
When the phone rings or I get a text about a last minute get together my gut reaction is to go, “It will be fun” I think in my head. Then I go about convincing my home loving husband why we should attend. After his reluctant agreement the realization sinks in and I know this will take a bit of effort on my part to make sure we get there and bring something to share. I hate showing up empty handed. I always feel the need to bring something to a get together even when the host hasn’t request that we do so. The last minute run to the store can increase my stress levels and leave me in a lurch trying to think of something to bring. This takes all of the fun out of the last minute get together and a form of dread sets in. So I try to live by the theme, “Keep it Simple.”
These little witches brooms are super simple treat and perfect for any last minute Halloween party. The result a Halloween themed treat that requires little effort and hardly any time. With the use of two ingredients that you will probably find in your pantry and Halloween candy bowl you’ll look so prepared. You will arrive with a treat to share and be there friends to enjoy it minus the stress!
Witches Brooms
Ingredients
1 package Mini Reese’s Peanut Butter Cup
1 package stick pretzels
Step 1 Unwrap mini Reese’s Peanut Butter Cups and place face down on a tray.
Step 2 Gently insert one pretzel stick into the center of every candy.
Step 3 Finished!
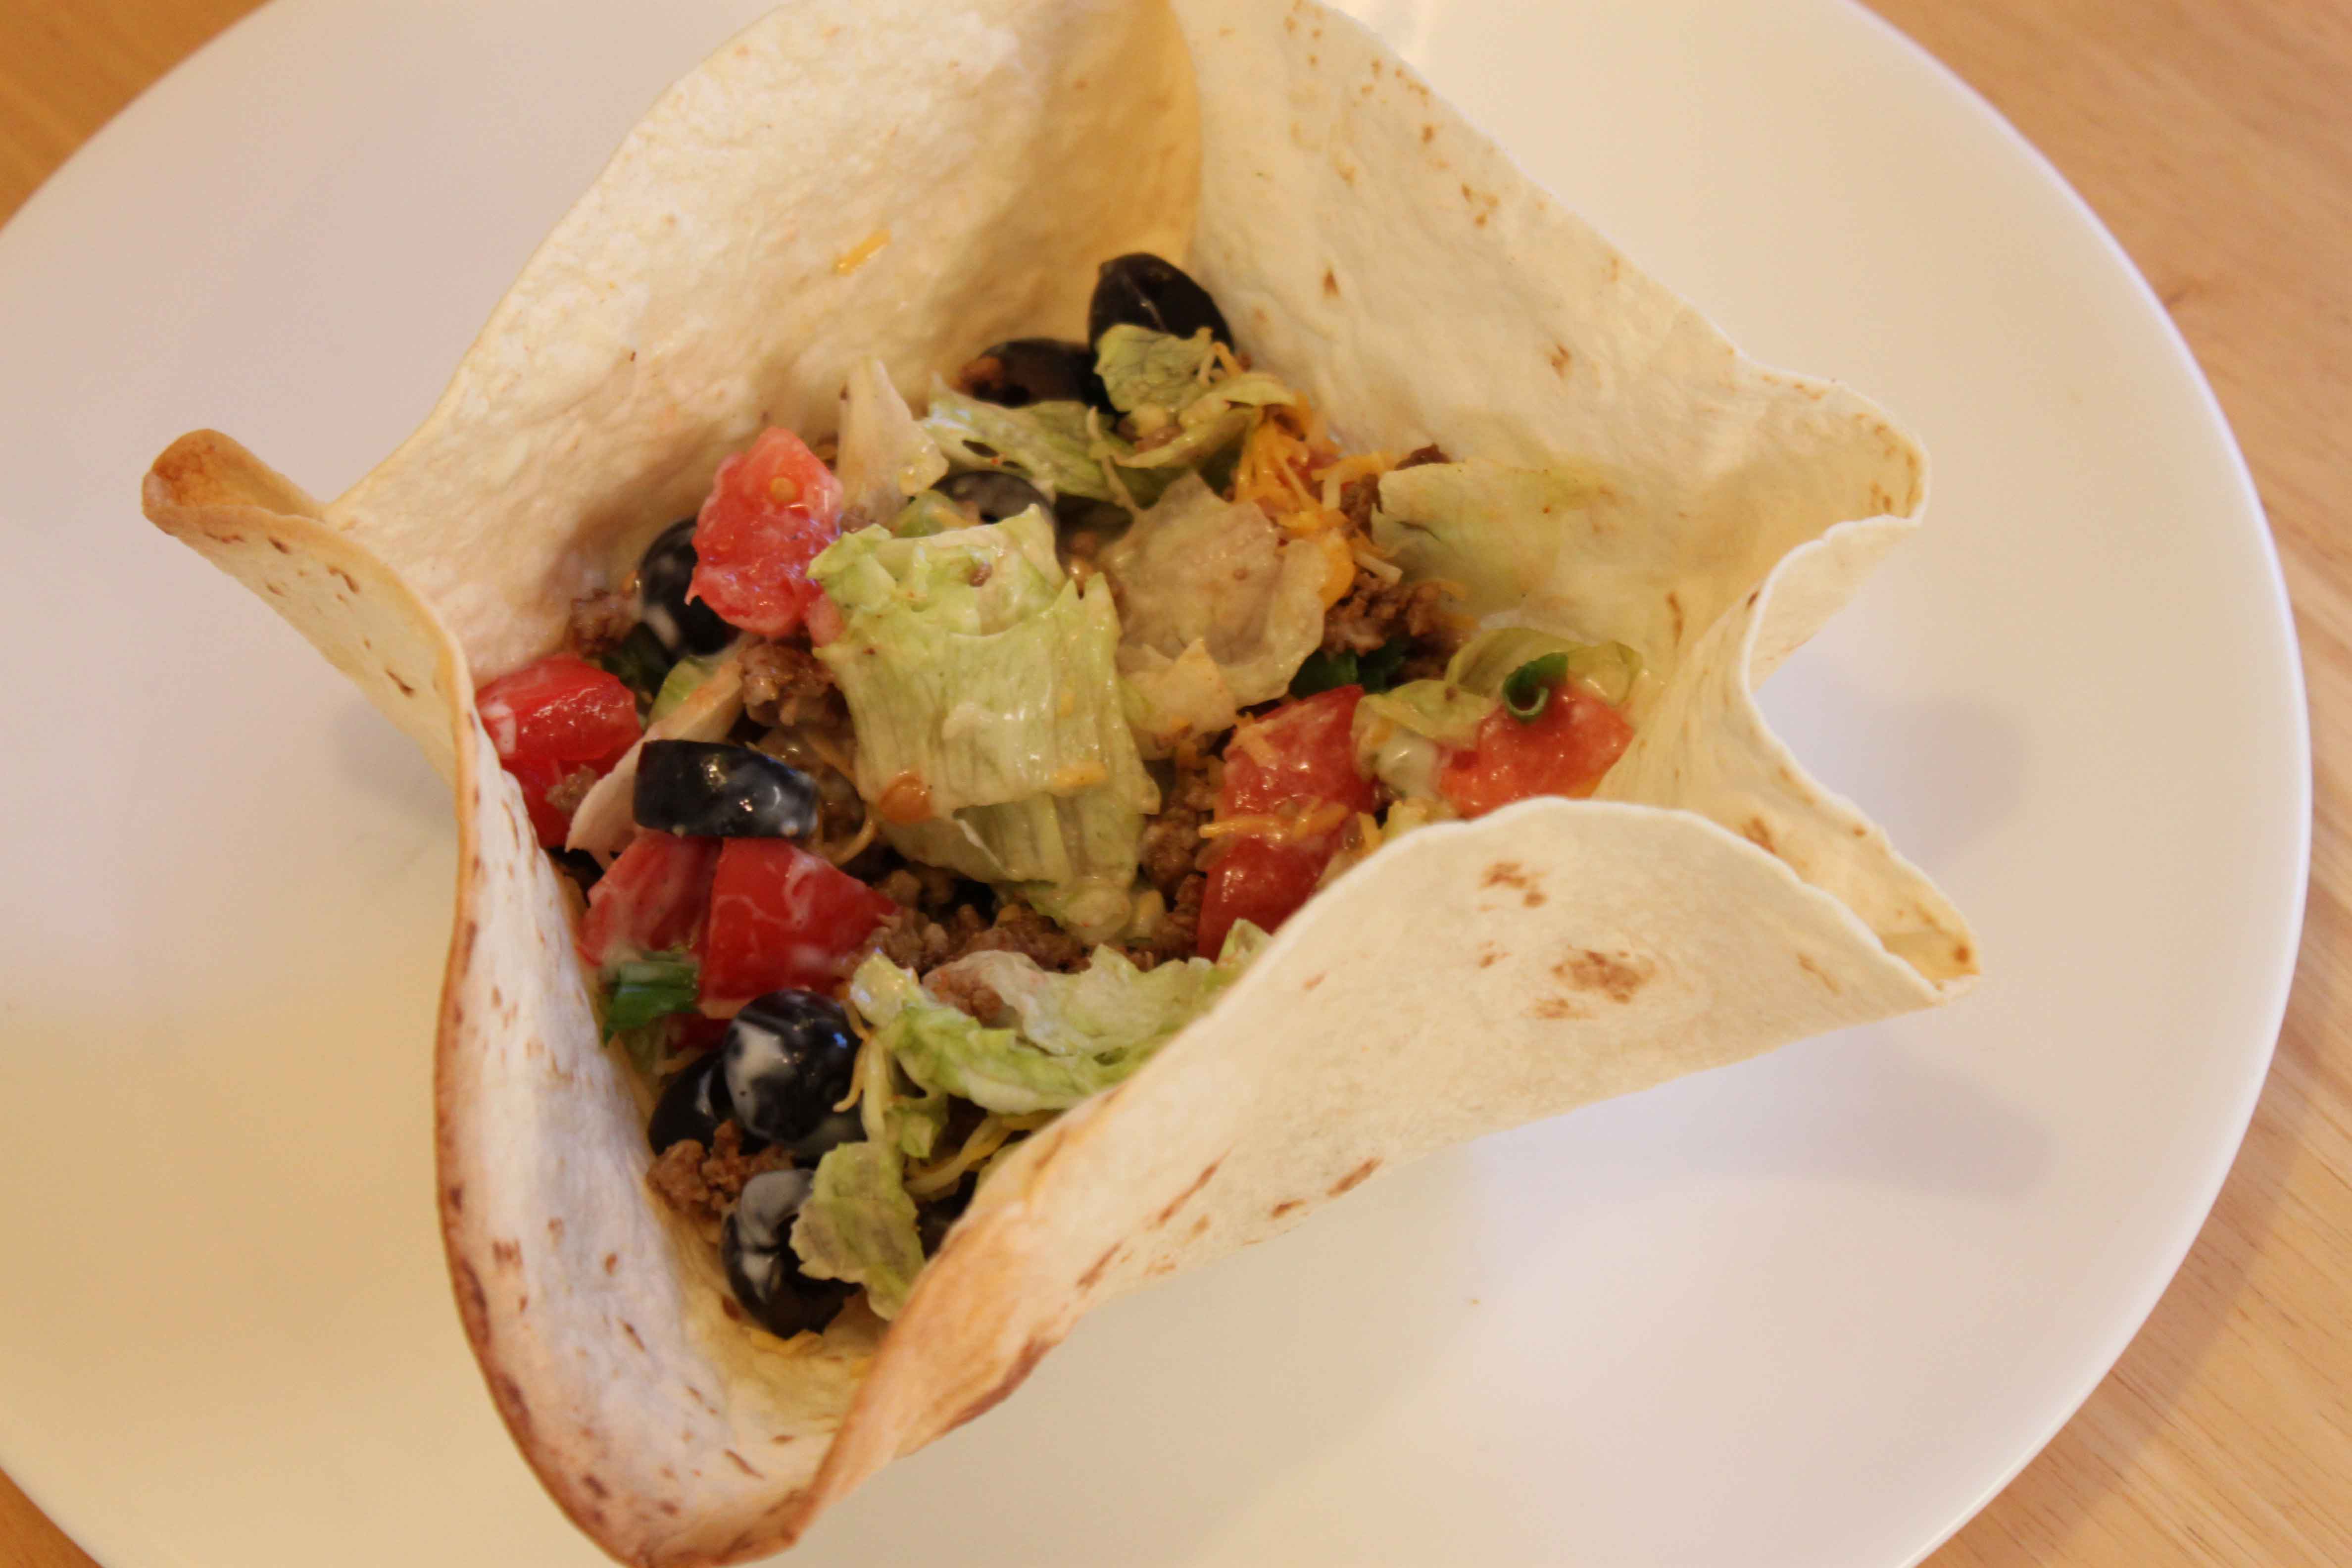
Make Your Own Tortilla Bowls
If you want to be the coolest mom ever, then you must make these tortilla bowls! Your kids will think it is the best thing ever. But, lucky for you…they are really easy. Here is how to do it.
You need:
Large tortillas (burrito size)
canola oil
canning jars
cookie sheet
First, place the tortillas in the microwave for about 40 seconds to warm them up. Makes them easily pliable. Then rub each one with about a teaspoon of oil, front and back, with your hands. Then place over the bottom of the canning jar and gently mold to the jar. Like seen here.
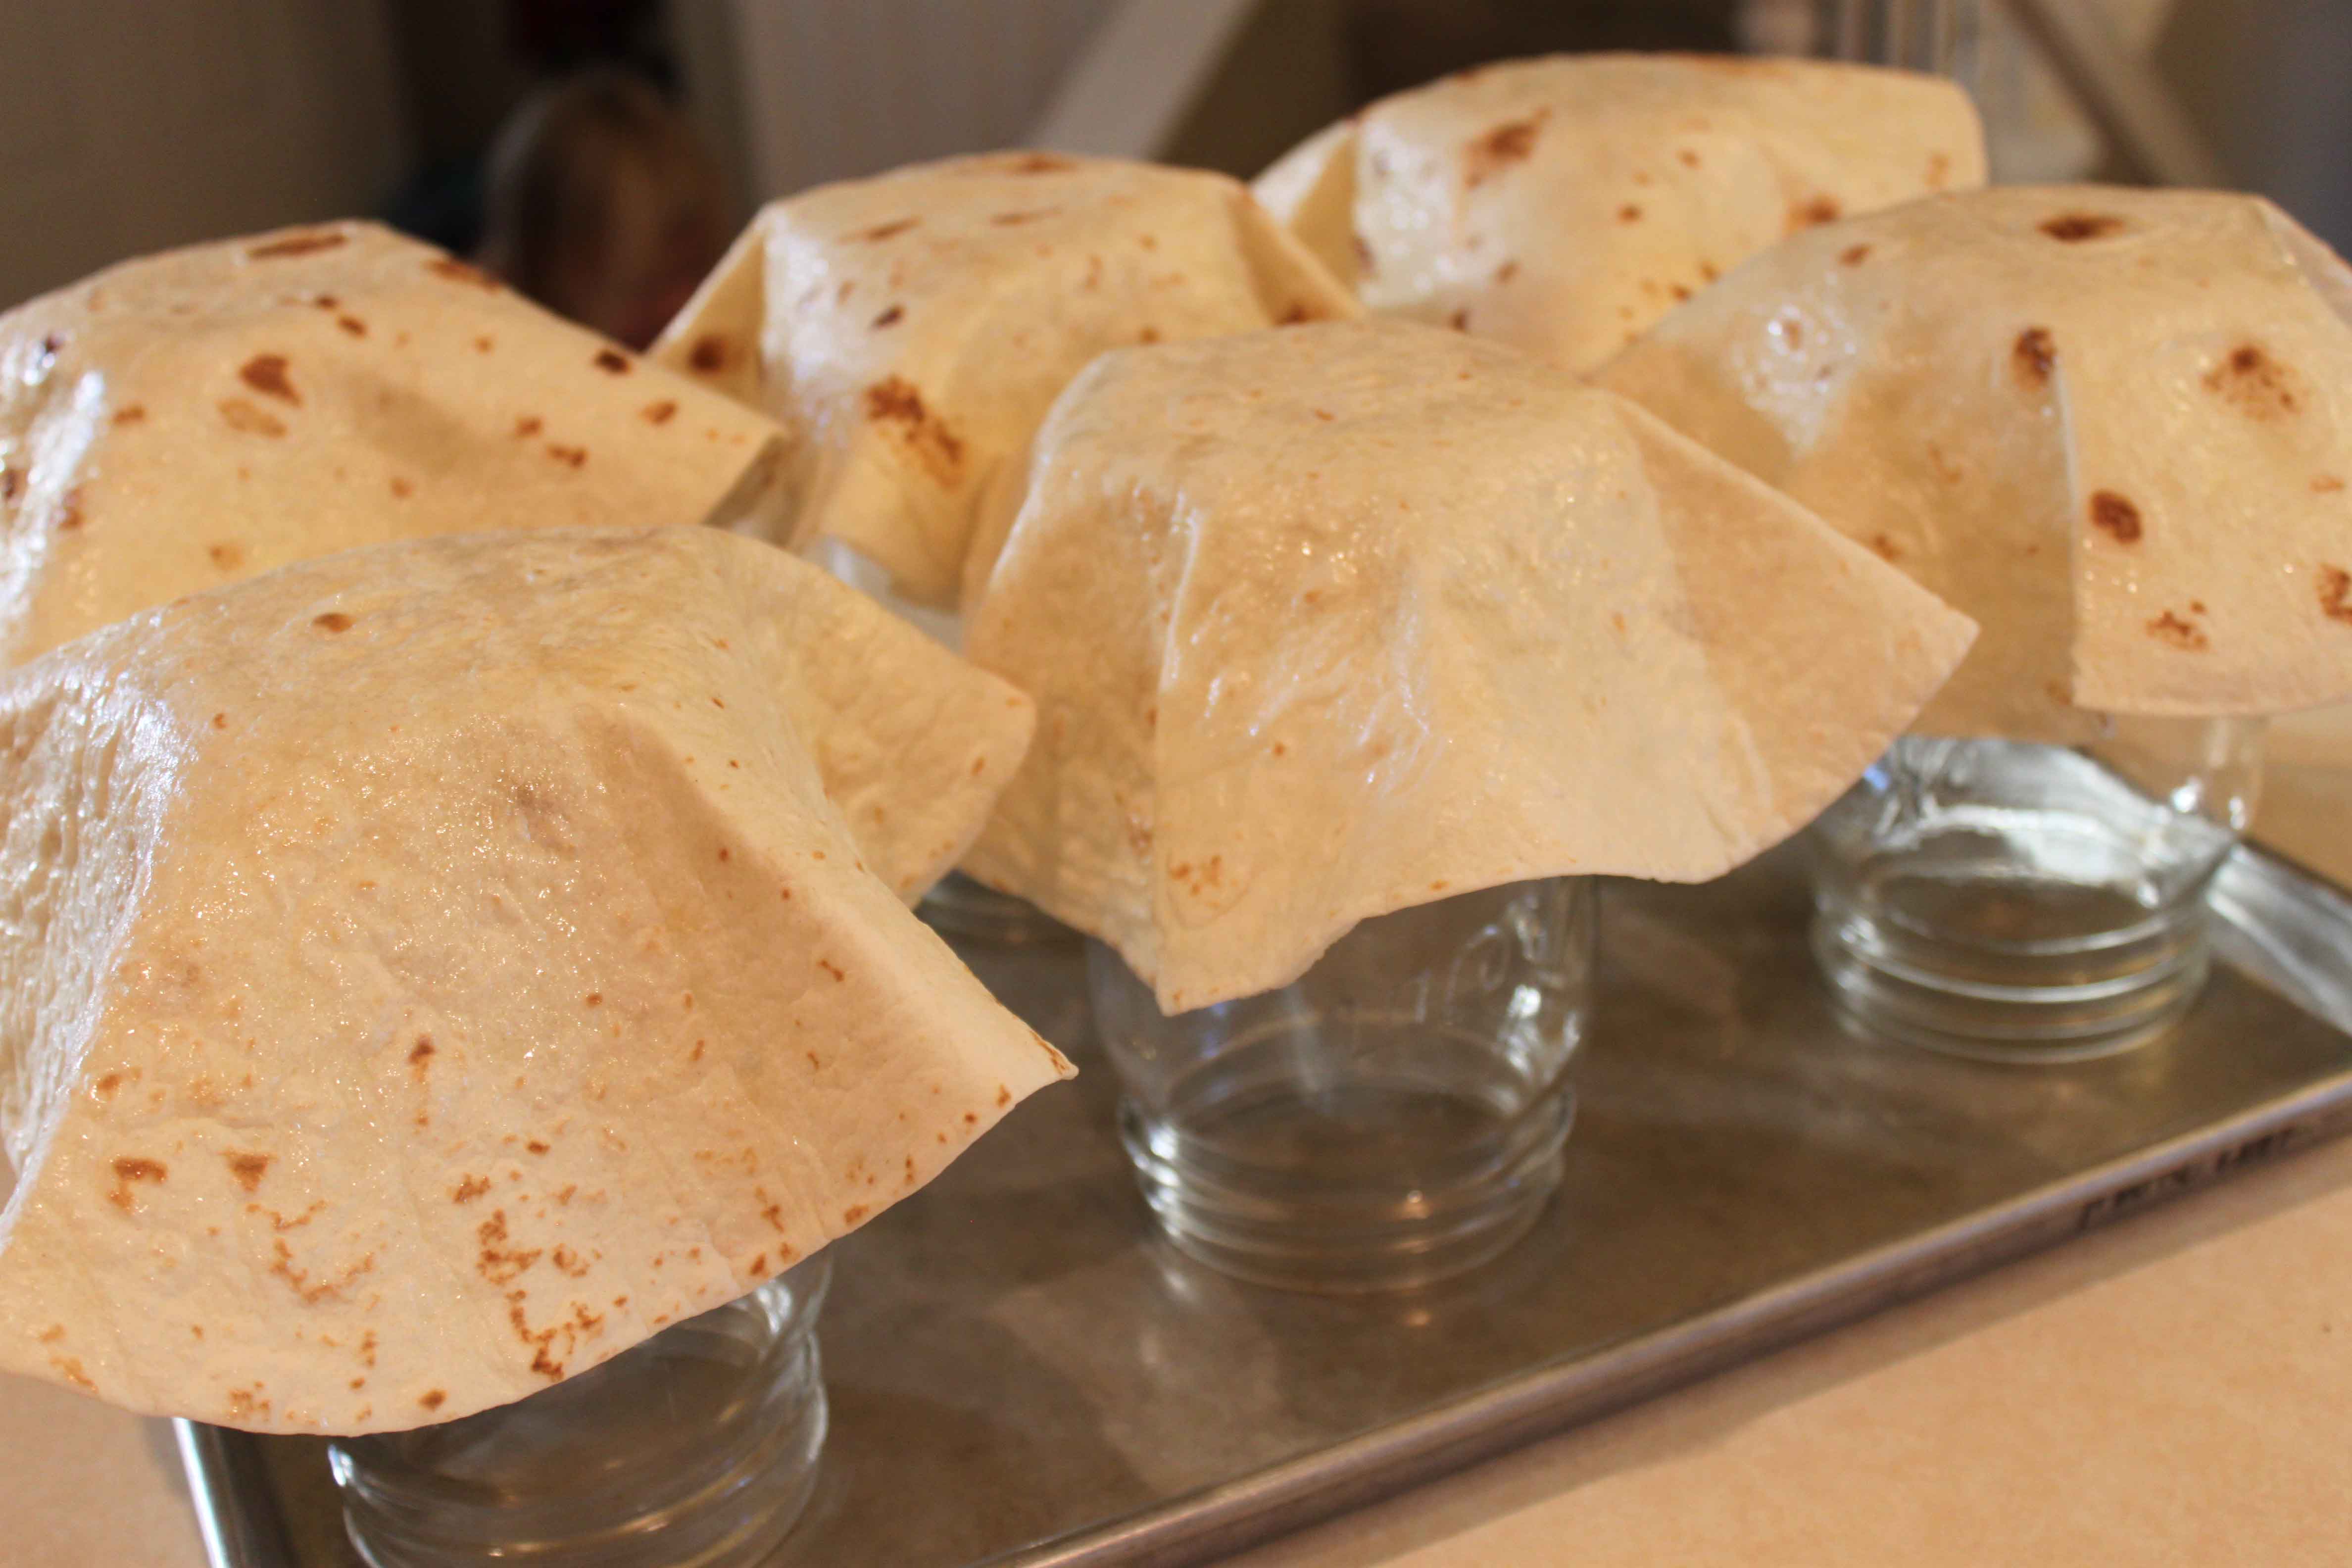
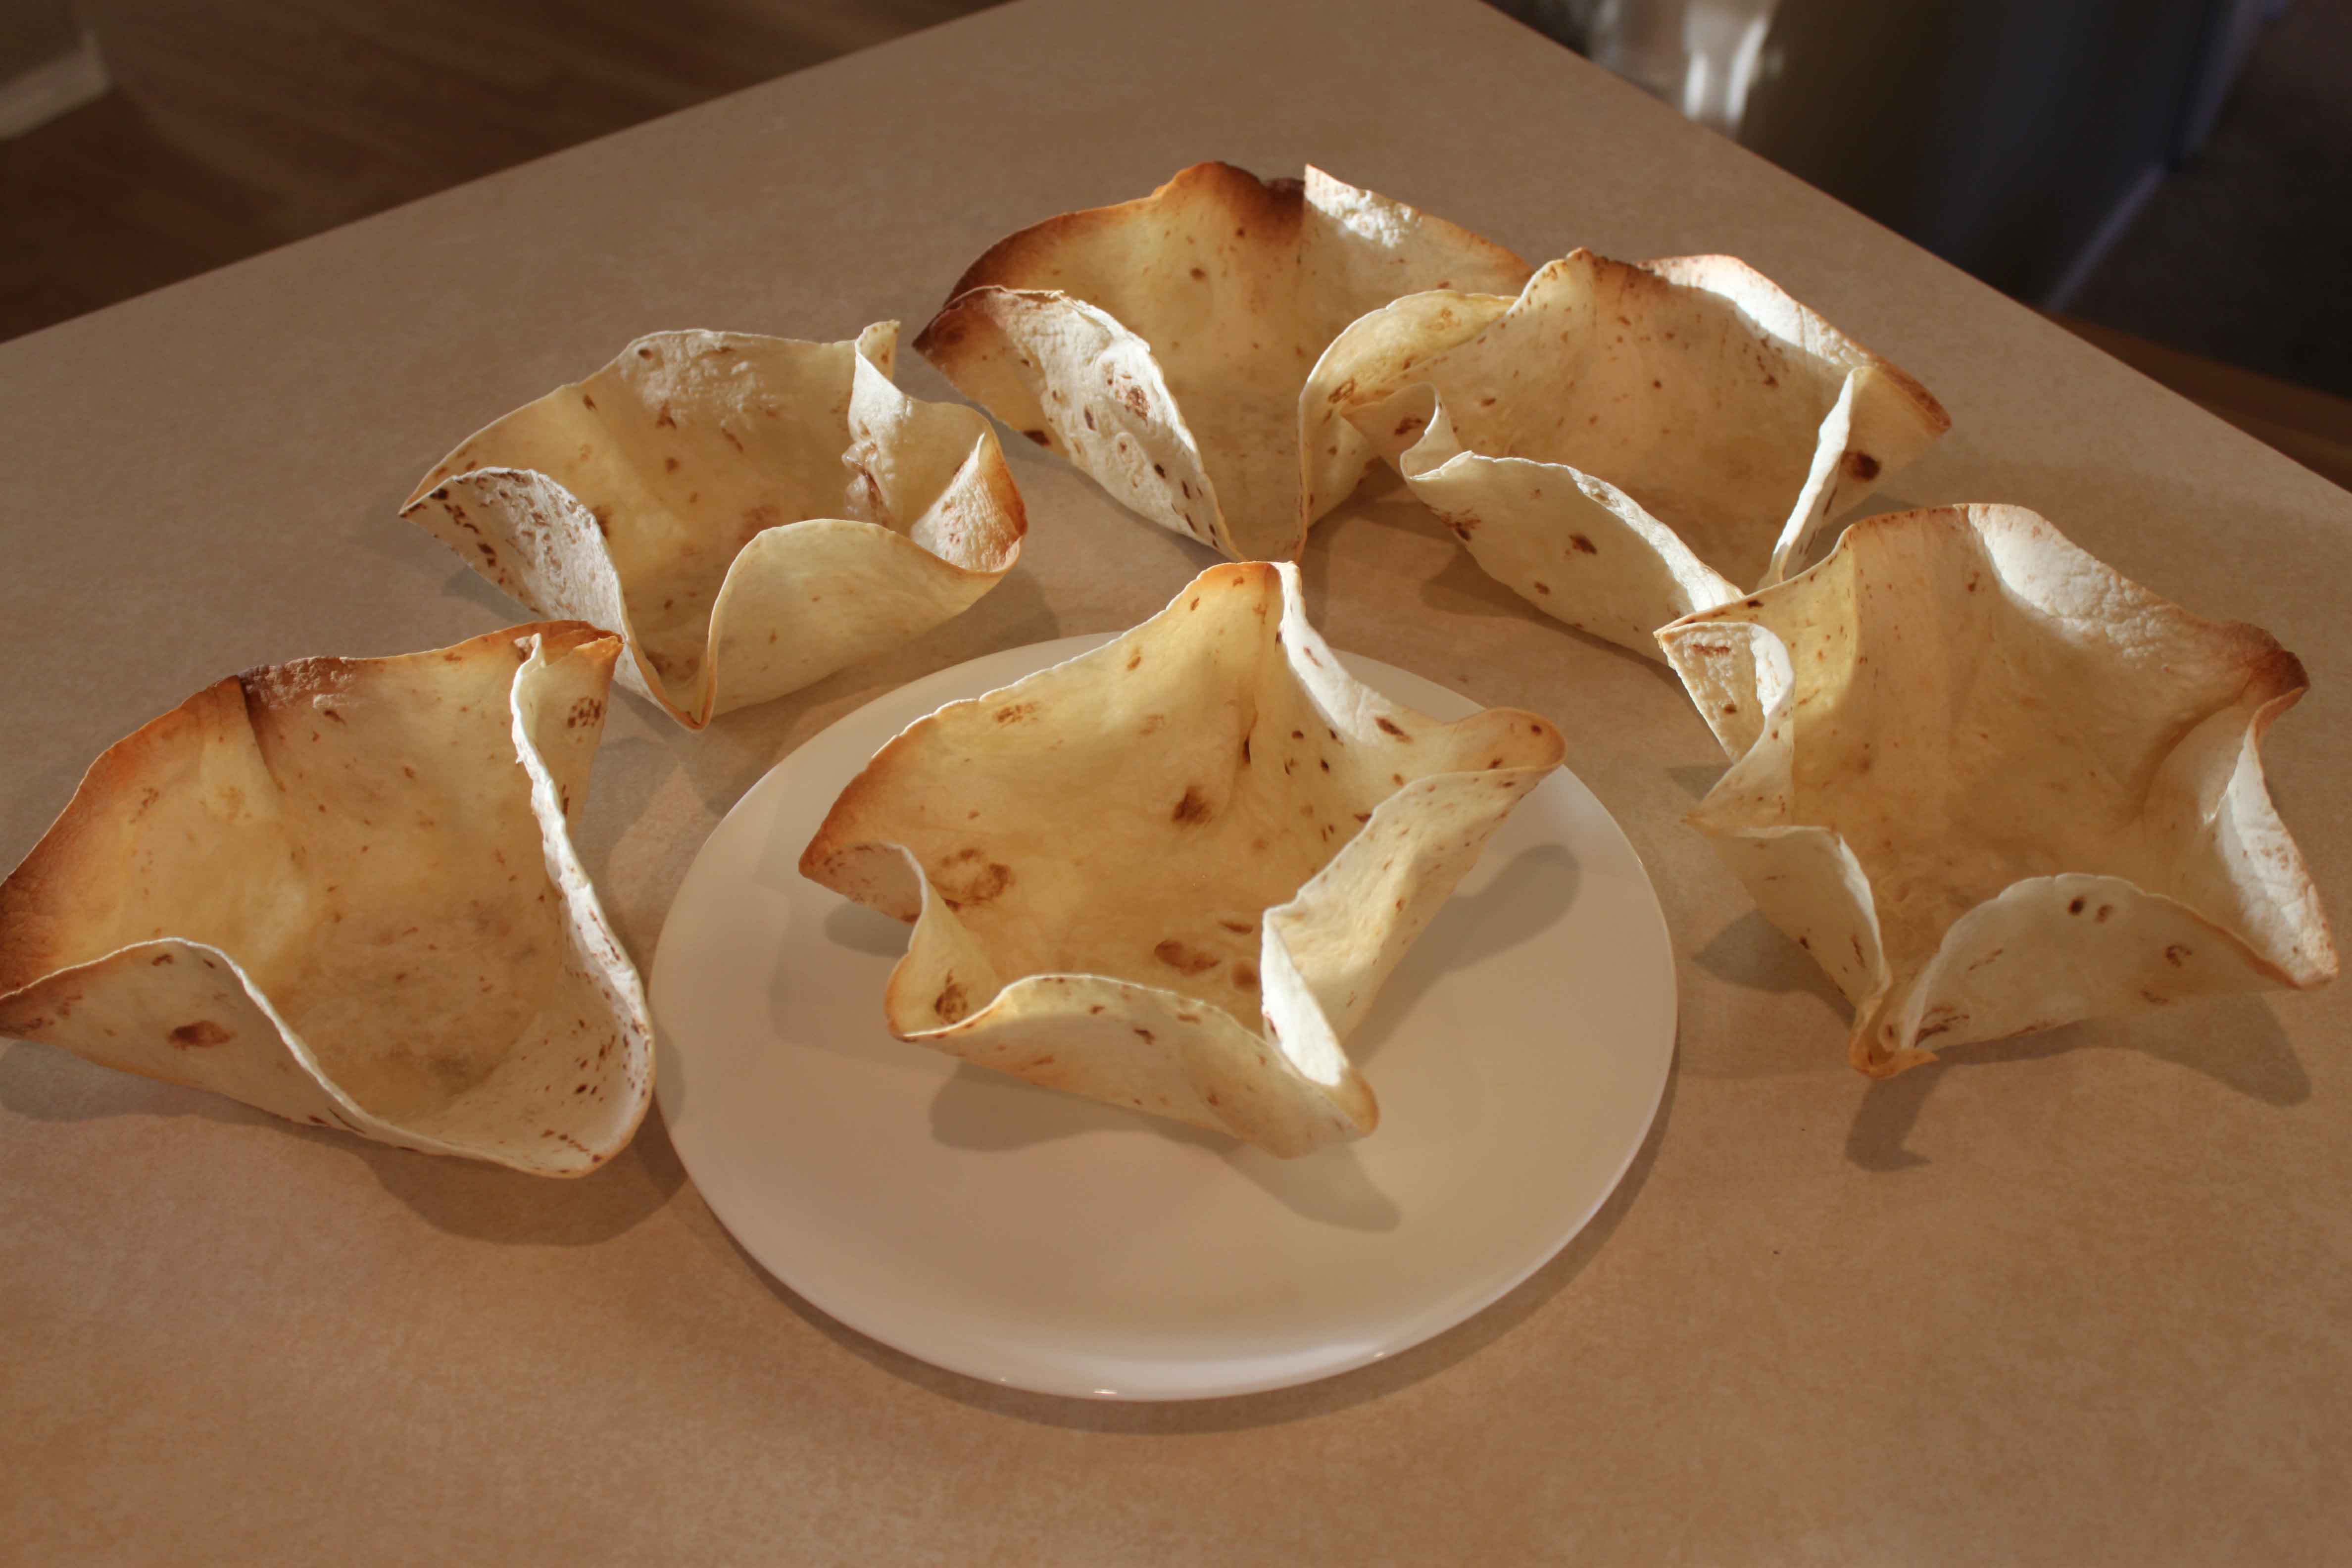
Place in the oven at 350 degrees for about 8 minutes. Watch carefully so they do not burn. Depending on your oven, you might want to rotate them. When lightly brown, take them out and let sit for a few minutes before removing off the jars. Here is what they look like!
That’s it! Now your family can fill them with yummy goodness. My kids love it when I make these, I hope yours do too!
Recipe: Apple Pear Butter
My family love apple butter, but this year I had extra pears and was tired of making pearsauce, so I made apple pear butter. I combined a few different methods and the result was fabulous! Best part about this recipe….NO PEELING OR CORING REQUIRED! Yes, it’s true! So easy. Let’s get started.
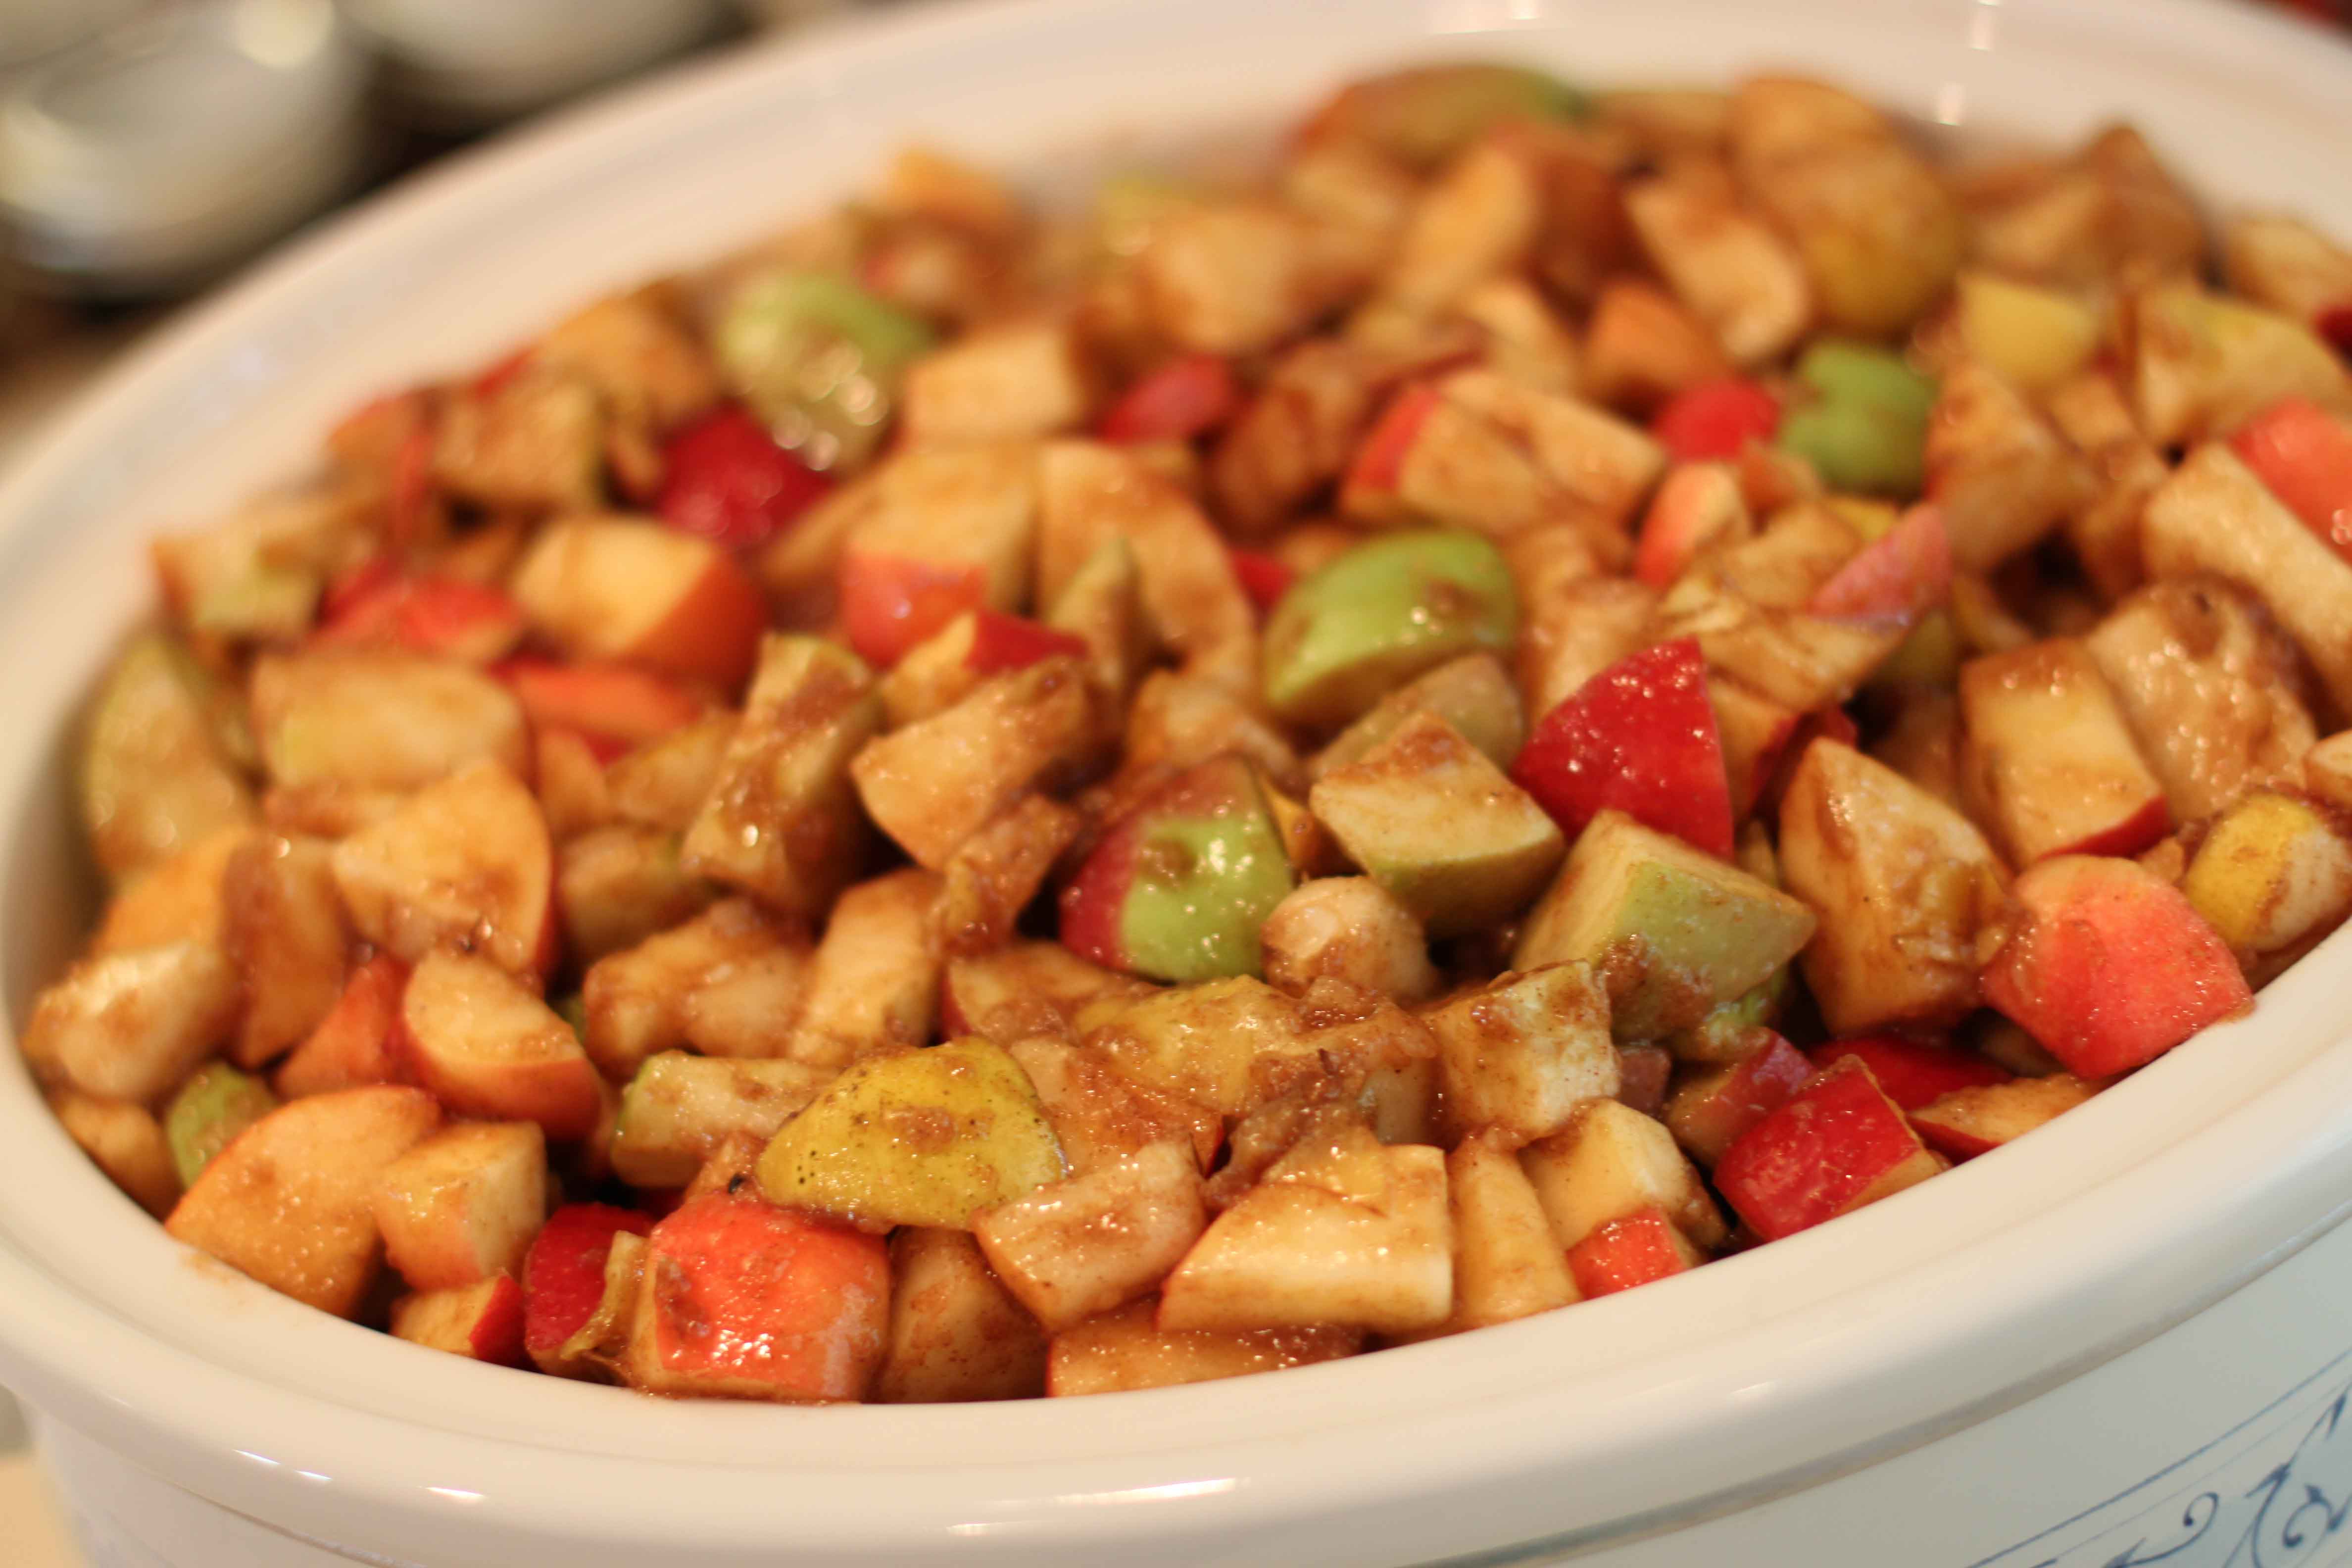
Start by cutting up all your pears and apples. DON’T peel or core them! I know…sounds wierd, but bear with me here!
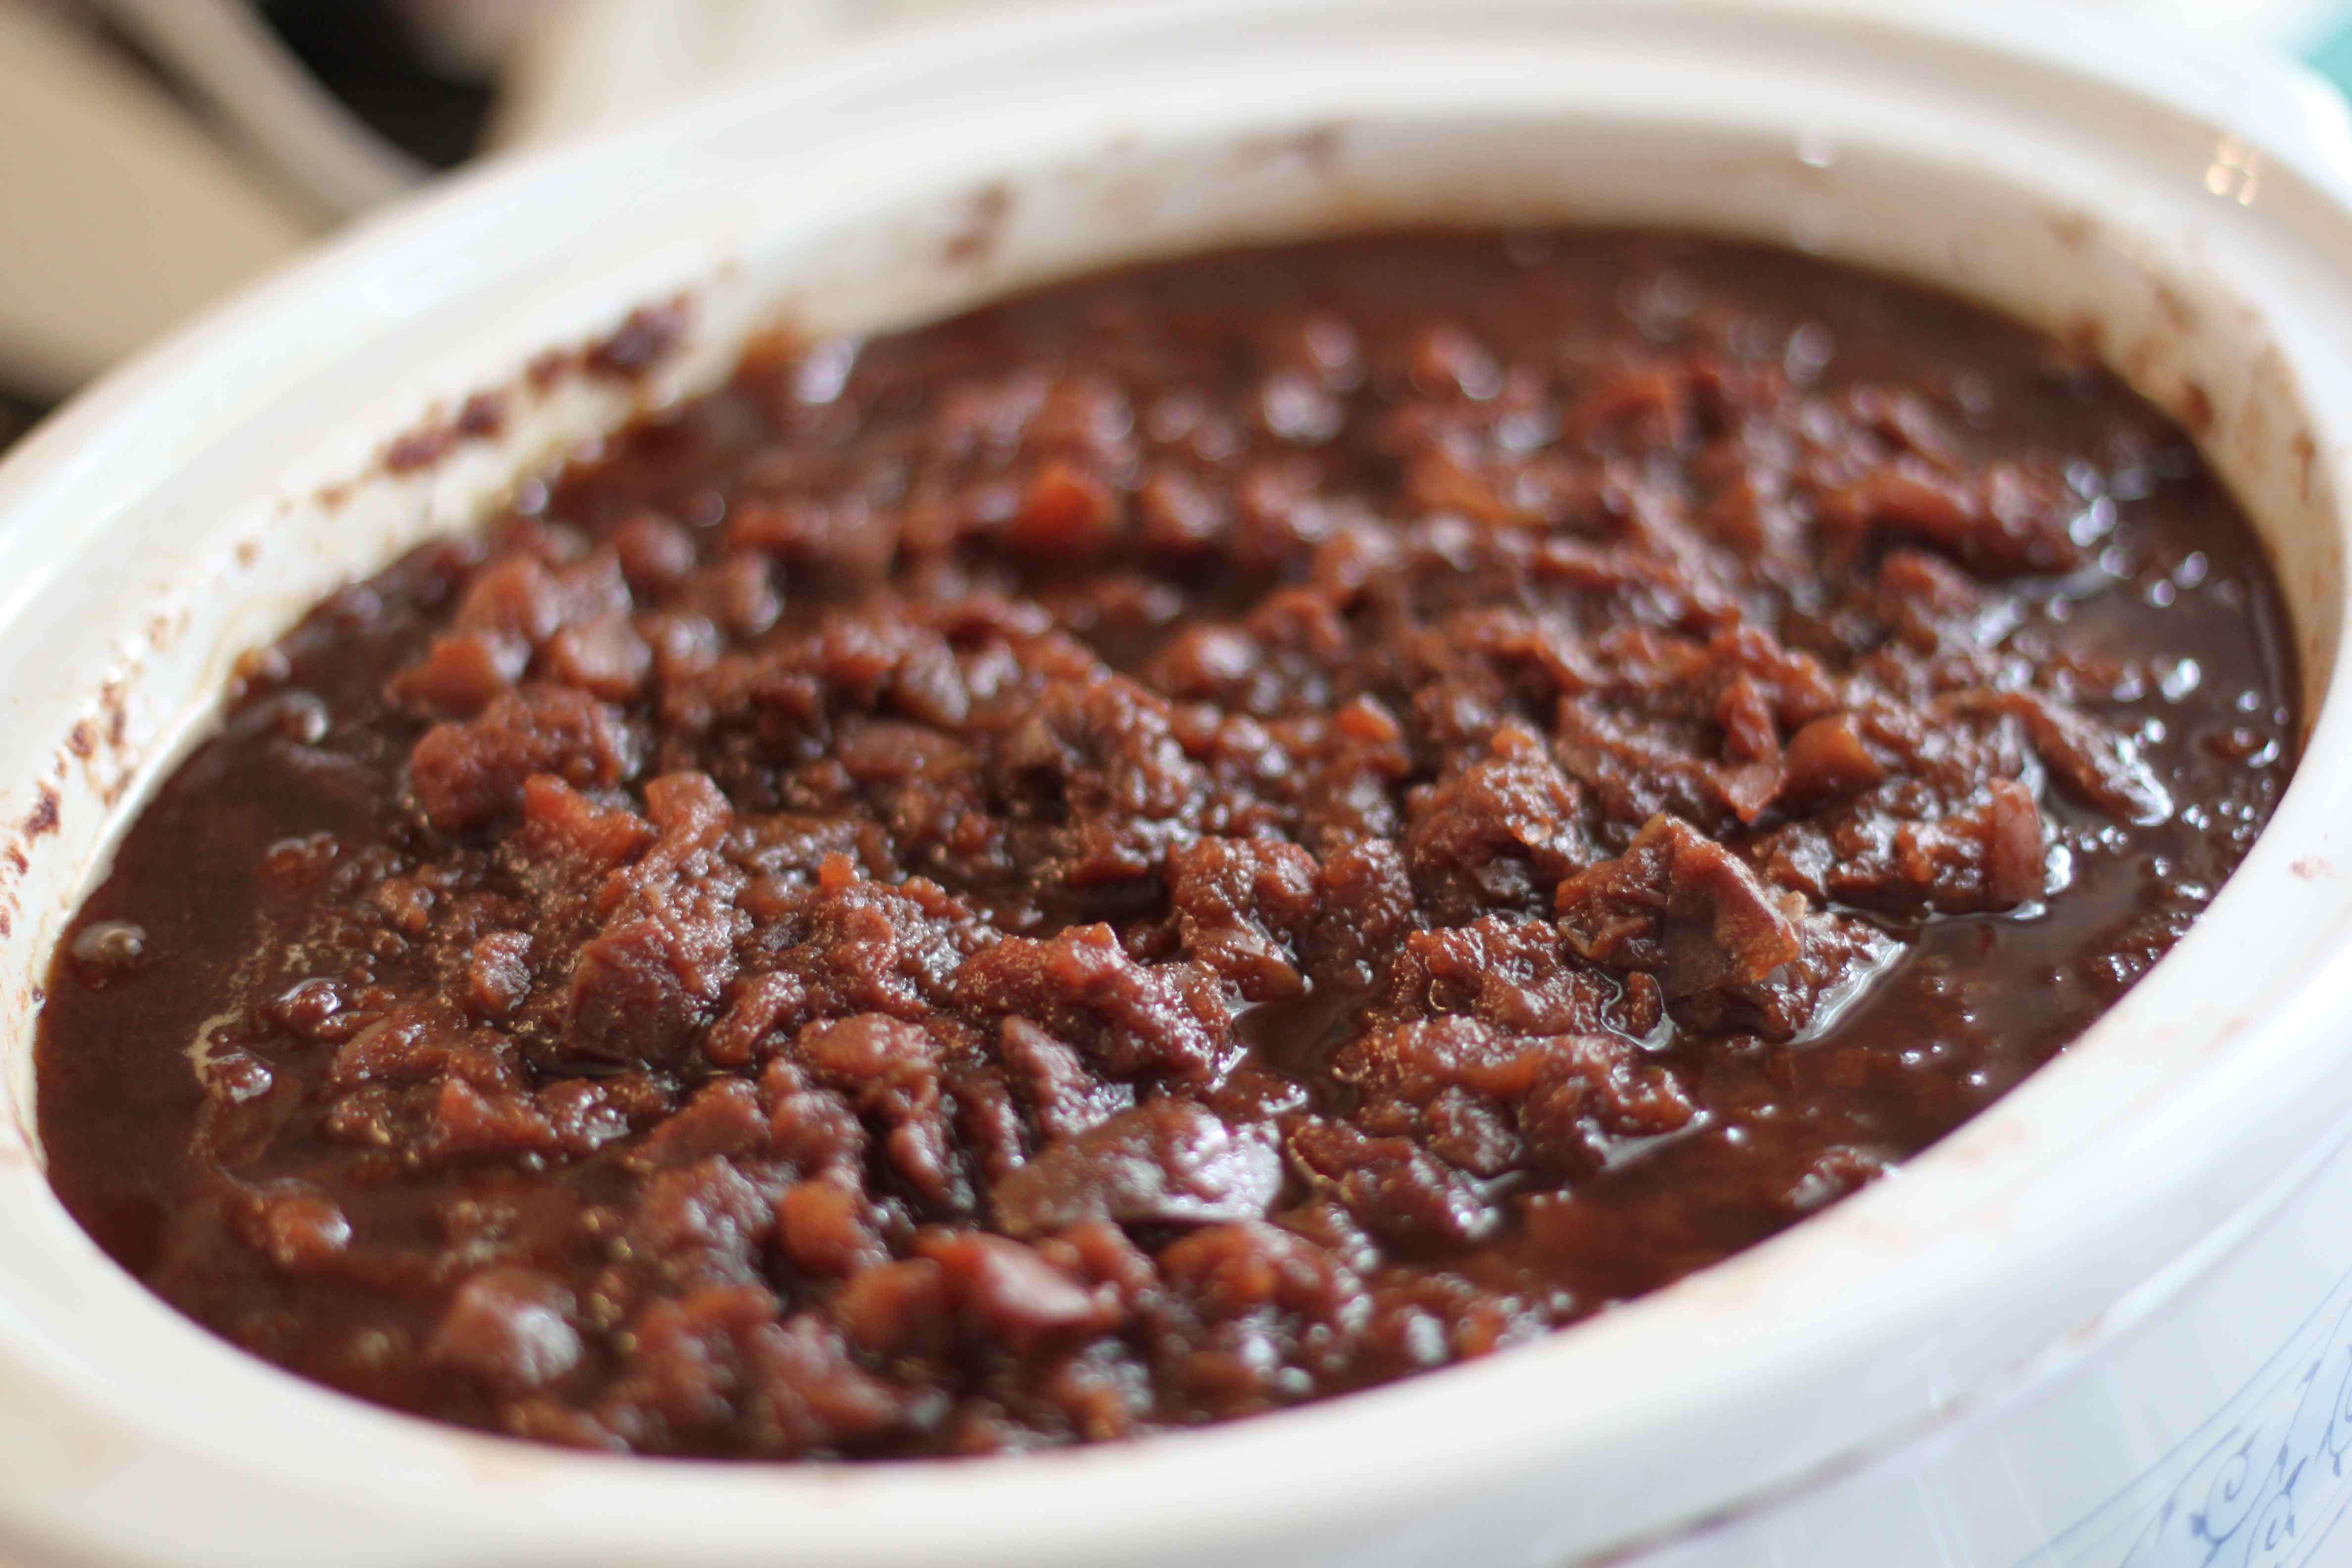
After cutting them up, mix them up with the sugar and spices. Dump everything into a crockpot. It will all break down in the next day or so then you can blend it up. By leaving on the skin & not coring you leave lots of vitamins and fiber that will be in the butter! I used a mixture of Gala & Macintosh apples in mine. Doesn’t it look pretty?
Cover and let it cook for 24 hours on low. By this time, it will look like this, and your house will smell INCREDIBLE.
At this point I like to take the lid off and let it cook for about an hour or so like that to let some extra moisture evaporate. Now all you do is use blender or food processor to blend it up nice and smooth!
I canned mine in half pint jars. Looks so pretty, eh? Delicious too. Our favorite way to eat apple pear butter is on toast, pancakes, and even peanut butter sandwiches!
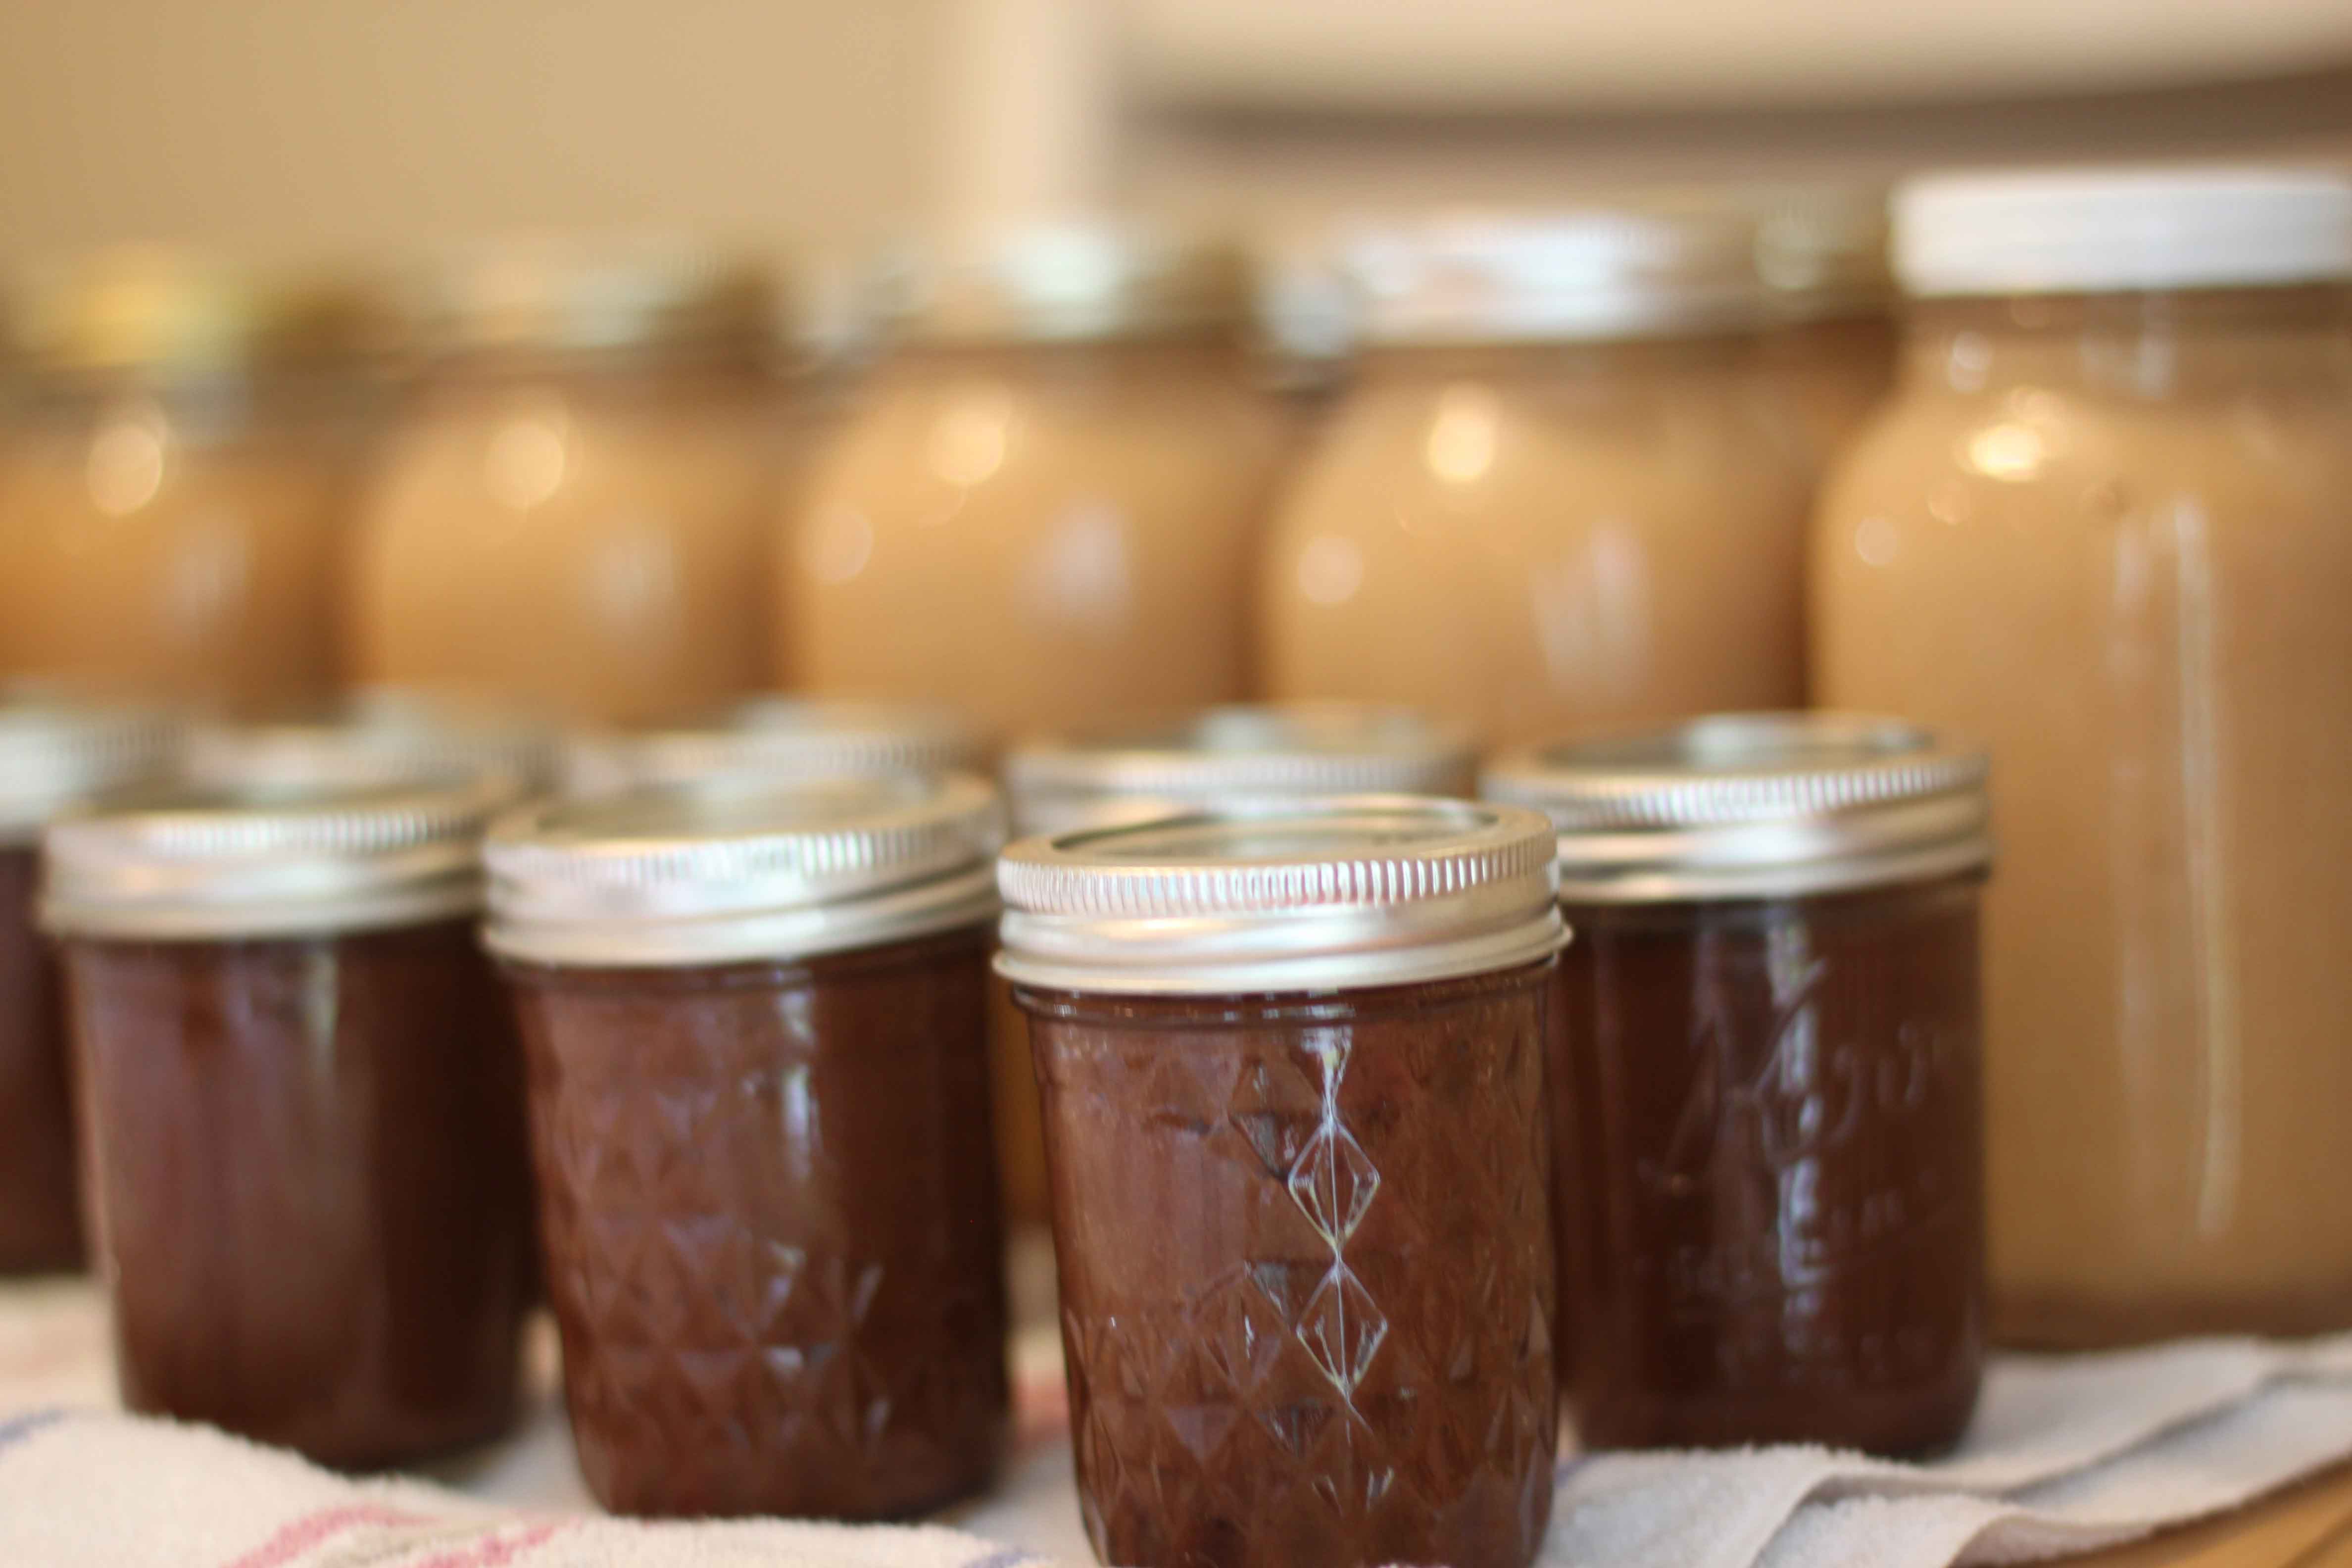
(See that applesauce in the back of the photo? Check out my post I did last year on making homemade applesauce to learn how.)
NOTE: Make sure your pears are nice and ripe, or your butter will be grainy.
Apple Pear Butter
(recipe adapted from Ball Complete Book of Home Preserving)
4 lbs apples, chopped up, NOT peeled or cored
2 lbs pears, chopped up, NOT peeled or cored
1 cup sugar (you can add more for super sweet but 1 c. is fine really)
1 Tbl. cinnamon
1/2 tsp. cloves
1/2 tsp. ginger
Place all ingredients into a large bowl and stir to incorporate. Dump into a crockpot and set on low. Cook on low for around 24 hours, stirring a few times. When nice and thick, blend up smooth.
To can your apple pear butter, prepare your canner, jars, and lids. If you are new to canning, read the basic here. Ladle the hot butter into the jars, making sure to leave about 1/4 inch headspace for expansion. Remove air bubbles with a knife. Clean the rim of the jar with a wet paper towel, and place hot lids on the jar and screw the band down. Place jars in a water bath canner and process for 20 minutes.
(Check your elevation for processing time. This is my elevation time. It is important to process according to your elevation in order to safely preserve your food).
This butter also freezes well if you do not wish to can it. Recipe makes approx. 4 pints.
Recipes: Homemade Syrups
When I was growing up, my mother made many different types of syrup for us to put on our pancakes and waffles. I wanted to share a few of those recipes with you today. These are a few of my favorites for the past 30 years or so. I hope you enjoy them as much as we do. Note: They do work out just find using reduced sugar.
Contrary to popular belief, Kneaders Restaurant did not invent cinnamon syrup! I have been eating it since the late-1970’s and my mom always made it from scratch!
CINNAMON SYRUP
1 c. sugar
1/2 c. corn syrup
1/4 c. water
1/2 to 3/4 tsp. cinnamon
1/2 c. evaporated milk
Combine sugar, corn syrup, water and cinnamon. Boil over medium heat stirring constantly. Cook and stir for 2 minutes more. Cool for 5 minutes removed from heat. Stir in evaporated milk. Makes 1 2/3 cups.
ORANGE SYRUP
1/2 c. butter
3/4 c. sugar
1/2 c. orange juice concentrate
Heat almost to boiling. Serve over pancakes or waffles.
PEACH SYRUP
5 cups peach puree
2 cups sugar
2 TBSP lemon juice
2 tsp vanilla
Over medium heat in a heavy pot, combine the peach puree, sugar, and lemon juice. Heat to boiling then reduce to a simmer. Simmer, stirring frequently for five minutes. Remove from the heat and add the vanilla.
You can water bath can this syrup, or you can freeze it. If you choose to can it, pour into the sterilized jars, leaving 1/4″ headspace at the top of each jar. Wipe all the rims with a clean cloth and center the lids. Add the bands and tighten to finger tightness, and process in a boiling water bath for 25 minutes (less time if you live at a lower elevation. Check the Ball canning regulations for specifics). Makes approx. 3 pints of syrup.
Cookie Craving – Oatmeal Chocolate Chip Cookie Recipe

We love cookies at our house. Chocolate chip cookies and milk is just one of those comfort treats that can’t be beat. Most of the time I fall back to the tried and true Nestle Toll House Cookie Recipe when I go to make cookies. But I came across this recipe and have made a couple tweaks to it and I think it has become my families new favorite cookie recipe.
Oatmeal Chocolate Chip Cookies
1/2 C. Butter
1/2 C. Shortening
1 C. Sugar
1 C. Brown Sugar
2 Eggs
2 tsp Vanilla
1 tsp Salt
1/2 tsp Baking Powder
2 tsp Baking Soda
2 1/4 C. Flour
2 C. Oats
1 package Semi-Sweet Morsels
Cream together butter, shortening and sugars. Add eggs and vanilla and mix well. Add salt, soda, powder, flour and mix just until combined. Add oats and morsels and mix with a wooden spoon. Bake at 350 degrees for 10-12 minutes.
These are so good you can’t eat just one. I suggest sharing immediately to avoid over consumption. Enjoy.