
DON’T Throw Away Your Green Tomatoes! Here’s 2 Great Green Tomato Salsa Recipes!
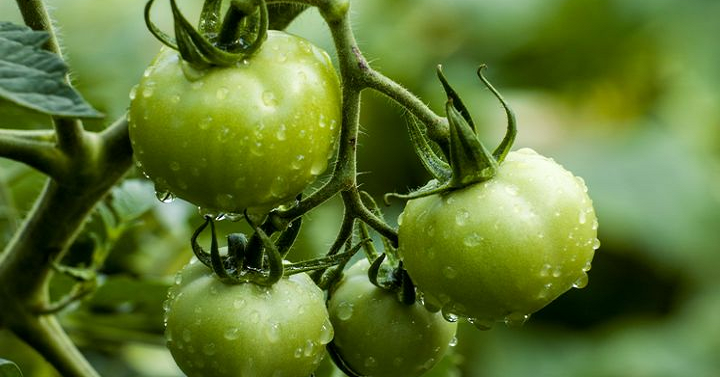
Summer is winding down which means your tomatoes are probably about done. But that doesn’t mean you need to throw away all your unripe tomatoes, you can make a simple Green Tomato Salsa to use those up! Here are two different recipes you can try out this fall on all your green tomatoes!
Green Tomato Salsa
- 8 ounces green tomatoes (about 5 small)
- 1 jalapeño pepper (without seeds)
- 3 large cloves garlic
- 1 medium white onion
- 1/2 cup fresh cilantro leaves
- 1/2 teaspoon kosher salt
- 2 tablespoons lime juice
Get a baking sheet out and place the green tomatoes (quartered), garlic (peeled), onions (quartered) and jalapeno (seeds removed) on the sheet. Broil for 4-5 minutes just until they start to blacken. Flip and rotate the veggies and broil another 4-5 minutes. Transfer everything to a food process or blender (except 1/2 of the jalapeno) including the rest of the ingredients and blend until desired consistency. If you’d like it spicier you can add in the other 1/2 of the jalapeno.
Green Tomato Relish
- 2 cups green peppers (3-4 med peppers)
- 3/4 cups red peppers (1 large pepper)
- 2 cups onions (2 large onions)
- 7 cups green tomatoes
- 1/4 cup pickling salt
- 3 cups sugar
- 2 cups cider vinegar
- 1 cup water
- 1 Tbsp mustard seed
- 1 1/2 tsp celery seed
- 3/4 tsp turmeric
Grind vegetables. Place all together in large bowl and add salt. Stir well and let set over night or for 5-6 hrs. Blend the next ingredients and pour over vegetables which have been rinsed and rained. Bring to a boil and boil for 20 minutes stirring frequently. Ladle into hot sterilized jars leaving 1/2″ headroom. Wipe top of jar and place lid and screw on top. Set out to cool. (Method for hot water bath: at the point where you combine all the prepared ingredients boil only for 5 minutes then fill jars. Place in boiling water bath and boil 15 minutes for pint and 1/2 pint.)
Easy Homemade Pizza Sauce
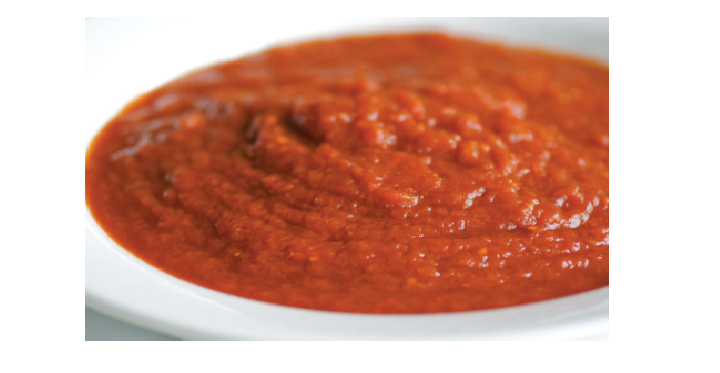
Do you make homemade pizza at your home? We just started making our own during the quarantine months in the spring. I’ve had to do some trial and error recipes until we found one that we really like. It’s a mixture of a few recipes put together. Depending on how many people you are cooking for, depends on how much of the sauce you’ll want to make. I would error on more and then just fridge it until the next week!
Easy Homemade Pizza Sauce Recipe
Ingredients:
1 (14 1/2 ounce) can of tomatoes, undrained. I love the Centro San Marzano Tomatoes-get the peeled option
1 (6 ounce) tomato paste
1 tsp fresh basil
1 tsp fresh oregano
1/2 tsp garlic
1/2 tsp sugar
Salt to taste
Directions:
Put all of the ingredients into a blender or food processor and blend until smooth.
Delicious Recipes to Use with Your Garden Zucchini!
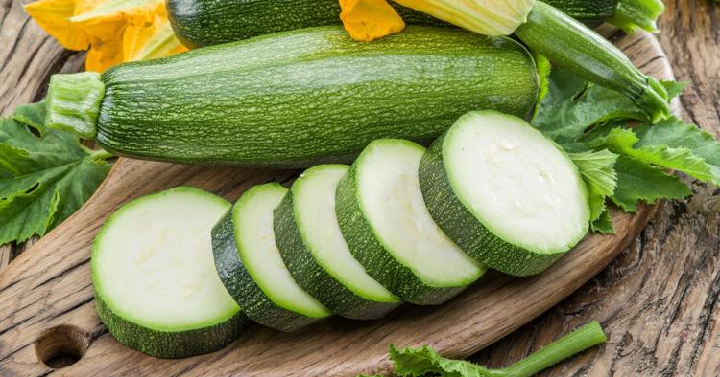
It’s that time of year when zucchinis are growing non stop. If you have a garden you may be overwhelmed with what you can do with all of the zucchinis. Here’s a couple of our favorite recipes to use our zucchinis up. They’re perfect for gifting to neighbors or baking for an after school snack.
| Zucchini Bread with Cream Cheese Frosting 3 Eggs 1 Cup Sugar 2 Cups Zucchini, Grated 3 tsp Vanilla 1 Cup Salt Oil 3 Cups Flour 1 Cup Brown Sugar 1 tsp Salt 1 tsp Baking Soda 3 tsp Cinnamon 1/4 tsp Baking Powder 1/2 Cup Nuts, chopped (optional) |
Frosting Recipe: 6oz Package Cream Cheese, Softened 1/2 Cup Butter, Softened 1 16oz Package Powdered Sugar 2 Tsp Vanilla |
Cream together eggs and sugar. Sift dry ingredients and add to creamed mixture, blending well. Add oil to mixture. Stir in grated zucchini and vanilla. Pour batter into two loaf pans. Bake at 325 degrees for 1 hour.
For the frosting: beat cream cheese and butter together until fluffy. Slowly add sugar; beating until well blended. Stir in vanilla. Frost on top of bread.
| Zucchini Brownies 2 Cups Flour 1 Cup Sugar 1/2 Cup Cocoa 1 1/2 Tsp Baking Soda 1 Tsp Salk 1/2 Cup Oil 2 Tsp Vanilla 2 Cups Shredded Zucchini 1/2 Cup Walnuts (optional) |
Chocolate Frosting Recipe: 1/4 Cup Butter 3 Tbsp Cocoa 3 Tbsp Evaporated Milk 4 Cups Powdered Sugar 1 Tsp Vanilla |
Combine flour, sugar, cocoa, soda and salt in mixing bowl. Stir in oil, vanilla and zucchini until well blended. Add walnuts. Pour into greased 9×13 inch baking dish. Bake at 350 degree for 20 to 25 minutes or until toothpick inserted in center comes out clean. Frost with chocolate frosting.
For the frosting: melt butter in saucepan. Add cocoa and stir until smooth. Add milk, vanilla and powdered sugar. Stir until smooth. Add more milk if necessary.
The BEST Peanut Butter Bar Recipe- The Perfect After School Treat
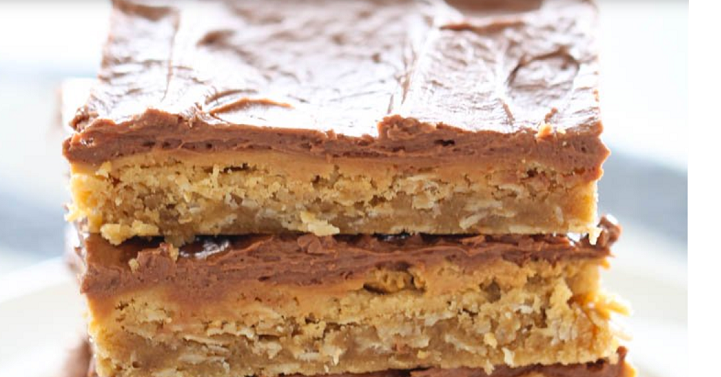 Do you guys remember in elementary school when you used to get homemade peanut butter bars? I sure do! We would get a bar and a carton of milk. I would always hope to get the biggest bar out of the group. Yes, they were that good. In today’s schools they don’t get these homemade bars anymore. They are pre-packaged treats that aren’t near as good. So, I’ve decided I need to make these as an after school treat for my kiddos. I found a recipe that I love. However, I’ve changed a few things and made a different frosting to make them absolutely delicious. I always get compliments on them. So thank you Six Sisters Stuff and Aunt Cindy for your recipes, because when you pair them together you get perfection.
Peanut Butter Bar Recipe: adapted from Six Sister’s Stuff and my Aunt Cindy’s recipe.
Ingredients:
- 1 cup butter, softened
- 1 cup sugar
- 1 cup brown sugar, firmly packed
- 1 teaspoon vanilla extract
- 2 large eggs
- 2 1/2 cups peanut butter, divided
- 2 cups old fashioned oats
- 2 cups flour
- 1 teaspoon baking soda
- 1 teaspoon salt
Directions:
- Preheat oven to 350 degrees F.
- In a large bowl, cream together butter, sugar and brown sugar together.
- Add vanilla, eggs, and 1 cup peanut butter; stir to combine.
- Add oats, flour, baking soda and salt and mix until well combined.
- Spray a baking sheet (half sheet jelly roll pan that is approximately 17.8 x 12.8 x 1 inch) with nonstick cooking spray and spread out dough in an even layer.
- Bake for 15 minutes and remove from oven.
- Drop remaining peanut butter by spoonfuls on top of warm bars and spread when peanut butter has begun to melt.
- Let cool until peanut butter has set up.
- Make frosting (recipe below) and spread on cooled bars
Frosting:
Ingredients:
- 3/4 Cup Butter
- 4 Tbsp Cocoa
- 1/3 Cup Evaporated Milk
- 3 Tbsp Karo Syrup
- 2 Tsp Vanilla
- 3 3/4 Cup Powder Sugar
Directions:
- Add Butter, Cocoa, Milk, and Karo Syrup to a pan and bring to a boil.
- Boil for 2 minutes whisking continuously.
- Remove from stove and add Vanilla and powder sugar.
- Beat with a beater until all combined.
- Spread over bars.
How to Make a Yummy Fruit Pizza (The Perfect Summer Treat)

Now that summer is in full bloom, I’m seeing all of the yummy berries on sale. At our home, we go through berries SO fast. I’ve been wondering what to do with all of these fruits that I’ve been collecting. After seeing these fruit pizzas, I knew that’s what I had to make! It’s definitely a family favorite and one you can all enjoy.
This recipe & picture is by Simply Home Cooked. You can see her video and an easy step by step instruction on how to make it here.
Ingredients
Sugar Cookie Dough
- 1 3/4 cup all-purpose flour
- 1/2 cup granulated sugar
- 1/4 tsp baking powder
- 1/2 cup unsalted butter
- 4 oz cream cheese
- 1 teaspoon vanilla extract
Cream cheese frosting
- 8 oz cream cheese
- 2 tbsp unsalted butter
- 1 cup powdered sugar
- 1 tsp vanilla extract
Fruit
- Kiwi
- Strawberries
- Blueberries
- Raspberries
- Mandarin oranges (my kids love these!)
- Any other fruit you enjoy
Instructions
-
In a food processor, add 1 3/4 cup flour, 1/2 cup granulated sugar, 1/4 tsp baking powder, 1/2 cup of cold cubed unsalted butter, 4 oz cream cheese (also cut in cubes) and then a 1 teaspoon of vanilla extract.
-
Now snap the lid on and begin pulsing the blades. You’ll want to do about 5ish pulses or until the butter gets down to the size of a pea.
-
Now add the dough into a large bowl and begin working it into a ball using your hands. It might not come together at first but have patience. Keep working it in and it will take shape as the butter slowly warms up.
-
Now place your dough onto a sheet of plastic wrap and shape it into a disk. cover the plastic wrap around it and place it in the refrigerator for about 30 minutes.
-
Meanwhile, begin working on the cream cheese frosting. In a large bowl, add 8 oz softened cream cheese, 2 tbsp of softened unsalted butter, 1 cup of powdered sugar, and 1 tsp of vanilla extract
-
Using an electric mixer beat all the ingredients together until it’s all well combined. Then set it aside.
-
Now take your dough out of the refrigerator, remove the plastic wrap and place it on a well floured surface.
-
Then add another generous sprinkle of flour on top and begin rolling it out using a rolling pin. Roll it out to about 14 inches in diameter. The. transfer your dough into a 14-inch pizza pan.
-
Generously poke the dough with a fork. Then bake at 350 degrees Fahrenheit for 20 minutes.
-
Once the sugar cookie crust has cooled Evelyn spread the cream cheese frosting on top.
- Now add the sliced strawberries, kiwi, raspberries, and blueberries on top. Eat within a few hours.
EASY Patriotic Foods to Make This 4th of July!
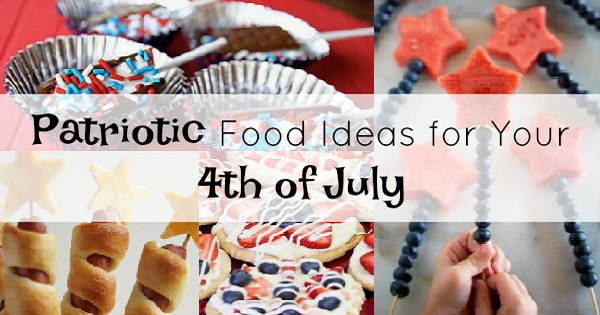
I’m finding this 4th of July I’m having to work a little harder to put together some fun ways we can celebrate. The parades have been canceled this year thanks to Covid, our annual 4th of July BBQ isn’t happening and firework shows are limited, so what are we going to do? Well, we’re going to create our own fun right at home, including the food menu! Here’s some fun ways you can celebrate the 4th of July with these patriotic food ideas!
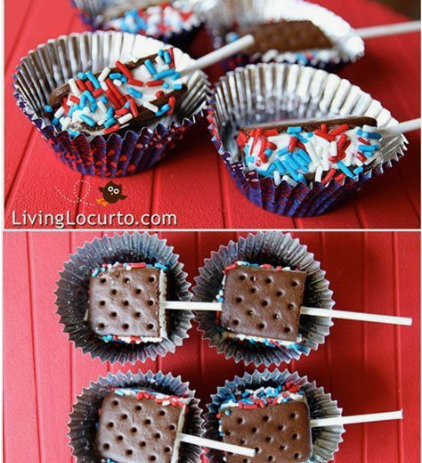 I love how simple these are but add that patriotic touch! The kids are going to love the sprinkles as well.
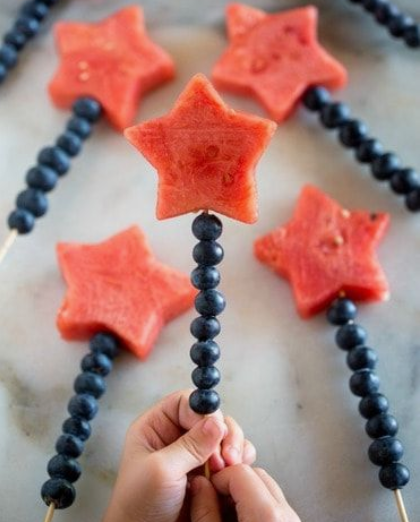 I mean you can’t have the 4th of July BBQ without the watermelon so why not dress it up for your family this year!
 We’re excited for these this year since we just put a fire pit in but you could even make yours in the oven (just don’t put the cheese on until after
  ).
).
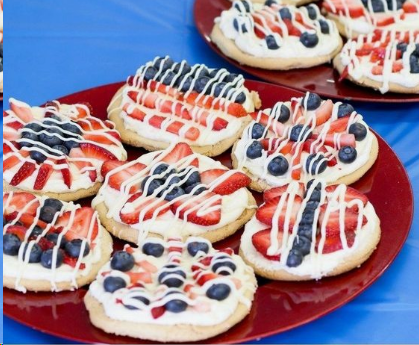 This is one of my all time favorite desserts! Make it easy and just get the pre-made sugar cookie dough at your local grocery store!
4 Cherry Recipes You’ve Got to Try this Summer
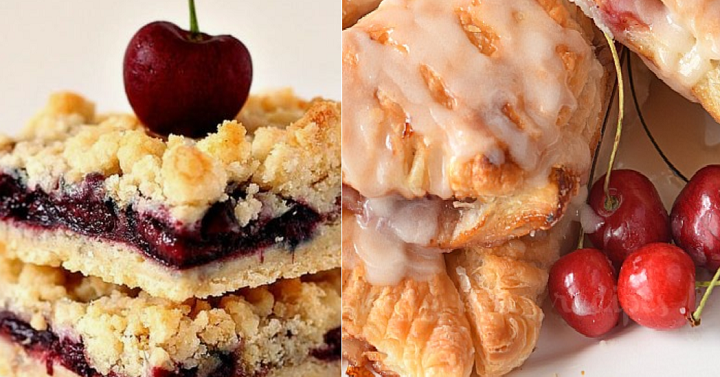
Guys. This year, my in-laws had a cherry tree full to the brim with absolutely perfect cherries. No worm or anything. I’ll admit, I’m not a super cherry fan, but these recipes that I found definitely have me drooling. Plus, you should start seeing cherries on sale in your local stores in the next few weeks.
- Cherry Pie Crumb Bars Recipe by Crunchy, Creamy, Sweet.
- Cherry Turnovers by Savory Bites Recipes
- Homemade Cherry Sorbet by For the Love of Food!
- Cherry Pie by Mel’s Kitchen Cafe
I love baking something new for the 4th of July. This year will be totally different since we don’t have parades, fireworks or family get togethers. However, you can still bake and make some yummy food! So choose one…or all of these recipes and get cooking!
5 of Our Favorite Meals to Take Camping!

This year seems to be the year everyone is getting a trailer and taking up camping. And for good reason, with the current situation it’s the best way to get away from the city, relax with the people that really matter and eat yummy food! We’ve had a trailer the last couple of years so I wanted to share some of our favorite meals we take camping! I promise they’ll have you drooling!
1. Dutch Oven Pull-Apart Pizza – this is one I tried for the first time our last camping trip and it was a big hit! It’s simple, get Rhodes frozen rolls, pepperoni, cheese and any other toppings you want for your pizza. I cut each of the rolls in half and placed them on the bottom of my dutch oven. Then I sprinkled on our toppings (pepperoni, olives and peppers) leaving the cheese for last. When cooking, place more of your coals on top so you don’t burn the bottom of your dough. Then once they’re done you can dish them out and serve with marinara sauce for dipping!
2. Campfire Hot Dogs with Crescent Rolls (pictured above)- this is a frugal and easy meal to take camping! All you need is your hotdogs, crescent rolls and a fire. First I patted down the hotdogs to make sure they were nice and dry (it will help the dough to stick). Then we wrapped crescent rolls around each of them and cooked them over the fire! Super simple and so yummy! We served with a size of watermelon and beans.
3. Hawaiian Sandwiches – This was a quick lunch we served up with some chips! All I did was take a bag of the Hawaiian Rolls and sliced them in half the long way (horizontal). I spread our mayo and mustard on each side, placed our meat and cheese and put the top back on. Then sliced them to make mini sandwiches for everyone. You could easily make these ahead of time and place back in the package the rolls came in. This will not only save you time but space in your cooler.
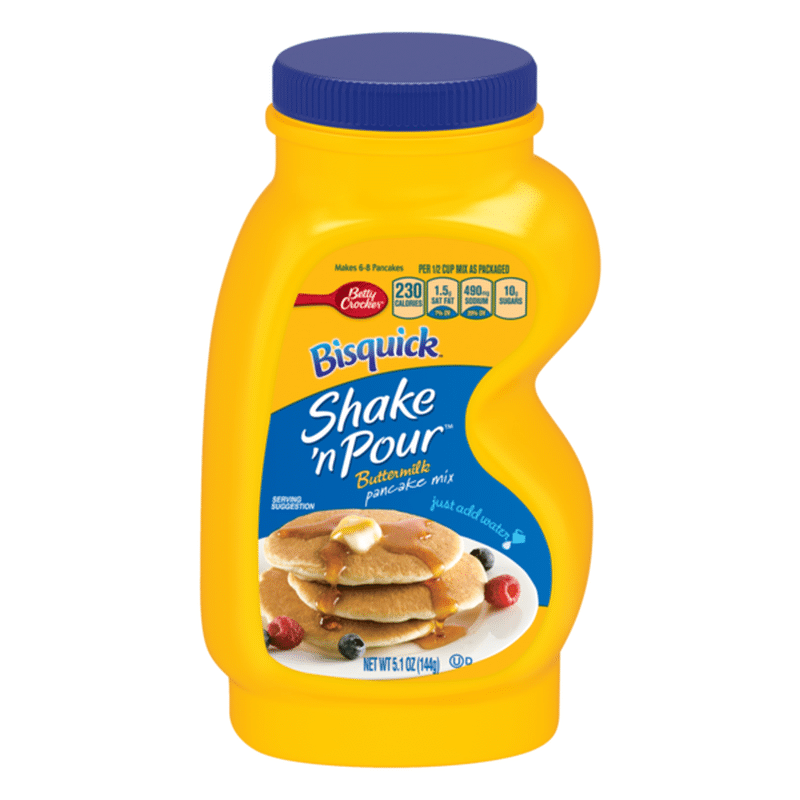
4. Pancakes – this is another one you can make ahead of time. I love the containers that have all the dry ingredient inside and you just add your water to the container it comes in. It is also simple enough you can do for cheaper from scratch as well.
5. Cobbler – You can’t go camping with out making cobbler. There so many different ways to do this and different flavors. We’ve done apple and peaches which are both amazing. Our favorite way to make cobbler though is with 7-up. If you haven’t make this before you’re going to be in heaven. All you need is 1 box of cake mix (we like yellow but you can use white or even spice if you want), 1 stick of butter and a large can of peaches (or any other fruit you’d like). You’ll dump your fruit on the bottom, sprinkle your cake mix over top and layer your butter across the cake mix in slices. That’s it! Remember when cooking in the dutch oven to add more heat to the top so you don’t burn the bottom of your cobbler.
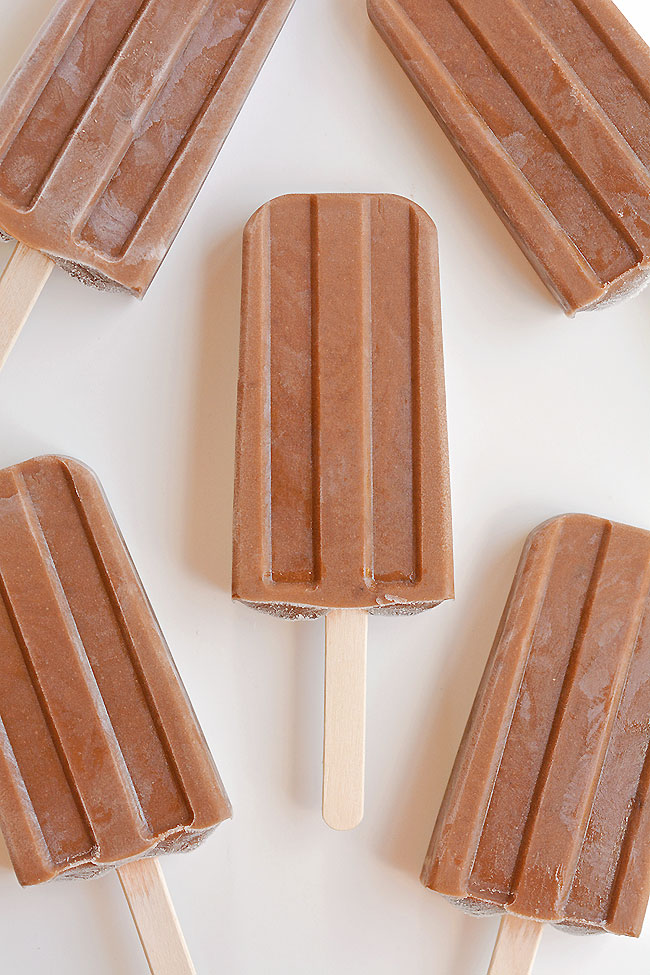
4 Tasty Fudge Pops To Cool Down With This Summer!
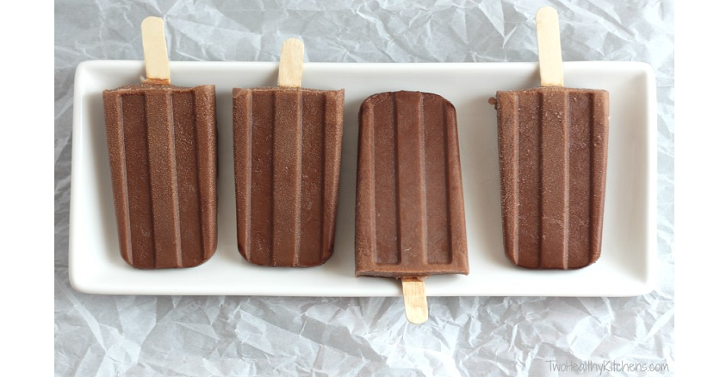
The temperature is heating up and my kids have been begging for popsicles. I’m not a huge fan of popsicles but rather, fudgesicles! We love to enjoy the store bought ones but the money saver in me came out and I found some yummy homemade fudgesicles that cost a fraction of what you would pay in the store. Here’s 4 different ones I’m sure you’re families are going to love!

Homemade Fudgesicles
3 cups milk
1 cup cream
1 1/4 cups sugar
pinch of salt
2 Tbsp unsweetened cocoa
2 Tbsp cornstarch
Mix ingredients over the stove (leave out the cornstarch) until it just starts to bubble. Add cornstarch and stir until all is dissolved. Fill your popsicle container and freeze.

Rootbeer Float Popsicles
Rootbeer
Vanilla Ice Cream
Start with ice cold rootbeer (you can place it in the freezer for a short time or make sure it’s been in the fridge overnight). Then simply layer inside your popsicle mold, ice cream and rootbeer. Put them in the freezer overnight.
Quick & Easy Fudgesicle
1 box Instant Jello Chocolate Pudding (4 servings)
2-2/3 cups milk
This is a simple recipe and whips together quick. Just combine both ingredients and fill in your popsicle mold. (Note: this is more milk than the box calls for but will help you pour into your molds easily). You can use this same recipe for other flavors as well!

Strawberries and Cream Popsicles
4 cups strawberries
3 Tbsp water
3 Tbsp sugar (or honey)
1/2 cup whipping cream
1/2 tsp vanilla extract
Combine your strawberries, water and sugar in a sauce pan and simmer for about 5 minutes until strawberries become soft. Let cool, then puree. Whip the cream and vanilla together for 2 minutes to make soft. Fold in your strawberries and pour into your molds.
Disney Shares Their Famous Churro & Dole Whip Recipes: Check Out These Super Easy Recipes
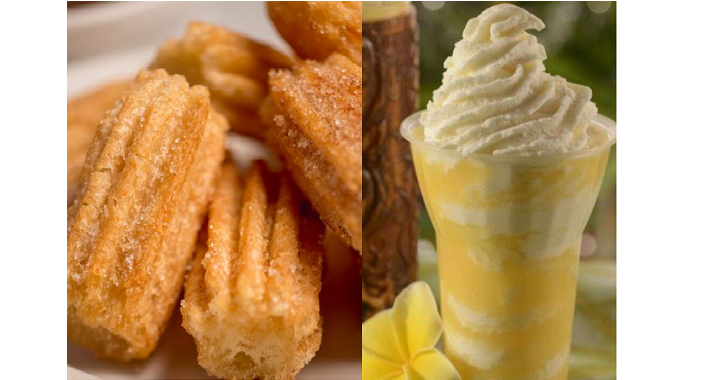
Is anyone else day dreaming about being at Disneyland and enjoying all of the yummy food? I sure am! Thanks to Disney, we can now make their famous Churros Bites and Dole Whip at our own home. Each one requires little ingredients which is super nice. So have a Disney style party tonight by making these yummy treats.
Disney Parks Churro Bites you can check out the complete guide here
Ingredients:
- 1 cup water
- 8 tablespoons butter
- ¼ teaspoon salt
- ¾ teaspoon ground cinnamon, divided
- 1 ¼ cups all-purpose flour
- 3 eggs
- 1 ½ cups vegetable or canola oil
- ½ cup sugar
Instructions:
- Combine water, butter, salt, and ¼ teaspoon cinnamon in 1 ½-quart saucepan over medium heat. Bring pot to rolling boil.
- Reduce heat to low.
- Add flour and stir vigorously until mix forms a ball. Remove from heat and let rest for 5-7 min.
- Add eggs, one at a time, and stir until combined. Set aside.
- Heat oil in medium skillet or 1-quart saucepan over medium-high heat or until temperature reaches 350˚.
- Spoon dough into piping bag fitted with large star tip. Pipe 1-inch strip of dough over saucepan, cut with knife, and drop into hot oil. Repeat until churro bites fill saucepan with room to fry.
- Fry churro bites until golden brown. Remove with slotted spoon or mesh spider strainer.
- Drain churro bites on paper towel.
- Mix sugar and ½ teaspoon cinnamon in medium bowl. Toss in churro bites until coated. Place on serving plate and serve with favorite dipping sauce.
Dole Whip Recipe: You can find the complete recipe when you use the Disney App.
(This is for a single serving)
Ingredients:
- 1 big scoop of ice cream
- 4 oz of pineapple juice
- 2 cups of frozen pineapple
Instructions:
Add all ingredients to a blender until it’s a thick drink.
Add your swirl and then you’re done! Enjoy!
5 Yummy Soups You Must Try this Winter
 Are you done with winter yet? I sure am! I’m trying really hard to enjoy the crisp air and snowy mountains. However, when February comes around, I tend to get antsy for spring. The one thing I do love during winter is soup…and lots of it! I make a soup nearly every week during the winter season. I’ve found quite a few that I like, but I’ll narrow it down to 5 to share with you.
- Cheesy Chicken Enchilada Soup by House of Yumm (my kids love this one!)
- Panera Bread Copycat of Broccoli Cheese Soup by The Recipe Critic
- Taco Soup by Mel’s Kitchen Cafe (if you don’t follow her, you totally should)
- Chicken Wild Rice Soup by Little Spice Jar
- Loaded Baked Potato Soup by Deliciously Cooking
The BEST Cheese Ball For Your Super Bowl Sunday Party!
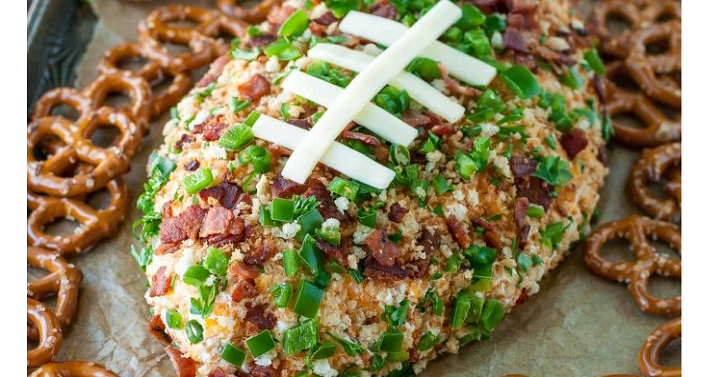
I love Superbowl Sunday! It’s time together with family, chatting, cheering and enjoying being together. But even more so, it’s yummy treats and snacks all night long! In all our years of get togethers and parties, I’ve found the yummiest cheese ball to take to all your gatherings. And better yet, it’s easy!
1 Packet of Hidden Valley Ranch Dressing Mix
1/2 cup of Mayonnaise
1/2 cup of Milk
8oz Brick of Cream Cheese, softened
3 cups Freshly Grated Cheddar Cheese
(Green Onions & Bacon are optional but not necessary)
I’m mix together the dressing mix, mayo and milk in a bowl. Add in your cream cheese and mix well. Once it’s all been combined, mix in your grated cheddar cheese (don’t use the pre-grated cheese, get the block and grate it). Place either in a bowl to dip out of or place on plastic wrap and form into a bowl. Place in the fridge to harden it and you’ll be good to go.
The Skinny Taste Air Fryer Cookbook (Hardcover) Only $9.34!
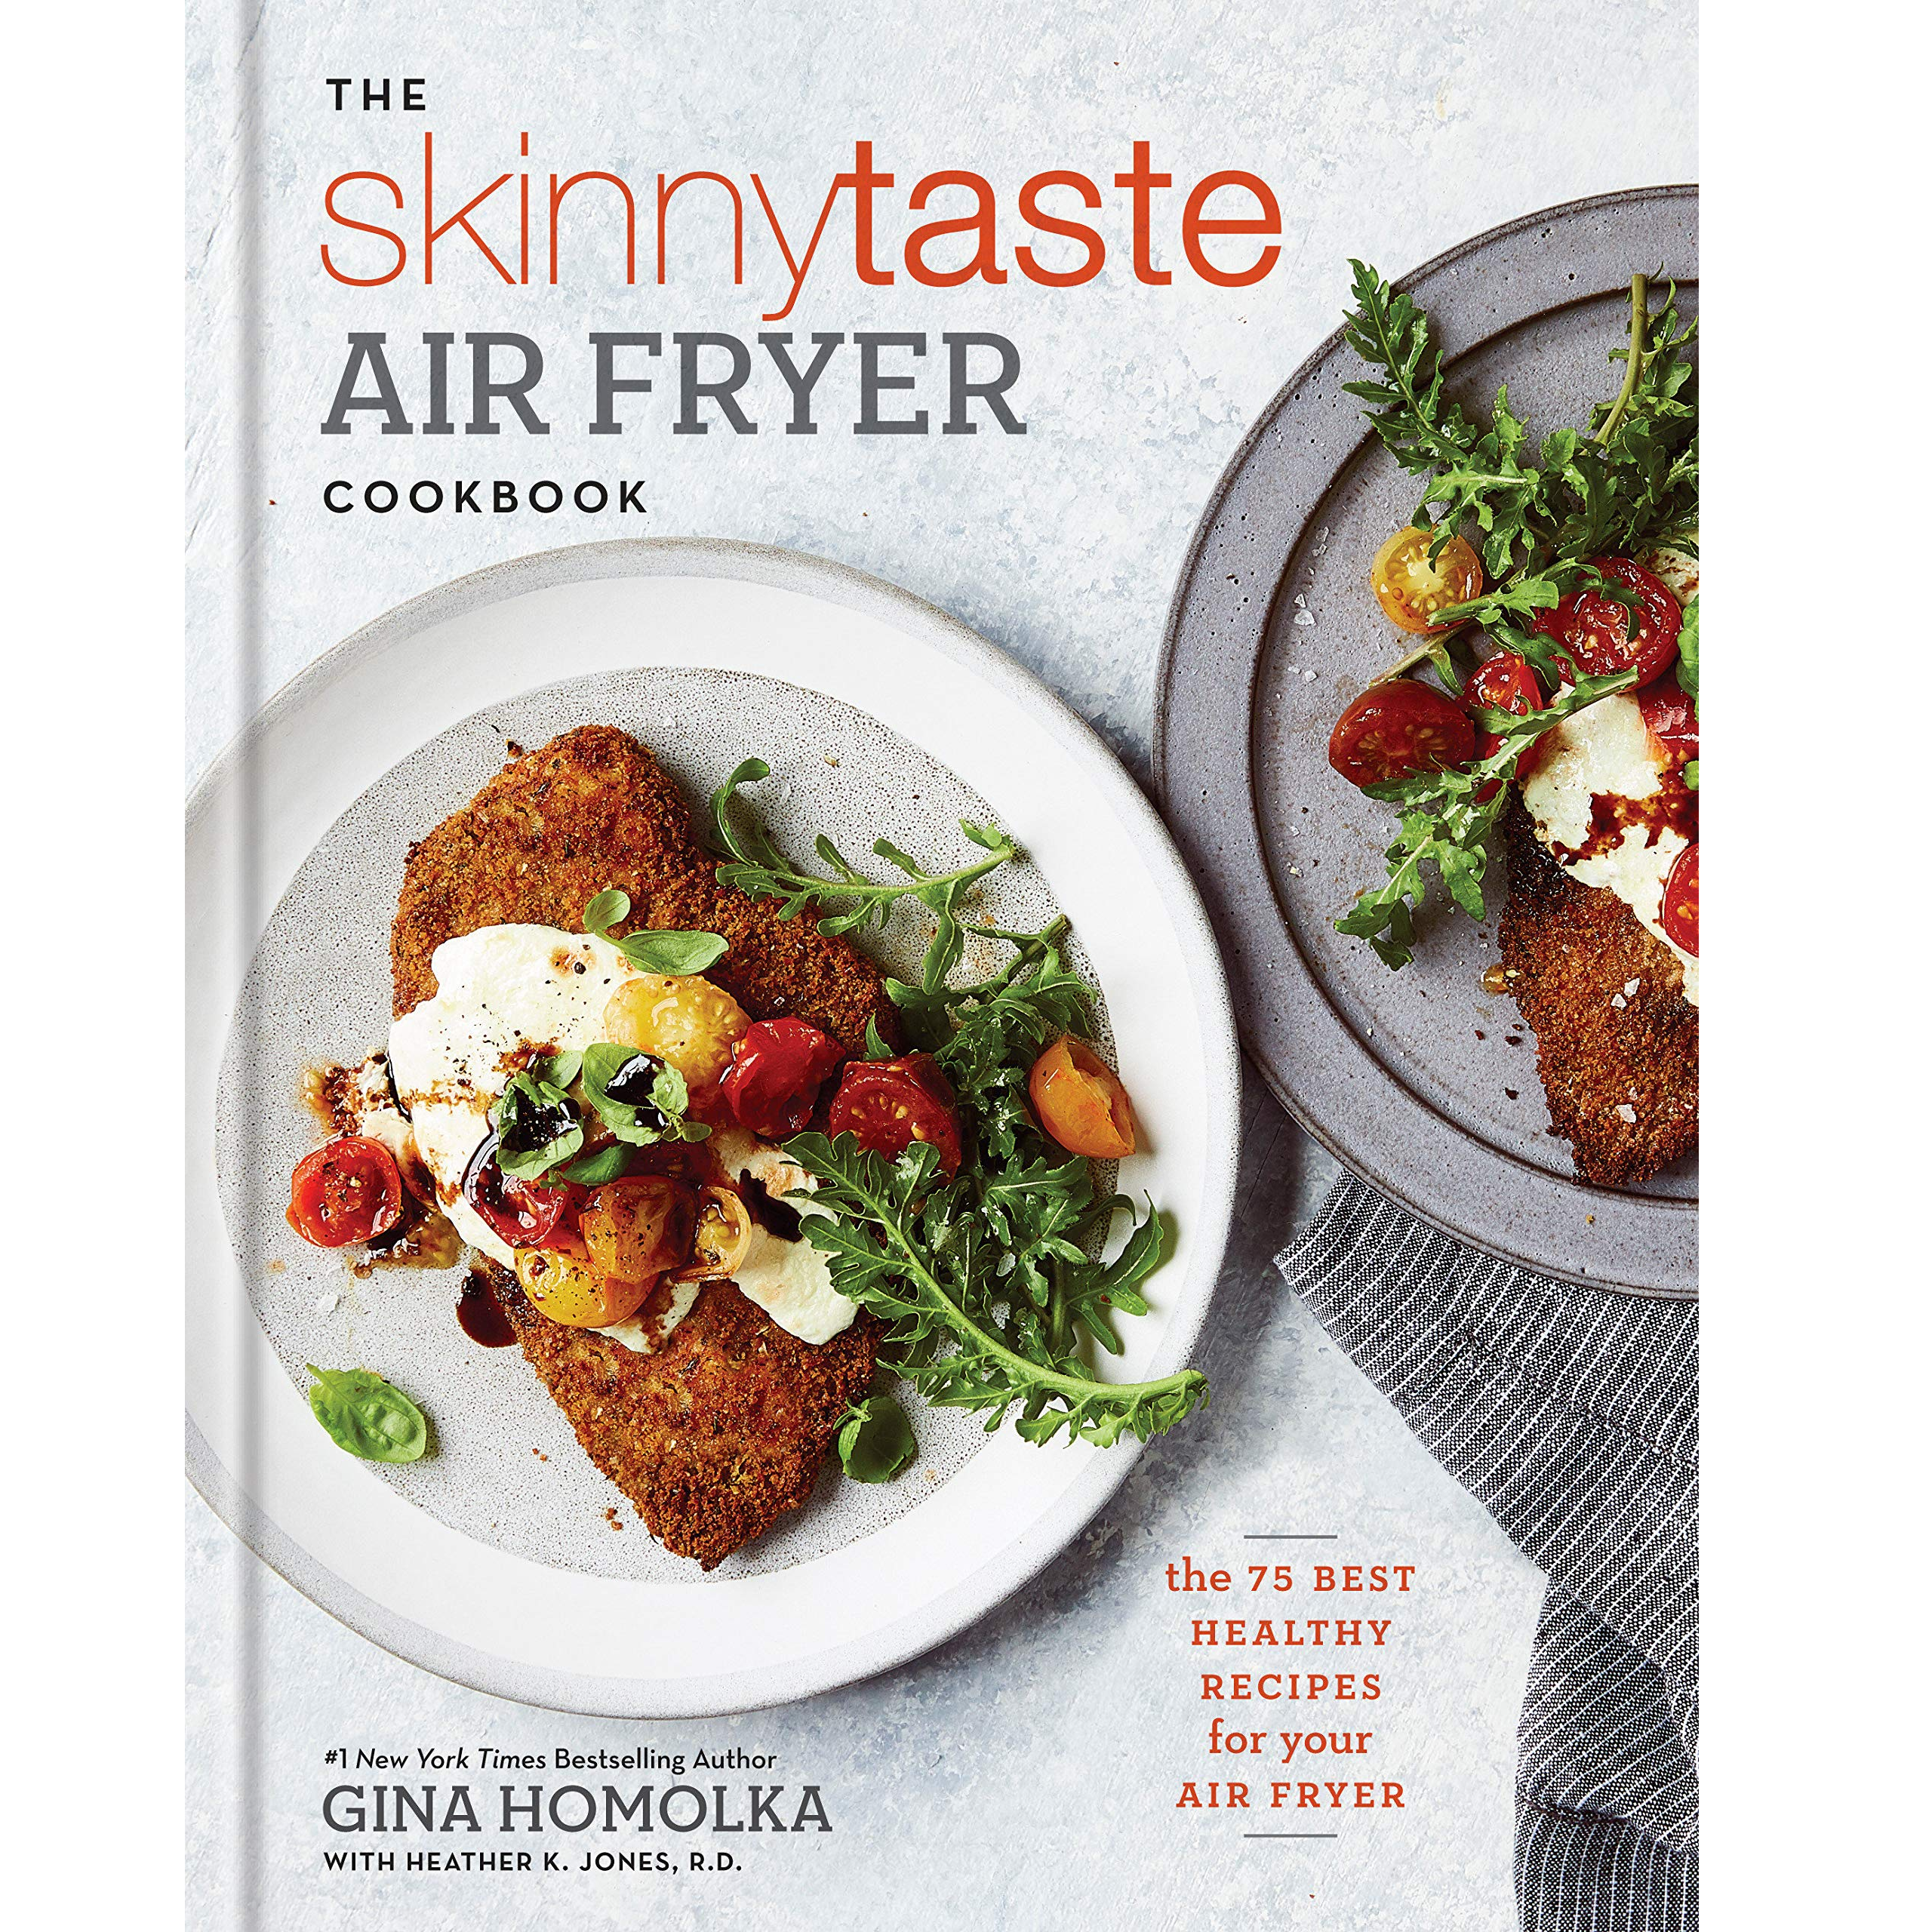
Yes! You finally bought an air fryer! Perhaps you don’t know what to make with it or exactly how to use it. Not to worry. Amazon has The Skinny Taste Air Fryer Cookbook for only $9.34! This is the hardcover copy that will be you loving your air fryer. Each recipe includes nutrition information as well as a recipe key labeling recipes that are at or under thirty minutes in cook time, vegetarian, gluten-free, dairy-free, ketofriendly, and freezer-friendly.
Keep in mind, Amazon pricing can change at any time! Don’t wait to purchase this deal or it might be gone when you come back! This item will ship free for all Amazon Prime members. Or, regular members can score free shipping by adding $25 or more worth of eligible items to your cart. You can get a 30-day free trial of Amazon Prime here.
Keto Your Way: A Customizable Approach to Low-Carb Lifestyle Only $15.49! (Reg $25)
 I can’t tell you how excited I am for this offer! Julie Smith released her keto cookbook a couple of months ago and I’ve been just waiting and waiting to find a deal, well the wait is offer! Amazon is offering Julie Smith’s Keto Your Way: A Customizable Approach to a Low-Carb Lifestyle with over 140 recipes for only $15.49 when you clip the $6.55 coupon before you checkout!
This recipe book is filling with easy, budget friendly recipes and pictures on (I think) every recipe. Keep in mind, Amazon pricing can change at any time! Don’t wait to purchase this deal or it might be gone when you come back! This item will ship free for all Amazon Prime members. Or, regular members can score free shipping by adding $25 or more worth of eligible items to your cart. You can get a 30-day free trial of Amazon Prime here.
Keto Pumpkin Pie For Your Thanksgiving Meal!
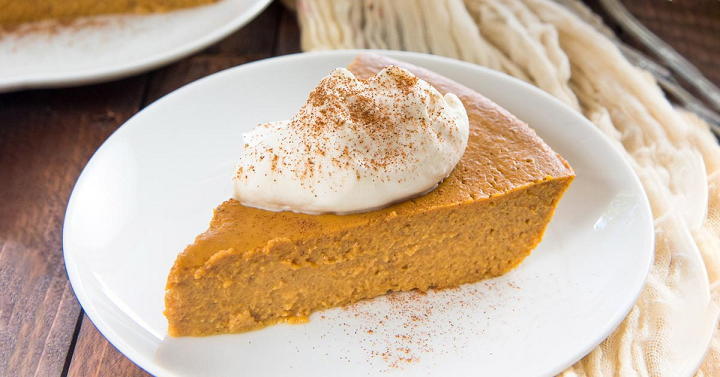 Thanksgiving is only a week away so the meal prep has begun! This year I’ve been working on listening to my body and working on portion control but that doesn’t mean I want to miss out on dessert! So I’m bringing the pie and I’ve found (and tested) this yummy Pumpkin Pie to take to the feast. It’s the perfect way to still stick to my goals and enjoy a taste treat.
Keto Crustless Pumpkin Pie
1 (15oz) can pure pumpkin puree
2 large eggs
1/2 cup erythritol
1/4 teaspoon salt
1 Tablespoon pumpkin spice
1 teaspoon ground cinnamon
1 cup unsweetened almond milk (or heavy cream)
1 teaspoon pure liquid stevia (optional)
First start by preheating your oven to 425 degrees. The simply whisk all ingredients together in a mixing bowl. Pour into a oiled 8×8 pan (or pie pan if you prefer). Bake for 15 minutes then reduce heat to 350 degrees and continue baking for another 35-40 minutes until the pie is set and cooked through. Knife should come out clean at center. Once cooled, slice and serve with whipped cream.
This is a crustless option and one I actually really love but you can always opt for a crusted pie make with almond flour if you’re wanting the full effect! Happy Thanksgiving!