
Goodbye Summer, Hello School

Diving into the first full week of school can feel like jumping into an icy lake. I’m trying help make the transition from summer to school as easy as possible for my children. It’s always a difficult transition for my boys, leaving the freedom of summer behind for the more regimented schedule of the school year. But I am determined that this year we will be successful altering our routine so it’s a pleasant experience for everyone.
Although this morning I was greeted with a few moans and bewildered looks as I reminded them that they needed to be catching the bus, they eventually rolled out of bed and made it to the bus stop. But who can really blame them? It is Monday.
After asking other moms what helps them and reading a few articles, I decided to put together a list of things we might consider as we send the kids back to school. Hopefully it will help you too.
Tips for Transitioning Back to School
1. Keep the first week of school as simple as possible. Limit extra activities, meetings and projects that everyone is involved in. Take the extra time to focus on your child’s experience and help them develop a routine they can follow through the school year.
2. Pack lunches the night before. Encourage older children to be involved in the process and have them help pack their lunches or do it on their own.
3. Eliminate the chaos of the morning by following a routine everyday. Have a set time that breakfast is served, plan a week menu for breakfast and encourage children to be ready in time to eat breakfast.
4. Plan outfits and lay clothing out the night before.
5. Have a specific homework time and place for children to complete their homework assignments. Make it a time when you can be available to your children. Kids that have supportive parents have been shown to have more successful school careers.
6. Read 20 minutes a day.
Image courtesy of digitalart / FreeDigitalPhotos.net
Freezing Zucchini
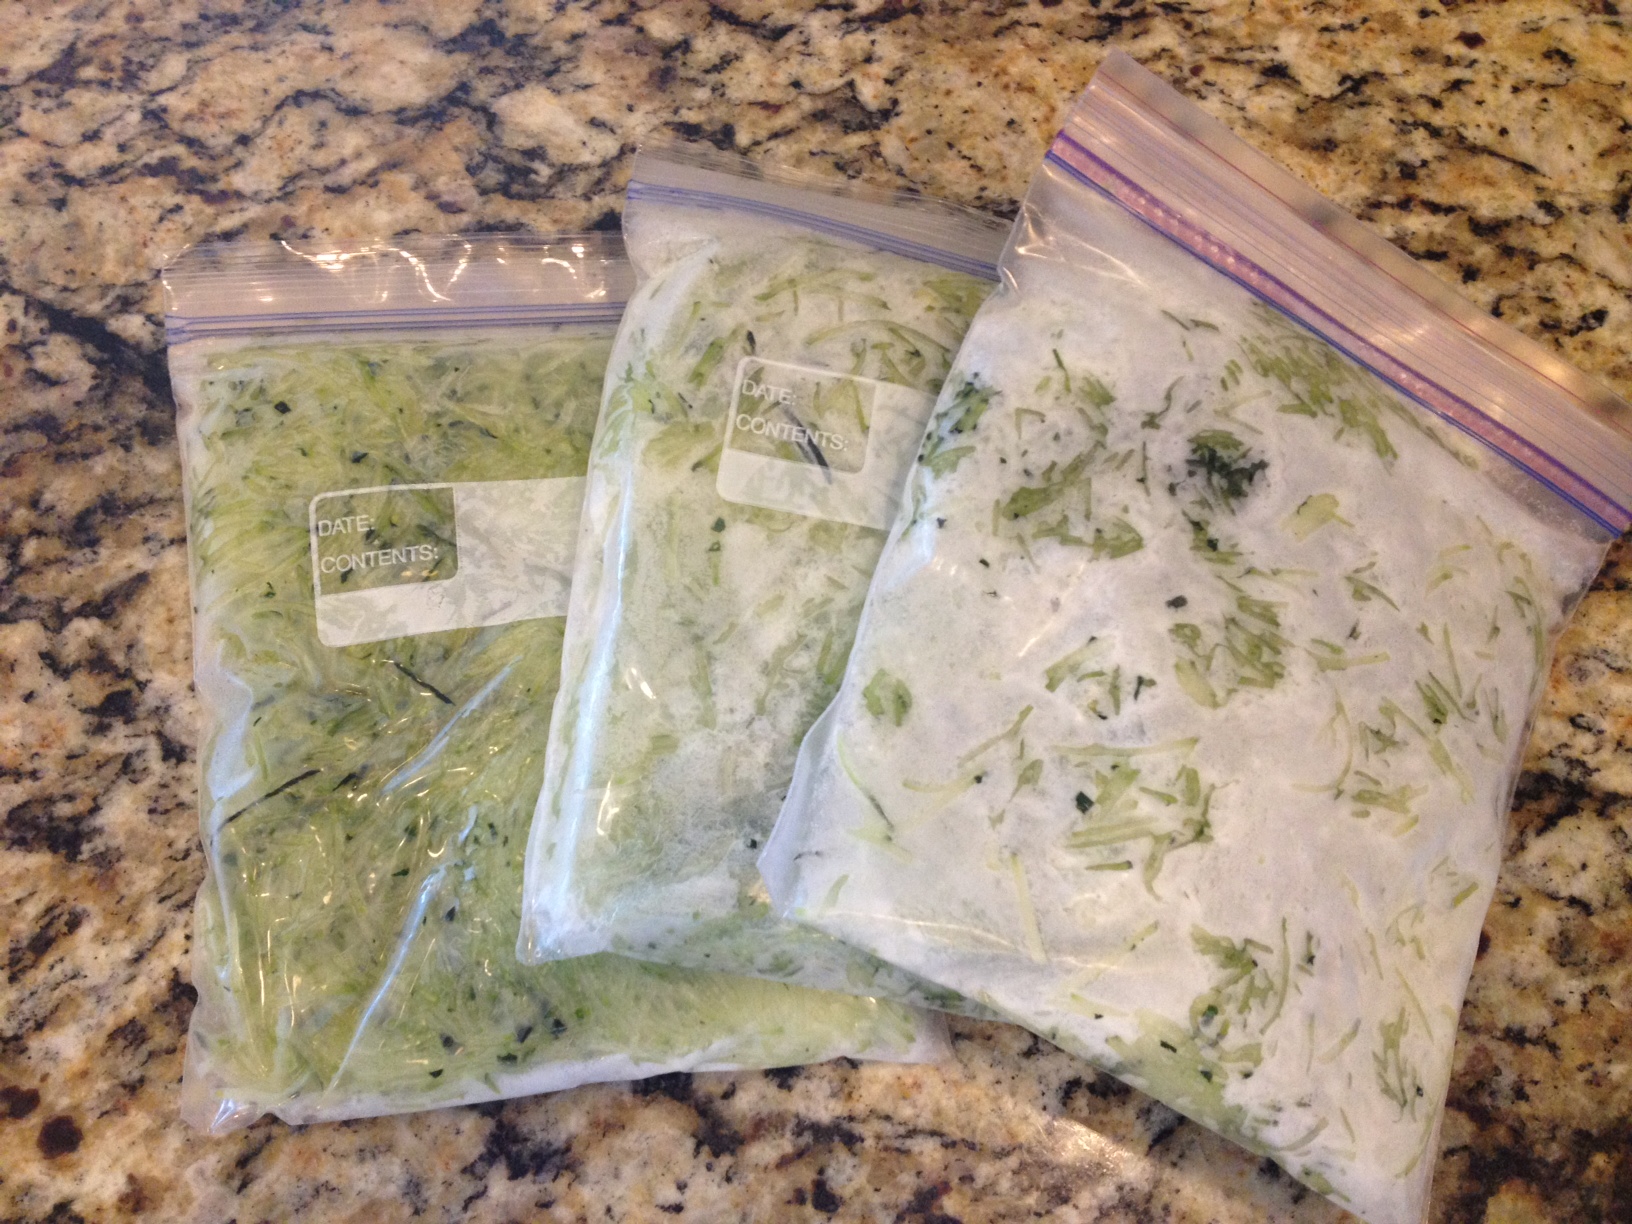
If you have an abundance of zucchini like I do and your friends aren’t so willing to take it you may want to try ding dong ditching it and leaving the green skinned squash on random front porches of unsuspecting neighbors. Or you can use it to your benefit and make it last a little longer by freezing it.
We are in the middle of what I call squash season and this forever giving vegetable (or weed as my husband likes to call it) seems to be waiting in the garden each and every morning. Although it is fun to watch something grow so prolific, it can be overwhelming when you look at the pile of squash on the counter and wonder just what you are going to do with it.
If you enjoy zucchini, freezing it is a great way to extend the life of your garden produce. Freezing the squash gives you the ability to use it later in year. These frozen veggie packs make it easy to add to soups, casseroles, side dishes, pasta sauces, breads, cakes and muffins.
Freezing zucchini is super simple just follow these quick and easy steps to regain your counter top and hide this summer squash away in your freezer.
Directions
Start by washing the zucchini well. Making sure to clean all the dirt off of the squash.
Next cut the ends and any undesirable sections off of the zucchini.
Then section the vegetable into smaller pieces that are easy to grate. Scoop any extra large seed out and discard them.
Grate the squash by hand or with a food processor.
Measure zucchini into amounts that can easily be used in your recipes. I measured out 2 cups and placed into freezer bags.
Store in small containers like freezer bags or plastic containers. If you decided to use freezer bags, pat the zucchini flat and stack the bags in the freezer to save space.
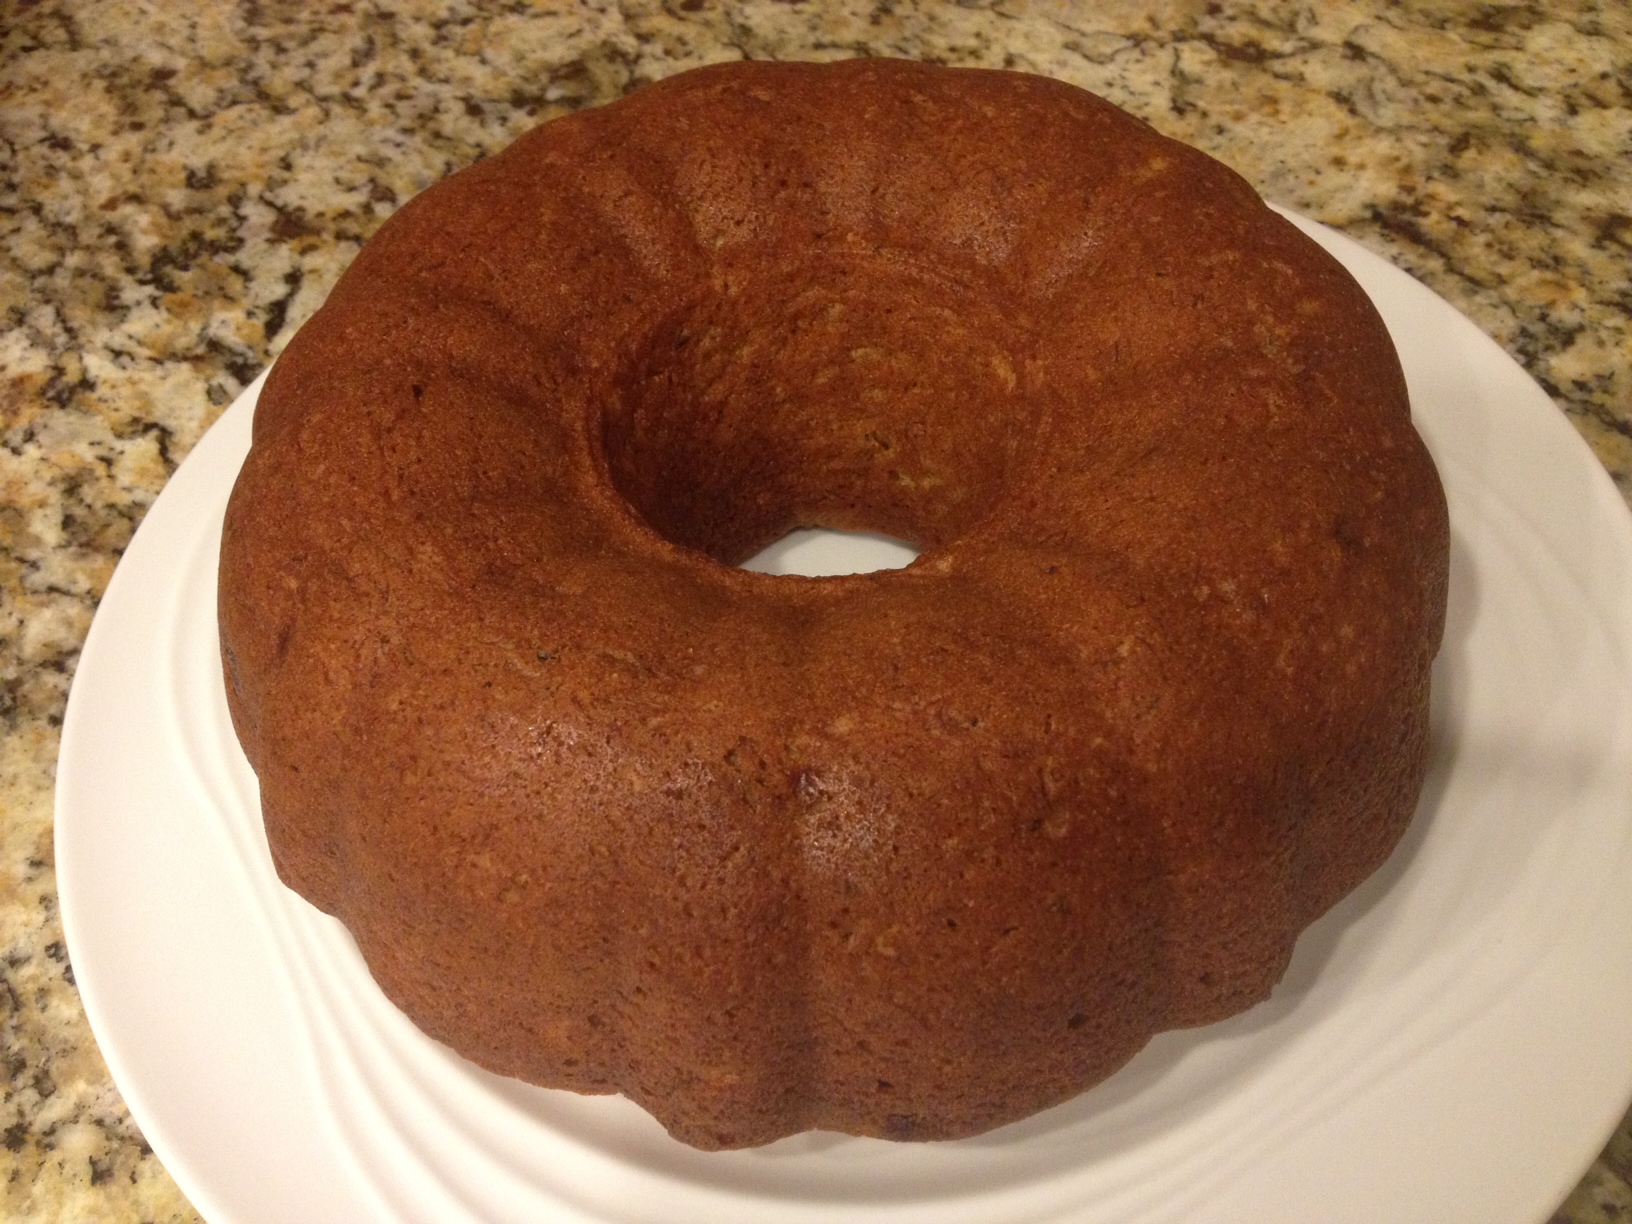
Zucchini Banana Bundt Cake Recipe
So as I said in one of my earlier post, I planted zucchini in my garden this year and it seems to be coming out of my ears. I am trying to make the most out of whatever comes out of my garden. These days that is looking grim since my digs have taken to eating peppers and pepper plants and anything else they have a fancy for trying out of the garden. But the zucchini grows like a weed and and keeps producing despite the other struggles in my garden.
This zucchini bundt cake is light and sweet with a hint of cinnamon. The colors are beautiful with the flecks of green peeking through the warm blonde cake. I love it when things you bake turn out so pretty. Theres something so satisfying, looking at it and thinking, “I made that.” It’s a perfect cake for a brunch. If you wanted to make it a little richer you could add a cup of chocolate chips. Serve it with vanilla ice cream for another good from the garden summer treat.
Ingredients:
3 large eggs
1 cup vegetable oil
1 1/2 cup sugar
2 cups all-purpose flour
1/4 tsp. baking powder
1 tsp. baking soda
2 tsp. ground cinnamon
2 tsp. vanilla extract
1 cup aw zucchini, shredded ( about 3 small )
1 cup mashed banana ( about 2 )
1/2 cup chopped pecans (optional)
Directions:
Preheat Oven to 350 degrees.
Shred zucchini and mash bananas and set aside.
In a large bowl, beat eggs, oil, and sugar.
Add vanilla extract and beat well.
Slowly add flour, baking powder, baking soda, cinnamon, and pecans. Mix well.
Next add the zucchini and bananas and fold in until well blended.
Pour into greased and flowered bundt pan, and bake for 45-55 minutes or until toothpick inserted into the center comes out clean.
Cool for 10 minutes in pans on wire rack.
Remove from pan and cool completely.
Top it off with a light dusting of powdered sugar.
Summer Key Lime Cookie Recipe
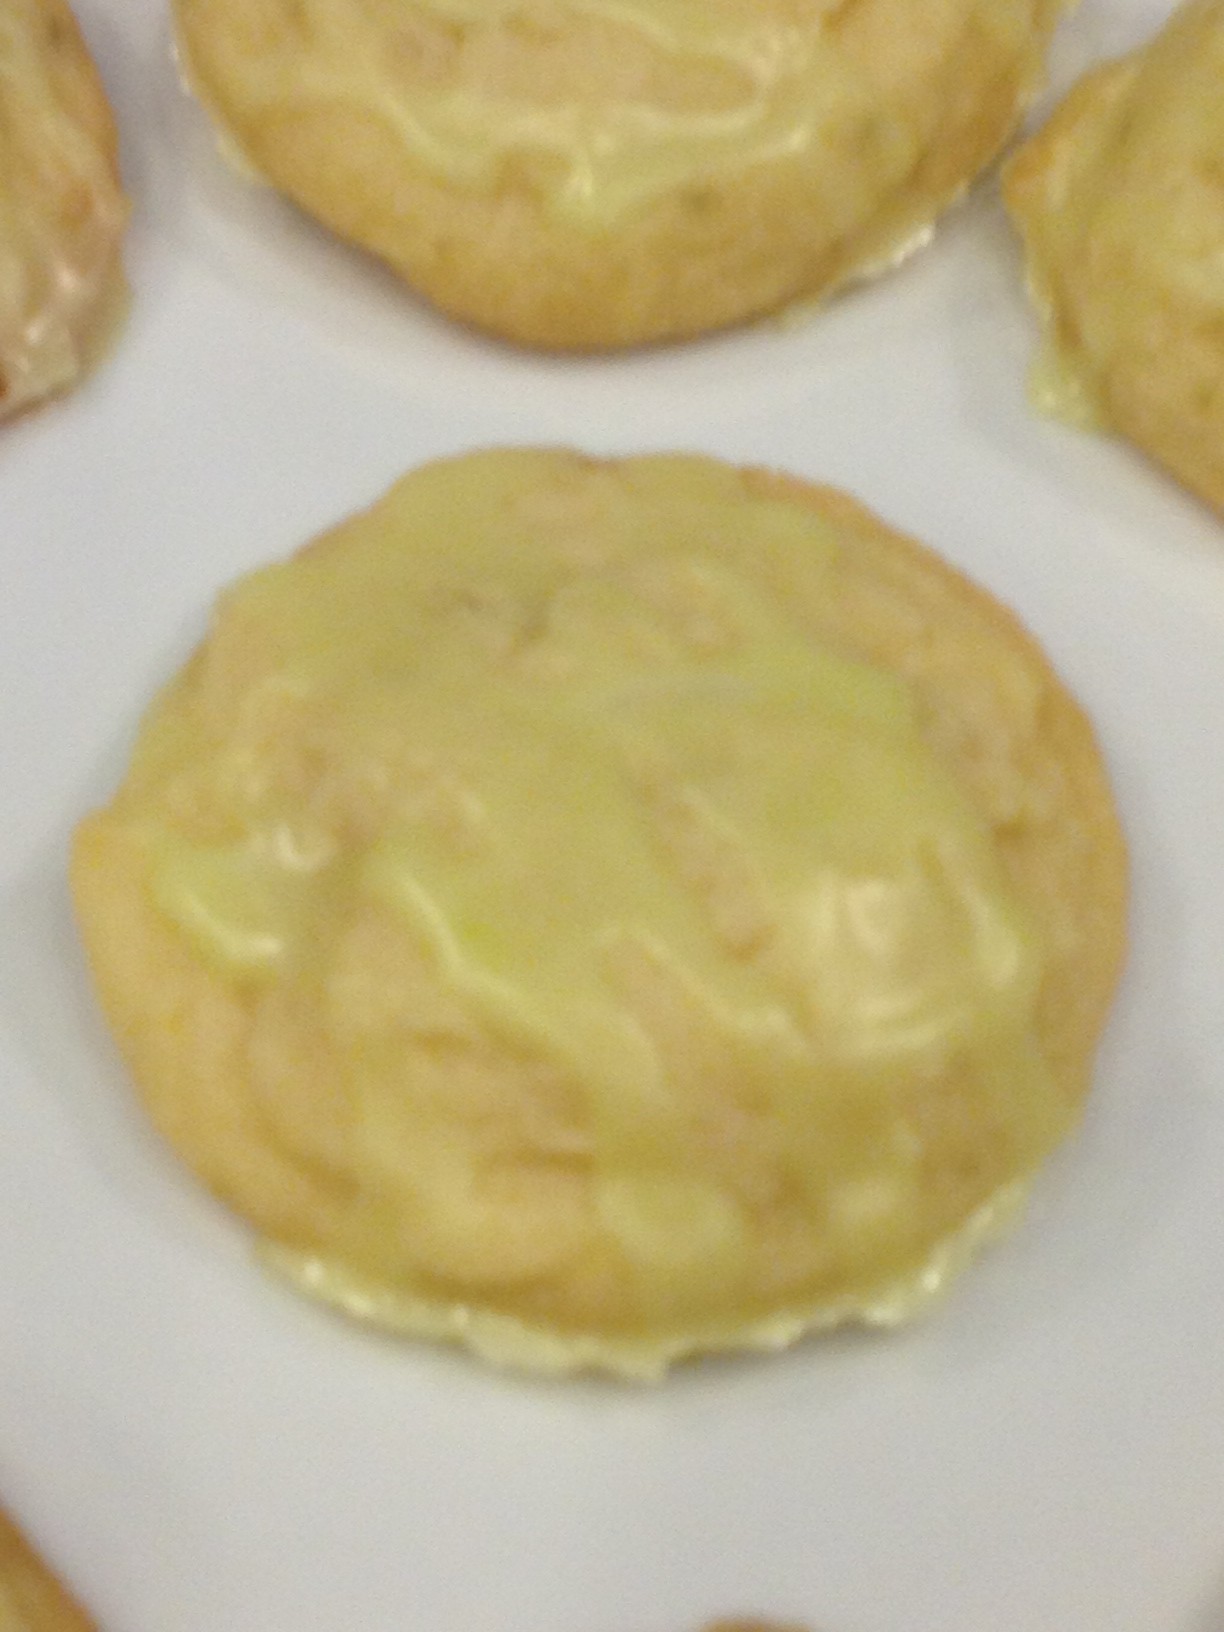
We love cookies at our house and summer is just enough reason for me to try a new recipe. This new key lime cookie recipe didn’t disappoint. If you love limes and even if you don’t you just might fall in love with this cookie recipe too. They are light and tangy and the best part is they are quick and easy to put together.
Key Lime Cookie Recipe
1 cup salted butter, softened
1 cup granulated sugar
1 egg yolk
2 Tablespoons key lime zest
1 teaspoon pure vanilla extract
2 Tablespoons key lime juice
1/2 teaspoon salt
2 cups + 2 Tablespoons all-purpose flour
Beat the butter and sugar together until it is fluffy. Next add the egg yolk and beat until incorporated. Then add the vanilla and key lime juice and mix well. Last of all add the key lime zest, salt and flour and mix until the dough is slightly sticky. Place the dough in the refrigerator for about 10 minutes. Drop by spoonfuls onto a greased cookie sheet or silpat mat. Bake for 8 to 10 minutes at 350 degrees.
Icing Recipe
2 1/4 cups powdered sugar
1/4 cup key lime juice
1/2 teaspoon pure vanilla extract
1/8 teaspoon salt
2 drops green food coloring (optional)
Mix powdered sugar, key lime juice, vanilla extract and salt. Add a couple drops of food coloring and mix well. Drizzle over cooled cookies.
Fresh Ideas For Summer Squash and Zucchini
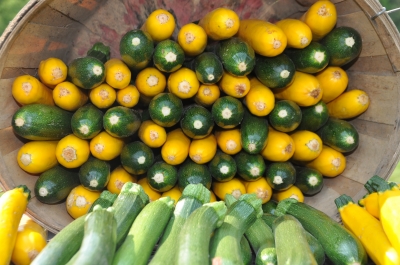
Summer gardens are in full bloom and starting to bare natures goodness. For those gardeners who have been lovingly attending to their gardens, they are now beginning to reap the bounty of their careful attention and patience. Some of my favorite summer plants are zucchini and yellow squash. (Probably because you really don’t have to posses a green thumb in order to help these thriving plants grow.) These plants are abundant producers and will keep giving all summer long. They also may produce more vegetables than you feel like your family could possibly eat. If this is the case at your house and you’re wondering what to do with all these extra veggies, here are a few ideas to dress up these ordinary garden vegetables while serving them up in a kid friendly way.
Veggie Fries
Start by cutting the squash into veggie sticks a couple inches long. Toss into flour and then drop them into a couple of beaten eggs. Finish them off by rolling them in panko bread crumbs. Place on a greased cookie sheet and bake at 400 degrees for 10 – 15 minutes.
Veggie Waffles
Begin by grating the zucchini or squash. Thaw hash browns and mix equal parts squash and hash browns in a bowl. Grease a waffle iron well and spread the hash brown and squash mixture in the waffle iron, close the lid and let it cook for about 15 minutes.
Squash and Sauce
Take a vegetable peeler and cut the squash into ribbons by running the peeler length wise along the vegetable. In a sauté pan cook the ribbons lightly for about 5 minutes. Serve with your favorite pasta sauce and eat it like spaghetti.
="https://
Image courtesy of [Bill Longshaw] / FreeDigitalPhotos.net
“>
Last Minute Fourth of July Party Decor
The Fourth of July is a time to celebrate! We are blessed to enjoy our independence and the many freedoms we have because of the great sacrifice and foresight of those who believed all men are created equal and were willing to sacrifice to establish this country.
Across the country we celebrate by gathering together with family and friends, cooking outdoors, enjoying the warm weather and topping the day off with fireworks just after dark. If your throwing a last minute BBQ or would just like to dress up your get together a little more, here is a quick and inexpensive decoration idea.
Yard Stars
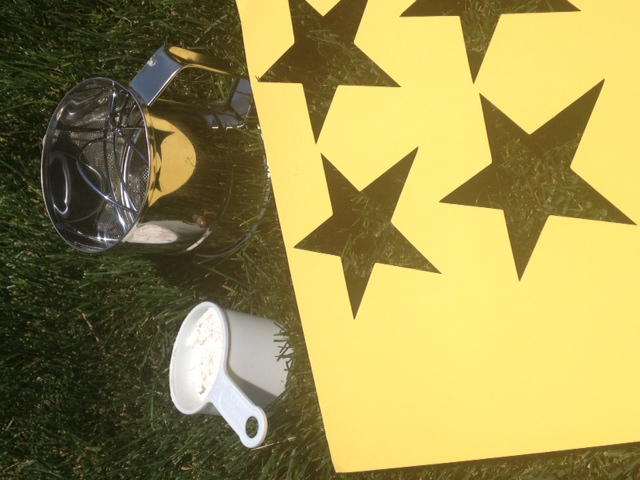
Items Needed:
Squirt Bottle
Sturdy Card Stock for Star Template
Flour
Flour Sifter
Begin by gathering your supplies. Most of these items are things you can easily find in your home. Having everything on hand will make the process move quickly.
Start by choosing the area of the yard you would like to decorate. Even grass will provide the best results. Give the lawn a quick once over with the lawn mower if you have the time.
Next take your card stock and create your star template. Do this by drawing or tracing a star in the center of the paper and cutting it out. Or you can cheat like I did and use a Circut or similar product to cut the stars for you.
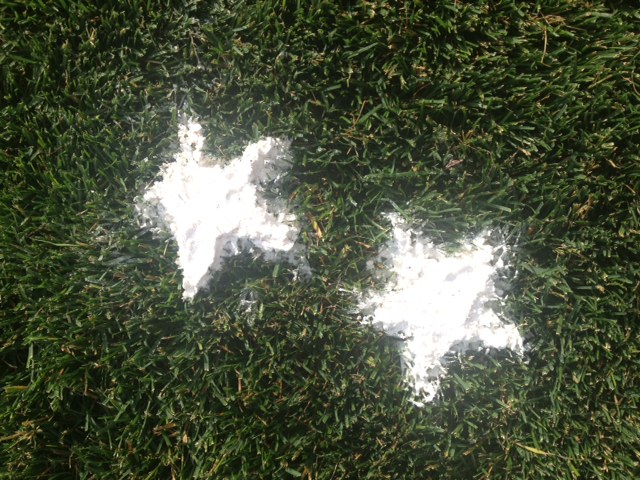
Once your template is made, place it on the grass in the desired location. Inside of the cut out star use the squirt bottle to spray the grass. After it is damp take the flour sifter and gently shake the flour over the star cut out. You will see the flour will stick to the moistened grass forming a star. Be sure to get the flour into the corners of the star or you will have a star with sloppy round looking corners.
Lift the star template to reveal the flour star. Ta-dah! Quick, easy and inexpensive yard decor. Repeat as many times as needed to achieve the desired look.
Enjoy the Fourth of July!
DIY: Cotton Ball Fire Starters
Living in a house of all boys, summer weekends easily turn into family campouts. Dirt, bugs and smelling like campfire aren’t my favorite aspects of camping but I do love spending time with my kiddos and the beauty of the great outdoors. Then only thing that makes these trips better is when I find a practical use for everyday house hold items that make my camping trips a little bit easier.
Camp fire starters can be handy when your trying to get a fire up and going for four anxious boys. These cotton ball fire starters are easy to prepare before a camp out and just as easy to pack. After they are ready simply toss them in a plastic bag and pack them with your camping supplies. As you prepare for a camp fire toss a couple under the logs with a bit of kindling and light them up.
These DIY camp fire starters are made with only two items and will burn about two minutes each. This should be plenty of time to get the camp fire up and running. Using these camp fire starters will limit the amount of kindling needed and the amount of time spent finding kindling to prepare for a camp fire.
DIY Cotton Ball Fire Starter Instructions:
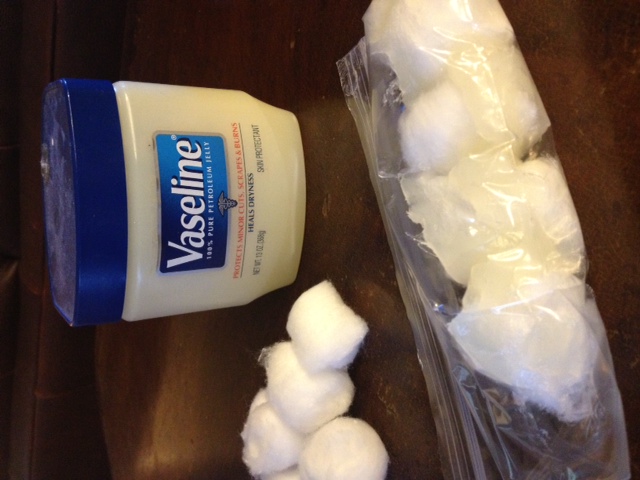
Items needed:
Cotton Balls
Petroleum Jelly (Vaseline)
Sandwich Size Plastic Bags
Rag or paper towel for clean up
Directions
1.Take a small scoop of petroleum jelly, about two finger tips full.
2. Spread the jelly around the cotton ball making sure to leave a small portion of the cotton ball uncovered. (I would suggest that you don’t dunk the cotton ball into the container of petroleum jelly. It will stick and quickly tear apart as you try to remove it.)
3. Place them in a row in the bottom of a plastic bag and then seal it shut.
4. Make as many as needed and use them at your next camp out.
These are simple camp fire starters to make and a great activity to keep the kids busy.
Recipe : Healthy Pumpkin Oatmeal Muffins
As a mom, I’m constantly trying to sneak in those extra healthy foods we should be eating into my kids diets. If there is a way to eliminate white sugar from their meals and slide in an extra vegetable or two, I’m your Guinea pig. (and my kiddos are too)
As I try to improve our diet and shake out the white sugar, white flour, preservatives, dyes and anything else we shouldn’t be eating, I always end up turning to the internet to find more information.
There are plenty of clean eating options, great blogs with recipes and an endless source of opinions. If you search the internet you will find some clean eaters are more extreme than others. I would call myself “a middle of the road clean eater.” I want it to be healthy and I want it to taste good. Lucky for us most natural foods do taste good.
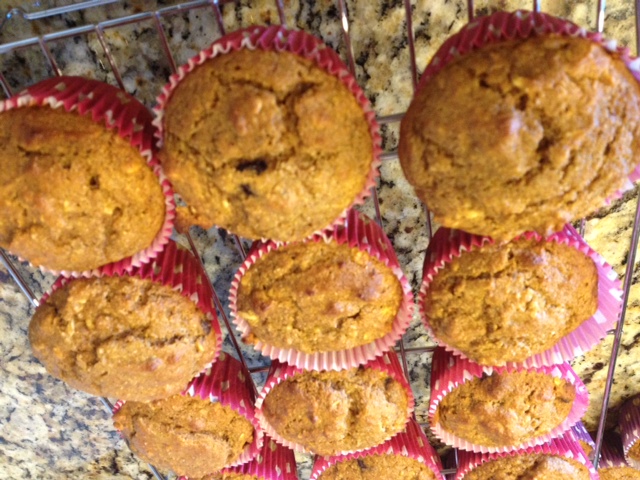
This recipe for Pumpkin Oatmeal Muffins received a thumbs up from my entire clan. I made it with homemade pumpkin puree that I preserved last fall. Pie pumpkins grow easily in the garden, so if your interested in giving this a try, plant you pumpkins now and follow my link.
I have to admit Pumpkin Chocolate Chip Bread from Great Harvest Bakery is a favorite in our home. These are a much healthier version in a muffin and were gobbled down by my boys this morning. We did add some chocolate chips to a batch because everyone needs a treat once in a while. Who can pass up chocolate? Not me.
PUMPKIN OATMEAL MUFFINS
Ingredients:
1 cup whole wheat flour
1/2 cup almond flour
1/2 old fashioned oats
1/2 cup chopped walnuts or almonds (optional)
2 teaspoons baking powder
2 teaspoons pumpkin pie spice
1/2 teaspoon baking soda
1/2 teaspoon natural sea salt
1 cup cooked pumpkin flesh, or winter squash or sweet potato
4 egg whites or 2 whole eggs
1/2 cup natural honey
1/2 cup sour milk (add 1 tsp lemon juice)
1/4 cup ground flax seed
Directions:
1. Preheat oven to 375 degrees F. Line muffin tins with paper muffin liners.
2. Combine all dry ingredients in one bowl. Set aside.
3. Combine all wet ingredients in another bowl.
4. Add dry ingredients to wet ingredients. Mix until just combined.
5. Drop spoonfuls of batter into muffin tin. Fill to top.
6. Bake for 25 minutes until just golden on top. Remove from heat and let cool on wire rack.
Yield: Makes 12
National Pretzel Day – Free Pretzel @ PRETZELMAKER

April 26th is National Pretzel Day! Who can resist these salted twisted treats? In honor of National Pretzel Day, PretzelMaker is giving away a free soft pretzel to all customers who come and share their favorite joke. So head into the closest PretzelMaker and celebrate National Pretzel Day with a free soft pretzel and a joke.
A Few Fun Pretzel Facts
The average American eats 2 pounds of pretzels a year.
Pretzels were invented by monks as a reward for children who said their prayers.
Like many other great inventions the hard pretzel was discovered when a baking apprentice in Pennsylvania over cooked his pretzels making them crispy and crunchy.
April 6 – International Pillow Fight Day
Today in gatherings all over the world, feathers will fly as large groups of the pillow armed public meet to celebrate International Pillow Fight Day. These friendly fights are planned all over the globe, from Washington D.C. to Los Angeles, CA, Rome to Brazil. Today there are pillow fights planned in every corner of the globe.
It all started back in 2008 on March 22. This is when the largest Pillow fight flash mob commenced with over 25 participating cities. A public staged event that was recorded as the largest flash mob ever. These pillow fighting flash mobs are planned and the word is spread primarily using the internet and social networking sites. Participants show up for a public pillow fighting frenzy. To blow off a little steam and display their pillow fighting skills.
If your wondering if there are rules to this mass chaos, there are some official guidelines . These include where to hold your events, never asking permission, how to hold your pillow and cleaning up after the party. They do believe in going green and leaving no trace is highly encouraged.
Now each year on April 6, pillow fighting events are planned around the globe. Who knows, there might just be one close to you. If not, why not start one in your neighborhood?
M&M Cookie Recipe….Yum
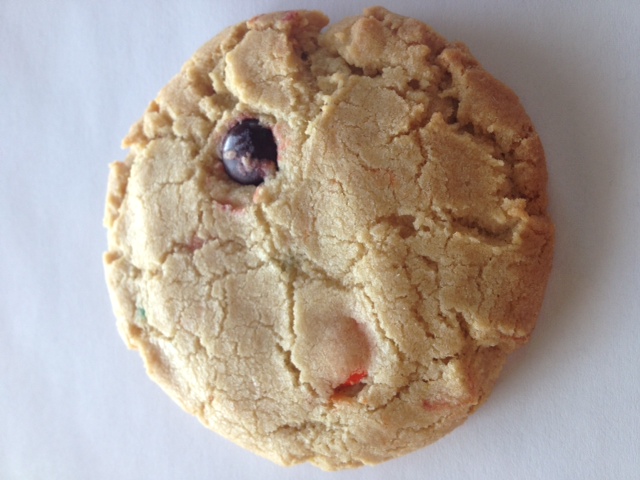
Cookies have always been one of my greatest weaknesses. If you look at my Pinterest boards you will see there is one devoted strictly to cookie recipes. My very own online cookie collection. I look through the recipes and salivate. Then I break out my baking gear and get to work. Sometimes the recipes are great and sometimes not so great.
This is the latest recipe I’ve tried and my boys gobbled them up. The recipe developed into 6 dozen, freshly baked, M&M laden cookies and still there weren’t enough to go around. Leaving the glasses of milk sitting alone on the kitchen table. They were a hit at our house, so I thought I would pass this recipe along. If you love M&M’s and cookies, give this one a try. It might just become your new favorite.
Ingredients:
1 cup packed brown sugar
1/2 cup white sugar
1 cup shortening
2 eggs
1 1/2 teaspoons vanilla extract
2 1/2 cups all-purpose flour
1 teaspoon baking soda
1 teaspoon salt
1 1/2 cups M&M’s
Directions:
1. In a large mixing bowl combine, sugar, eggs, shortening and vanilla. Until well creamed.
2. Add flour, salt, and baking soda. Mix until well incorporated.
3. Add M&M’s and stir in until evenly distributed in the dough.
4. Bake at 350 degrees F until edges are lightly browned. About 9-11 minutes.
Enjoy 🙂
Fun For Kids: Finger Foods – Mini Pigs In A Blanket

Having little ones at home and a busy schedule, I’m always on the look out for quick and easy lunches. I have to admit that I have fallen into a rut of serving the old time favorites like macaroni and cheese or peanut butter and jelly. If my kids are lucky they might have a choice to add honey to their peanut butter. Then there are the days we are really desperate. A quick bowl of Ramen Noodles are usually the go to choice , which may fill their tummies but I’m sure does not rank very high in the nutrition scale. I don’t know what it is about lunch time but it always hits our home at the busiest time of our day.
I’ve found that if I create a more interesting I make the lunch menu, my children are more likely to take the time to slow down and actually eat. Finger foods are always a big hit. They are bite size and can be eaten quickly. The best part is there are no utensils required.
This week we tried Mini Pigs In A Blanket paired with a few apple slices. It was a big hit at our house. Nothing was left over and they are quick and easy to prepare.
Mini Pigs In A Blanket
1 package Lil’ Smokers Sausages
1 package refrigerated crescent rolls
Directions:
1. Open crescent rolls and separate dough into the divided triangles. Using a pizza cutter, cut each triangle in half creating a smaller triangle.
2. Take individual Lil’Smokers and roll inside of the dough from the widest part of the triangle down. Repeat until all of the dough has been used.
3. Place on a cookie sheet and bake at 375 degrees for 11- 13 minutes.