
Halloween Treat : Edible Witches Brooms

Last minute holiday parties can be some of the best. As fun as they may be they can create a bit of stress as well. If you are more laid back or are one of those type A personalities who need a plan, you need not stress.
When the phone rings or I get a text about a last minute get together my gut reaction is to go, “It will be fun” I think in my head. Then I go about convincing my home loving husband why we should attend. After his reluctant agreement the realization sinks in and I know this will take a bit of effort on my part to make sure we get there and bring something to share. I hate showing up empty handed. I always feel the need to bring something to a get together even when the host hasn’t request that we do so. The last minute run to the store can increase my stress levels and leave me in a lurch trying to think of something to bring. This takes all of the fun out of the last minute get together and a form of dread sets in. So I try to live by the theme, “Keep it Simple.”
These little witches brooms are super simple treat and perfect for any last minute Halloween party. The result a Halloween themed treat that requires little effort and hardly any time. With the use of two ingredients that you will probably find in your pantry and Halloween candy bowl you’ll look so prepared. You will arrive with a treat to share and be there friends to enjoy it minus the stress!
Witches Brooms
Ingredients
1 package Mini Reese’s Peanut Butter Cup
1 package stick pretzels
Step 1 Unwrap mini Reese’s Peanut Butter Cups and place face down on a tray.
Step 2 Gently insert one pretzel stick into the center of every candy.
Step 3 Finished!
Trick for a Treat : Pumpkins and Spice
The countdown to Halloween has begun. Putting up the final decorations, stocking the candy bowl and roasting pumpkin seeds may be on your agenda this week. There are only a few days left to put the finishing touches on Halloween this year. The children are excited to wear their costumes and the jack-o-lanterns have been carved.
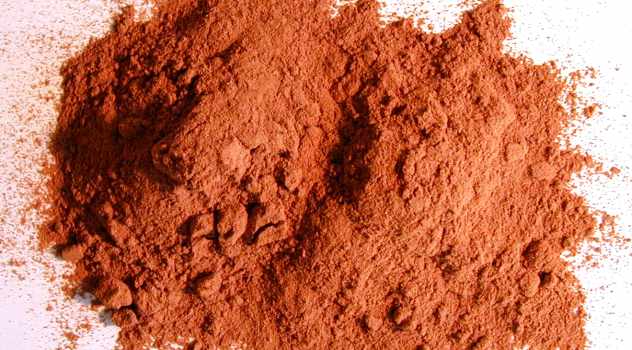
If your pumpkins have already been carved, you may notice a squash like smell graces the front porch of your home. It’s an interesting earthy smell that reminds me of fall and Halloween. However sometimes it can be a little over powering. If you find this to be true at your home here is a simple trick you can use to create yourself a treat.
Take some powdered cinnamon and rub it on the lid of your jack-o-lantern. When you light the candle tonight, the aroma of cinnamon and pumpkin will fill the air. As the neighborhood visits your home this instead of being welcomed by the smell of three day old squash, they will be greeted with the welcoming smells of pumpkin pie.
You’ve Been Boo-ed!

Halloween is known for it’s tricks and treats. In the last couple of neighborhoods we have lived in there has been a tradition of sharing Halloween treats anonymously. As your house was hit they would say “ You’ve Been Boo-ed.” Many of you have probably heard about “ You’ve Been Boo-ed” but in case you haven’t I thought I’d share a little about it.
In the weeks that lead up to Halloween our family has often been surprised with goodies left on our door step from a phantom guest (neighbor) with a poem attached. In reading the poem it recommends in order to ward of future phantoms that you hang the ghost in the window for all to see and then continue to carry on the phantom treat leaving tradition. In order to carry on the tradition we take our turn putting together treats to be delivered to another unsuspecting neighbor. The goal is for the phantom to hit most if not all of the homes in the neighborhood before October 31st.
The treats need not be fancy or homemade. Anything that brightens someones day will work. Homemade goods are always a treat but store bought cookies, apples or cider mix can be an excellent choice as well. Use your imagination you’ll come up with endless ideas. Spread some Halloween cheer where you live by using the “ You’ve Been Boo-ed” tradition. With the turn of a few tricks and leaving a treat the Halloween Spirit will fill your neighborhood before Hallow’s Eve.
Tips To Keep Your Pumpkins Smiling
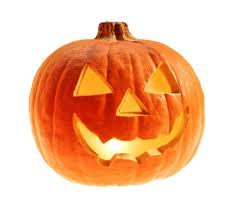
As Halloween draws closer dots of bright orange have begun to fill our neighborhood. Pumpkins gathered from their patches or the local grocery stores are just waiting to be given some personality. Soon spooky and friendly jack-o-lantern faces will begin to make their appearances. Each to decorate and light the night know as Halloween. Before gracing them with their faces read on for a few tips to make the most of this year’s pumpkin carving tradition.
Where to Start
In order to make your pumpkin last a little longer always start with a clean pumpkin. Clean the surface by taking a few paper towels and giving them a quick wipe down with a mild cleaner like Windex Multi Surface Cleaner or vinegar. Taking the time to clean your pumpkin will help remove dirt and germs from it’s surface. Eliminating as many germs as possible will prevent them from spreading during in the carving process. Preventing germs from spreading will help your pumpkin to live a little longer.
Top or Bottom
If your looking for a traditional pumpkin lid, it is best to start at the top. Make sure to use a knife or cutting utensil with a serrated edge. Cut at a forty five degree angle in a circular direction. When the circle is complete the top should pop of easily.
For a not so traditional approach try cutting a hole in the bottom of the pumpkin. Follow the same tips above, making sure to cut a larger enough hole to gut the pumpkin from. This will give your jack-o-lantern a seamless look and keep the top from caving in.
Mold and Dehydration
All carved pumpkins are subject to mold and dehydration. These are two reasons jack-o-lanterns lose their grins so quickly. To help keep a freshly carved pumpkin moist, cover all cut edges with petroleum jelly. Petroleum jelly will also help keep mold growth to a minimum. If your pumpkin is looking particularly sad on Halloween try submerging it in water for up to 8 hours. This may help revive it but is only a temporary fix. Remember most jack-o-lanterns only last a few days and at most up to a week. So don’t carve them too soon.
Lighting
There are many options to choose from when it comes to lighting the jack-o-lantern. Flame free lights have become a popular choice. These led lights provide a flameless light source that helps reduce fire hazards.These popular lights come in a few different varieties including tea lights and rainbow lights. No matter what you choose each provides the jack-o-lantern with it own special glow.
Traditional votive candles give the jack-o-lantern a vintage feeling. The flicker of the candle flame can breath life into a pumpkin. To keep the heat from building up in your pumpkin consider drilling a hole in the top to function like a chimney. This will help the heat escape and preserve your pumpkin a little while longer.
Carving a jack-o-lantern takes times and creativity. To make the most of all the energy you put into creating a one of a kind jack-o-lantern this Halloween , take time to make sure it lasts. Follow these tips and keep your pumpkin smiling for as long as possible.
International Book Week – Read On!

According to many Facebook posts, it’s International Book Week. I’m not sure how far reaching this is because I can’t find many other declarations to celebrate books this week that don’t link back to Facebook. The game their playing is kind of fun and so the Facebook posts got me thinking about books in general.
Reading is my escape. A bubble bath and a good book and I’m in heaven. I’ve always enjoyed reading. I love that words on paper can conjure up images in my mind that I’ve never seen, evoking emotions as my eyes scan over printed words and I internalize them and find meaning there. Reading has always been an experience I loved. Wanting to share this love with my children, we have been reading since they were very little.
Encouraging my kids (all boys) to read 20 minutes a day for school used to be a chore. As long as I read to them when they were little they loved it and I loved it too. As we’d sit down to read we’d snuggle together and indulge in a story. Then they started to grow up and reading became more of a chore. As it was assigned for homework and the task became an individual event, they became even more resistant. For a while I’m sure they classified reading as a waste of time. Suffering through it until the timer ran out and they could be on to greater adventures.
As they have grown and become older they have found things that interest them and in turn read about those things. They began to read series of books. Some of the adventures they used to run outside to seek were now happening in their heads. ( and they liked it!) Suddenly they were having conversations with other kids at school about books they were reading and the love of reading began to develop. Reading has now become a habit and a love of my children.
I guess the moral of my rambling is to all you the mothers out there with young children who find themselves struggling like I did is…. It get’s better. Put books in front of them and encourage them and they will find a place for reading in their lives too.
So to honor International Book Week this is the game being played. Turn to page 52 of the closest book. Read the 5th sentence on the page and enter it in the comments. Ready, go!
“He nodded his thanks and moved to the bow.”
The Tooth Fairy Now Pays $3.00 Per Tooth

According to a phone survey interviewing 2000 participants, conducted by Visa during July 13 – 17 2012, the average price paid per tooth during this tough economy has risen 15% from last year. Some kids were lucky enough to receive as much as $20 for a tooth this year! As the tooth fairy visits the pillows of children throughout the country she on average will leave $3.00 per tooth. That’s up $.40 from last year.
In order to help parents determine just how much a tooth is really worth, Visa has created a free app for the iPhone and iPad. There is also a tooth fairy calculator available at Visa’s Practical Money Skills website www.PracticalMoneySkills.com/ToothFairy to help parents determine a fair and competitive price for one of their child’s pearly whites.
When I turned to the Tooth Fairy Calculator for a recommendation, the results said I should leave my little ones $2.00 per tooth. It also informed me this would be the equivalent of me receiving $1.01 as a child in todays economy. In today’s world of the debit card, I’m lucky if this tooth fairy has $1.00 in her wallet when my children remind me as I’m tucking them into bed that their tooth has been placed under their pillow so that they too can cash in.
Call me old fashioned, traditional or cheap but a $1.00 bill seems a fair wage for waiting for a loose tooth to come out. What do you think? How much does the tooth fairy leave at your house?
Happy 40th Birthday Egg McMuffin – Tips for Making The Egg McMuffin At Home
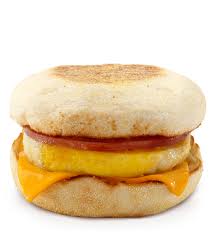
If you’ve ever had to grab breakfast on the run chances are you too may have indulged in McDonald’s Egg McMuffin. The Egg McMuffin made it’s debut in 1972 and it’s recipe has remained a staple in the McDonald’s breakfast line up ever since. This year McDonald’s celebrates 40 years of serving up one of America’s favorite breakfast sandwiches.
Although it may be easy to swing through the drive through to grab this tasty breakfast sandwich, it is just as easy to assemble in your very own kitchen.
You only need a few ingredients.
1 large egg
English muffin
1 slice Canadian bacon
1 slice American cheese
butter cooking spray
Directions:
You will also need an Egg Ring, or a tuna can with the top and bottom off.
Pre-heat an electric griddle to 275 degrees.
Toast your english muffin by laying both sides face down on the griddle and applying pressure with spatula. This takes 1 to 1½ minutes.(they should be medium brown)
Set aside.
Lay your egg ring/can on the pre-heated grill.
Spray with Pam to prevent sticking. Crack the egg and pour into ring on the grill. Poke the yolk with a sharp instrument so it flows.
Butter both toasted halves of the english muffin liberally with melted butter.
Put a slice of American cheese on the bottom half.
2 to 2½ minutes after you started cooking the egg, the whites should firm up, and the yolk should still be a bit”liquidy”. Add a small amount of water to the pan and cover for about 30 seconds. This will result in a partially fried/poached egg. (Just like the Egg McMuffin) Carefully remove the ring, leaving the egg on the griddle. You may have to”slice” around the edges if it sticks.
Lay one slice of Canadian bacon on the griddle. After about 30-45 seconds,”flip” the Canadian bacon, and remove the egg, placing it on the bottom half (cheesed half) of the english muffin.
Place the Canadian bacon on top of the cooked egg, and cover with the top of the toasted english muffin.
There you have it an Egg McMuffin in the comforts of your home!
Cookie Craving – Oatmeal Chocolate Chip Cookie Recipe
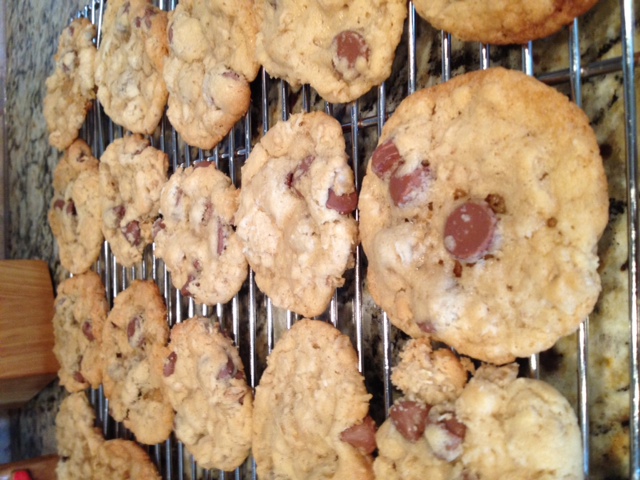
We love cookies at our house. Chocolate chip cookies and milk is just one of those comfort treats that can’t be beat. Most of the time I fall back to the tried and true Nestle Toll House Cookie Recipe when I go to make cookies. But I came across this recipe and have made a couple tweaks to it and I think it has become my families new favorite cookie recipe.
Oatmeal Chocolate Chip Cookies
1/2 C. Butter
1/2 C. Shortening
1 C. Sugar
1 C. Brown Sugar
2 Eggs
2 tsp Vanilla
1 tsp Salt
1/2 tsp Baking Powder
2 tsp Baking Soda
2 1/4 C. Flour
2 C. Oats
1 package Semi-Sweet Morsels
Cream together butter, shortening and sugars. Add eggs and vanilla and mix well. Add salt, soda, powder, flour and mix just until combined. Add oats and morsels and mix with a wooden spoon. Bake at 350 degrees for 10-12 minutes.
These are so good you can’t eat just one. I suggest sharing immediately to avoid over consumption. Enjoy.
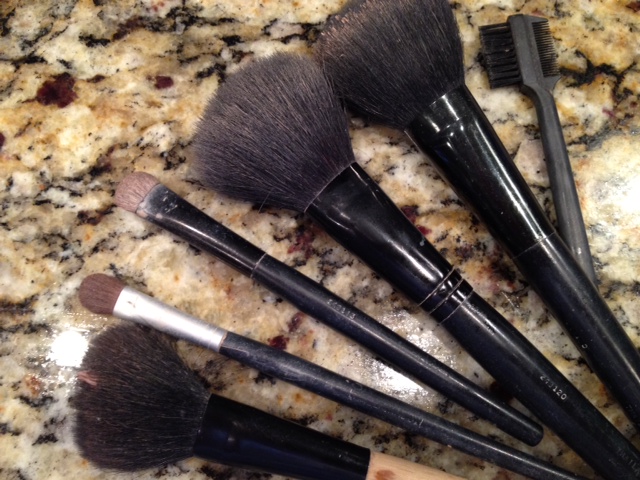
DIY Make Up Brush Cleaner
 Before
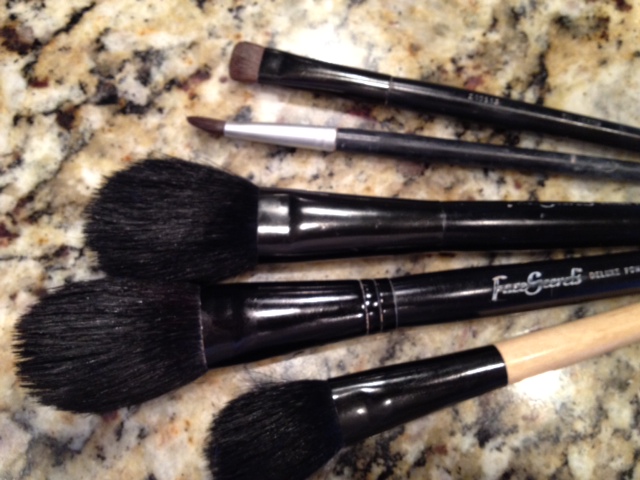 After
After
I hate when my make up brushes are dirty and after a while make up is bound to build up in application brushes. This can effect how well makeup is applied not the mention the extra bonus of the build up of bacteria in the brush it’s self. (Yuck!) I can’t stand dirty makeup brushes and have purchased many different cleaners for my brushes in the past. You can find a variety of makeup brush cleaners online at Amazon if your interested in a professional cleaning product. These usually range from about $4.00 up to $20.00. I don’t really had any complaints about the products I’ve used other than they all leave a chemical smell lingering in the bristles or hairs of the brush. But if your on a budget or are out of the professional cleaner, try this inexpensive alternative.
If you need to clean your make up brushes and don’t have a professional cleaner on hand I’ve found this DIY recipe to work just as well. All you need is some liquid dish soap, olive oil, a small bowl and some water.
Place a tablespoon of the liquid dish soap in the bottom of a bowl. Add a teaspoon of olive oil to the bowl. Simply swirl the brush in the mixture and rinse with water. Set brushes where they can air dry.
The result, clean brushes that have the additional benefit of being conditioned by the olive oil. This is safe to use on synthetic and real hair brushes as well.
FYI: Be sure to give your brushes enough time to dry before using them to apply your make up. Wet brushes will lead to clumpy makeup.
National Donut Day
 Yes, it is the first Friday in June and thus it is National Donut Day. A day declared to indulge in those sweet rings we know as donuts. The celebration of Donut Day started in Chicago back in 1938 by the Salvation Army. It was a day set aside to honor all of the ladies who served donuts to the U.S. armed forces during World War I. These ladies were known as the Salvation Army Lassies. This tradition also continued during World War II. So in keeping with tradition each year the first Friday in June is celebrated as the day of the donut.
Freebies Today:
Krispy Kreme is offering a free donut to all of their customers
Participating Dunkin’ Donuts locations are offering a free donut with the purchase of a beverage.
Enjoy the traditional version of the donut with the Salvation Army’s original recipe.
SALVATION ARMY LASSIES’ DOUGHNUT RECIPE
Yield: 4 doz. doughnuts
5 C flour
2 C sugar
5 tsp. baking powder
1 ‘saltspoon’ salt
2 eggs
1 3/4 C milk
1 Tub lard
DIRECTIONS
Combine all ingredients (except for lard) to make dough.
Thoroughly knead dough, roll smooth, and cut into rings that are less than 1/4 inch thick. (When finding items to cut out doughnut circles, be creative! Salvation Army doughnut girls used whatever they could find, from baking powder cans to coffee percolator tubes.)
Drop the rings into the lard, making sure the fat is hot enough to brown the doughnuts gradually. Turn the doughnuts slowly several times.
When browned, remove doughnuts and allow excess fat to drip off.
Dust with powdered sugar. Let cool and enjoy.
On Top Of Spaghetti – Meatball Recipe
 School is ending this week for us and I would like to think that our life is about to slow down. But the truth is it’s just going to get busier. We may be minus the homework but summer means lots of activity and little rest around our house. So still my quest to stay in my budget and not eat out will still have to be conquered. Baseball, tee ball, tennis and trips to the lake, park and splash pad are just a few of the things that will send my hungry crew into a million different directions.
As I have said before I love meals that are quick and easy. They rank even higher on my list if I can prepare them ahead of time. This meatball recipe is one of those quick and easy meals. I can prepare it in the morning and toss it in the crock pot for later that night. I often make a double batch and quick freeze part of them to have for another night.
Meatball Recipe:
You will need,
1 pound extra lean ground beef
1/2 teaspoon sea salt
1 small onion, diced
1/2 teaspoon garlic salt
1 1/2 teaspoons Italian seasoning
3/4 teaspoon dried oregano
3/4 teaspoon crushed red pepper flakes
1 dash hot pepper sauce (such as Frank’s RedHot®), or to taste
1 1/2 tablespoons Worcestershire sauce
1/3 cup skim milk
1/4 cup grated Parmesan cheese
1/2 cup seasoned bread crumbs
Directions:
Mix then ingredients together in a larger bowl. Make sure to work all the flavors together until well blended. I find it works best to mix it with my hands.
Shape small balls about 1 to 1 1/2 in round.
Bake in a preheated oven at 400 degrees for 20 minutes.
This recipe works well with any type of sauce that you desire. We love to add them to spaghetti sauce or BBQ sauce.
DIY Fire Starters
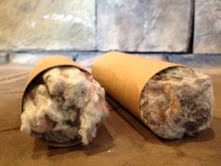
The campfire is one of my families favorite parts of the camping trip. They love smores and setting fire to sugary marshmallows until they resemble hot glowing lumps of coal. Roasting starburst is also among one of their most recent passions. Getting a campfire going can be frustrating if your not an Eagle Scout or expert in fire building. So why not have a little help?
Making your own fire starter is as simple as changing a load of laundry. To make your own fire starter you only need two things.
Dryer lint & Empty toilet paper rolls
Simply gather the lint and stuff it inside the card board tubes. Place these under your wood with you kindling to give your fire a little starter fuel. Light both end with a match for best results.