
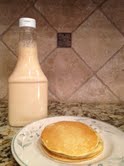
Pancakes In A Bottle
Memorial Day seems to be the unofficial kick off to the summer camping season. Families seem to leave in droves to set up temporary residency in the nearby wilderness. Filling their weekend with hiking, fishing, campfires and smores.
Family camping as popular as it is requires a bit of planning to pull off a successful trip. Packing for a family campout is no small feat. The food, supplies and making sure you’ve packed all the children is quite a bit of work in itself.
What to do for breakfast is always a question that comes up. Planning the menu and making sure that there is enough food to feed four growing and energetic boys is always a concern. To keep them going through the weekend we try to keep the menus filling with out making them extravagant.
Keeping things simple and packing as few items as necessary makes me a happy momma. Pancakes are always on the menu but to save a bit of time and lessen the mess I have to clean up while staying in the great out doors, I’ll share with you one of my favorite ways to prepare and store pancake batter.
Tip:
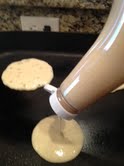
SImply premix your batter and store it in a cleaned plastic ketchup bottle.
This is a mess free way to store pancake batter for a couple of days. It makes it easy to dispense the batter and save any of the left overs. Pancake batter will keep this way for a couple of days before it has to be discarded. It eliminates the need to haul the entire kitchen with you and you can toss the bottle into the garbage when your through.
My Hop Pancakes:
(this is one of my favorite pancake recipes)
Ingredients:
1 1/4 cups buttermilk
1/4 cup vegetable oil
1/2 teaspoon vanilla extract
1/4 cup white sugar
1 1/4 cups all-purpose flour
1 1/2 teaspoons baking powder
1 teaspoon baking soda
1 dash salt
1 egg
1 teaspoon lemon juice
1 tablespoon butter, or as needed
Directions:
Mix the buttermilk, vegetable oil, and vanilla extract in a bowl; stir in the sugar. Whisk in the flour, baking powder, baking soda, and salt, combining the batter with just a few strokes to moisten. Leave the lumps.
In a separate bowl, whisk the egg and lemon juice together; gently stir into the batter. Refrigerate the batter for at least 30 minutes, up to 1 hour.
Heat a large skillet over medium heat and grease with the butter.
Herbed Butter Recipe – Add A Special Touch To Your Meals
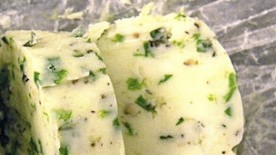
Have you ever been to a nicer restaurant and ordered a steak that comes out with a lovely dab of melting herbed butter on top? I love the look and taste of herbed butter. Not only is it beautiful in presentation, it is delicious and easy to make. It feels fancy and what girl doesn’t love to dress things up a bit? For me that even drizzles down to the food I eat. Try dressing your next meal up with herbed butter. It is a great addition to meats, pastas, breads and vegetables.
Memorial Day like other most other summer holidays is often celebrated with friends and families enjoying campouts or BBQs. This week I thought I’d whip up a batch of herbed butter to serve with the steaks my hubby has become so addicted to cooking outdoors on the BBQ grill. If your having a dinner party it just adds that extra special touch that makes people think “mmmm.”
Herbed Butter
Ingredients:
4 oz. Butter (1 stick), softened
1/4 Cup Herbs (your choice), finely chopped
1 Teaspoon Lemon Juice
Sea Salt, to taste
Directions:
1. Start by choosing a combination of your favorite herbs. This is where you get to be creative. Think about all your options and mix it up for new flavors each time. Or pick your favorite single herb to add flavor to the butter.
Herbs Ideas:
Tarragon, Chives, Parsley, Dill, Rosemary, Thyme, Sage
2. Mesh the butter and herbs together with a fork. Add the lemon juice, then salt to your taste.
3. On a piece of plastic wrap and shape the butter into a one inch round log. Finish wrapping the log in the plastic wrap and place in the fridge.
4. This will keep in the fridge for about a week or for a month in the freezer.
5. To use take out of the fridge or freezer and slice a piece off to use. Place it directly onto hot food just before serving.
Simple Homemade Lemonade Recipe:
 Lemonade is one of my favorite summer beverages. Growing up in Southern California I remember walking through lemon groves on my grandmothers property. The beautiful bright yellow fruit hanging in the trees seemed to call to us and before I knew it we were picking lemons and heading back to the kitchen.
Grandma loved to make fresh lemonade. I vividly remember standing in the kitchen with the old fashioned citrus juicer trying with all my might to squeeze every last drop of juice from the lemon half with in. She added the lemon juice, sugar and water to the large glass pitcher and gave it a stir. As she gathered the glasses and ice she would send us off to invite the old widow next door or the kids down the street to come and sip lemonade with us by the pool or on the porch. This was a summer ritual we shared.
As the school days have become numbered and I am trying to think of ways to spend the summer days with my kids, making lemonade has been added to my list. Although the lemons from the produce section will have to do, I hope they too will have memories of sipping summer lemonade and sharing it with friends.
Simple Homemade Lemonade Recipe:
Prep time: 10 minutes
INGREDIENTS
1 cup sugar (can reduce to 3/4 cup)
1 cup water (for the simple syrup)
1 cup lemon juice about 4 to 6 lemons
3 to 4 cups cold water (to dilute)
DIRECTIONS:
1 Make simple syrup by heating the sugar and water in a small saucepan just until the sugar is dissolved completely.
2 While the sugar is dissolving, use a juicer to extract the juice from 4 to 6 lemons, enough for one cup of juice.
3 Add the juice and the sugar water to a pitcher. Add 3 to 4 cups of cold water, more or less to the desired strength. Refrigerate 30 to 40 minutes. If the lemonade is a little sweet for your taste, add a little more straight lemon juice to it.
Serve with ice, sliced lemons.
Yield: Serves 6.
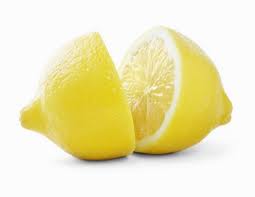
Lemons – Little Facts
 Summer time brings an abundance of lemonade stands on neighborhood street corners run by ambitious children looking to earn a few dollars. The site of children waving poster board, jumping around trying to get neighbors to drop a few quarters always brings a smile to my face as personal childhood memories come to mind.
When you think of lemons you may think of warmer climates here in the United States like California, Arizona or Florida. But did you know that lemons originated in China? Lemonade was a favorite drink of the Chinese Emperors before it became such a popular summer time beverage. Lemons were brought to the United States by Catholic missionaries who planted them in California and Arizona. Now the United States produces about one third of the worlds lemons.
There are many used for lemons. They are used to flavor food, to garnish plates and for a variety of household purposes. Here are a few tips on how to get the most out of your lemons.
How to Store Lemons:
Lemons will keep at room temperature for about two weeks. Store them in a plastic bag in the refrigerator for up to six weeks. Or to get the most out of your produce dollar you can freeze them.
Freeze lemons by washing and drying them well. Cut them into quarters and place on a cookie sheet. set in the freezer until frozen. Remove them from the cookie sheet and store in a freezer bag taking them out as needed. Do not freeze lemons whole as they will turn mushy. You can also freeze the juice in ice cube trays if you prefer not to save the whole lemon.
Additional uses for lemons:
Here are a few ideas for using lemons.
You can add a twist of lemon to water in ice cube trays before freezing to add a little extra zip to beverages.
Combine lemon and salt to treat rust or clean copper.
If your having trouble getting whipping cream to stiffen add a few drops of lemon juice.
Remove funky odors like fish or onions from containers or the fridge by rubbing them down with a fresh lemon .
Tip:
To get the most lemon juice out of a fresh lemon, place it in the microwave for about 15 seconds. Then roll it firmly on the counter before cutting it open.
Free Summer Activities – Check Your Community Calendar

The count down to summer has begun. My boys are diligently marking the days on the calendar, counting them down until they have the freedom summer will bring them. (Or so they think. 😉 ) Summer is drawing near and I find my self trying to plan activities to keep us busy and out of the house. Having made no real official summer vacation plans I’ve started to look for local activities to fill some of our summer break.
Soccer season has caused us to travel around the community. As we have been out and about lately I keep hearing and seeing advertisements for a variety of community events that we can explore and use to fill our lazy summer days. All of these flyers and posters prompted me to check out my local community calendar online. To my surprise almost every day was dotted with several community events. Seeing the event line up on our local community calendar encouraged me to check into further details. Each day on the community calendar is filled with a variety of events to participate in and even better, many of them are free.
It really is amazing the various free events in the community that are available to anyone that wants to participate. All summer long and almost everyday I can see events that would be entertaining and fun to participate in. Photography workshops with instructions on how to photograph wild flowers, canoeing in the wetlands, college sporting events, open mic night at the local art house and a variety musical performances are just a few of the activities that are scheduled in our community.
With the wide variety of events from the gardeners market to the opera house there is something for everyone in the community on the community calendar. So if your wondering what to do this summer, check your local community calendar. It’s best to start planning early, many events require registration even if they are free.
Cinco de Mayo – Just a Few Facts

Cinco de Mayo is the most popular Mexican festival celebrated in the United States. It’s a great reason to gather your friends together and indulge in a few of the wonderful things the Mexican culture has to offer. If your joining in and celebrating Cinco de Mayo you might find a few of these facts interesting.
Cinco de Mayo, or the 5th of May is commonly thought to be the day Mexico celebrates it independence. However the countries Independence Day is actually September 16th. Cinco de Mayo celebrates the day that a small group of Mexican soldiers fought off a French army led by Napoleon III , with twice as many men. This unlikely victory rallied the people of Mexico together and the day is now celebrated as a day of national pride.
If your looking for the best Cinco de Mayo Party today, the place to be is Los Angels, CA. Over 600,000 people gather together at the Festival de Fiesta Broadway to celebrate in the streets with food and music. Large celebrations are also held in Denver, CO and St. Paul, MN.
Happy Cinco de Mayo!
Frugal Cinco de Mayo Party Tips

Gathering friends together to celebrate Cinco de Mayo is a great reason to party and can be fun. It can also be an easy way to blow your budget as well. If your tempted to throw a party for Cinco de Mayo but are worried about spending a fortune don’t let that hold you back. Here are a few tips for throwing a great fiesta on the cheap.
Tip # 1
Shop the Dollar Stores
Dollar stores are a great place to buy the perfect decorations inexpensively. Bright colored streamers are always in stock and are a quick fix if your lacking in decorations. It’s also a great place to pick up party favors. Often you can find similar items that they carry at the party supply stores for a fraction of the cost.
Tip #2
Buy In Bulk
Shopping at warehouse club store like Sam’s Club or Costco can be a great place to pick up the items you will need in large quantities. Paper goods like napkins, cups and plates can be expensive. Buying in bulk is one way to pinch your pennies and the best way to go if your going to have a large gathering.
Tip #3
Make it a Potluck
Food is always one of the most expensive items at any party. Th cost can add up quickly. Invite your guest to bring their favorite mexican dish to share. This is a easy way to pull a party together quickly, enjoy everyones’s dishes and lessen the expense of food.
Tip #4
Create Your Own Play List
Forget hiring a D.J. with today’s technology you can be your own. Create a playlist on your computer or Ipod. After you’ve made your own mix burn it to a CD or set up on iHome. Let your music play for the perfect background party music.
Use these tips to pull together a fun and frugal Cinco de Mayo!
Cinnamon Lunch – Cinnamon Raisin Bread Recipe
 One the way home from school yesterday with my 6 year old we were discussing his day. He began telling me about his friends and all the exciting things that happened in his kindergarten class that day. Including how he feel asleep during math and drew a great big line down his paper when his hand slipped. It’s interesting to listen to him relate his feelings of school and friends in our one on one conversations. These times in the car result in some of the best conversations I have with my kids. When I have them all to myself in the car I feel like they are willing to share things they wouldn’t speak up and share at our crowded dinner table. I love how if I will listen to them just for a minute, during this one on one time, they start to talk about almost everything they could possibly be thinking.
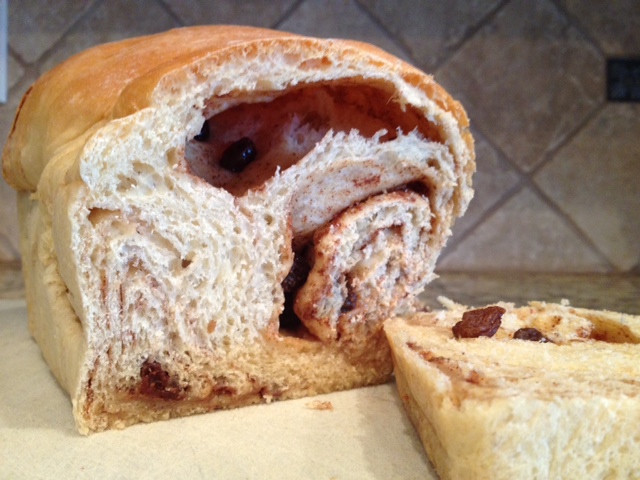
When I asked my talkative six year old what we should have for lunch, he paused for a minute as if in deep thought and then replied, “ We should have a cinnamon lunch!” As he grinned at me from ear to ear. I started to think of all the things we could make with cinnamon. By the time we pulled into our driveway we had decided that we would make cinnamon bread.
As I pulled out the ingredients, mixed the bread and baked it he was actively by my side. This a simple everyday moment but one that has changed the way I think about cinnamon. As I pulled the bread out of the oven I thought “mmmm, cinnamon lunch!”
Cinnamon Raisin Bread Recipe
1 1/2 cups milk
1 cup warm water
2 packages active dry yeast
3 eggs
1/2 cup white sugar
1 teaspoon salt
1/2 cup margarine, softened
1 cup raisins
8 cups all-purpose flour
2 tablespoons milk
3/4 cup white sugar
2 tablespoons ground cinnamon
2 tablespoons butter, melted
1. Warm the milk in a small saucepan or microwave until it bubbles, then remove from heat and let cool.
2. Dissolve yeast in warm water, and set aside until yeast is frothy. Mix in eggs, sugar, butter or margarine, salt, and raisins. Stir in cooled milk. Add the flour gradually to make a stiff dough.
3. Knead dough on a lightly floured surface for a few minutes. Place in a large, greased, mixing bowl, and turn to grease the surface of the dough. Cover with a damp cloth. Allow to rise until doubled.
4. Roll out on a lightly floured surface into a large rectangle 1/2 inch thick. Moisten dough with 2 tablespoons milk. Mix together 3/4 cup sugar and 2 tablespoons cinnamon, and sprinkle mixture on top of the moistened dough. Roll up tightly; the roll should be about 3 inches in diameter. Cut into thirds, and tuck under ends.
5. Place loaves into well greased 9 x 5 inch pans. Lightly grease tops of loaves. Let rise again for 1 hour.
6.Bake at 350 degrees F for 45 minutes, or until loaves are lightly browned and sound hollow when knocked. Remove loaves from pans, and brush with melted butter or margarine. Let cool before slicing.
Tis the Season to Yard Sale
 Spring cleaning has prompted me to go through my whole house scrubbing, dusting and organizing everything in sight. Each time I leave a room I come out with more things I’ve collected that we don’t really use any more. These items unfortunately get added to the boxes of things I have been piling in my garage that really need to be hauled off so that the clutter doesn’t just continue to grow in the garage.
As I was driving around this weekend I notice that yard sale season has begun. Telephone poles on busy street corners are beginning to play host to the brightly colored signs of yard, estate and moving sales all over town. My husband hates when I even mention having a yard sale but the last one we had was pretty successful, so I am always tempted to try it again.
I enjoy going to yard sales, it’s interesting to look at the items people have collect over the years and they are a great place to find items to up cycle. This is a growing trend especially with furniture and a way to express your creativity. Yard sale exploring is really a fun and free way to spend the weekend.
You’ve probably heard the saying, “One man’s junk is another man’s treasure.” If spring cleaning has left you with a ever growing collection of “junk,” or your moving and need to unload a few items, why not spend a weekend hosting a yard sale of your own. Let the treasure seekers come see what you have and you might be surprised with the results.
Follow these tips for a successful yard sale.
1. Know the purpose of your yard sale. Do you just want to get rid of stuff or do you need to make some money on a few quality items? Price your items accordingly.
2. Be willing to negotiate on price.
3. Coordinate with neighbors and host a group yard sale to draw more buyers.
4. Advertise – use the local paper and free local web pages that advertise community events. Make sure your signs are readable and arrows are pointing the right direction.
5. Have change on hand with plenty of one dollar bills.
6. Keep your cash with you at all times. Some thieves look for these types of opportunities to pick up a few extra dollars of their own.
7. Have a plan on what to do with the items you have left over. Sometimes the Salvation Army and other places like them will come and pick up items if you plan ahead.
Guilt Free Double Chocolate Muffins

I love baking and my kids love to eat what ever comes out of the oven. So once in a while, when we are trying to be careful about what we eat, I try to sneak in a healthy treat. I will admit this is not always a successful venture. Their taste buds can sense the lack of sugar in a nano second and they quickly spit out the baked sugarless creation and disappear from sight. Leaving me with a countertop of healthy baked goods now declared “no man’s land.” A desolate space no one will touch until all signs of the recent sugar free intruder have disappeared. Once the word has spread, certain sugar free baked goods could sit there for days and no one would be tempted to try one again. I’m pretty sure this is how they protest my efforts to guide us towards a healthier way of eating.
When I found a recipe for a healthier version of a double chocolate muffins with chocolate chips, I was a little leery of how it would be received. To my surprise this double chocolate muffin was quickly gobbled down by the entire clan. My little boys were even calling them cupcakes. They even asked me to make them again! So I thought I pass this recipe along to you.
Ingredients:
1 3/4 c oats
3 egg whites
3/4 cup unsweetened cocoa
1/2 cup unsweetened applesauce
1 tsp. vanilla extract
1/2 cup plain Greek yogurt (or regular plain low fat yogurt)
1/2 tsp cream of tartar (or 1-1/2 Tbsp. vinegar)
1-1/2 tsp. baking powder
1-1/2 tsp. baking soda
1/4 tsp. salt
1 cup hot water
1 cup sugar substitute (like Splenda granular) OR 1/4 cup + 2 tbs stevia
1/2 cup semi-sweet chocolate chips (or switch it up with any kind of chip you’d like.)
Preheat the oven to 350 degrees.
Line a muffin pan with foil or paper liners.
In a blender combined all the ingredients until oats are smooth.
Place the mixture in a bowl and gently fold in half of the chocolate chips.
Divide into prepared muffin tins. (batter will be loose)
Place muffins in the oven for 10 mins and then pull them out of the oven.
Top with remaining chocolate chips and place back in the oven for another 10 minutes.
Test with a toothpick and remove when the toothpick comes out clean.
National Pretzel Day

If a soft baked pretzel is one of your favorite treats or if your just a twisted deal finder, join Pretzel Maker in celebrating National Pretzel Day. In honor of National Pretzel Day, Pretzel Maker is offering a free salted or unsalted pretzel to any of it’s customers who sing dance or just say “It’s National Pretzel Day!” So go get your groove on and enjoy a FREE pretzel. 🙂
* Valid at participating locations only. Limit 1 per customer.
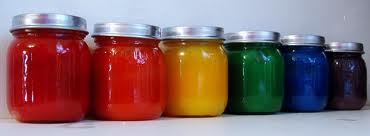
Paint Touch Ups – Baby Food Jars Make It Easy
It’s been a long winter and my four rowdy boys have played hard all winter long. In the process they have been a tad bit hard on our play room to say the least. They are creative, active and busy kids. They have turned the play room space into a sports arena and war zone multiple times this winter with Nerf darts, swords and basketballs leaving their marks on the walls. As we have been dejunking and spring cleaning several dents, scrapes, and exposed nail heads have come to my attention.
So another item is now added to my honey do list. Touch up the paint! This used to be a a big chore. We’d have to pull out the large 5 gallon buckets of paint and try to mix them after they have been sitting for a while. Then I would take a small amount and usually in a paper bowl and walk around the house to touch up the small areas that needed paint.
Then a friend gave me this great tip to easily store touch up paint. Use baby food jars.
Baby food jars can easily be repurposed into a paint container. This has been a really useful tip for me. I store small amounts of paint in baby food jars and keep them in my wash room cabinets so I can pull them out quickly when they are needed. They are easy to shake up to make sure the paint is well mixed. By using baby food jars you can store and access multiple paint colors for the various colors in your home.
This time saving tip has saved me over and over again. Now touching up the walls isn’t such an overwhelming chore. Paint stored in baby food jars keeps my walls looking like new.