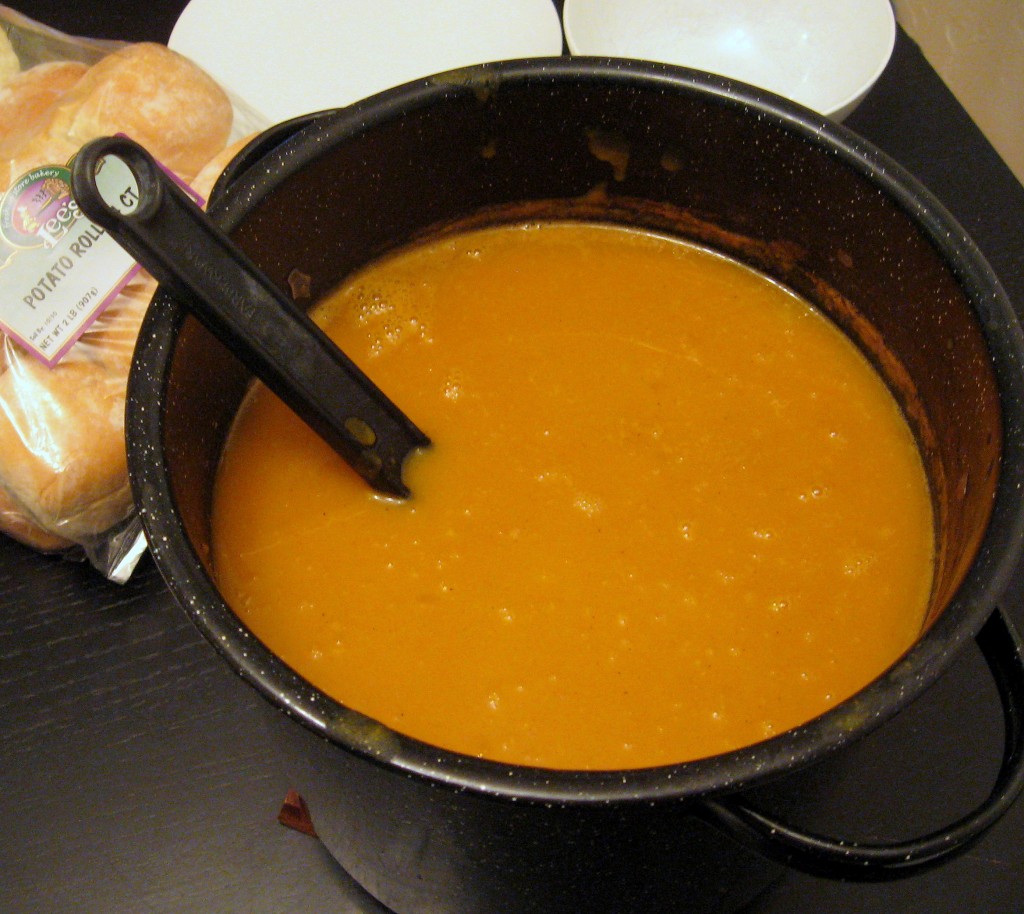
Spiced Apple and Butternut Squash Soup
When I get the packet of coupons and recipes from my local grocery store, I’ll admit I usually grab out the coupons and throw the rest away without even a glance. Last week I got a recipe that caught my eye, though, and I decided to give it a try. It was easy and delicious! My husband and I are big squash fans, but even my kids liked this one.
SPICED APPLE AND BUTTERNUT SQUASH SOUP
1/2 tsp ground Allspice
Salt and Pepper
Melt the butter in a large pot over medium heat. Add the diced onions and apples, and cook until tender, about 10 minutes. Stir in the spices, cook for 1 minute, and then add the squash and chicken stock. Bring to a boil; reduce heat and simmer, uncovered, until the squash is tender, about 20-30 minutes.
Puree and serve. Add additional stock if necessary, to desired thickness. Season with salt and pepper. Refrigerate leftovers.
My thoughts:
- This was a pretty easy recipe, but be sure to chop all of the ingredients before you start. I didn’t do this, thinking I could just do it as I went along. Really, save yourself the time and trouble and just cut everything before you even turn on the stove.
- This makes A LOT of soup. One of the squash that I bought was quite huge, so I only used 3 and it made a ton. If I make it again just for my family of 5, I would half the recipe.
- It was really good the first time, but I kept thinking maybe it was missing something. The next day when I ate it for leftovers, I heated it up really hot, then poured in some canned milk to cool it down – perfection! Next time I make it, I will add some canned milk or half and half to the pot before serving.
- If you don’t have an immersion blender, you will have to puree this in batches in a blender. If you have an immersion blender (and really? you should!) then just puree it right in the pot.
YUM!
Making a Polymer Bouncing Ball
 I saw “recipes” all over Pinterest last summer for making your own bouncing ball. Since I have a daughter who is OBSESSED with them, I thought it would be a fun activity, and even went so far as to buy the ingredients – which then sat on my counter until now. I never really got around to reading the instructions and assumed that it would be complicated. Finally, I got tired of the stuff being in my way and made a few of them this afternoon.
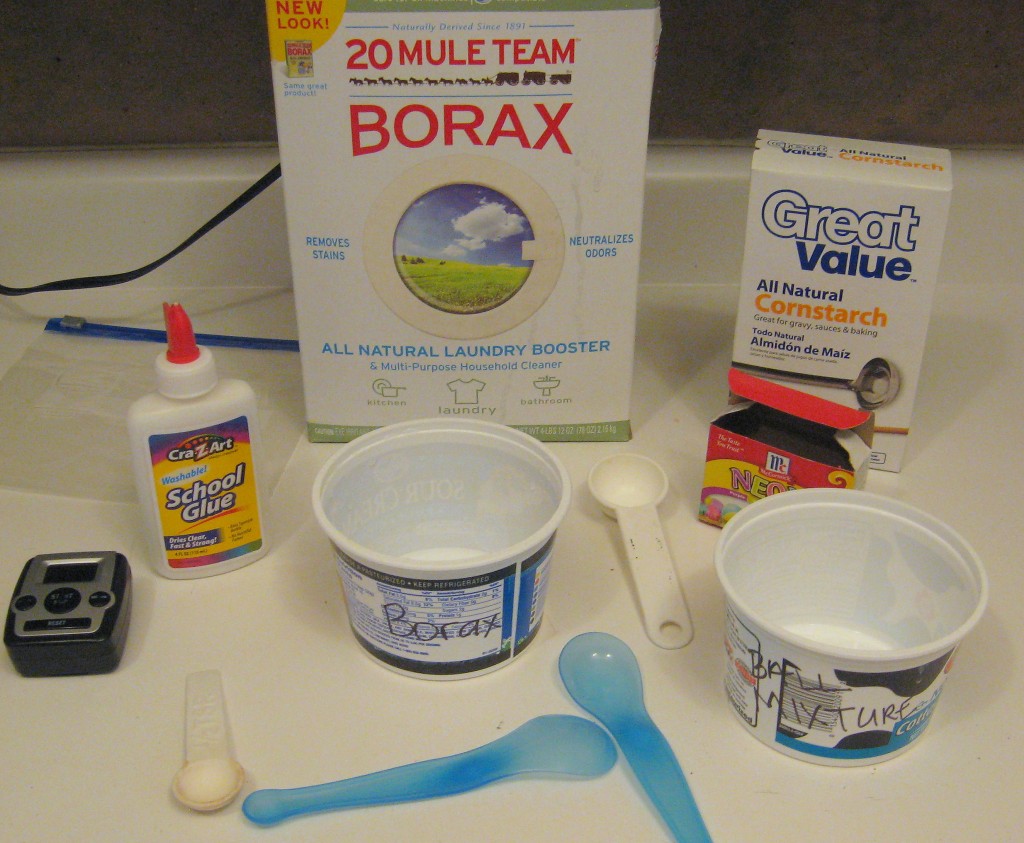
I used the recipe on this site:
https://chemistry.about.com/od/demonstrationsexperiments/ss/bounceball.htm
Here is what we thought:
- It was certainly NOT complicated. It was super easy and only took a few minutes to make. It probably took longer to read through the recipe than it did to make it.
- It also isn’t super messy. If you are doing it with very small children, you may want to put down newspaper or an old towel, but really, I did it right on my counter top using old butter tubs and plastic spoons. Once I threw those away, there was no other mess.
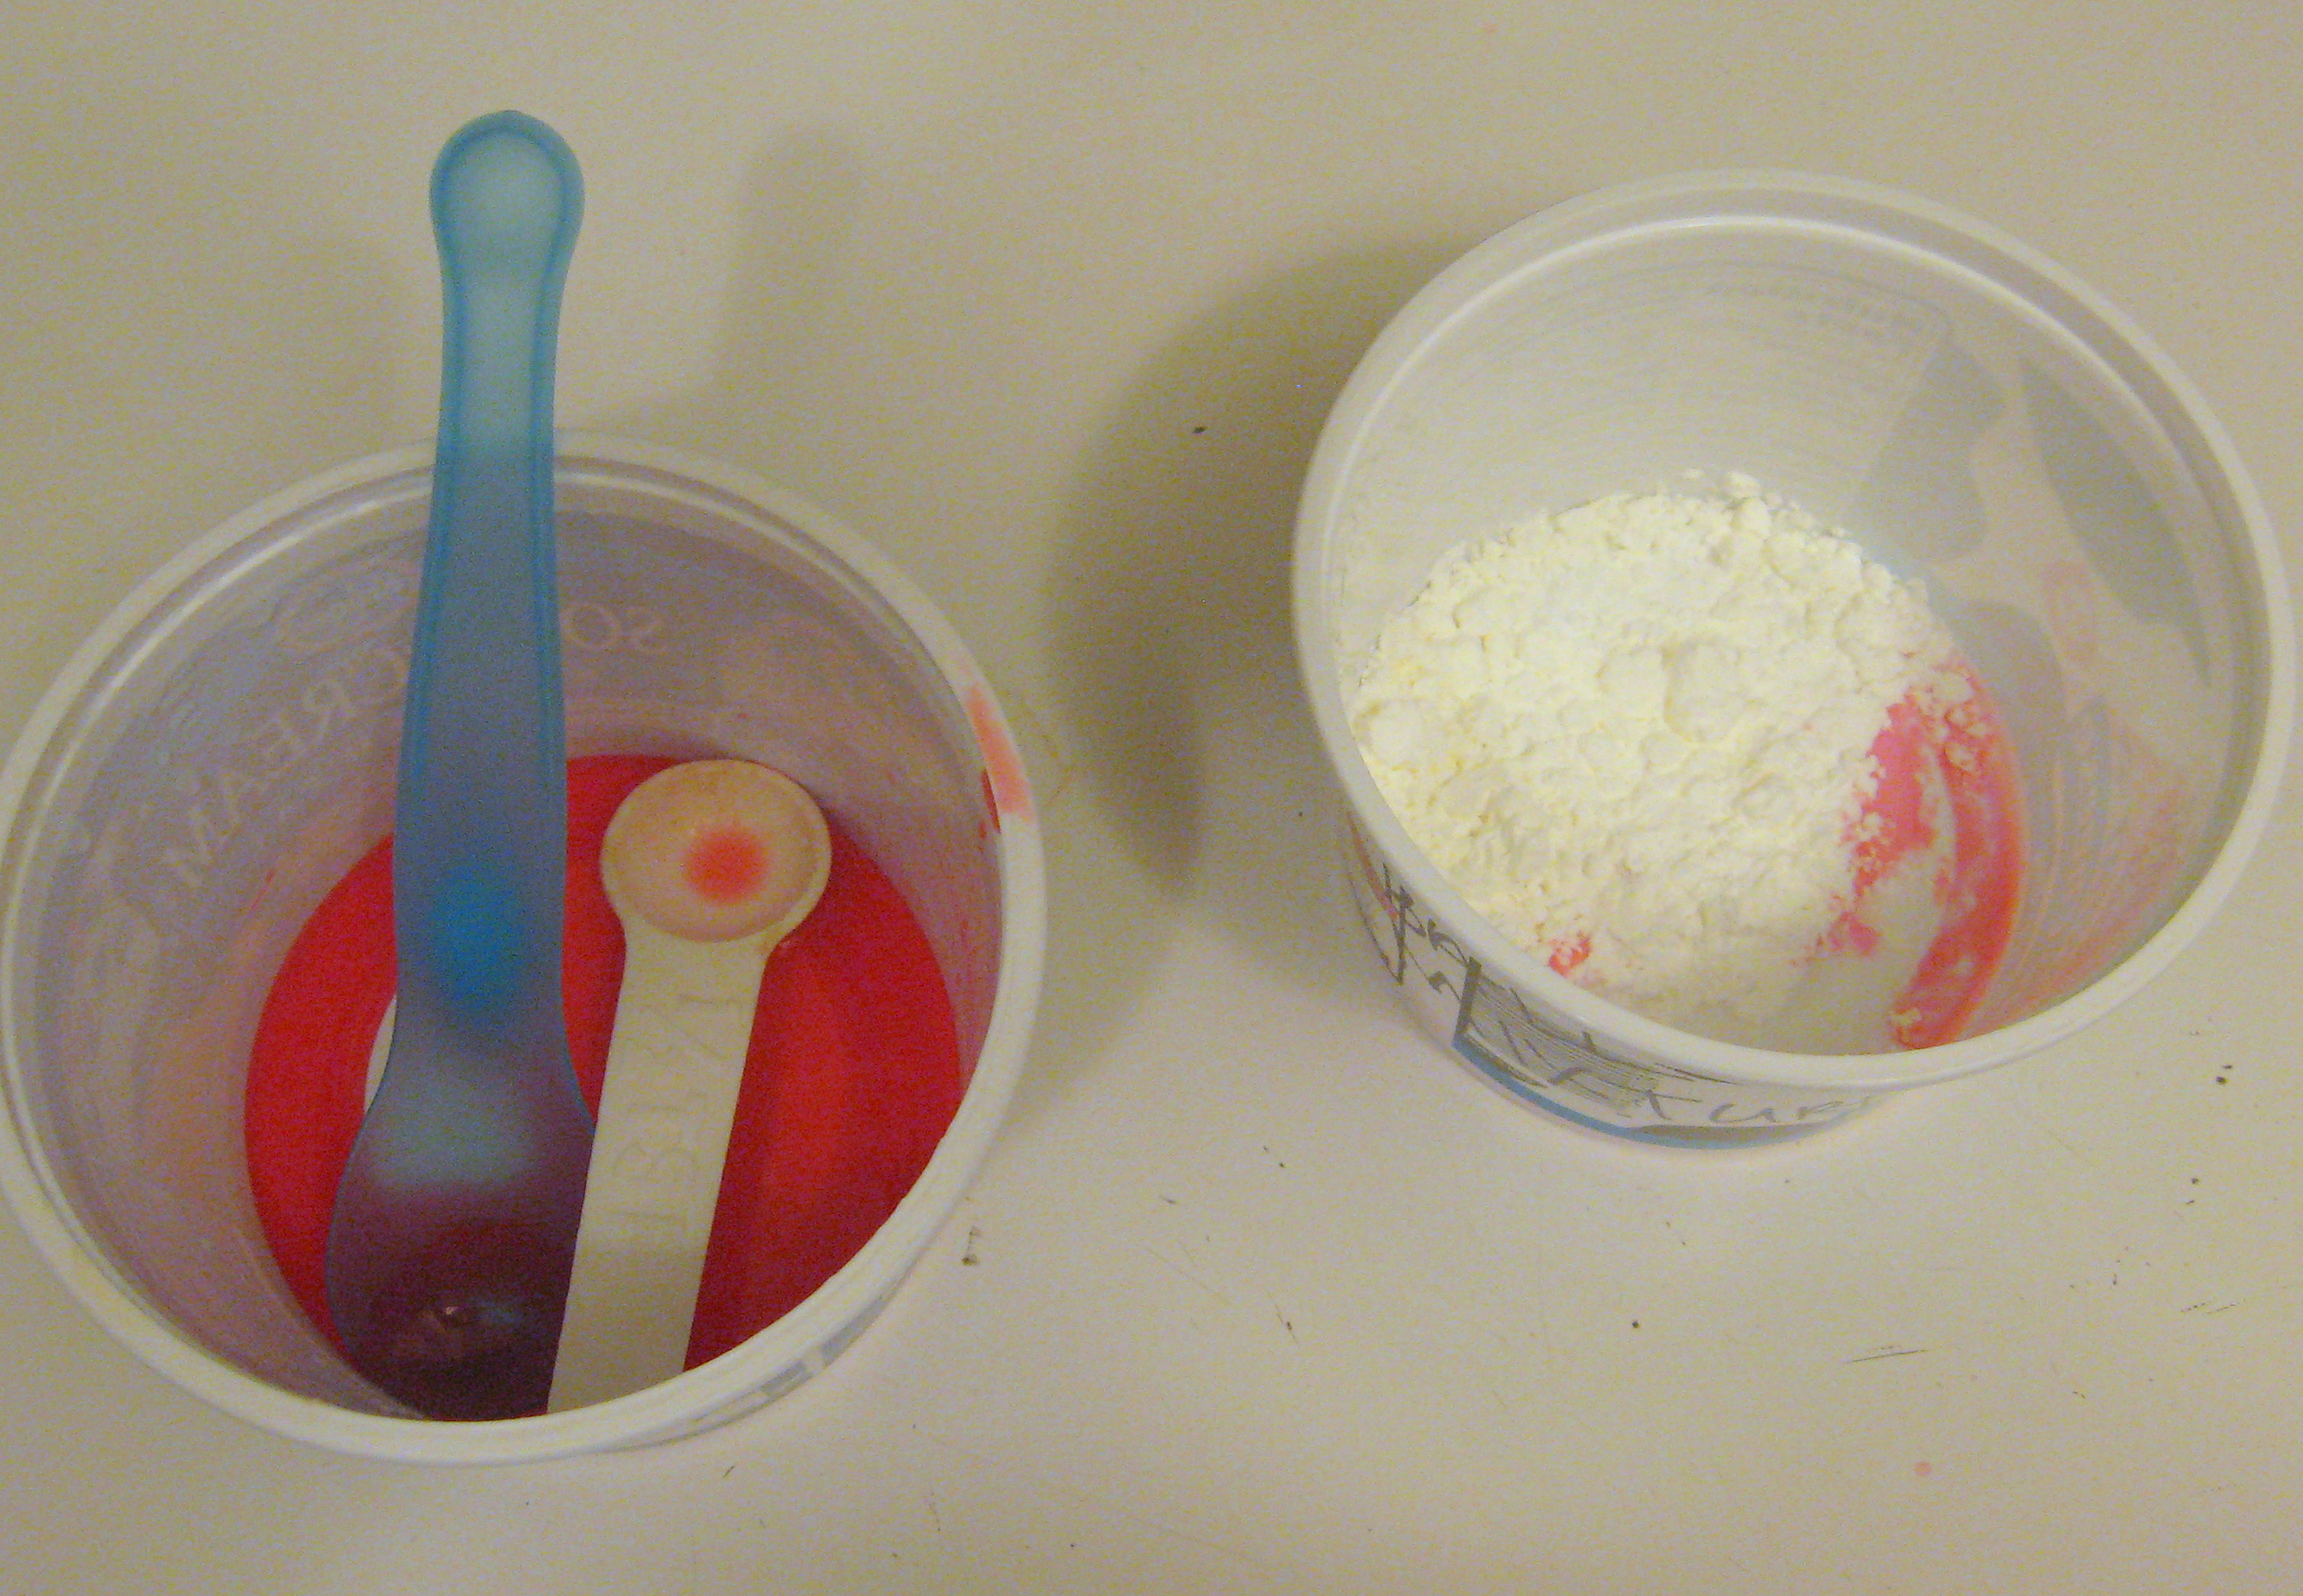
- I used white glue, but if I were to make this again, I would definitely use glitter glue or clear glue; I think it would look much cooler
- Our balls didn’t really bounce. They are super soft – basically like slightly more solid Gak. We all thought it was fun to play with it – like you would play dough or silly putty – but they definitely didn’t come out like a bouncing ball.

- The website explains the science behind how it works, but it is more on a level for middle school students, not little ones. My high schoolers understood it, but I didn’t!! so if you’re looking for a science lesson and – like me – haven’t taken chemistry since the 80’s, you may need to google for a simpler explanation. We did change up the ingredients on the second ball as per their suggestion (we added more cornstarch) but thought it was only barely different from the first one.
Final analysis? I think you should give it a try! It is easy and fast, and takes ingredients that you likely already have sitting around the house. It is fun to play with (it would make a great stress ball). If I had had more time, I think I would have gone ahead and made gak as well, so we could have talked about the differences (here’s a good gak recipe if you don’t know what I’m talking about: https://lilluna.com/homemade-gak-recipe/).
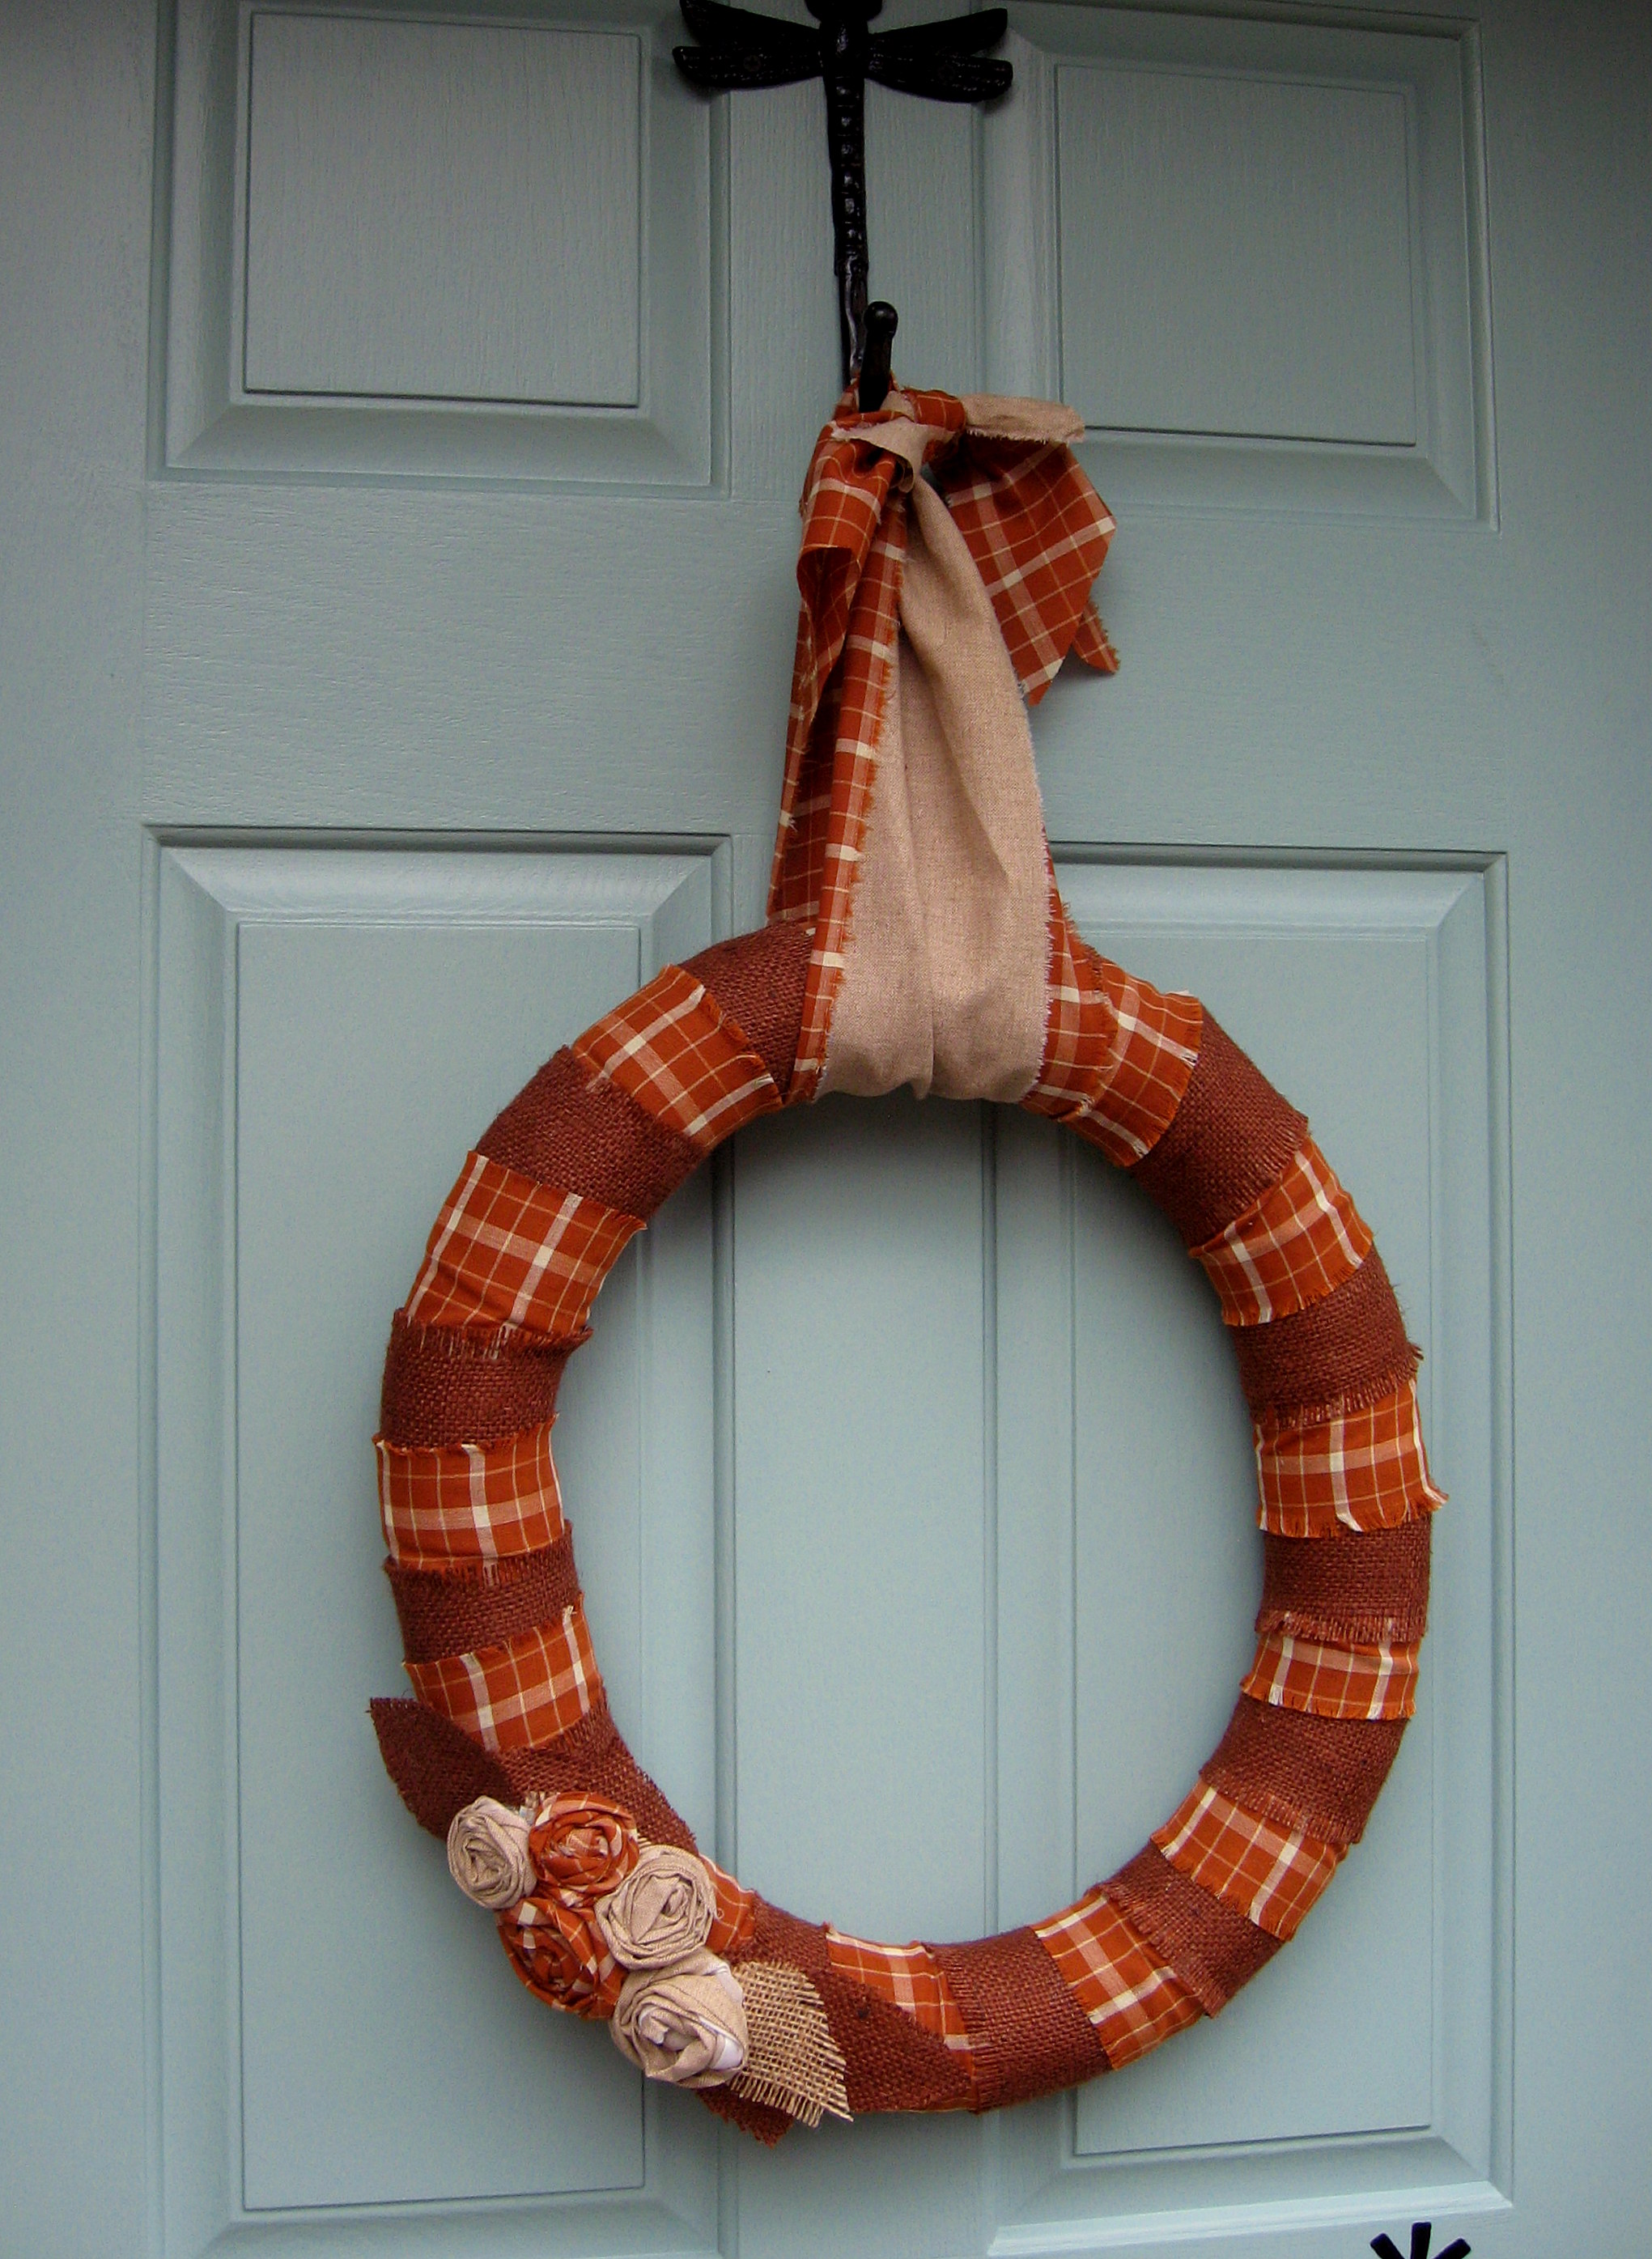
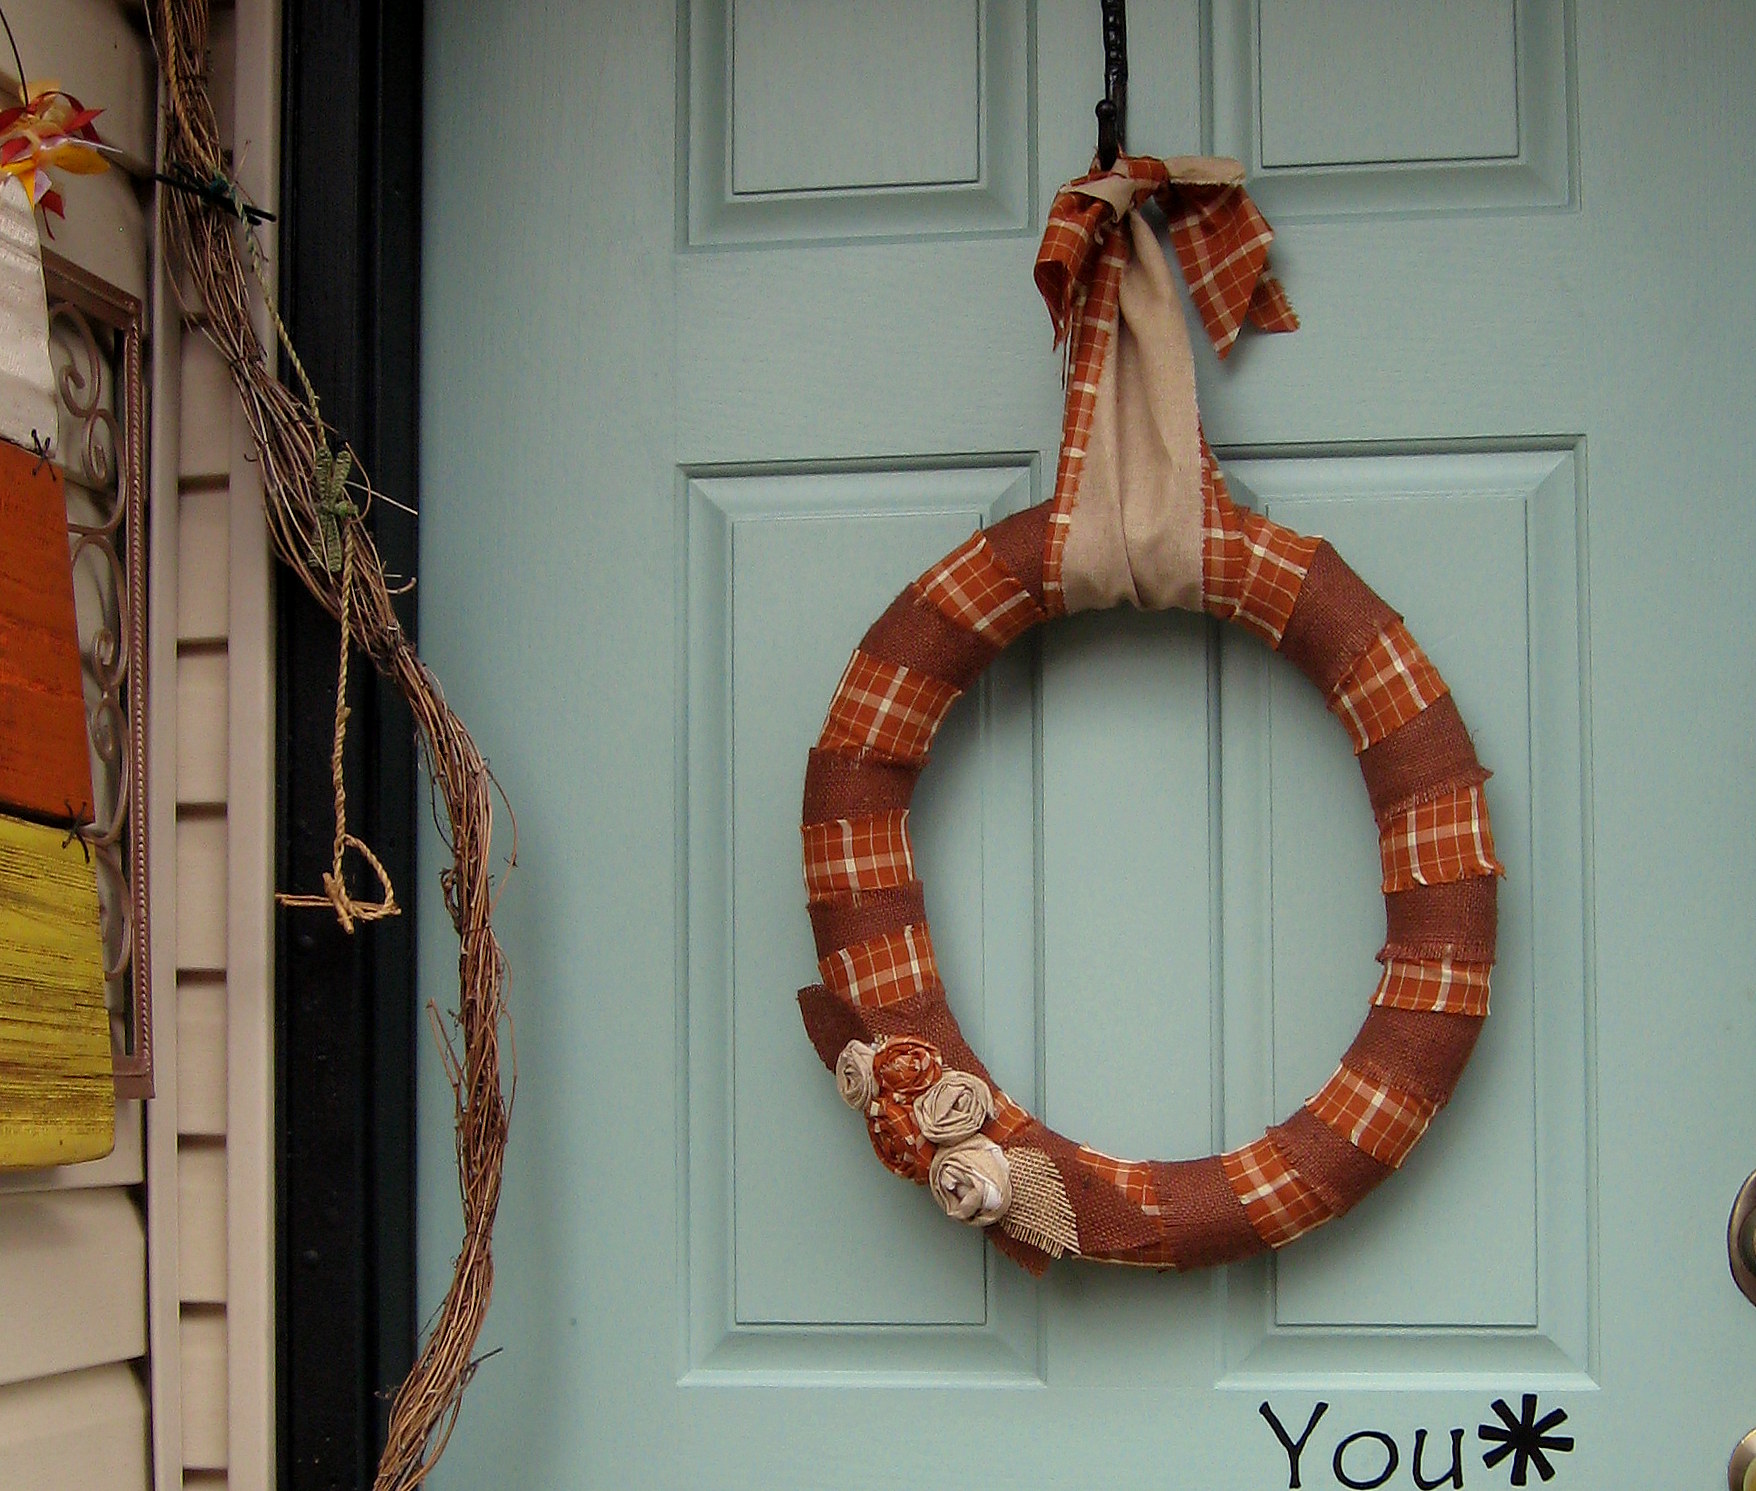
Fall Fabric Wreath
Super simple fall wreath – I created this in one episode of Grimm (are you watching that show? You totally should be!) using only materials I already had on hand.
Start with a wreath form made from a pool noodle, as in this post here.
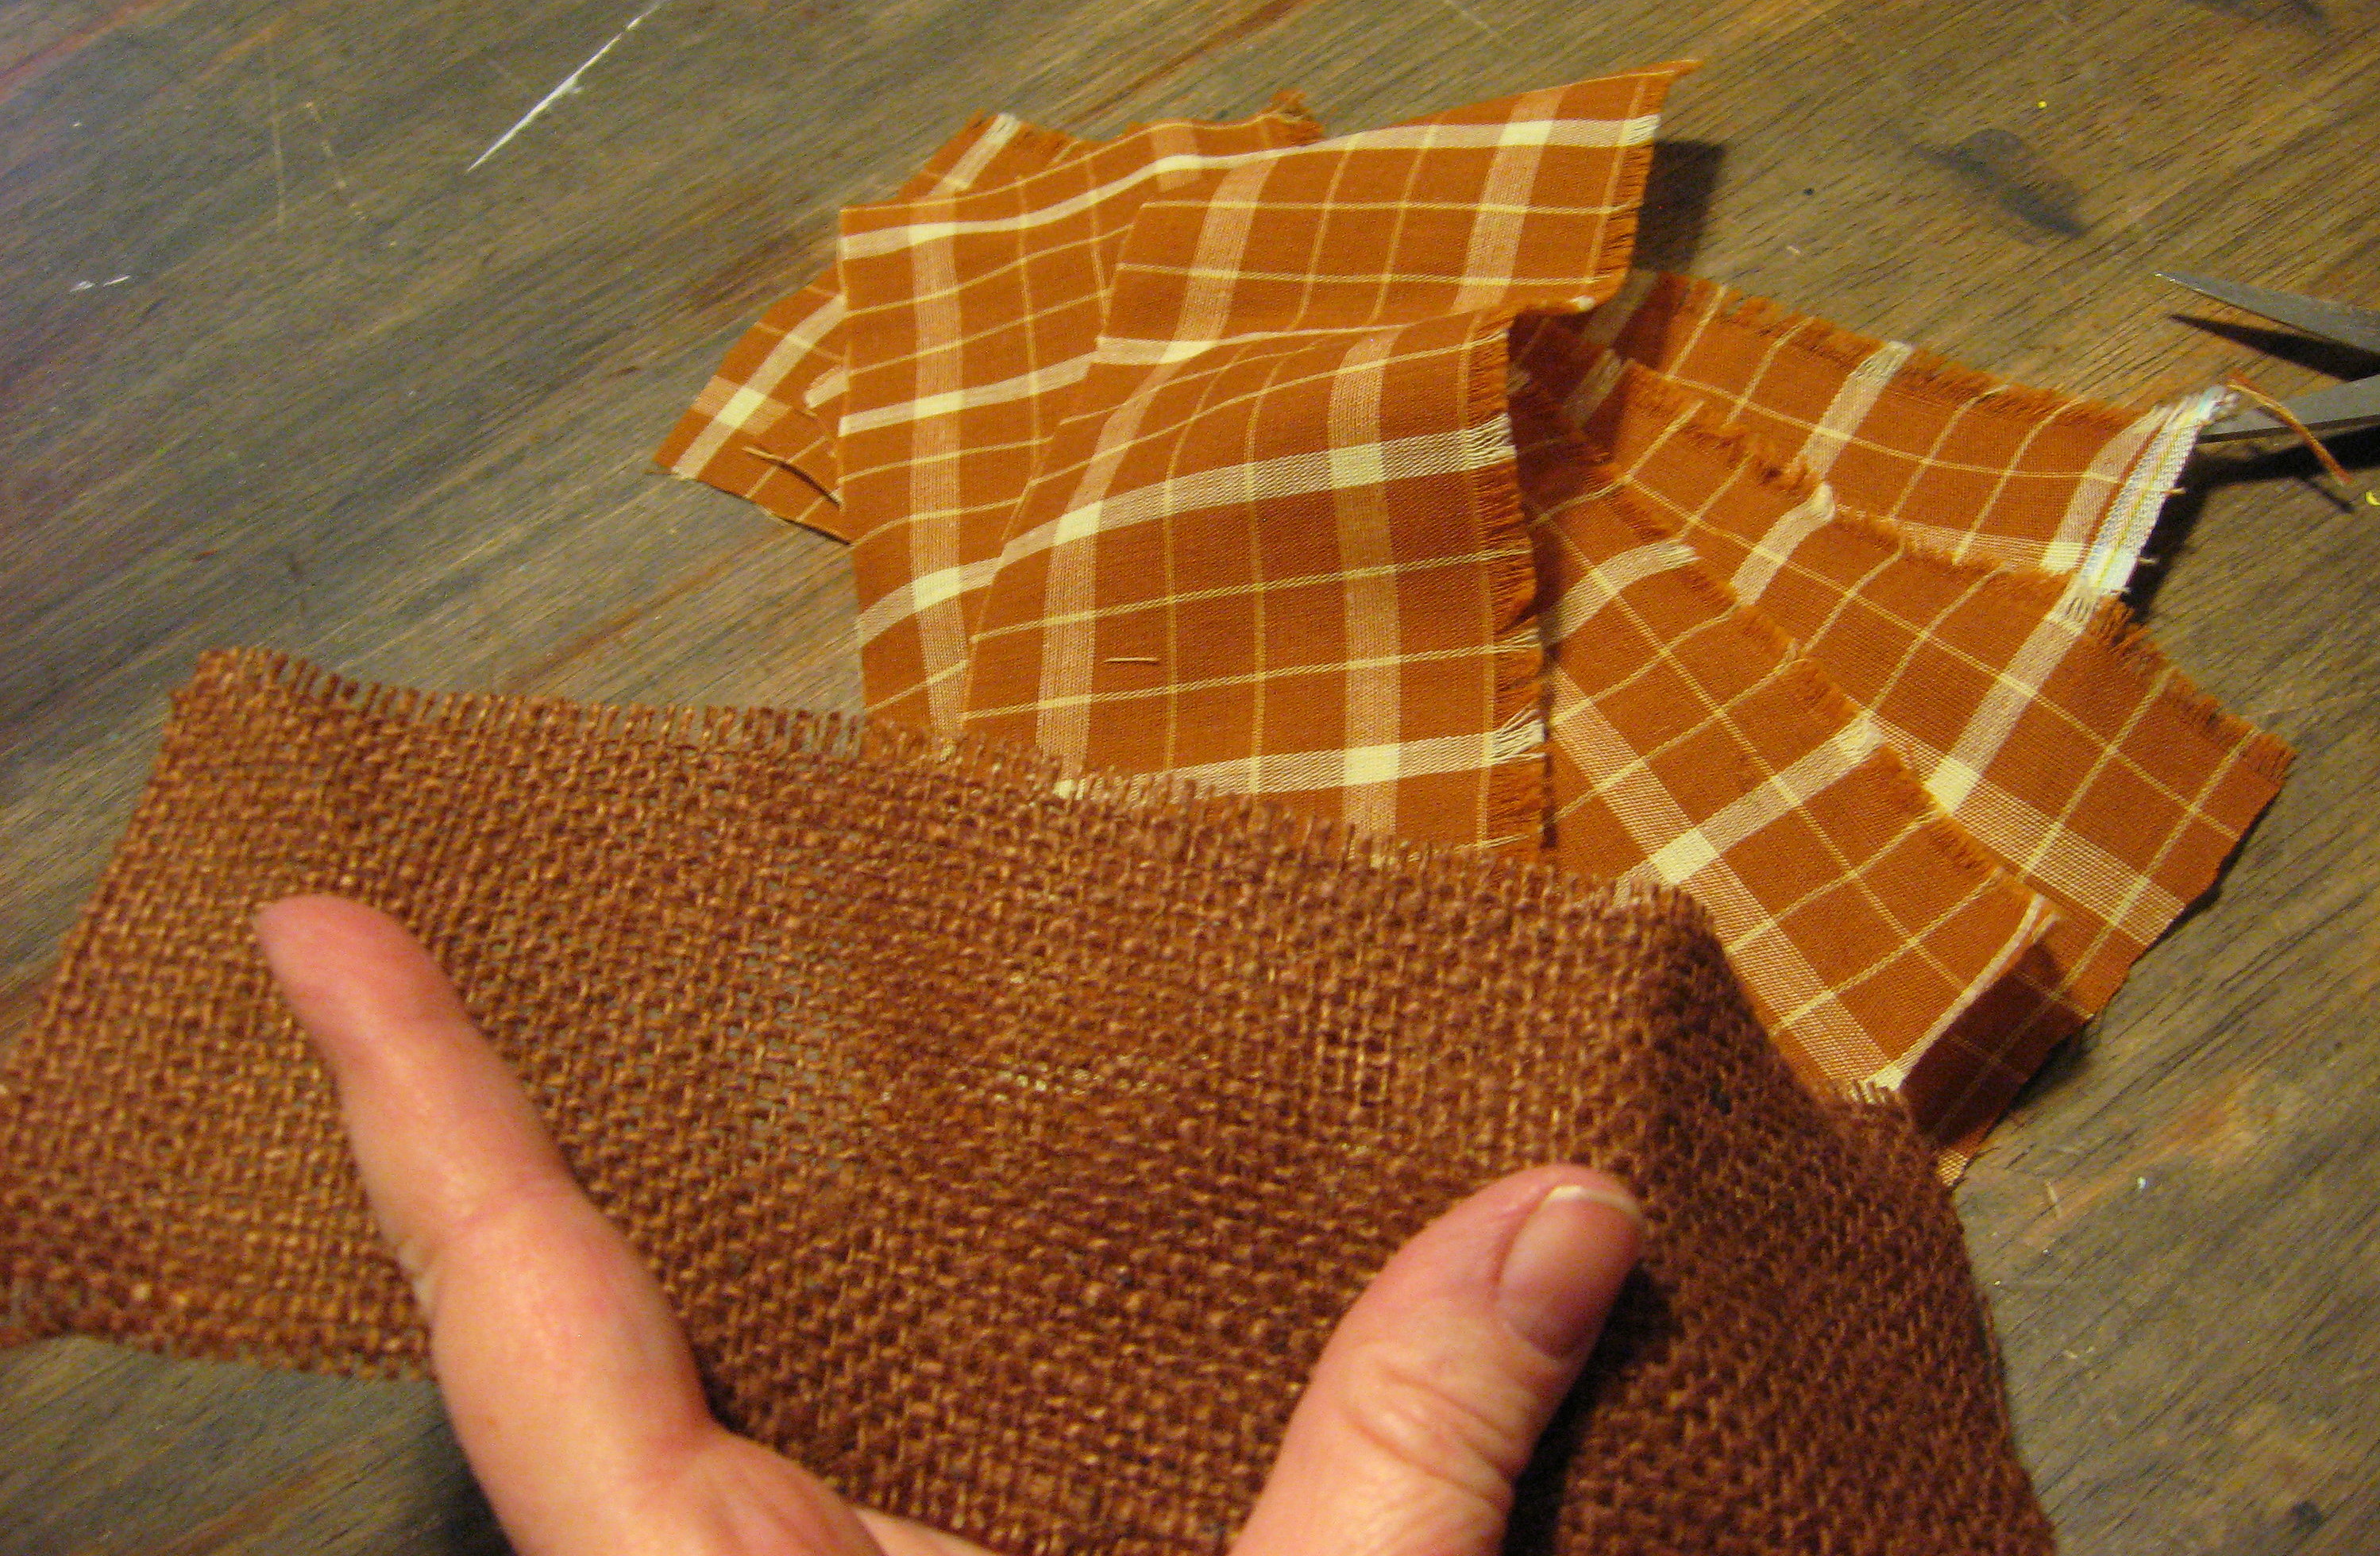
I used two different fabrics; one a rust colored burlap, and a fall colored plaid cotton. If you don’t have fabric on hand already and need to buy some, you shouldn’t need more than 1/4 yard of each. Cut the fabric into strips, about 2-3 inches wide and just long enough to wrap around the wreath form.
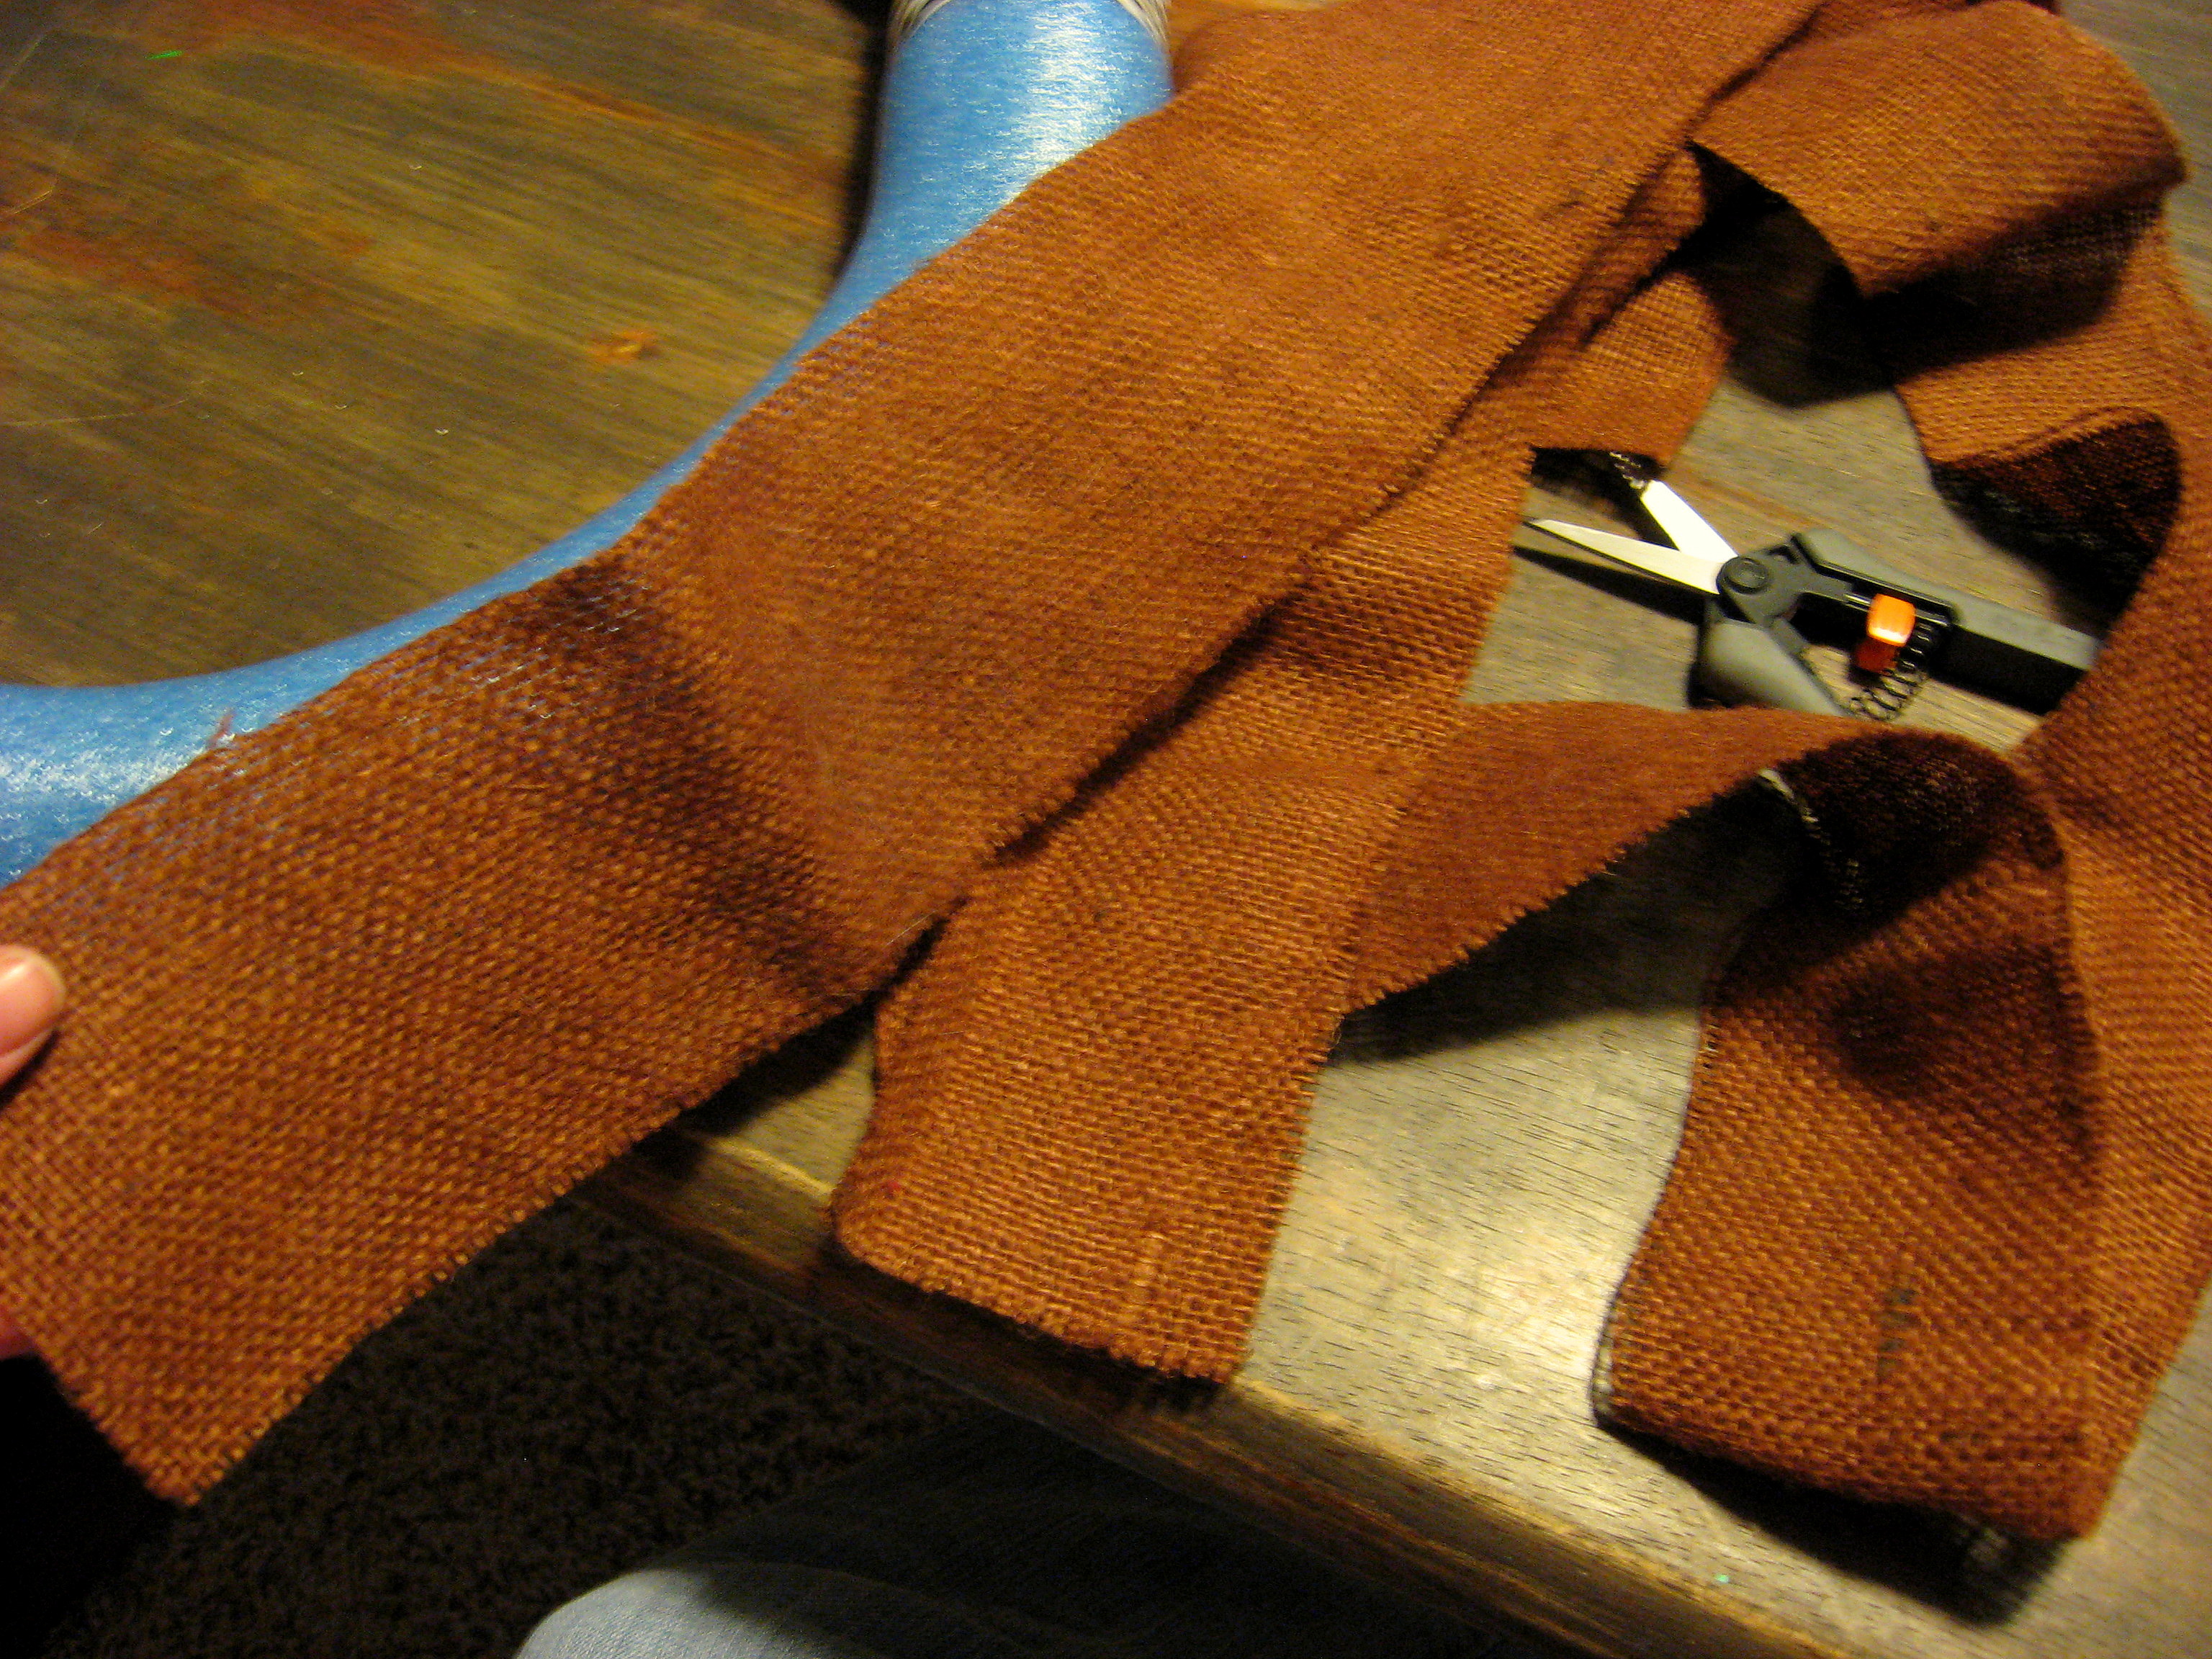
I liked the look of the end that shows being frayed, so I pulled threads out of one long side.
Wrap a strip around the wreath form and hot glue down both ends. Now wrap around a strip of the other fabric, slightly overlapping the first, and hot glue.
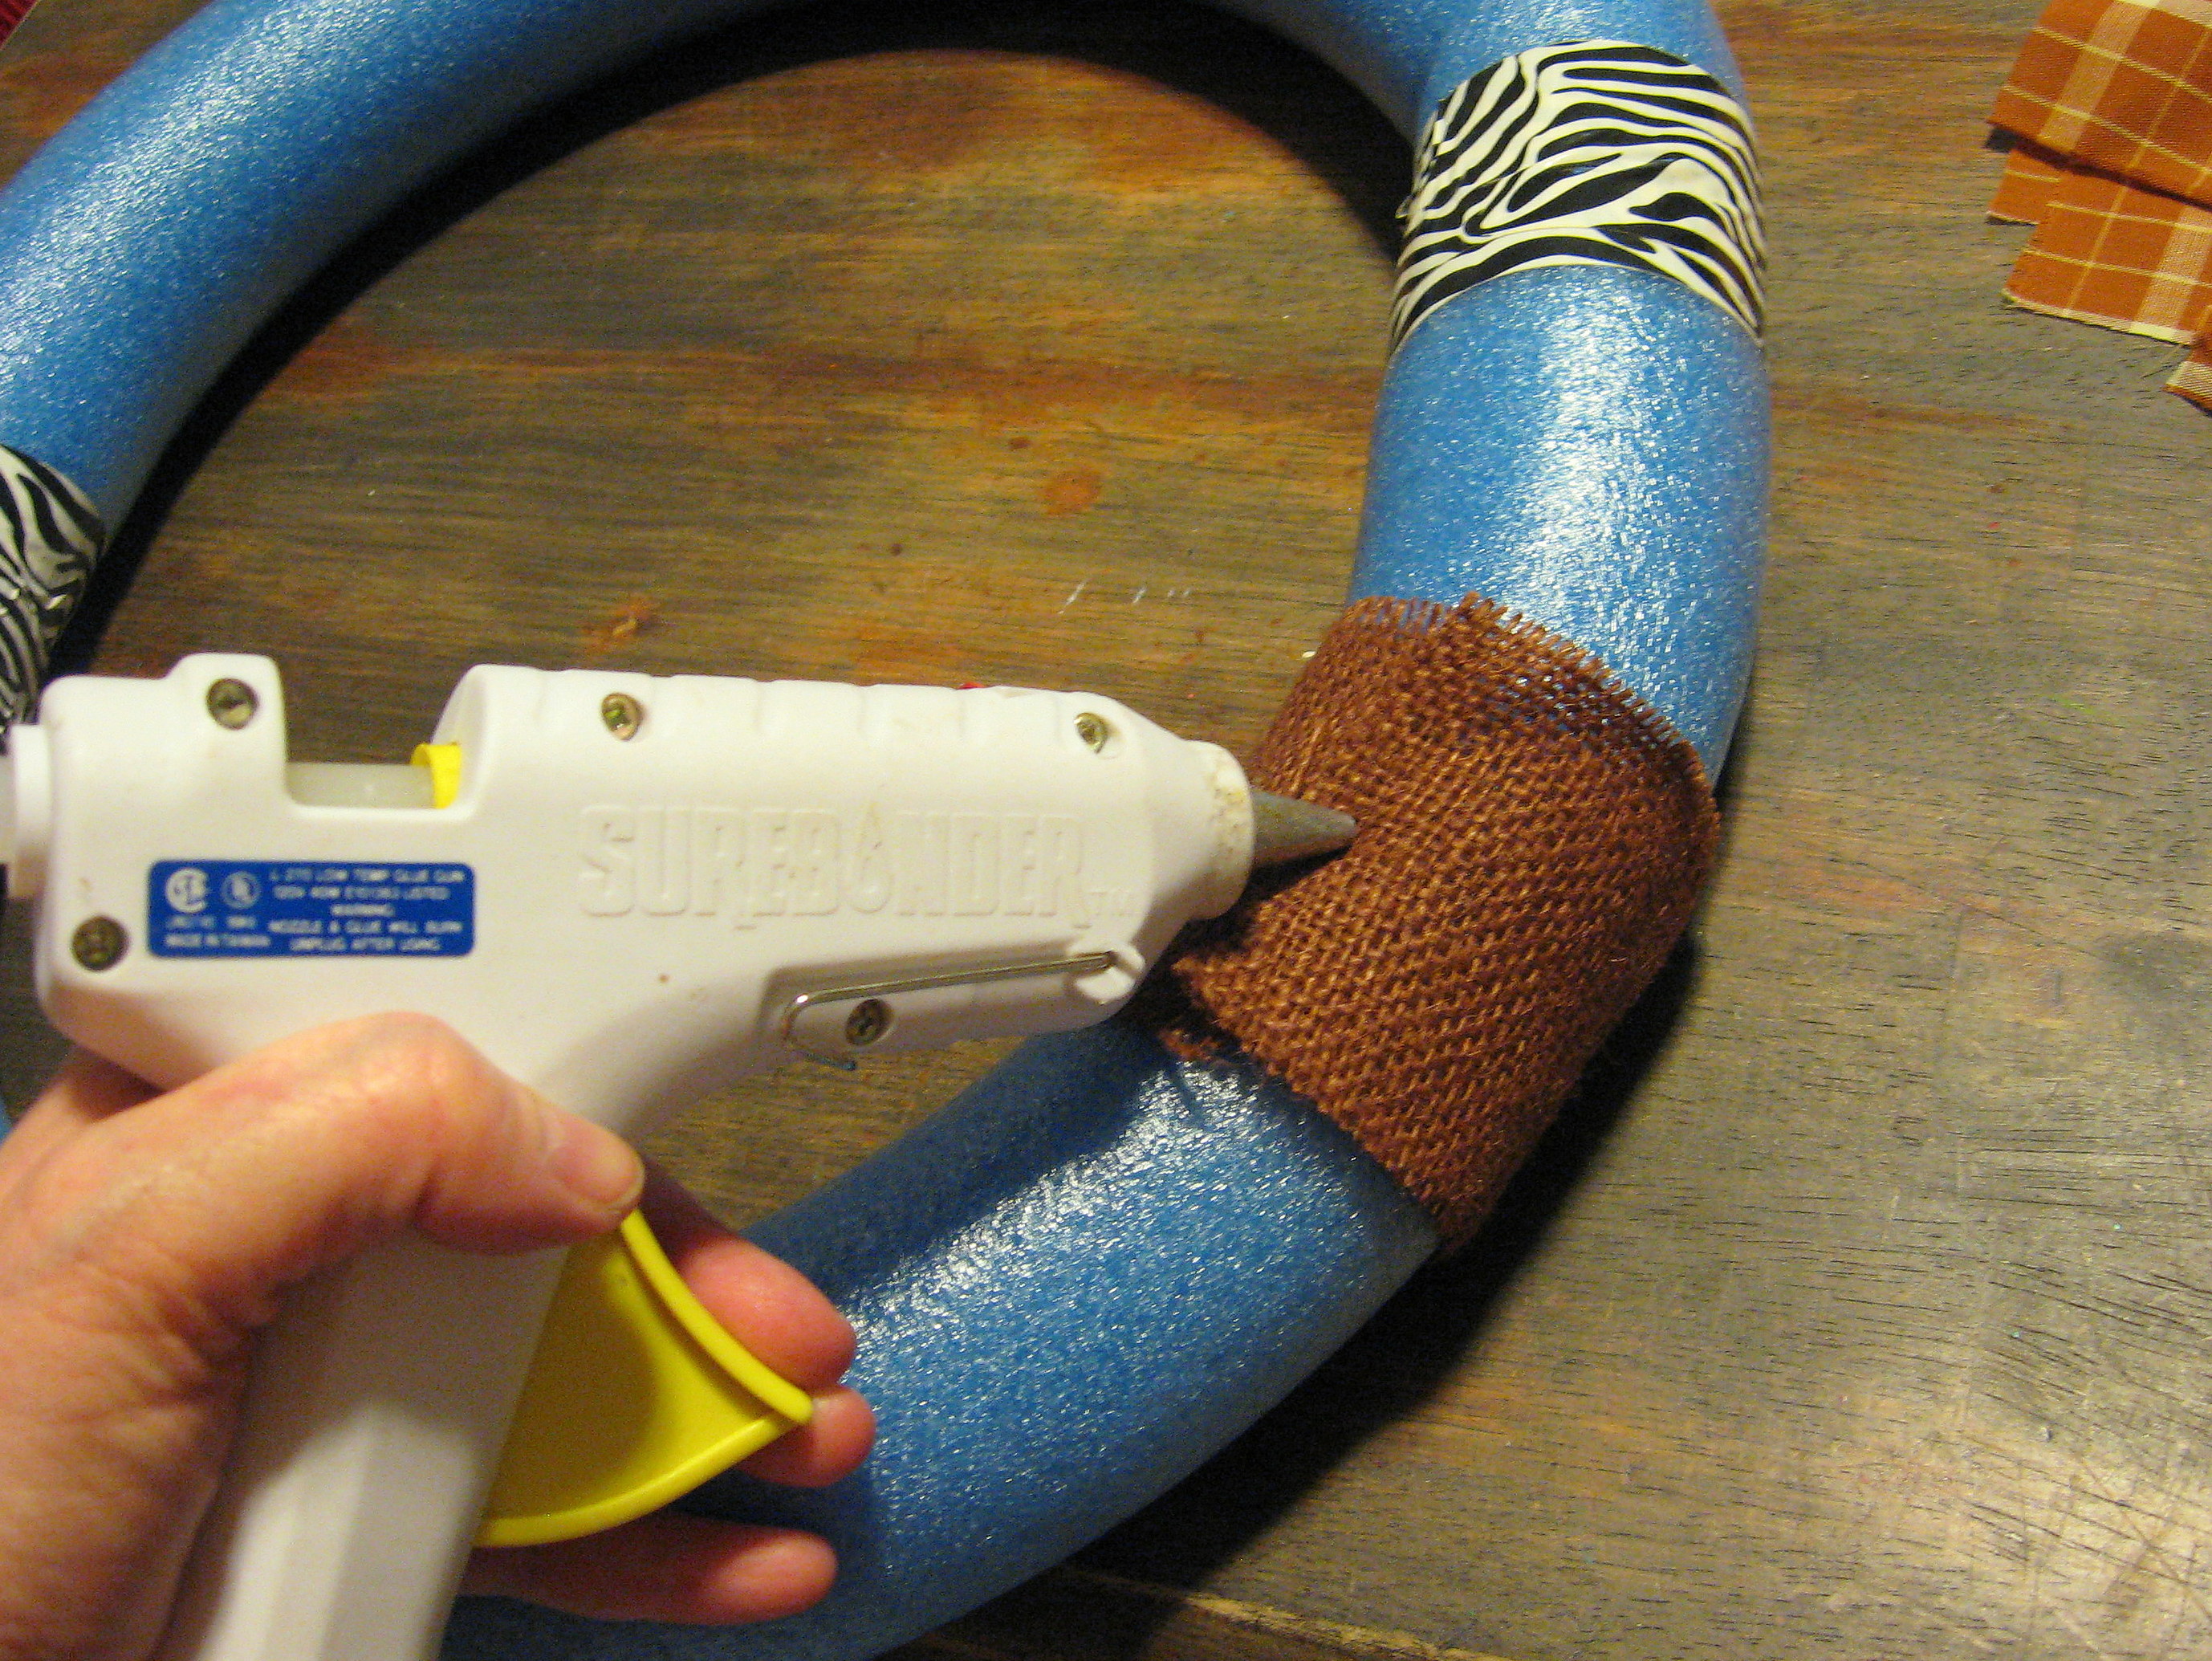
Continue this all the way around until the whole form is covered.
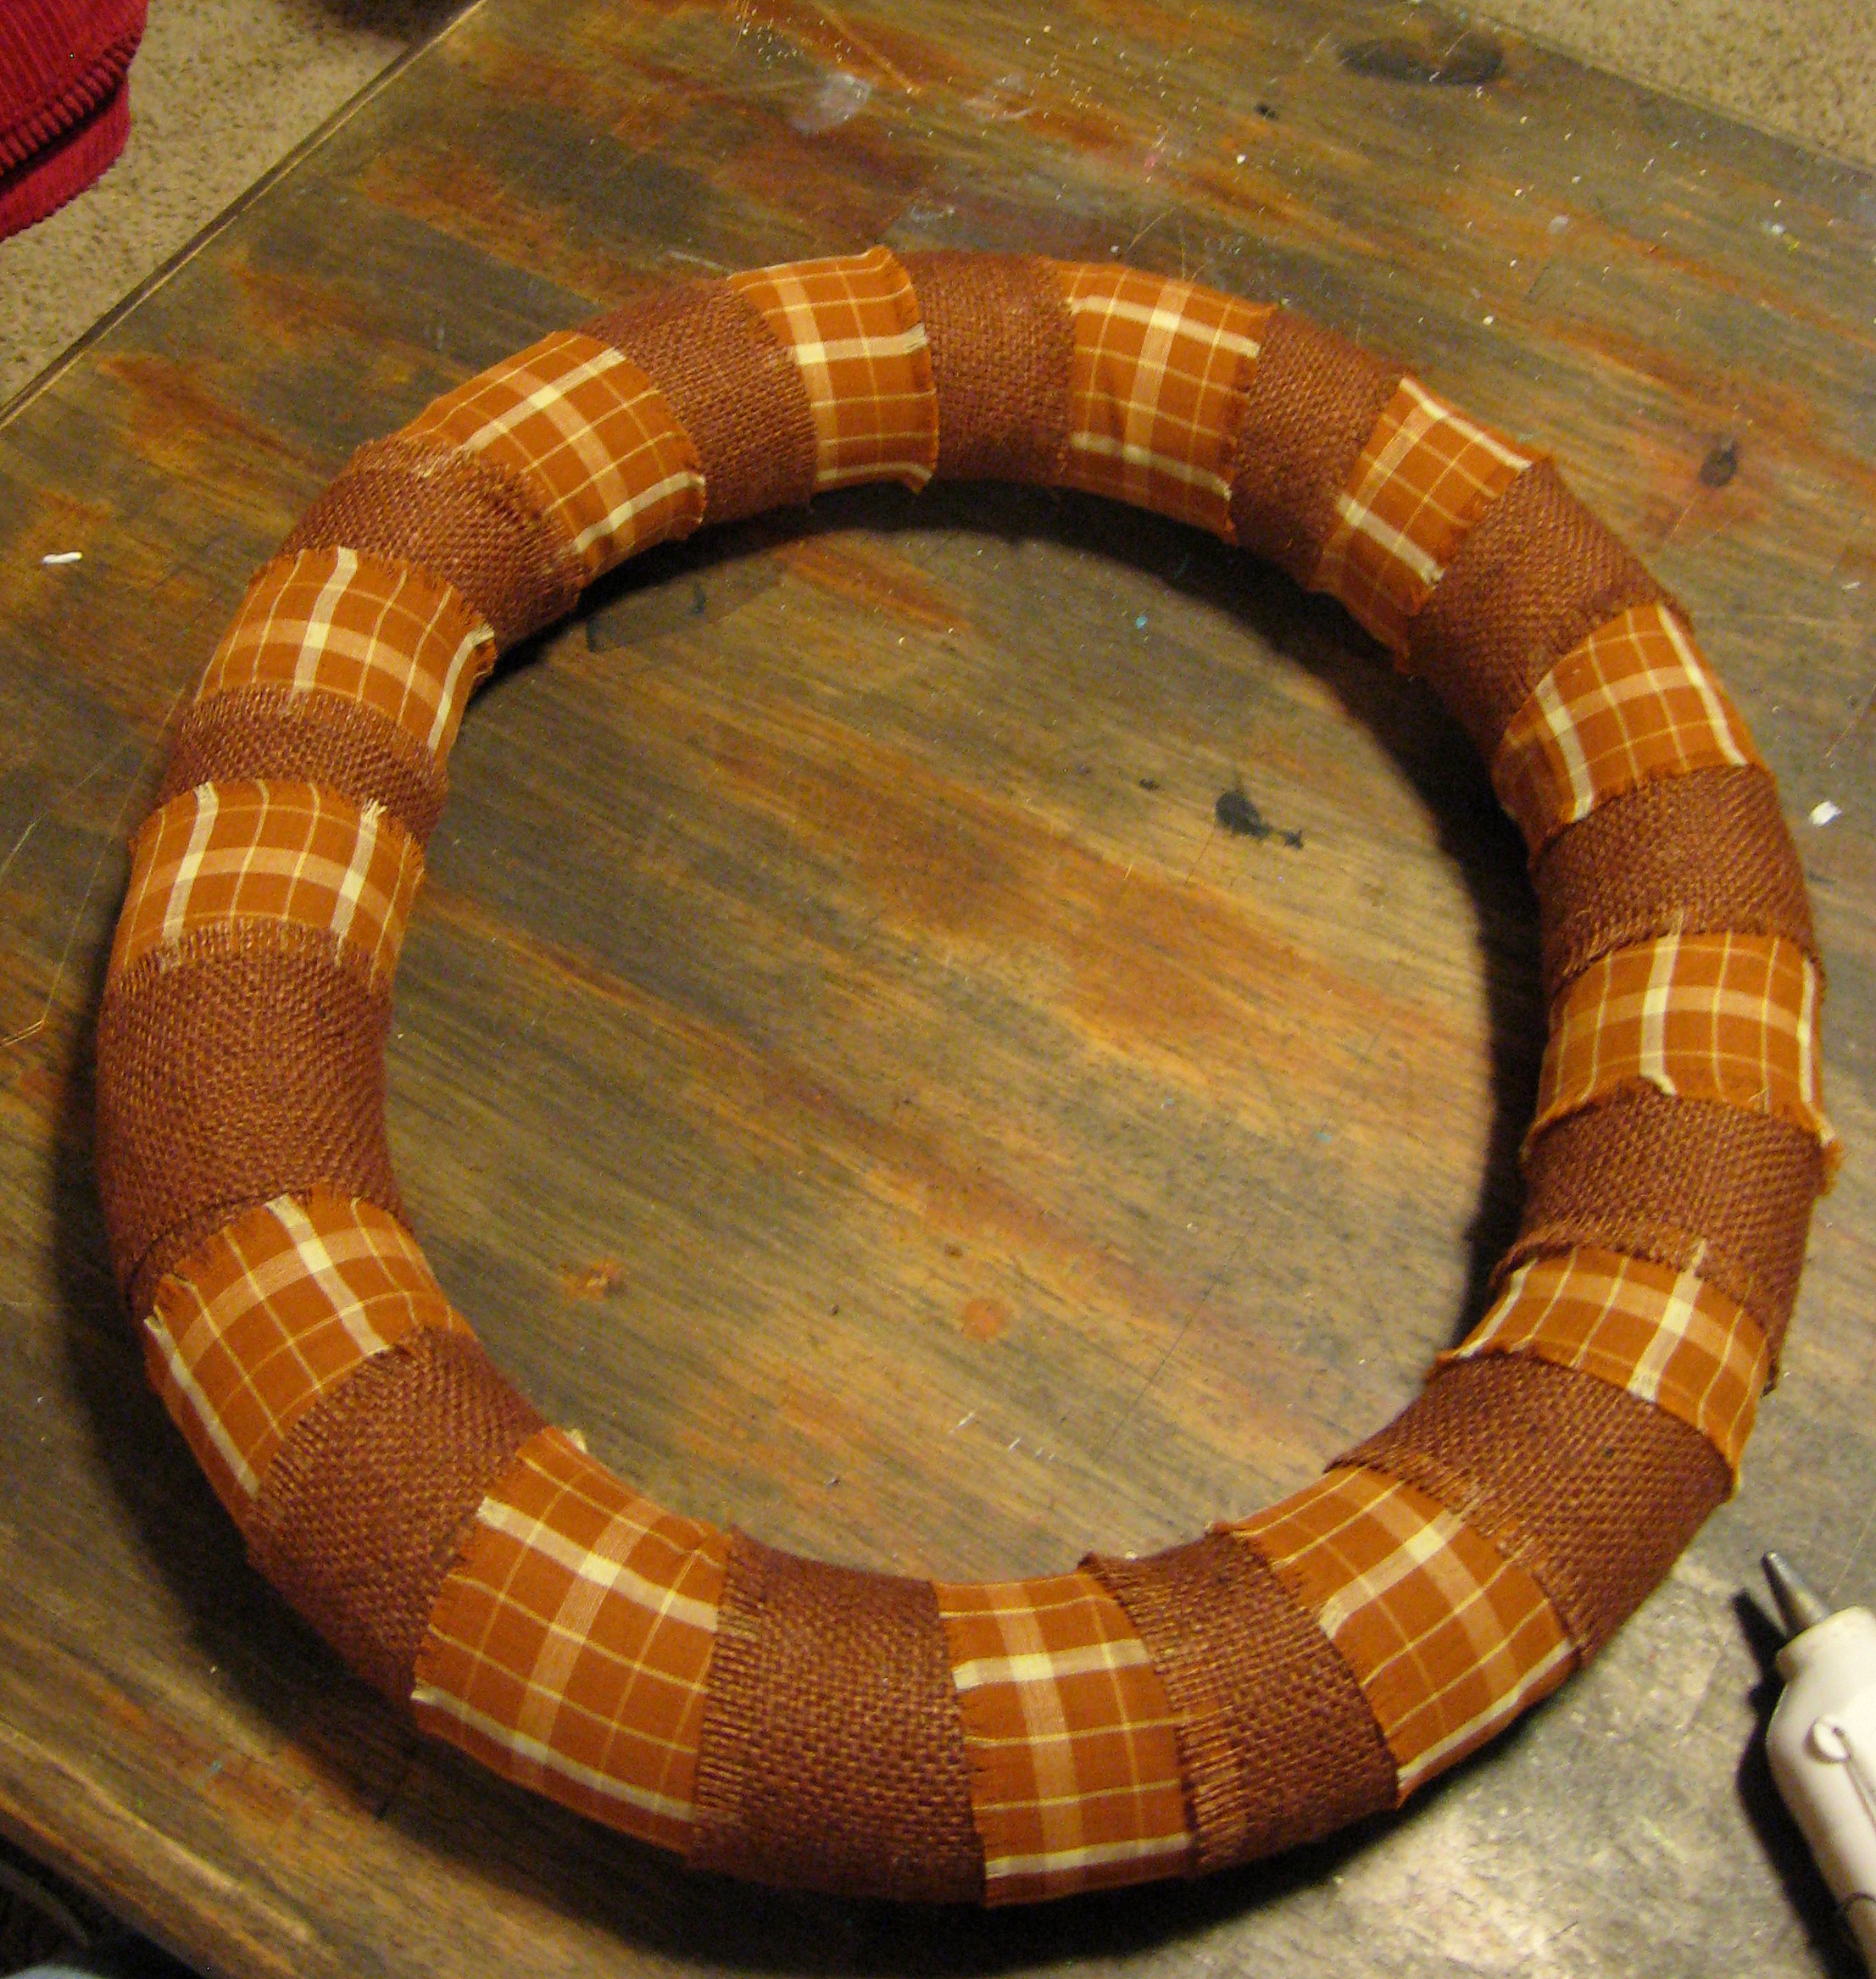
Cut out a few leaves and make some rolled fabric flowers to embellish – I used them to cover the area where my strips met back up because I thought it looked a little messy. I didn’t include a tutorial on the flowers here. Google “rolled fabric flower” and you’ll find tutorials galore. Mine aren’t even sewn; they are just hot glued on the bottom, then pressed onto the wreath.
Cut two more strips of fabric – one wider than the other – and loop them around the top of the wreath. Tie a knot, letting the ends flop down, and hang on the door.
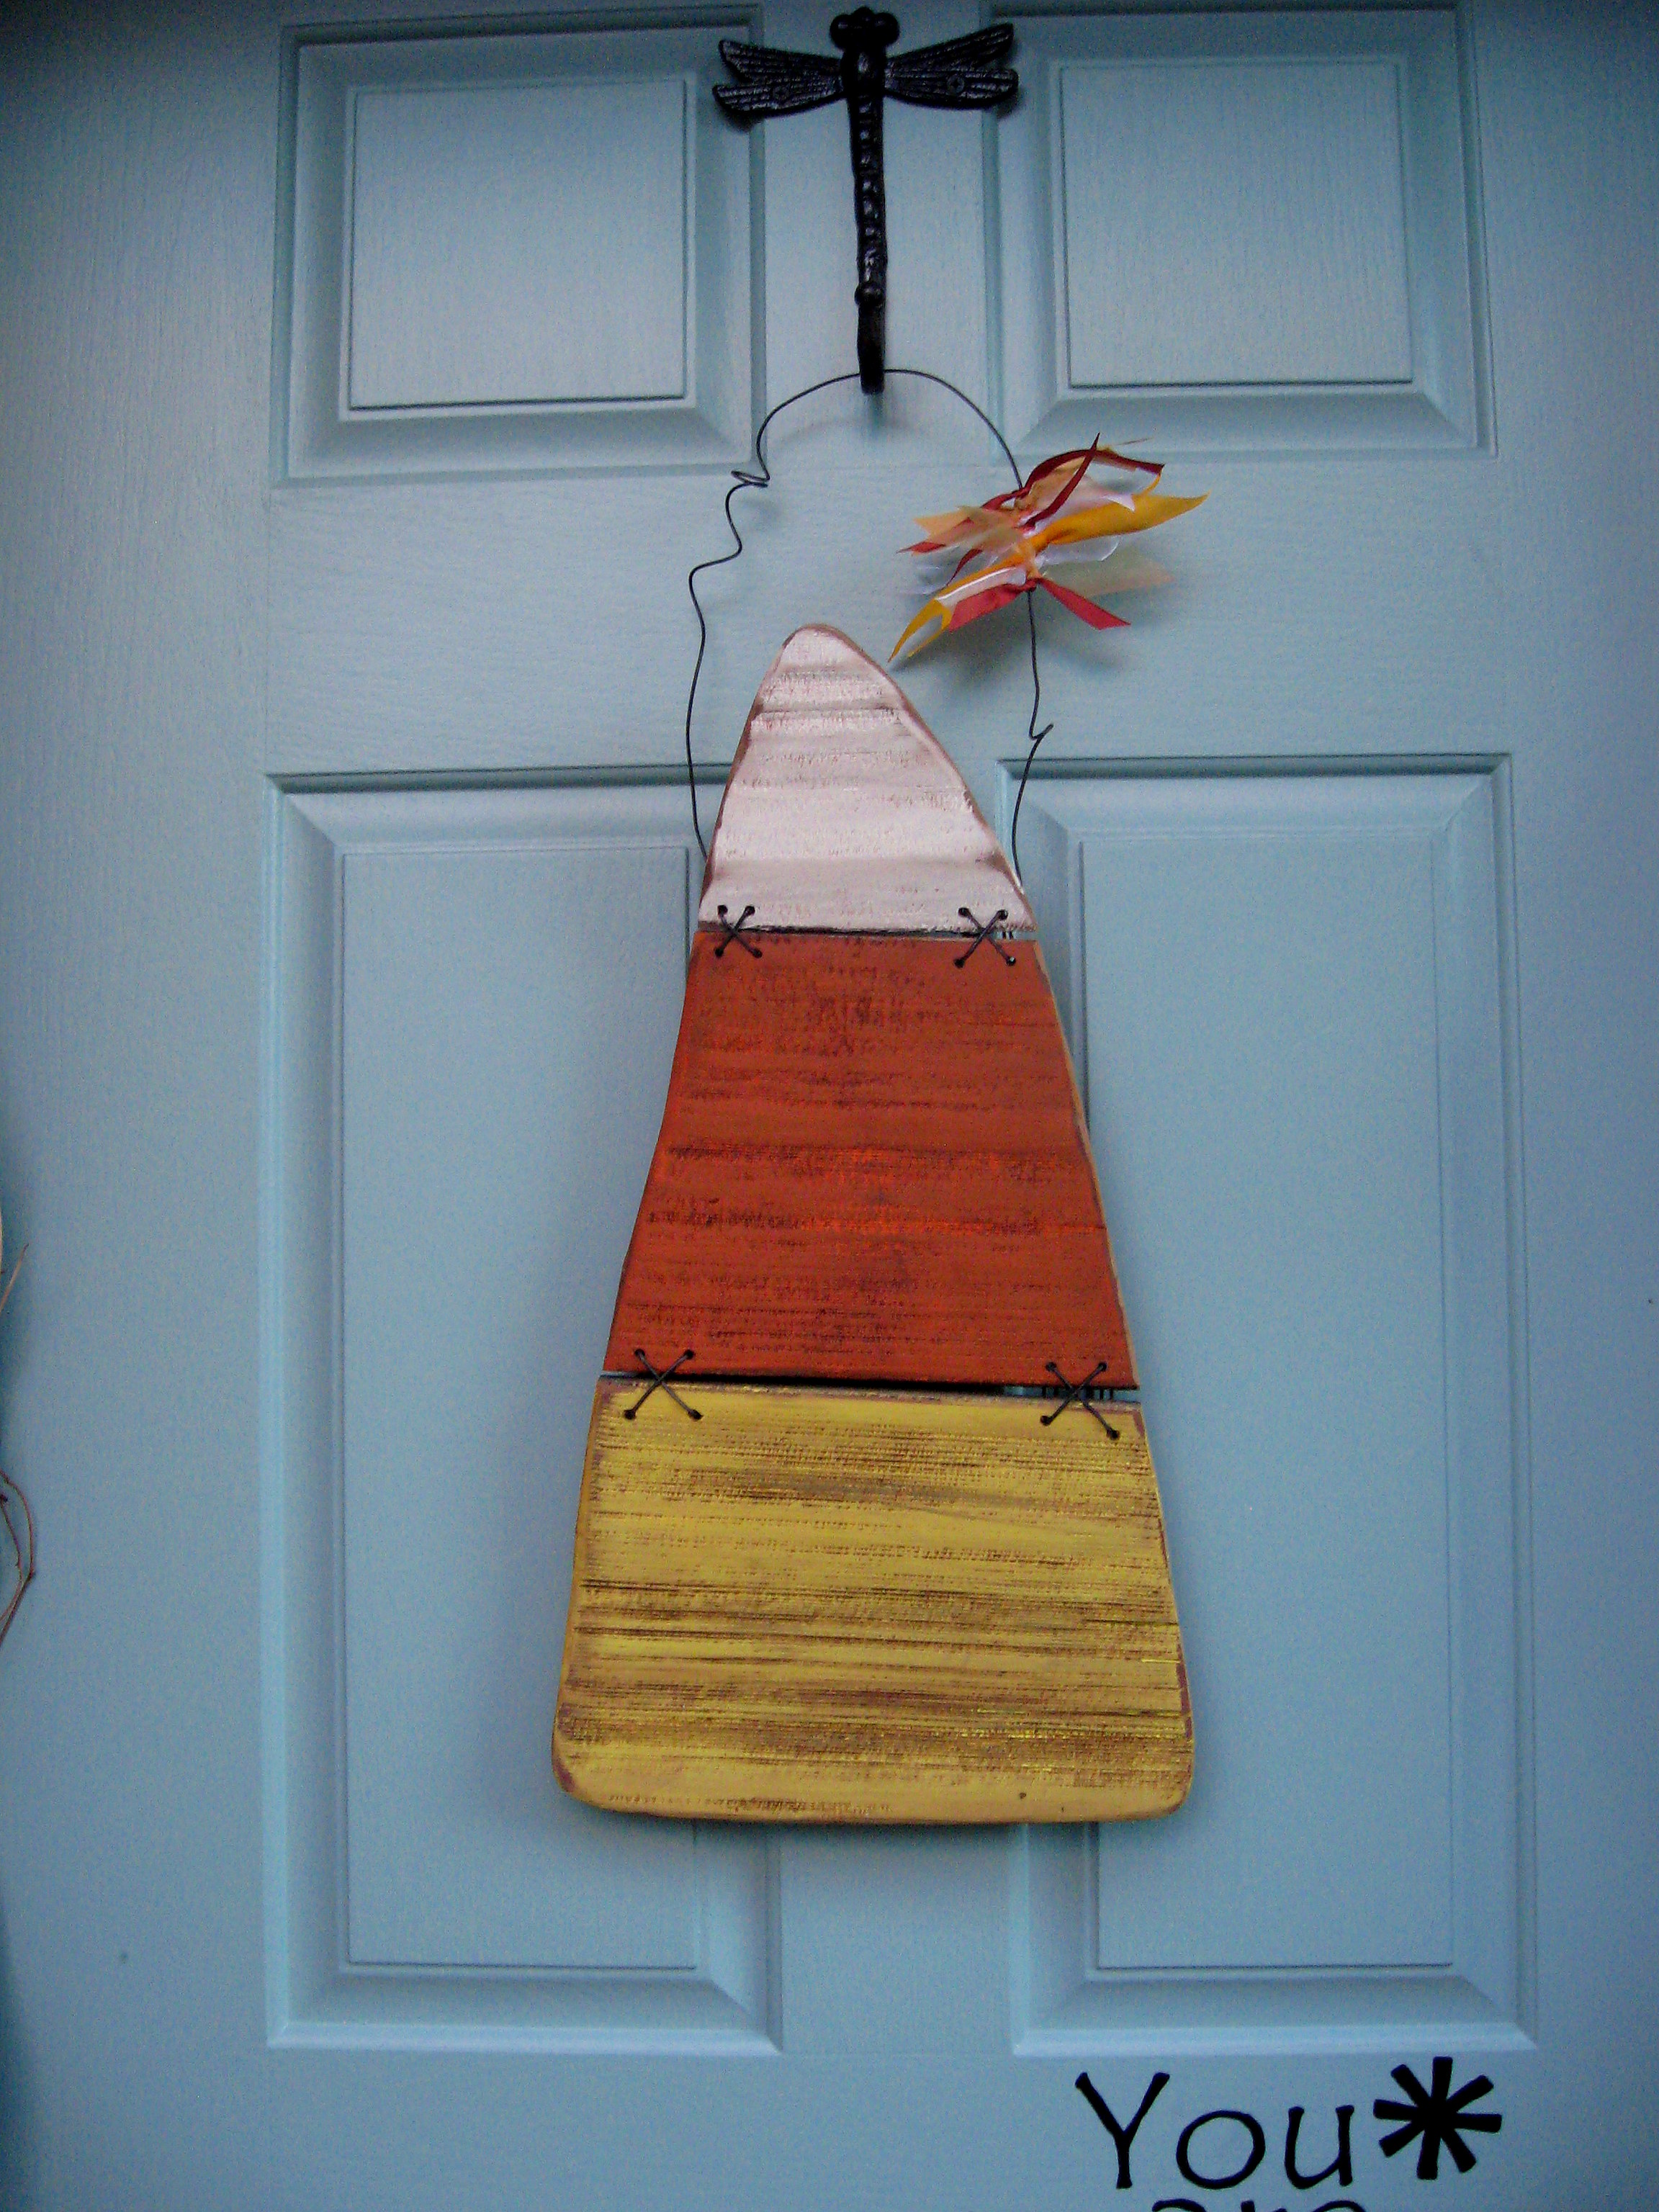
Barnwood Candy Corn
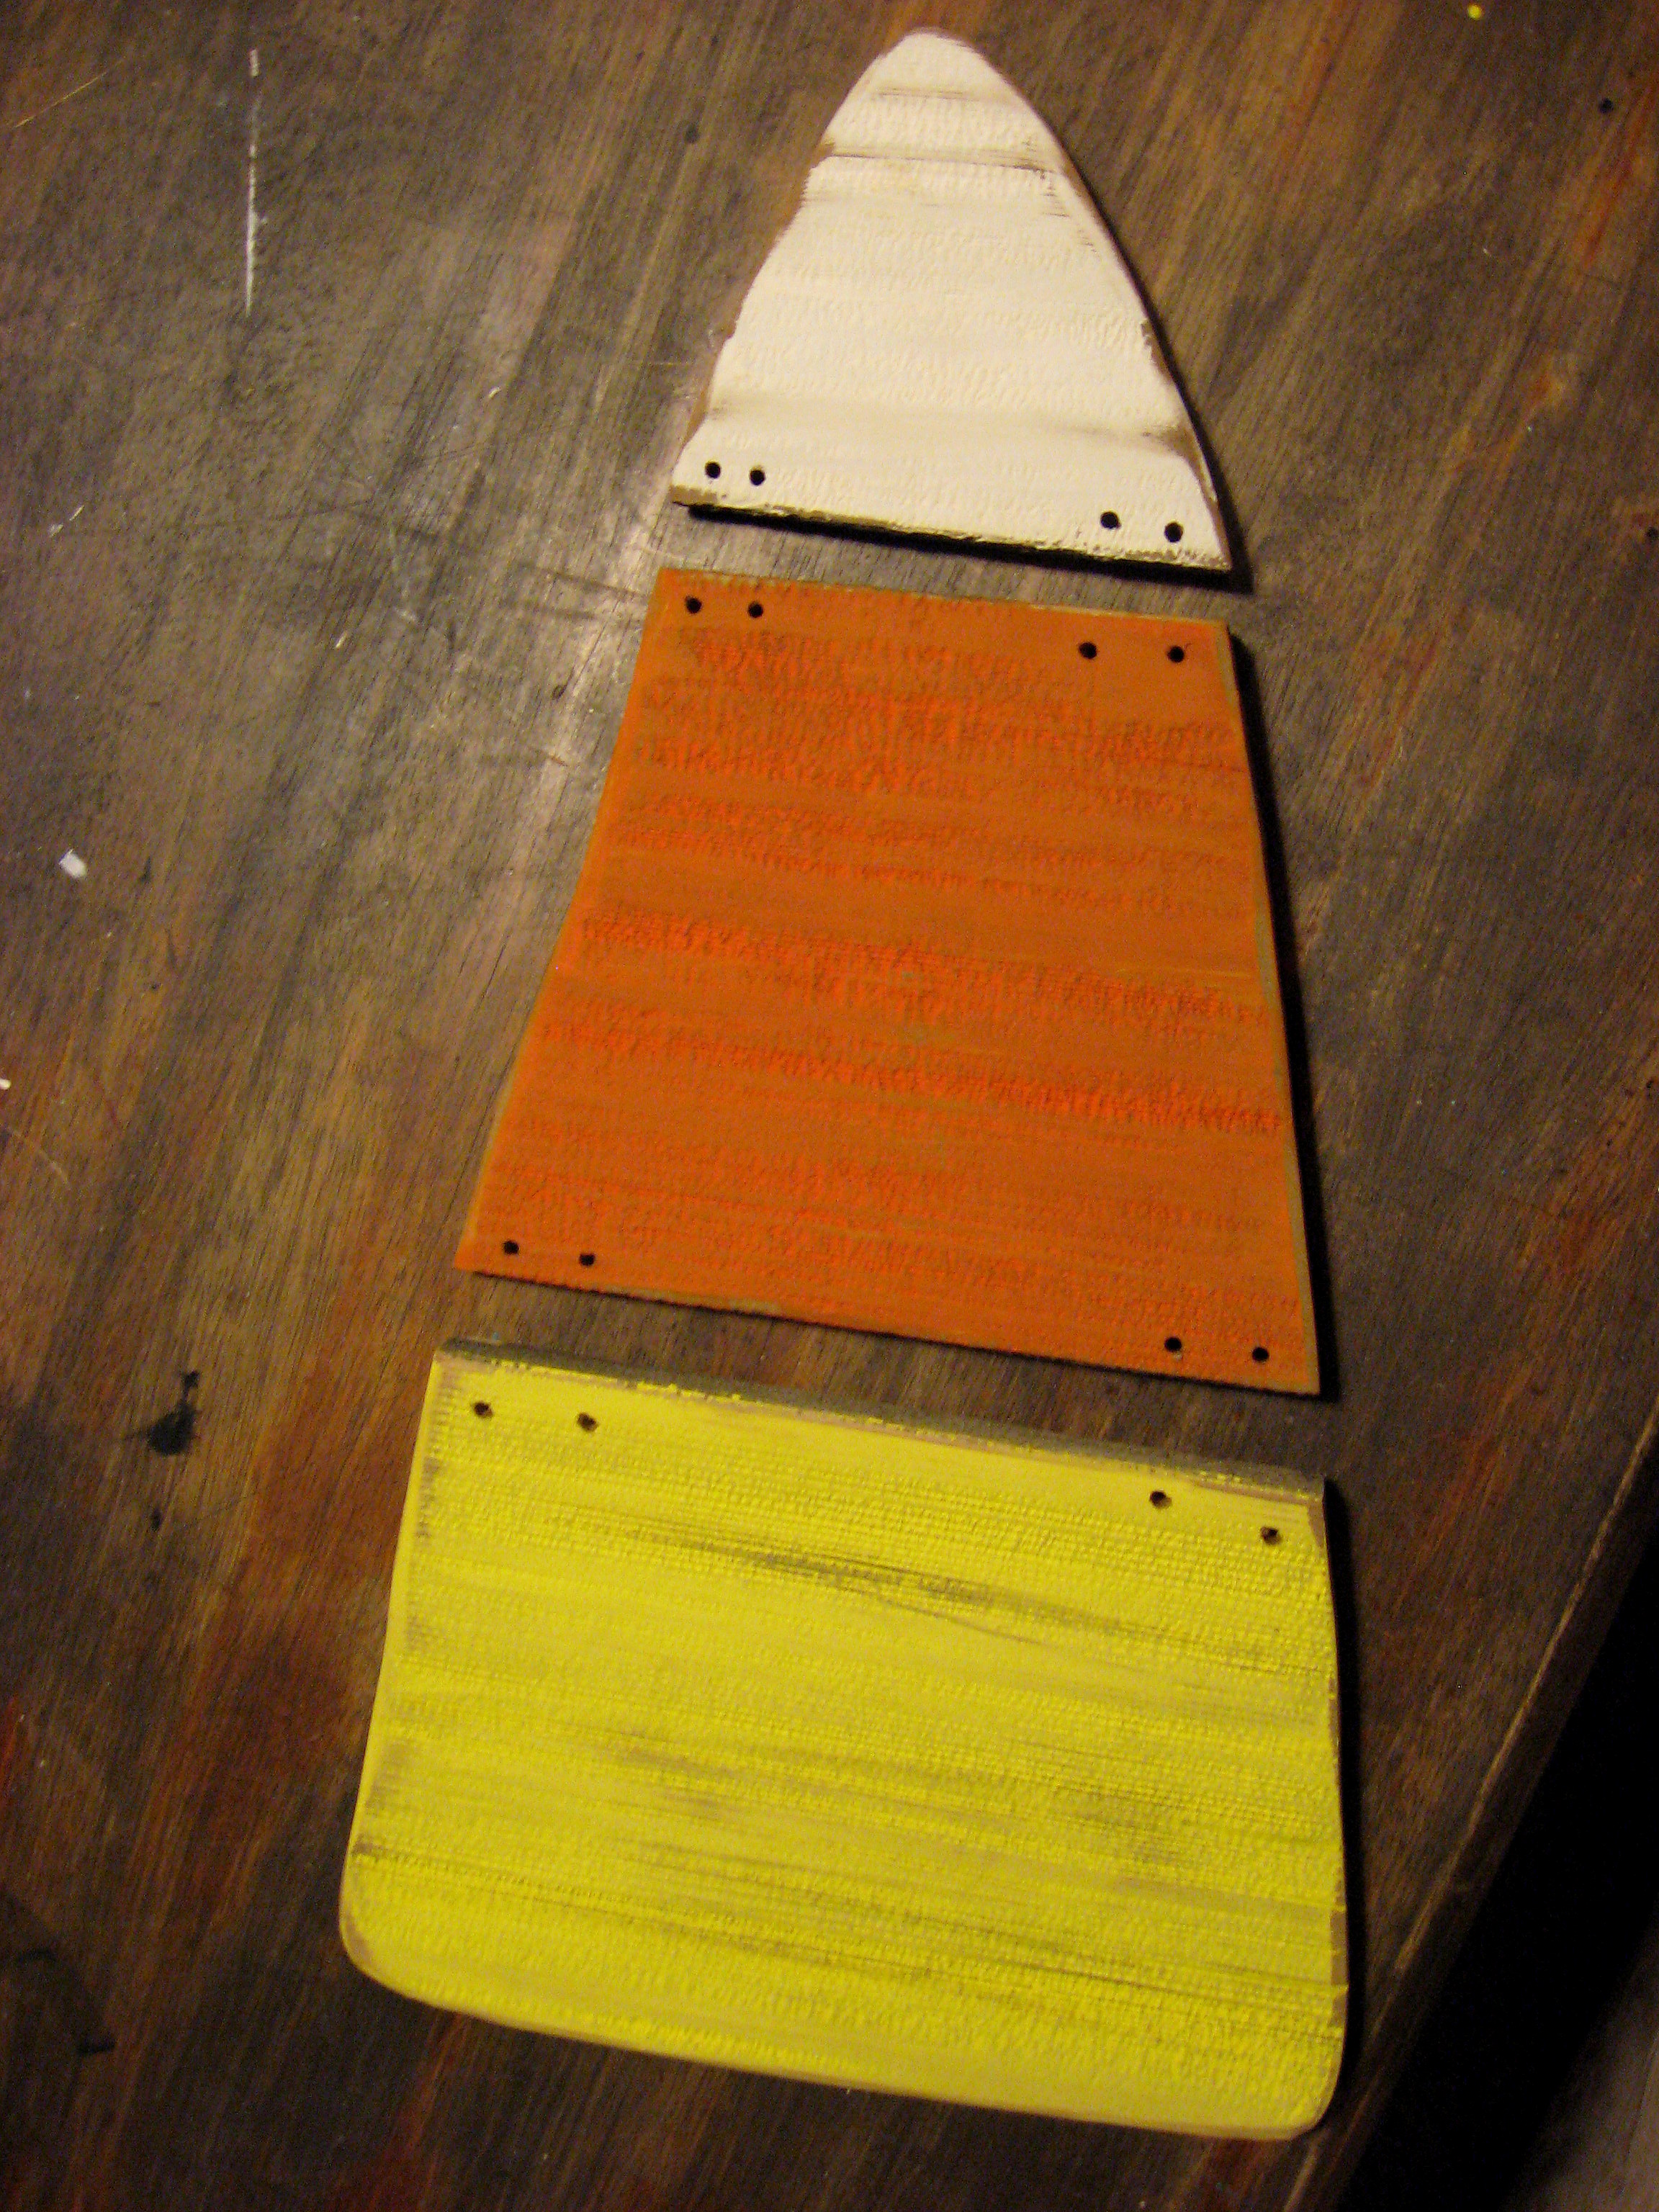
I started with three planks of barnwood. I wanted it to look very primitive – it would work great with new wood if you don’t have barnwood on hand (what, doesn’t everyone?) It will just not look as rough when it is finished.
Lay the planks out side by side and draw a large candy corn shape on them – spanning all three pieces of wood. Just freehand it – remember we are going for primitive. Cut this out with a jigsaw or a scroll saw and sand all the pieces to remove any splinters.
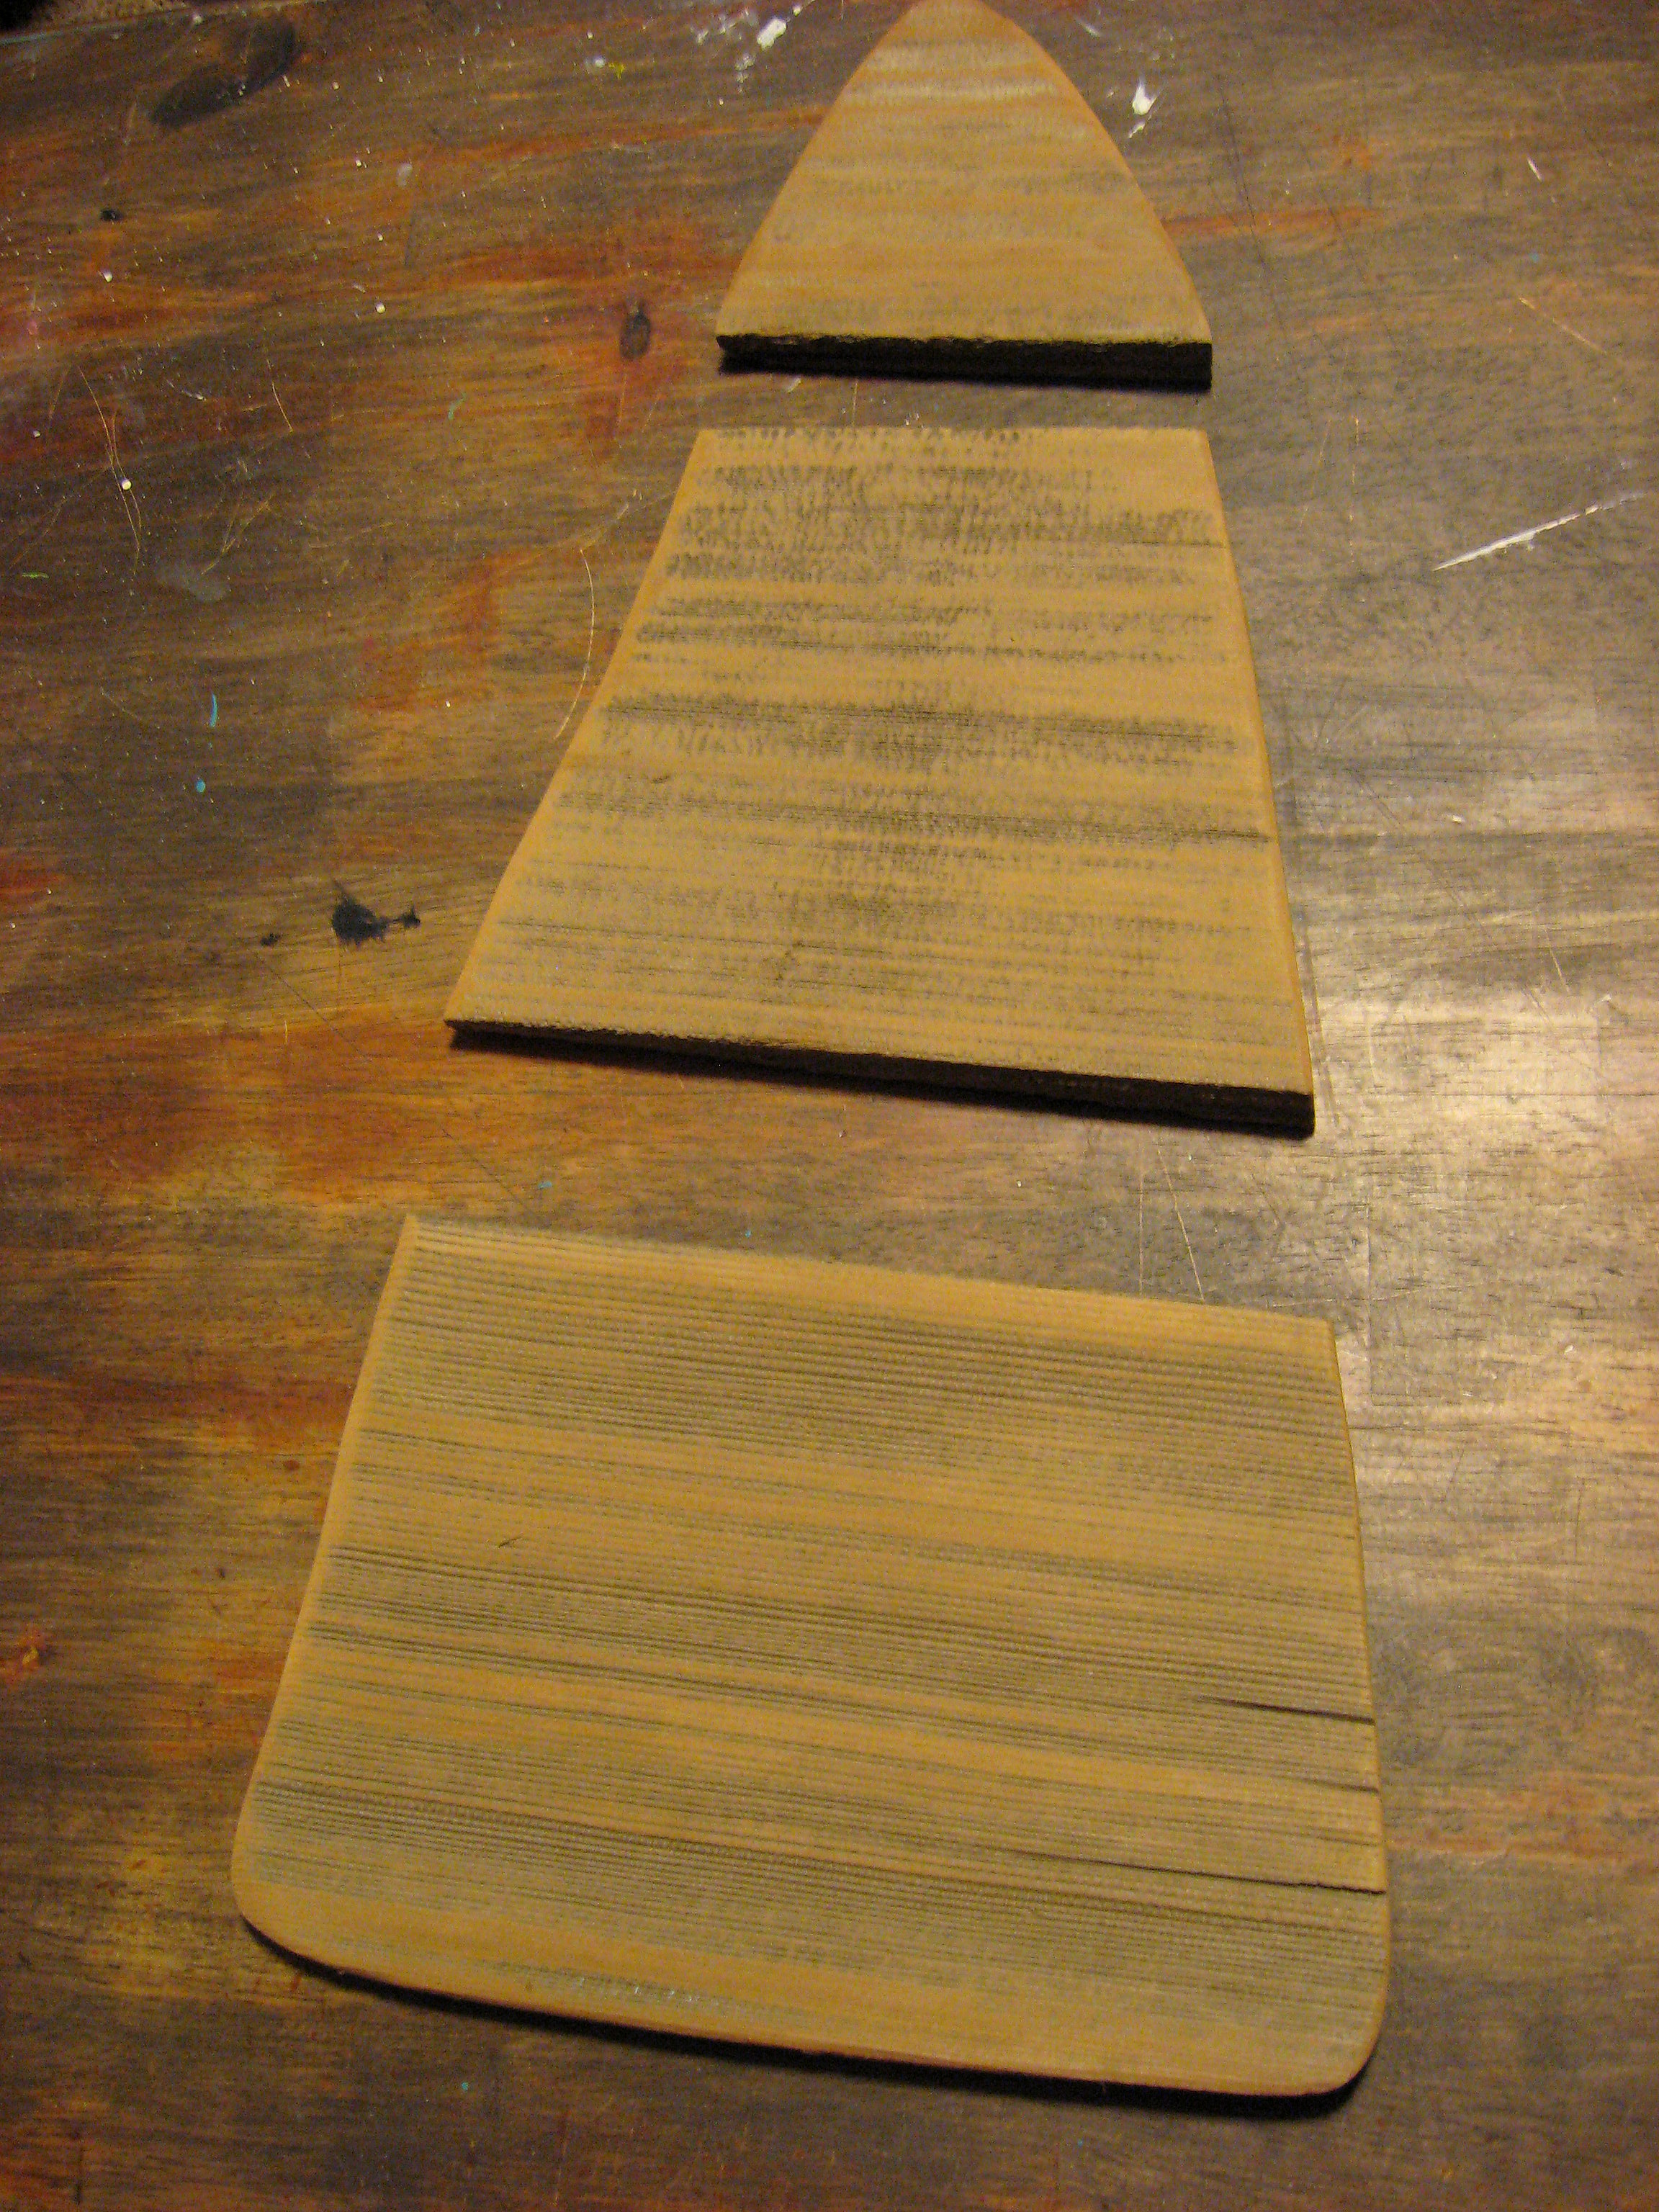
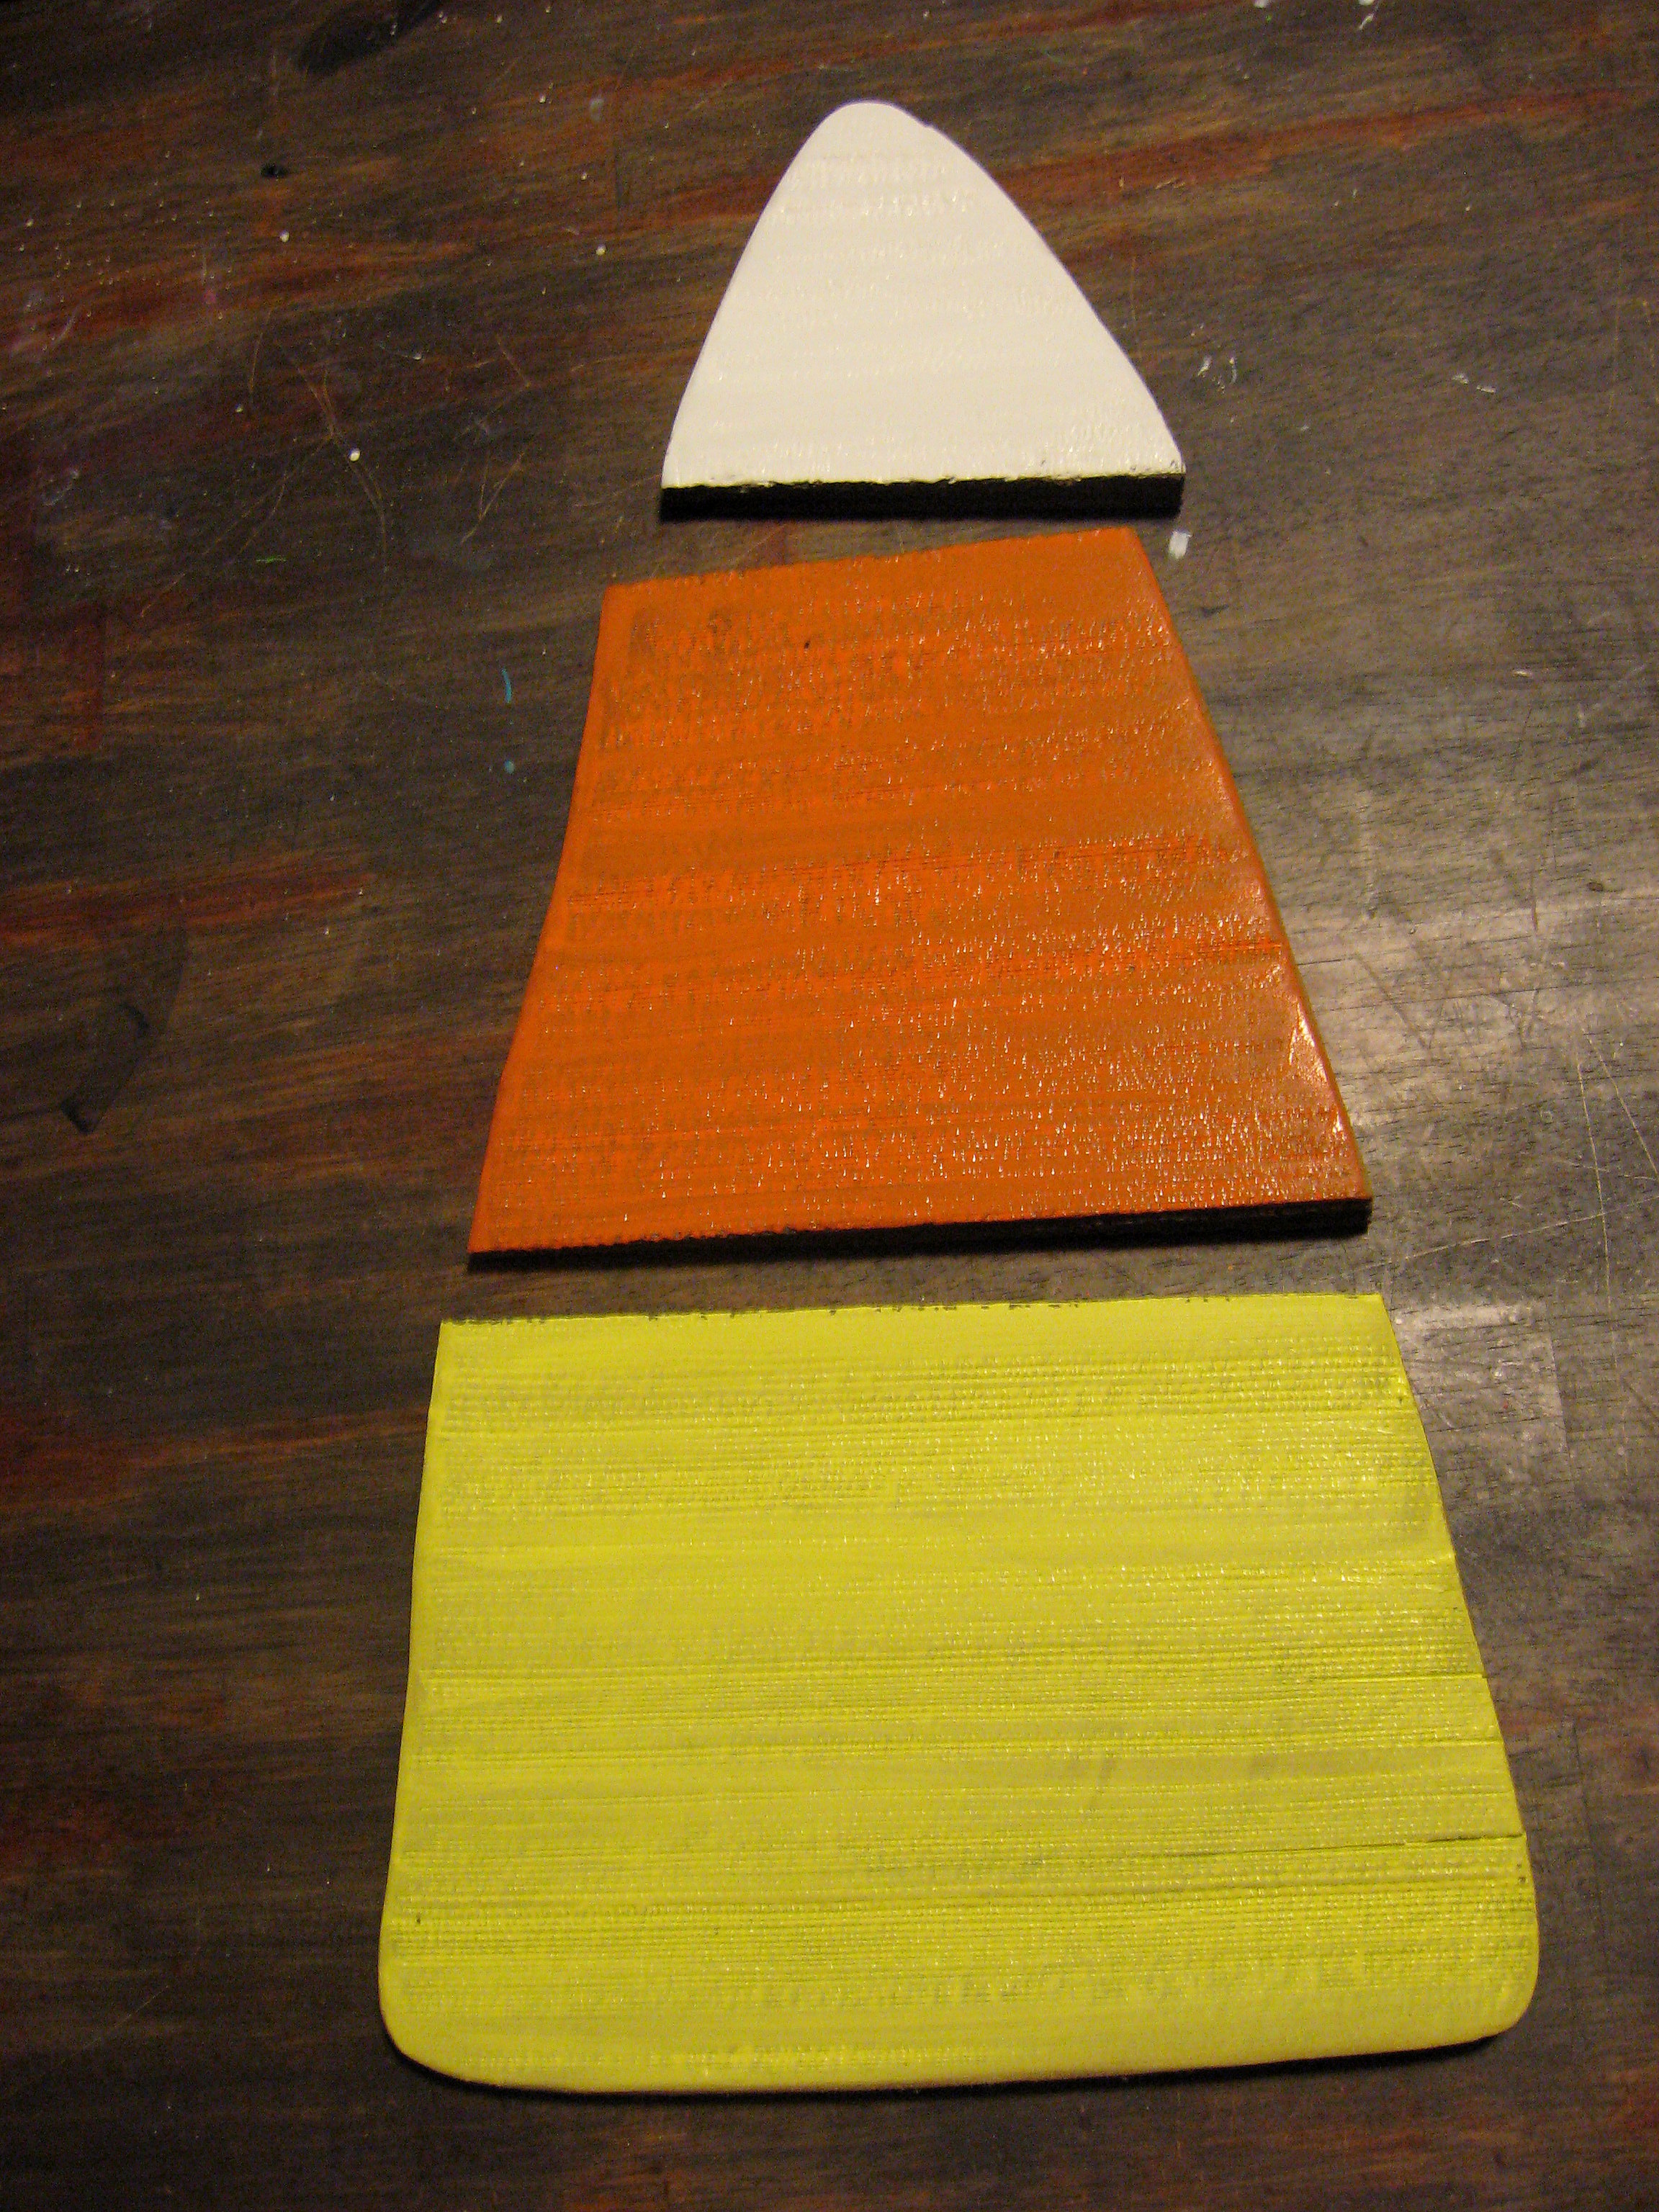
Paint the pieces orange, white and yellow, let dry then rough it all up with a sanding block. Now paint each piece with brown stain and then wipe off with a rag, leaving the stain down in the crevices of the wood.
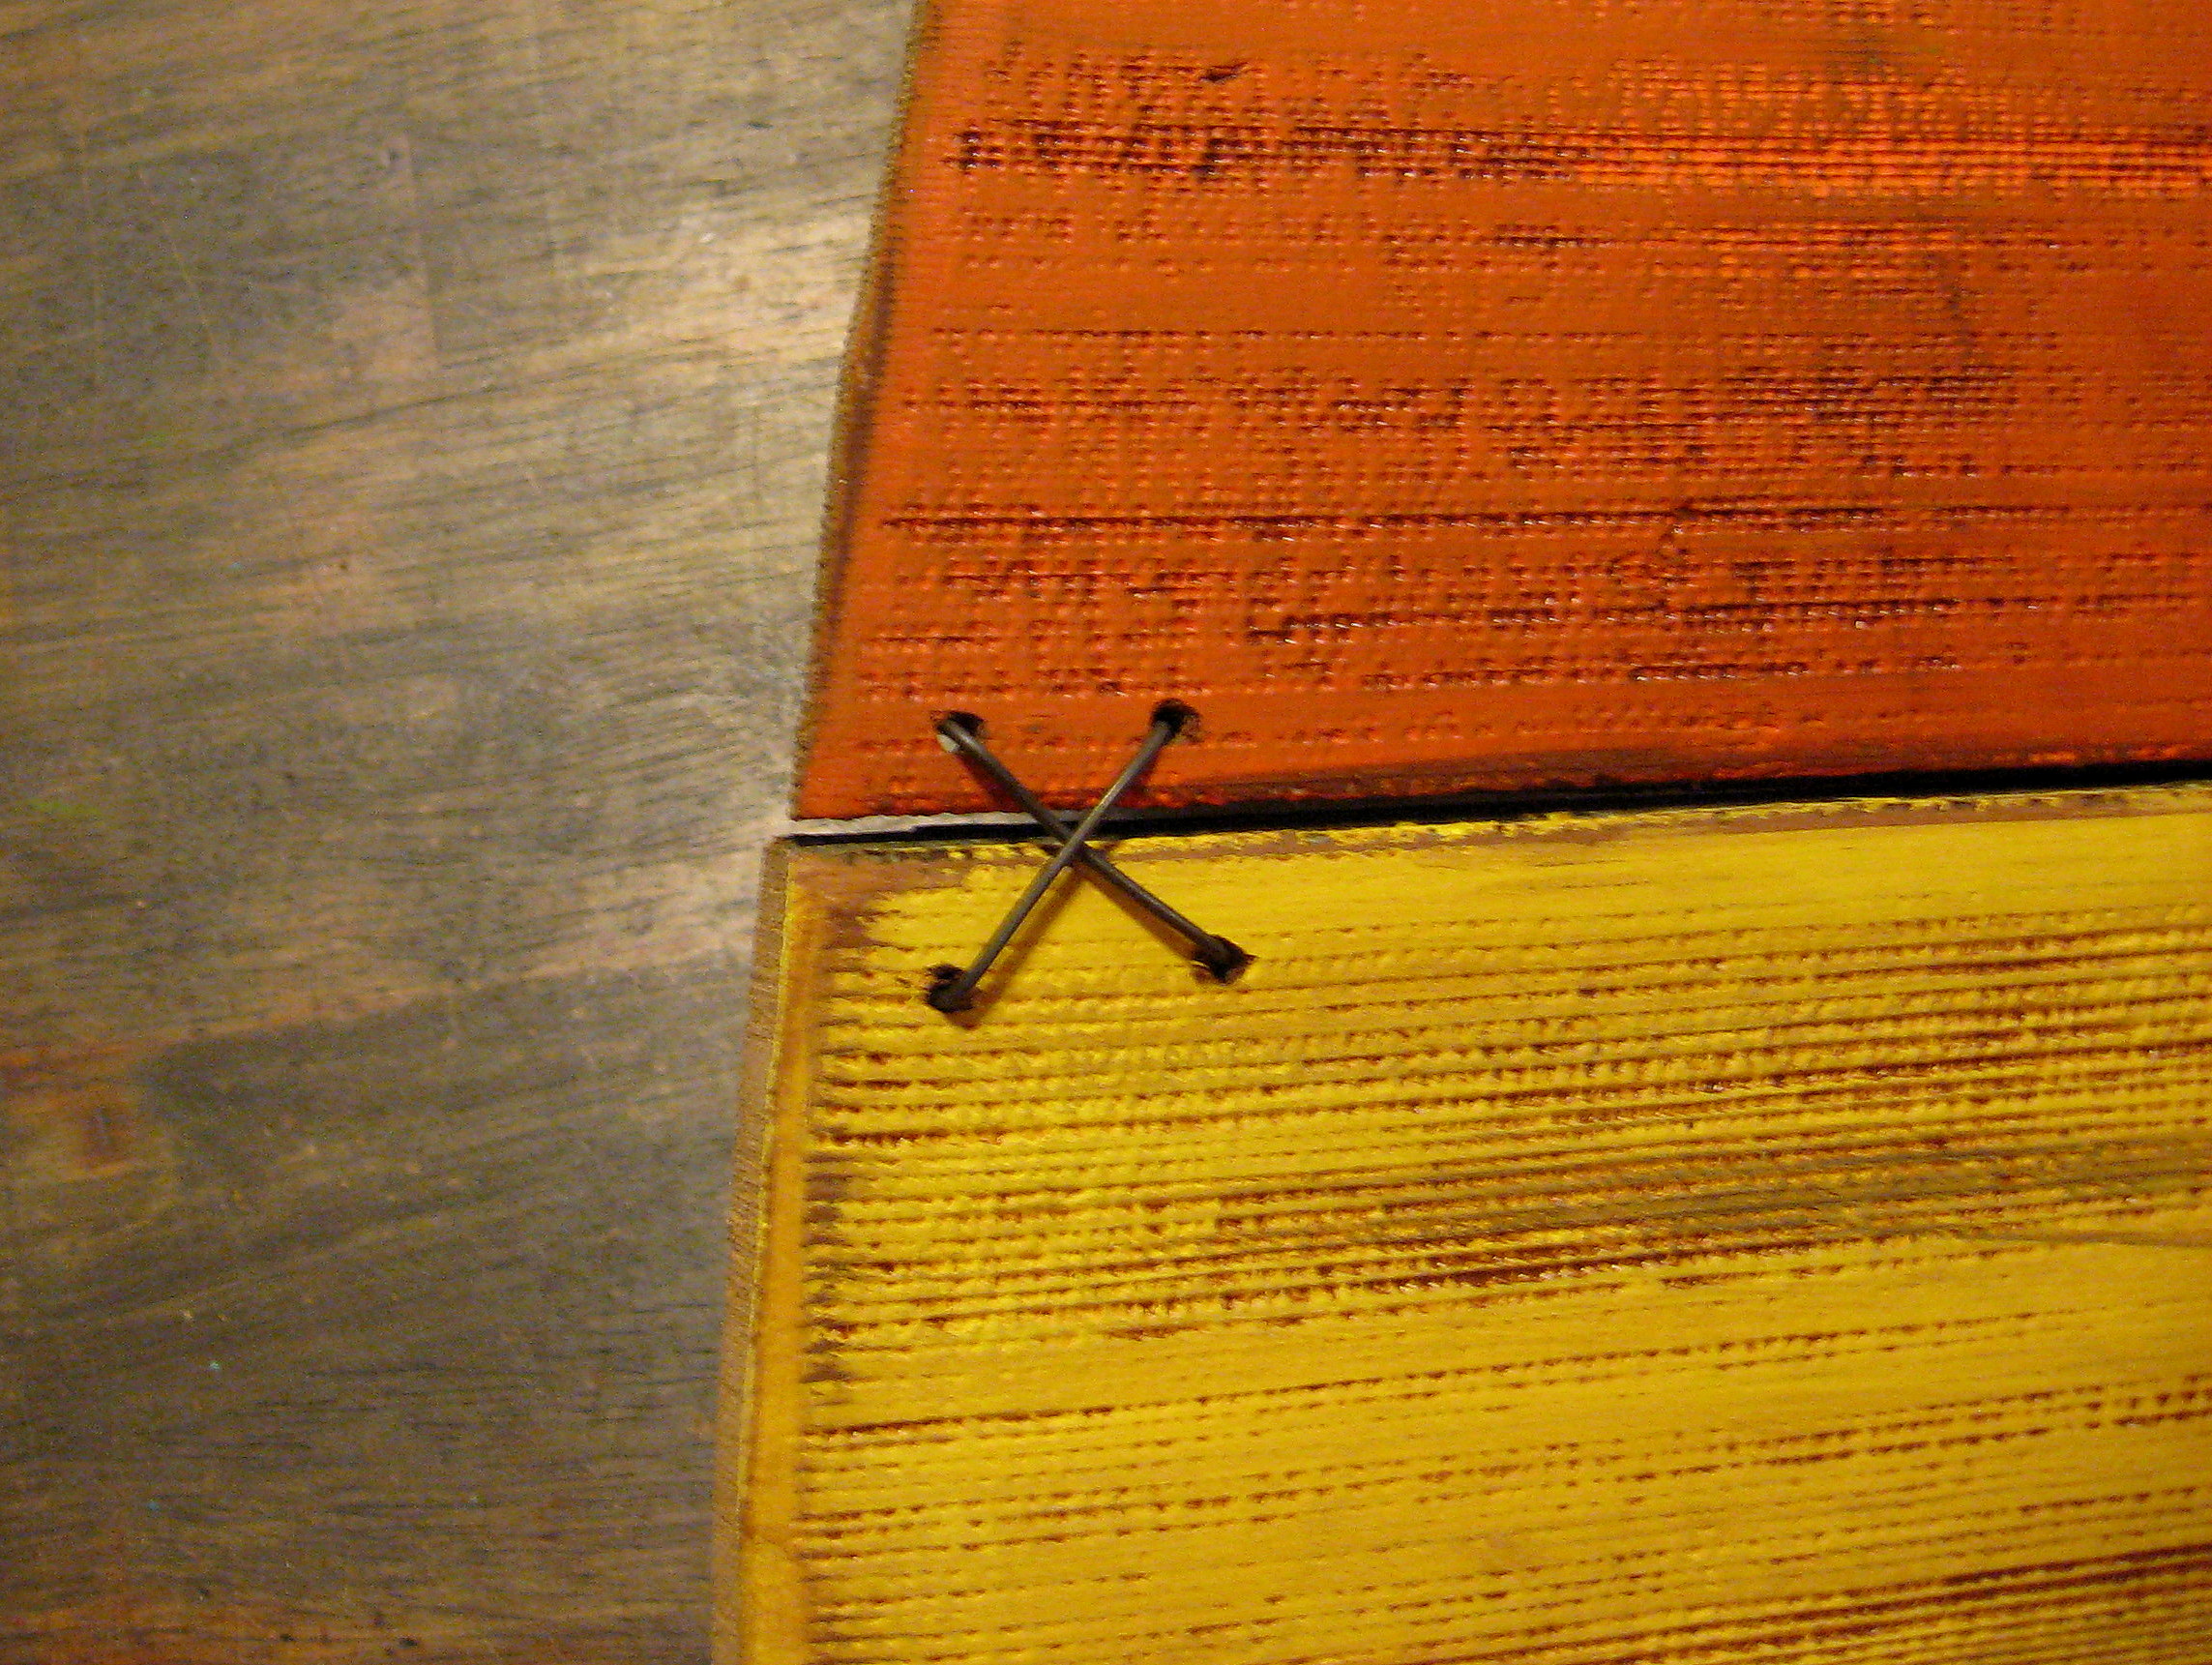
 Once that’s dry, drill holes in each piece like in the picture below. This is how you will attach the pieces together.
 Cut 8 pieces of wire about 5-6 inches long.
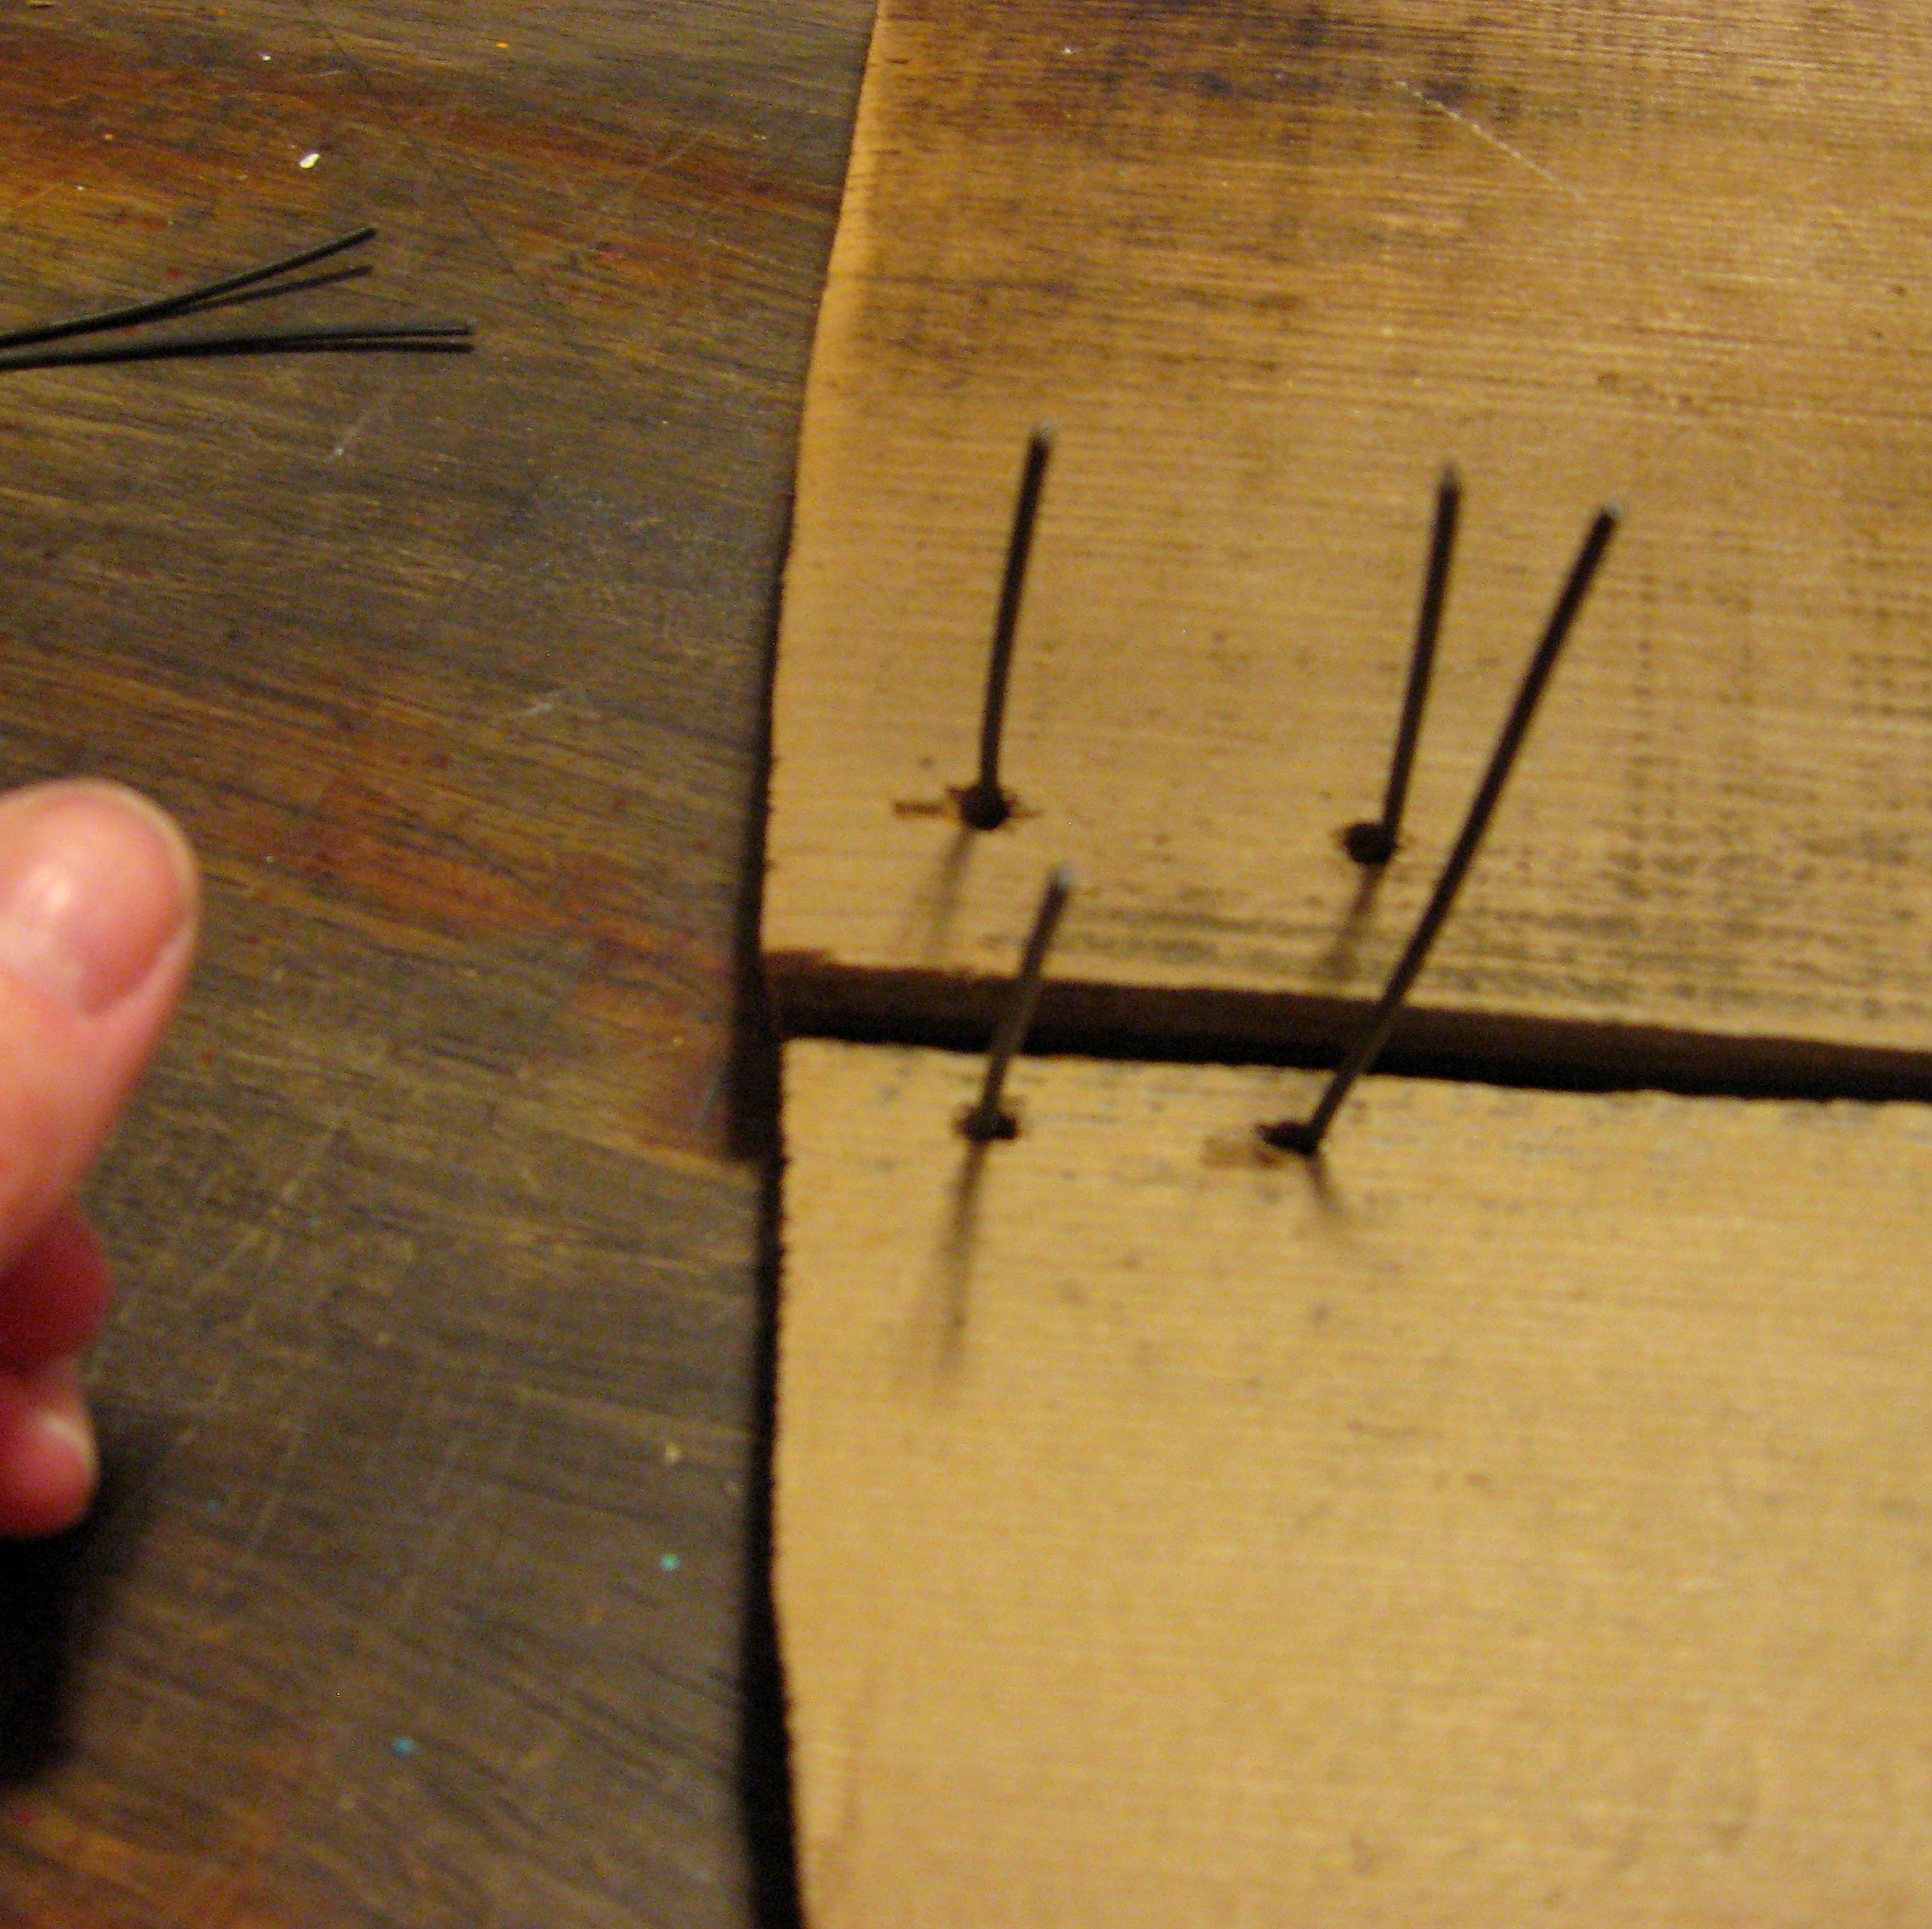
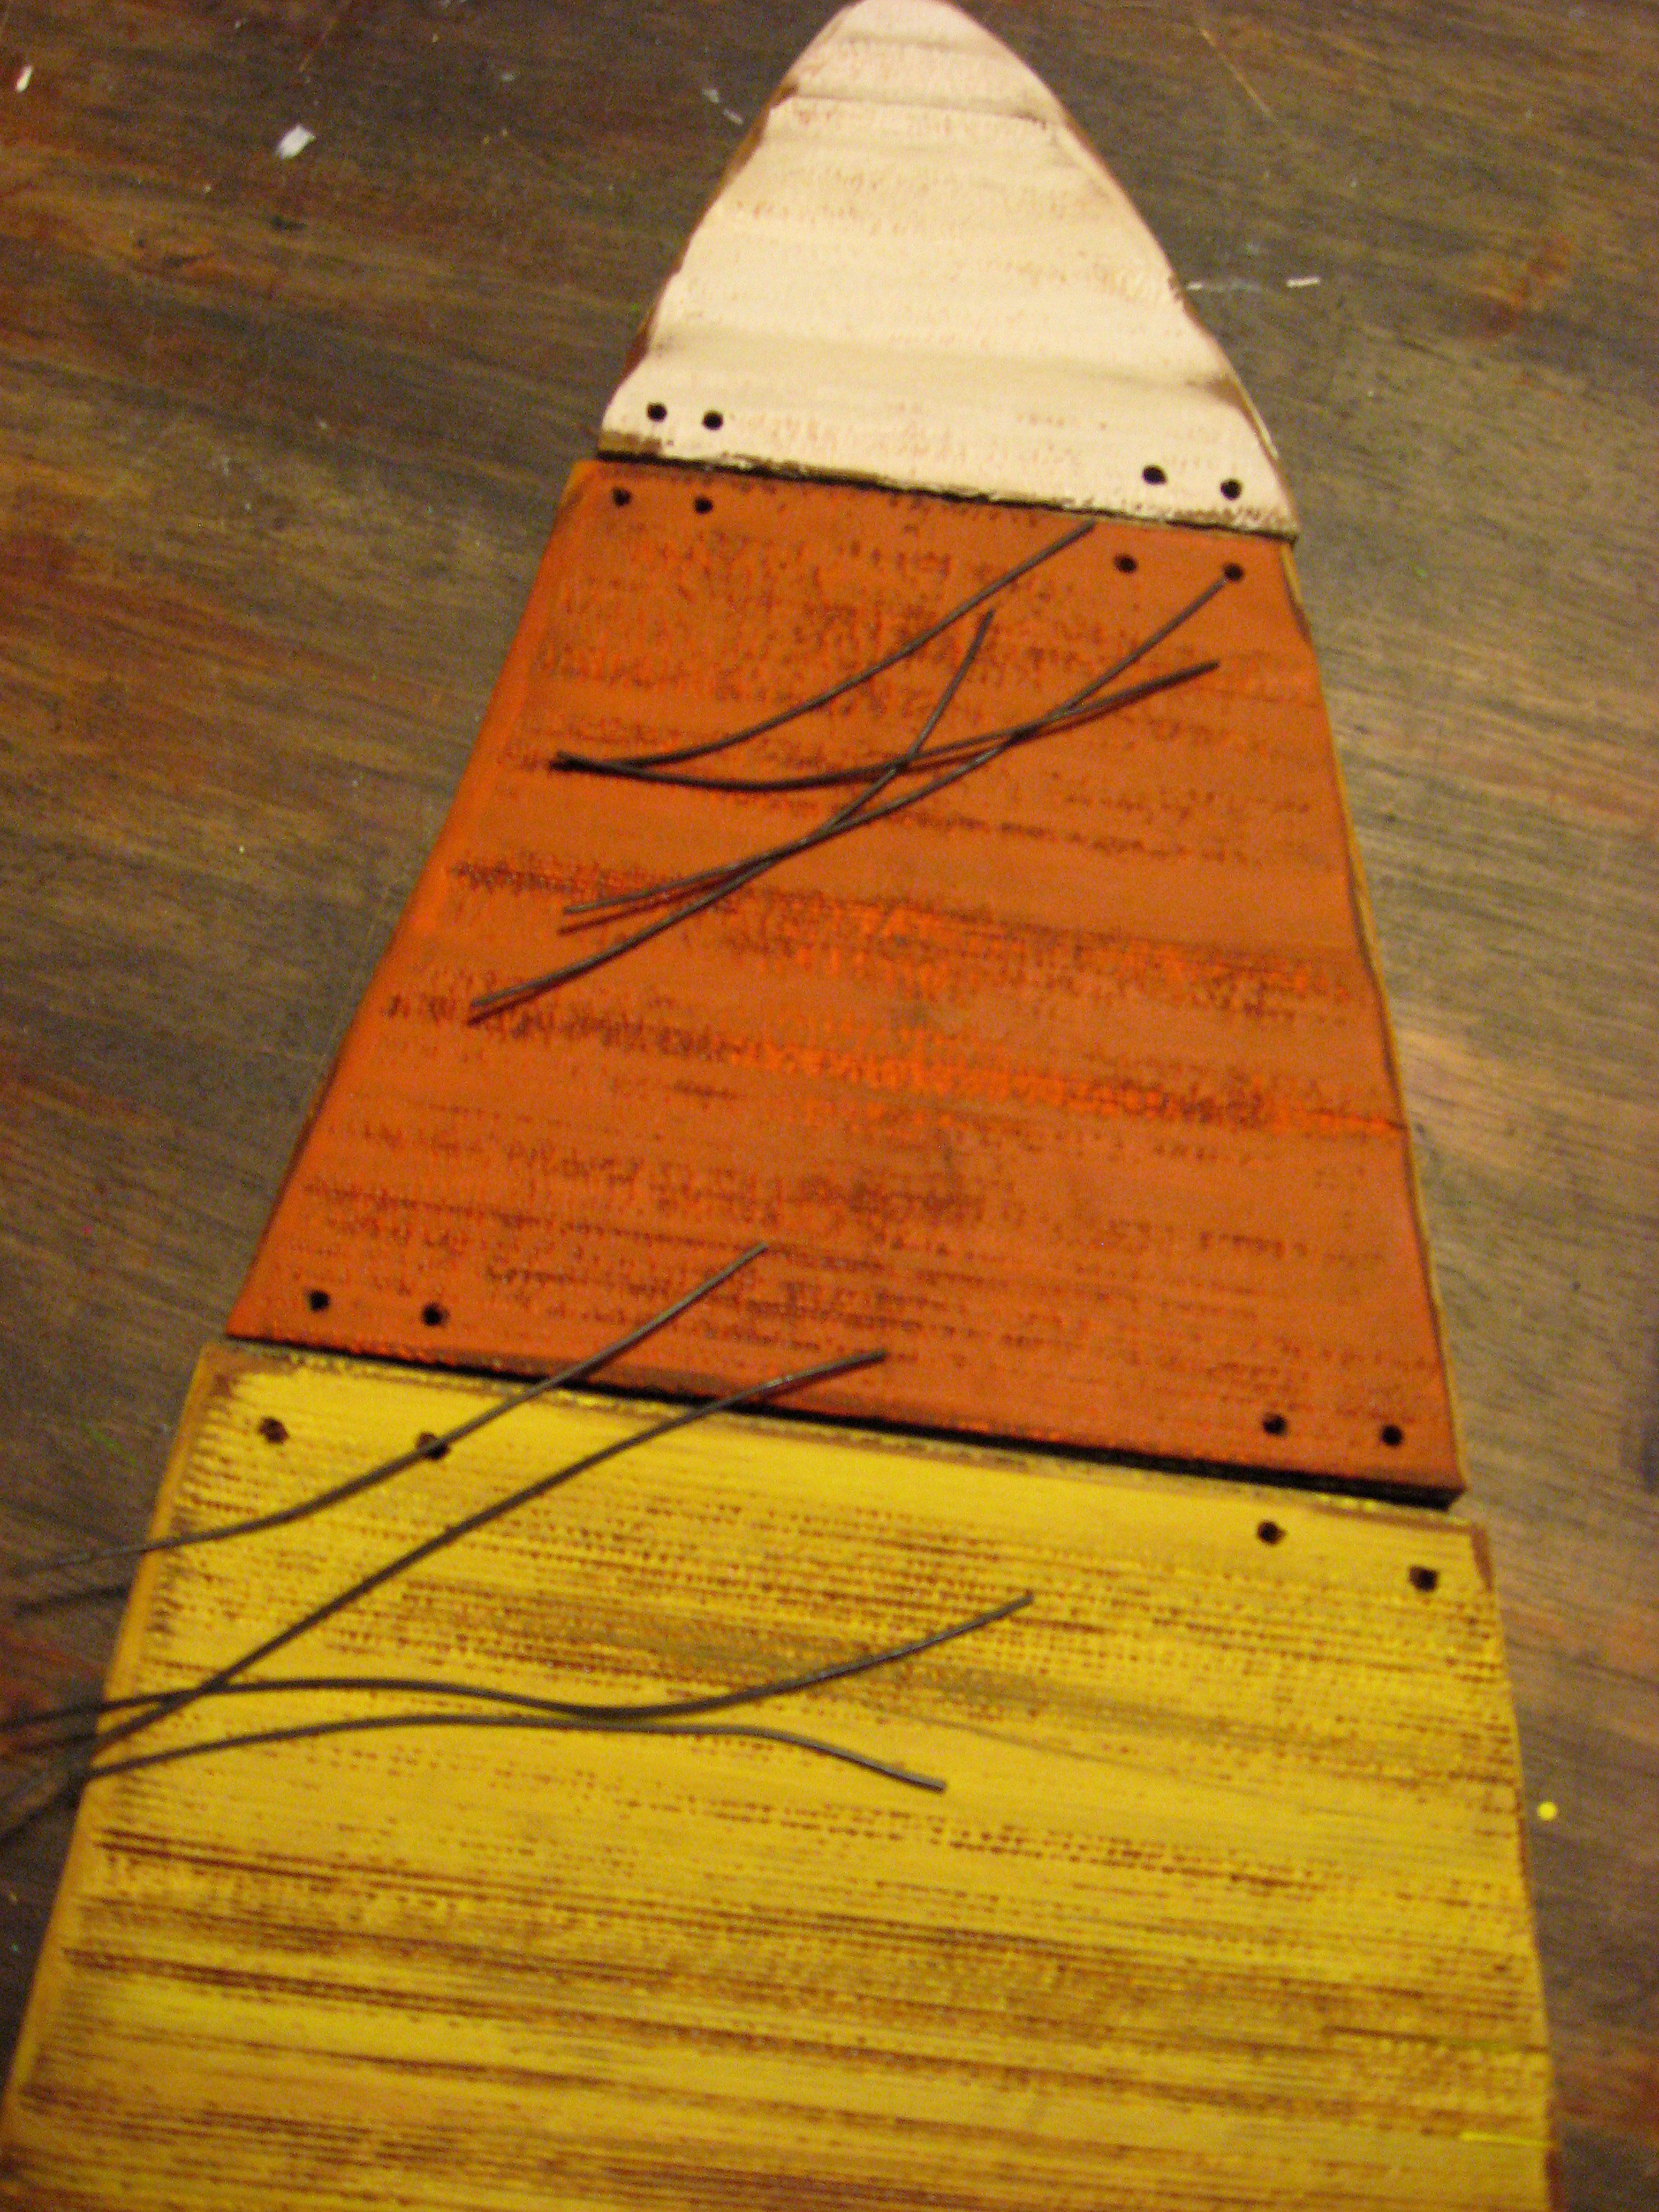 Line the pieces of wood up right next to each other – so the holes align – and use the holes to determine where you will bend each wire.
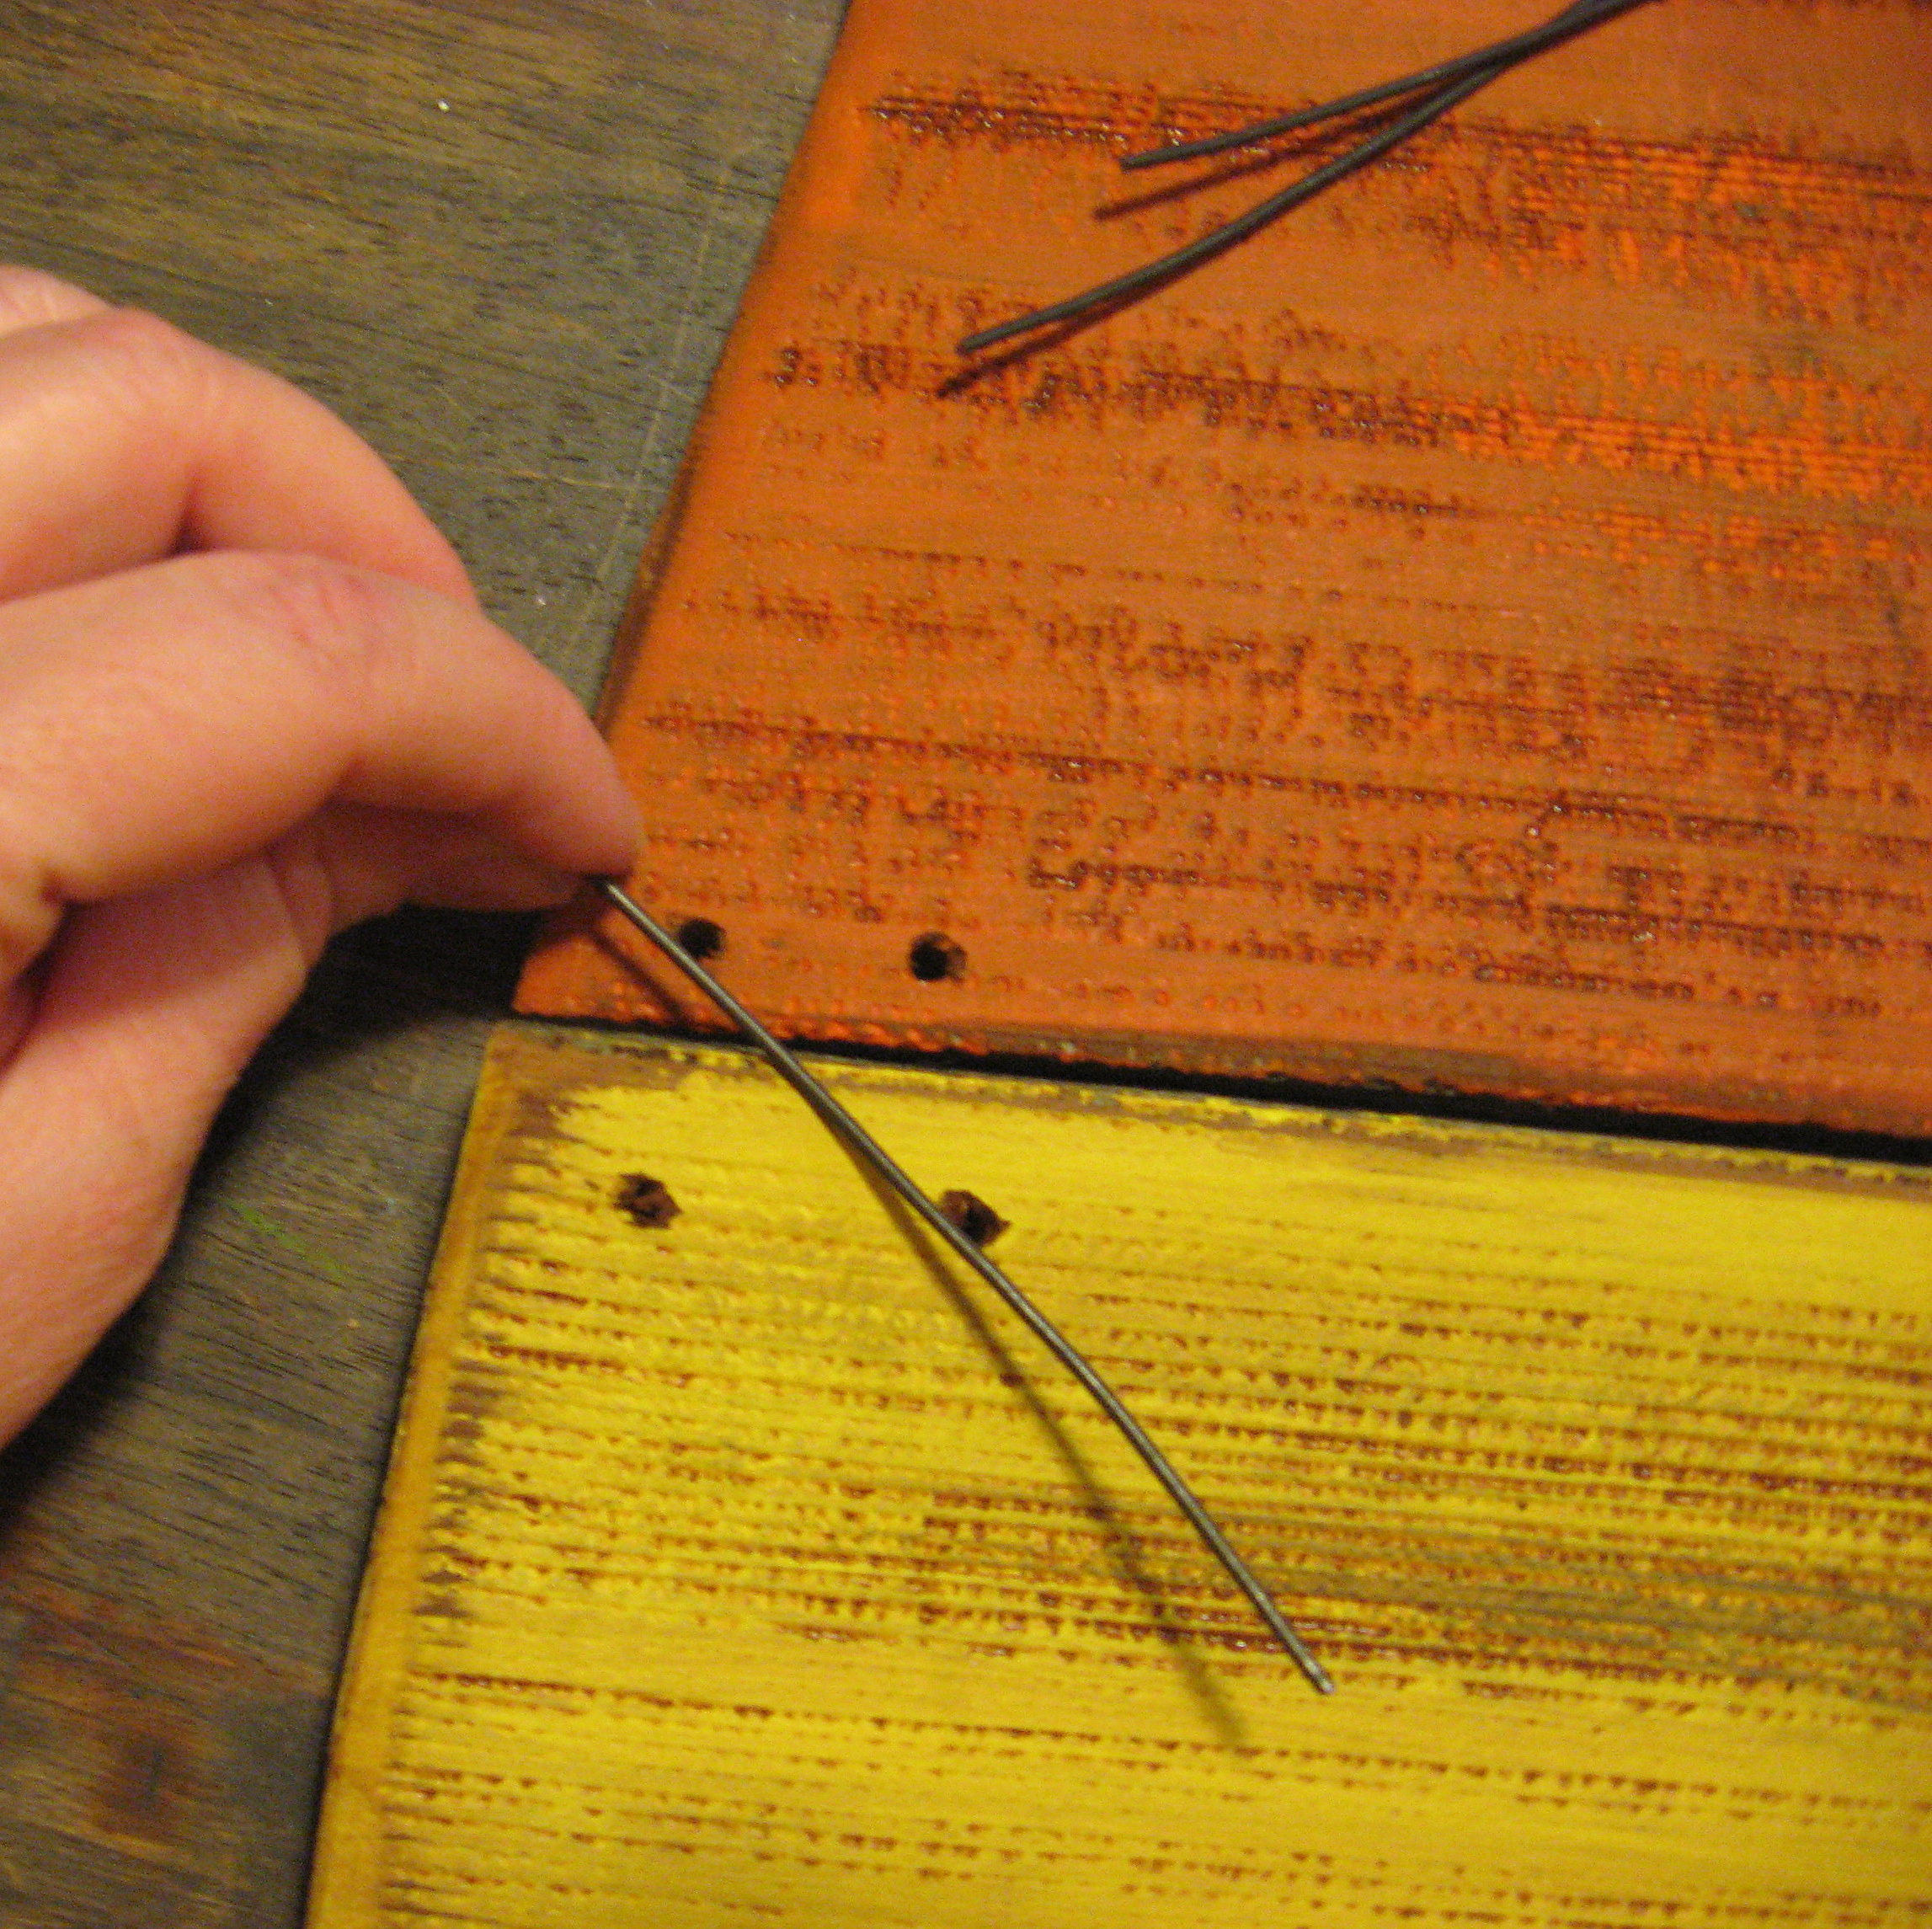 Bend each wire so that it looks like a huge staple, like this:
 Then insert the “staples” through the holes so that they criss cross over each other, like this:
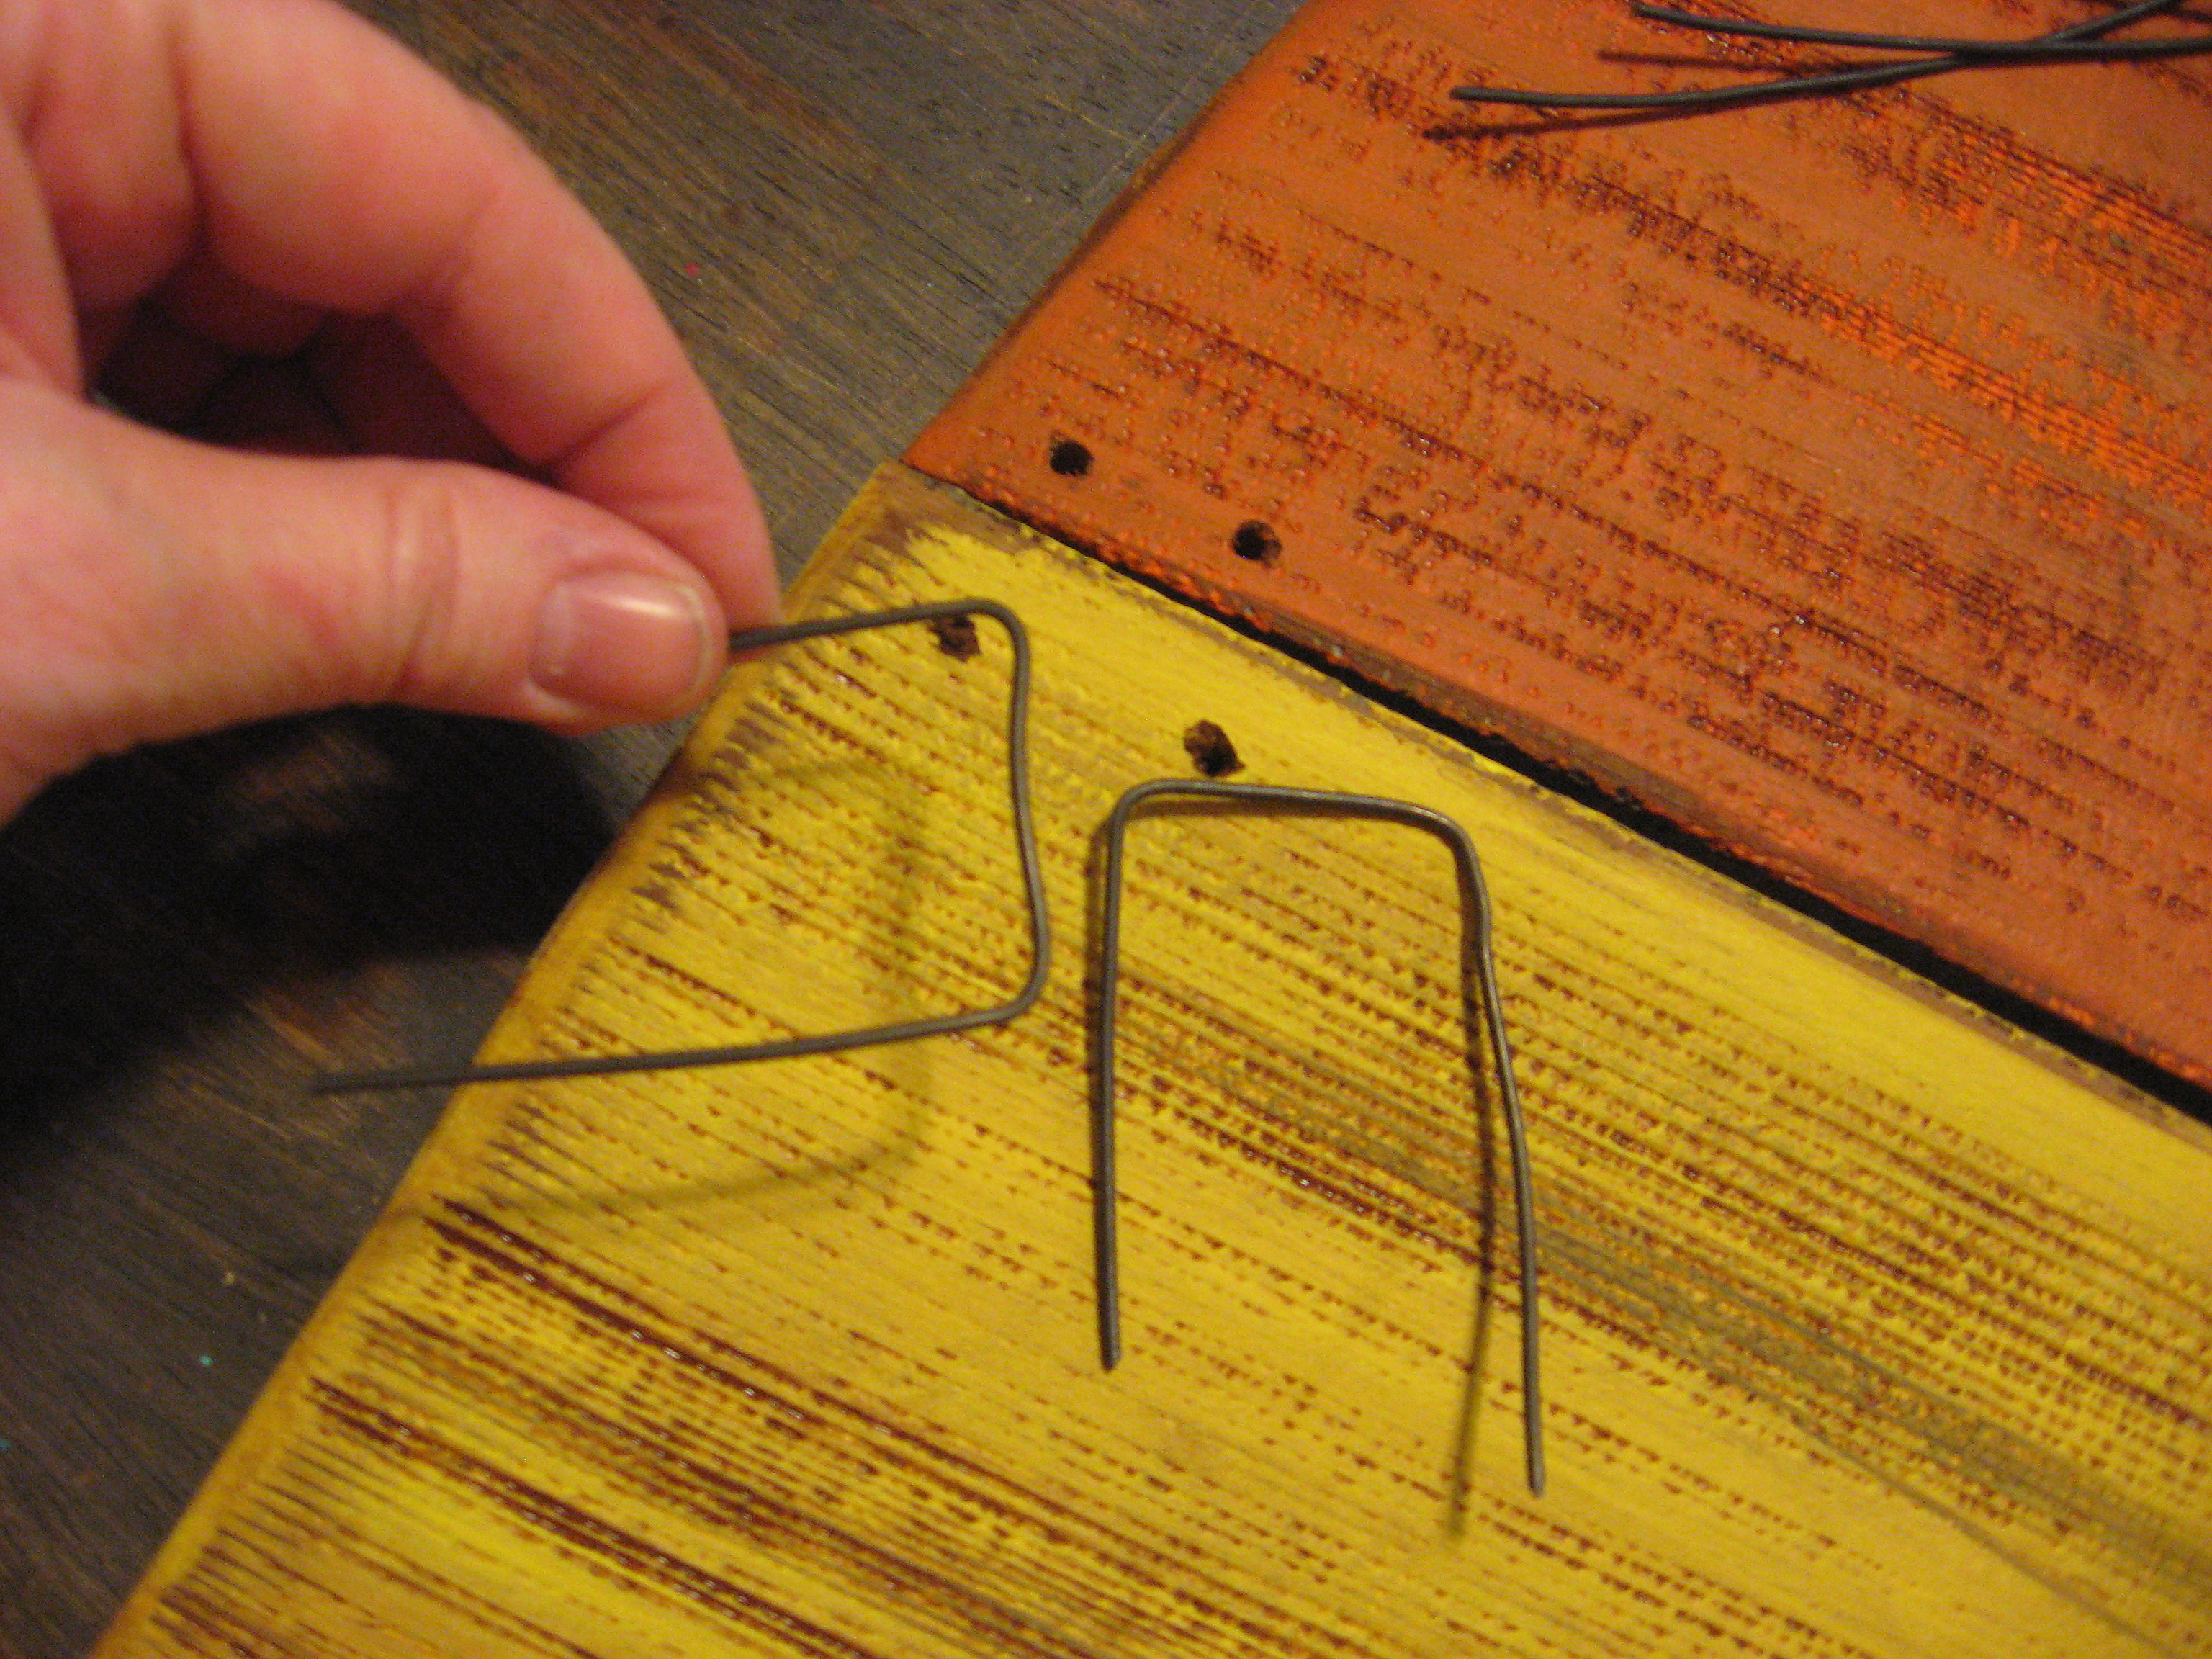
 Turn the whole thing over, where you will see the “staples” all sticking straight out the back.
 Use a pair of needle nosed pliers to bend the wires down. I like to curl the ends under a bit so that they aren’t poky. If I’m going to hang this on a door – or some other surface that I’m afraid will be scratched by the wires – then I would cut out a piece of felt or craft foam and glue it on the back to cover the staples. That will also dampen the noise of it banging when you open and close the door.
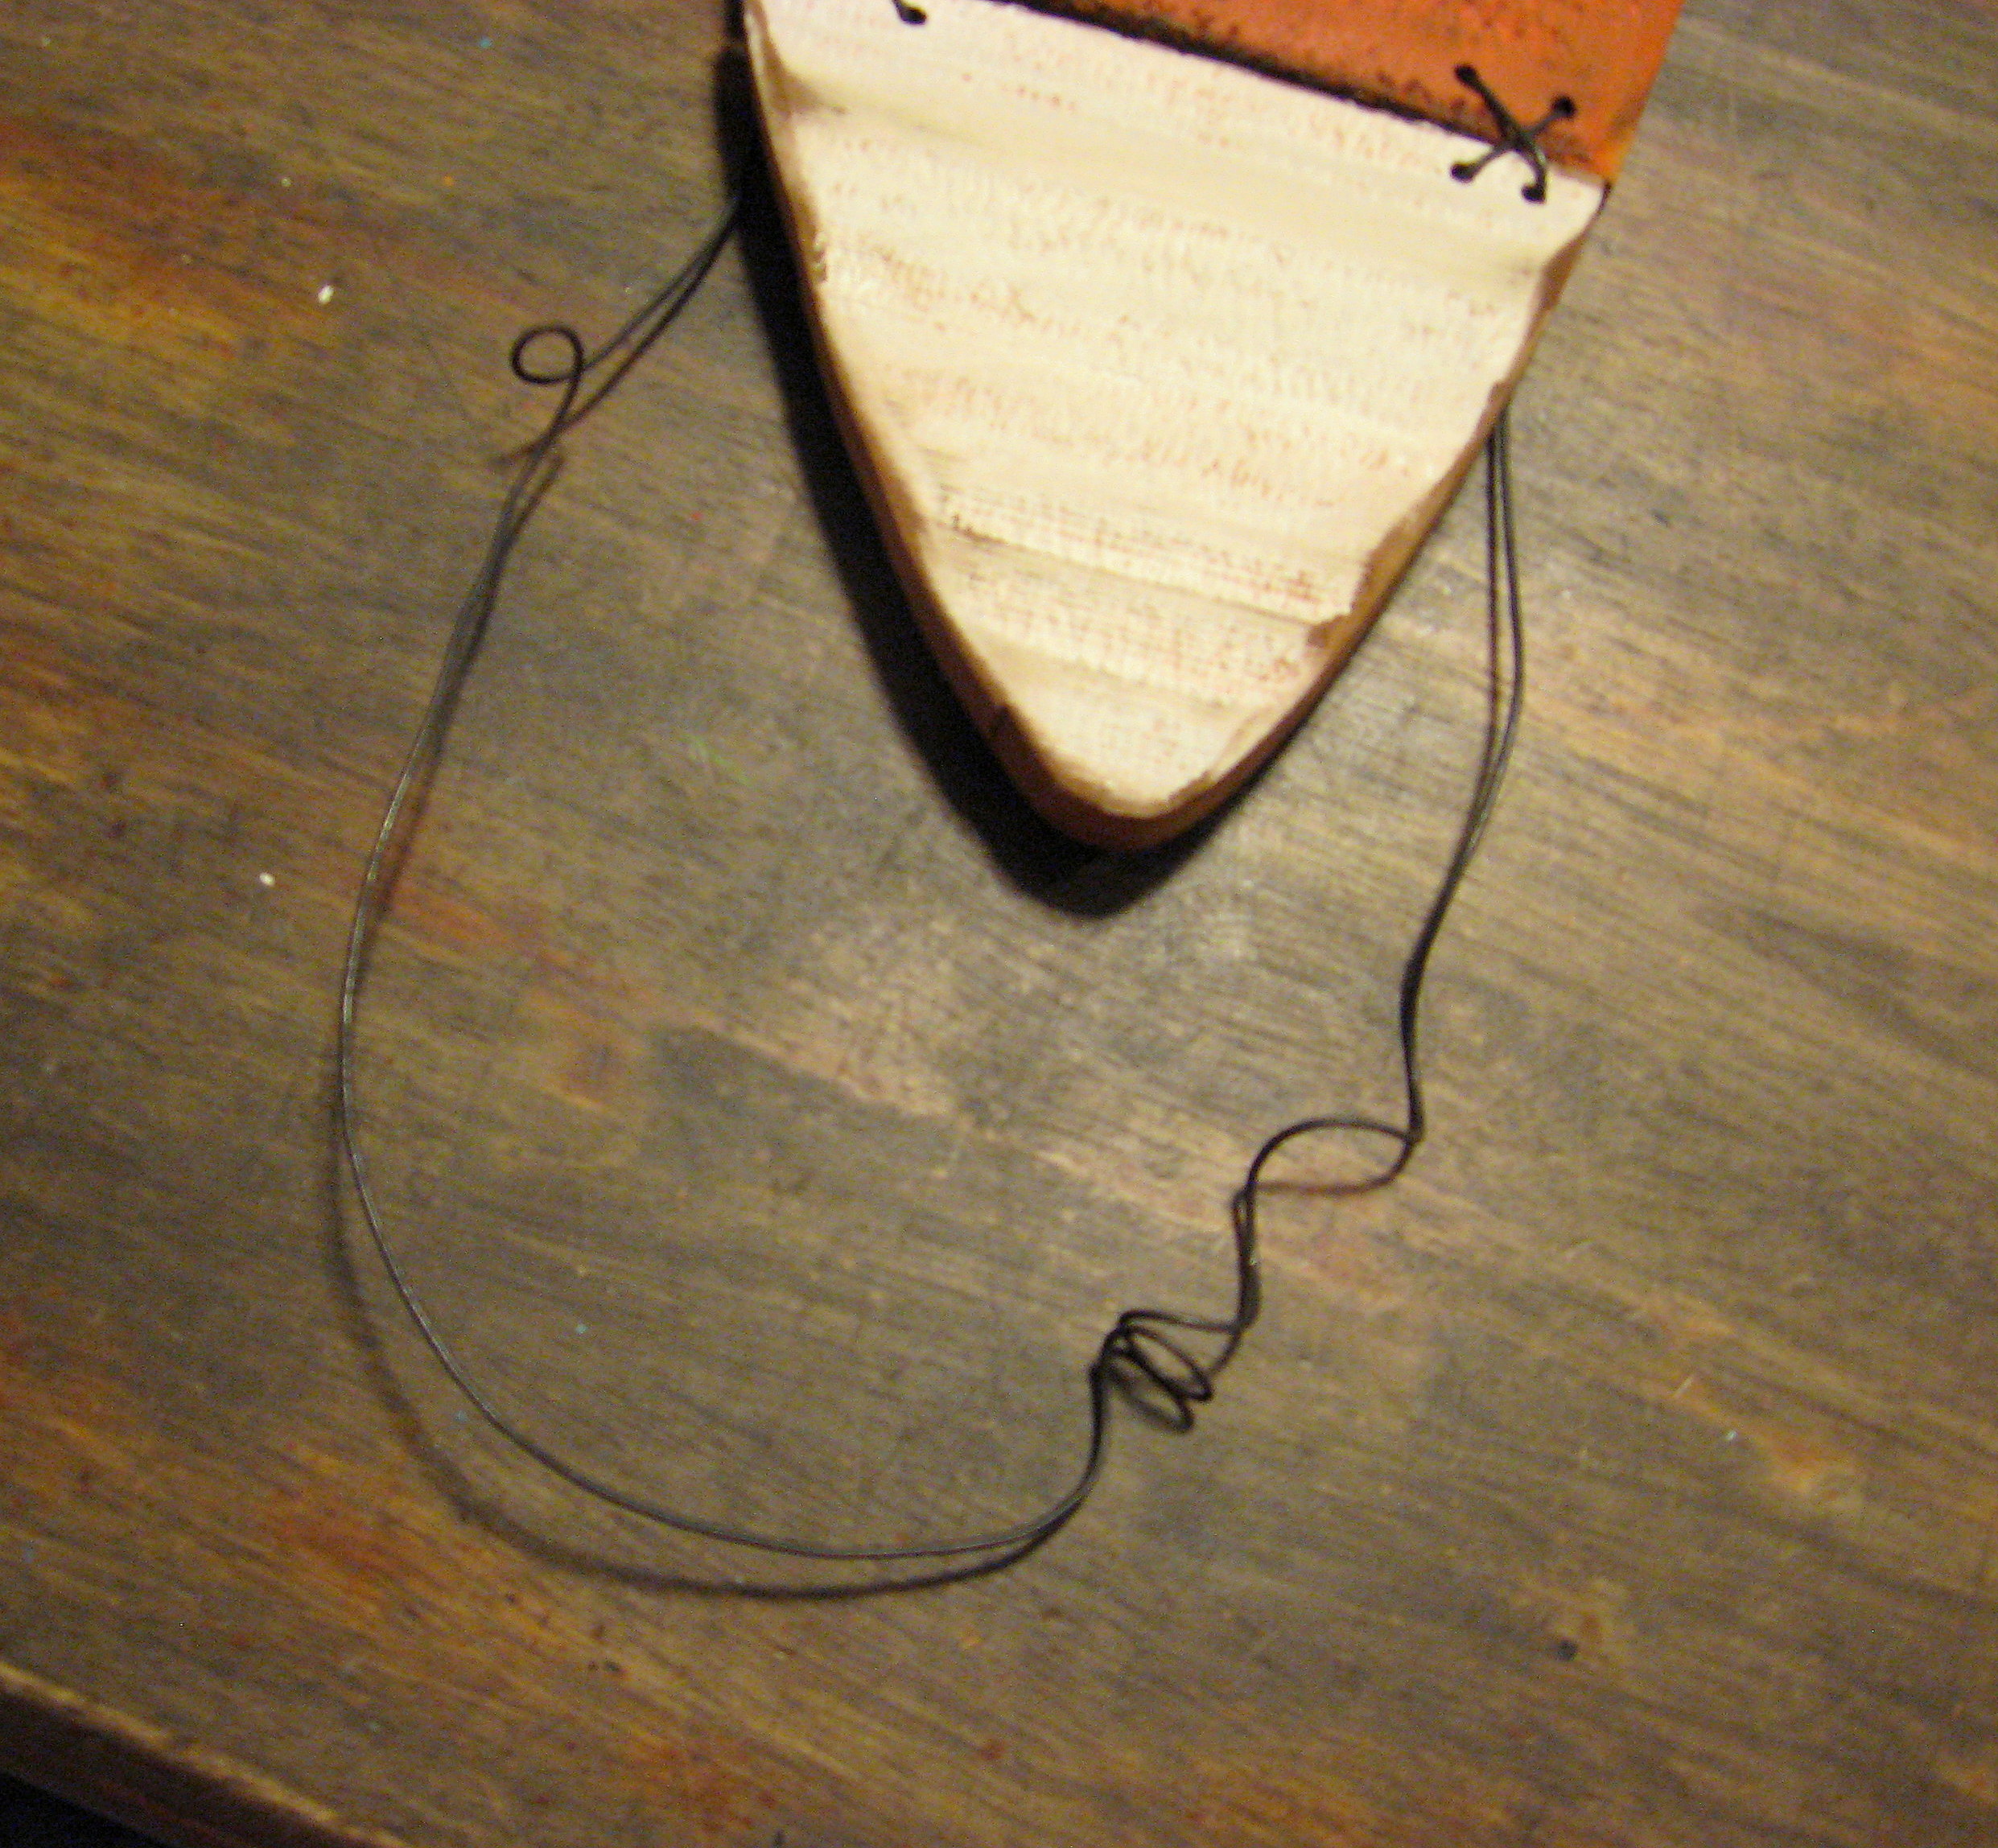
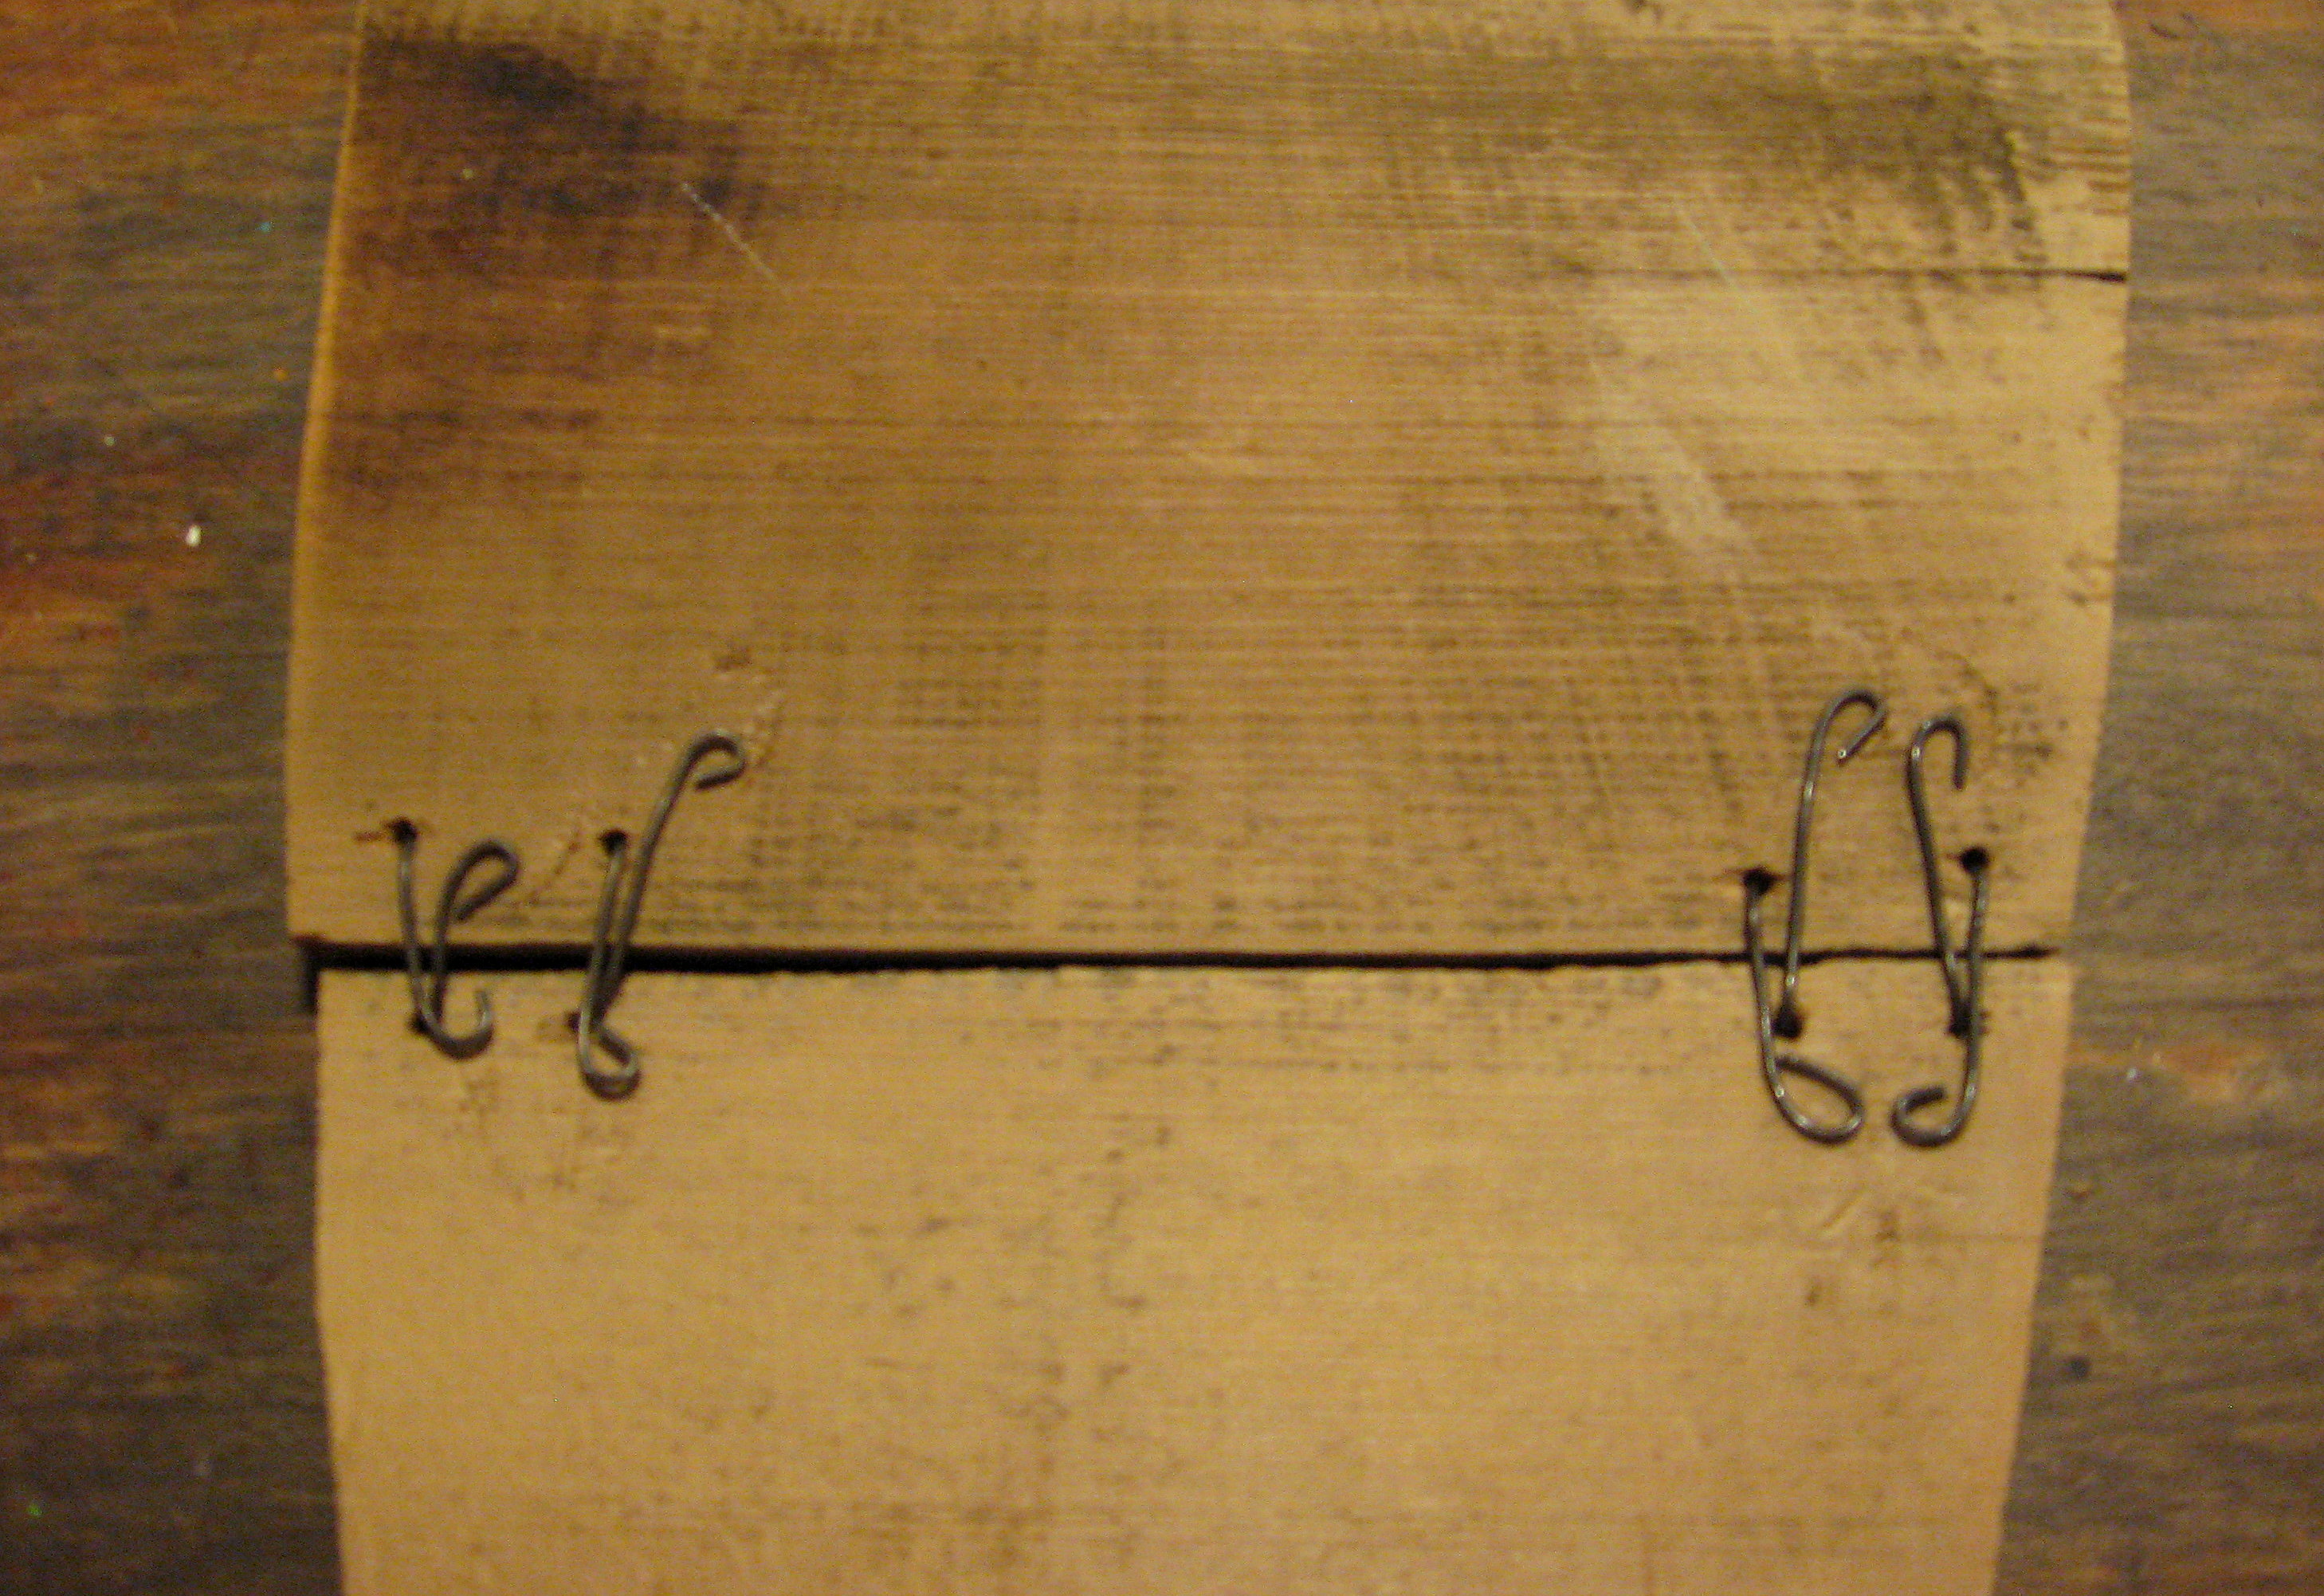 Now cut a longer piece of wire to use for hanging the finished piece. Bend the ends at a right angle at about 6 inches in from each end. Push those ends under the smaller wires on the back of the wood, inserting each end of the wire in from each side of the candy corn. Bend the wires around to secure them and if you like, cover them with felt as above.
I like to use a pencil to add a couple of curls into the wire.
 Then cut small lengths of different colored matching ribbon and tie on one side,
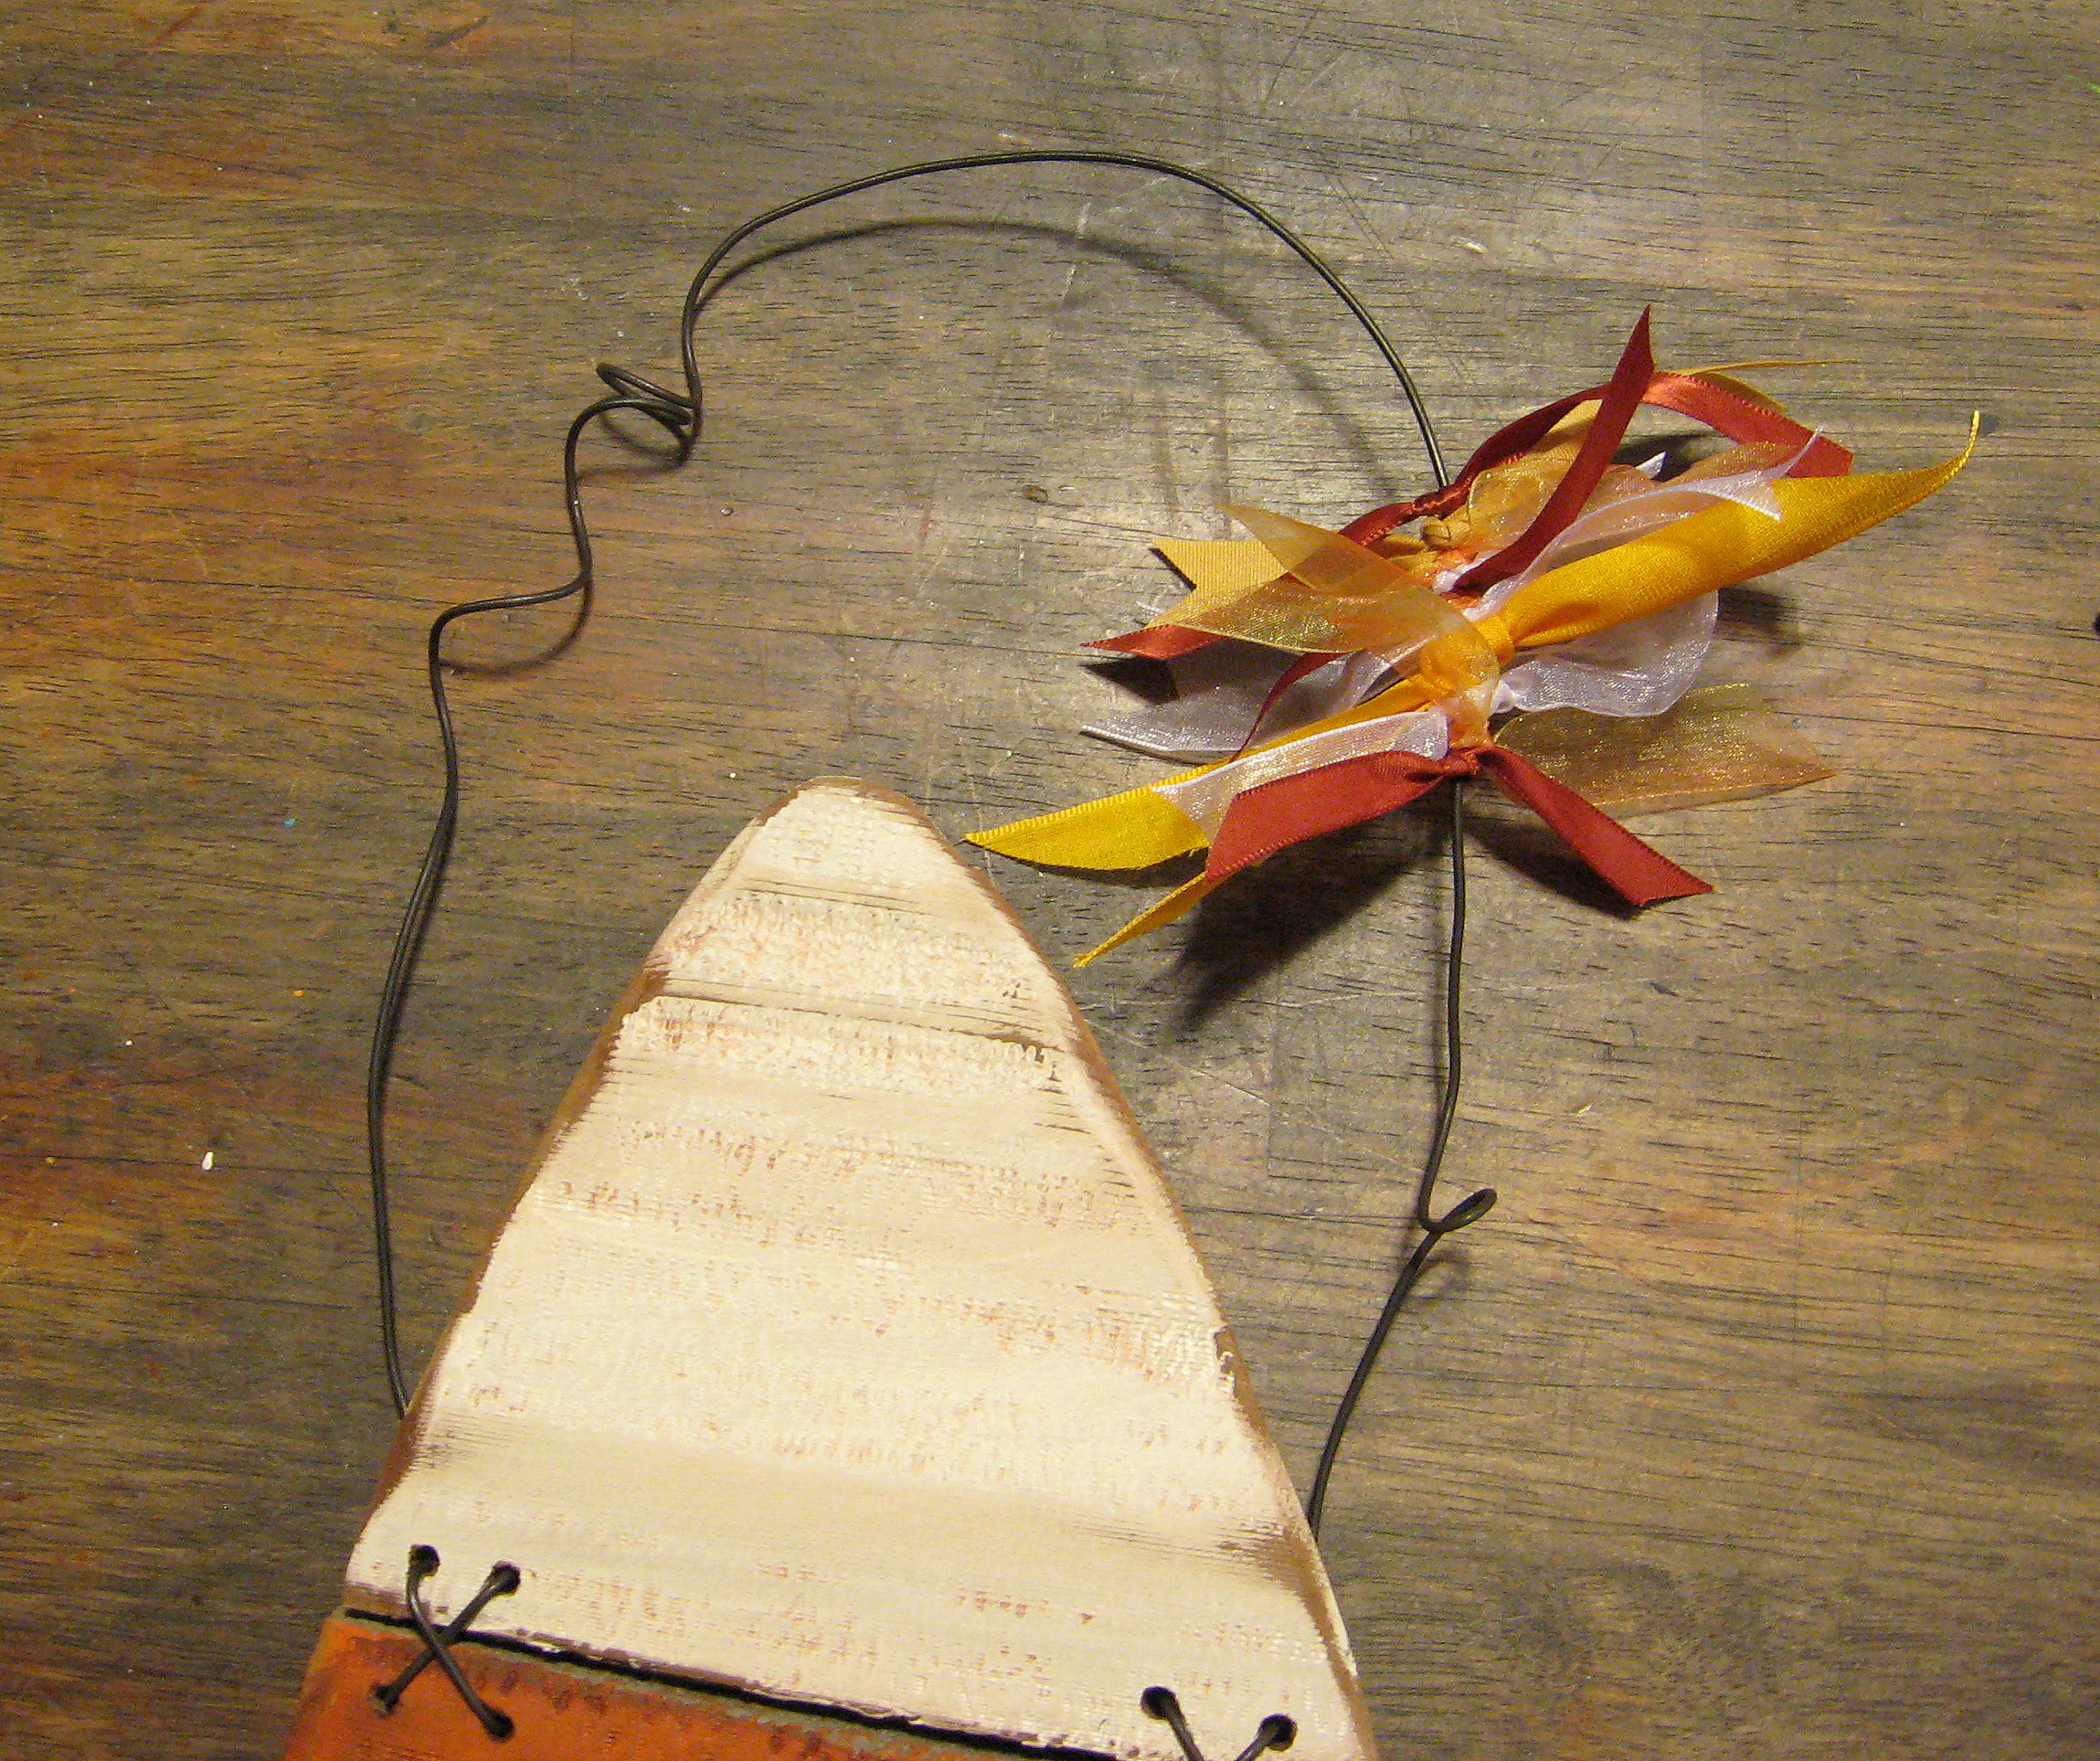
and hang!
Carrot Cookies
I have such happy memories of these cookies – coming home on cool fall days after school to a plate of carrot cookies, warm and waiting with a tall glass of milk. My sister mentioned them the other day and I realized that I haven’t made them in years and years. I dusted off the recipe last weekend and made a batch. My kids loved them just as much as I used to; they didn’t last long!

Carrot Cookies
- 2 cans of canned carrots are just right for this recipe.
- This makes a TON of cookies, so you could half it if you need to.
- I LOVE the frosting on these cookies; I tend to put a lot on and so I usually double the frosting recipe.
- The original recipe calls for 1 cup of chopped nuts. I think my mom usually used walnuts, but I am allergic so I leave them out.

Do You Boo?
Does your neighborhood Boo? Now that October is here, I know that my neighborhood will soon be filled with colorful “Boo” signs on front windows. Don’t know what I’m talking about? Let me explain.
To “Boo” someone, usually in your neighborhood or workplace, make two copies of a “Boo” picture and two copies of the poem/ instructions and two plates, bags or baskets of treats. Drop them off – anonymously – to 2 neighbors or coworkers. The recipient hangs up the “Boo” picture to tell everyone that they’ve already been boo’d, and the poem instructs them to repeat the process and deliver goodies to 2 more people. It really is one of my favorite traditions this time of year. I love watching the little “Boo” pictures popping up throughout the neighborhood and my kids LOVE it when it is our turn to sneak a treat onto someone’s doorstep, ring, and run!
If your neighborhood doesn’t already do this, it couldn’t be easier to start! I’ve found some links of places around the internet that offer free printable poems and pictures. So cute!
https://christmas.organizedhome.com/crafts/halloween/boo-youve-been-booed-poem-signs
https://peasandbananas.com/15/halloween-boo-poem/
https://www.scribd.com/doc/37054670/Printable-Halloween-BOO-FLYER-The-Tomkat-Studio
https://gift-gazette.blogspot.com/2007/10/youve-been-booed-start-tradition-in.html
Here’s the one we use in my neighborhood:
Outfit Hanger
Boring title? Yes. The discussion that took place in my house about what to call this project may have lasted a long time and just might have gotten a little heated. Never mind, call it whatever you like – I LOVE this project!
My daughter started middle school this year, and as we all know – wardrobe choices are of UTMOST importance. We were spending time at night picking out clothes, only to find out the next morning when we put them on, that maybe they didn’t quite look as good together as we wanted them to, and I thought how nice it would be to have somewhere in her room for the complete outfit to hang. You can easily finish this project in a day and it is very inexpensive.
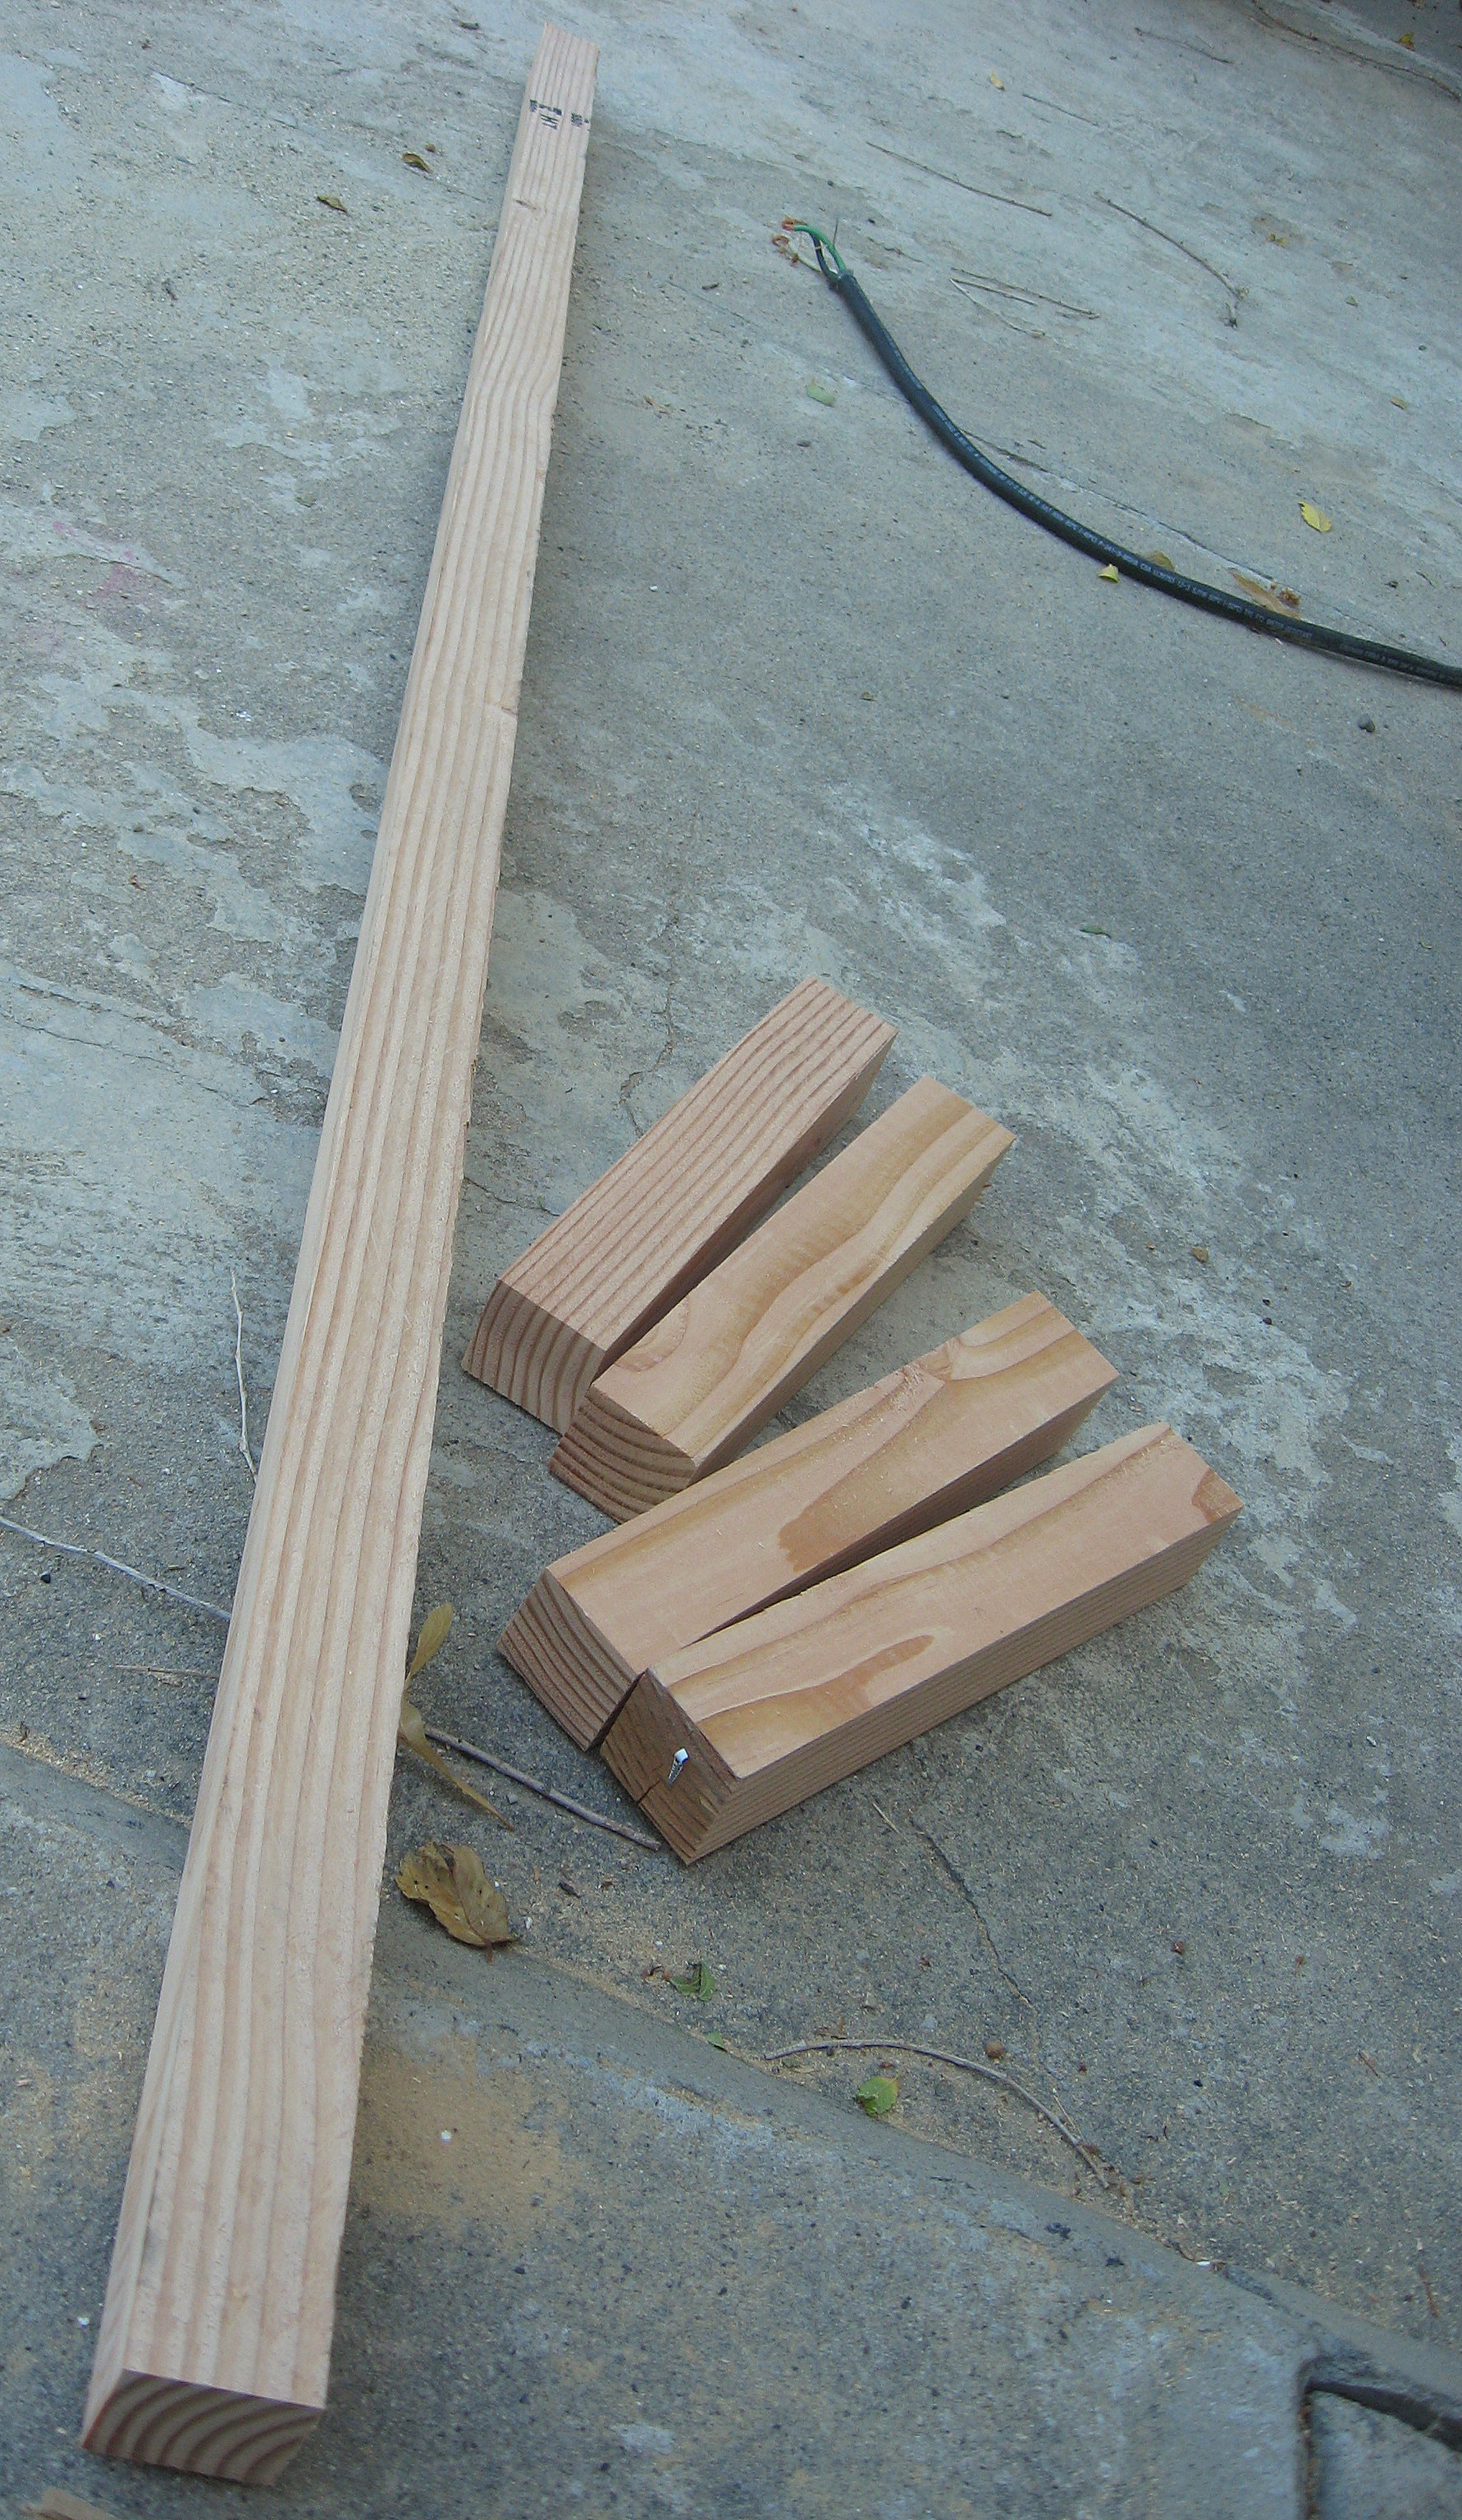
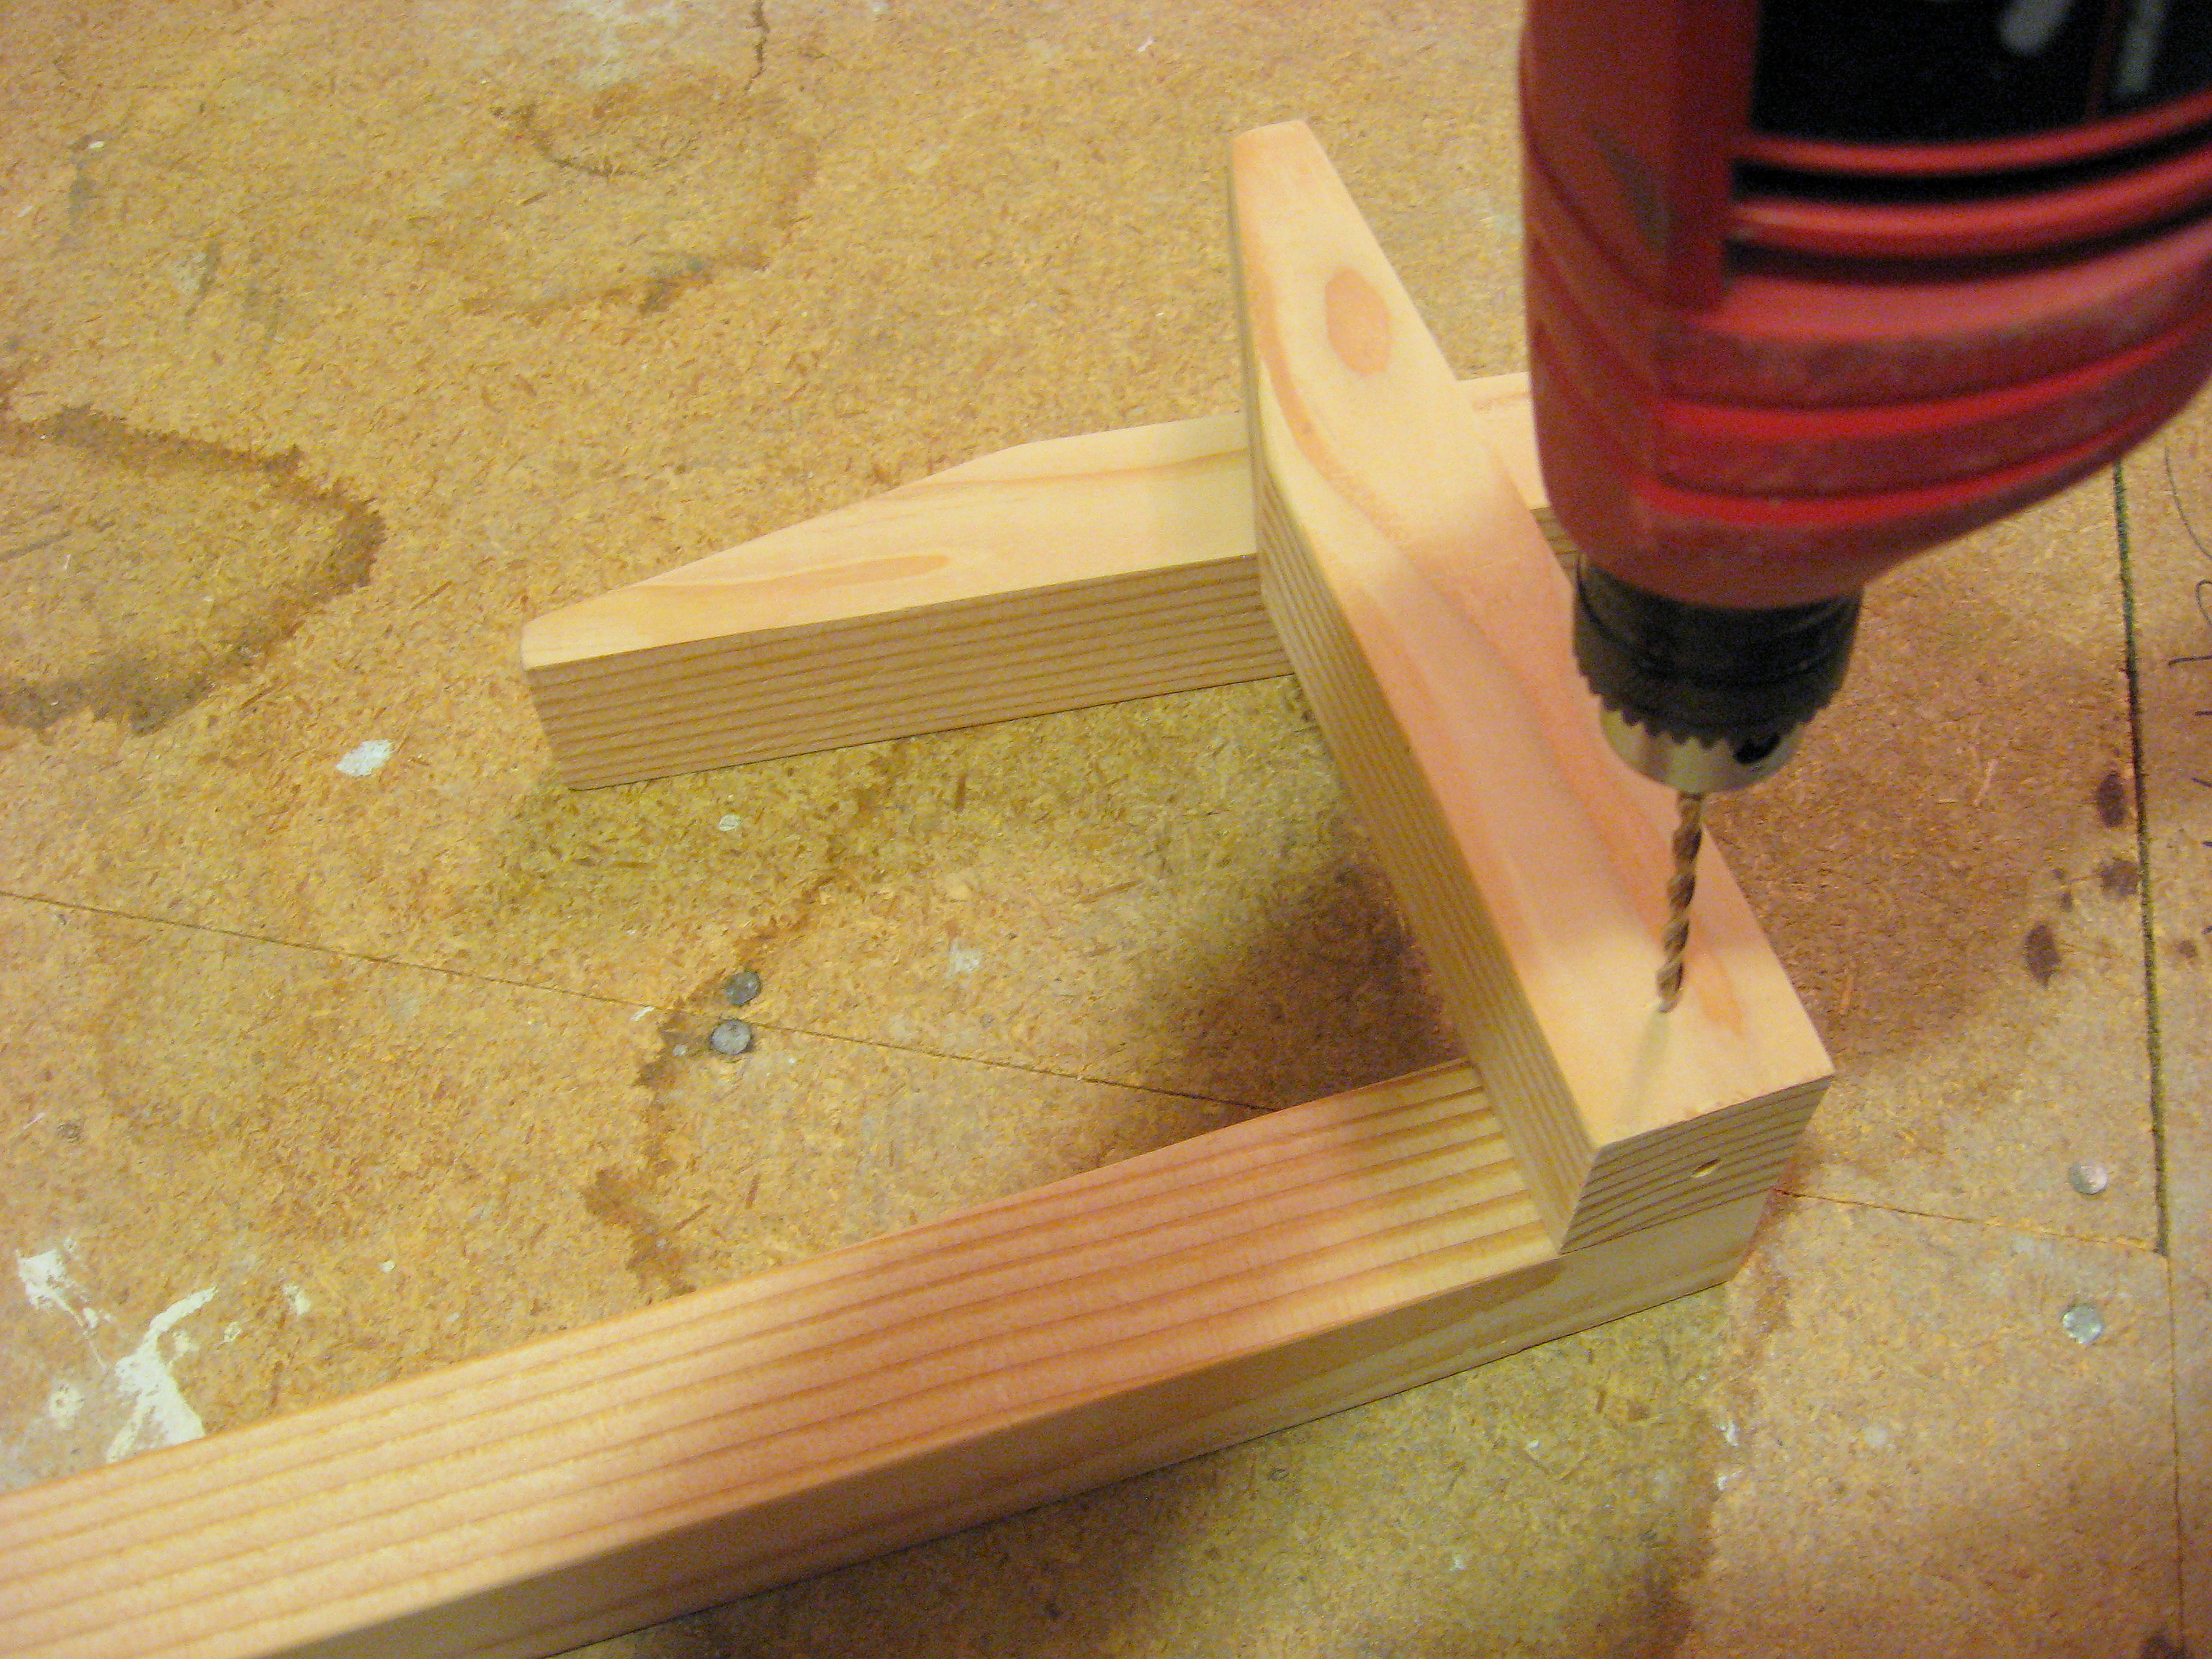
Start with a board like this from a home improvement store. It is 2 inches square by 8 feet long and cost less than a dollar. They can often be very bowed, so take your time to find one that is pretty straight.
Cut it into 5 pieces – one is 5 ft. long and the small pieces are each 9 inches long. If you are making this for someone taller or shorter, you could adjust your measurements to better reflect the size of their clothes. Sand everything down to get rid of any rough spots.
I cut my feet so they tapered at an angle, as you can see in the photo below, but that isn’t necessary if you don’t want to do it.
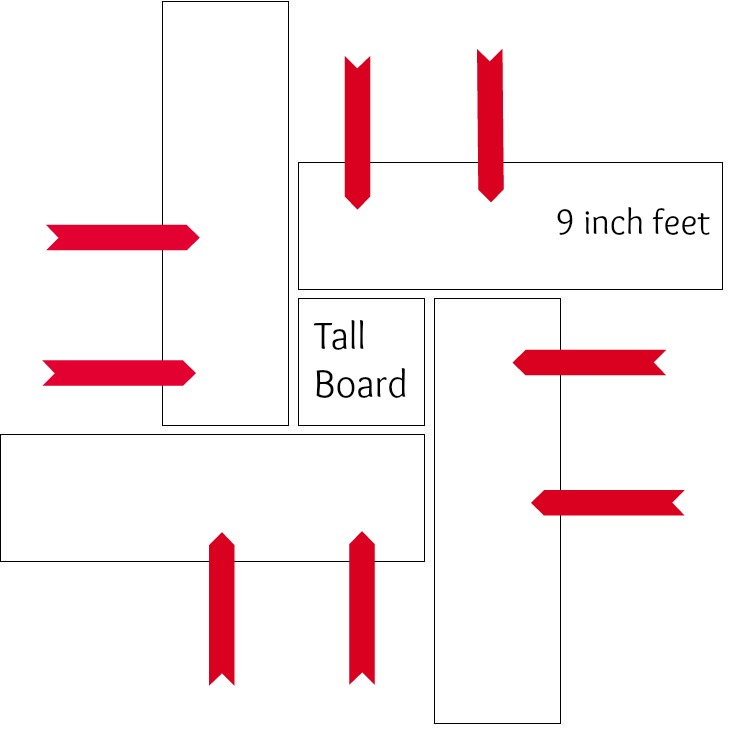
Now you will start attaching the feet to the longer board. Here is a diagram that shows what it would look like if you looked at it from the bottom. The red arrows indicate where you will put each screw.
Pre drill the holes to make it easier, and counter sink the screws in. The first two feet were pretty easy to attach, but for 3 and 4, it will help to have a second person. Keep checking to make sure that you are keeping it level so that it will sit flat on the ground when you’re done.
Here’s a view just as I’m about to put in the last screw. It is lying on top to show you kind of where it will go.
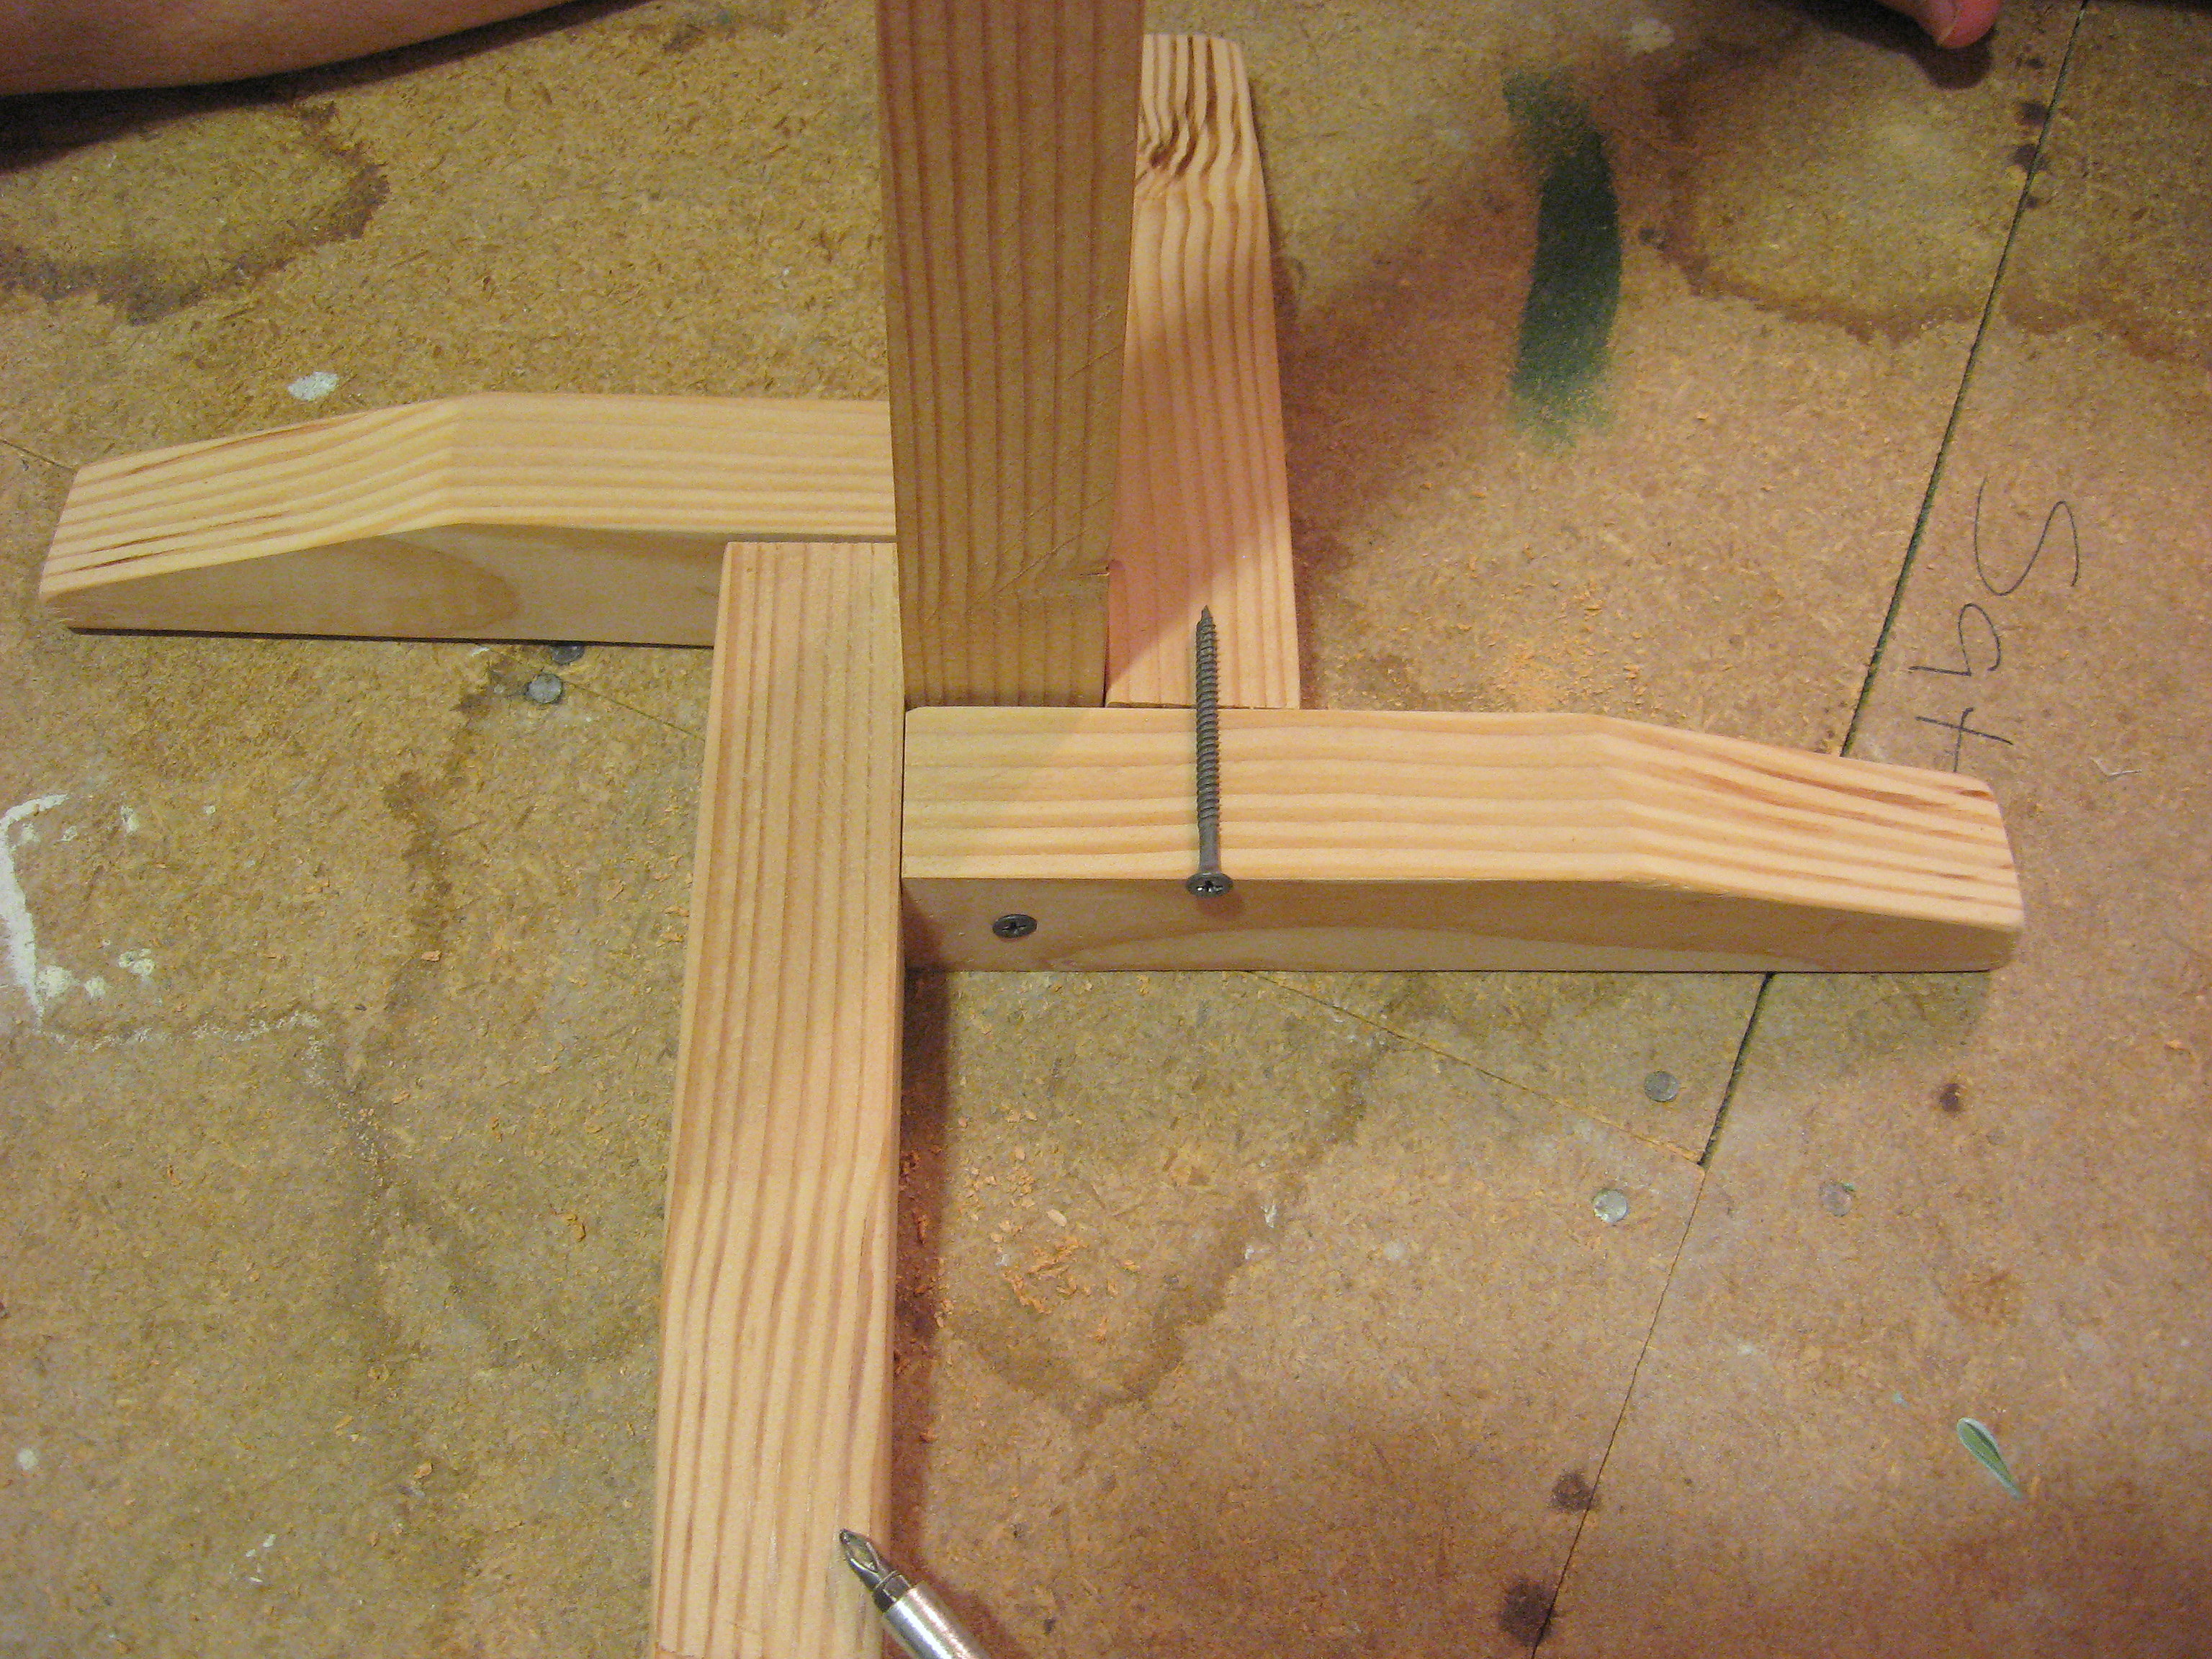
At this point, double check the whole thing for stability and levelness. Make any adjustments needed to the screws and make sure everything is good and tight.
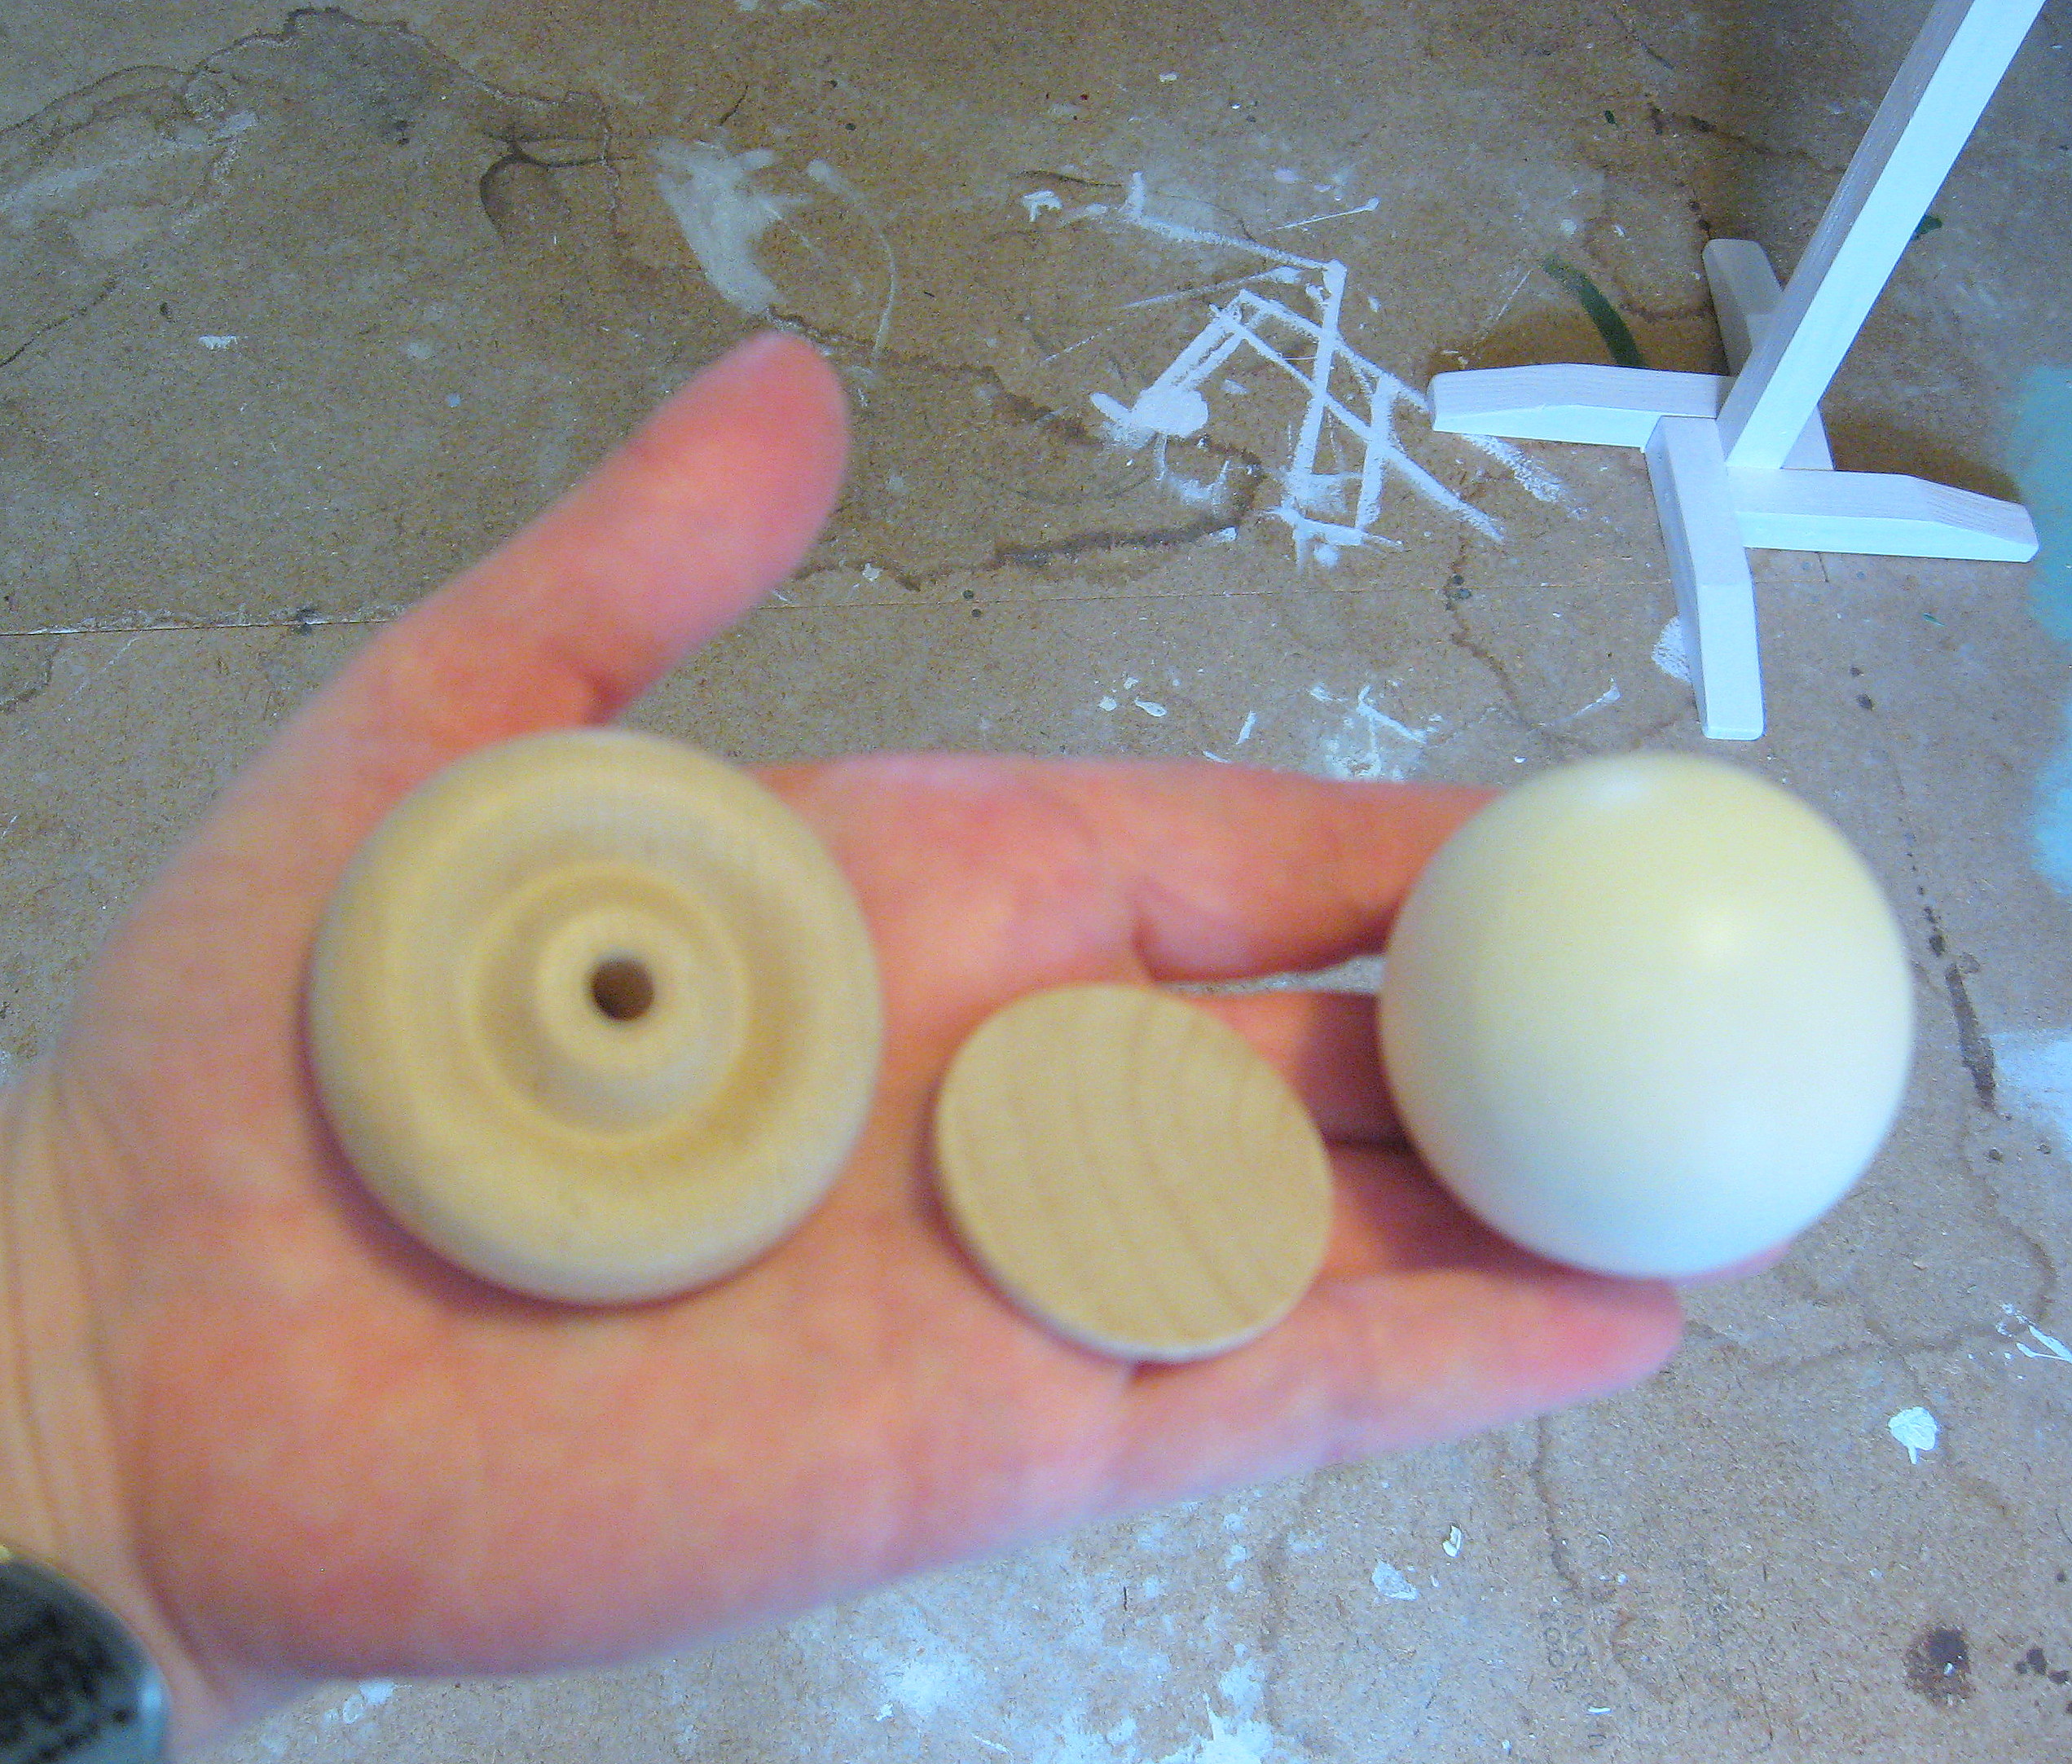
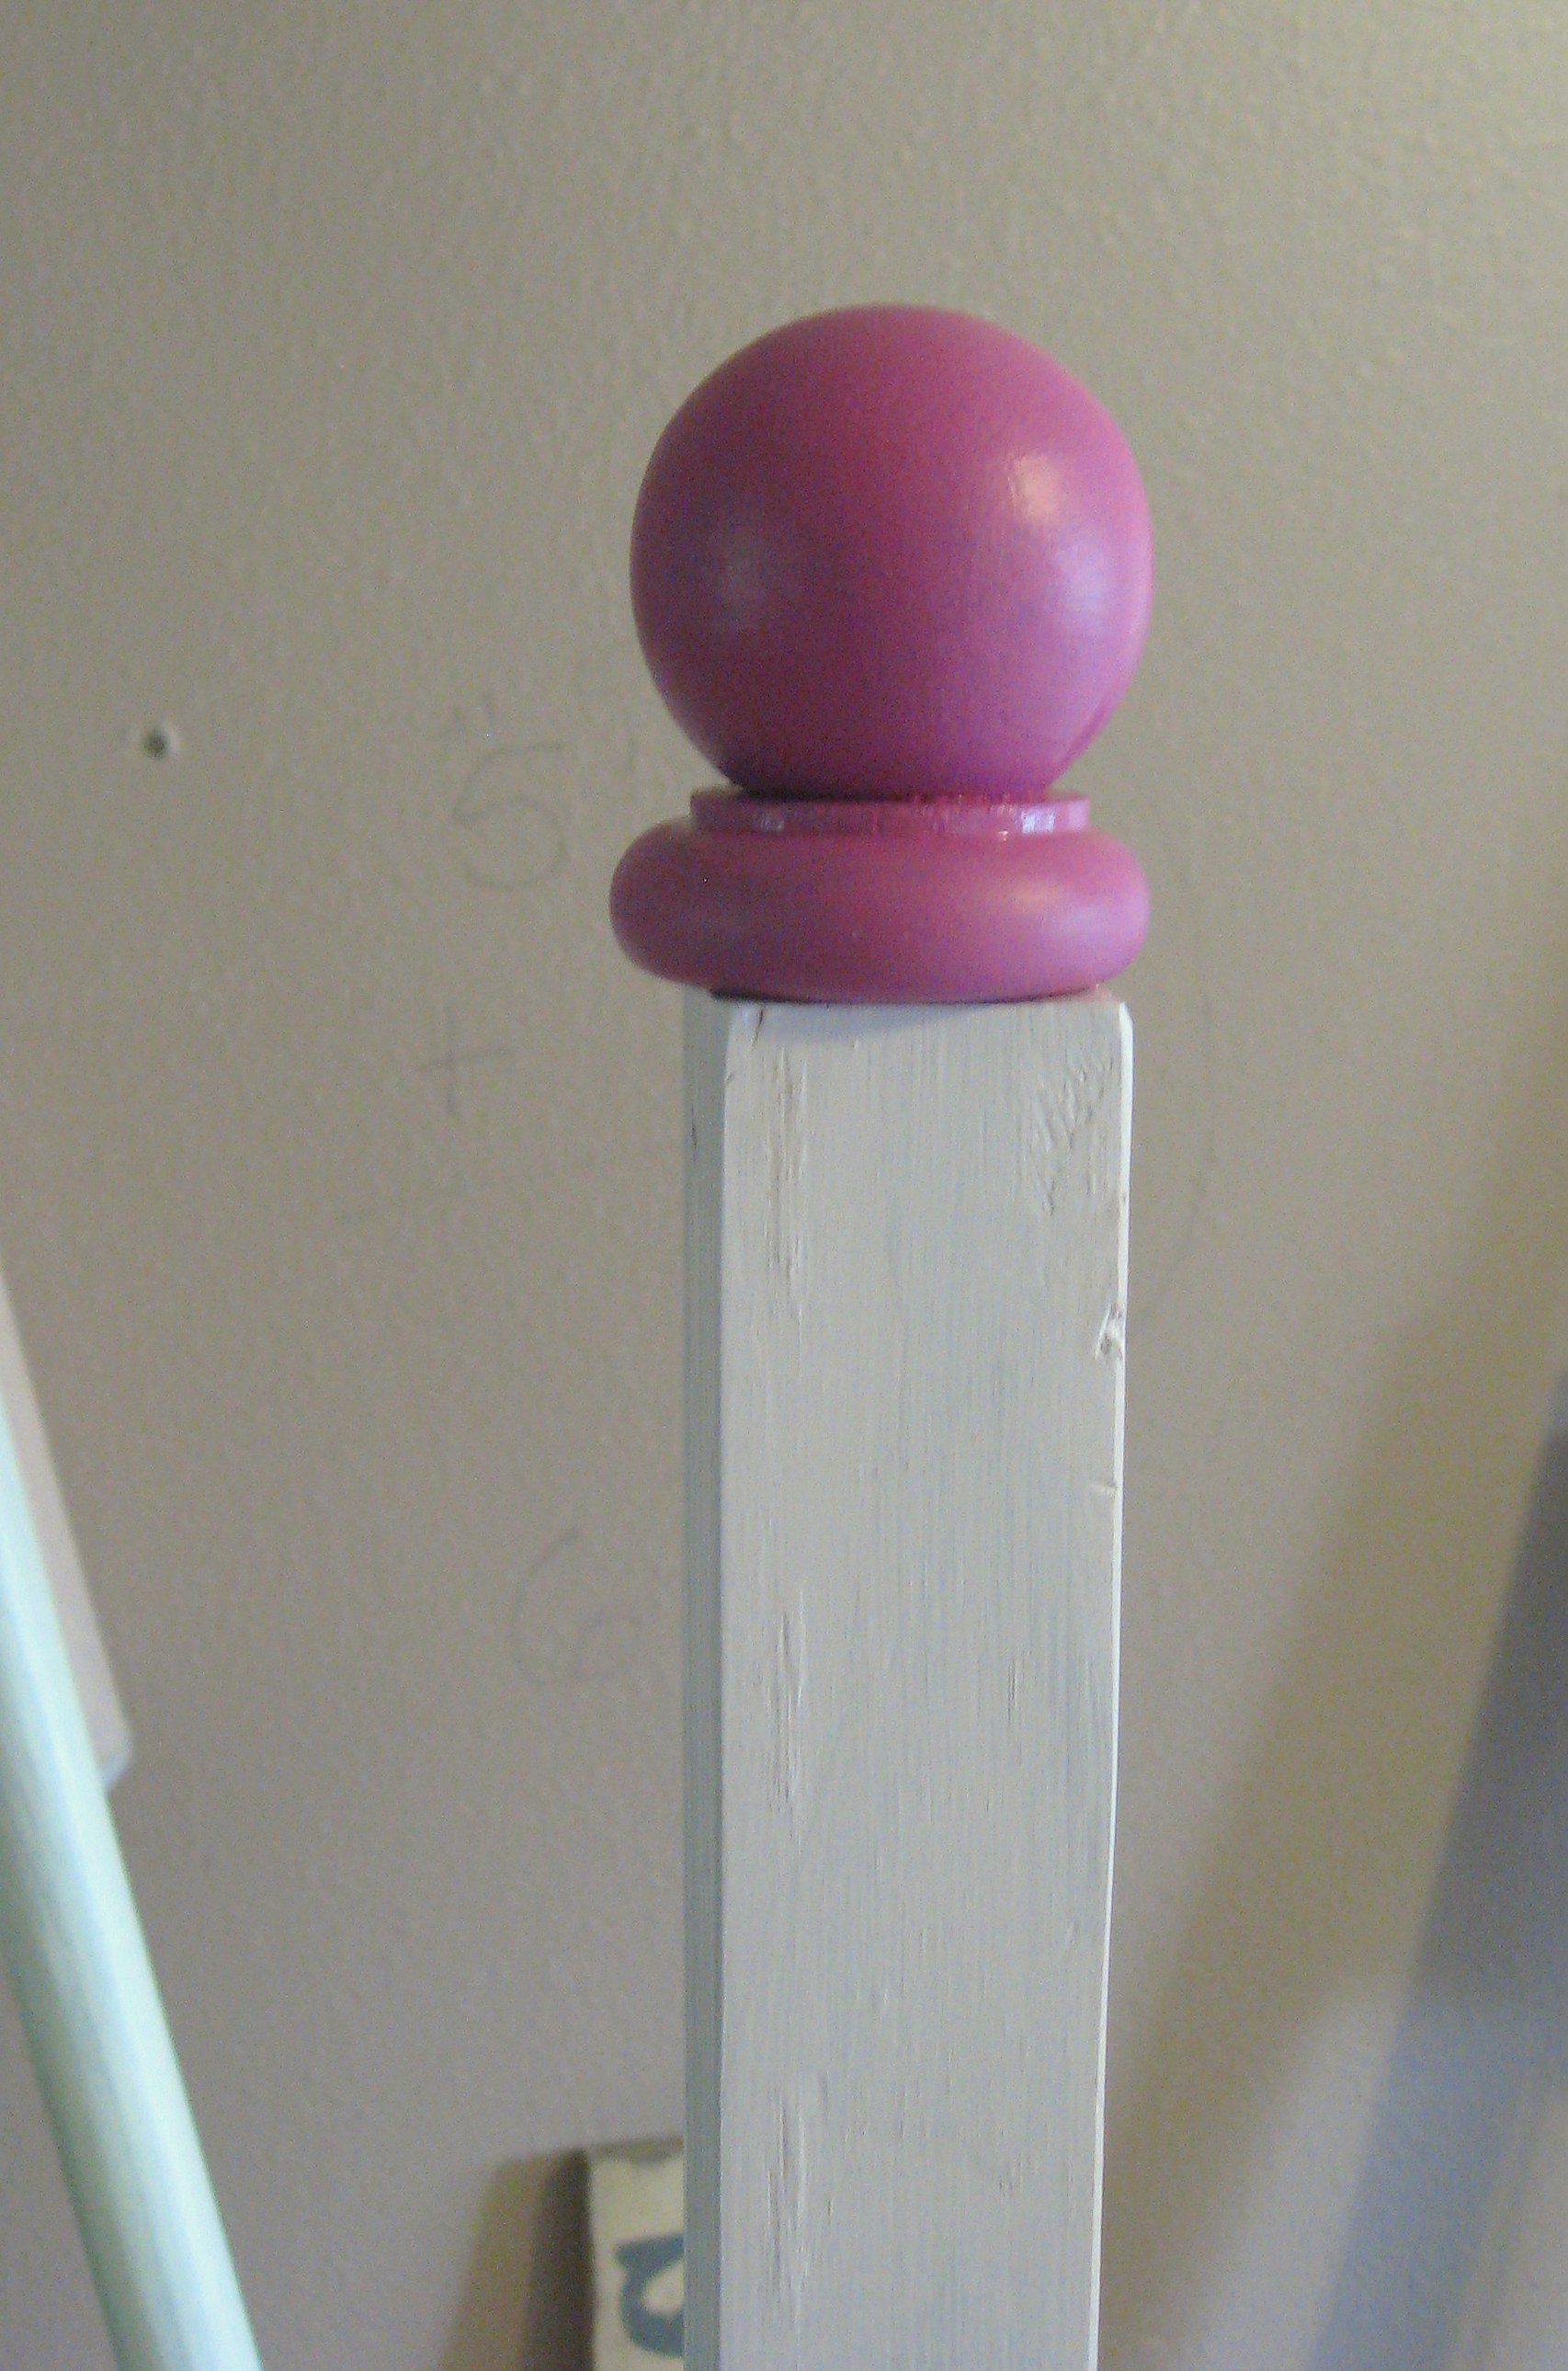
Now you can paint it. I chose to paint the long board white and the feet a dark pink. I also decided I wanted something to embellish the top, so I made a finial to go there. You can easily buy a simple finial – or even just a wood ball – at any craft store to finish it off, but since I had these parts on hand, I just put them together
and attached them with Gorilla Glue. Once they are dry, you can paint it and once that’s dry, drive a screw part way into the bottom.

Drill a hole (large enough to accommodate the head of the screw) centered into the top of the long board. Apply some gorilla glue to the screw and bottom of the finial (sorry for the fuzzy pic)
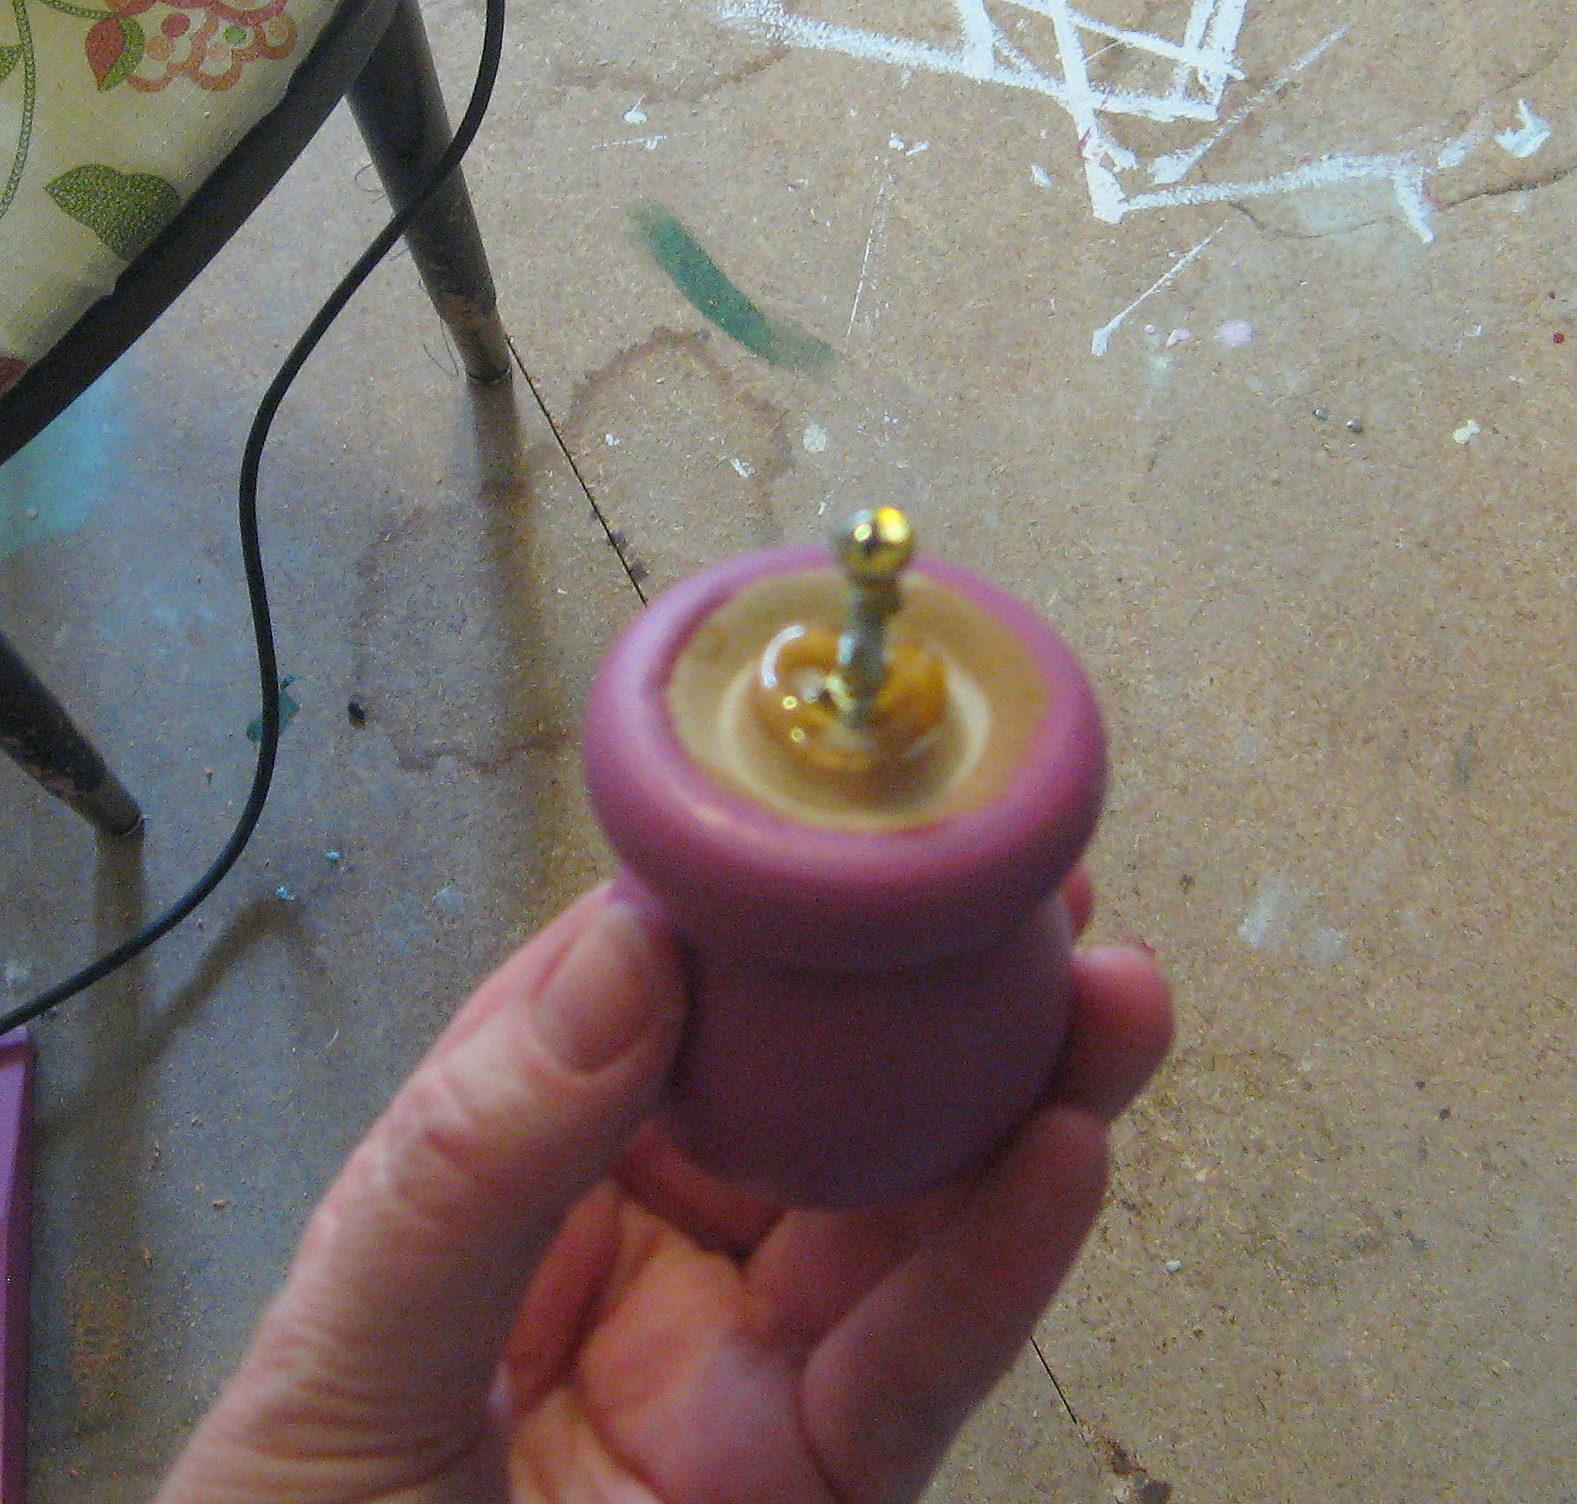
and insert the screw into the hole. Once that glue sets that should be all you need to keep it in place.
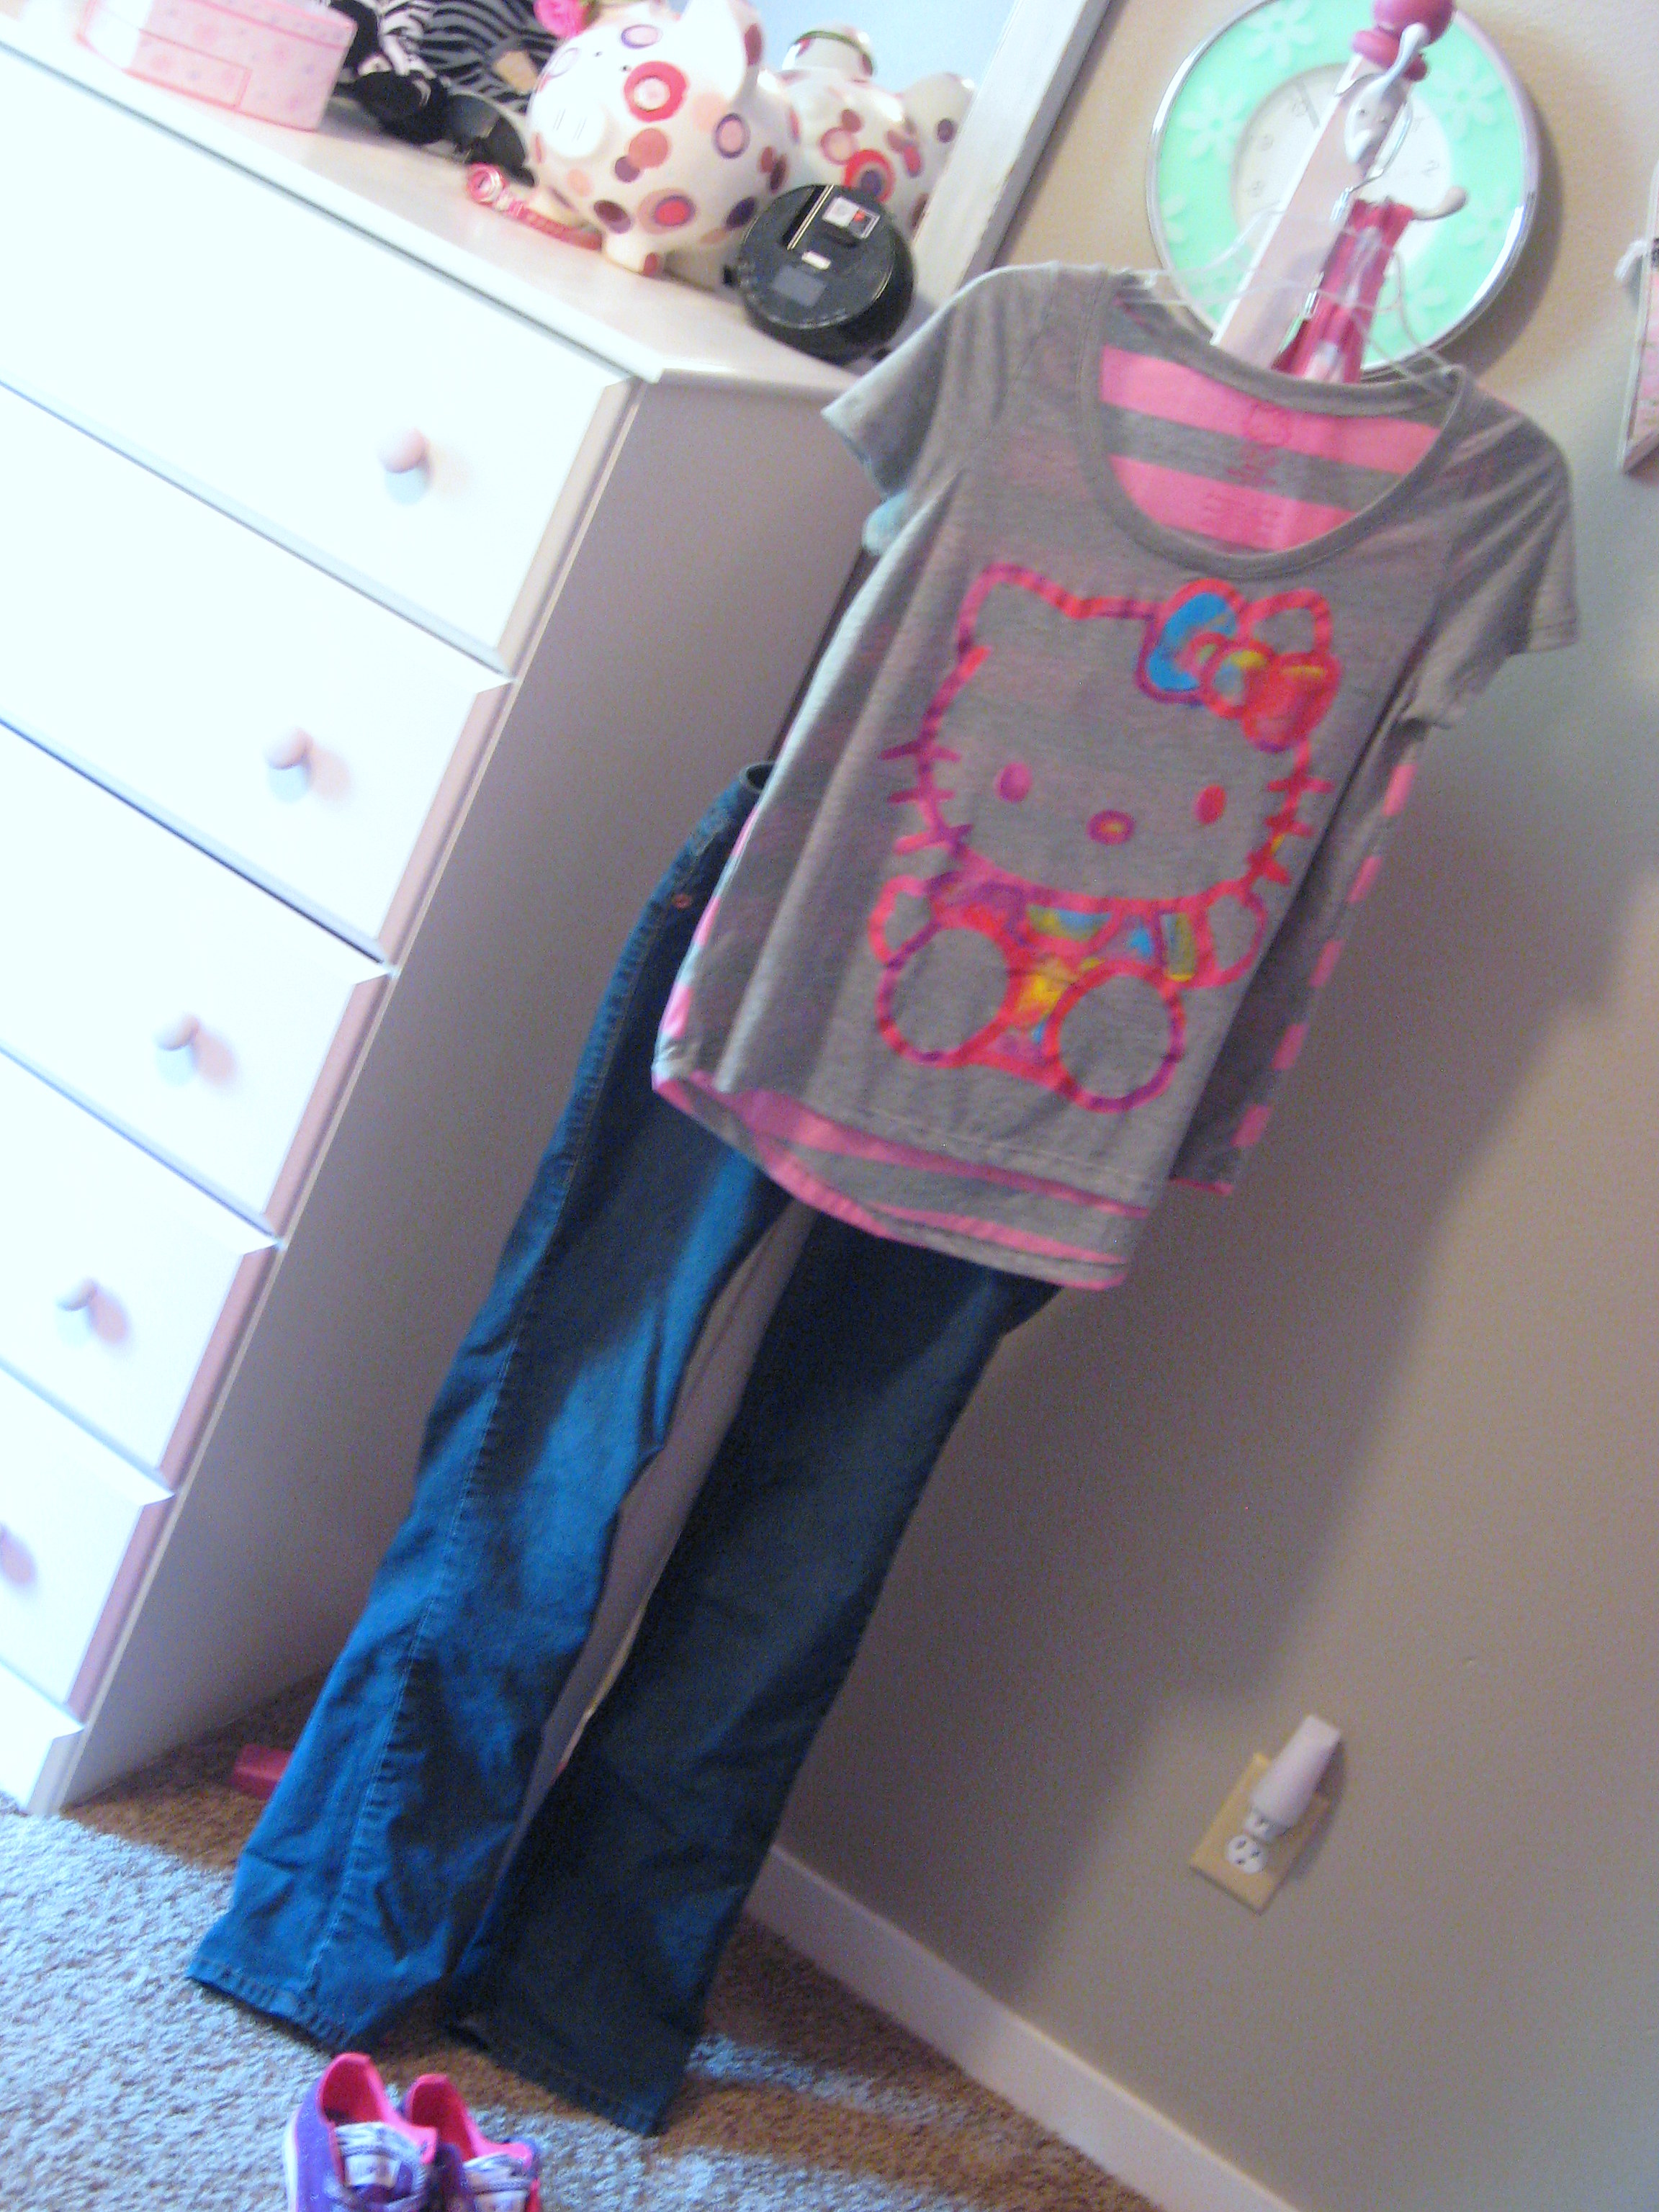
Now you will need some hooks to hang the clothes from. I used white metal coat hooks, because that is what I had leftover from another project. I grabbed some of my daughters pants – hung them on a clippy pants hanger – and held them up to the board to determine where I wanted the hook for the pants. Drill it in, then do the same for the top hook for the shirt.
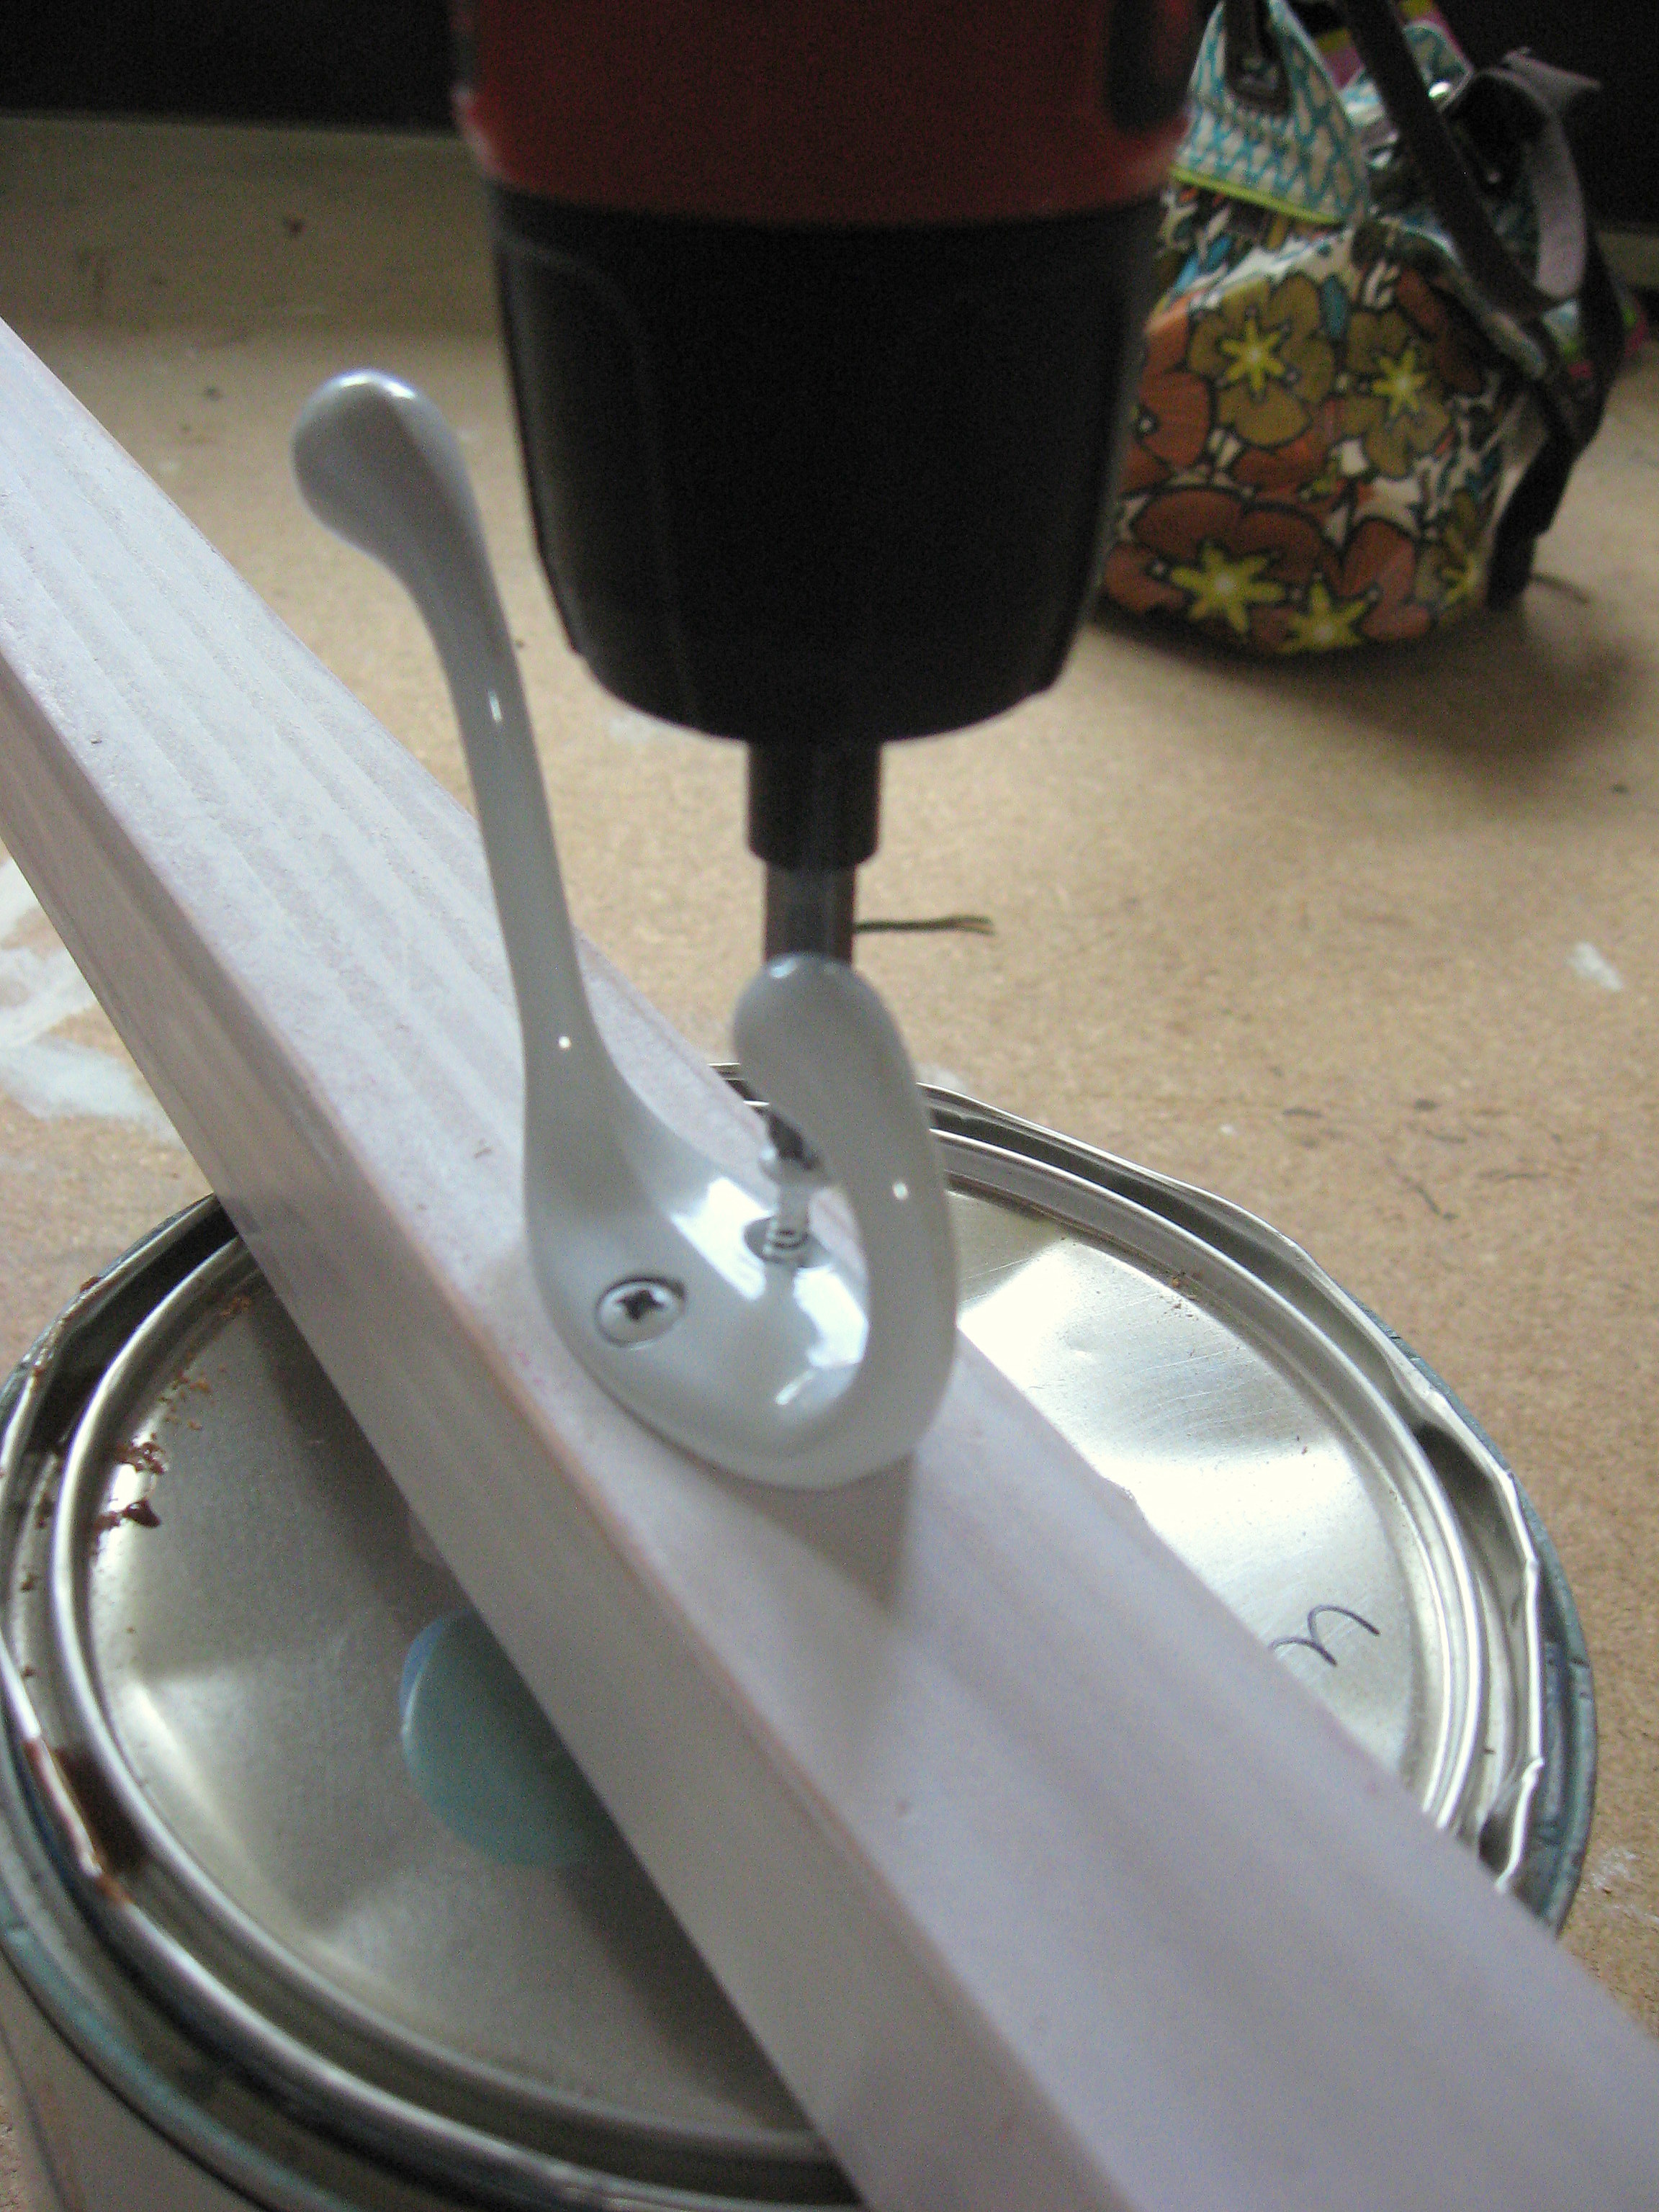
I added a third hook on the side, which she uses to hang anything else she needs for the outfit – tanks or camis to go under the shirt, belt, etc.
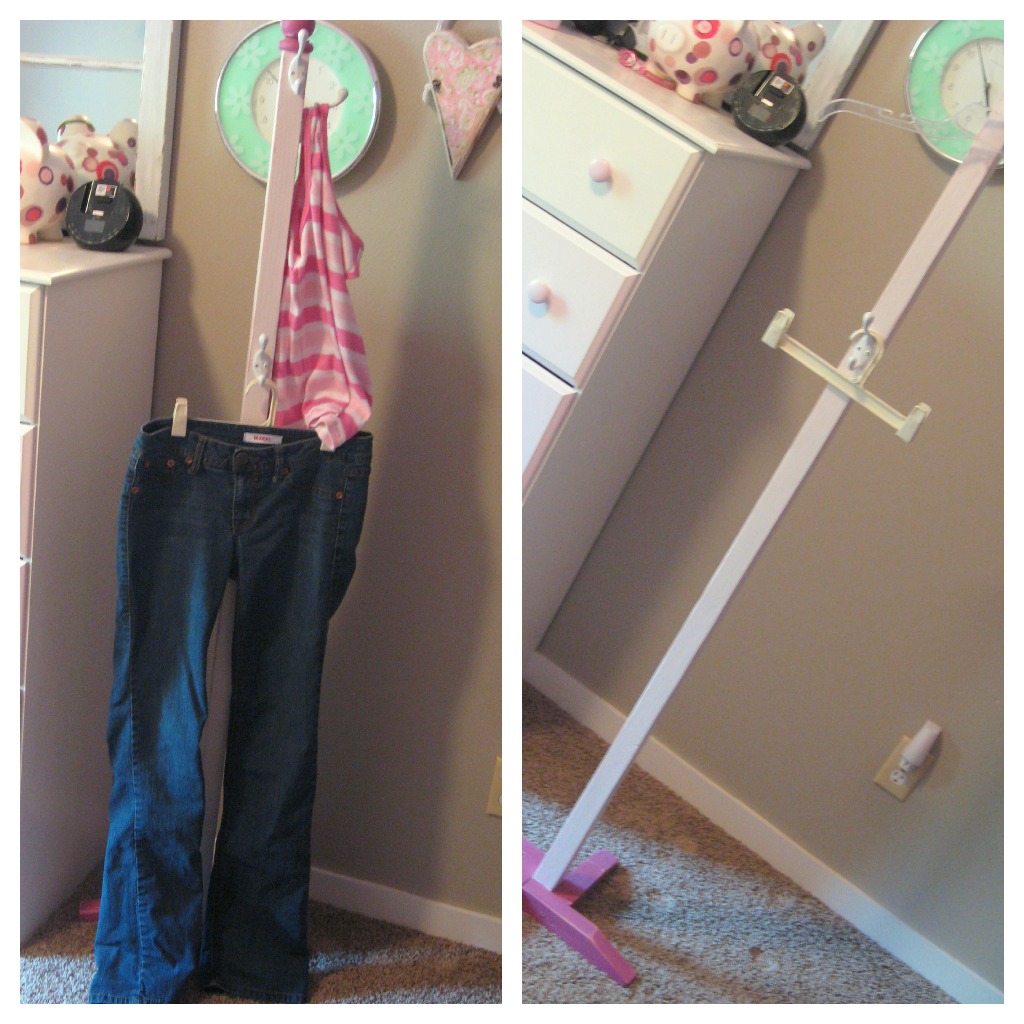
Everything is ready to go the next morning and she can get dressed quickly knowing that it will look great.
Business Blogs for Project Inspiration
If you are like me, you have a list of blogs that you follow. Mine are mostly craft and decorating blogs, and I love looking at their projects to see what is trending and find inspiration for my own home. Once source of great inspiration that a lot of people tend to overlook, though, is the websites of big companies. Here are some that I like to check out.
Lowes – Near the top of the page, you will see drop down tabs. Hover over “inspiration” to see a photo gallery of home improvement projects, or hover over “projects” to explore how-tos and tutorials for any area of your home. They walk you through projects from building a deck to replacing a bathroom faucet, and also have handy calculators for figuring out how much flooring you need, or how much paint you will have to buy.
Home Depot – This link takes you directly to their blog, where they have new articles daily on everything from house cleaning tips, to grilling recipes to gardening how to’s. Look at this chalkboard – easy and inexpensive, with instructions right on their blog. I could think of a hundred cute things to use this for!
Hobby Lobby – Click on “project inspiration”, then you can click on the left to browse by season or category.
Michaels – Click on either “projects” or “videos” at the top of the page for lists of what they have available. You can search by category, length of project or age range. Check out this cute pillow project – perfect for warming up your space for the colder weather.
Remember that at both Michaels and Hobby Lobby websites, you can get coupons for in store purchases!
Ace Hardware – Click on “tips and advice” for lists of available topics, similar to Lowes and Home Depot. If you are taking on a complicated and involved home improvement project, check you the section called “interactive project videos” for some really practical tutorials on things like changing your furnace filter and how to use a table saw.
Home Goods – Do you just love this store as much as I (and my good buddy Nate Berkus) do? I’m not lucky enough to have one in the town where I live, but it’s a must-stop anytime I head to the “big city”. The link will take you straight to their blog that is full of beautiful photos and design inspiration. If you have a minute, check out their Stylescope quiz to determine your decorating style. My teenage boys and I played around on this for quite awhile the other night and just had a blast (No! Really!). At the end of all the silliness, though, it told me my style was a mixture of Boho and Urban Funk, which I thought was right on the money.
Kids Craft by Plaid – This is a really fun blog if you have little ones in the house, or if you are an elementary teacher. Lots of great ideas, searchable by category on the right. How cute is this?
My kids would have loved making these pots when they were younger, and I love that most of the projects use items that are inexpensive and easily obtained.
Plaid – Hover over “craft by type” then search your options there. My favorite? The decoupage section. A whole section full of Mod Podge ideas?? Swoon…
There you have it; next time you’ve finished your usuals on the internet and need a little fresh inspiration, give one of these a try!
House Numbers on a Cabinet Door
A few weeks ago, I posted about the versatility of using cabinet doors in decorating and crafting projects. I’ve been slowly working on updating the decor on the front of my house, and I knew that little brown cabinet door would be perfect for what I had in mind.
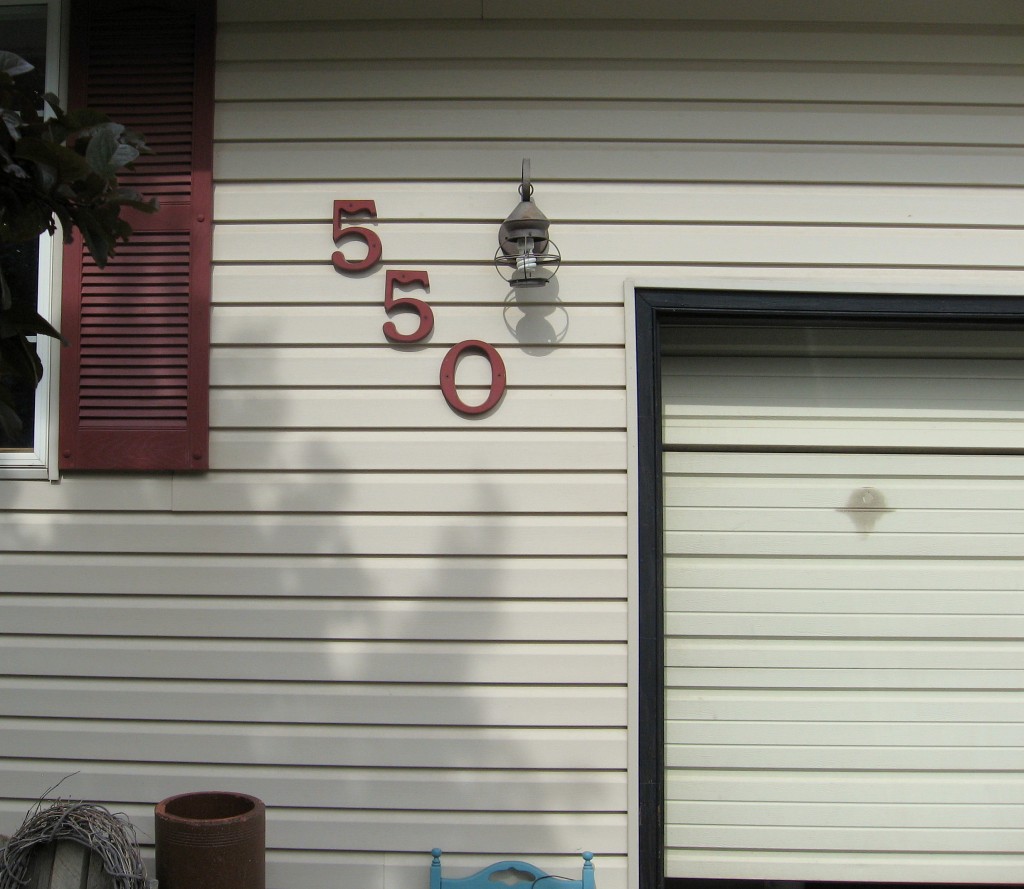
This is what the numbers on the front of my house looked like. They were fine; they matched the shutters and front door in all their sun-faded glory. I knew we could do better.
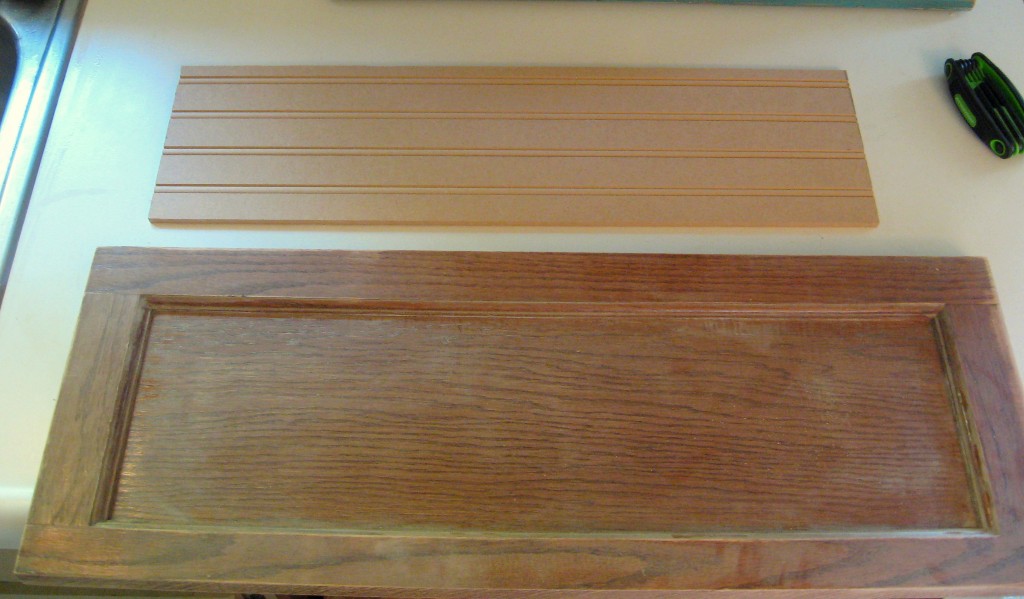
Then, I took the cabinet door and sanded it just enough to rough up the surface, then cleaned with a damp cloth.
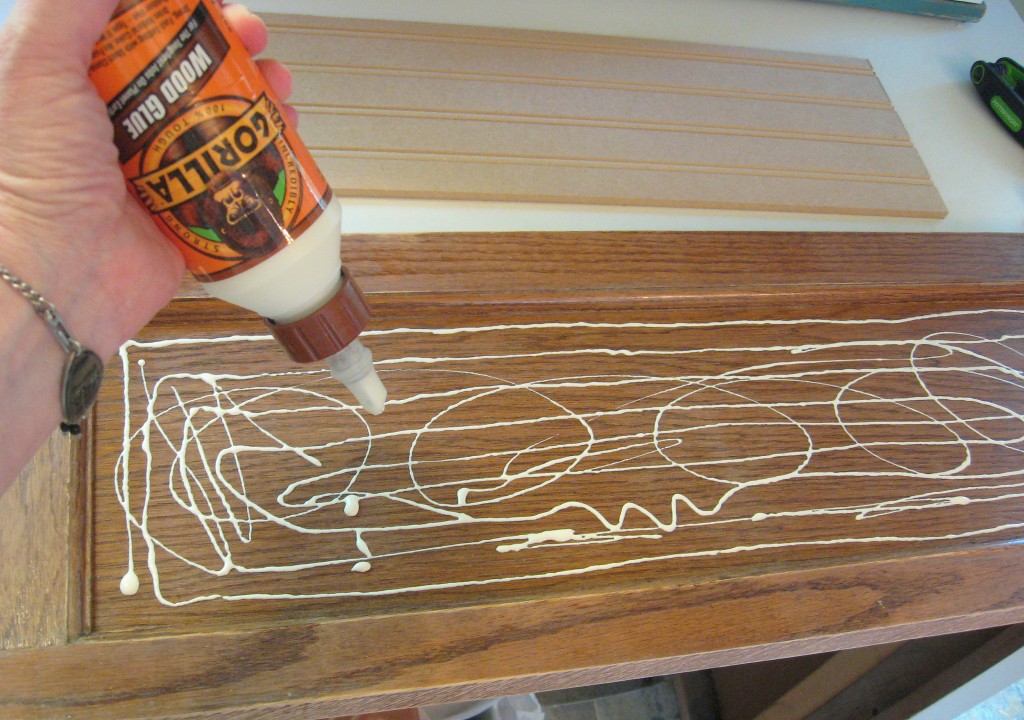
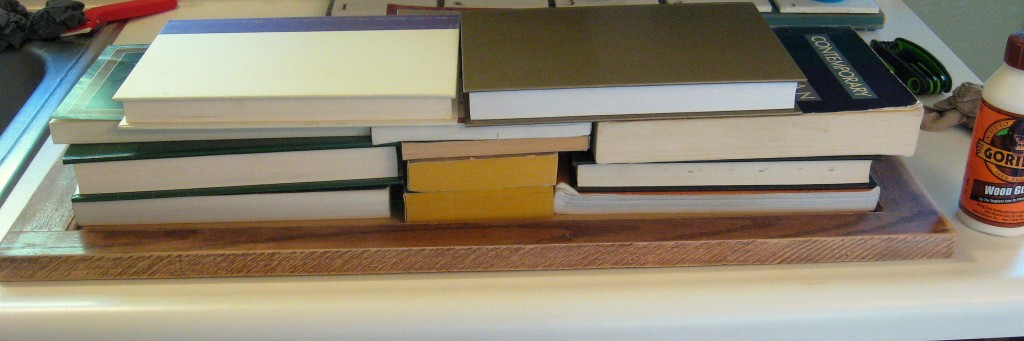
Next, I cut a piece of beadboard to size to fit down into the indentation of the door. I used a scrap that I had on hand, but if you don’t have this, check in the scrap section of a local home improvement store – or maybe even a renovating neighbor – and have it cut to size. It doesn’t take a very big piece.
Once that was dry, I roughed up the edges of the door and the house numbers with a sanding block, then screwed the numbers back on, centered on the door.
Drill pilot holes through the corners of the door and screw it back into the siding where you want it to go.
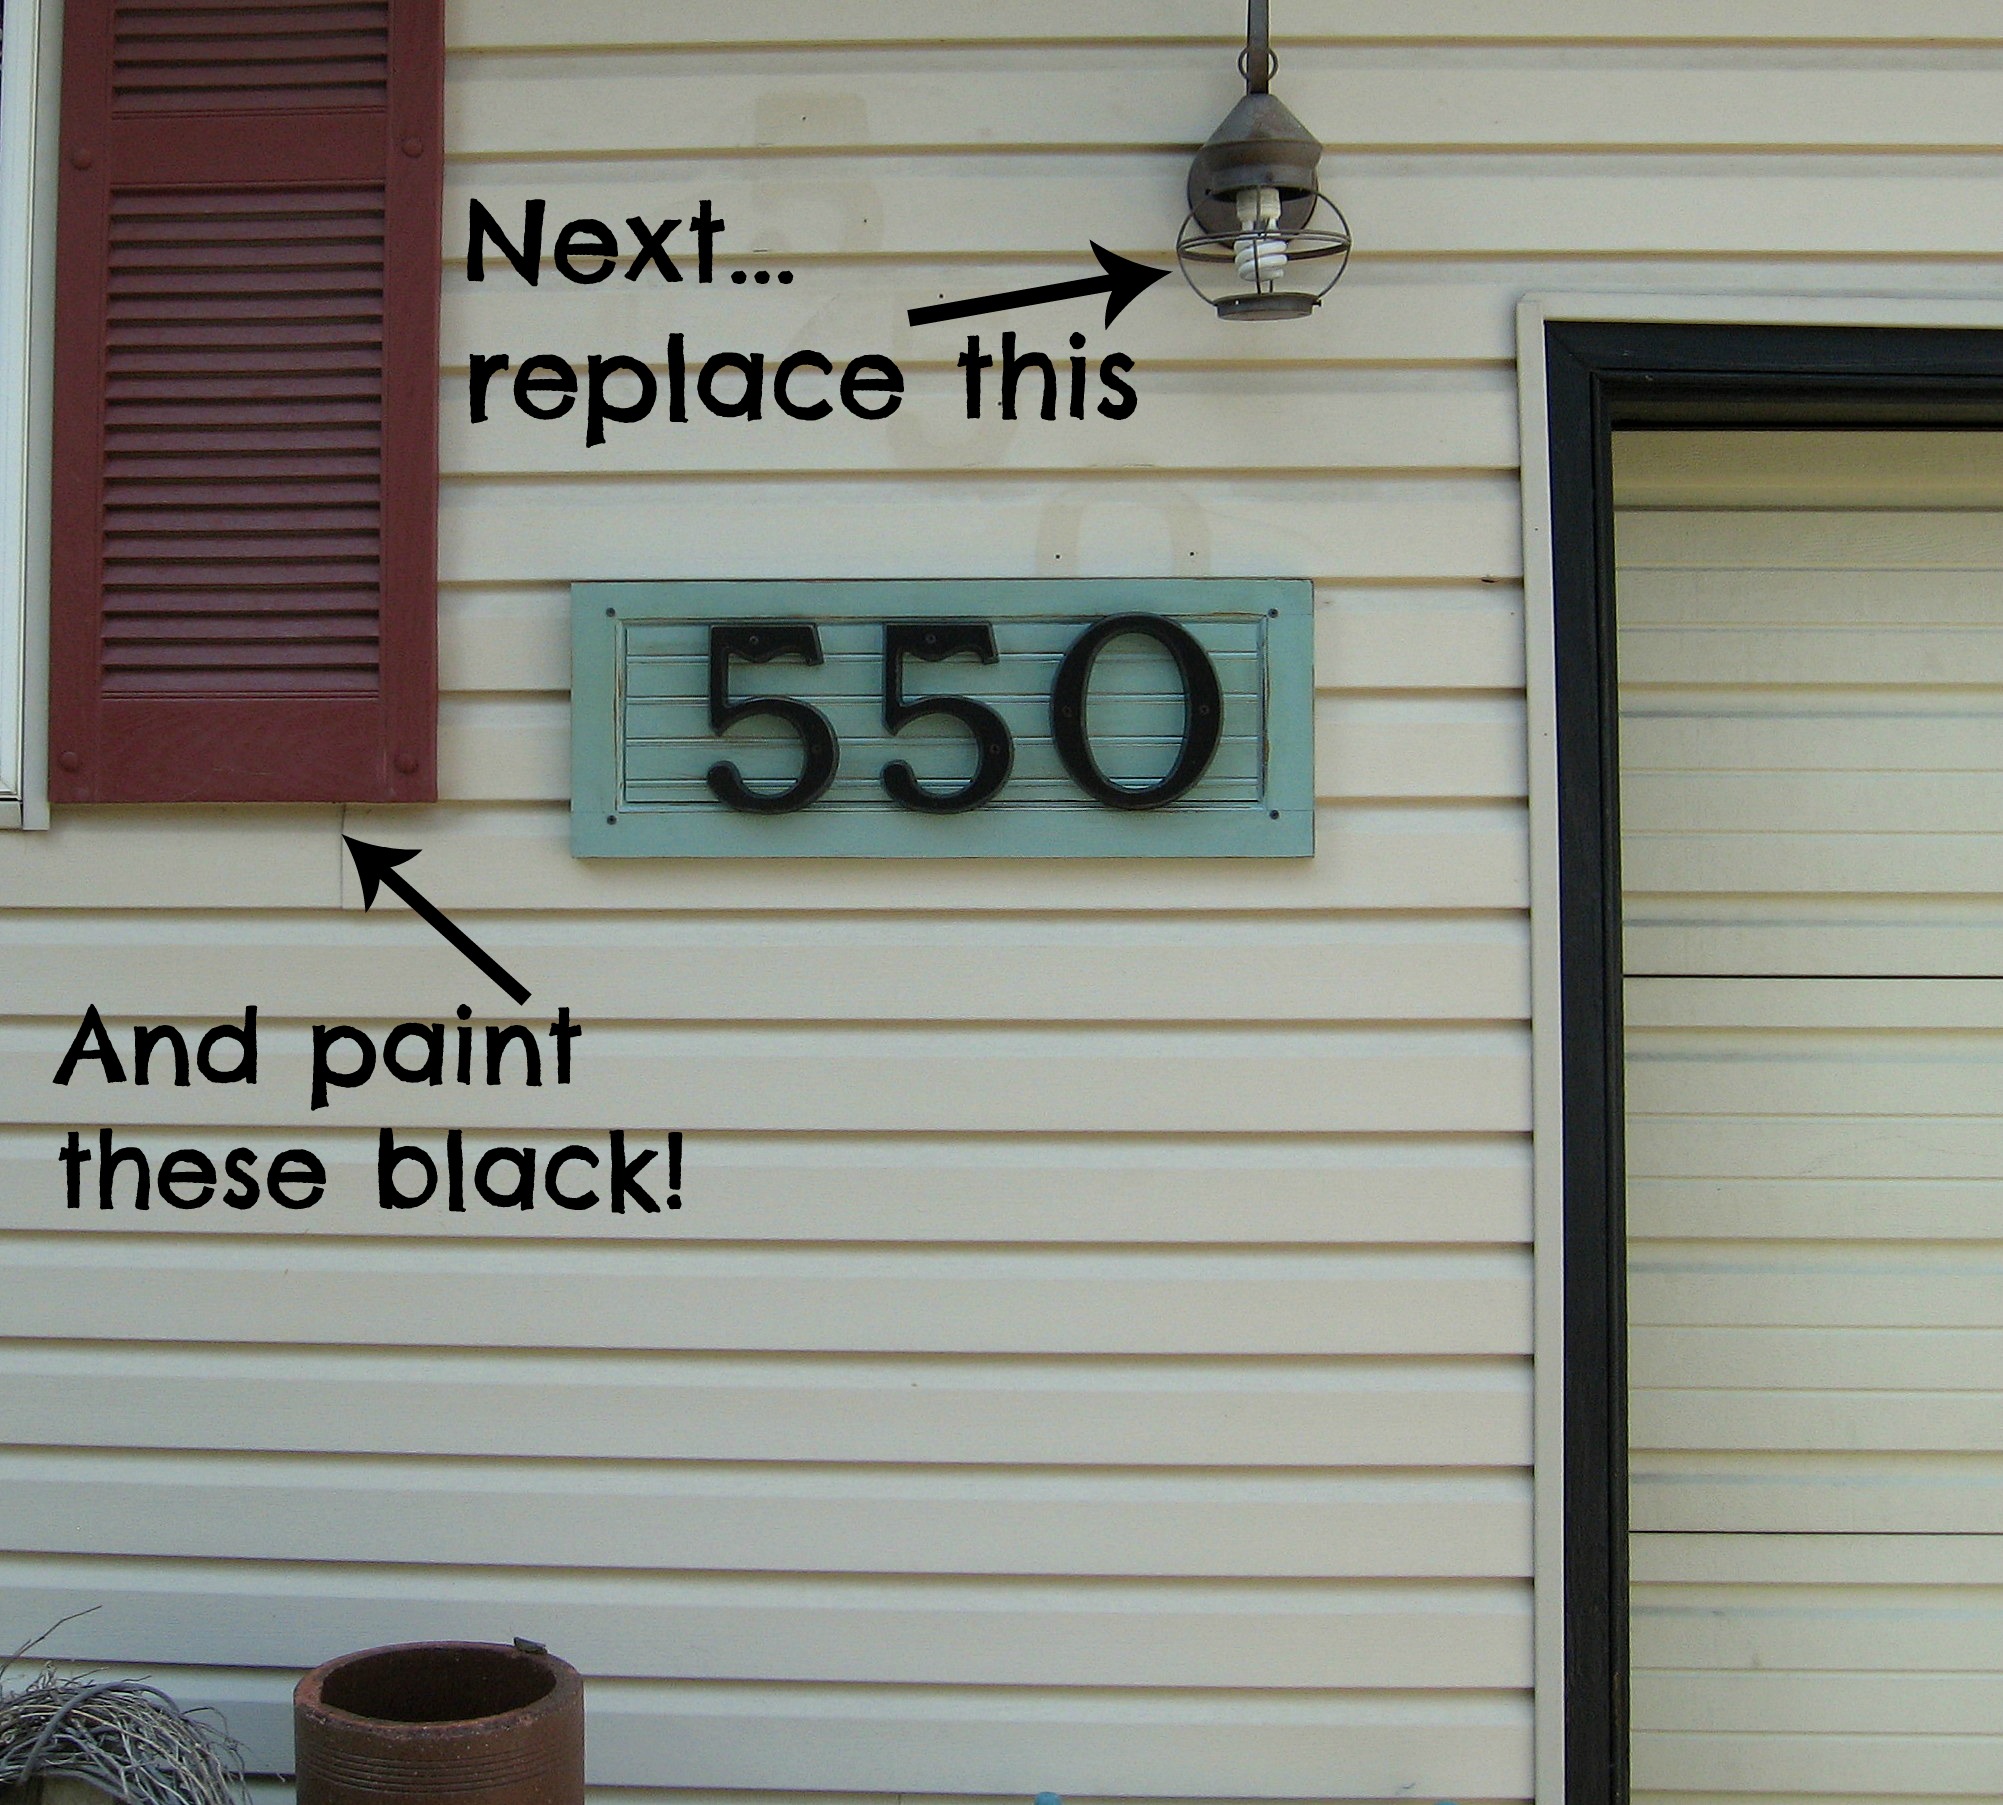
You can see a little sun-fading around where the numbers were, but I don’t think that will take long to even out. And now it matches my newly painted front door!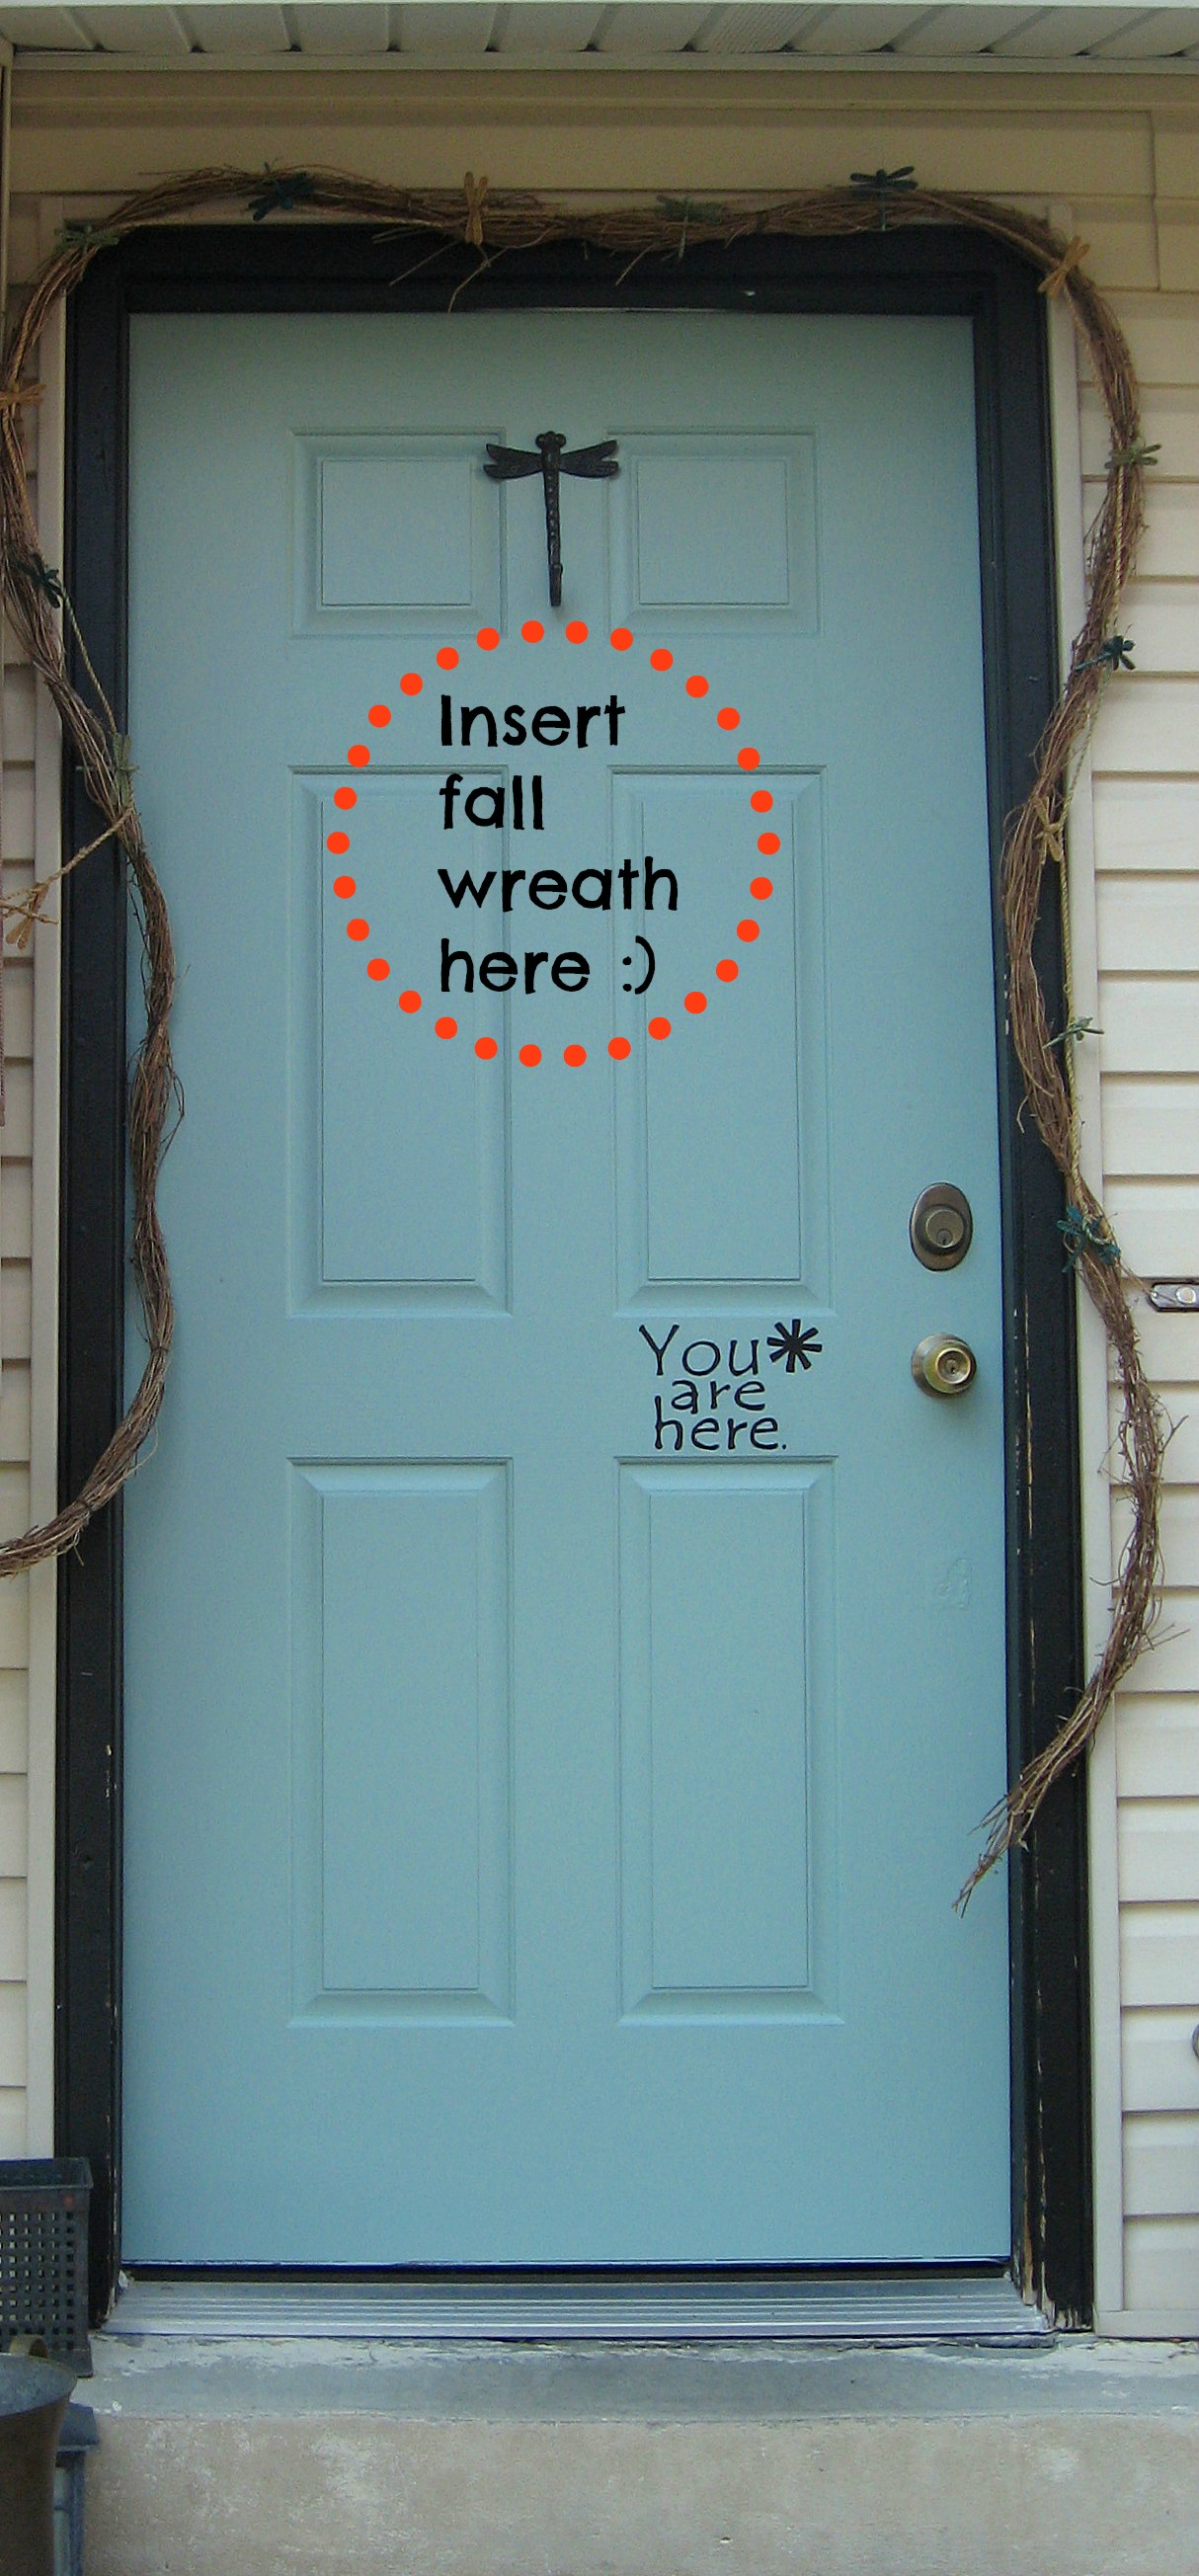
Facebook Cover Photo for Dummies
Like it or not, Facebook Timeline is here to stay. May as well make the most of it with a really kickin’ cover photo! Technology challenged? Me too…but it is easy, I promise!
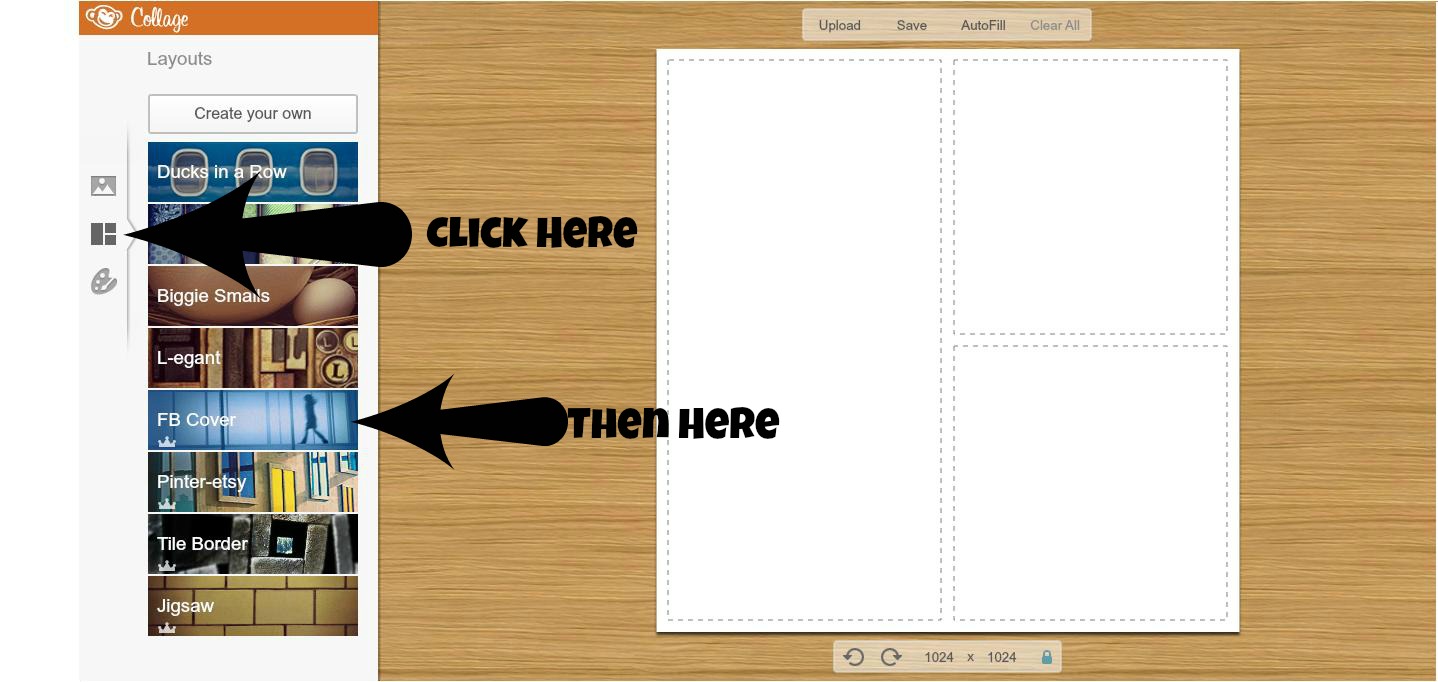
Go to PicMonkey.com – simple, free, and more than a little cheeky, this is my favorite photo editing site.
Click on the button on the left that says “create a collage”.
Then, click on the middle of the choices on the left – the one that is three boxes. It will bring up a menu of preset collage choices. Click on the one that says “FB Cover”. See the screen shot below.
That will open up four photo layout choices. You can choose whichever one you want. See the screen shot below.
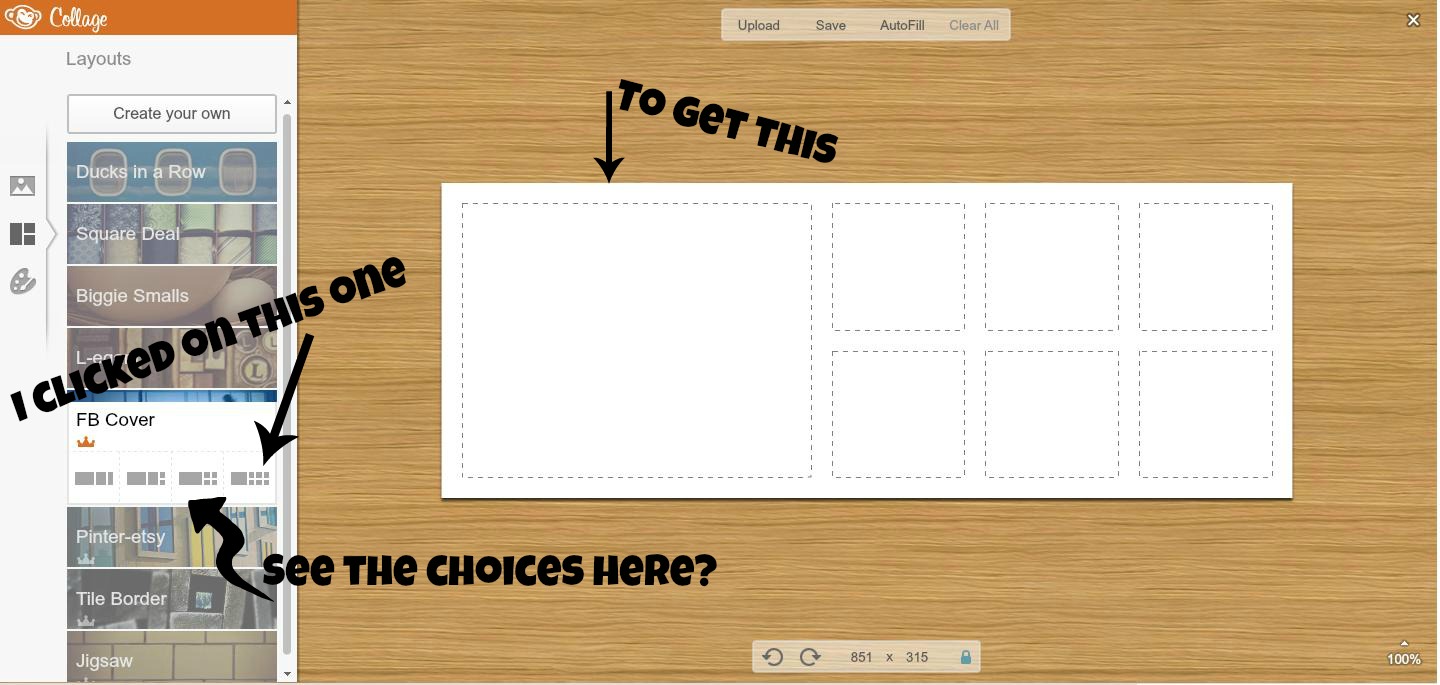
Each of those little dotted squares is a place that you can put a photo.
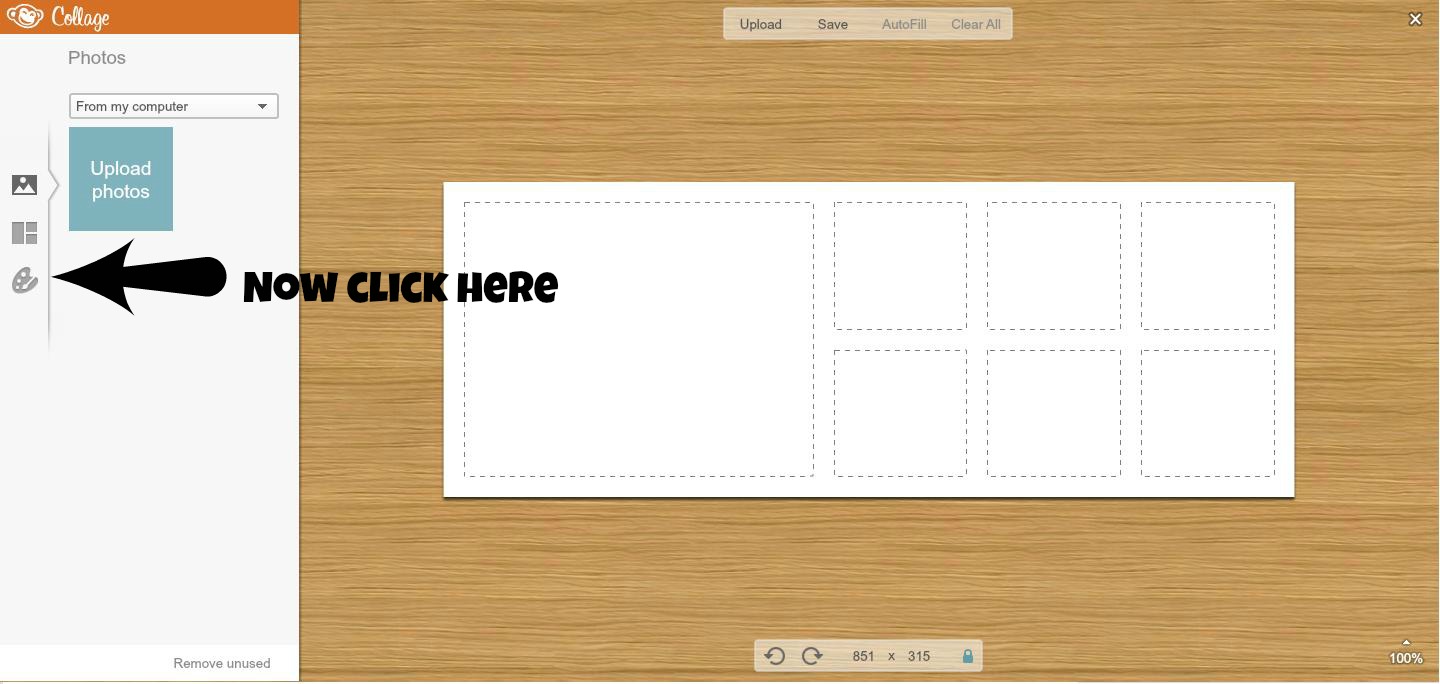
Now click on the picture above the layout one: 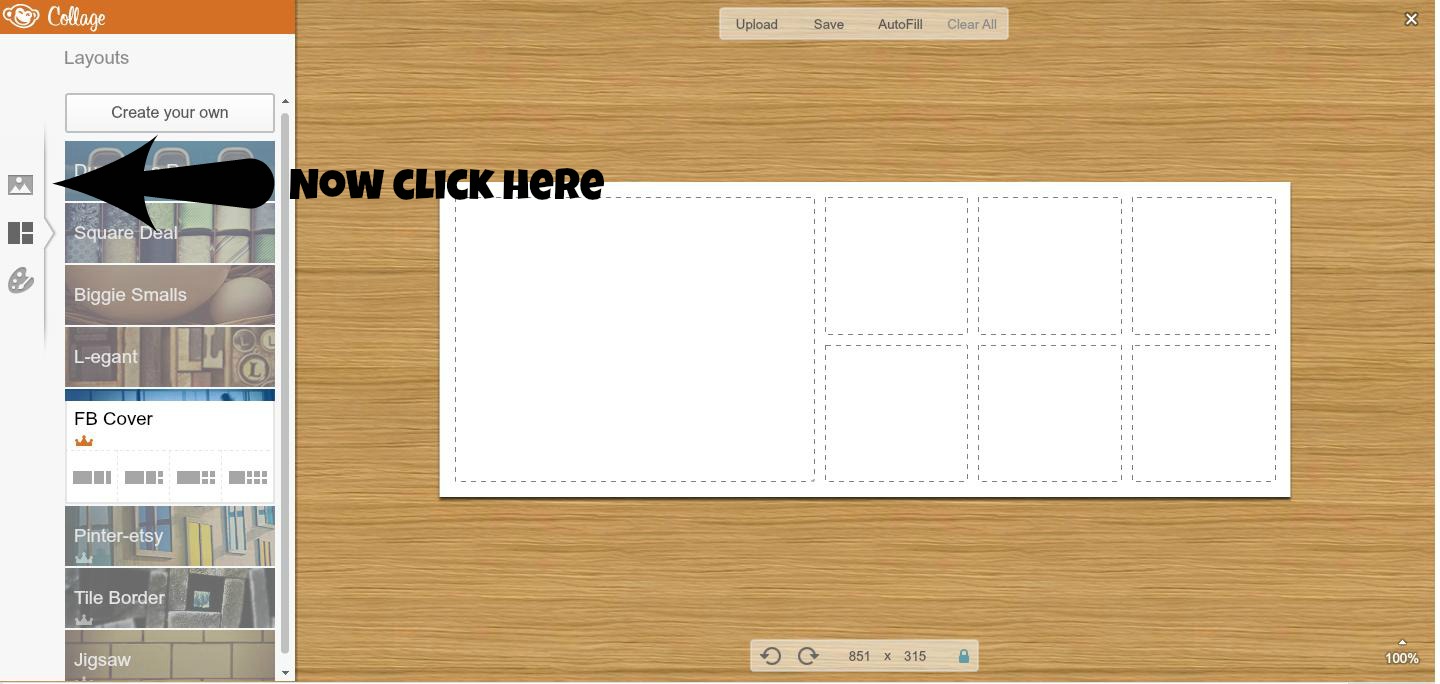
You’ll see a blue box that says “upload photos”. Click on that and now you can choose photos from your computer. You can choose more than one at a time by holding down the ‘ctrl’ key when you select them. The pictures you select will fill in on PicMonkey on the left side by the blue “upload photo” box. Now you can just drag them into place in the collage. Move them around until you like the placement. Remember that your Profile Photo will slightly overlap the left bottom corner of your collage, so plan accordingly.
If you hover your cursor between the boxes, you will see a blue line. Drag this to resize the boxes. When all the photos are sized and placed as you want them, it’s time to embellish!
Click on the artist palette:
Play around with the options there to change your background color and the size of the photos, or round the corners. If you want to stop there, then save the photo by clicking on “save” at the top of the page and save it somewhere you can find it easily (I usually just save it to my desktop). Then go to Facebook and upload it as your new cover photo.
OR, you can take it to the next level by uploading it back into Picmonkey as a new picture.
This time, click on “Edit a Photo” instead of “Make a Collage” and upload the collage that you just made and saved. At this point, you can no longer manipulate the collage, you will just be able to embellish it as a single photo. Here’s an example of what the page in PicMonkey will look like now:
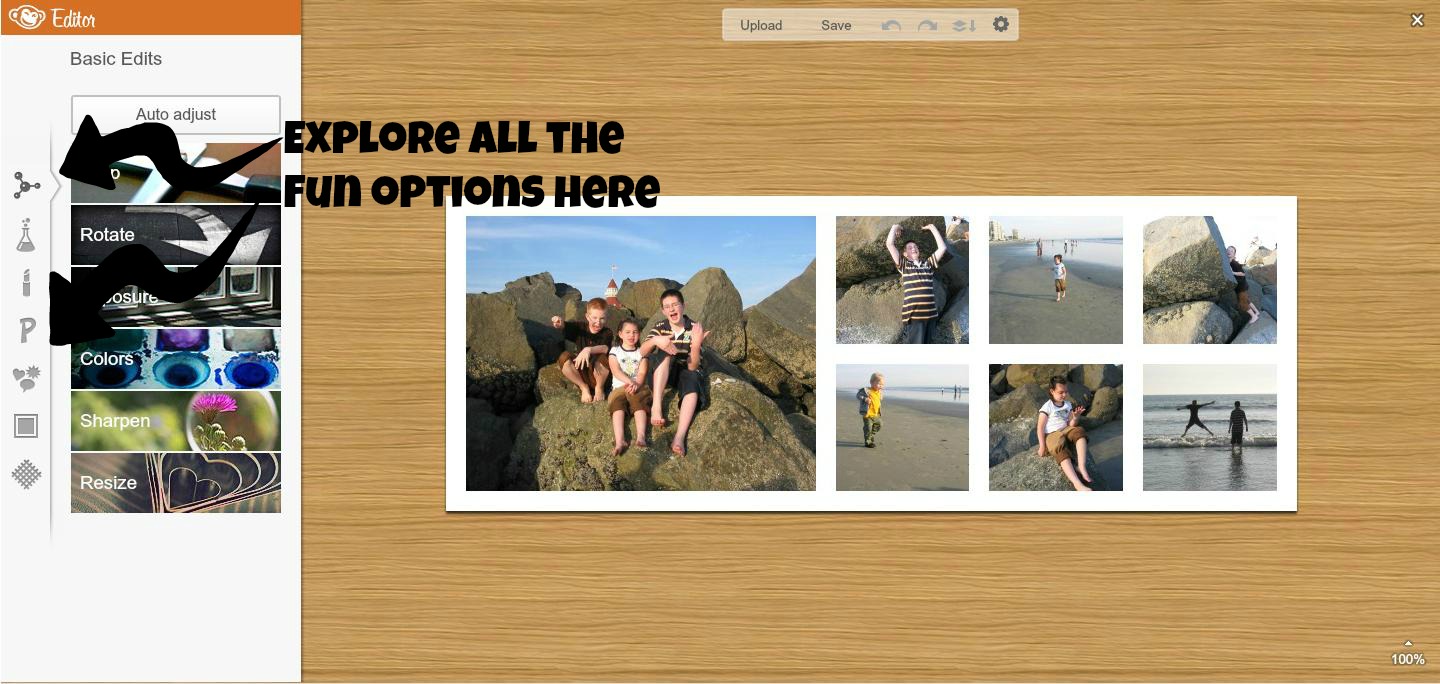
See all those options that are on the left now – the list of little grey pictures? As you click on each of the little pictures, it will bring up – right to the right of them – a list of choices under each option. Play with them to see what they do with your photo. Everything is reversible until you save it, so just take some time and go for it!
Here is what my actual current Facebook cover photo looks like: 
I changed the sizes of the small photos, rounded the corners of the collage, added a border around the whole thing, manipulated the exposure and coloring, then added the asterisk stickers.
Once you have a finished product, save it, upload it as your cover photo on Facebook Timeline, then sit back and enjoy the compliments!
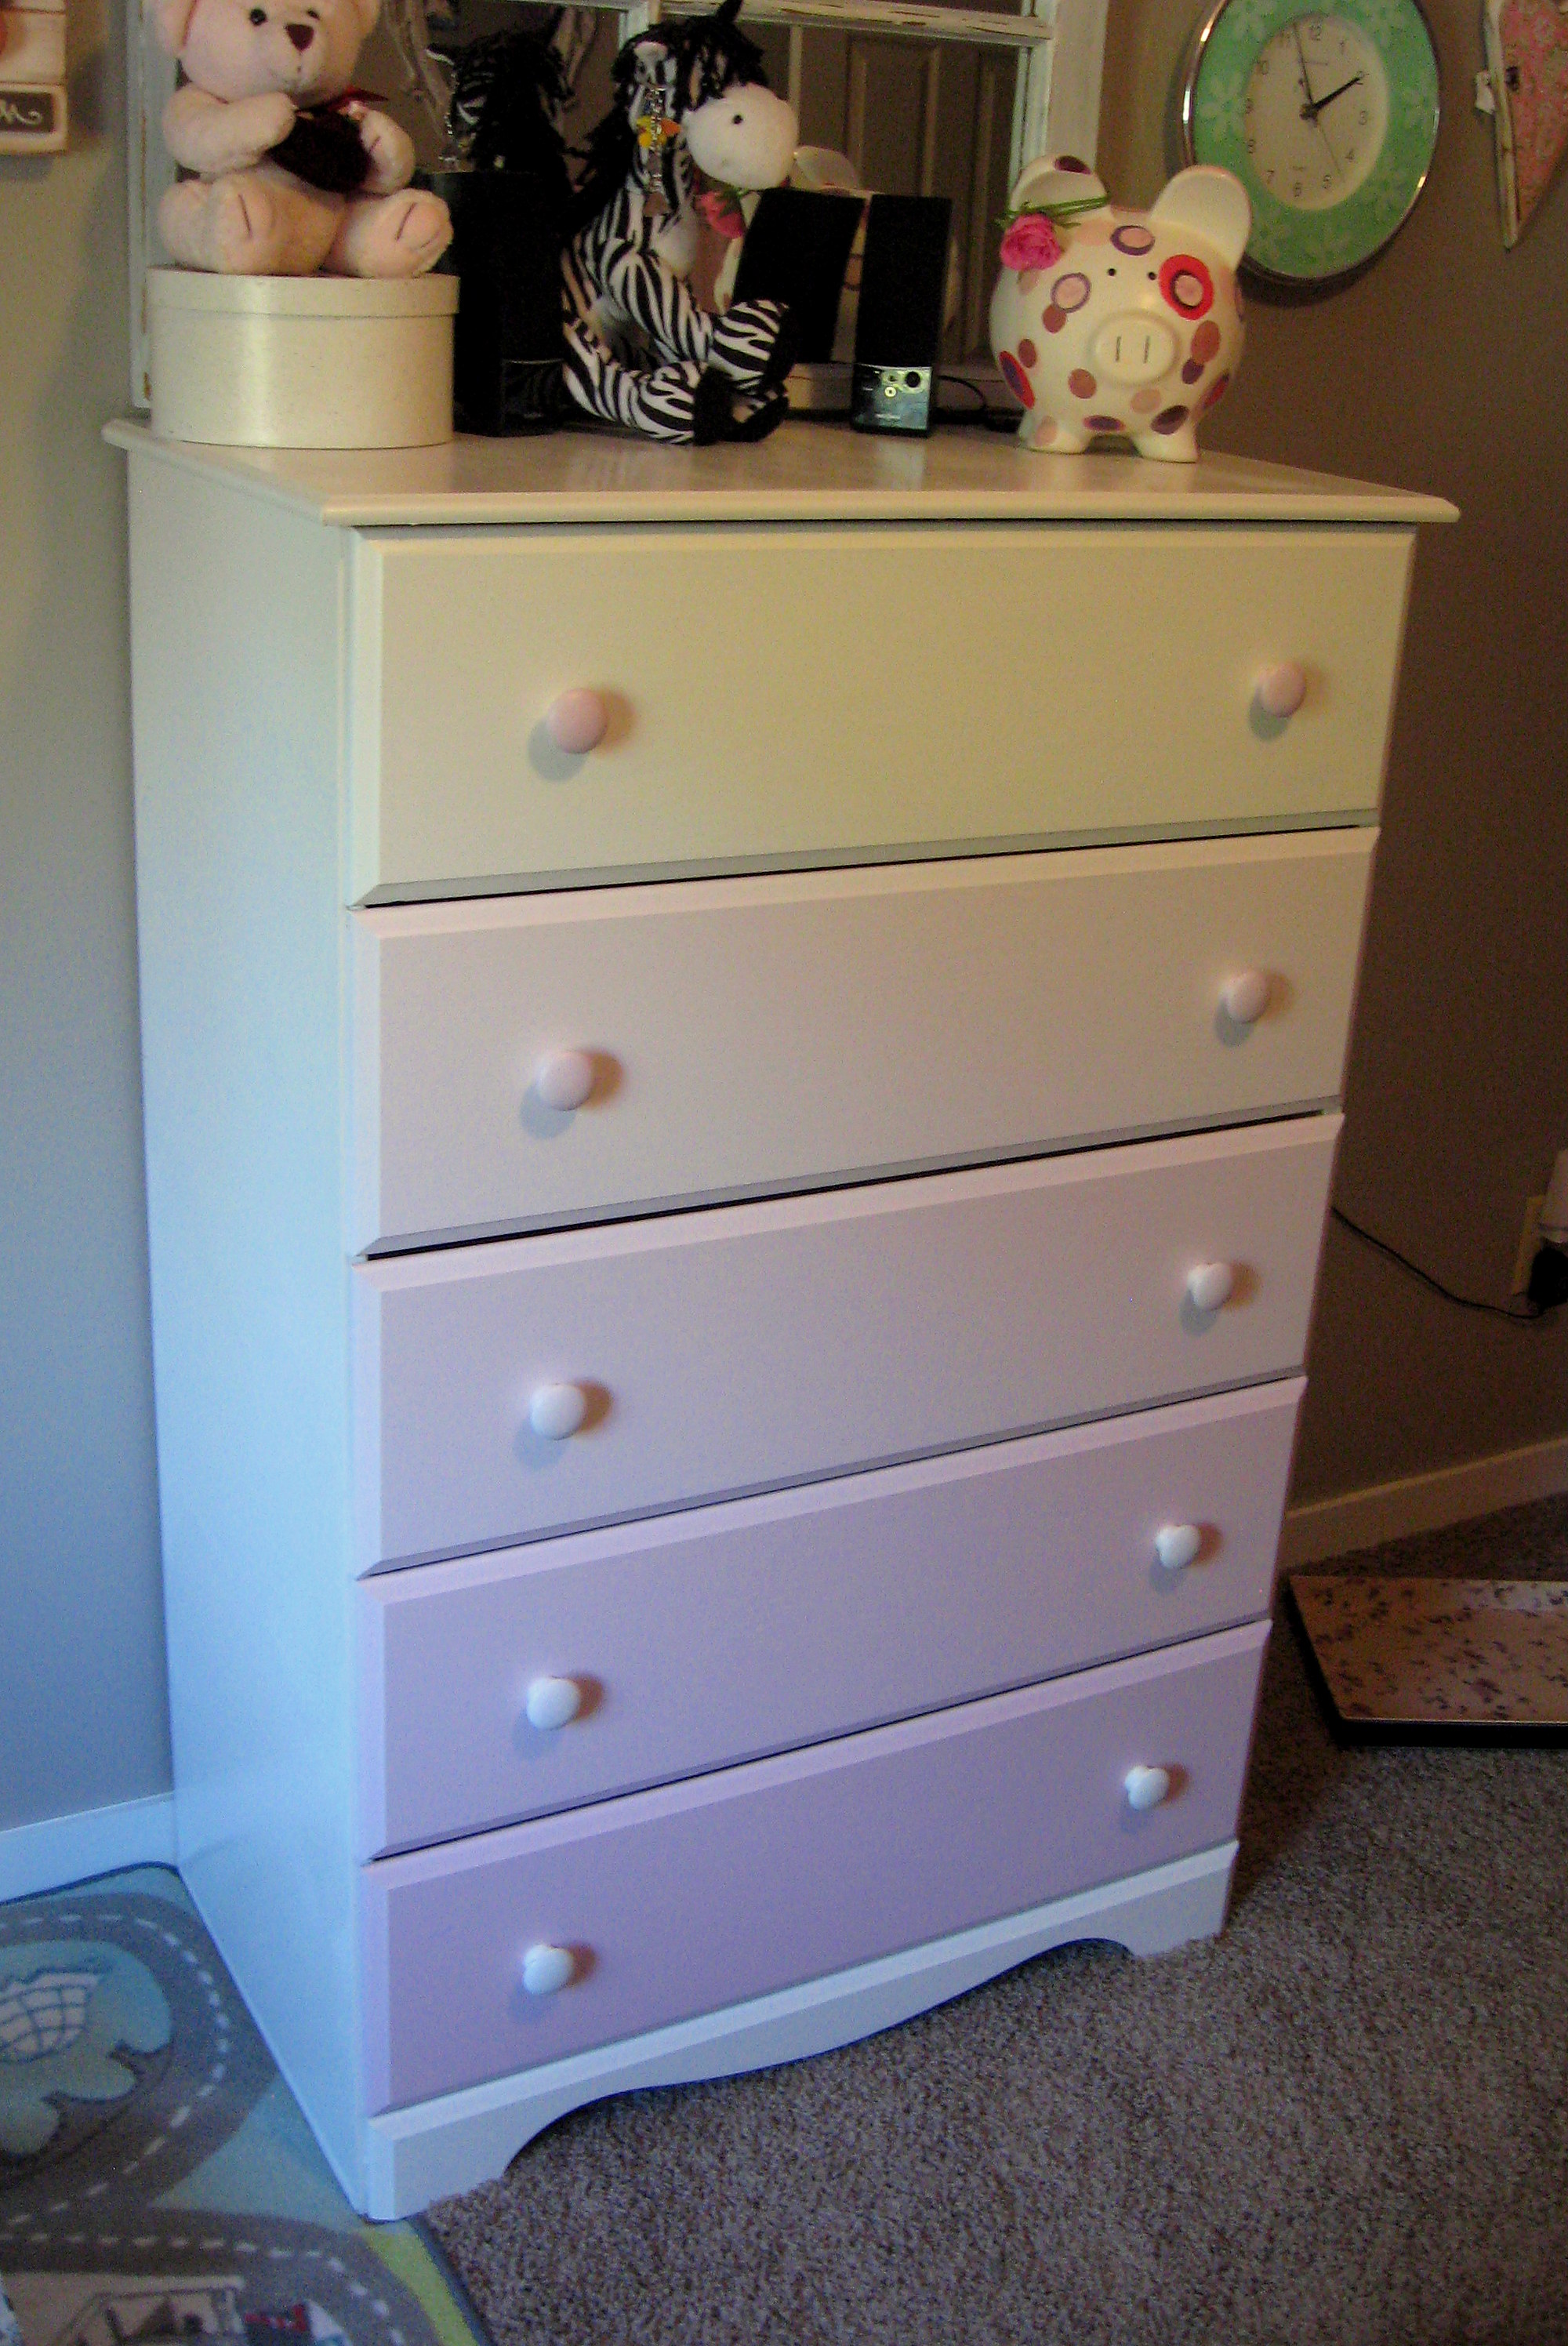
Ombre Painted Dresser
I’m not usually one for following what is trendy in my home decor, but I do love the Ombre look. Even if you don’t know the word, I’m sure you’ve seen it around; it refers to a gradation of color and can be spotted everywhere from home decor:

to clothing:

to hair:

and I love it!
If you want to add this trend to your home, it is a pretty easy technique to produce a big wow factor.
I started with the dresser that’s been in my daughter’s room. I didn’t get a picture of it before I took the drawers out (what is with me and before pictures!?!) but it is your basic inexpensive laminate furniture store dresser.

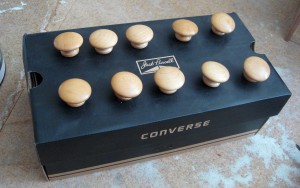
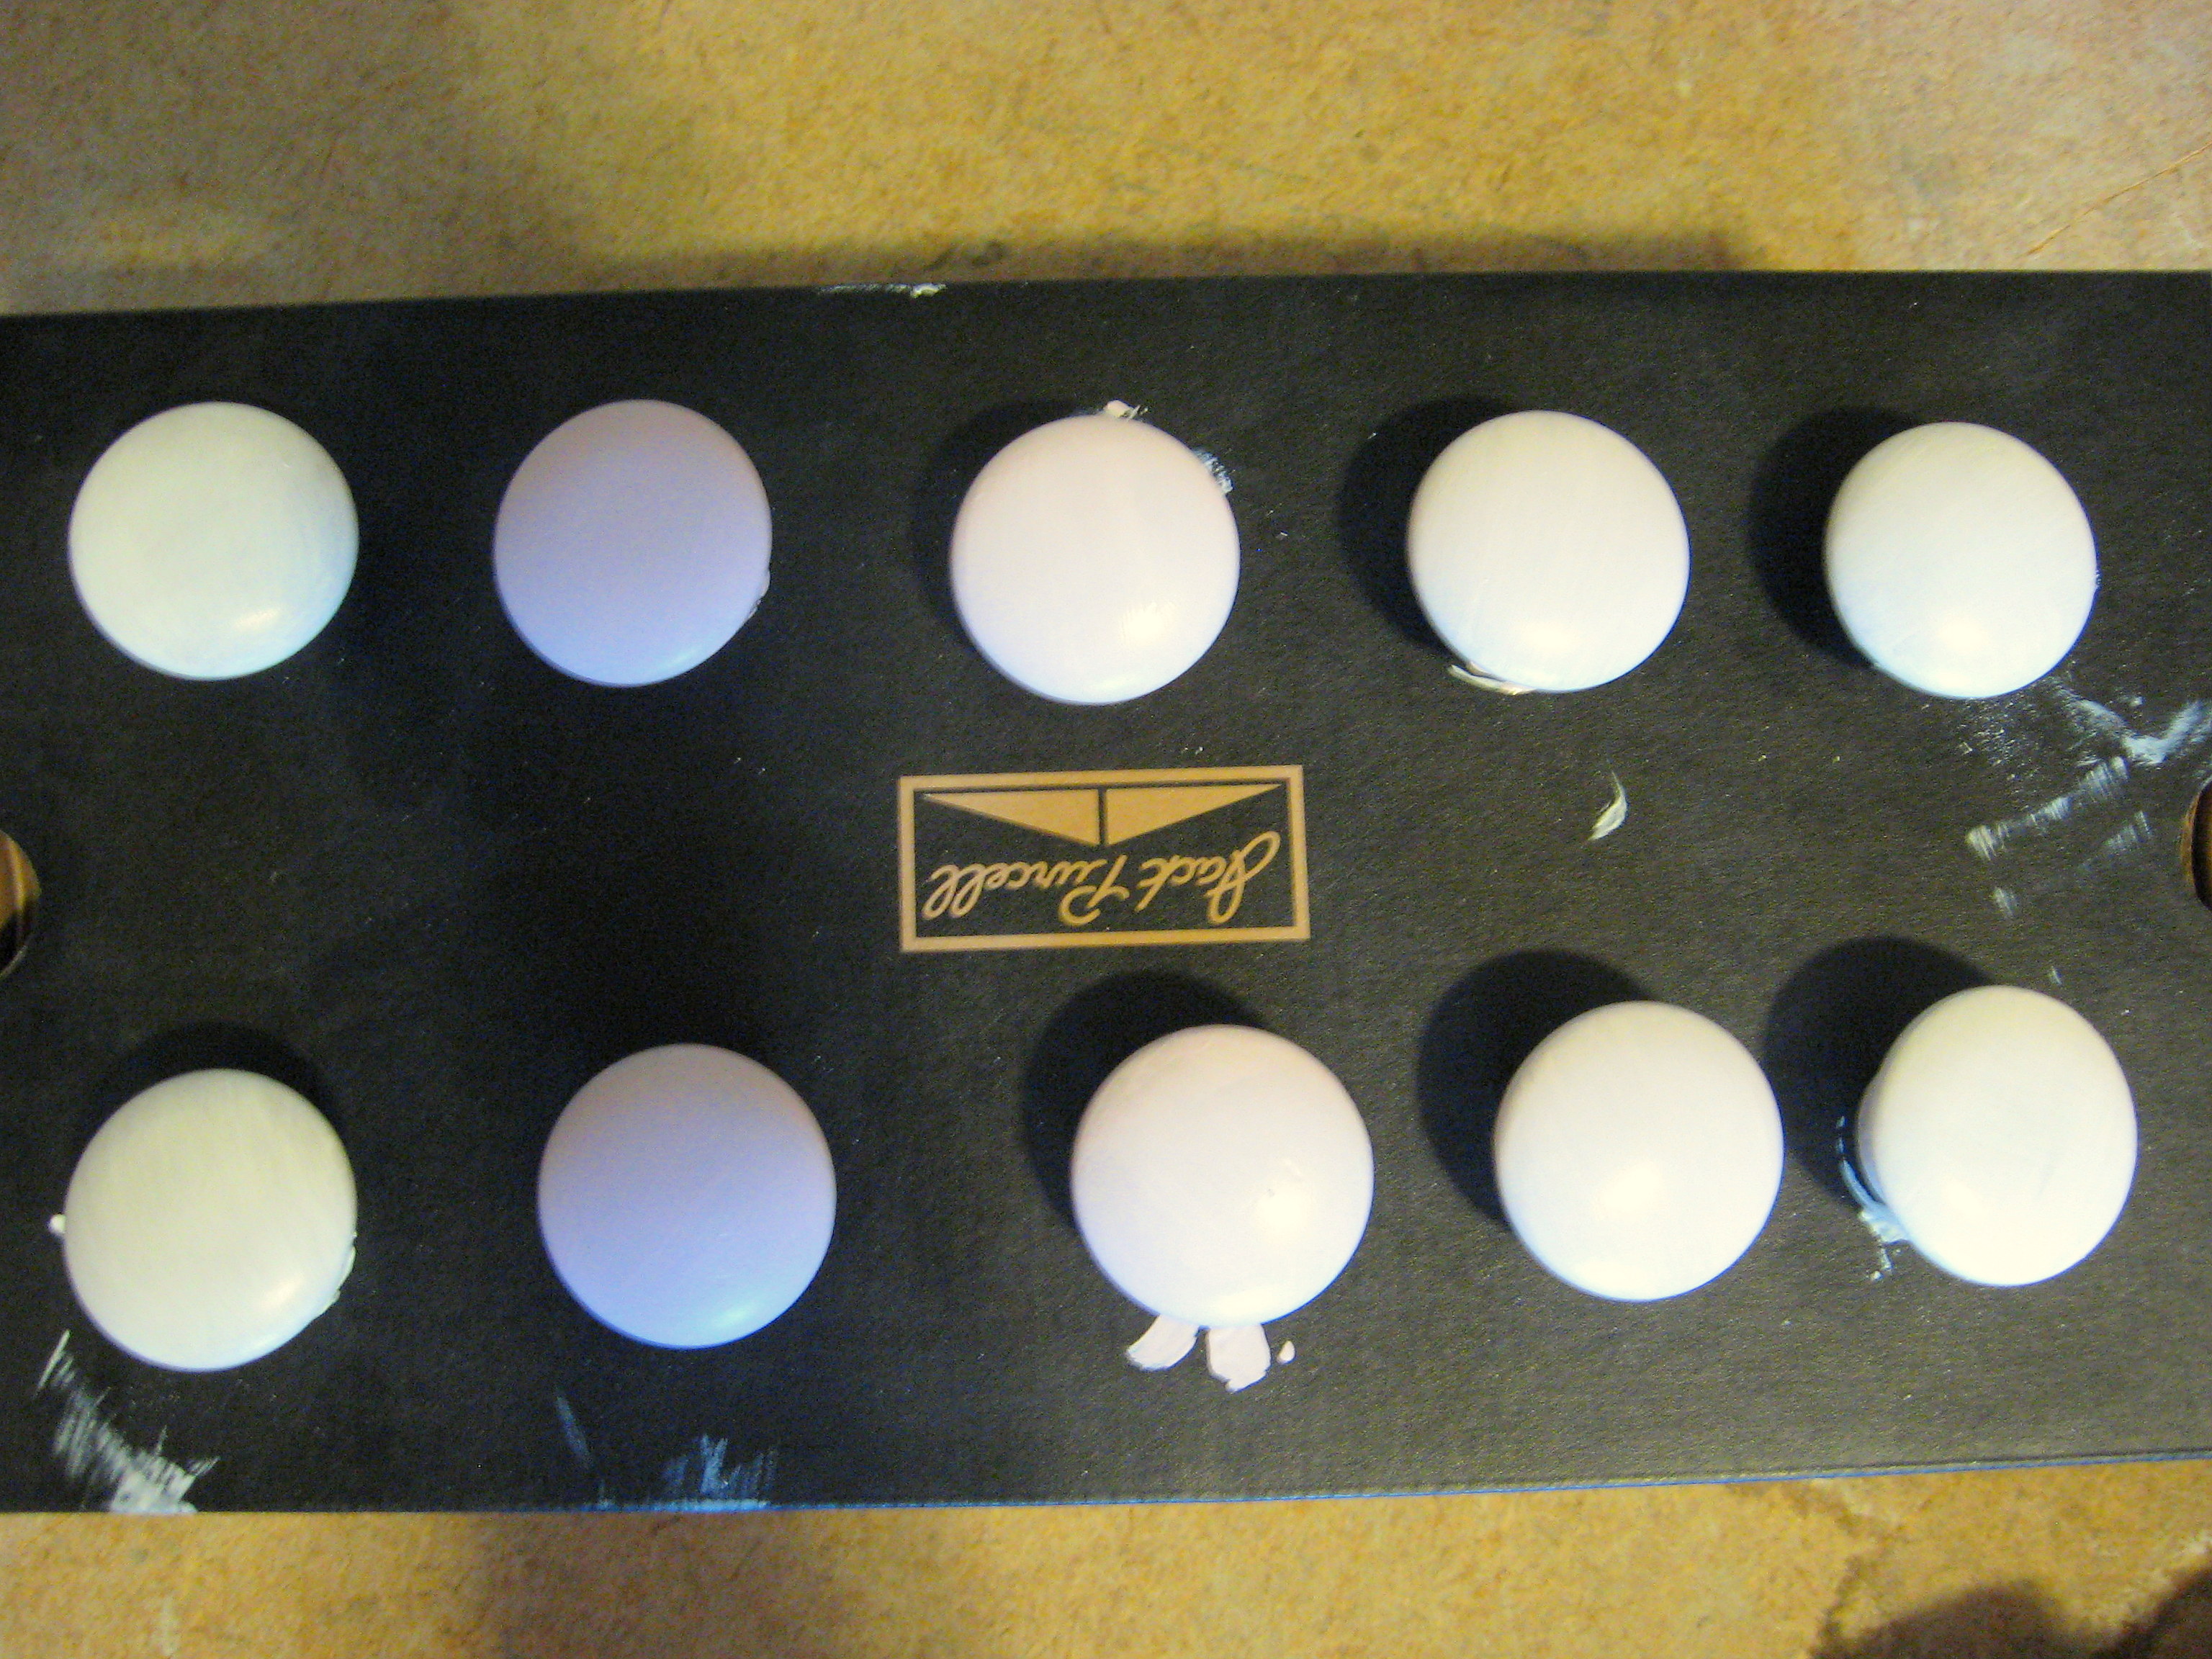
Start by taking the drawers out and removing all the knobs. I stick the screw part of the knob through a box like this to hold them while they dry.
 Give everything two smooth coats of a good gripping primer (if you’re unfamiliar with painting laminate furniture, read this post first.) and let it dry. I chose for this project to paint the body of the cabinet white, so I did that next and set it aside to dry while I worked on the drawers.
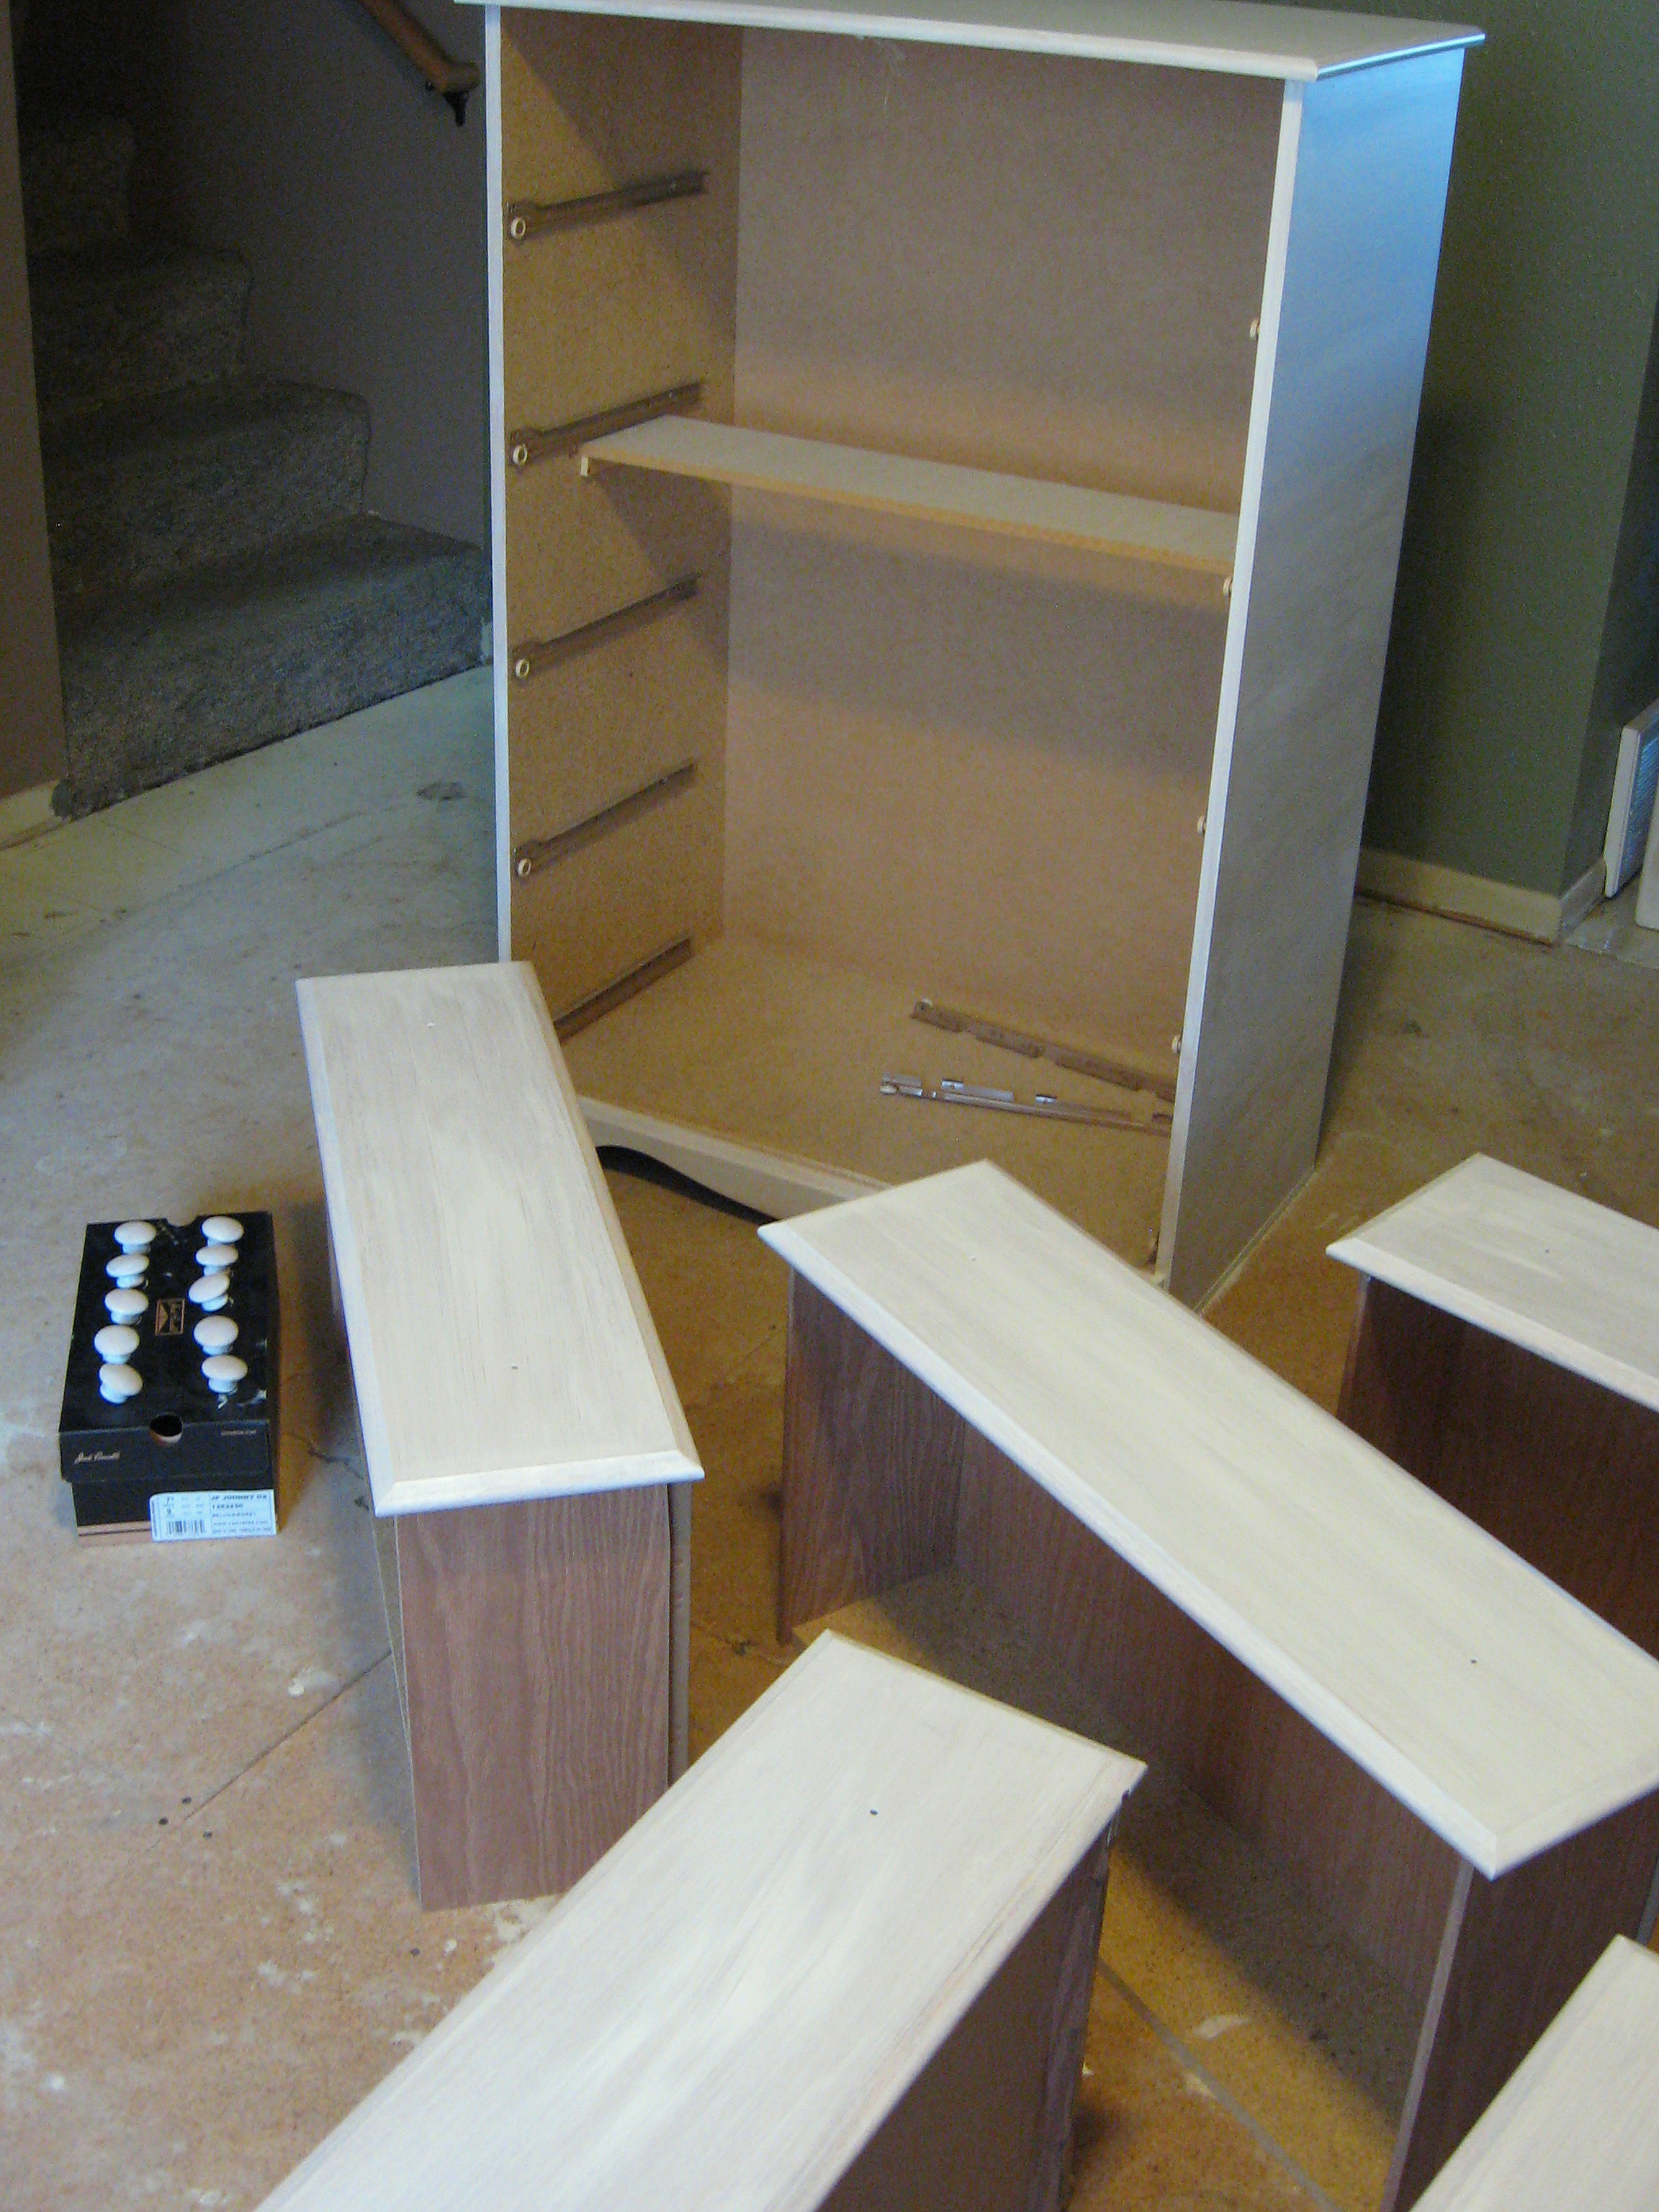
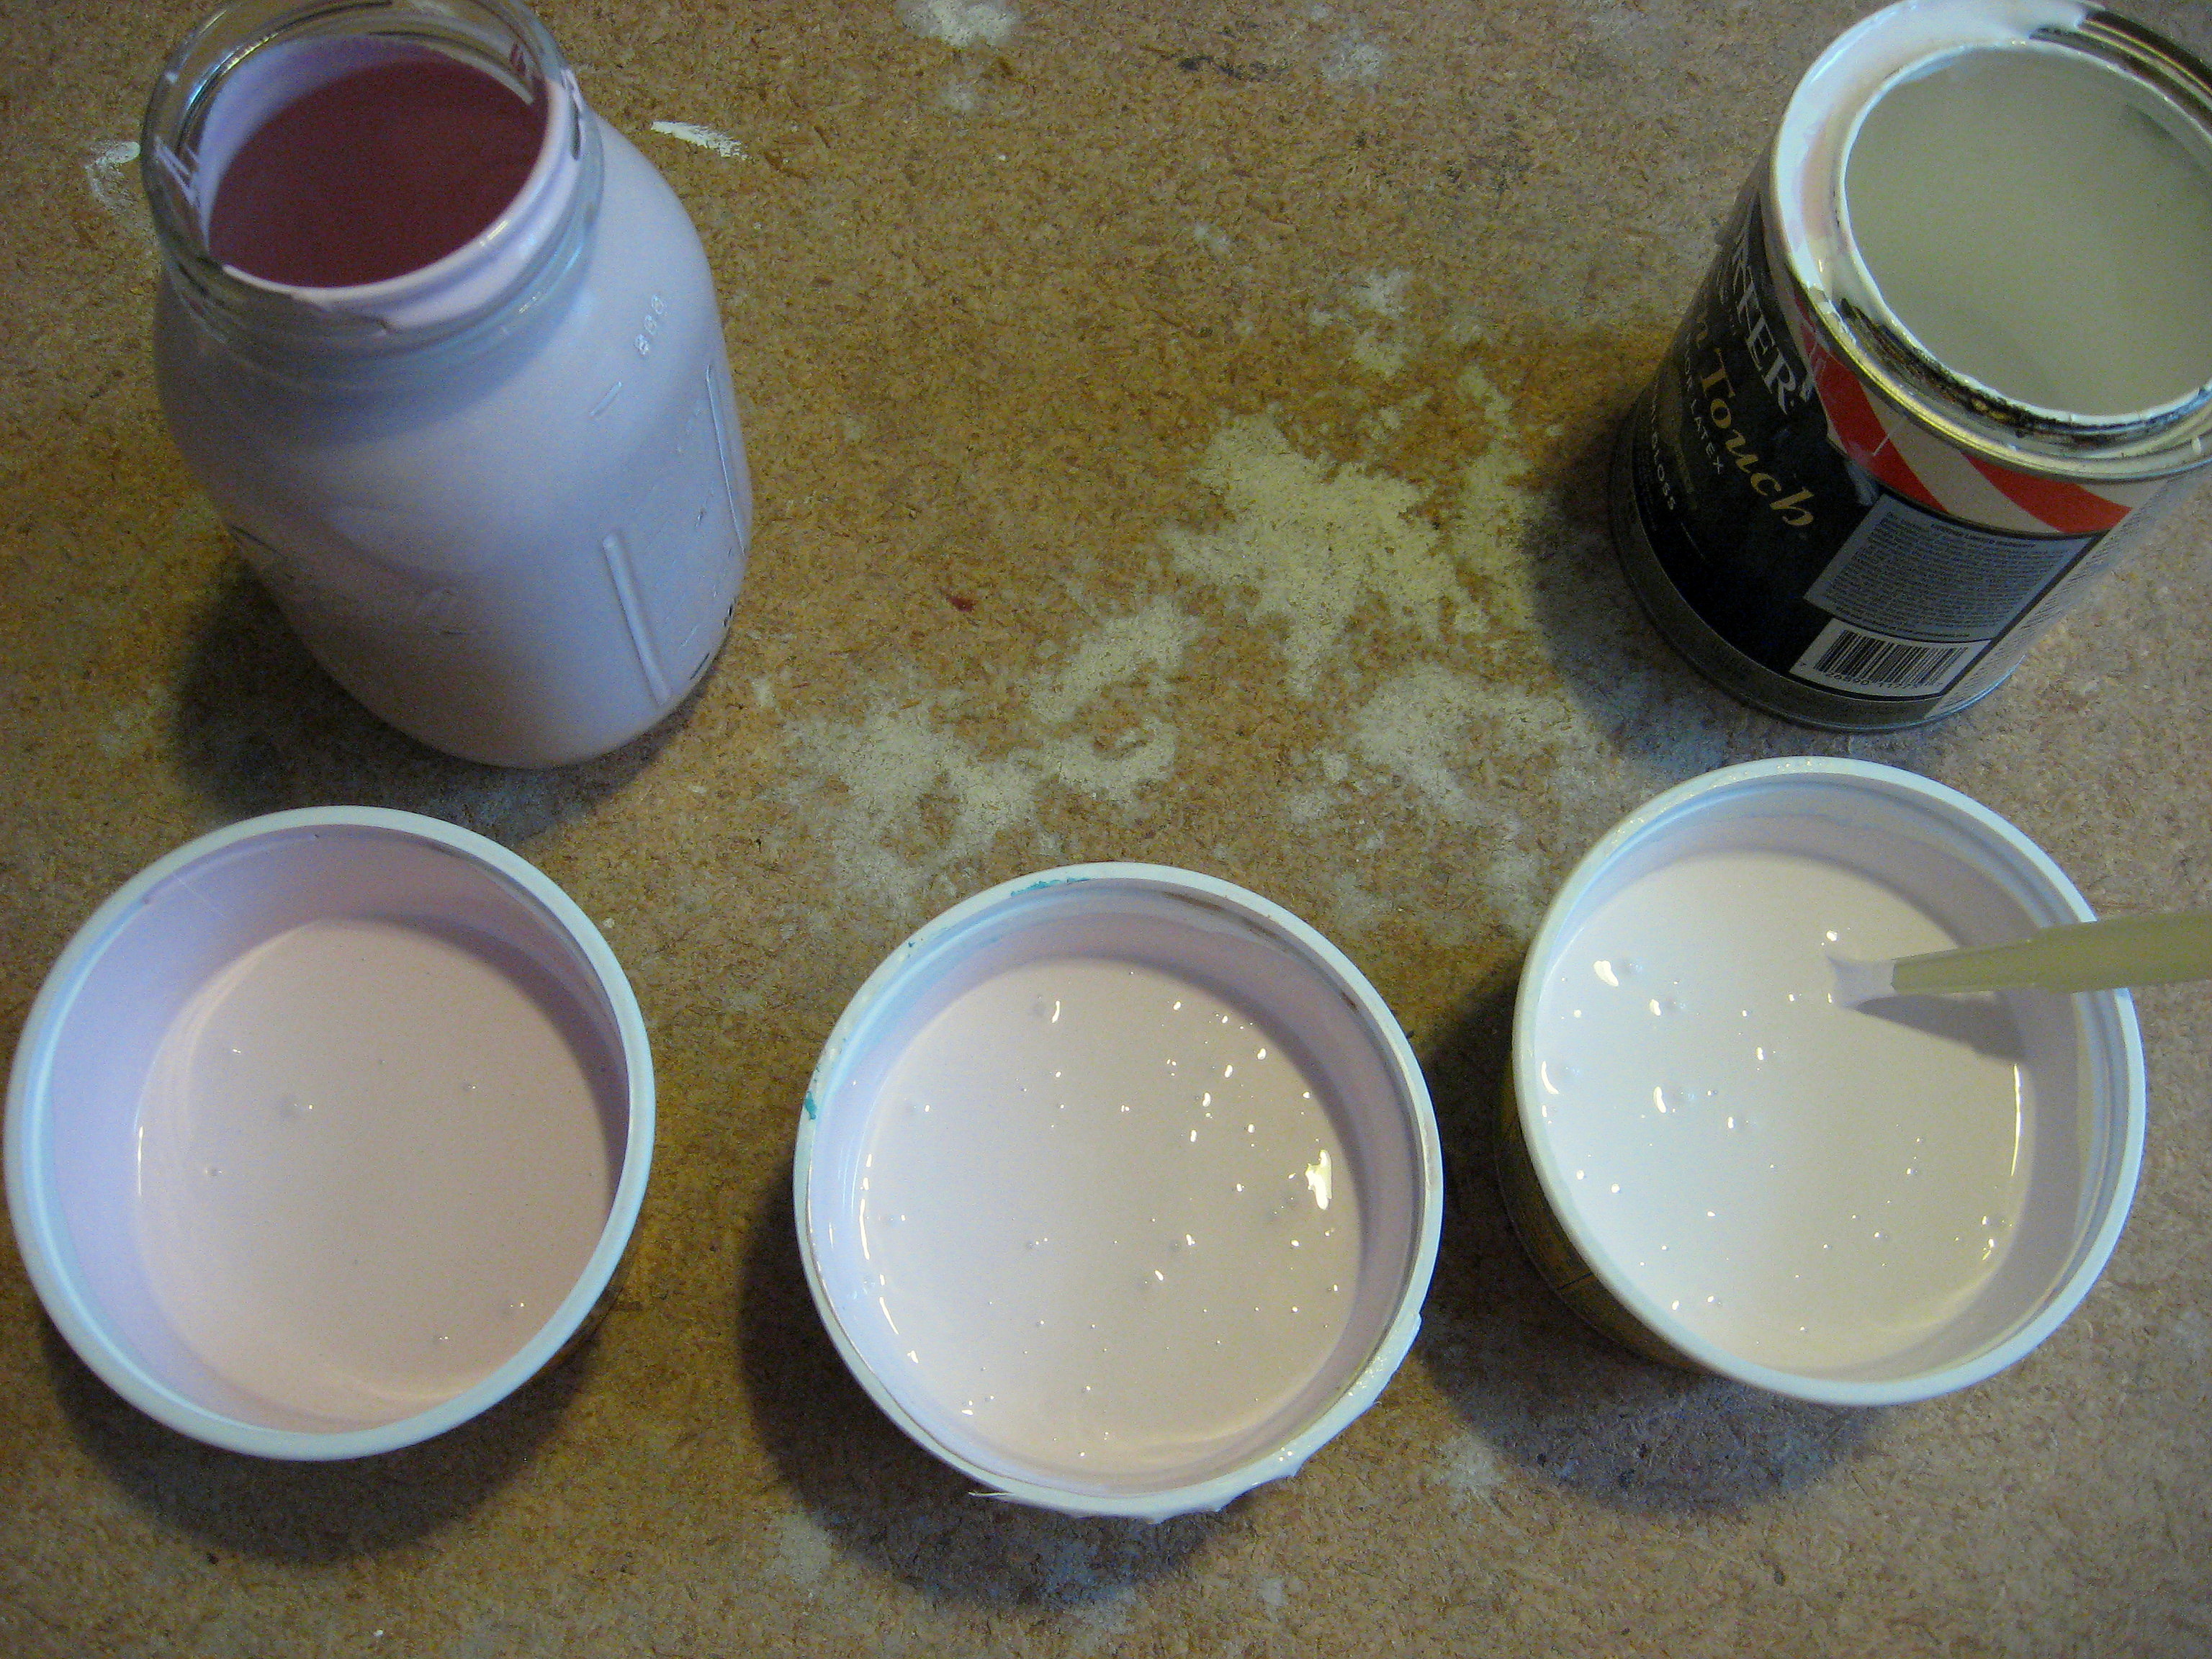
First up, mixing the paint for the Ombre effect. This dresser has 5 drawers, so I needed 5 different colors. I started with the top drawer being white and the bottom drawer being the same color of pink that I painted her bedroom ceiling.
I poured an equal amount of pink and white into one container (the middle one), then about the same amount of paint into another container, but this time more pink than white (the lefthand one) and then the same thing in reverse in a third container – more white than pink (the righthand one).
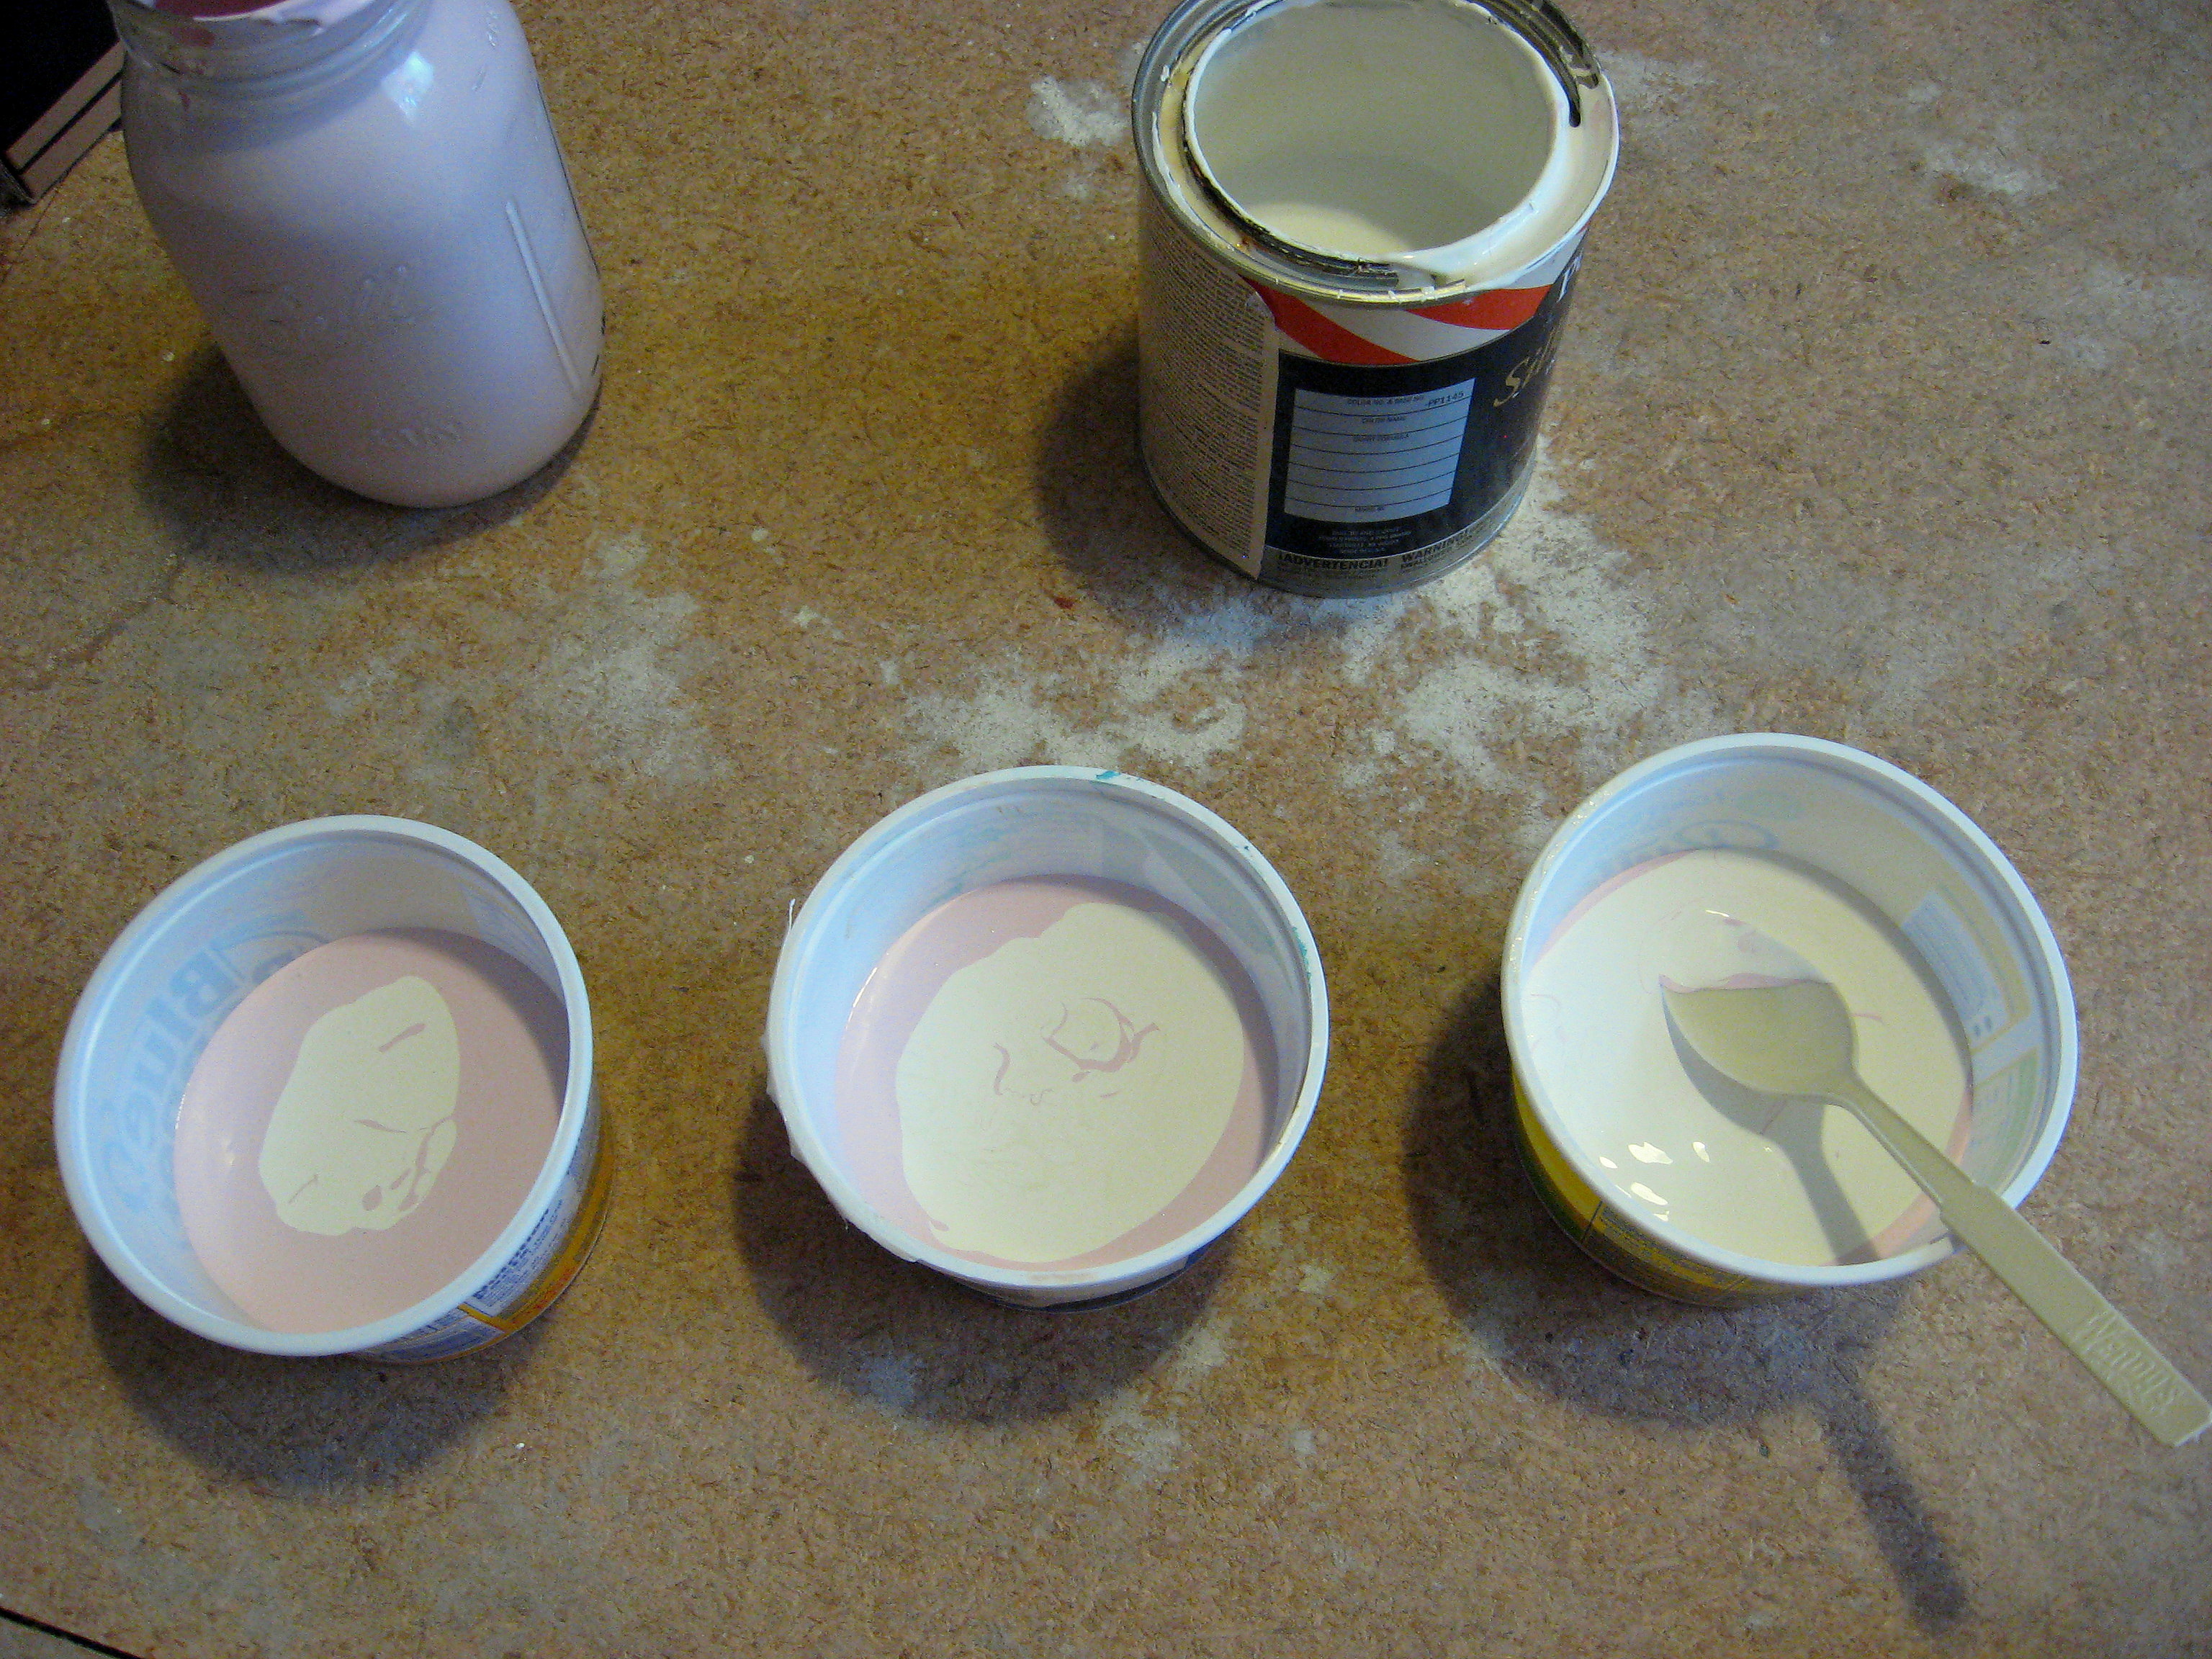
Mix them all well and line them up with the plain pink and plain white to see if you like the color values. Add more pink and/or white as needed to achieve the color gradation you are happy with.
Don’t forget about the knobs! This is the world’s worst picture to show what I actually did – sorry – but I painted each set of 2 knobs one of the five colors.
Once everything has received 2 coats and is very dry (wait at least overnight – the longer you let this cure the sturdier the paint will be!) reassemble the drawers. I reversed the knobs, so that the darkest pink ones are on the white drawer and vice versa.
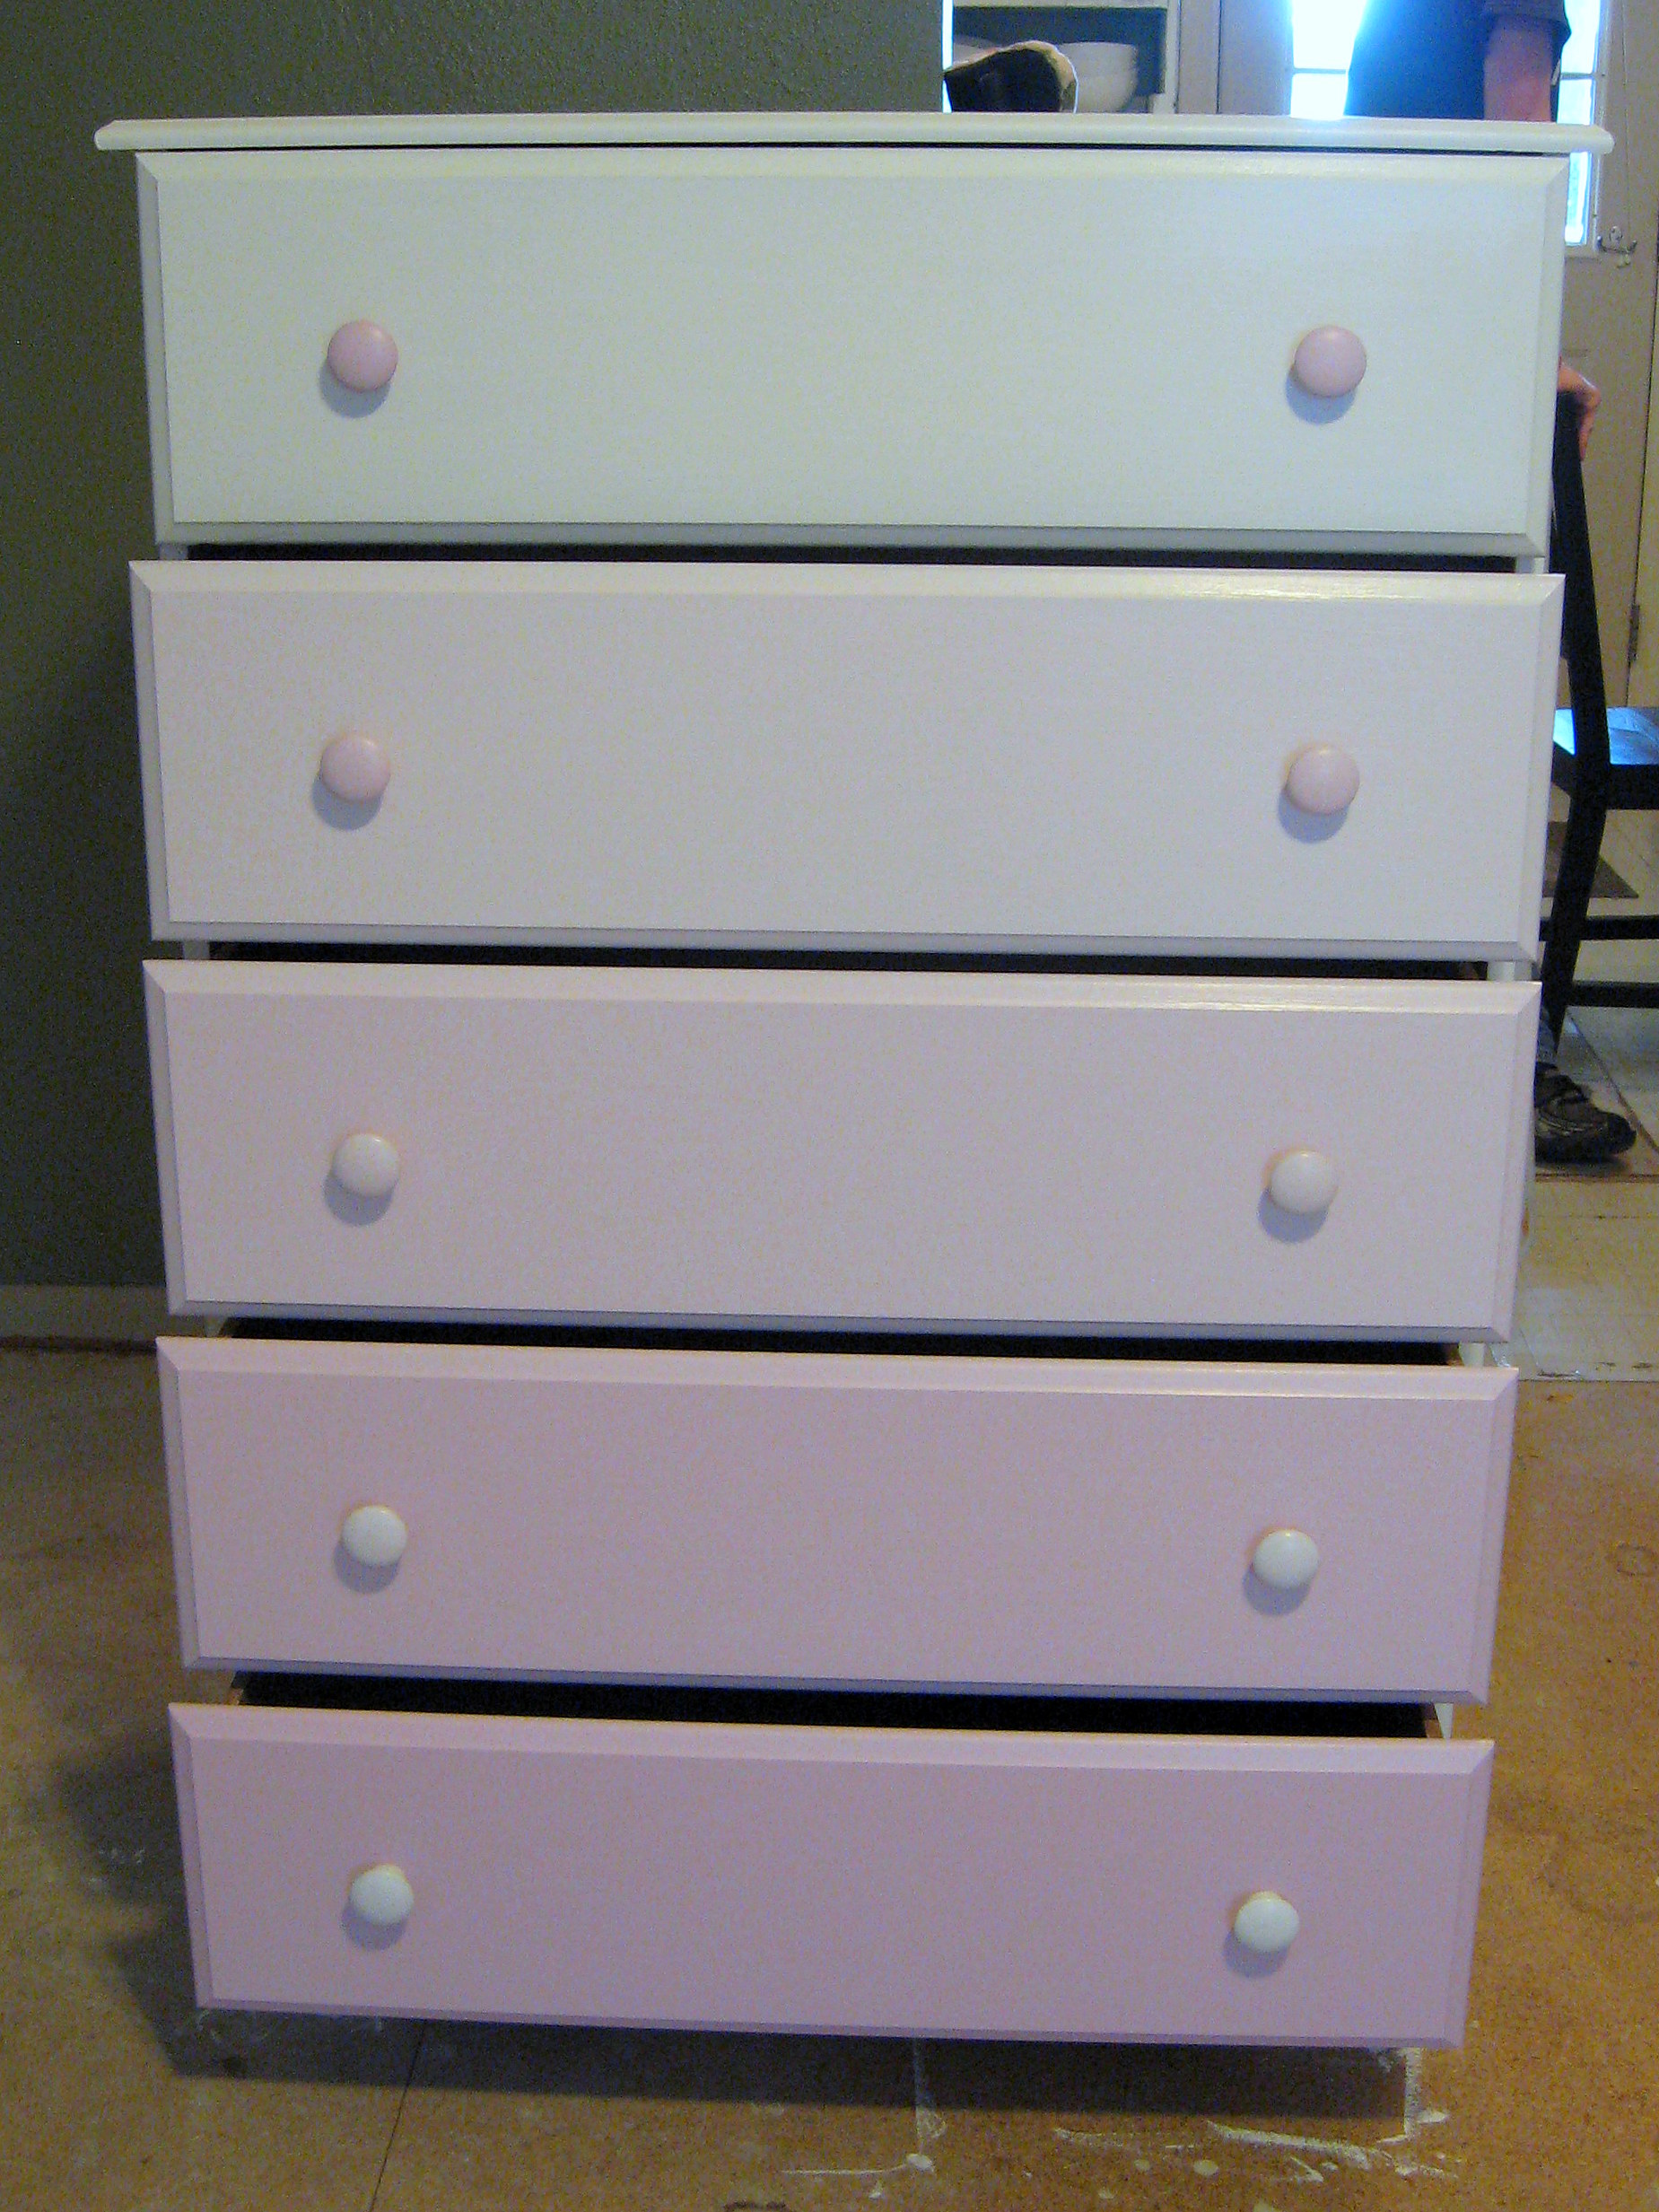
Love how this turned out, and not any harder than just painting it plain!
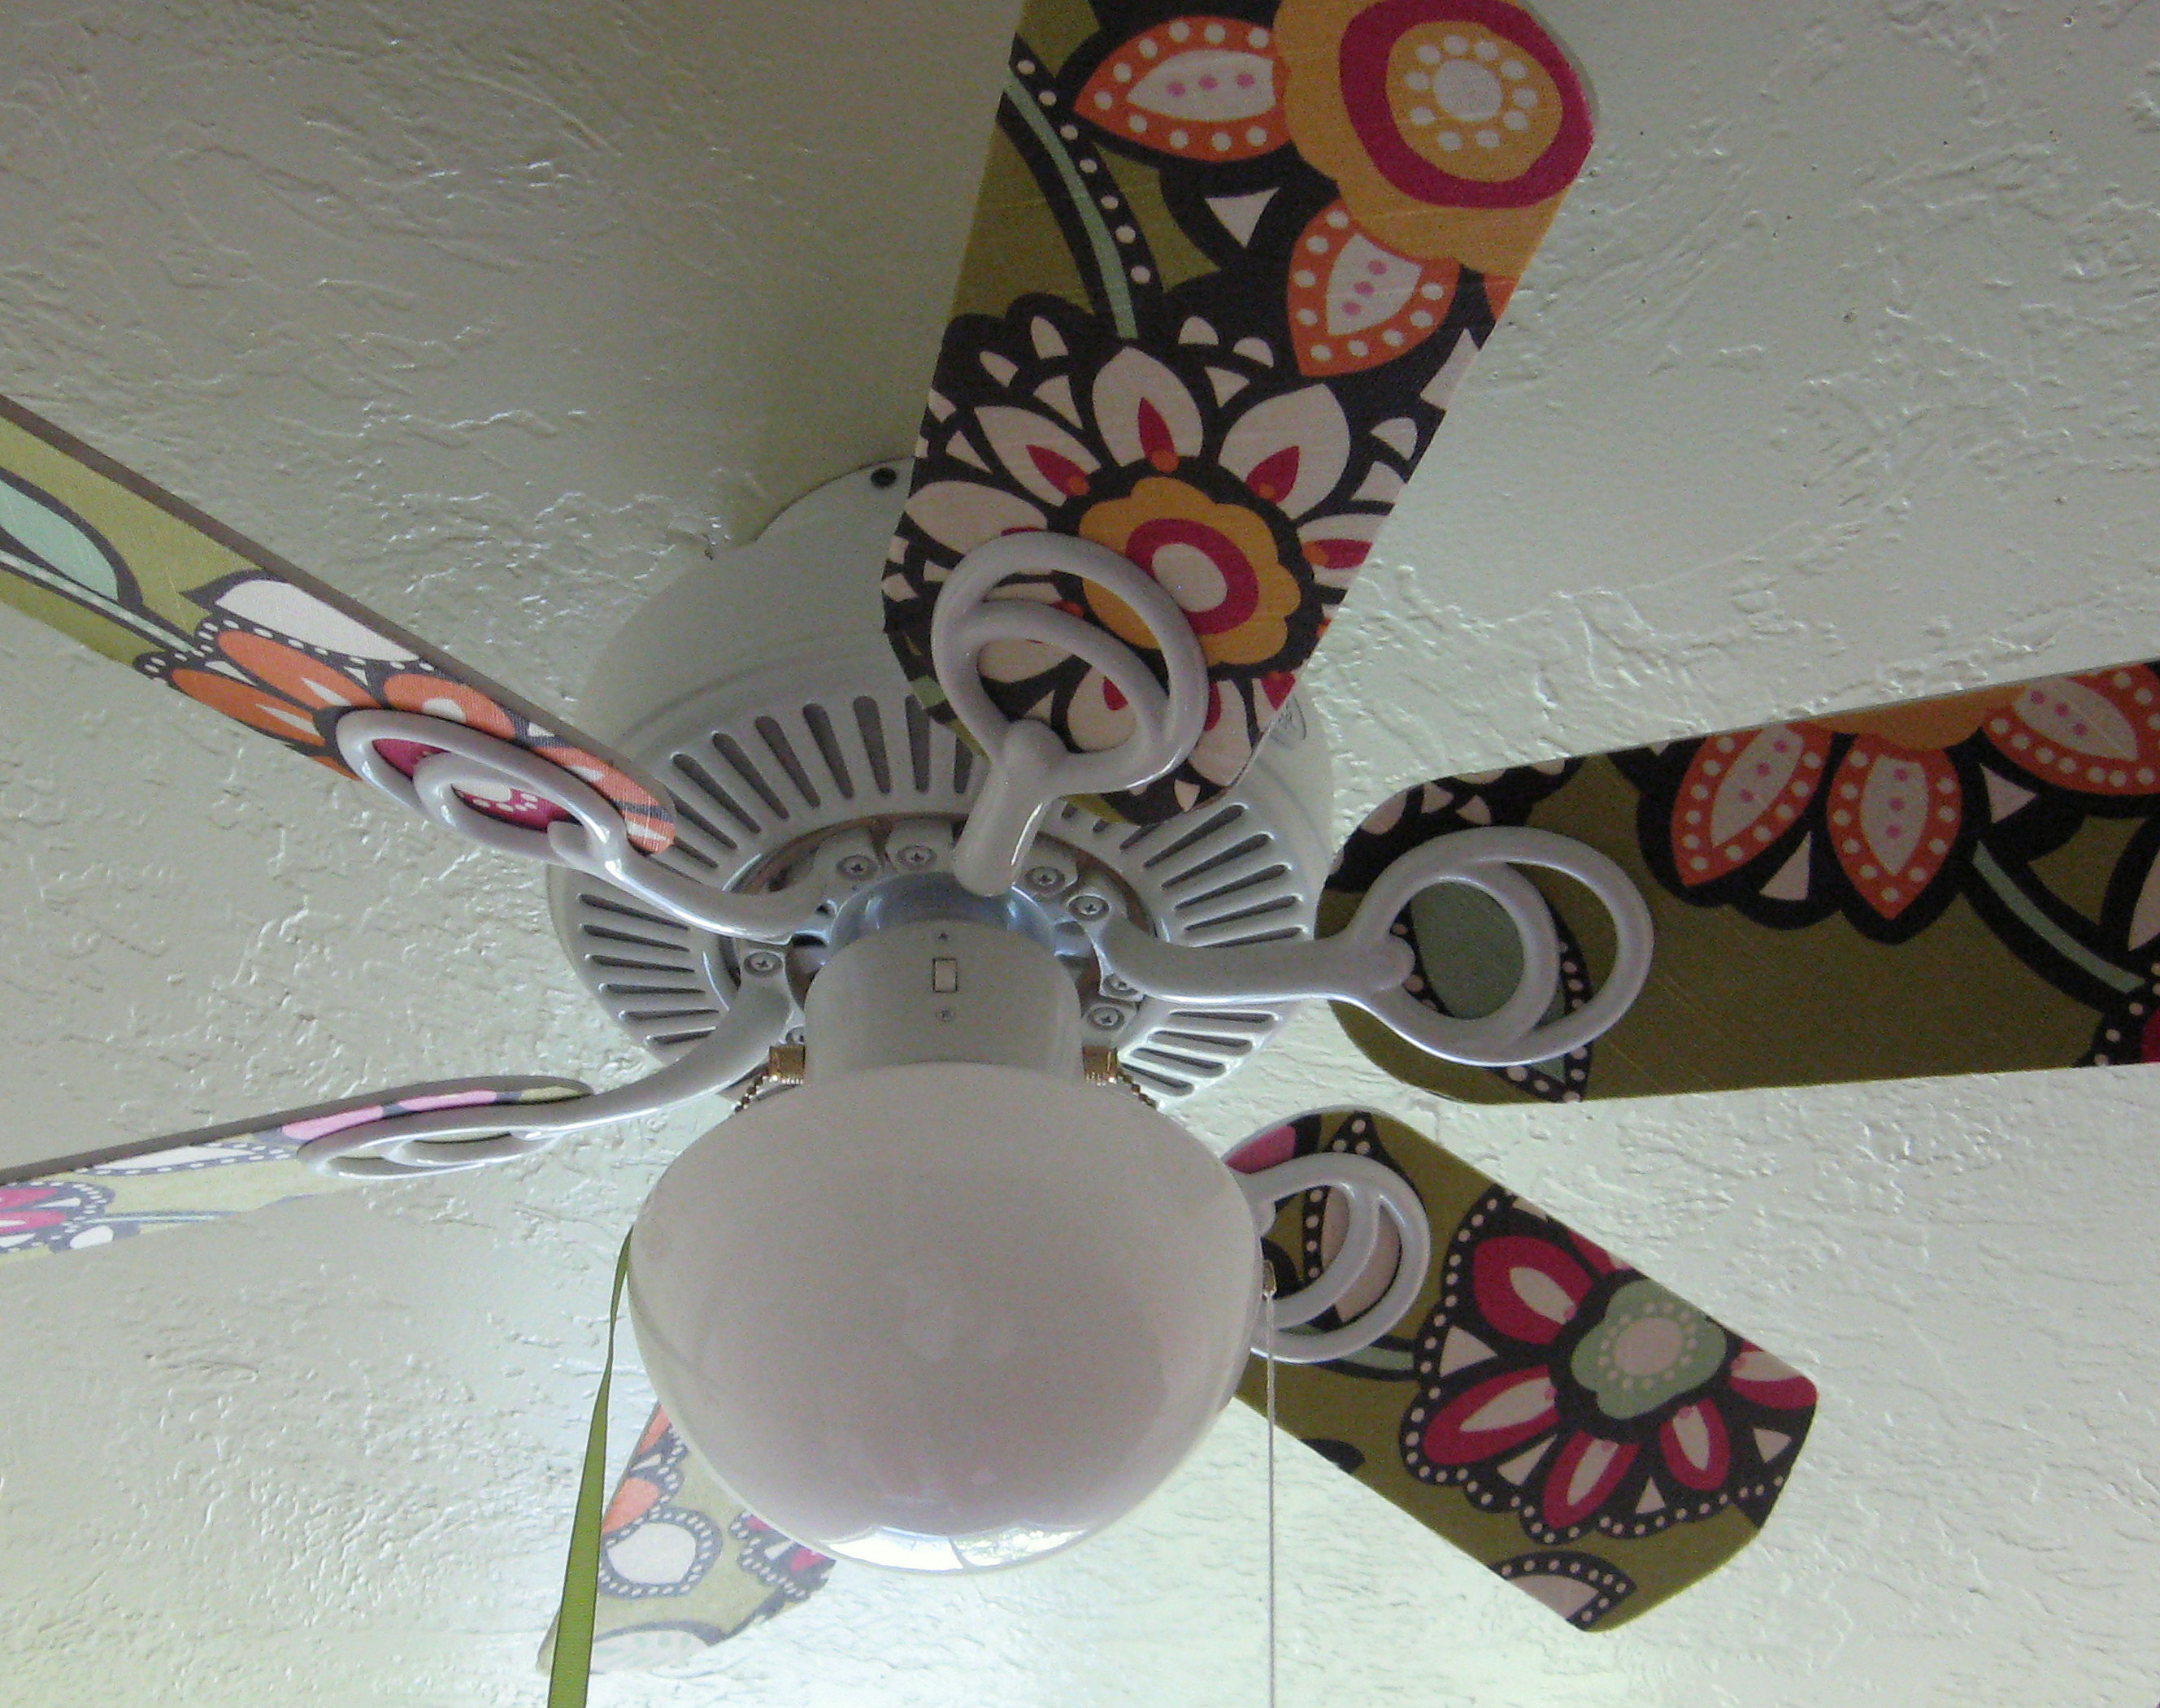
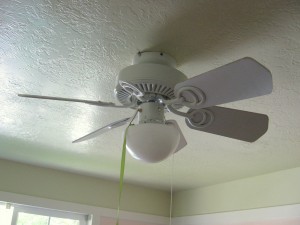
Update a Boring Ceiling Fan
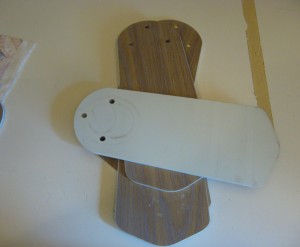
This is the ceiling fan that was in my daughter’s room when we bought our house:
I used the leftover fabric from the roman shade that I made for her room and a bottle of Mod Podge and the whole project took about an hour.
Start by removing the fan blades. They come off easily with a screwdriver. Use this opportunity to give both fan and blades a good scrubbing!
Most fan blades will be reversible with a different color on each side so that you can change them out if you want to. This fan had brown wood grain on the other side, and since I can’t see myself EVER using it that way, that is the side I decided to cover.
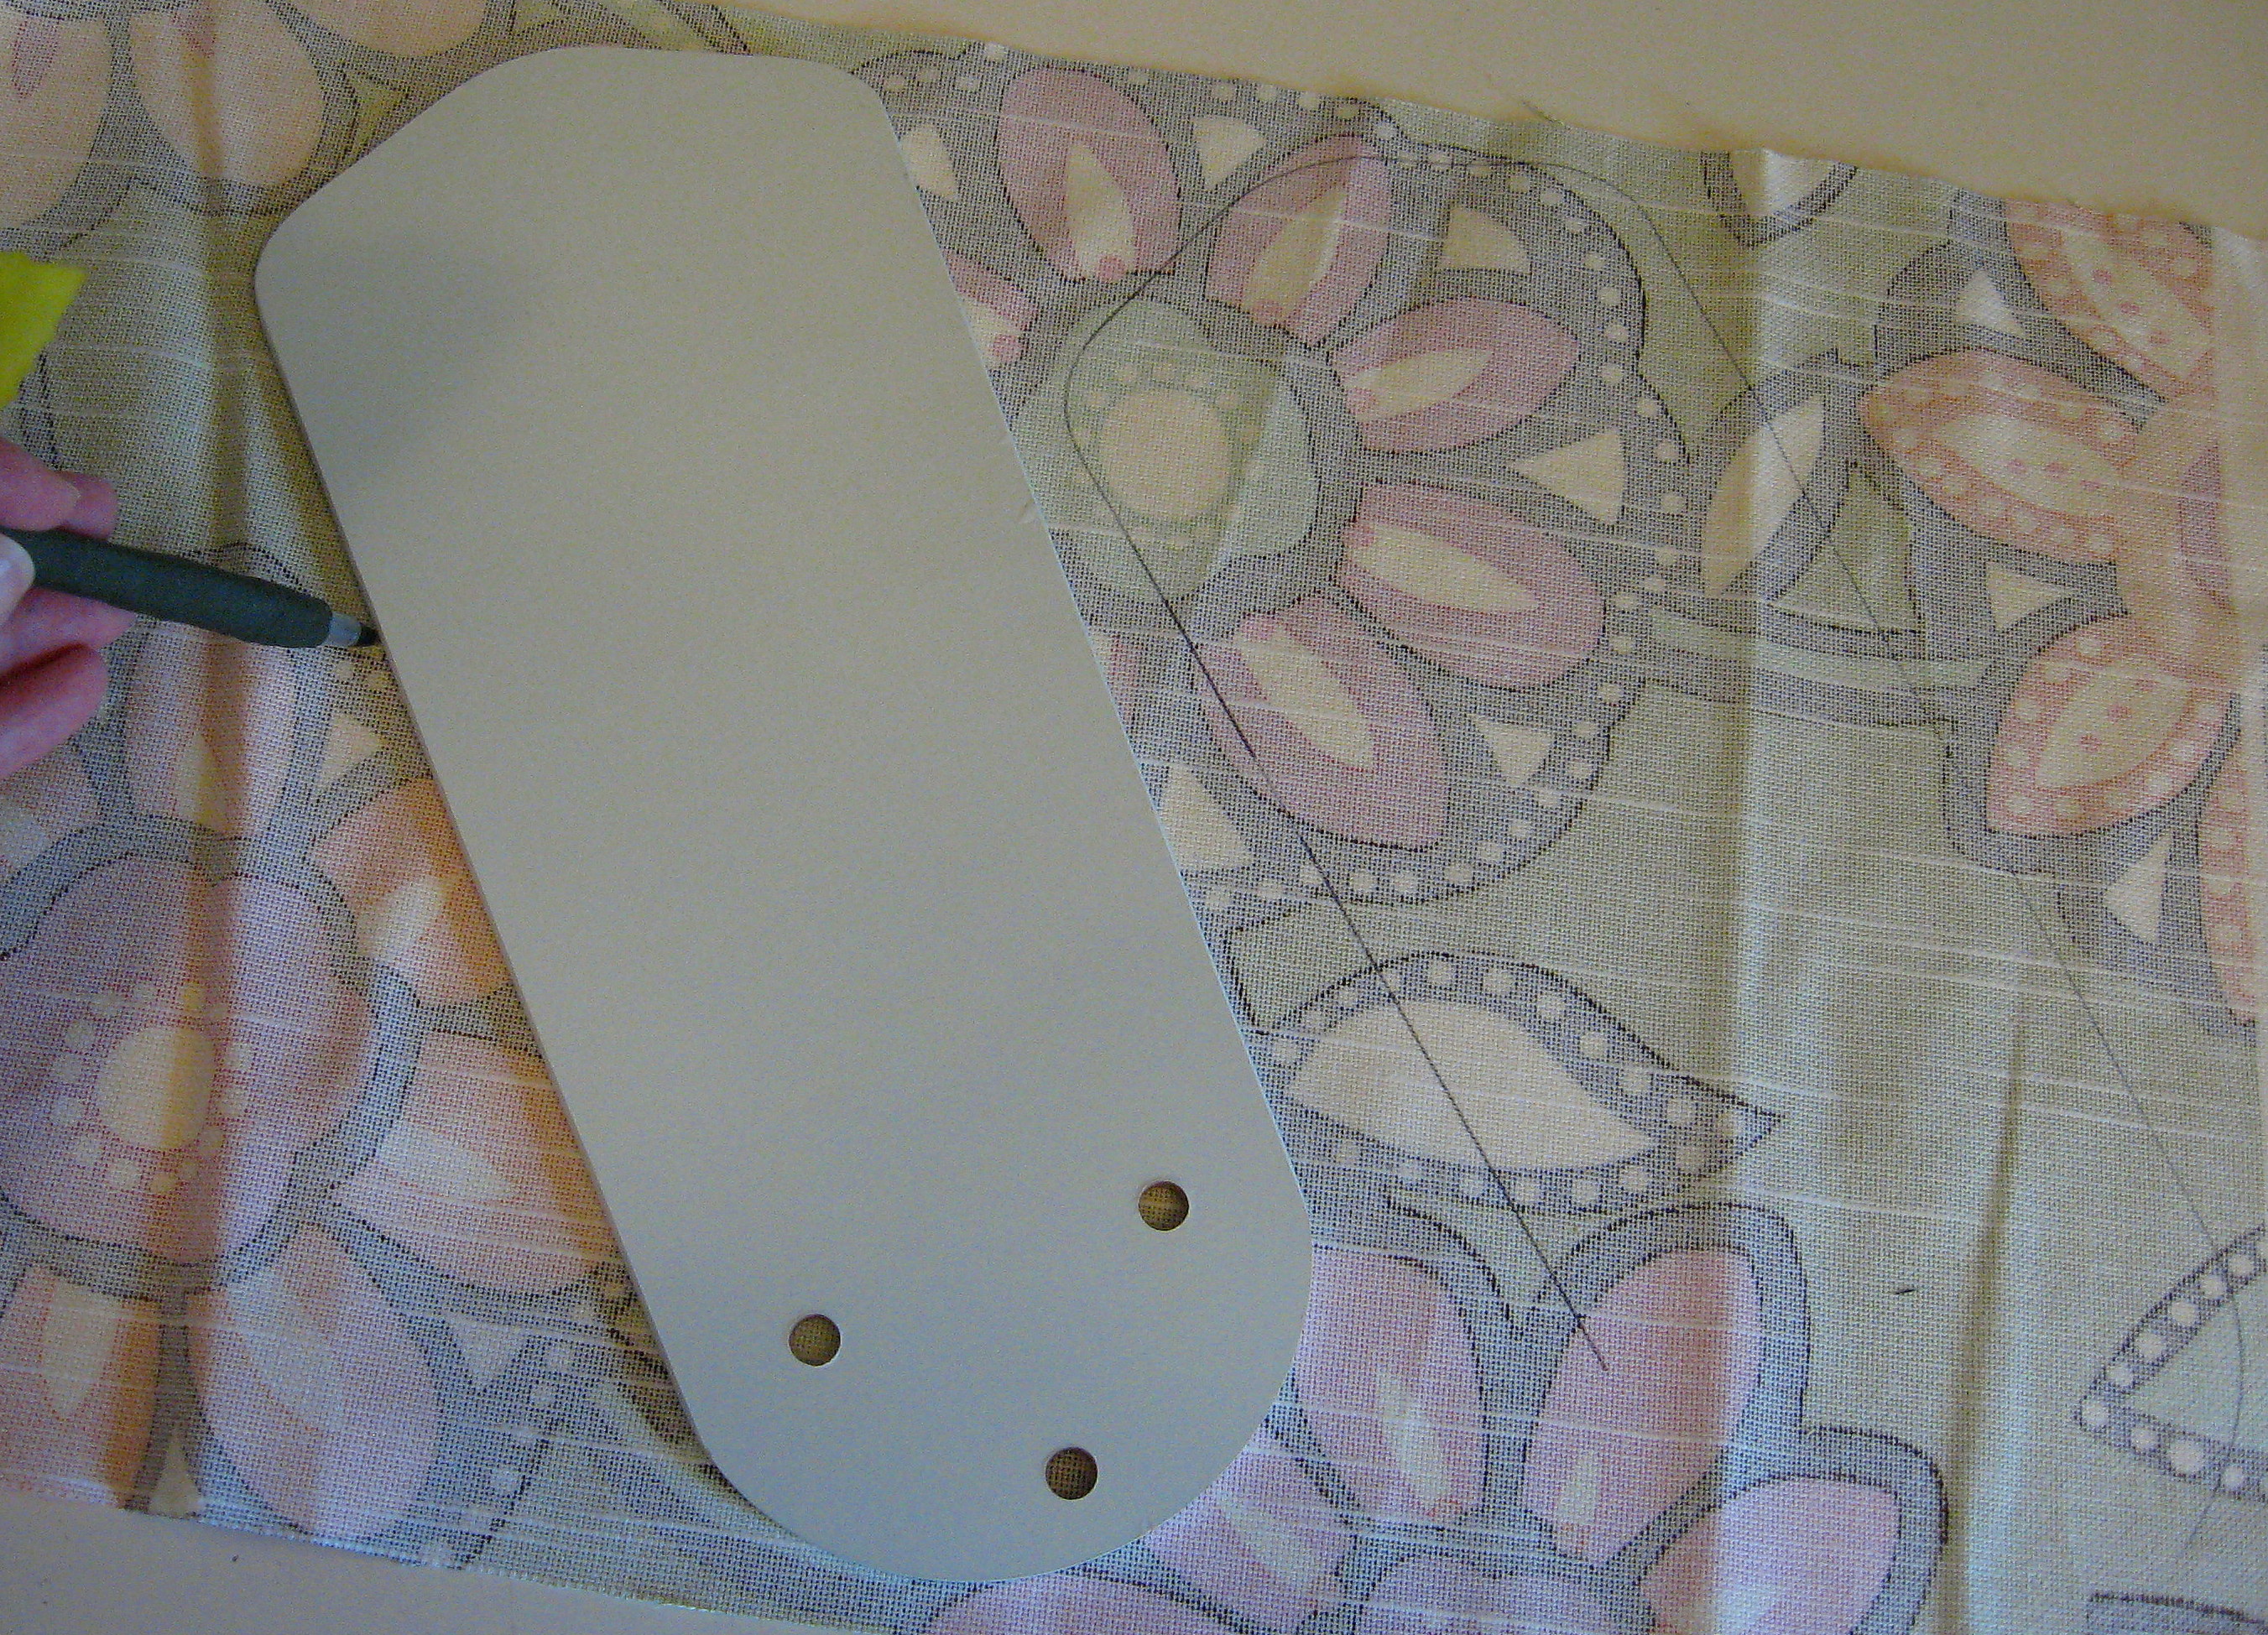
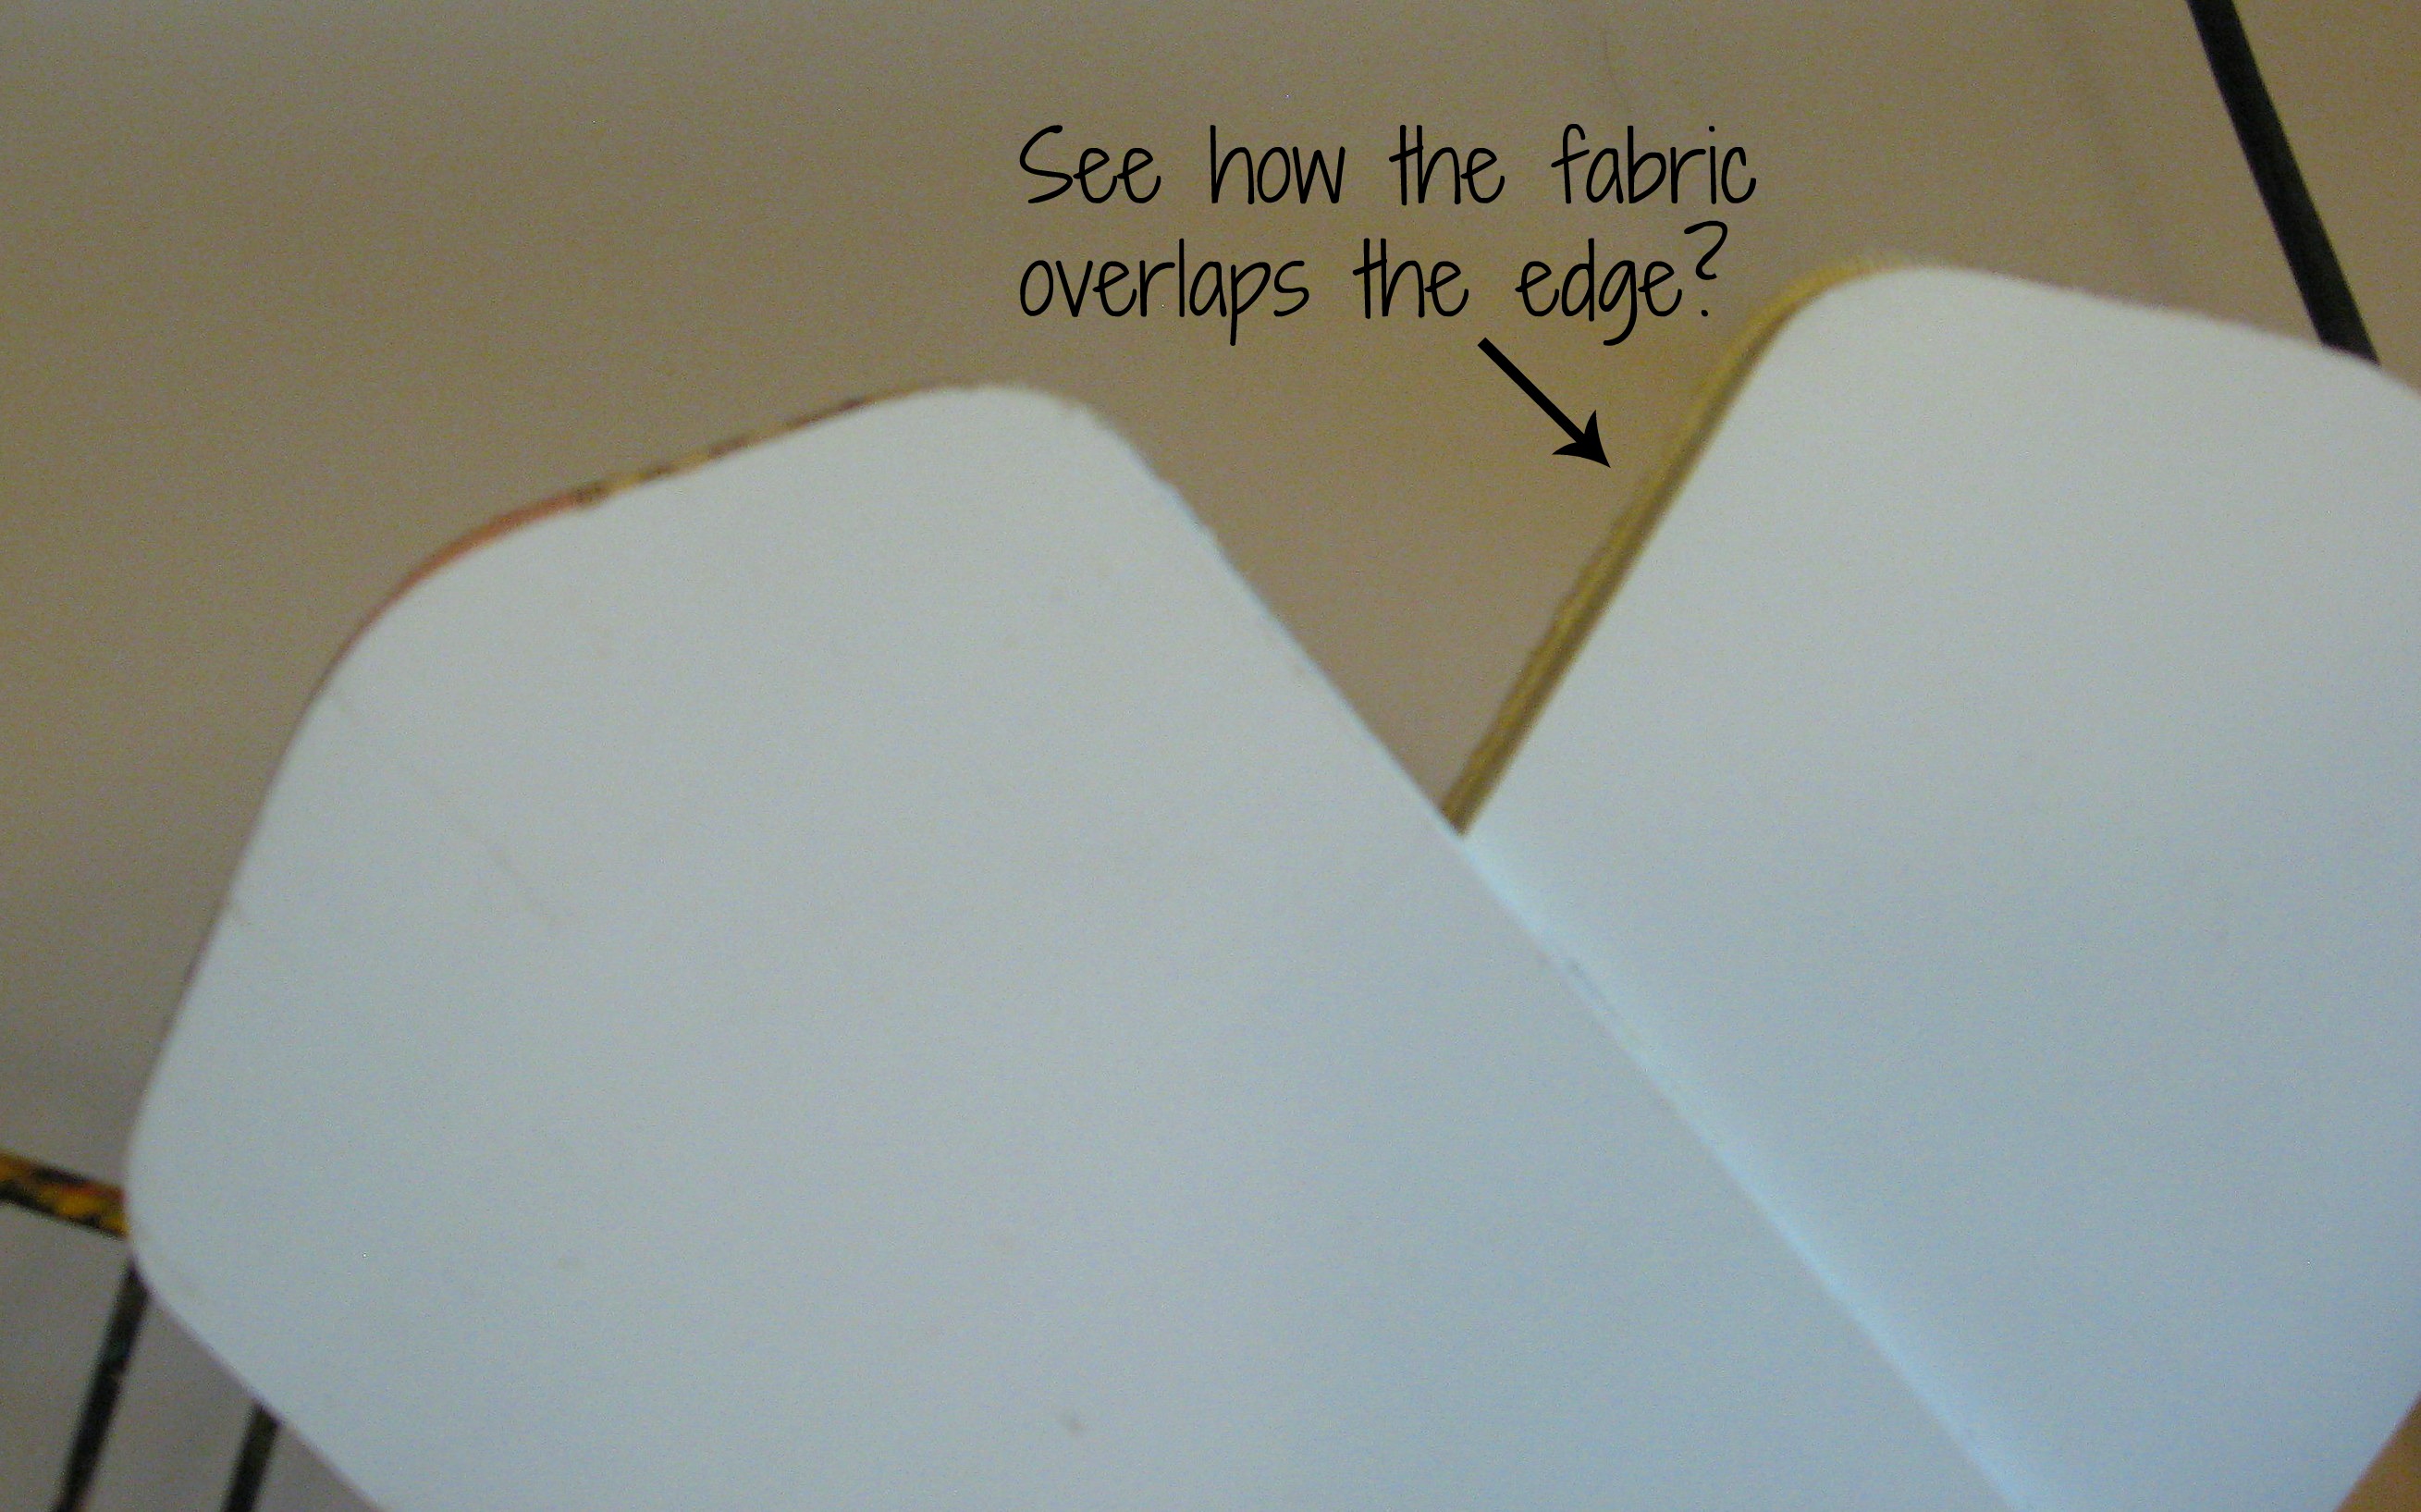
Err on the side of cutting too big and not too small. You don’t have to be too careful about the fabric fitting on exactly – if it hangs over just a touch it will be fine because no one will ever see the tops!
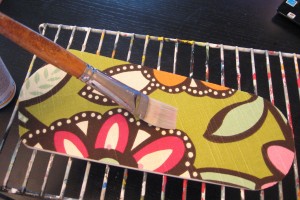
Now put a generous coat of Mod Podge on the fan blade
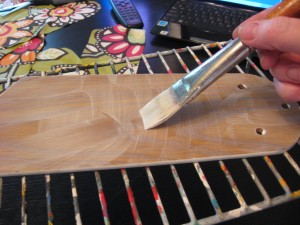 and then put the fabric on it. Smooth it down with your hand as it begins to dry; I didn’t even iron the fabric first. Between the Mod Podge and the smoothing, it will get the wrinkles out!
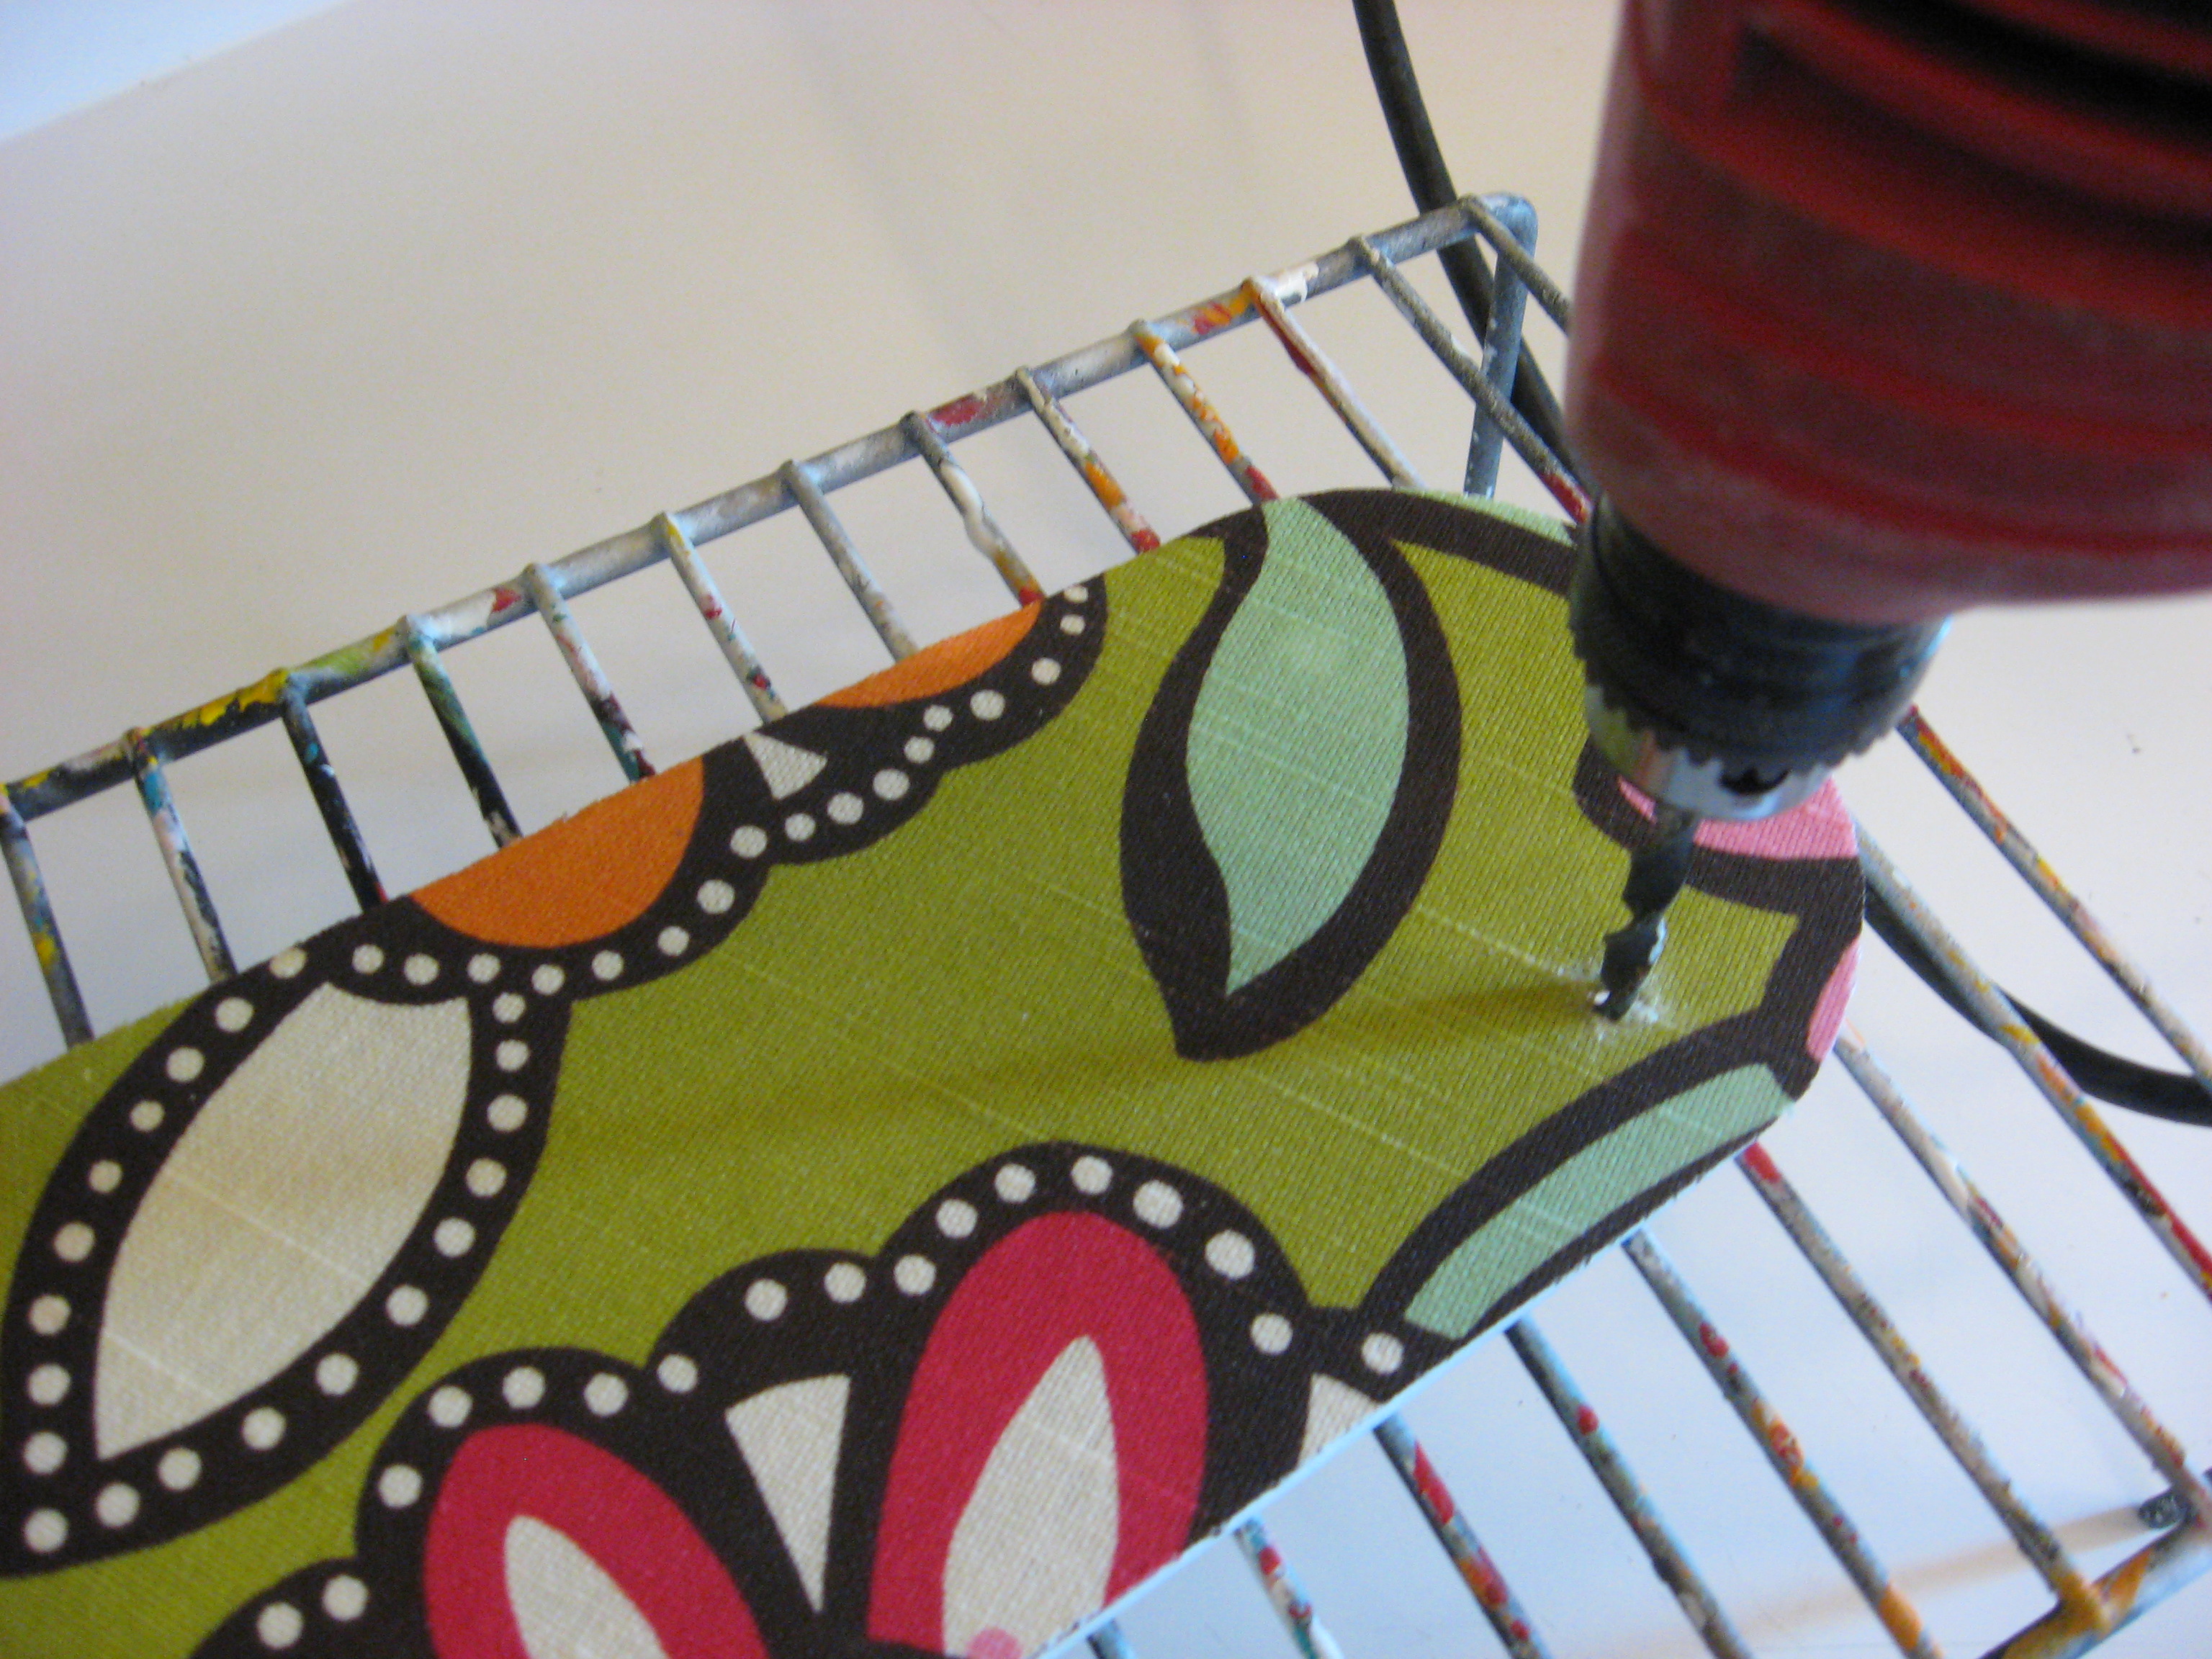
Let that dry about 15 minutes, then put a coat of Mod Podge on top of the fabric to seal it. Let that sit until it is completely dry,
 then use a drill bit to drill a hole through the fabric where the screw holes are in the fan blade. Make sure the Mod Podge is totally dry or the fabric will come twisting off when you start to drill through it (uh…you know. I’m IMAGINING that is what would happen anyway…..)
Screw the finished fan blades back into place and enjoy!