
A PYP Best Blog: Make Your Own Butter
Just in case you missed this article on DIY an update on making your own laundry detergent the first time we shared it a couple of years ago, we are republishing it. After Candi wrote this blog originally, we got an awesome response. This is one of the PYP Best Blogs!
There are many reasons why you might want to learn how to “churn” your own butter – self-reliance, avoiding preservatives, just for the fun of it, etc. 🙂
It’s actually pretty easy (although not necessarily any cheaper than buying it already made). Anyone remember doing this as an experiment in elementary school – passing around the glass jar with the cream and having everyone shake it until it turned into butter?
This is only my second time doing my own butter, but I thought I would take some pictures through the process in case it might help anyone else.
Here’s the skinny on the butter-making. The basic instructions? Take your cream and whip (churn) it until you can no longer do so. That’s it. 😉
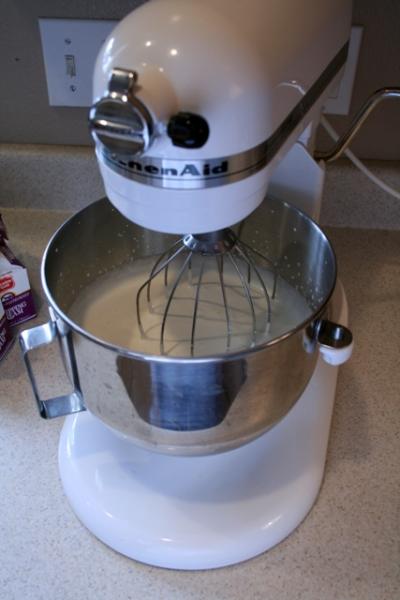
I did mine in my KitchenAid, but you could also use a handheld mixer, or even do it by hand or in a glass jar (add marbles) if you wanted to. The instructions below will assume you are using a mixer of some kind. (If you’re doing it in a glass jar, just shake until you can’t shake any more.)
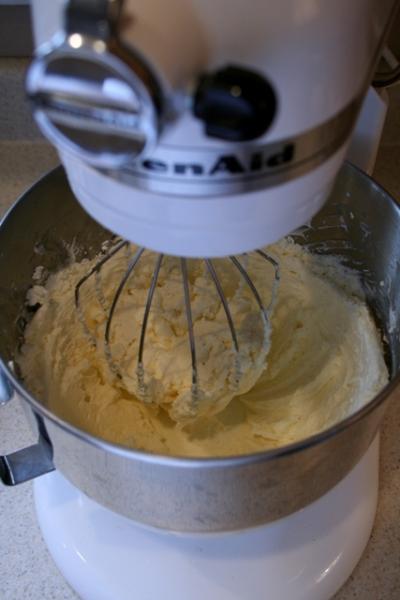
Start with this, just as if you were going to make whipped cream (but do not add any sugar or vanilla):
(I had actually whipped this for about a minute before I stopped to take a picture)
You’ll get to what they call the soft-peak stage:
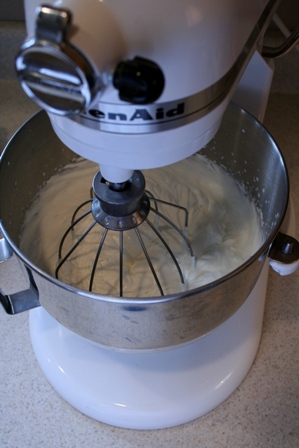
Then the stiff-peak stage:
You’ll go through those first steps quite quickly. Just keep whipping…
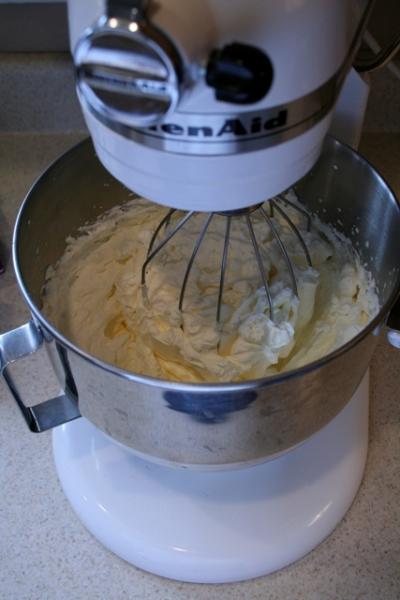
Then the cream will start to turn from white to a pale yellow:
It will start to look like really thick whipped cream (clotted cream anyone?) and will start to cling thickly to the sides of your bowl:
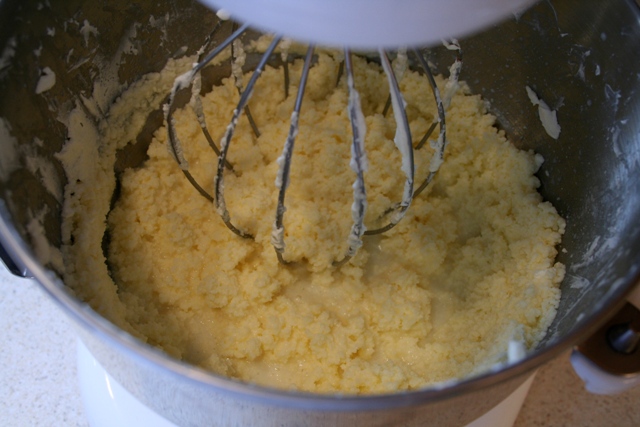
Keep going. (You might want to stop every few minutes to scrape down the sides of your bowl.) As you continue, you’ll start to see it turn a little grainy:
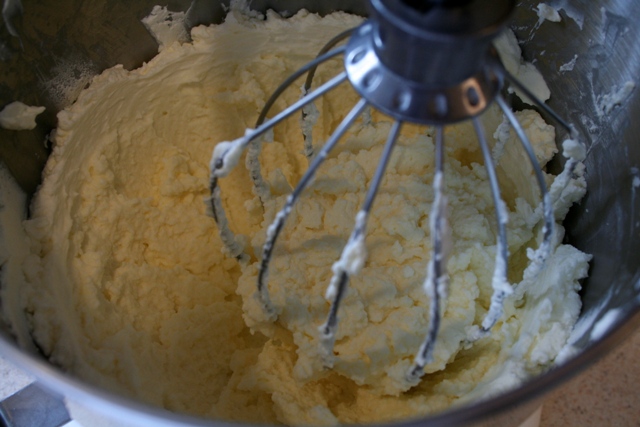
…and get grainier:
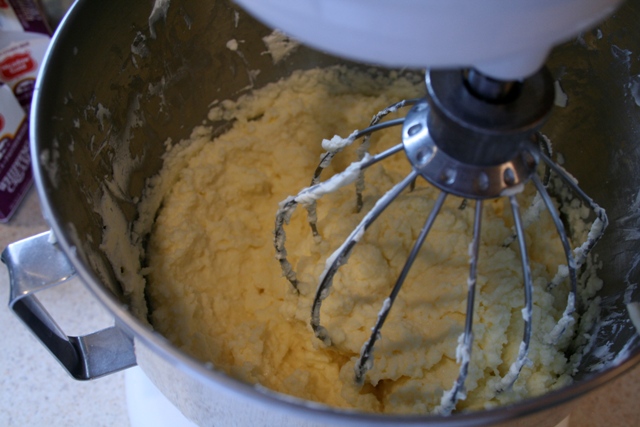
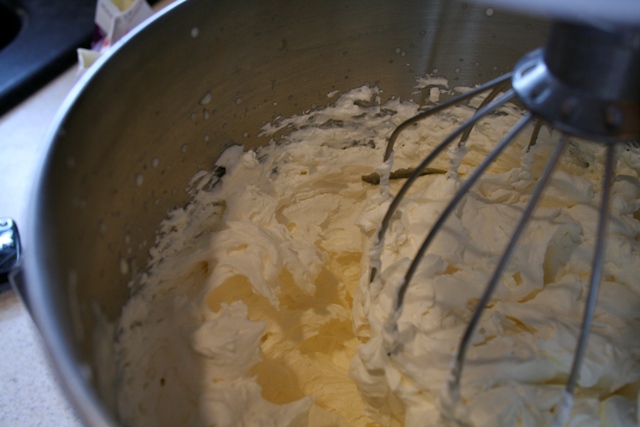
…and grainier. And you’ll start to see a little bit of “shine” on the top – it will begin to look “wet”:
(you can sortof see little spots of “shine” in the picture – that is the liquid being squeezed out as the fats and proteins coagulate)
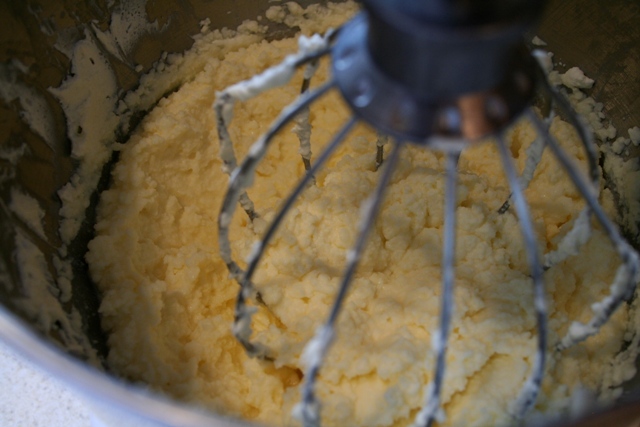
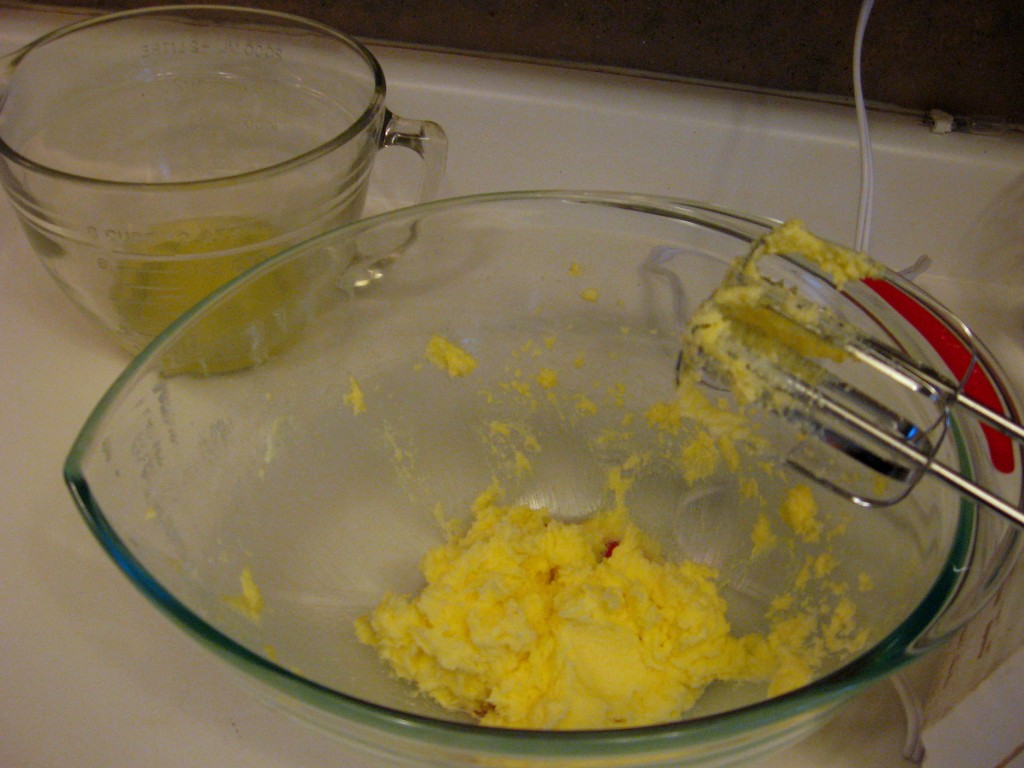
It will start to look almost like bread crumbs or cottage cheese or when you cut-in butter to a crumb topping:
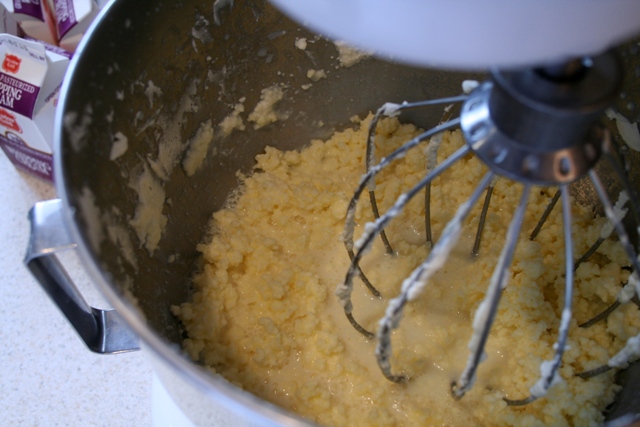
At this point you’ll want to turn your machine down a bit (I turned mine down from 10 to about 7 or 6) because it will start to spit liquid at you. [These last steps happen very quickly, and you’ll go from the crumb topping look to a big chunk of butter in a puddle of buttermilk in about 5 seconds, literally. If you’re machine is still zipping away at highest speed, you’ll slosh buttermilk all over the kitchen before you have time to turn it off.]
You’ll start to see more and more liquid accumulate on the top:
Keep going for another minute or two, at a medium speed, and watch carefully because in a matter of about 5 seconds it will go from the picture above, to THIS:
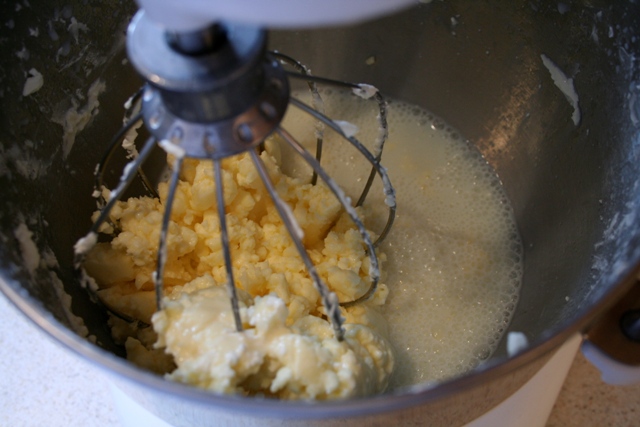
It will clump up all together in your whip attachment and you wont be able to whip it any longer. You’re now done (with the churning part, that is)!
You can now either pour off the buttermilk and save it (think cornbread, buttermilk pancakes, buttermilk biscuits, etc.) or you can just discard it.
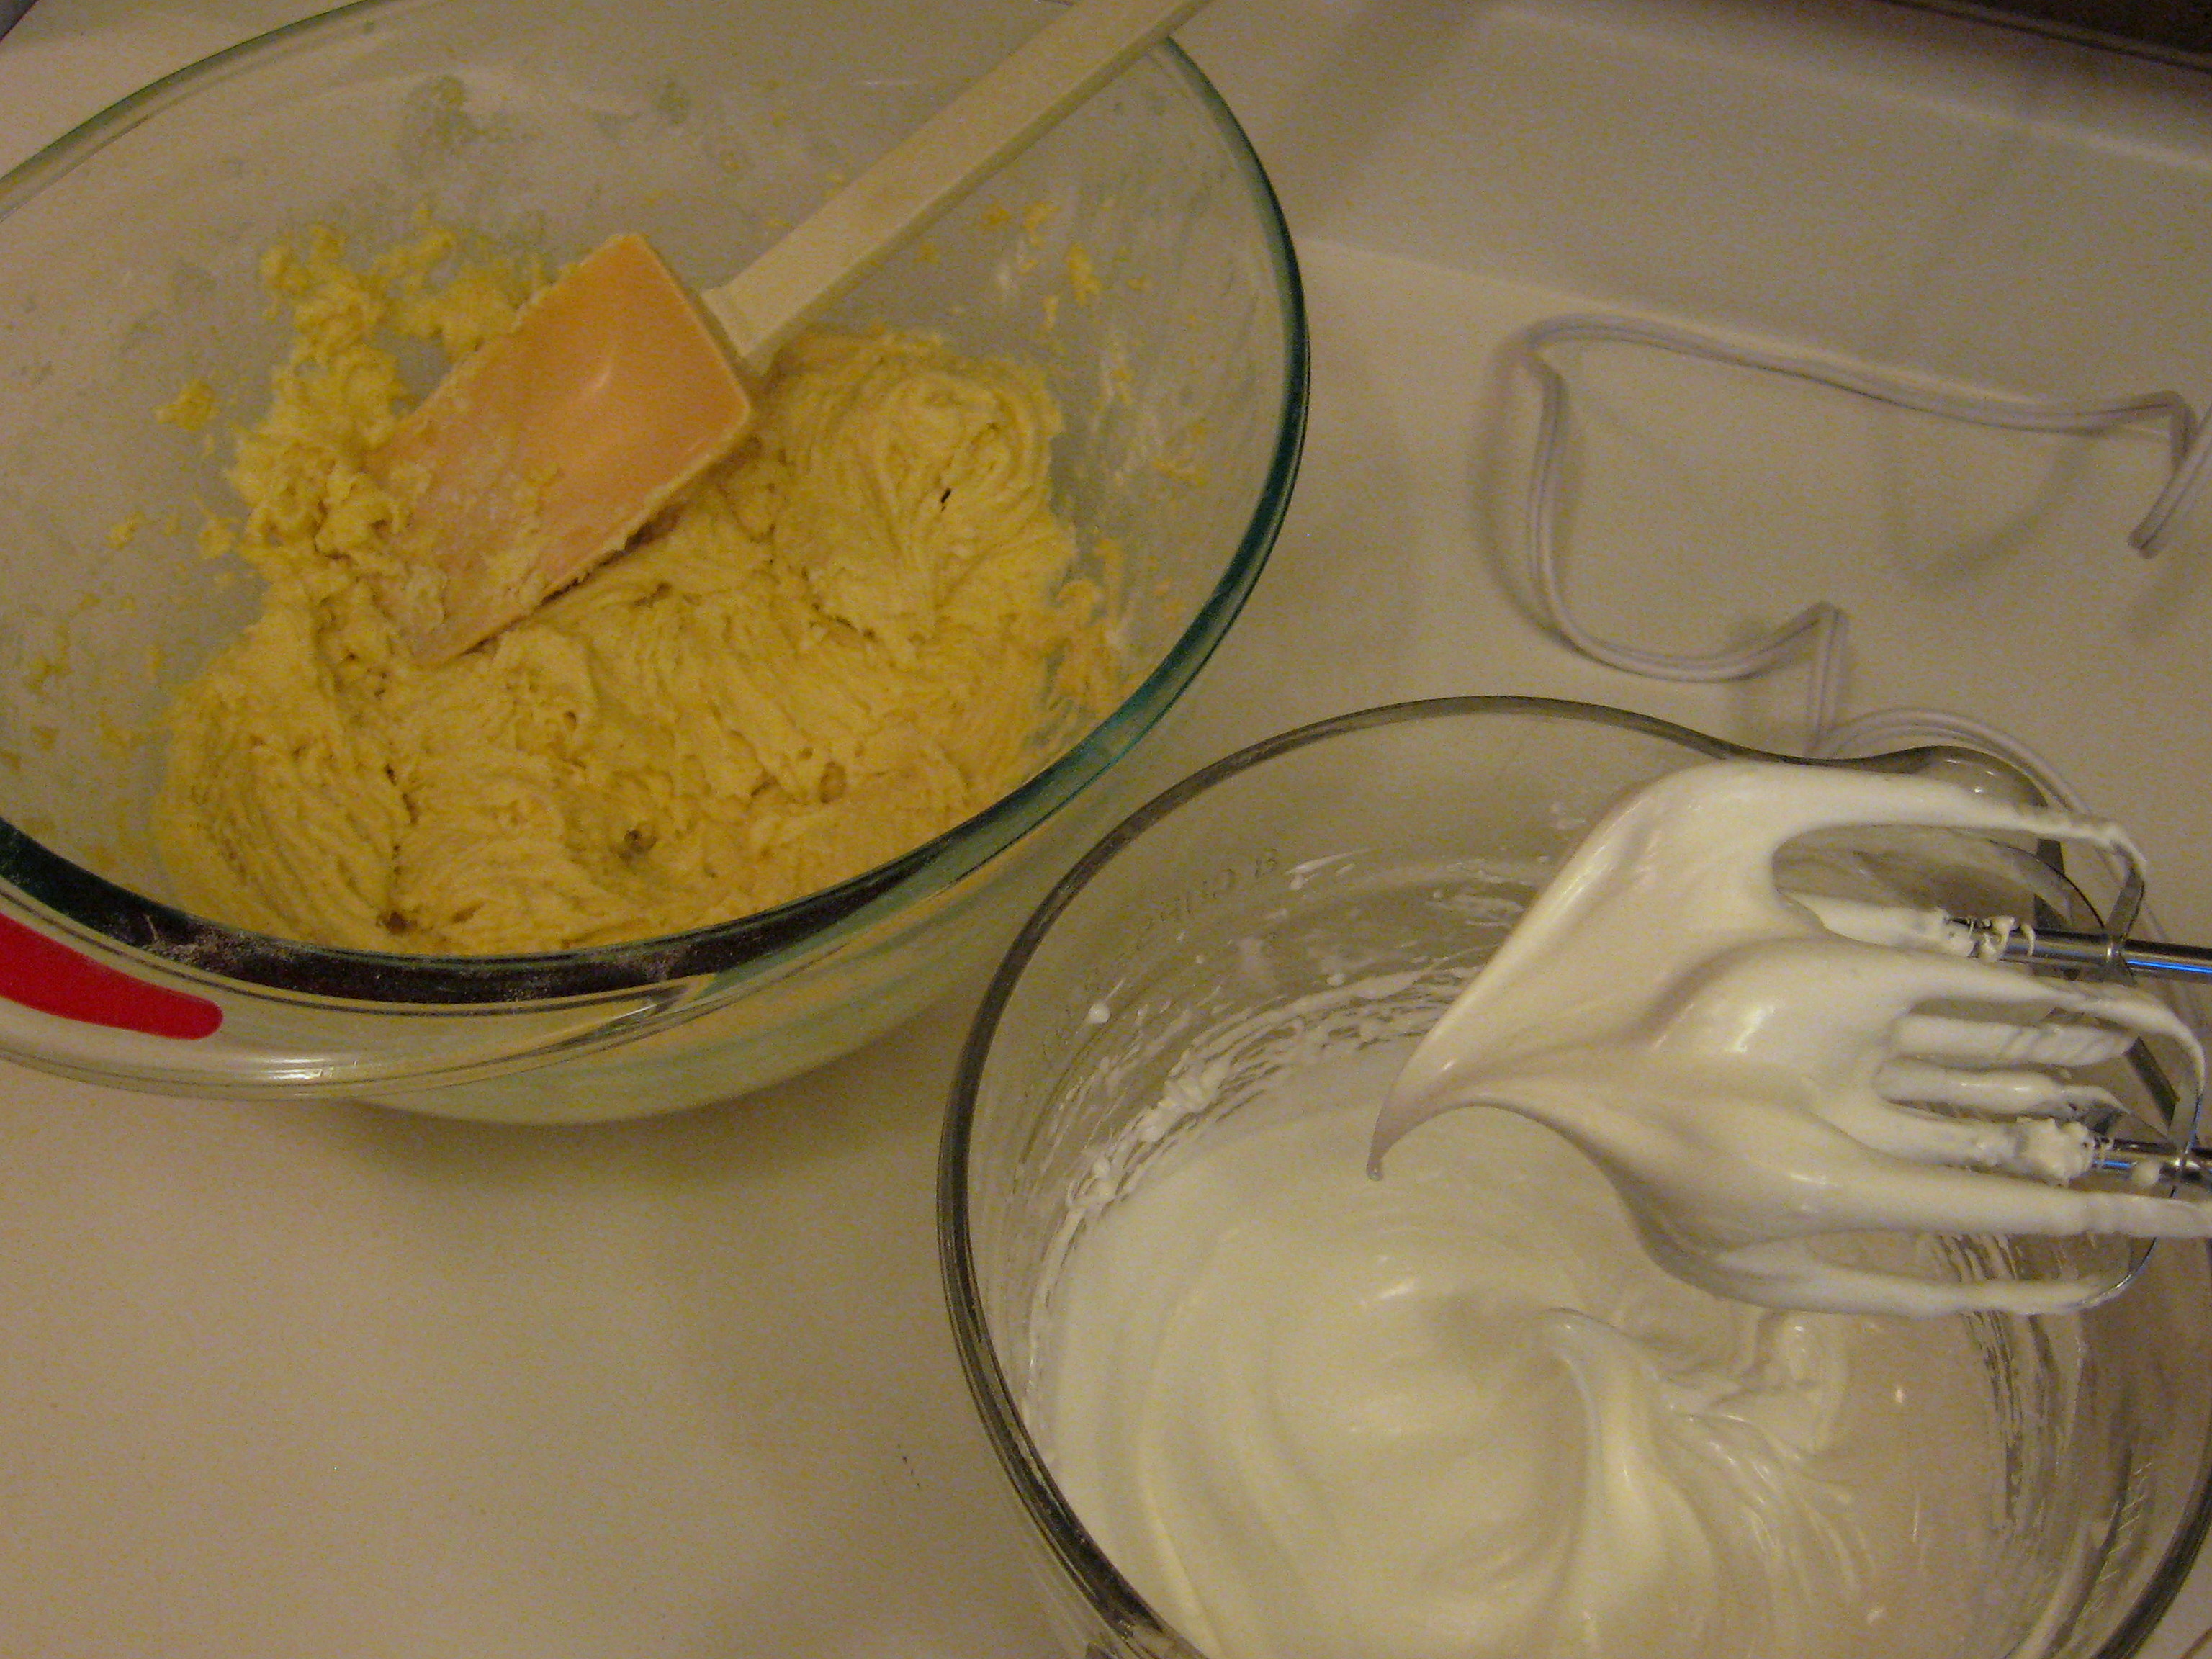
With clean hands, press all of the butter solids into a ball. Squeeze it a little to get more buttermilk to drain out.
You can put it in a container in the refrigerator at this point, but I’ve read that it can still have buttermilk in it and that can tend to make it go rancid, so many places suggested to wash it.
I filled my mixed bowl with cold water (if you use warm you’ll melt the butter) and then kneaded it a few times under the water. Pour off the water, and repeat one more time, or until you feel like you’ve gotten most of the buttermilk out.
You’ll then end up with this:
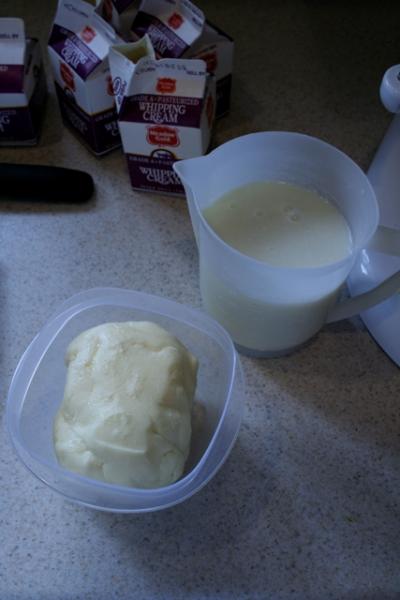
I started with 2.5 pints of whipping cream, and ended up with 11.2 ounces of butter and just under 2 cups of buttermilk. If you use heavy whipping cream (with a higher fat content) you’ll get slightly more butter.
The half-pints of whipping cream were .50 each on clearance after Christmas. I used 5 of them, for a total of $2.50. Extrapolating that out would give me the equivalent of 1 lb of butter for $3.63, definitely not cheaper than just buying it already made at the store. BUT, I also got buttermilk out of it, so I think when you add in that I’d have to buy that at the store as well, I think I come out about even, maybe just a little higher than the store-bought option.
If you have a source where you can get shelf-stable boxed whipping cream (Ultra High Temperature pasteurized), like through Gossner’s here in Utah, you can use that in place of the fresh stuff from the store, with the same results. However, you cannot use whipping cream that has been previously frozen (it denatures the proteins and fats and they will no longer coagulate or “whip” once thawed).
Have any of you ever tried making your own butter? What advice would you give to us newbies? Does anyone make specialty butters this way by adding additional ingredients? I’d love to hear about some of the possibilities!
A PYP Best Blog! Making apple pear butter!
Just in case you missed this article on making apple pear butter the first time we shared it a couple of years ago, we are republishing it. After Marne wrote this blog originally, we got an awesome response. This is one of the PYP Best Blogs!
My family love apple butter, but this year I had extra pears and was tired of making pearsauce, so I made apple pear butter. I combined a few different methods and the result was fabulous! Best part about this recipe….NO PEELING OR CORING REQUIRED! Yes, it’s true! So easy. Let’s get started.
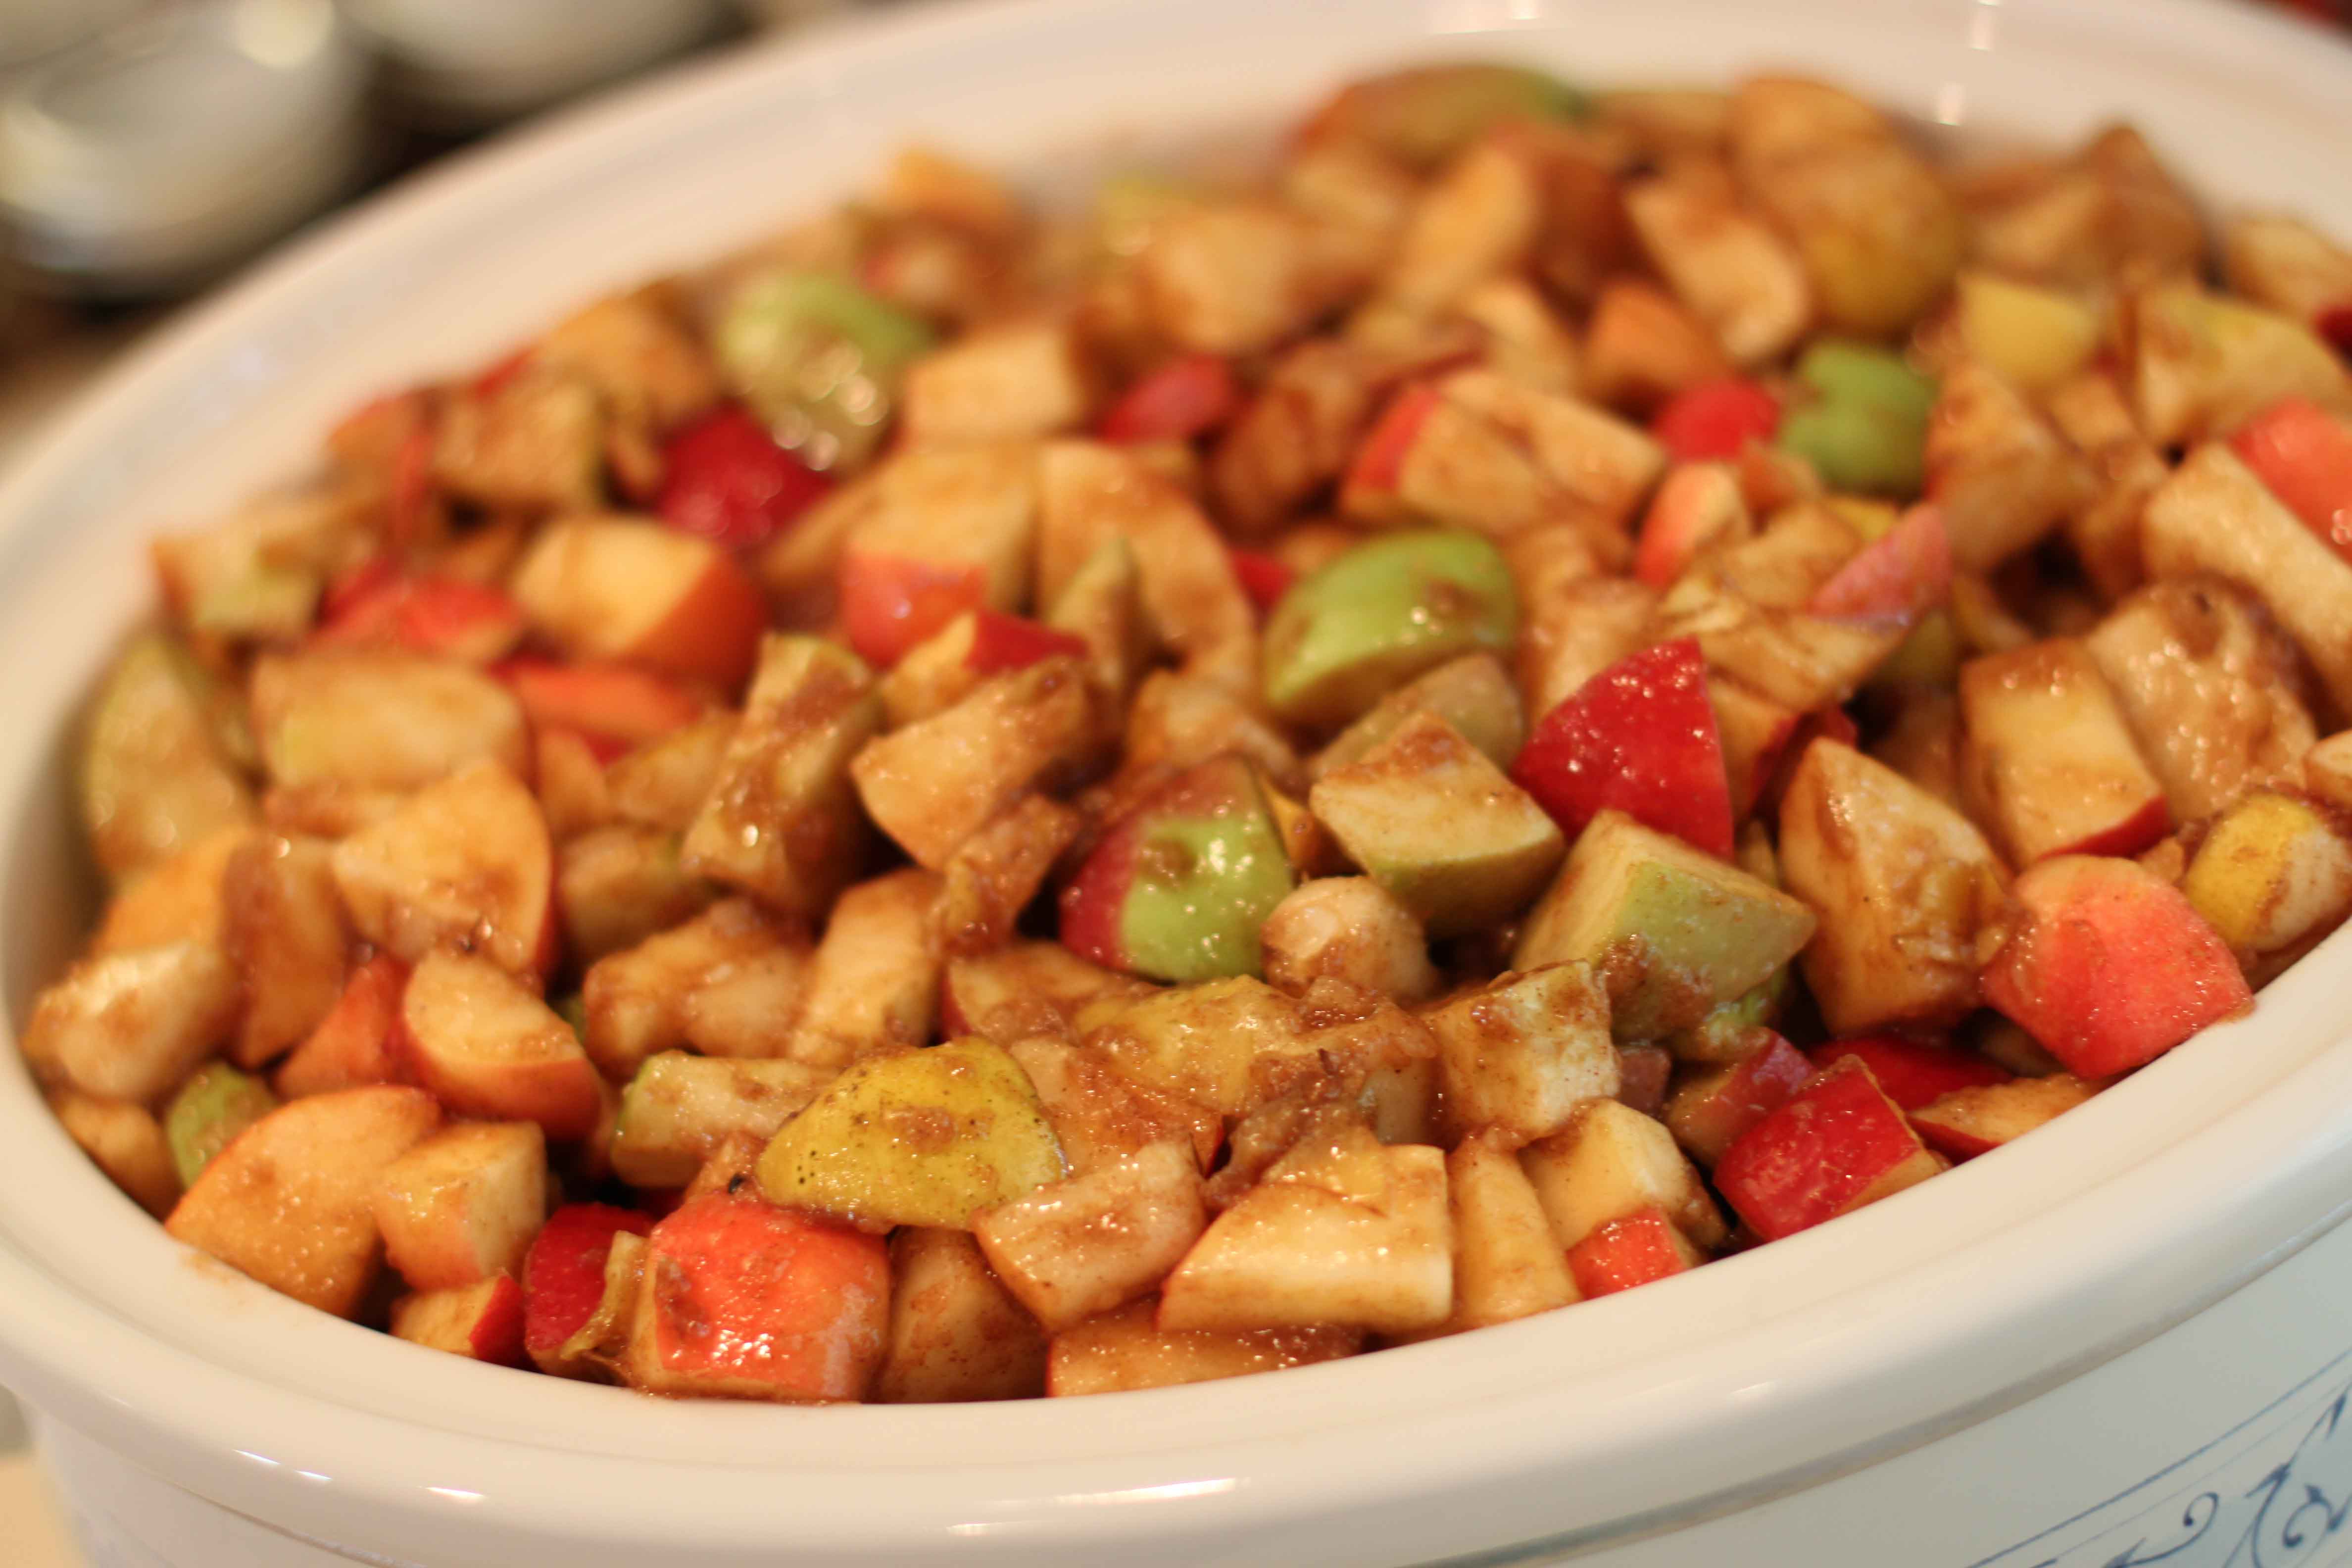
Start by cutting up all your pears and apples. DON’T peel or core them! I know…sounds weird, but bear with me here!
After cutting them up, mix them up with the sugar and spices. Dump everything into a crockpot. It will all break down in the next day or so then you can blend it up. By leaving on the skin & not coring you leave lots of vitamins and fiber that will be in the butter! I used a mixture of Gala & Macintosh apples in mine. Doesn’t it look pretty?
Cover and let it cook for 24 hours on low. By this time, it will look like this, and your house will smell INCREDIBLE.
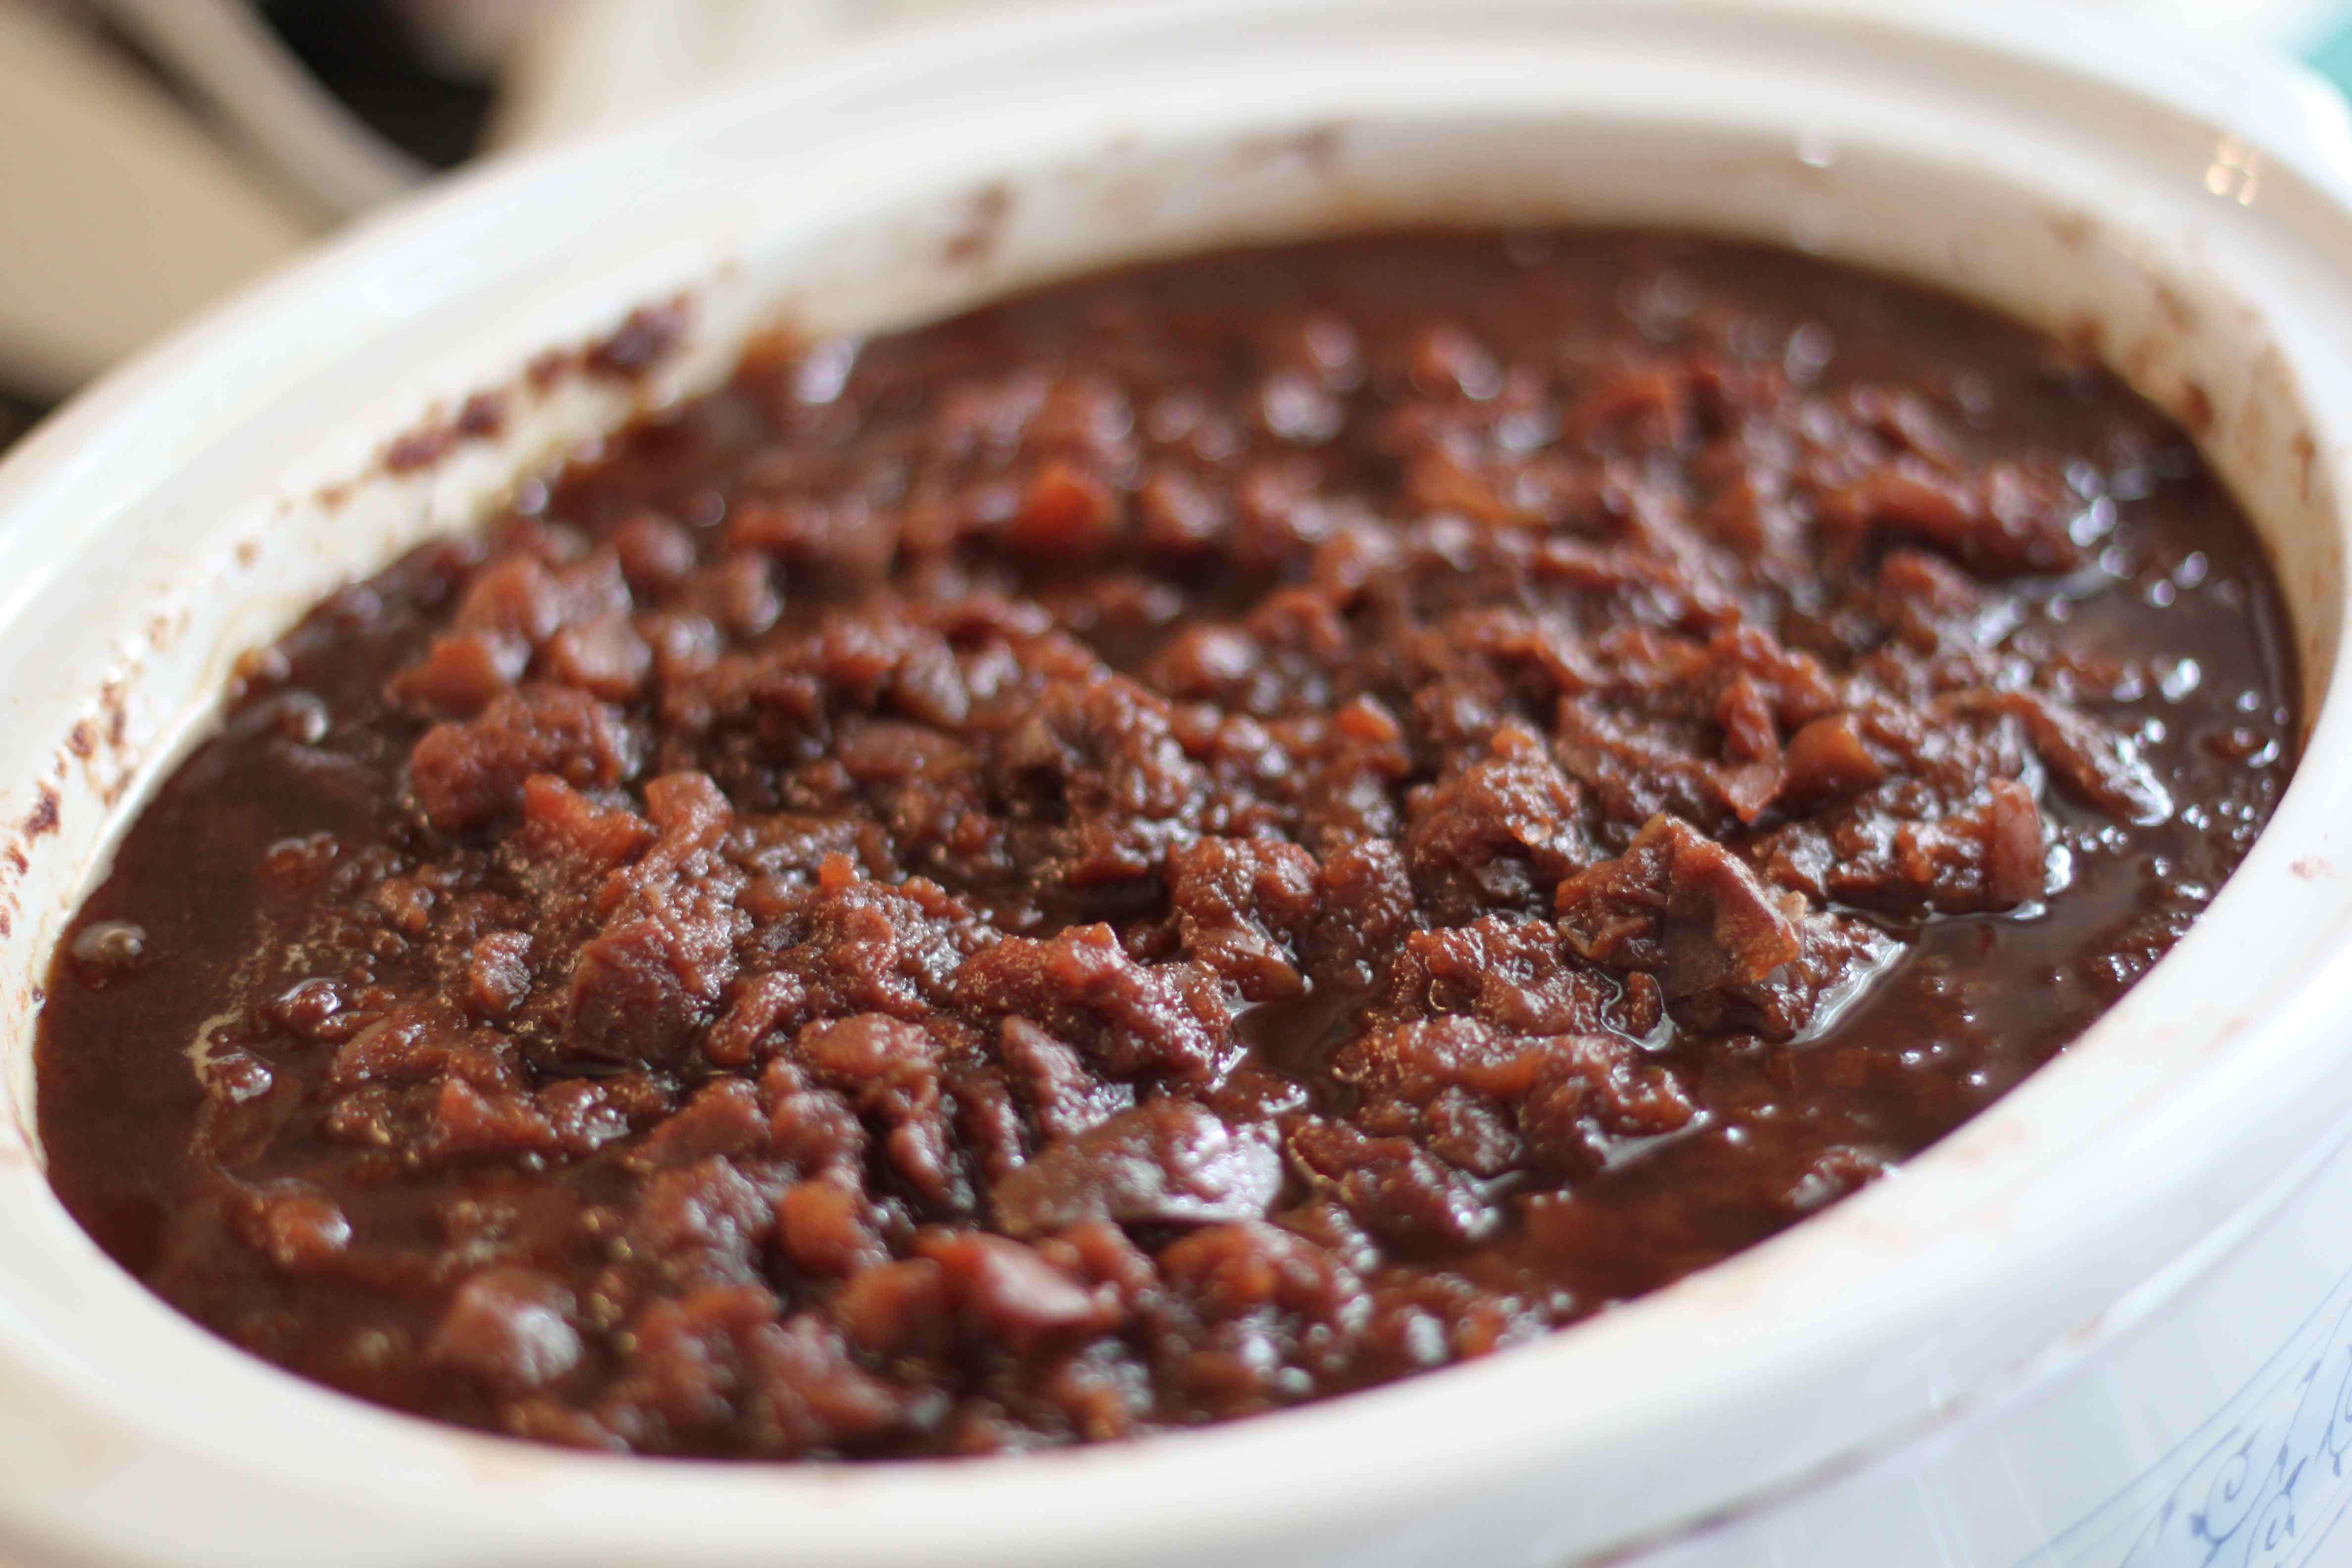
At this point I like to take the lid off and let it cook for about an hour or so like that to let some extra moisture evaporate. Now all you do is use blender or food processor to blend it up nice and smooth!
I canned mine in half pint jars. Looks so pretty, eh? Delicious too. Our favorite way to eat apple pear butter is on toast, pancakes, and even peanut butter sandwiches!
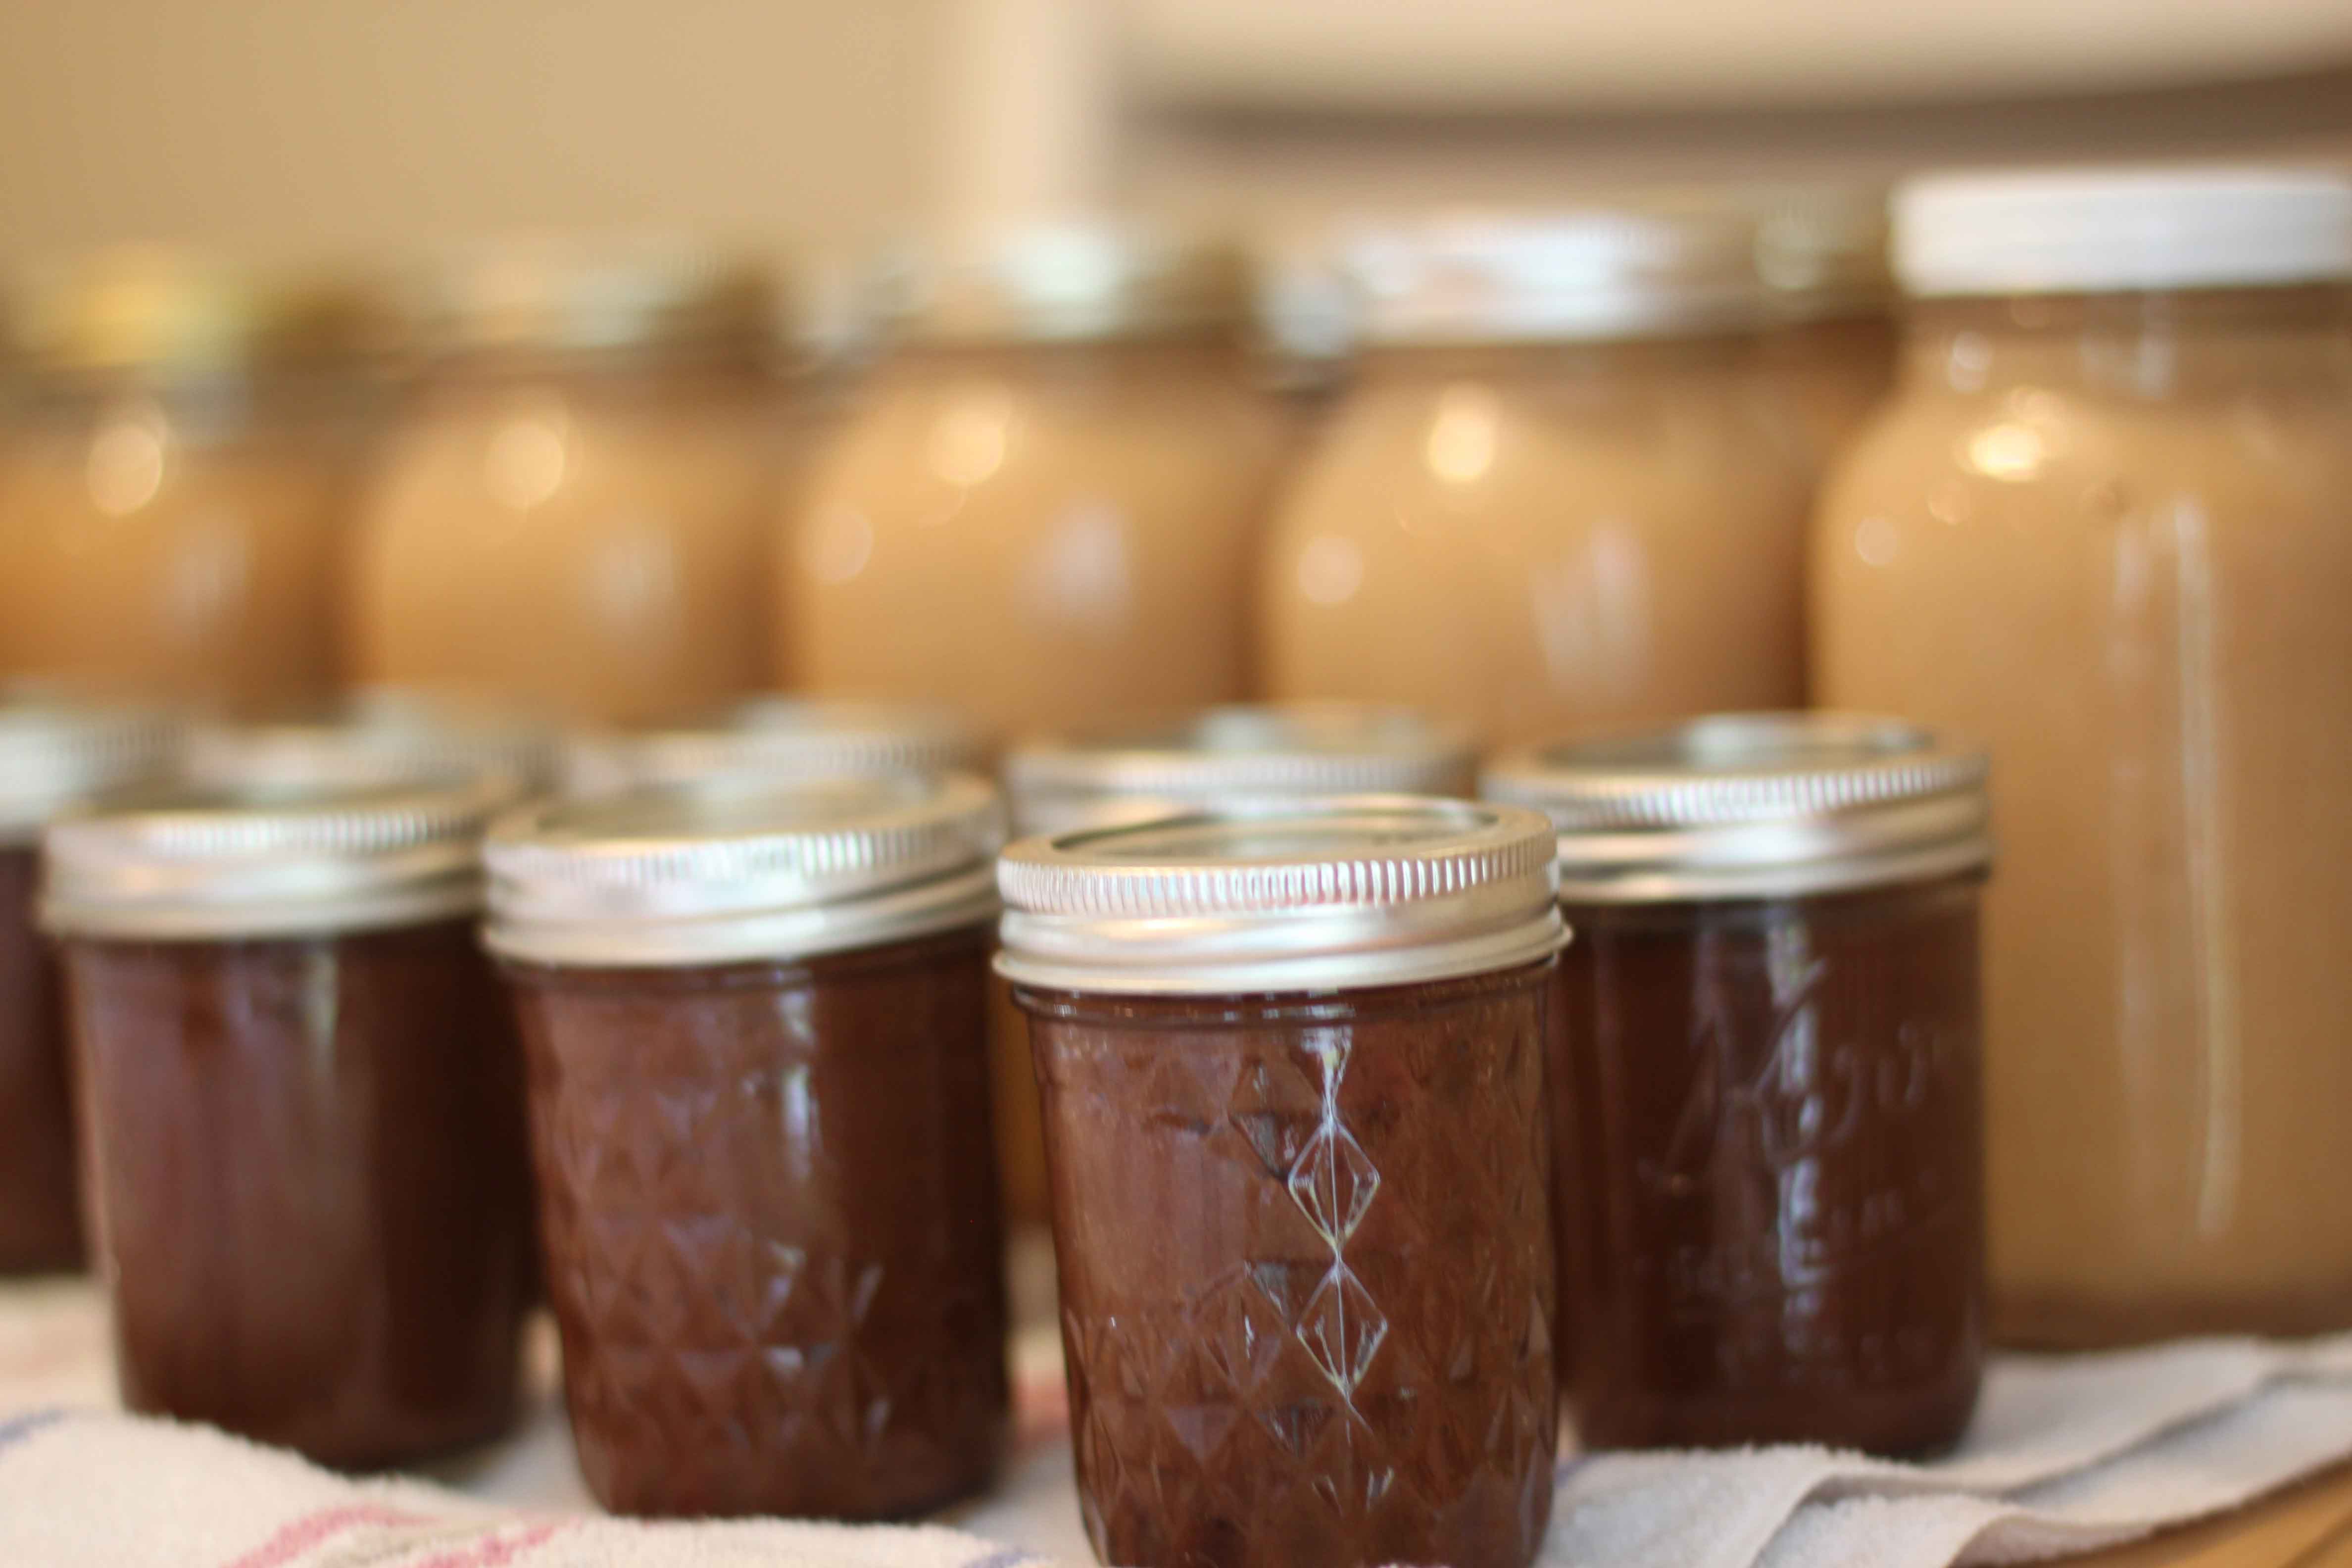
(See that applesauce in the back of the photo? Check out my post I did last year on making homemade applesauce to learn how.)
NOTE: Make sure your pears are nice and ripe, or your butter will be grainy.
Apple Pear Butter
(recipe adapted from Ball Complete Book of Home Preserving)
4 lbs apples, chopped up, NOT peeled or cored
2 lbs pears, chopped up, NOT peeled or cored
1 cup sugar (you can add more for super sweet but 1 c. is fine really)
1 Tbl. cinnamon
1/2 tsp. cloves
1/2 tsp. ginger
Place all ingredients into a large bowl and stir to incorporate. Dump into a crockpot and set on low. Cook on low for around 24 hours, stirring a few times. When nice and thick, blend up smooth.
To can your apple pear butter, prepare your canner, jars, and lids. If you are new to canning, read the basic here. Ladle the hot butter into the jars, making sure to leave about 1/4 inch headspace for expansion. Remove air bubbles with a knife. Clean the rim of the jar with a wet paper towel, and place hot lids on the jar and screw the band down. Place jars in a water bath canner and process for 20 minutes.
(Check your elevation for processing time. This is my elevation time. It is important to process according to your elevation in order to safely preserve your food).
This butter also freezes well if you do not wish to can it. Recipe makes approx. 4 pints.
A PYP Best Blog! How to Can Peaches the Easy Way!
Just in case you missed this article on how to can peaches the easy way the first time we shared it a couple of years ago, we are republishing it. After Marne wrote this blog originally, we got an awesome response. This is one of the PYP Best Blogs!
It is almost canning season! And peach season too. I love canning peaches. There is more than one way to can peaches. I grew up canning peaches using this method, and I still can this way myself. It is traditionally called the ‘cold pack’ method, but also called the no-syrup method too. I wanted to share it with you today, I really enjoy canning my peaches this way. Easy, not a lot of mess (no sticky!) and fast. Plus, I think it is a little healthier as I am not cooking my peaches in heavy sugar syrup.
1. Gather your peaches. I blanche my peaches for about 20-25 seconds to loosen the skin. I use a blancher and can do about 8 peaches at a time. Fill a sink full of cold water, then put the peaches in the sink to cool off. The skins just slide off, its so simple this way!
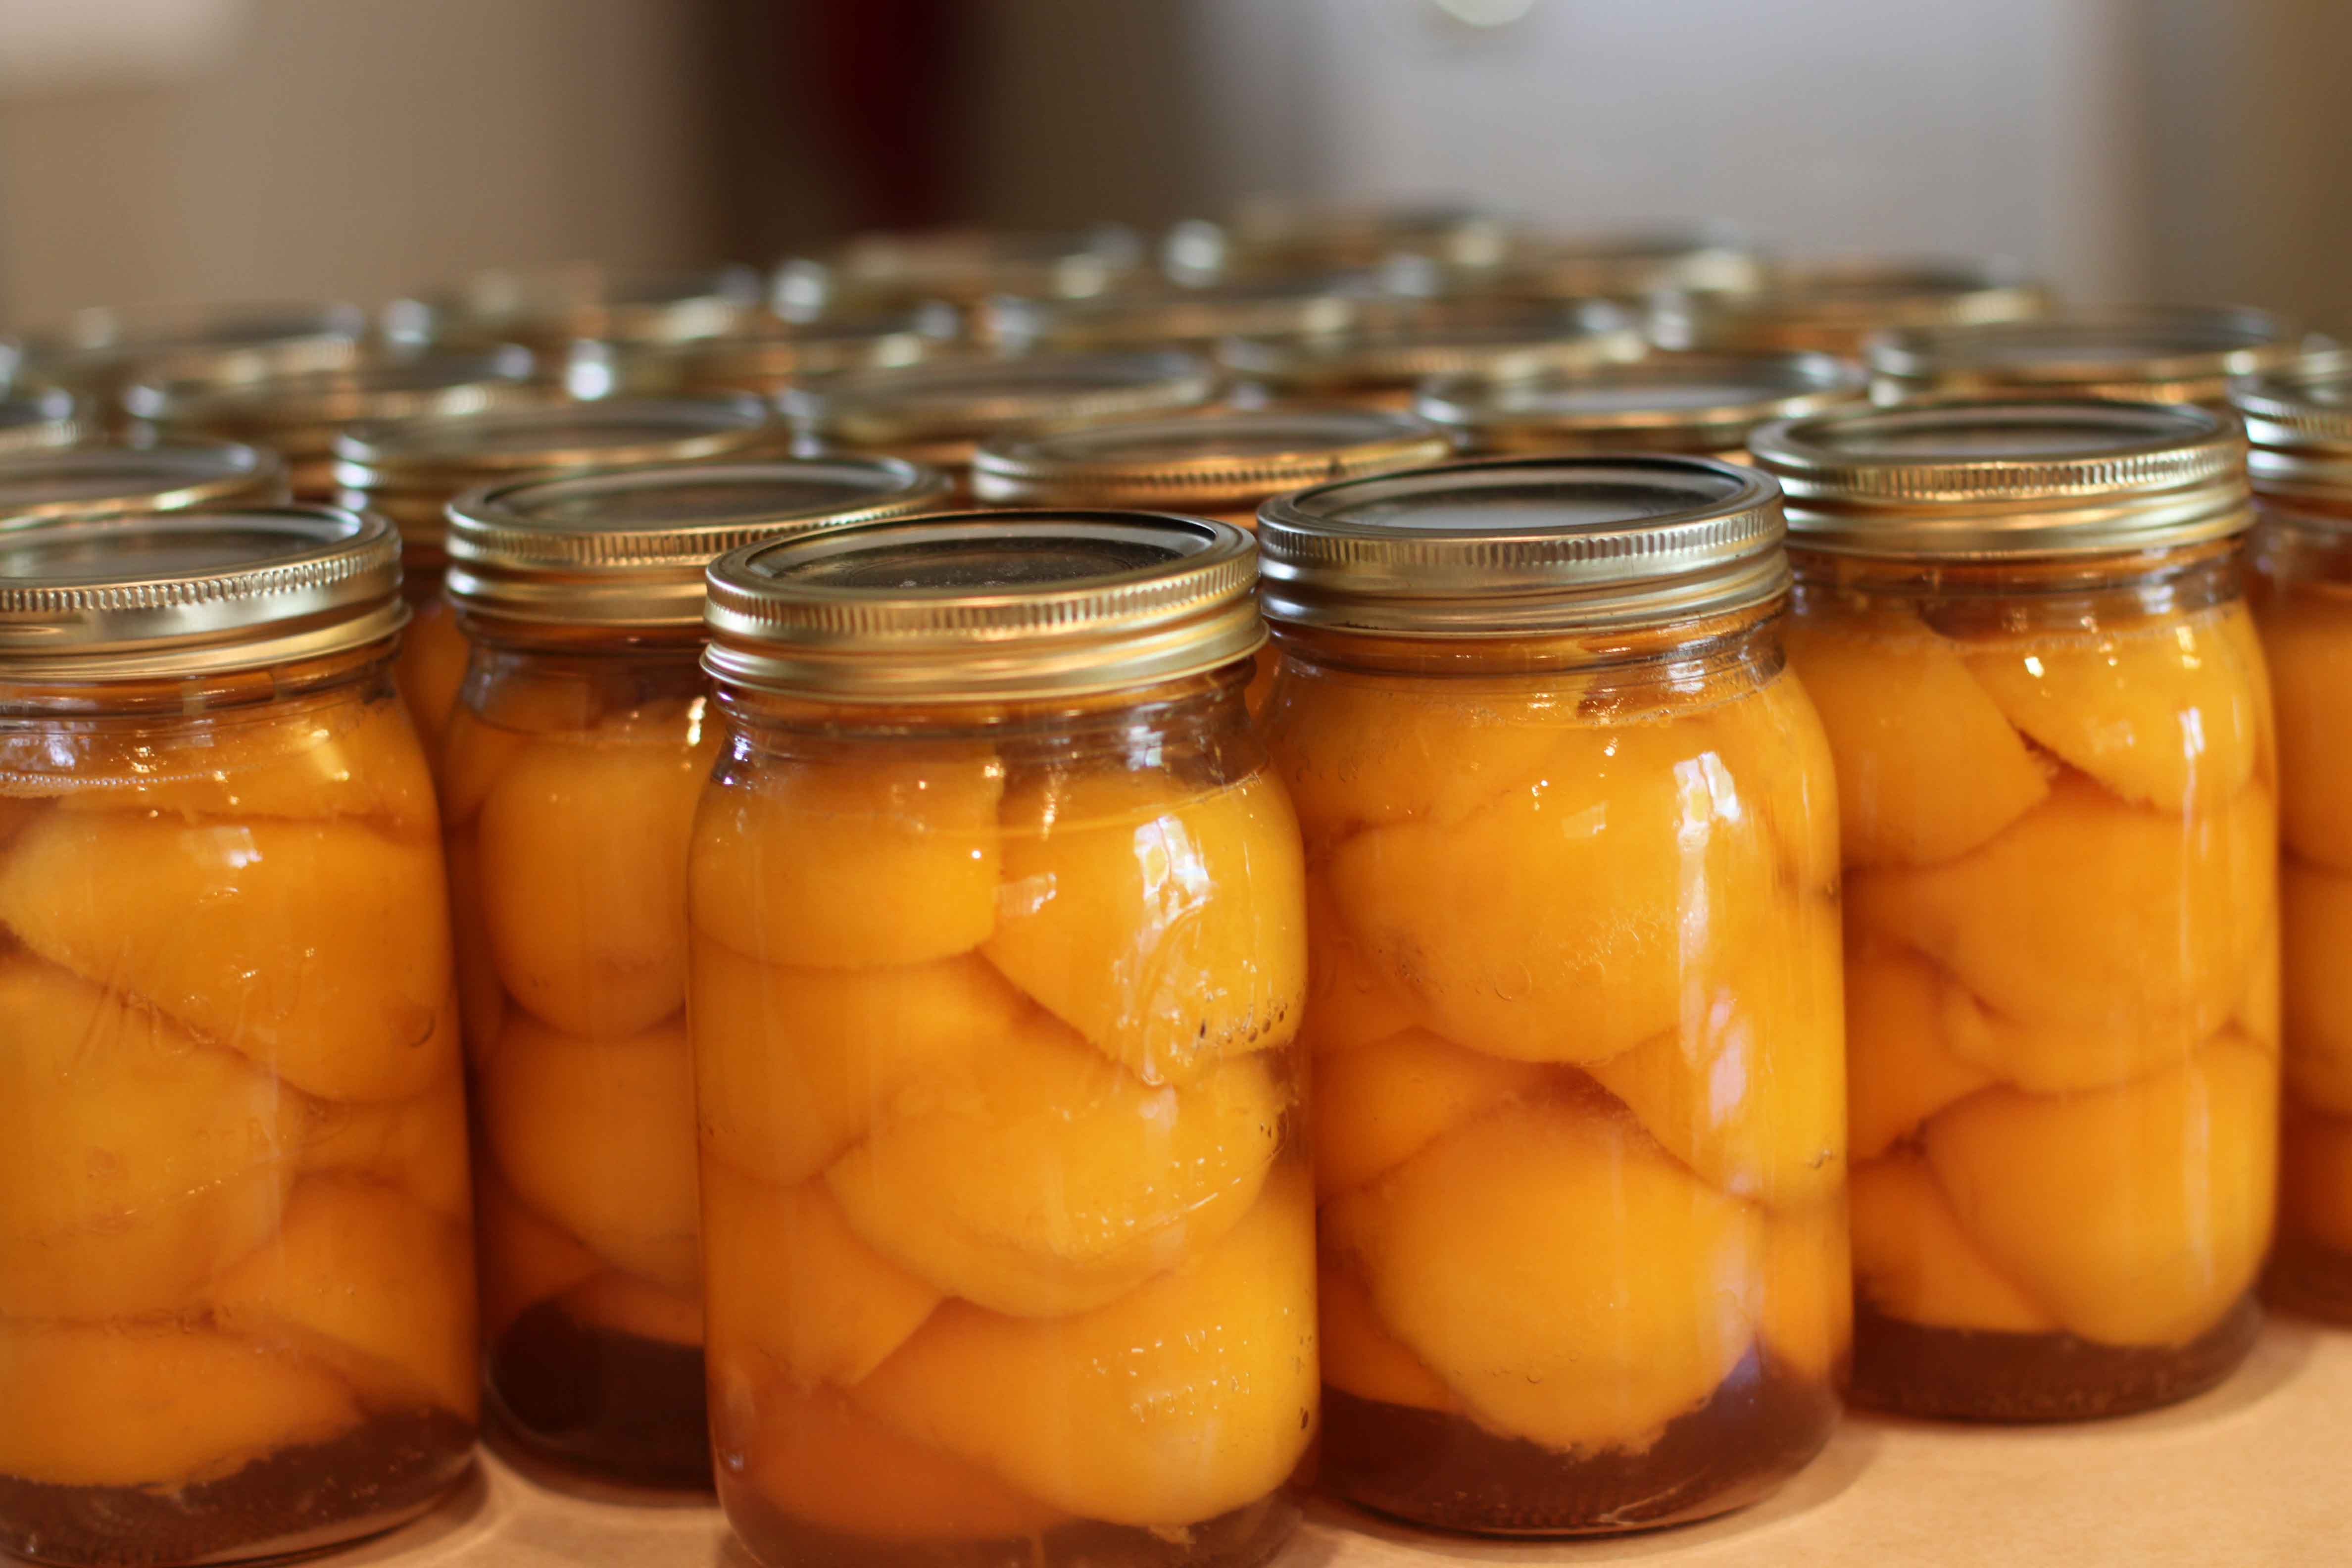
2. When you have a sink full of blanched peaches, begin slipping the skins off and cutting them in half. Put the cut halves in a large bowl. When a have a good amount in the bowl, I start filling my jars with the peach halves. (I have previously washed and sterilized my jars in the dishwasher prior to this step). Leave about 1.5 inches of space at the top.
3. After you have packed your jar full of peaches, put in 1 tsp. Ball Fruit Fresh (keeps them from turning brown) and as much sugar as you like in your canned peaches. I don’t use a lot of sugar in ours, I usually put in about 1-2 Tbl., depending on the sweetness of the peach. Just put those right on top of the peaches in each jar.
4. Take HOT water and using a pitcher or other pouring device, pour the hot water into each canning jar, up to about 1 inch head space. The hot water will dissolve the fruit fresh and sugar and fill in all the areas around the peaches. Once you fill the jars, wipe off the mouth of the jar WELL, making sure there is nothing on it. Put hot canning lids (that have been sitting in HOT water on the stove all this time) on each jar, and finish with a ring.
5. Put into a water bath canner for about 25 minutes (check your elevation for correct canning times). Remove and let sit for 24 hours before testing if the jar sealed. Now you can be proud of your hard work!
Once you get a system down it is easy for just one person, but if you are just beginning you might want someone to can with you. One person can be blanching and cutting while the other is packing. Makes it fun too!
Free eCookbook – All-Star Slow Cooker Recipes
 Free eCookbook – All-Star Slow Cooker Recipe
9 of Our Best Slow Cooker Main Dishes, featuring more than 25 pages of
slow cooker main dish recipes.
Free eCookbook: Cool Fuel for School: 30 Recipes for Kid-Friendly Meals

Free eCookbook: Cool Fuel for School: 30 Recipes for Kid-Friendly Meals
Features 30 full-color recipes that kids will love for breakfast, lunch, dinner, and everything in between + the Mr. Food Test Kitchen Recipe eNewsletter for FREE! In today’s hectic world, we’re always looking for delicious, nutritious, and convenient ways to fuel our kids’ growing minds and bodies. Our free eCookbook has plenty of convenient (and tasty!) recipes that kids will love, like Super Breakfast Sundaes (page 6), PB&J Waffle Sandwiches (page 10), Taco Chicken Wraps (page 11), Magical Mac ‘n’ Cheese (page 13), Easy Cheeseburger Pie (page 14), Tutti Frutti Dessert Pizza (page 23), Mini Fruit Pockets (page 25), Fluffy Cream Cheese Fruit Dip (page 28), and lots more!
FREE eBook: 30 Recipes for Kid-Friendly Meals

Do you have a picky eater on your hands? Head over and enter your email for a FREE eCookbook – 30 Recipes for Kid-Friendly Meals. This ebook has features 30 full-color recipes that kids will love for breakfast, lunch, dinner, and everything in between. You’ll also get the Mr. Food Test Kitchen Recipe eNewsletter for free.
A PYP Best Blog! Back to School Breakfast Tips & Recipes
 Just in case you missed this article on Back to School Breakfast Tips & Recipes the first time we shared it a couple of years ago, we are republishing it. After I wrote this blog originally, we got an awesome response. This is one of the PYP Best Blogs!
Sometimes it is so hard to get our kids to eat a healthy breakfast. Once school starts and our mornings are more rushed than they are in the summer time, getting a good breakfast on the table can be a pretty big task. Last year, several times, my daughter came home from school with her whole lunch still in her bag. That made me realize even more that I need to make sure she’s eating a good breakfast.
Back to School Breakfast Preparation Tips:
A breakfast casserole is a favorite at our house. It only takes a little time to prepare which I do the night before and just stick it in the fridge. Pop it in the oven in the morning for 45 minutes while everyone is getting ready and you have a quick and nutritious breakfast!
My neighbor told me they set the breakfast table the night before, even if it’s only for juice and cereal. They also set the table for dinner when they are done with breakfast.
Things like French toast, waffles, and pancakes can be made up ahead of time and frozen. You can just stick them in the toaster and add your favorite toppings. You can also keep pancake or waffle batter in the refrigerator, ready to pour on the griddle.
If you like to bake, you might keep a supply of muffins in the freezer, ready to warm in the microwave. Not only are the good for breakfast but they can be put in lunch bags too!
Try making your own nutritious granola and granola bars. Here is a link to a recipe we use.
Breakfast burritos are great for grab and go breakfasts. cook up your eggs & meat, roll them in a tortilla with some cheese. Freeze them and they can easily be reheated in the microwave.
Another grab and go idea is a biscuit or English muffin sandwich; scrambled eggs, sausage patty, a small chicken patty, or a slice of ham with cheese melted on top. Kind of like McDonalds, but you control the ingredients.
Here are a couple of our favorite breakfast recipes:
Crock Pot Breakfast
Spray your crock with cooking spray.
Dump in a bag of frozen hash browns or 4 cans of sliced potatoes
Top with sausage (I like using cut up links), Cooked Bacon, or Diced Ham
Beat a dozen eggs and pour that on top. (you can mix in diced peppers & onions if you like)
Cook on low overnight. Serve with salsa!
Breakfast Cookies
1/3 C butter or margarine
1 egg, beaten
1/2 t vanilla
1/2 C flour
1/4 t baking soda
1/4 t salt
1 1/2 C quick cooking oatmeal
1/2 C grated cheese
5 slices of bacon – cooked and crumbled
Cream butter, sugar, egg and vanilla. Sift together flour, salt, and baking soda, then combine with wet ingredients. Beat in oatmeal, bacon and cheese. Bake on greased cookie sheet at 350degrees for 7-10 minutes or until lightly browned.
German Pancakes
I use a 9×13 glass baking pan. Put 3 TBLS of butter in the pan and put the pan in the oven. Preheat to 450. In the mixer —- 6 eggs, 1 cup of flour, a handful of sugar, 1 cup of milk and 1/2 tsp. salt. Mix until well mixed and fluffy. Pour into the preheated pan and bake for 20 minutes. This will puff up around the edges. Serve with fruit or your favorite syrup.

Free Copycat Recipe eBook!

The Best Drink Recipes: 13 Refreshing Easy Summer Recipes for You features some of the most fresh and top-secret copycat recipes around, which also happen to be our readers’ favorite recipes as well. In this free eCookbook you’ll find recipes Better than McDonald’s Mango Pineapple Smoothie (p. 6), Copycat Chick-fil-A Sweet Tea (p. 11), Copycat Olive Garden Italian Cream Soda (p. 18) and many more perfect simple drink recipes for summer! Next time want to blend up something sweet that’s inspired by your favorite restaurant, consult our free eCookbook.
Free Slow Cooker Recipes eBook, Perfect for Hot Summer Meals

Free eCookbook: Summer Meals That Won’t Heat Up The House: 30 Summer Slow Cooker Recipes, featuring more than 60 pages of summer slow cooker recipes + AllFreeSlowCookerRecipes’ The Slow Cooker Chronicle newsletter for FREE! Get this brand new FREE eCookbook collection of summer foods that won’t heat up the kitchen. This eCookbook is packed with summertime slow cooker recipes. Inside, you’ll find our best slow cooker summer recipes for appetizers and drinks (p.9). You’ll also find main dish summer slow cooker recipes (p. 21), as well as summer slow cooker ideas for side dishes (p. 33) and dessert slow cooker recipes for summer (p. 45). This free eCookbook, Summer Meals That Won’t Heat Up The House: 30 Summer Slow Cooker Recipes, is the ultimate guide to summer cooking
A PYP Best Blog! DIY Dulce de Leche!
Just in case you missed this article on making your own dulce de leche the first time we shared it a couple of years ago, we are republishing it. After Sharon wrote this blog originally, we got an awesome response. This is one of the PYP Best Blogs!
I made a discovery of epic proportions this weekend! Dramatic? Maybe a bit, but if you – like I – didn’t know this before, I think you’ll be happy I shared!
My boys found a recipe they were dying to try, but it called for Dulce de Leche. Whether that is available in my store or not, I don’t know, I never looked. Since I had cans and cans of sweetened condensed milk in my pantry and knew you could use it to make dulce de leche, I wasn’t going to spend the extra money. The internet is full of “recipes” about how you can boil a closed can of sweetened condensed milk either in a pan or in your crock pot for hours until it turns into thick, gooey, carmely goodness.
The internet is also full of stories about said cans exploding as they heat and making a thick, gooey carmely mess in your kitchen and potentially harming anyone nearby.
I will admit that I tried it once; it works, but I was nervous the whole time, so even though I knew I could do it again, I kept putting it off. Finally, I searched the internet to see if there was another option. I found one blogger who said that you can pour the milk into the top of a double boiler and stir it over heat for 2 1/2 hours as it cooks. No thanks; keep searching…
BINGO!
You can cook it in the oven!!!
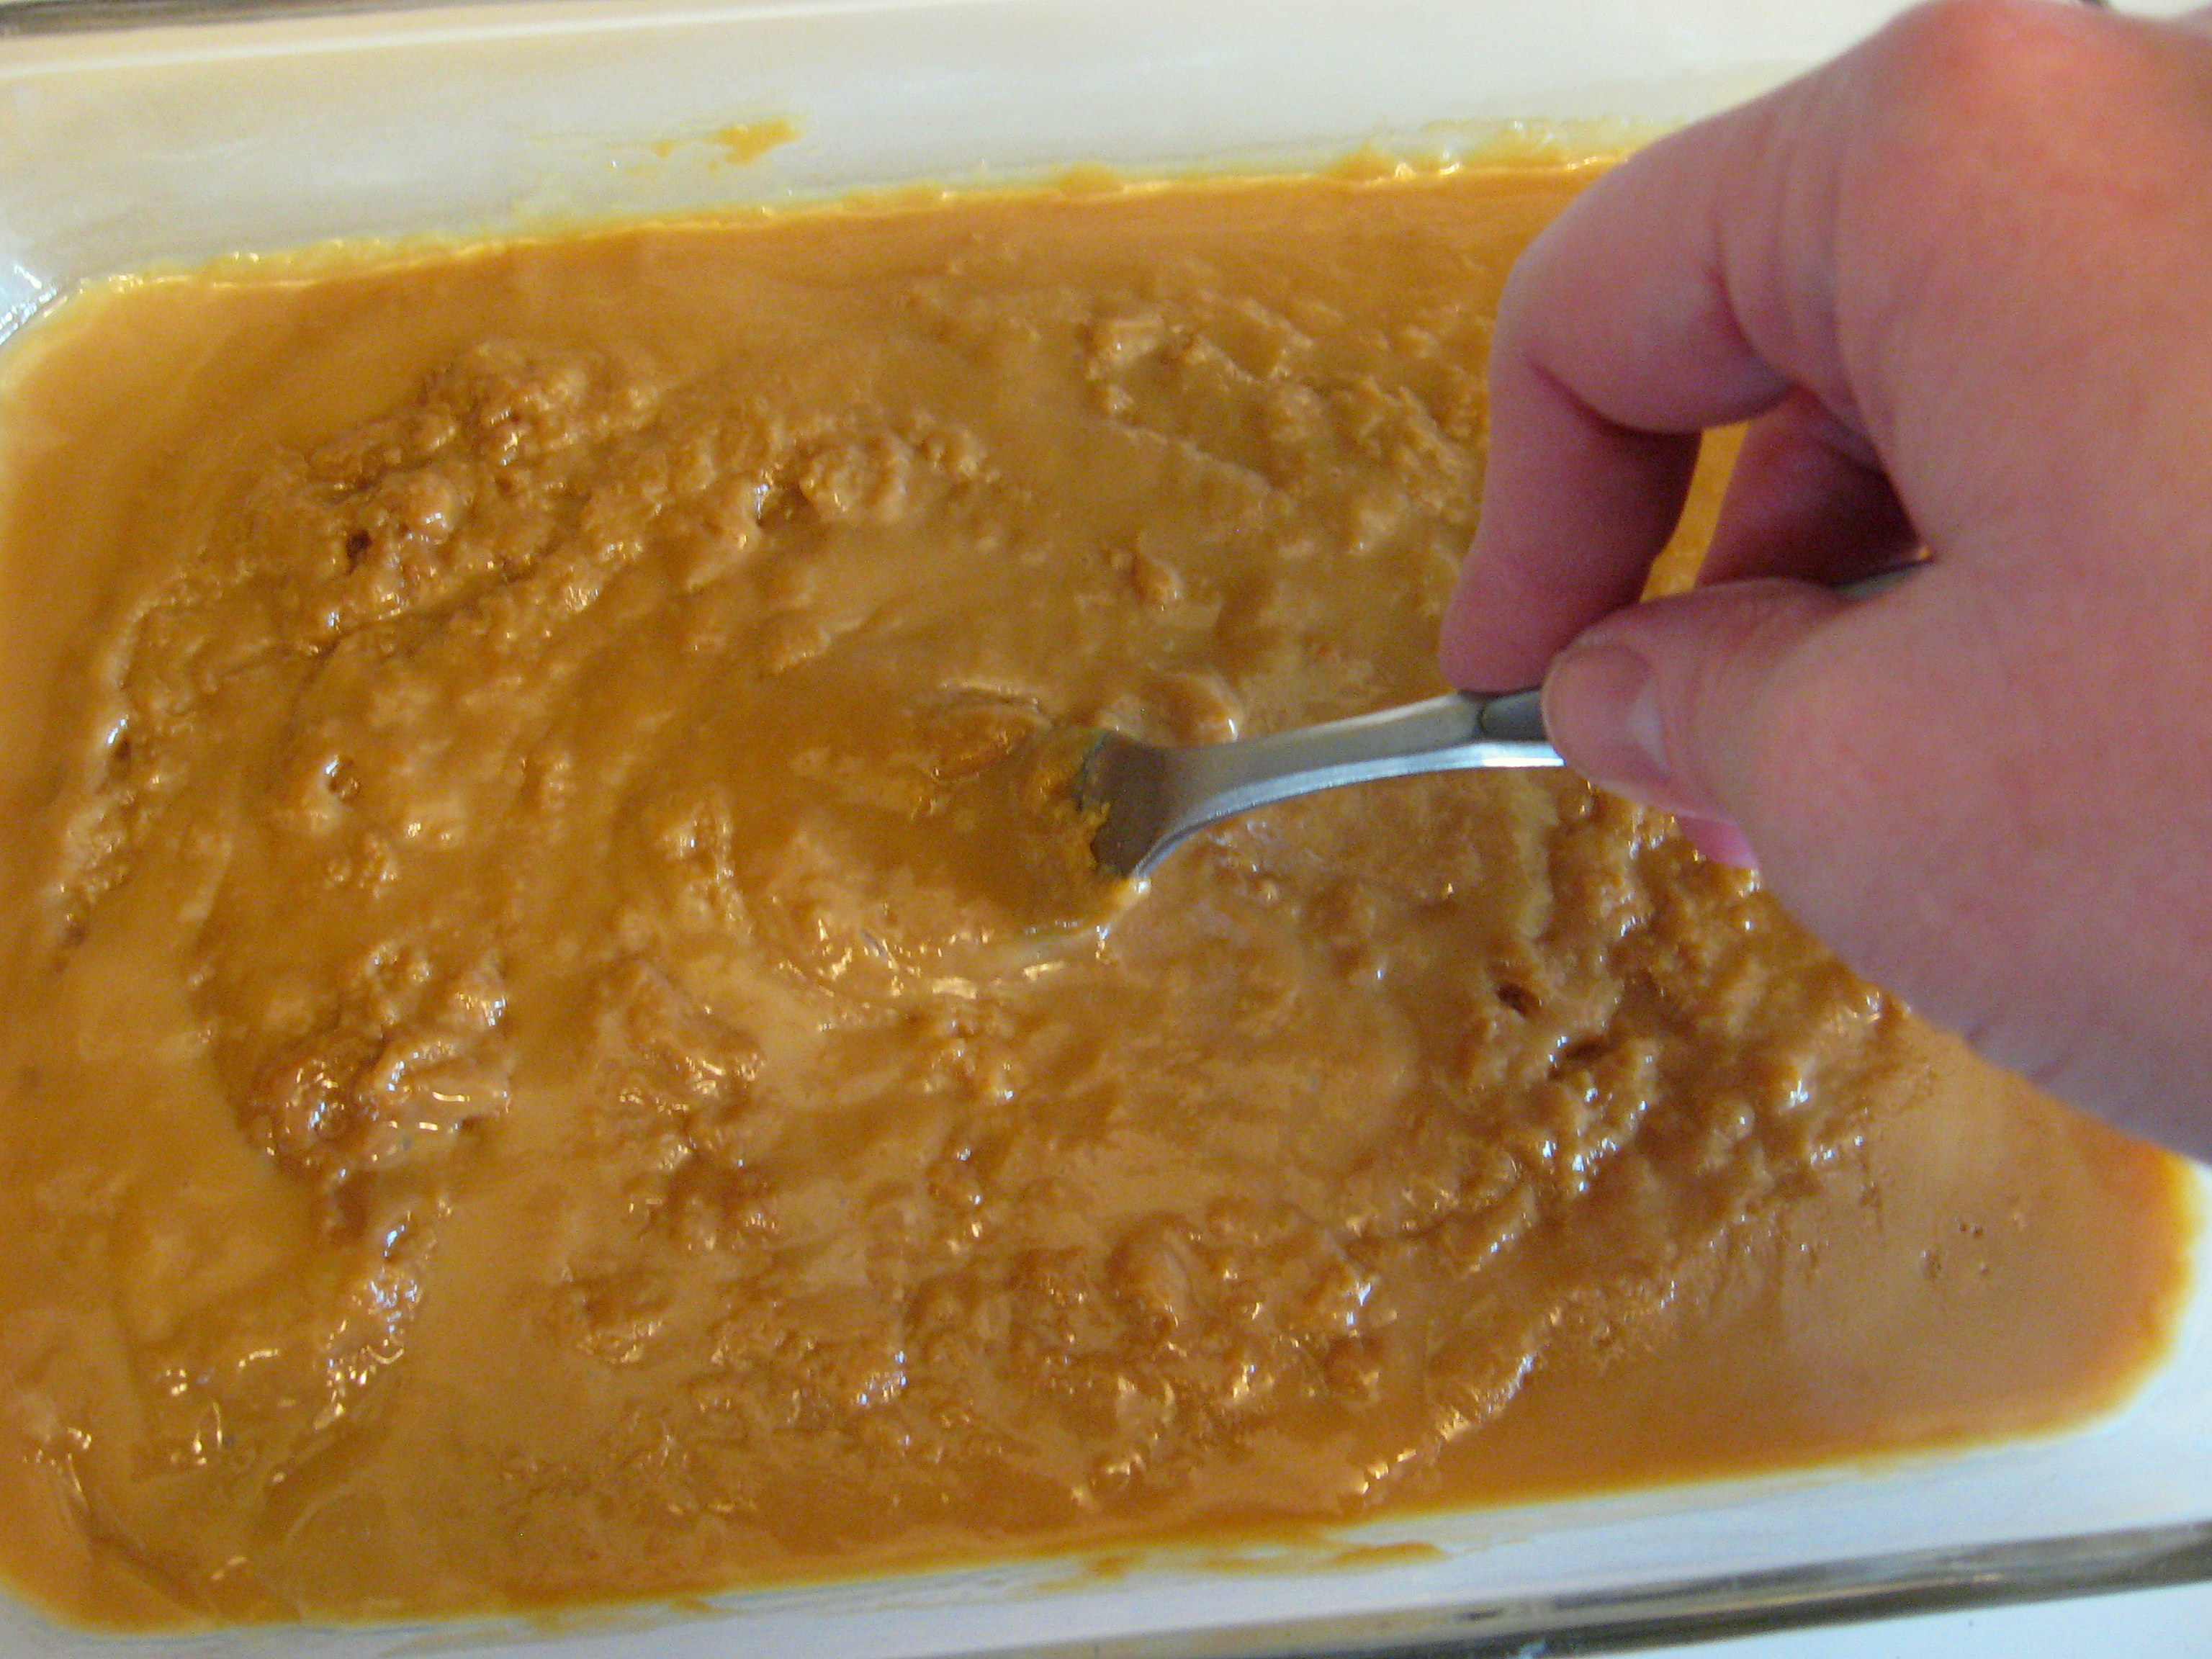
Turn your oven on to 425*. Open the sweetened condensed milk and pour it into an oven safe glass pan…a pie plate is perfect for one can. I used a bigger pyrex pan here because the recipe I’m making required 2 cans worth of the finished product. 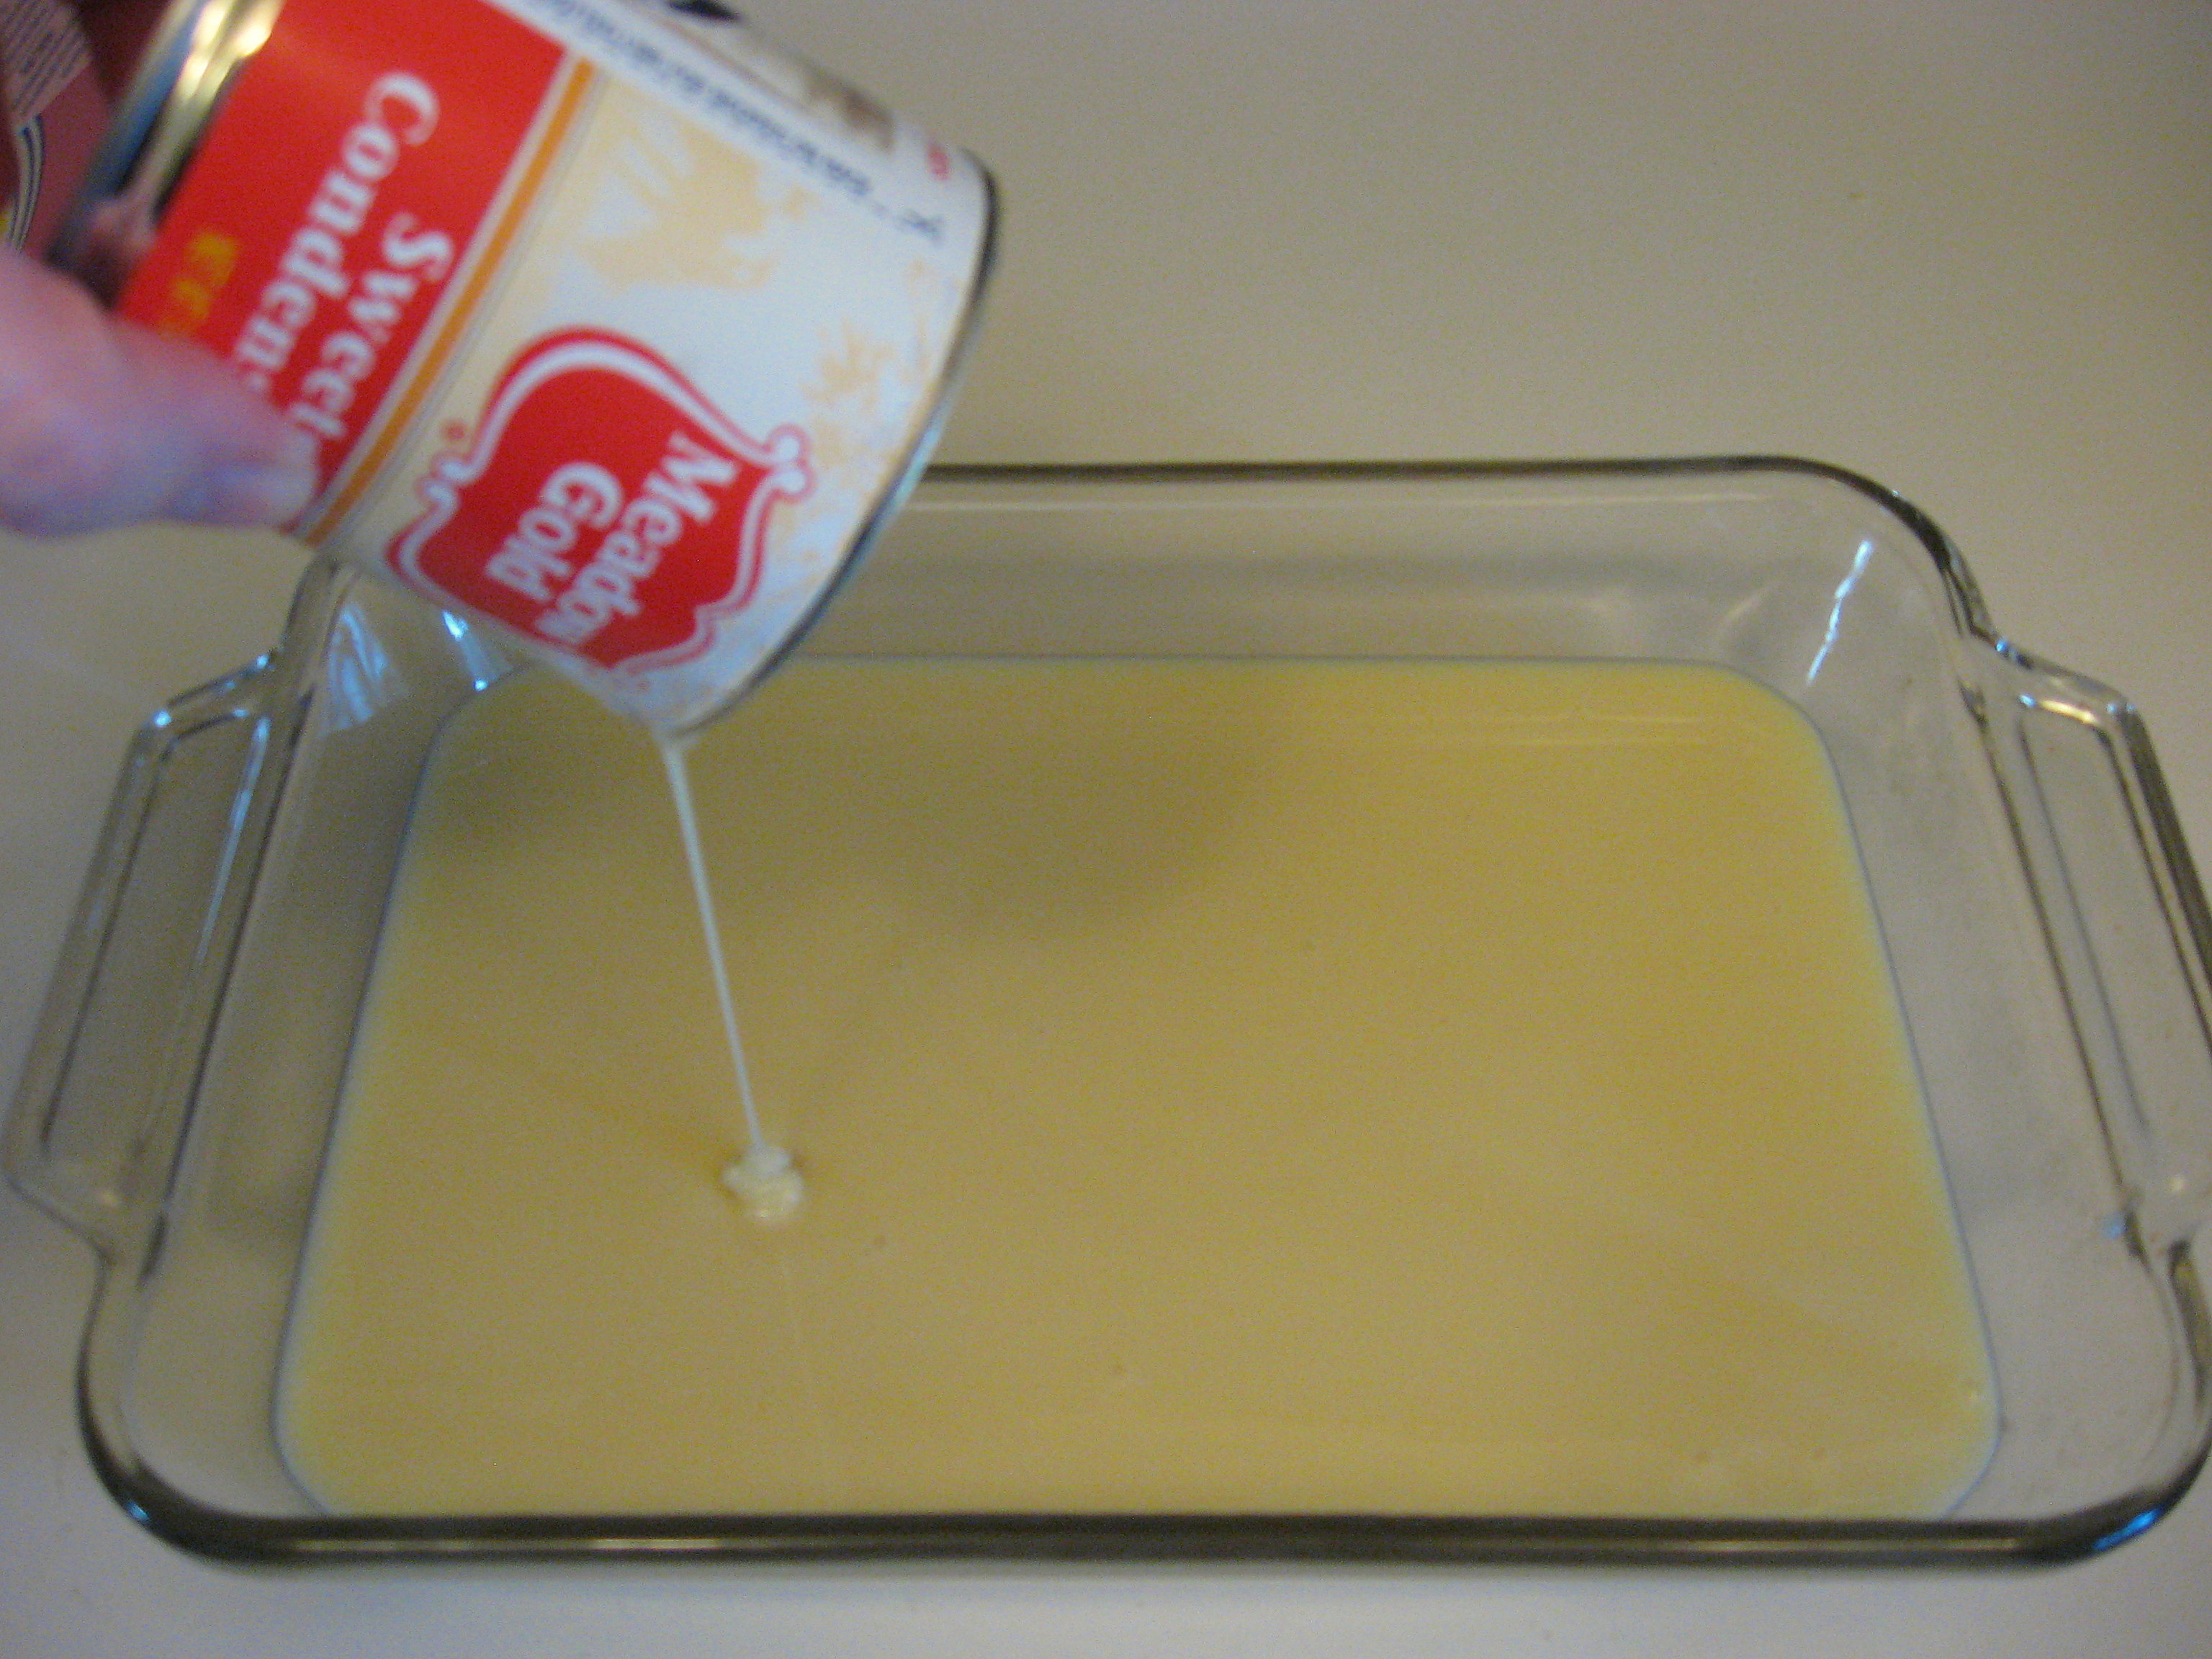
Cover this tightly with aluminum foil.
Put the glass pan into a bigger pan – like a roaster pan – and fill with hot water up to about halfway up the sides of the glass pan.
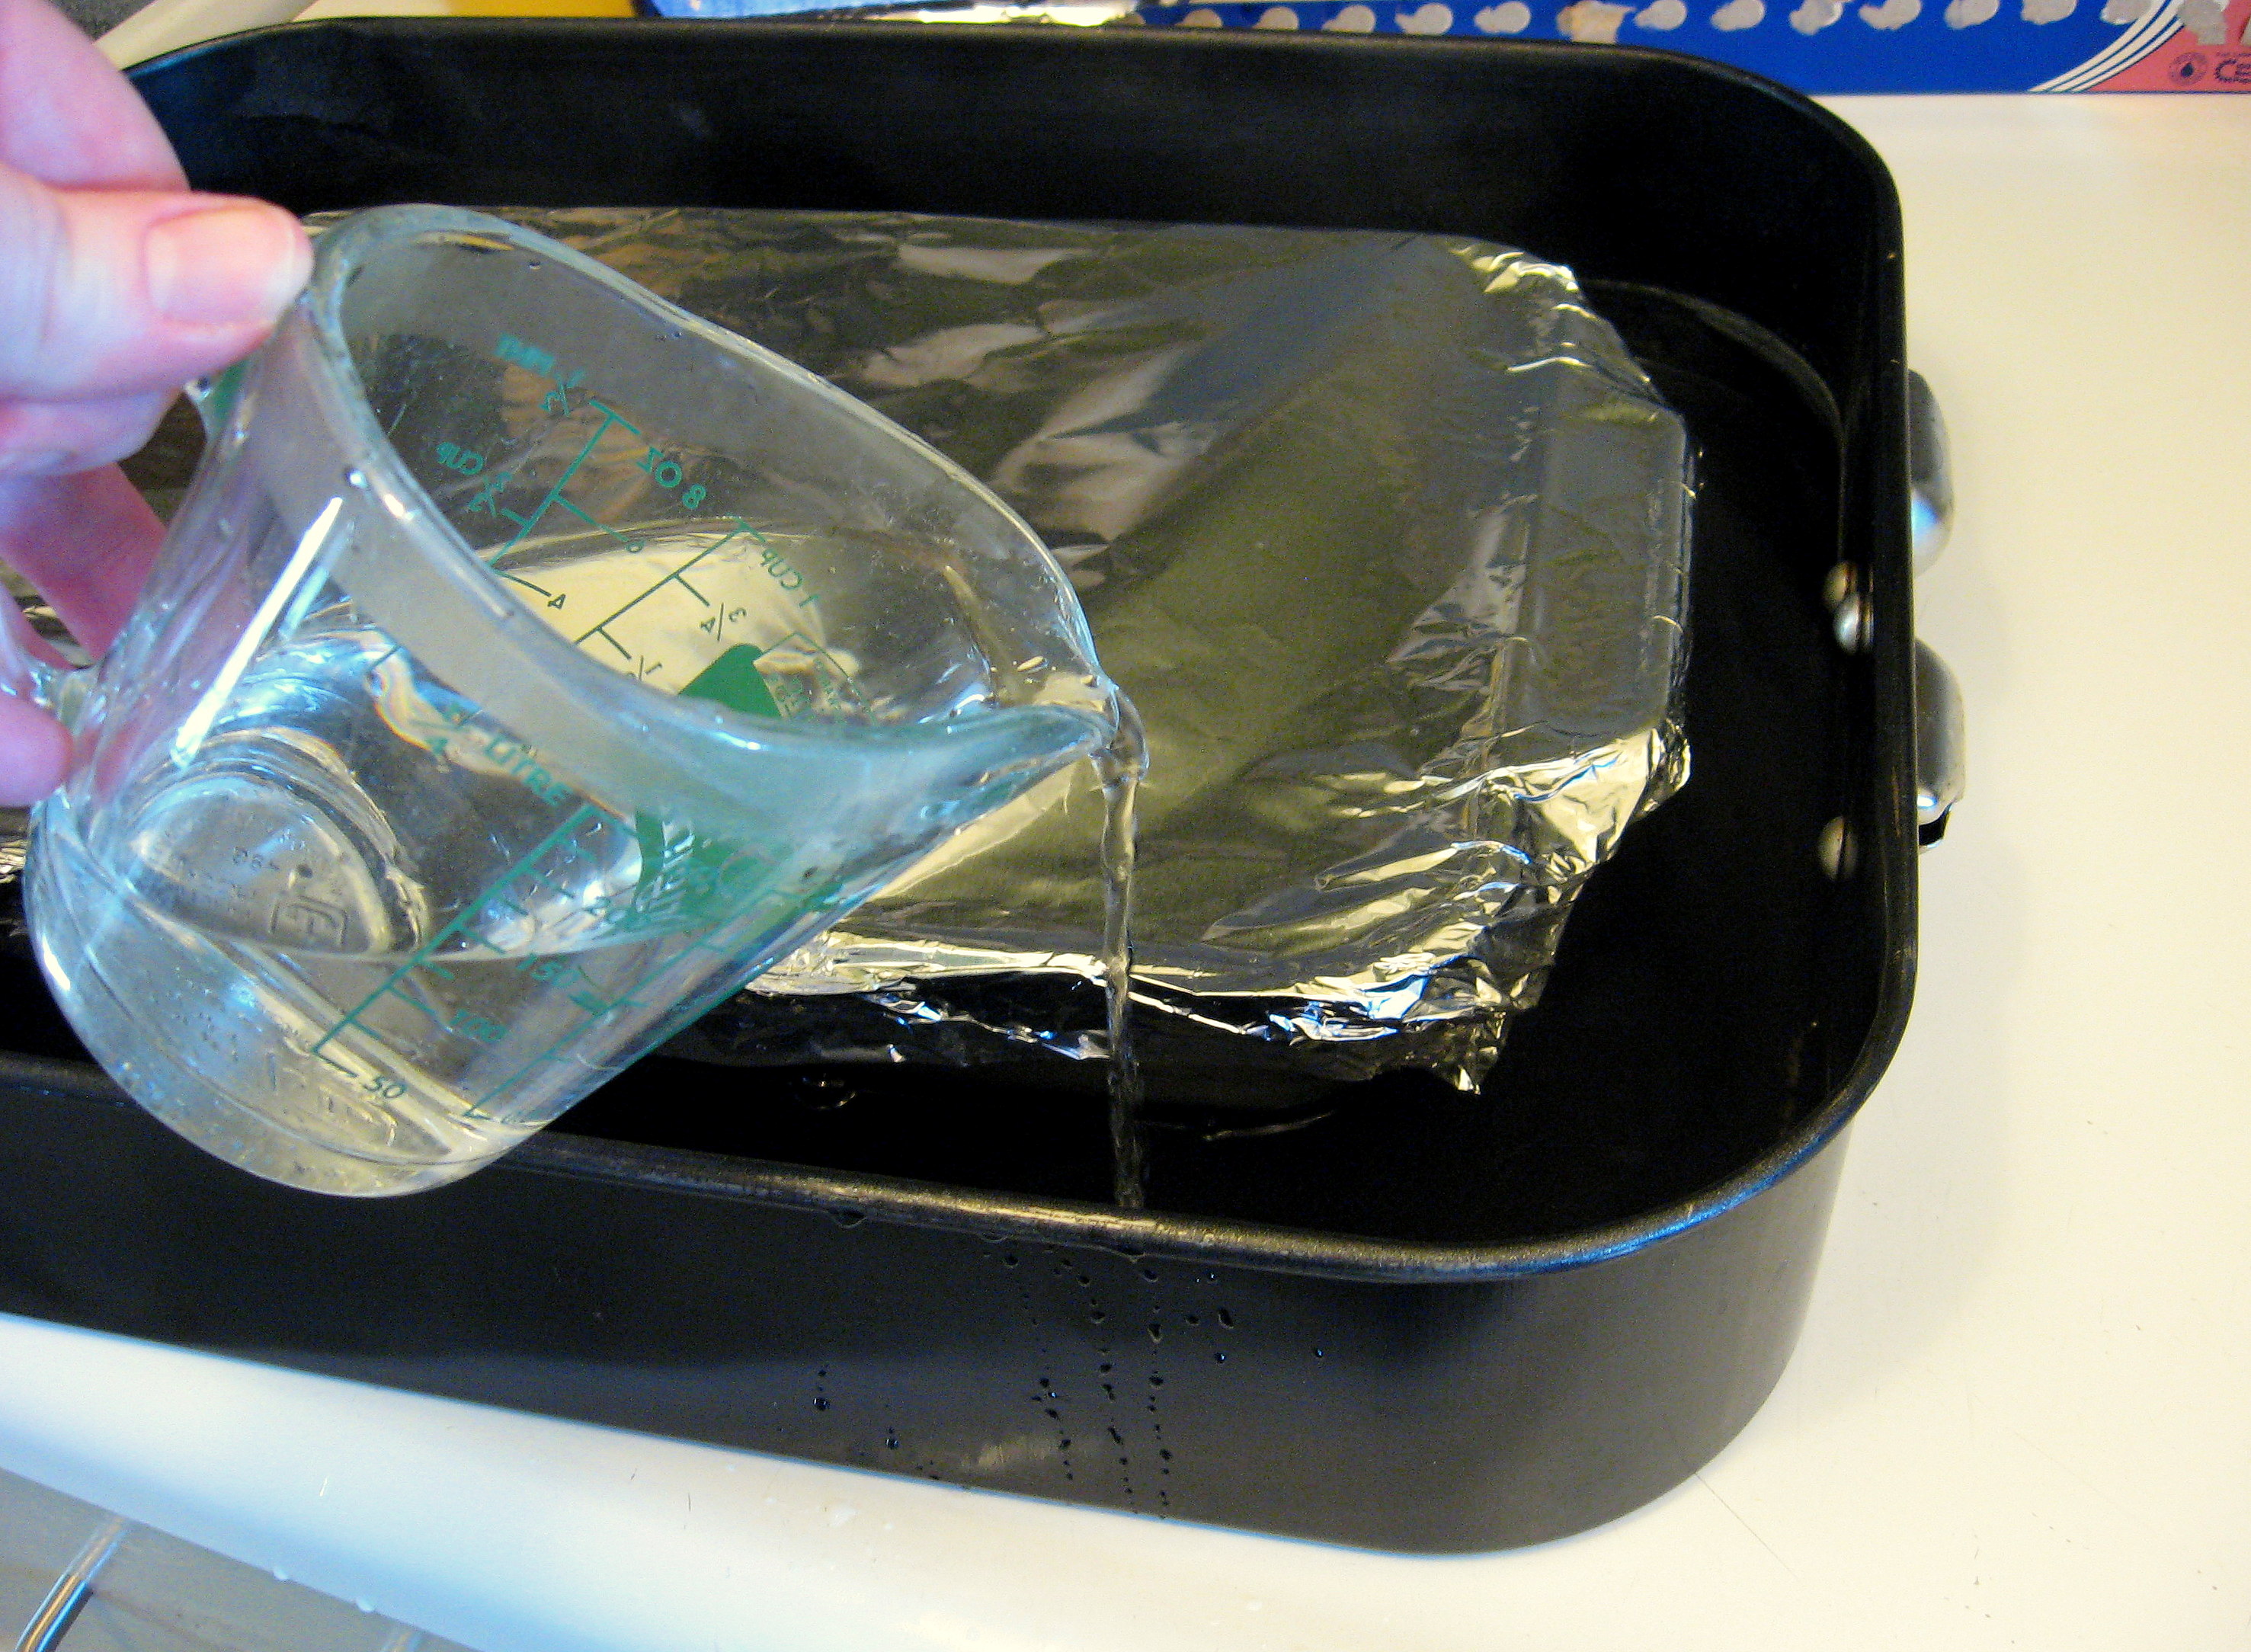
Pop the whole thing in the oven and leave it to cook for 1 to 1 1/2 hours. Check it once in awhile to make sure that there is plenty of water and replenish when necessary.
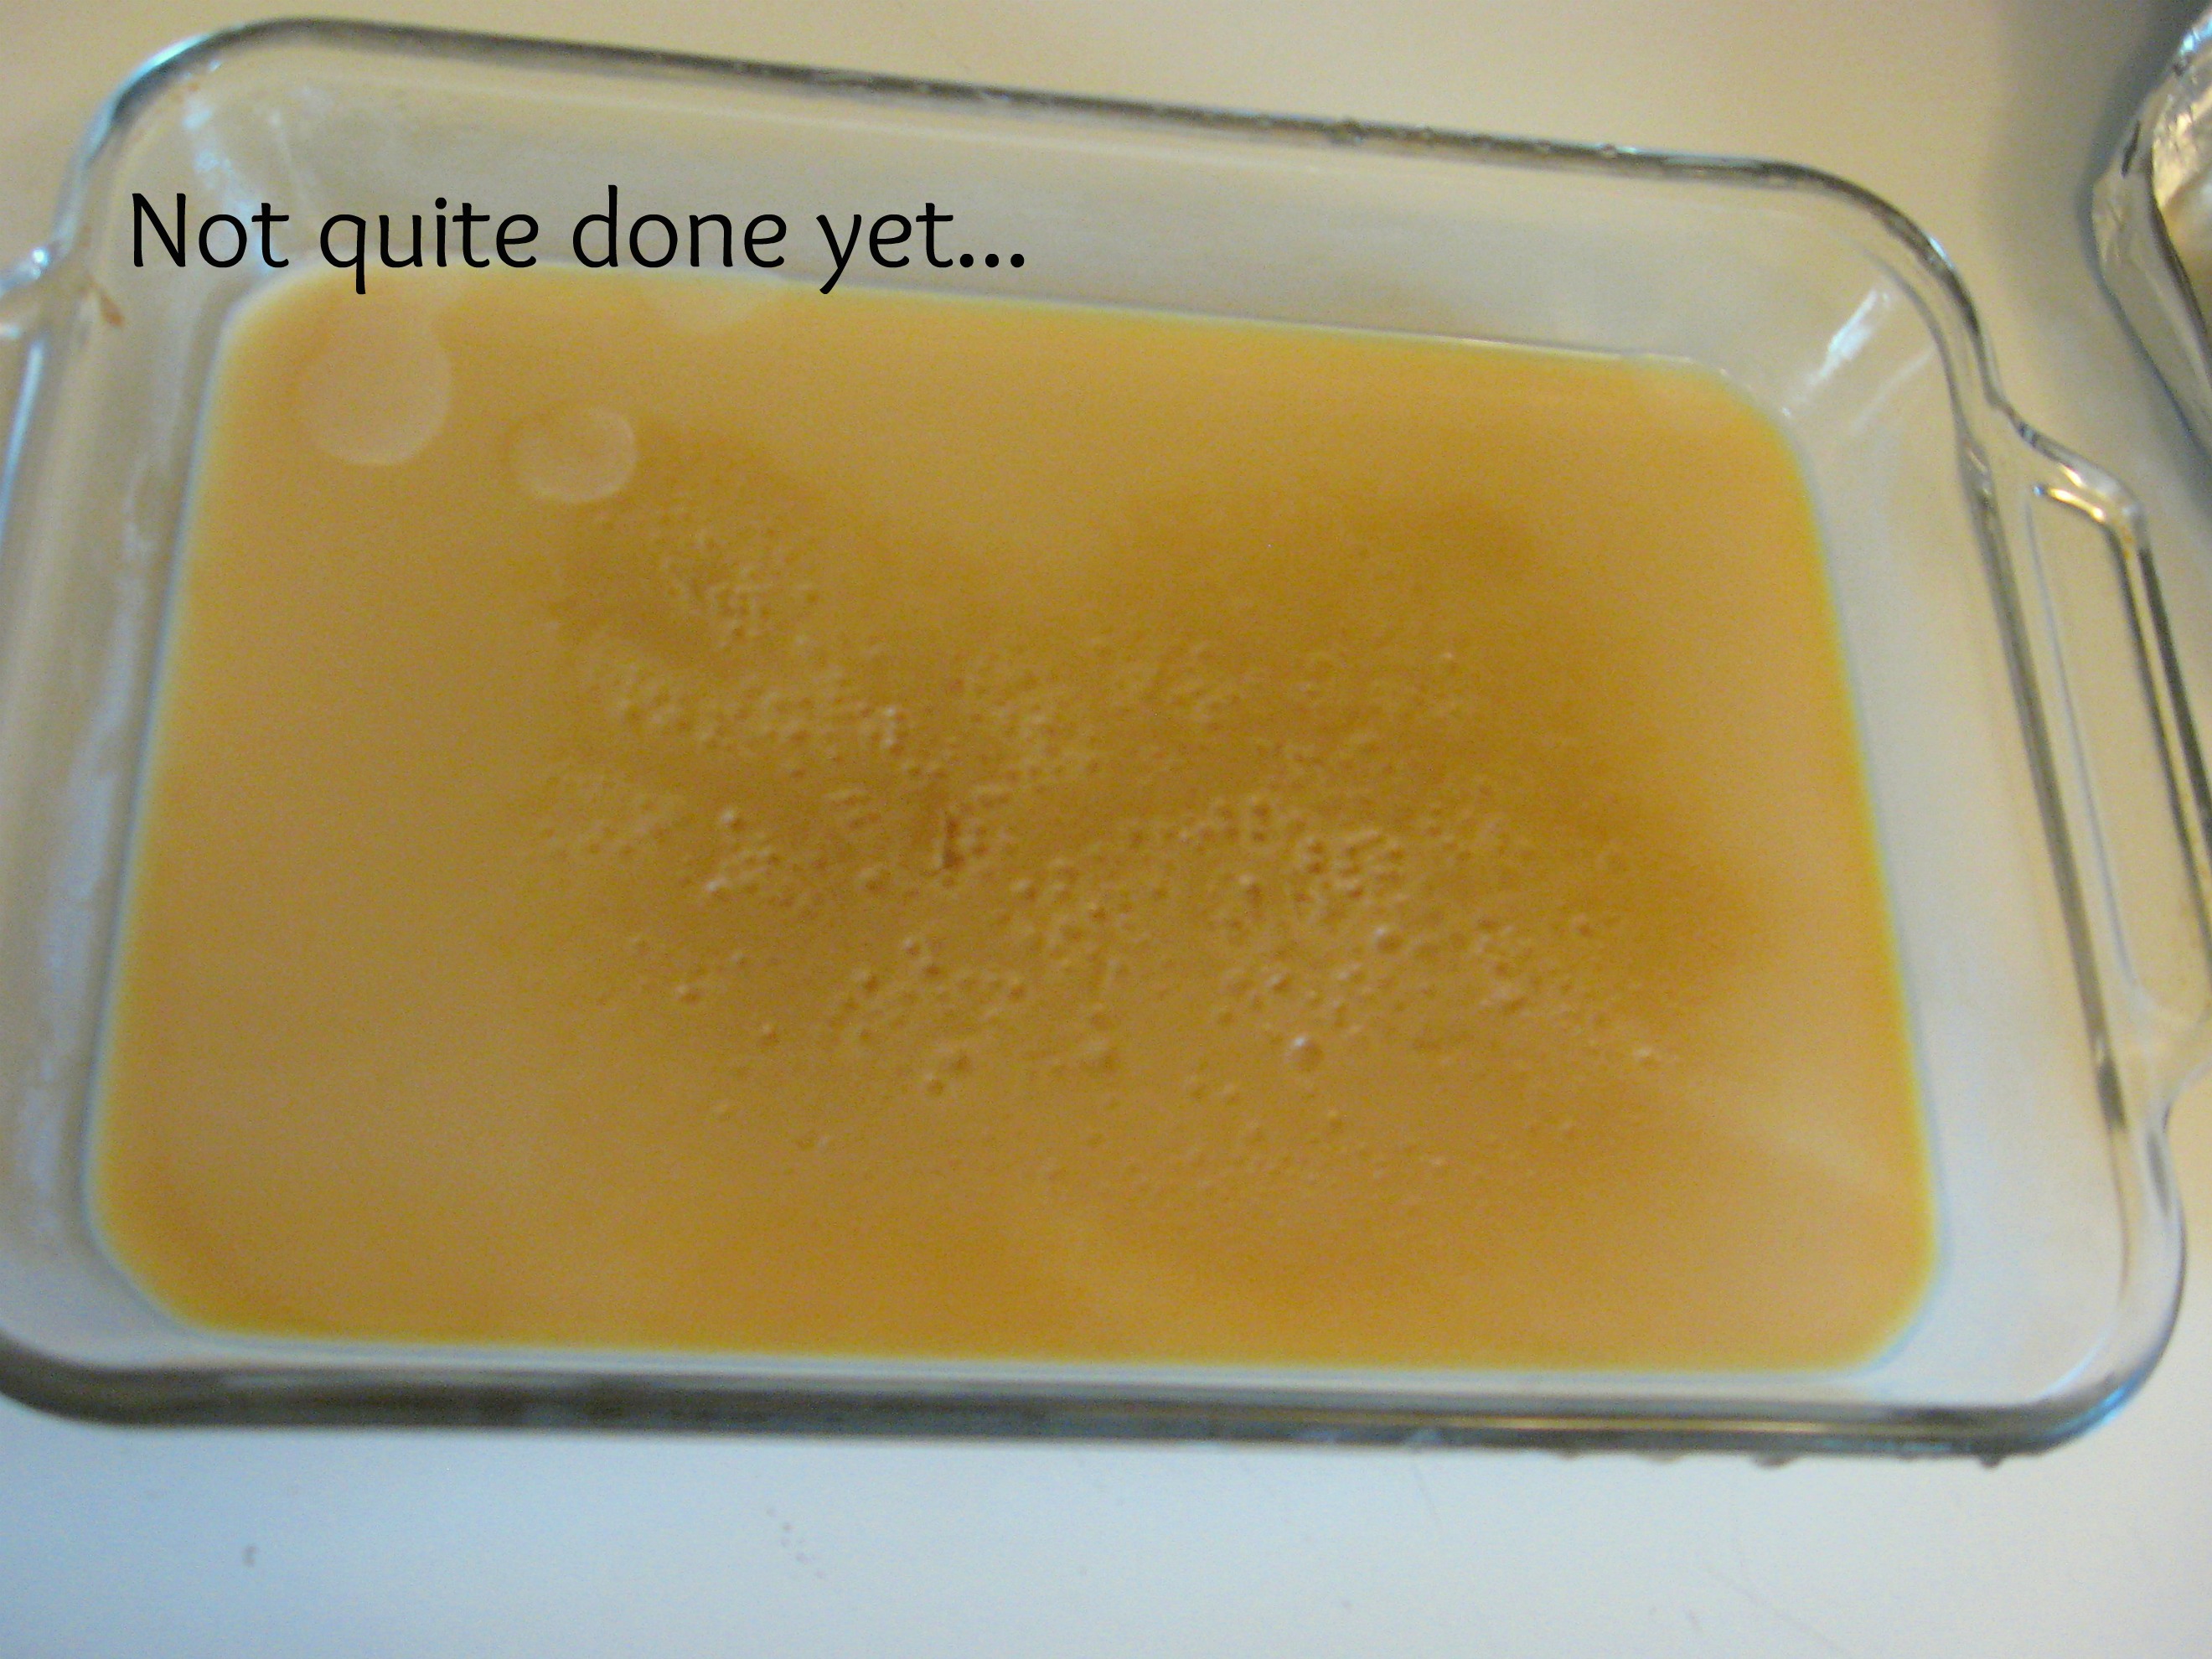
After about an hour, pull back the corner of the foil and have a look. When it’s done it should be thick and brown. (With the 2 cans that I did, it took more like 2-and-a-bit hours, but the one can was perfect after about an hour and 15 minutes).
**BE VERY CAREFUL when you open the oven door. Open it and stand back or you will get hit in the face with very hot steam!!
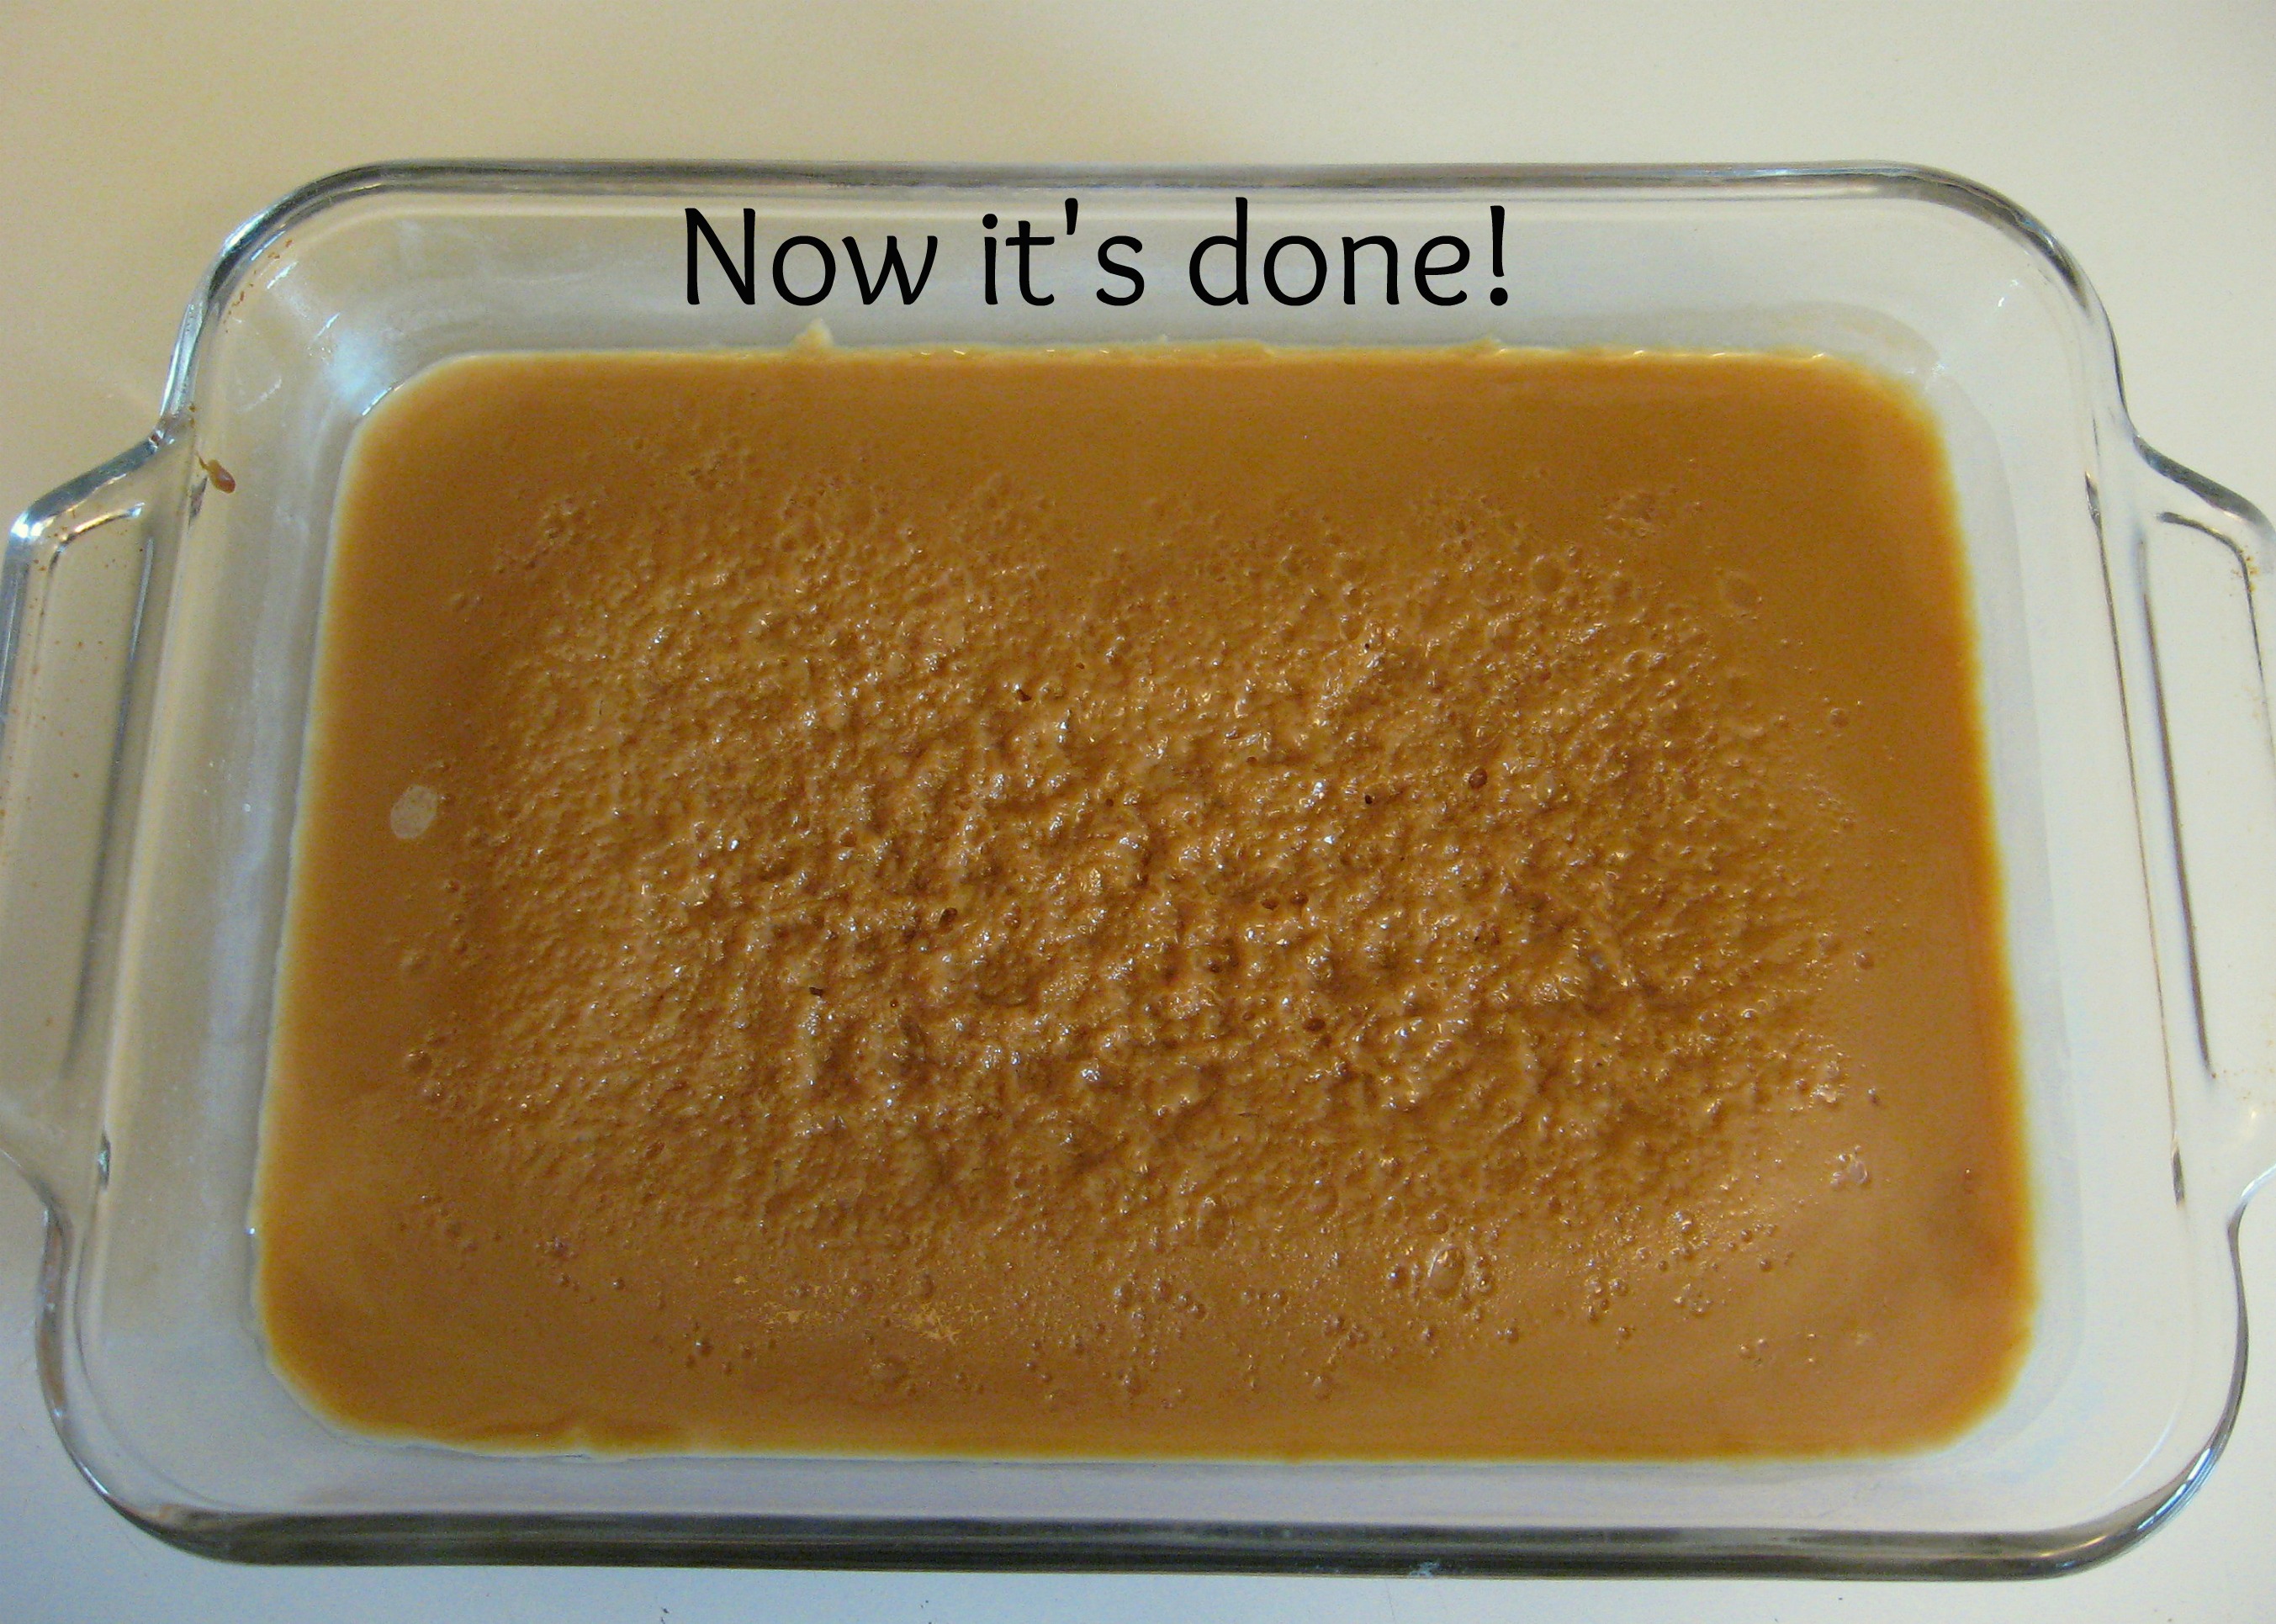
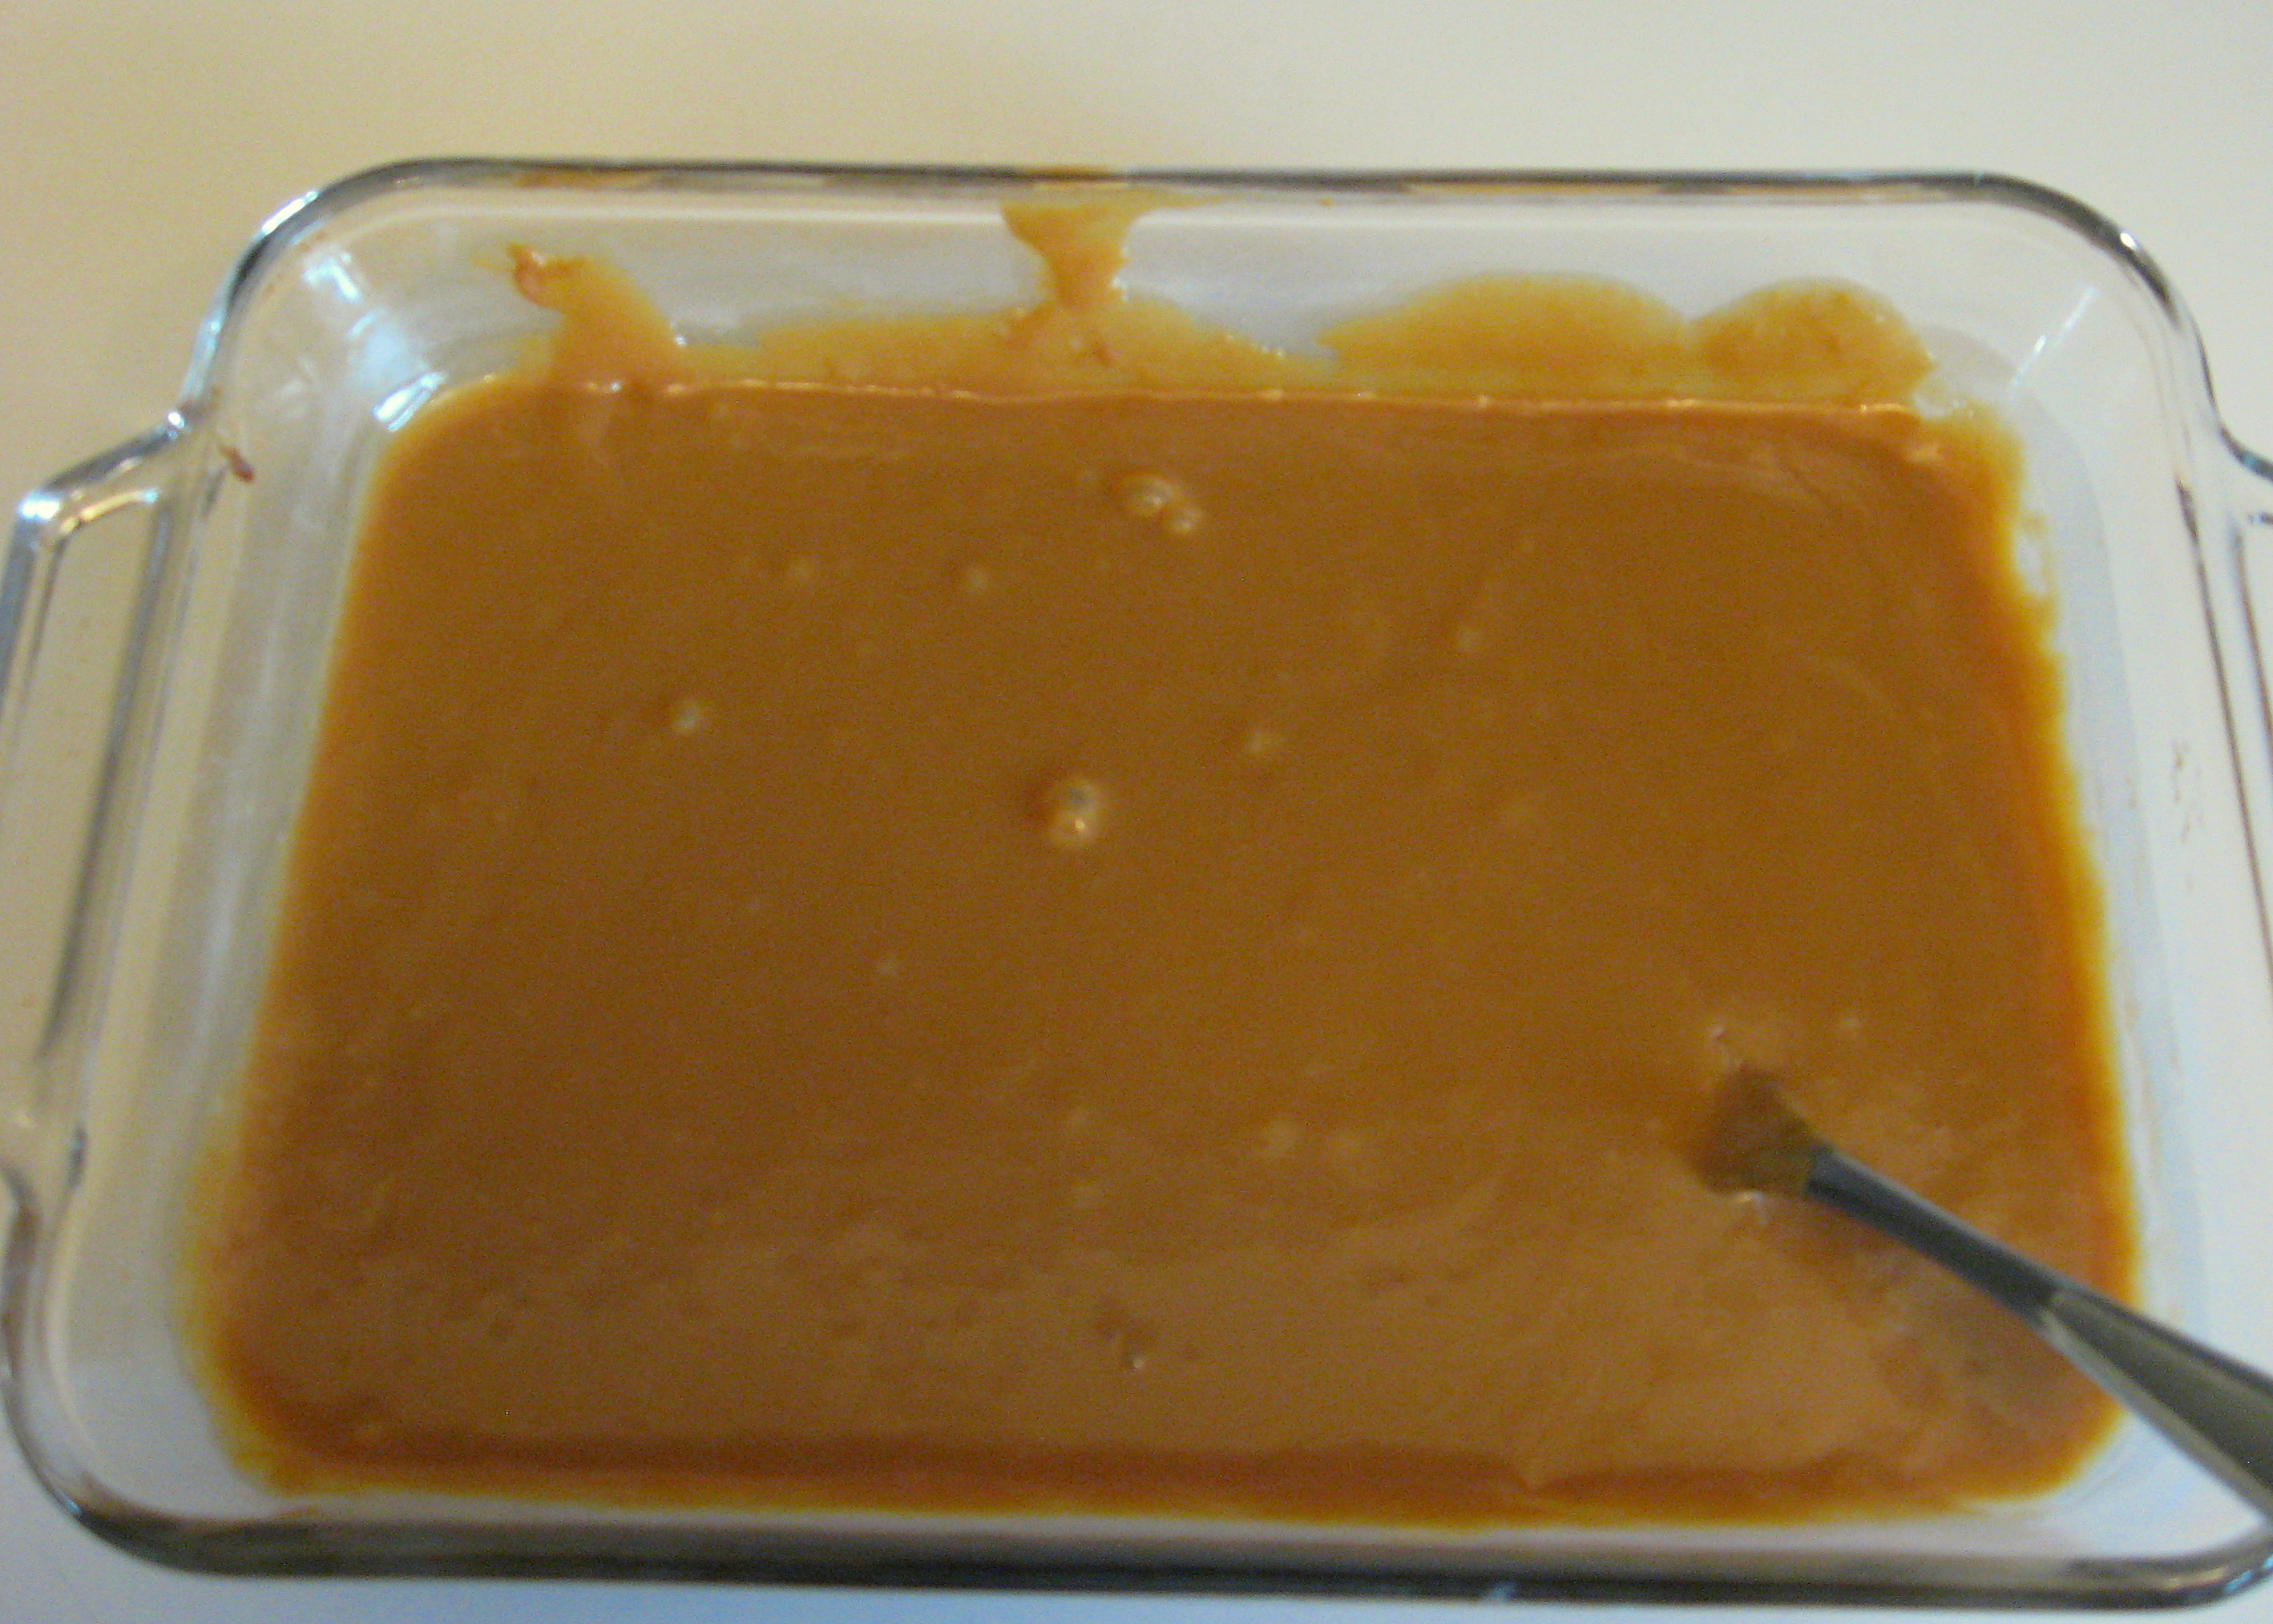
Once it is dark and carmely looking, remove the pan from the water and whip it with a whisk or a fork until it is smooth.
Now just try not to eat it all with a spoon…
Simple & Delicious Magazine Just $7.21 for 1 Year!

Deal of the Day – Simple & Delicious Magazine Just $8.49 for 1 Year
June 14th Only – Use Coupon Code 15CJ0615 and Save an Additional 15%!
A PYP Best Blog! Making a Polymer Bouncing Ball!
Just in case you missed this article on making a polymer bouncing ball the first time we shared it a couple of years ago, we are republishing it. After Sharon wrote this blog originally, we got an awesome response. This is one of the PYP Best Blogs!
 I saw “recipes” all over Pinterest last summer for making your own bouncing ball. Since I have a daughter who is OBSESSED with them, I thought it would be a fun activity, and even went so far as to buy the ingredients – which then sat on my counter until now. I never really got around to reading the instructions and assumed that it would be complicated. Finally, I got tired of the stuff being in my way and made a few of them this afternoon.
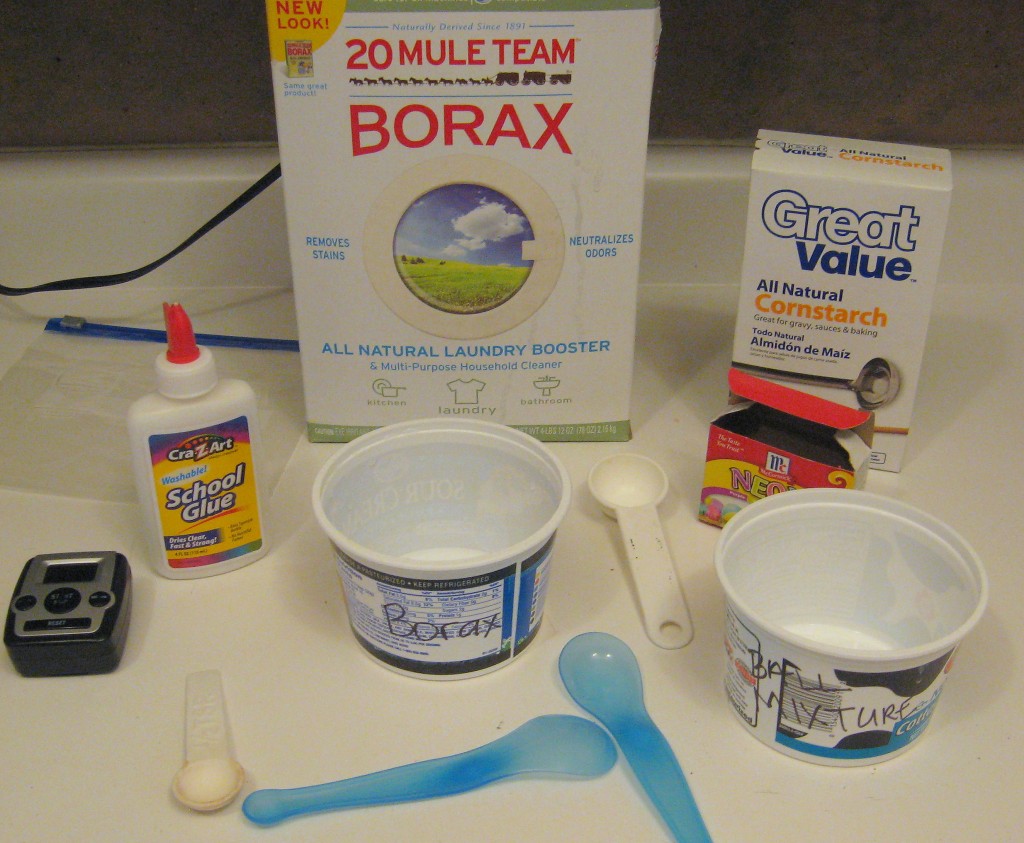
I used the recipe on this site:
https://chemistry.about.com/od/demonstrationsexperiments/ss/bounceball.htm
Here is what we thought:
- It was certainly NOT complicated. It was super easy and only took a few minutes to make. It probably took longer to read through the recipe than it did to make it.
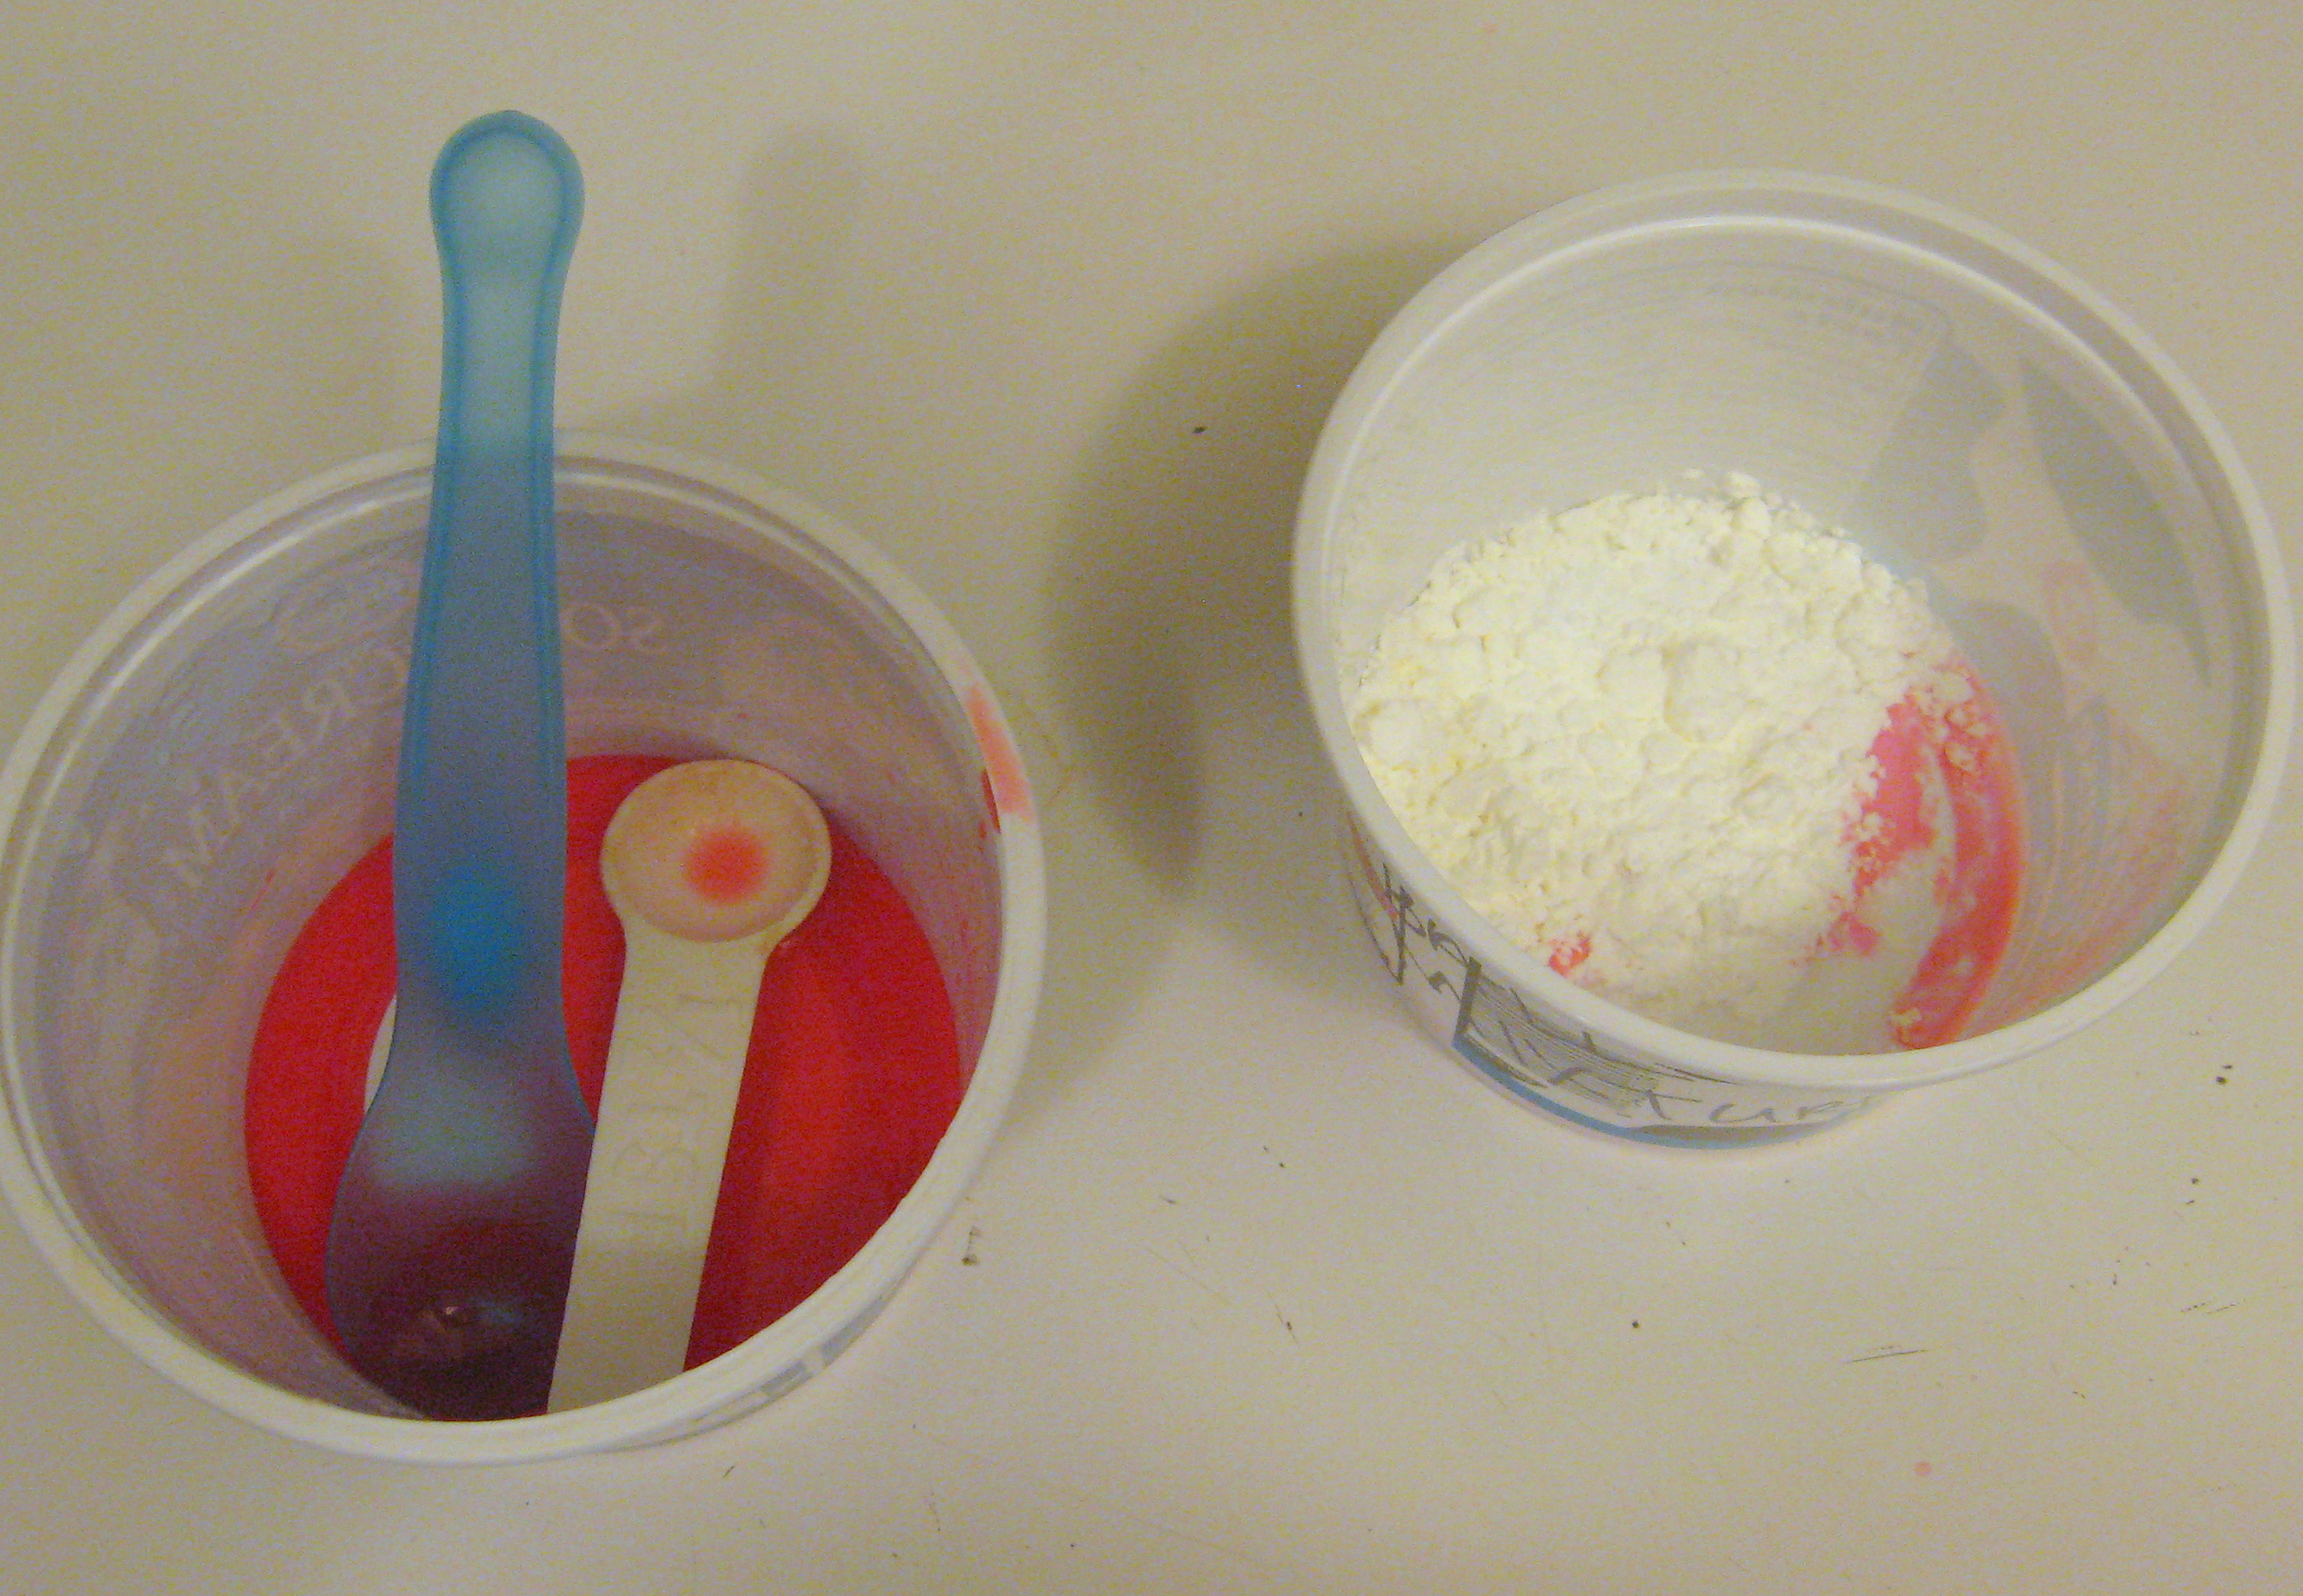
- It also isn’t super messy. If you are doing it with very small children, you may want to put down newspaper or an old towel, but really, I did it right on my counter top using old butter tubs and plastic spoons. Once I threw those away, there was no other mess.
- I used white glue, but if I were to make this again, I would definitely use glitter glue or clear glue; I think it would look much cooler
- Our balls didn’t really bounce. They are super soft – basically like slightly more solid Gak. We all thought it was fun to play with it – like you would play dough or silly putty – but they definitely didn’t come out like a bouncing ball.

- The website explains the science behind how it works, but it is more on a level for middle school students, not little ones. My high schoolers understood it, but I didn’t!! so if you’re looking for a science lesson and – like me – haven’t taken chemistry since the 80’s, you may need to google for a simpler explanation. We did change up the ingredients on the second ball as per their suggestion (we added more cornstarch) but thought it was only barely different from the first one.
Final analysis? I think you should give it a try! It is easy and fast, and takes ingredients that you likely already have sitting around the house. It is fun to play with (it would make a great stress ball). If I had had more time, I think I would have gone ahead and made gak as well, so we could have talked about the differences (here’s a good gak recipe if you don’t know what I’m talking about: https://lilluna.com/homemade-gak-recipe/).
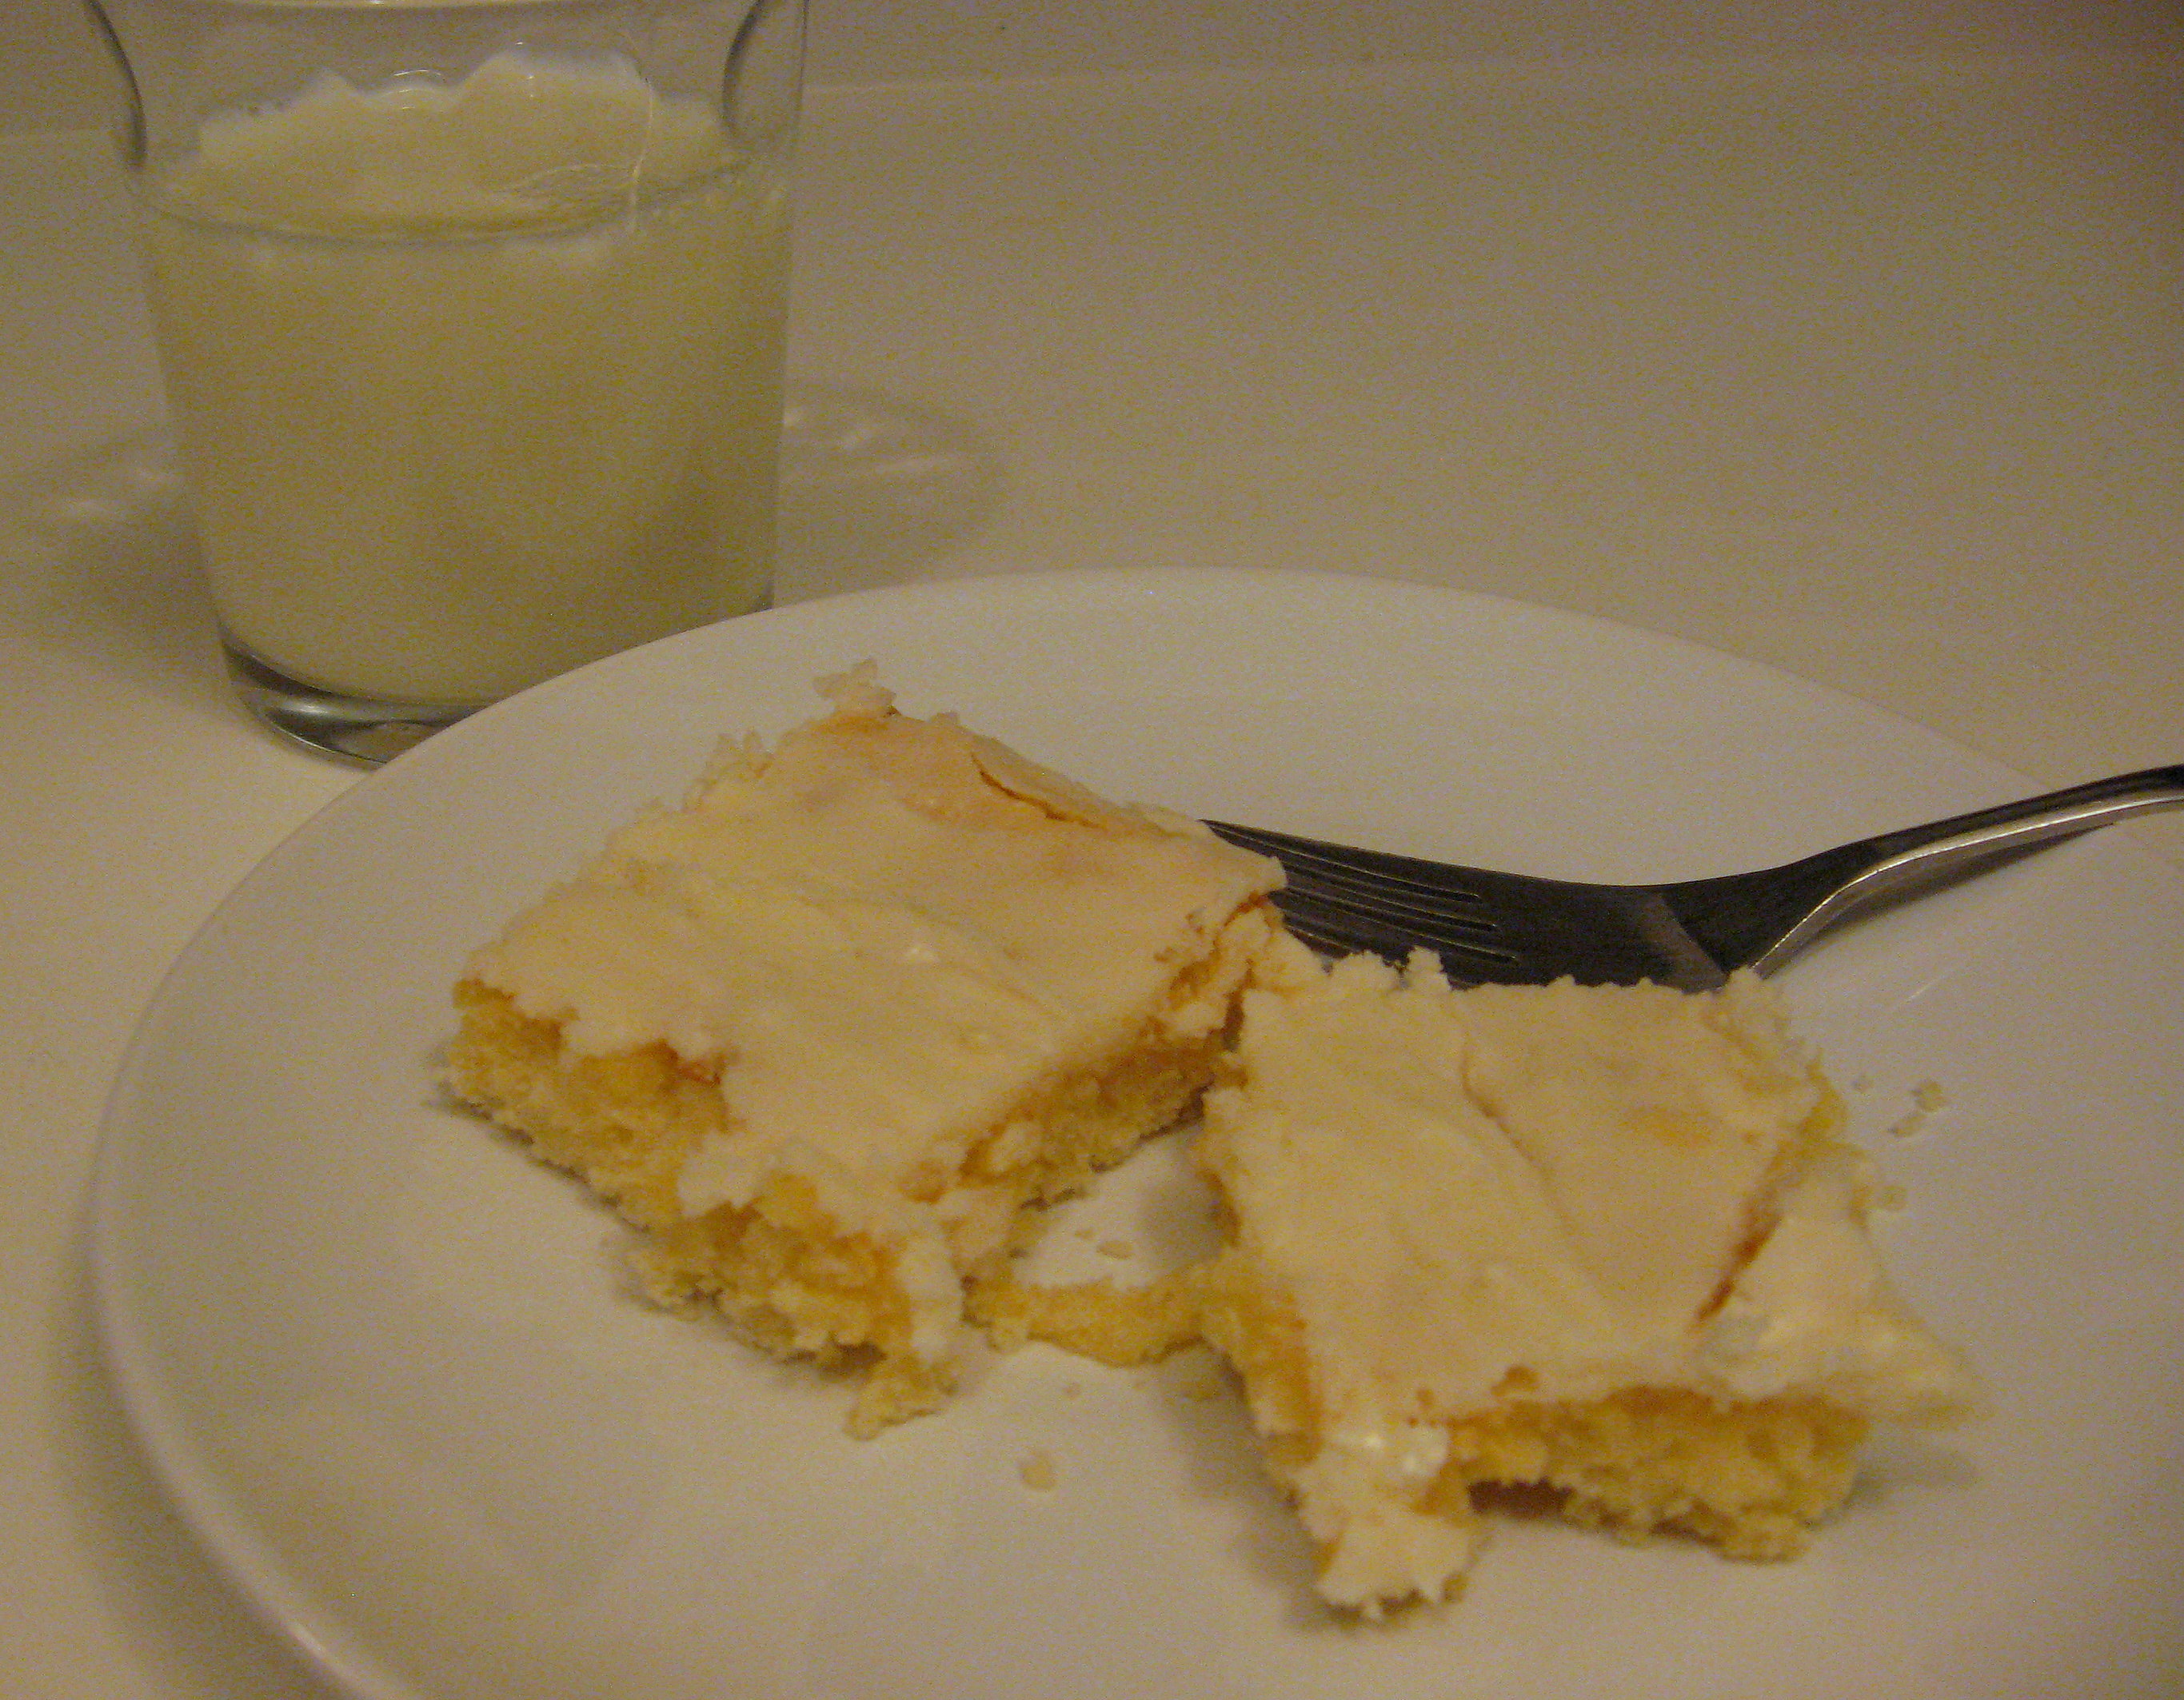
A PYP Best Blog: Lemon Mardi Gras Squares! Yummy!
Just in case you missed this article on making lemon mardi gras squares the first time we shared it a couple of years ago, we are republishing it. After Sharon wrote this blog originally, we got an awesome response. This is one of the PYP Best Blogs!
This is one of my favorite recipes from my childhood. I loved making them and I loved eating them. I dusted off the recipe recently and was thrilled to discover that my kids like them as much as I did do! This recipe is a little pickier than your typical dump and mix cookie recipe, but it certainly isn’t difficult. Although these are good right out of the oven, they are HEAVENLY the next day.
Lemon Mardi Gras Squares
- Cream butter, then gradually add sugar, creaming well. Add egg yolks, one at a time. Beat for 1 minute.
- Mix together the dry ingredients. Add to creamed mixture alternately with the lemon juice, beginning and ending with the dry ingredients.
- Beat the egg whites into stiff mounds. Add powdered sugar and continue beating to stiff peaks. Fold into the lemon mixture, adding the pecans.
- Pour into a greased and floured 9X13 pan. Bake 25-30 minutes at 400*. Frost while warm.
- 2 T. Butter
- 1 C. Powdered Sugar
- 1 T. Cream
Just a few notes:
- Put the egg whites in the fridge while you are mixing the rest of the batter so that they stay cold until you are ready for them.
- One thing I’ve never liked about this recipe is that it tends to get a little too brown on the top before it is cooked through. When I made them last night, I cooked them at 375* for 30 minutes and thought they were perfect. You may want to play around with your oven temp.
- We are a frosting-loving family, so I usually 1 1/2 the frosting.
- I don’t use the pecans; I like nuts, but in this recipe I prefer them without.
- I thought about waiting until today to take the pictures but worried there wouldn’t be any left. And I was right…my boys had destroyed most of the pan before bedtime. YUMMY!
Meals in a Jar: Quick and Easy, Just-Add-Water, Homemade Recipes – Just $8.22!
Meals is a Jar – crazy and trendy – here’s a book full of great ideas at a great price!
![]() Meals in a Jar: Quick and Easy, Just-Add-Water, Homemade Recipes
Meals in a Jar: Quick and Easy, Just-Add-Water, Homemade Recipes
List Price: $15.95
Save: $7.73 (48%)
$8.22
Eligible for free shipping on $35+ orders or on ANY order with Amazon Prime.
Don’t have a Prime membership? Get a one month free trial! Click here for details!